


-
iconic_productionsAsked on October 8, 2017 at 10:47 PM
I really like using the widget Configurable List on my forms, but the fields are always displayed horizontally.
What CSS coding can Input to have the fields displayed vertically?
-
John_BensonReplied on October 8, 2017 at 11:36 PM
Unfortunately, there's no option or feature that can turn the Configurable List widget vertically.
Please provide the form link and we will see if we can add a custom CSS code to turn your Configurable List widget vertically.
Thank you.
-
iconic_productionsReplied on October 8, 2017 at 11:47 PM
Here it is https://www.jotform.com/build/72808502784866
Is the configurable list called Road Conditions
-
Ashwin JotForm SupportReplied on October 9, 2017 at 12:44 AM
I am working on your requirement but it is taking some time. I will get back to you on this soon.
-
iconic_productionsReplied on October 9, 2017 at 3:12 AM
Thank you.
-
Ashwin JotForm SupportReplied on October 9, 2017 at 3:13 AM
Please inject the following custom css code in your configurable list widget and see if it works as expected:
#list > tbody > tr:first-child {
display: none;
}
.checkbox-container {
width: 80px;
}
td.col2 {
position: relative;
float: left;
left: -113px;
top: 200px;
}
td.col2:before {
content: 'Traffic was ';
}
td.col3:before {
content: 'Traffic controls were ';
}
td.col3 {
position: relative;
left: -204px;
top: 247px;
}
td.col4:before {
content: 'Weather was ' !important;
}
td.col4 {
position: relative;
left: -391px;
top: 295px;
}
td.col5:before {
content: 'Lighting conditions were ' !important;
}
td.col5 {
position: relative;
left: -482px;
top: 342px;
}
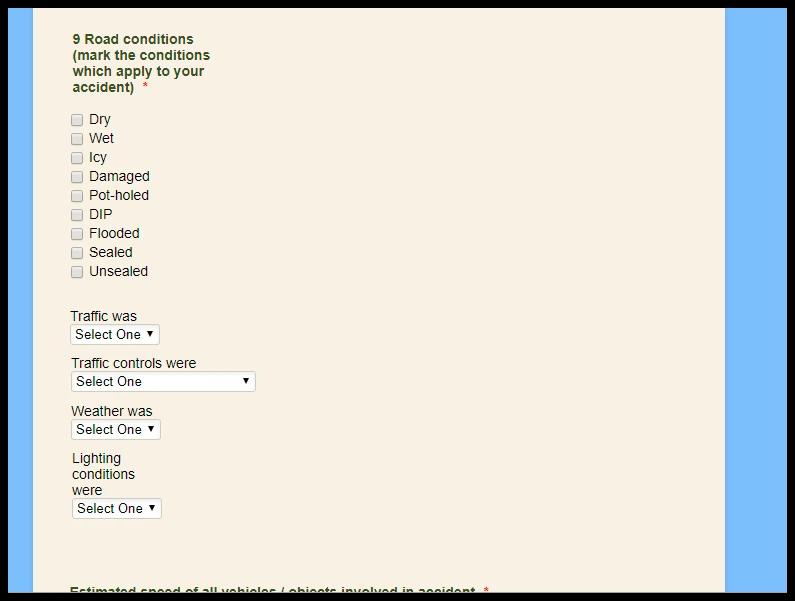
The output of the above custom css code is as displayed in the screenshot below:
The following guide should help you how o inject custom css code in widget: https://www.jotform.com/help/428-How-to-Inject-CSS-Codes-to-Widgets
Hope this helps.
Do get back to us if you need any other changes.
-
iconic_productionsReplied on October 9, 2017 at 4:56 AM
Thank you for your assistance. However it doesn't actually display correctly. With the field below it, after adding the CSS code in the widget, it only shows the first part.
-
iconic_productionsReplied on October 9, 2017 at 5:06 AM
Previously someone helped me create the Widget to use the Configurable List on Smart Phones. This code works perfectly, but on a desktop, it fails to show the fields correctly.
Is it possible to maybe fix this code below, but can we have it that when the form is displayed on a Desktop Version, rather than cell phone, that it correctly displays it horizontally on Desktops.
@media screen and (max-width:500px){
.checkbox, .radio {margin: 3px 0; min-width: 70px; } div#listContainer {background: #fff; } th{display:none;} td {float: left; margin: 0 !important; display: block; min-height: 40px; } td:before{display:block} input[type=text], select, textarea{box-shadow:none; border-radius:0; padding:4px; } td[class*="col"]:before {width: 30%; float: left; } td {max-width: 620px; width: 100% !important; } td [name="input"], td > select, textarea{width: 68% !important; box-sizing: border-box; } img.calendarIcon {display: none; } .radio {width: 50%; float: left; } .buttonsColumn {min-height: 30px; } textarea {min-height: 120px; } .buttonsColumn {text-align: right; } table {border-collapse: collapse; } #list tbody > tr + tr + tr {margin-top: 22px; border-top: 1px solid #ccc; box-shadow: 1px 0 0 #ccc; } #list tbody tr td:first-child{padding-top:20px !important; }
td.col1:before {content: "";}
td.col2:before {content: "Time Start";}
td.col4:before {content: "Kms Start";}
td.col6:before {content: "Start from Location Address / Suburb / State";}
td.col8:before { content: "Answer ONLY when you stop driving?"; }
td.col10:before { content: "Travel Ended at Location Address / Suburb / State"; }
td.col12:before { content: "Time End"; }
td.col14:before { content: "Kms End"; }
}
-
candyReplied on October 9, 2017 at 8:06 AM
I have cloned your form named "Accident Form - Vehicle" on my side in order to test it. I have tested the codes you have given and they are not working.
Besides, the codes given by my colleague Ashwin are much better. However, they will be much better if getting adjusted.
Firstly, in order to apply those codes given by Ashwin in order to make the widget vertically, we need to inject the following CSS codes to increase configurable widget iFrame height.
#customFieldFrame_15 {
height: 450px !important;
}
And then, the configurable list widget will look as seen below:

After, I have added the following codes to the widget in order to make the widget appear as the following screenshot below:
#list > tbody > tr:first-child {
display: none;
}
.checkbox-container {
width: 80px;
}
td.col2 {
position: relative;
float: left;
left: -113px;
top: 200px;
}
td.col2:before {
content: 'Traffic was ';
}
td.col3:before {
content: 'Traffic controls were ';
}
td.col3 {
position: relative;
left: -204px;
top: 247px;
}
td.col4:before {
content: 'Weather was ' !important;
}
td.col4 {
position: relative;
left: -391px;
top: 295px;
}
td.col5:before {
content: 'Lighting conditions were ' !important;
}
td.col5 {
position: relative;
left: -482px;
top: 342px;
}
.checkbox-container
{
font-size: 12px;
}
.col1{
width: 150px;
}

In order to make the items in the widget more aligned, you need to play with the left alignment and find the perfect size.
In order to make the widget mobile responsive, you need to inject the following code at the beginning of the injected CSS:
@media screen and (max-width:500px){
and close the bracelet:
}
I hope this helps.
- Templates
- Integrations
- INTEGRATIONS
- See 100+ integrations
- FEATURED INTEGRATIONS
 PayPal
- Slack
- Google Sheets
- Mailchimp
- Zoom
- Dropbox
- Google Calendar
- Hubspot
- Salesforce
- See more Integrations
- Products
- PRODUCTS
- Form Builder
- Jotform Enterprise
- Jotform Apps
- Store Builder
- Jotform Tables
- Jotform Inbox
- Jotform Mobile App
- Jotform Approvals
- Report Builder
- Smart PDF Forms
- PDF Editor
- Jotform Sign
- Jotform for Salesforce Discover Now
- Support


