


-
lritterAsked on April 16, 2018 at 3:34 PM
You had suggested using the inventory widget so I could create dropdown lists for these last two categories. I tried this and I was able to create a dropdown, but I don't have an option for adding the quantities (small box on the left of the text). How do I create a dropdown and have the options to select the quantities?

-
JanReplied on April 16, 2018 at 4:43 PM
I checked your form and I can see that you are not using the Inventory widget. In the Widget Settings, you can specify the "Available Quantity", "Quantity Input Type" and the "Description". Here's a screenshot:

Quantity Input Type = Allows you to select Dropdown or Number Input
Quantity Range = Options that will appear in the dropdown.
Available Quantity = Shows the available optionsYou can hide the label and adjust the width in the Properties. Here's a screenshot:

Hope that helps. Let us know if you have any questions. Thank you.
-
lritterReplied on April 17, 2018 at 10:35 AM
I'm sorry. I believe my explanation was confusing.
I have eight different Auto Scrubber Pads, each are a different size. I need end users
FIRST: to select one pad out of the eight
SECOND: give me the number of cases they need to order.
So, the drop down menu content would look like this:
Auto Scrubber Pad 10"
Auto Scrubber Pad 11"
Auto Scrubber Pad 12"
Auto Scrubber Pad 13"
etc., etc.
How can we make this work, so I have a drop down list of the products, PLUS a drop down quantity box?
-
Richie JotForm SupportReplied on April 17, 2018 at 11:51 AM
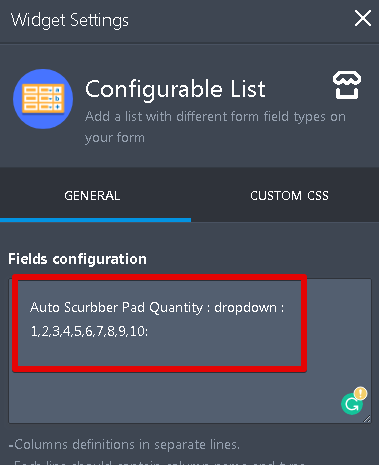
You can use the configurable list widget to create a dynamic dropdown field.
Here is a guide:-How-to-Set-Up-the-Configurable-List-Widget
Here is my sample screen cast.

Here is how I setup in my Configurable list configuration.
Link to my cloned form:https://form.jotform.com/81064796482971
Please give it a try and let us know how it goes.
Thank you.
-
lritterReplied on April 17, 2018 at 4:52 PM
This got me closer. Thank You!
I just need some tweaks.

-
Elton Support Team LeadReplied on April 17, 2018 at 7:21 PM
Here's how:
Inject this CSS codes within 2 two config list widgets under Custom CSS tab. Guide: https://www.jotform.com/help/428-How-to-Inject-CSS-Codes-to-Widgets
table#list {width: 100%; border: 1px solid #ccc; padding:4px; } th.col1 {width: 20px; display: inline-block; } .stepper-wrap input.stepper {text-align: left; width: 20px; } select {box-shadow: none; width: 100%; box-sizing: border-box; border: none; color: #444444; -webkit-appearance: none; outline: none; } #list tbody > tr:first-child {display: none; }
Then inject this in your form. Guide: http://www.jotform.com/help/117-How-to-Inject-Custom-CSS-Codes
iframe#customFieldFrame_56, iframe#customFieldFrame_57, iframe#customFieldFrame_34, iframe#customFieldFrame_33 {width: 100% !important; }
Result:
-
lritterReplied on April 18, 2018 at 1:19 PM
Hello,
I'm sorry, but this isn't what I need.
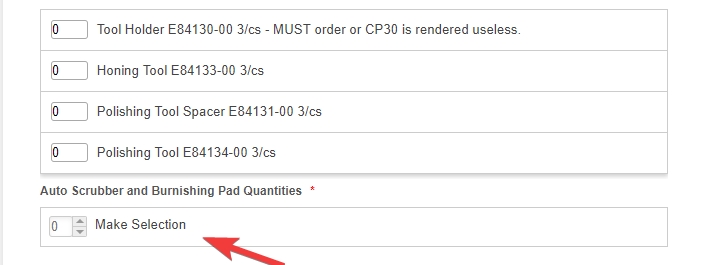
1. I need the input box (1st column) to be fill-in only, NOT a drop-down. Look again at the examples I point to (purple arrow) in my prior screen shot. Notice there are no up or down arrows for the input box.
2. I need the 'make selection' (column 2) to be a DROP-DOWN. 'Make selection' is the default to force them to select from the drop-down.
-
aubreybourkeReplied on April 18, 2018 at 2:24 PM
I checked your form and it seems to be setup how you like.
I have cloned your form and adjusted the look of the configurable list widget. The CSS for each widget is:
.checkbox, .radio {
margin: 3px 0;
min-width: 70px;
}
table#list {
width: 100%; border: 1px solid #ccc; padding:4px;
}
.stepper-wrap input.stepper {
text-align: left; width: 20px;
}
select {
box-shadow: none;
width: 100%;
box-sizing: border-box;
color: #444444;
outline: none;
}
How-to-Inject-CSS-Codes-to-Widgets
It will look like this:

-
aubreybourkeReplied on April 18, 2018 at 2:35 PM
If you want to remove the headings you can use this code in the widget:
.checkbox, .radio {
margin: 3px 0;
min-width: 70px;
}
table#list {
width: 100%; border: 1px solid #ccc; padding:4px;
}
.stepper-wrap input.stepper {
text-align: left; width: 20px;
}
select {
box-shadow: none;
width: 100%;
box-sizing: border-box;
color: #444444;
outline: none;
}
th.col1, th.col2{
display:none !important;
padding: 0px;
margin: 0px;
}
tr:first-child{
display:none;
}
How-to-Inject-CSS-Codes-to-Widgets
It will look like this:

- Templates
- Integrations
- INTEGRATIONS
- See 100+ integrations
- FEATURED INTEGRATIONS
 PayPal
- Slack
- Google Sheets
- Mailchimp
- Zoom
- Dropbox
- Google Calendar
- Hubspot
- Salesforce
- See more Integrations
- Products
- PRODUCTS
- Form Builder
- Jotform Enterprise
- Jotform Apps
- Store Builder
- Jotform Tables
- Jotform Inbox
- Jotform Mobile App
- Jotform Approvals
- Report Builder
- Smart PDF Forms
- PDF Editor
- Jotform Sign
- Jotform for Salesforce Discover Now
- Support


