


-
farsheedAsked on May 26, 2020 at 12:13 AM
Hi after a lot of searching I have decided to make a support request.
I wish to use the Buttons Radio Widget.
I have taken inspiration from these 2 links and they have helped me thru a lot of styling issues
https://www.jotform.com/answers/2134809-CSS-styling-of-Radio-Buttons-Widget
and
https://www.jotform.com/answers/1524576-Button-Radios-Widget-How-to-style-it-with-CSS
However what I want is 2 things
1.to increase the height of the radio button itself.
2. To increase the size of the actviv_elem class.
To increase the height I am using these 2 css properties
/* Button Width */
label {
width: 100px !important;
}
/* Button Height */
label {
height: 60px !important;
font: 22px/40px Lato, sans-serif !important;
}
However I cant increase the height of the button. I would like a square button say 140px x 140px.
Also I would like to increase the size of the actviv_elem class and make the triangle look bigger than what it is.
Are both these possible thru CSS?
If not then I would use the Image Radio Button.
However in this case too I would like 2 things
1. I would like one Image Radio Button to be selected by default. I dont know how to enable that property.
2. I would like the Image Radio Button widget to be responsive. In-spite of reducing the width and aligning the container to the center, it still appears off center.
Thanks for any help on your part.
-
Elton Support Team LeadReplied on May 26, 2020 at 3:38 AM
I assume you're referring to the first radio button widget in your form. To change it to 140x140 square button, you can inject this CSS code within the mentioned widget under Custom CSS tab in its settings.
label {
width: 100% !important;
height: 100% !important;
}
.checkedButtonRadio + label span {
width: 100% !important;
height: 100% !important;
}
.wrapperButtonRadio {
width: 140px !important;
height: 140px !important;
border-radius: 0 !important;
float: left;
display: inline-block !important;
}
div#radios,
.rowButtonRadio {
width: 100% !important;
}
label span {
height: 100% !important;
}
.checkedButtonRadio + label .actviv_elem {
background:none !important;
margin-left: -15px;
width: 0;
height: 0;
border-style: solid;
border-width: 0 15px 20px 15px;
border-color: transparent transparent #292929 transparent;
}
.radios input+label span {
white-space: normal;
}
Guide: How to Inject Custom CSS Codes to Widgets
Here's how it'd look like after:
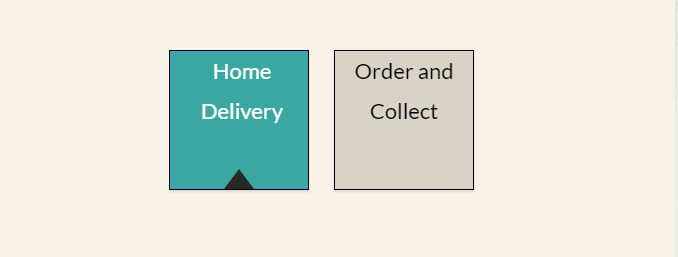
You may want to change the width of the widget too in order for the 2 buttons to appear side by side.
-
farsheedReplied on May 26, 2020 at 4:19 AM
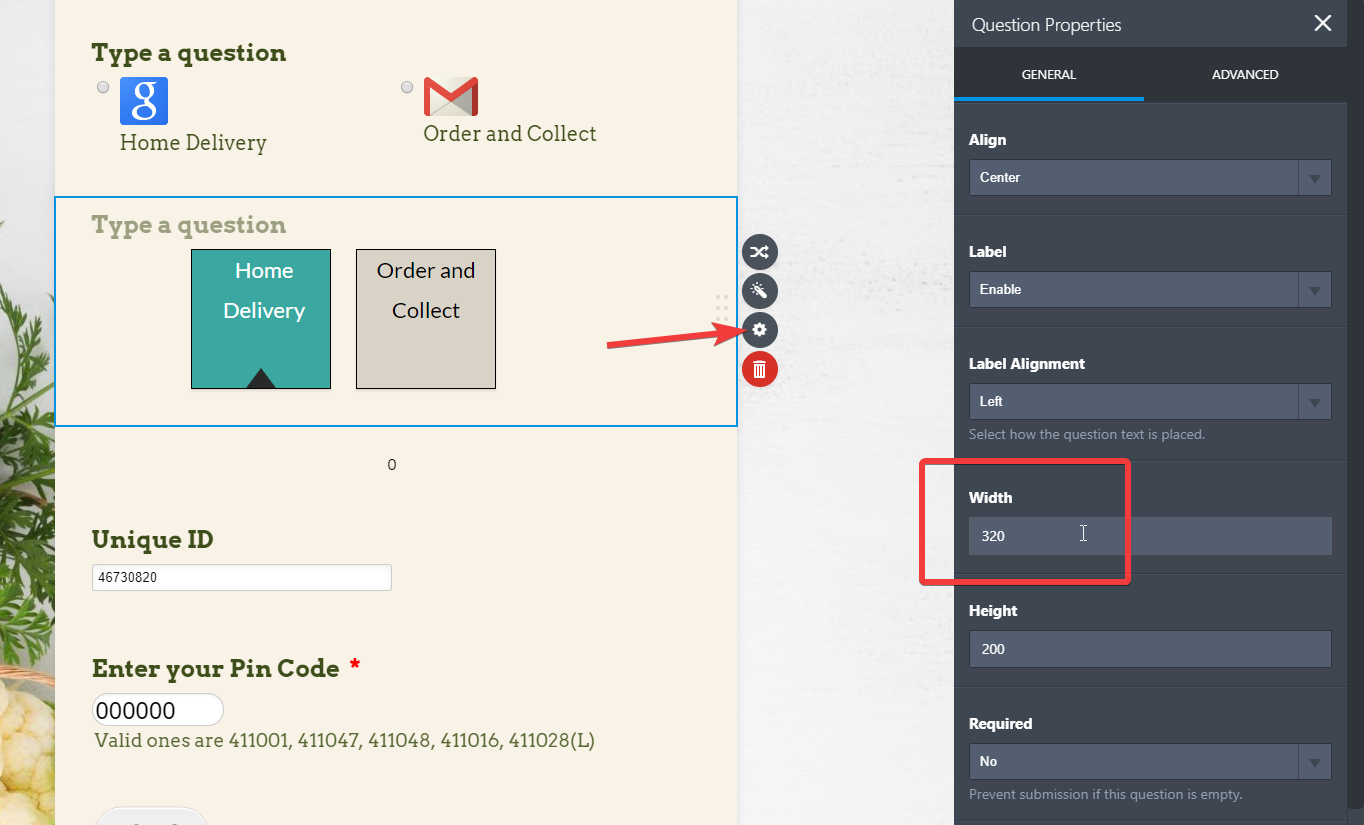
EltonCris Thanks for the CSS code.. I've got everything I need except the label .actviv_elem That is not increasing as in your pic.
I have simply cut and pasted your code to my existing code... so this is my code as of now
/* Button Background */
span {
background-color: #d8d3c6;
color: black;
}
/* Button Border */
.wrapperButtonRadio {
border-color: #000000;
border-radius: 10px;
border: 1px solid ;
margin-right: 25px;
}
/* Button Width */
label {
width: 100px !important;
}
/* Button Height */
label {
height: 60px !important;
font: 22px/40px Lato, sans-serif !important;
}
.checkedButtonRadio + label span {
color: white;
background-color: #3ba7a1;
}
label {
width: 100% !important;
height: 100% !important;
}
.checkedButtonRadio + label span {
width: 100% !important;
height: 100% !important;
}
.wrapperButtonRadio {
width: 140px !important;
height: 140px !important;
border-radius: 0px !important;
float: left;
display: inline-block !important;
}
div#radios,
.rowButtonRadio {
width: 100% !important;
}
label span {
height: 100% !important;
}
.checkedButtonRadio + label .actviv_elem {
background:none !important;
margin-left: -15px;
width: 0;
height: 0;
border-style: solid;
border-width: 0 15px 20px 15px;
border-color: transparent transparent #292929 transparent;
}
.radios input+label span {
white-space: normal;
}
and this is what I get unlike your pic

-
Elton Support Team LeadReplied on May 26, 2020 at 4:24 AM
My bad, I failed to update the code. Sorry about that :)
Please update the following selector found in the code.
.checkedButtonRadio + label .actviv_elem
to
.checkedButtonRadio + label + .actviv_elem
This should correct it.
-
farsheedReplied on May 26, 2020 at 5:08 AM
Thanks EltonCris. That corrected it...and thanks for the prompt response
- Templates
- Integrations
- INTEGRATIONS
- See 100+ integrations
- FEATURED INTEGRATIONS
 PayPal
- Slack
- Google Sheets
- Mailchimp
- Zoom
- Dropbox
- Google Calendar
- Hubspot
- Salesforce
- See more Integrations
- Products
- PRODUCTS
- Form Builder
- Jotform Enterprise
- Jotform Apps
- Store Builder
- Jotform Tables
- Jotform Inbox
- Jotform Mobile App
- Jotform Approvals
- Report Builder
- Smart PDF Forms
- PDF Editor
- Jotform Sign
- Jotform for Salesforce Discover Now
- Support


