


-
BenflipsAsked on December 19, 2014 at 5:17 AM
-
JanReplied on December 19, 2014 at 11:16 AM
Hi,
Yes you can change the width of the label. As I understand you want the check box near the "YES" label right? Here's how you can do it.
1. Select the appropriate field
2. Click on the "Form Style" tab.
3. Click on the "Label Width" button.
4. Put the value you prefer. It should be lower than 100. This is the width of the "YES" label.

Hope this helps. Thank you!
-
BenflipsReplied on December 19, 2014 at 10:21 PMThank you. I've done this.
This option appears to change the label width for all labels on the form,
rather than just the selected one.
Can I go into each individual element and alter a label width to be greater
than the new figure I've just set?
Also, when I changed the label width, I initially dropped it right down to
40px, but this led to the Previous and Next buttons overlapping. Can I
inject custom code or control these buttons separately, as per the sentence
directly above?
... -
valReplied on December 20, 2014 at 7:35 AM
Hi,
Could share us what fields do you want to change the width of the labels so that we can check the CSS elements and we can send you a CSS codes to change the width labels.
Thank you!
-
BenflipsReplied on December 20, 2014 at 6:30 PMWell...all of them!
I would still like the label width of all of the "Yes" checkboxes to be
closer (ie, less than the current 80px) - but if I reduce this global
amount any further the next and previous buttons overlap.
Then, there are other labels (such as for the name fields, the radio button
field near the end, the 'risk of stroke' checkbox, and the 'further
(optional) information' checkboxes that I have set as TOP label rather than
LEFT, because if I select LEFT the labels wrap onto multiple lines
... -
abajan Jotform SupportReplied on December 20, 2014 at 8:34 PM
Please add the following code to the jotform's injected CSS and let us know if it helps:
#label_27, #label_27 span {
display: none;
}#label_28, #label_28 span {
display: none;
}#label_31, #label_31 span {
display: none;
}#label_34, #label_34 span {
display: none;
}
Thanks -
BenflipsReplied on December 20, 2014 at 8:50 PMYes, thank you that is part of the issue resolved by not displaying labels
for these controls.
But (as per my most recent previous email) I would also like to set custome
widths for several other labels so that I can have label and tick
box/description on one line (rather than having to resort to TOP label
alignment as I have done currently)
... -
raulReplied on December 20, 2014 at 10:09 PM
In this case, I suggest that you use the form designer to accomplish this.
You can use the CSS tab (on the right) to find the CSS classes of the labels you want to adjust. For example, as you can see below when I clicked on a checkbox it automatically showed the CSS class name to control all the checkboxes.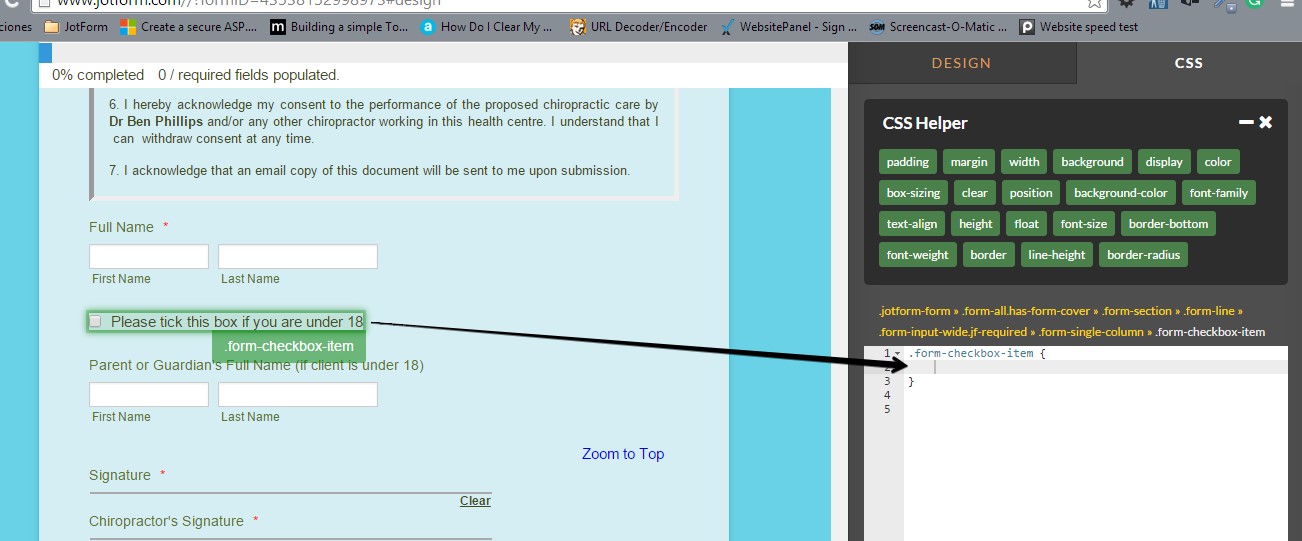
If you want, you can also let us know which are the labels you're having issues with (I was able to see all checkboxes labels in one line when I cloned your form and also on the live version) and we'll be happy to help.
Thanks.
-
BenflipsReplied on December 20, 2014 at 10:20 PMI had already given you this detail in a previous email...but here are the
specifics:
labels _69 _12 _18 _23 are all currently set as TOP alignment. I want them
to be LEFT alignment, but with the label running along one line, not
wrapping onto multiple lines.
I just tried to change the CSS width variable, but as soon as I changed the
CSS element from top to left, my width changes seemed to invalidate
labels -59 and -50 I want a similar situation - but their labels are much
longer, and so any width adjustment will need to be greater than the four
above
... -
BenReplied on December 21, 2014 at 3:24 AM
Hi Ben,
Following up from the top it seems that you are interested in having label's 69, 12, 18 and 23 width increased so that everything falls into one line.
I believe that also labels 59 and 50 should not be changed - as per your message.
Do let us know if I have missed an element, but I will show you here how to change the 12, 18, 23 and 69 labels and how you can easily do that for any other label that you need.
1st - left alignment
I would first like to set them to left alignment. The reason is simple - if labels are on top they get one class and if they are on the left, they will get another and we want to make sure that we set it to left, but also allow them to be switched to the top if so required (good example would be mobile layout).
Now click on the label in question and set it's alignment to Left, like so:

You will need to repeat this for all labels.
Now they will be shown in several lines instead of just one longer one as you have already mentioned, but that is OK since we will now deal with that.
2nd - injecting CSS code
To set them to proper width, but again, not make them hard to be changed by the system if it is viewed on the mobile device, we inject the next CSS codes:
#label_69, #label_12, #label_18, #label_23 {min-width: 190px;}As soon as it is applied, this is how it will look like:

Before you make any changes, you can see it in action here: http://form.jotformpro.com/form/43541071370951
* If you would like to clone it and use like that instead of implementing the changes, please follow these steps: How to Clone an Existing Form from a URL.
How to make additional label changes?
Now, lets say that for example you want to change a label and you find that its label is ID 40. As you can see above, to style such label - but not any others, you should add this rule:
#label_40 {
and here you can adjust any property that you want, such as color:blue for label font color, or width to set its width and so on.
}If you use our Form Designer tool, that would be a lot easier than manually, just double click on the label that you want to edit and it should change to editing ID rather than class.
I would suggest taking a look at a video that was made by a colleague of ours: Video Course: Form Designer Basics
Do let us know how it goes and if you have any issues and we would be happy to help.
Best Regards,
Ben -
BenReplied on December 21, 2014 at 3:29 AM
Hi Ben,
I just wanted to add that there was a bad CSS rule in your code that did not allow code after it to get applied properly so I have logged in and fixed that for you, but I did not want to apply any changes without you first taking a look if that is what you are after.
I hope that you will not mind that, just wanted to make sure that you can add the code above and any other CSS code without any issues.
Best Regards,
Ben
- Templates
- Integrations
- INTEGRATIONS
- See 100+ integrations
- FEATURED INTEGRATIONS
 PayPal
- Slack
- Google Sheets
- Mailchimp
- Zoom
- Dropbox
- Google Calendar
- Hubspot
- Salesforce
- See more Integrations
- Products
- PRODUCTS
- Form Builder
- Jotform Enterprise
- Jotform Apps
- Store Builder
- Jotform Tables
- Jotform Inbox
- Jotform Mobile App
- Jotform Approvals
- Report Builder
- Smart PDF Forms
- PDF Editor
- Jotform Sign
- Jotform for Salesforce Discover Now
- Support


