


-
martinbondAsked on March 4, 2015 at 4:33 PM
I'm not joking when I say this, I love you. Literally saved me a restless nights sleep & an awkward chastising from my superiors tomorrow. That work's perfectly.
I must confess, I have no clue as to how you constructed that little beauty.Using your method, is it possible to replicate the following:


A big Irish cyber hug & kiss in advance.
Regards,
Martin.
-
BenReplied on March 4, 2015 at 5:43 PM
I would first like to explain how I did that on that sample form (http://form.jotformpro.com/form/50626089696973).
This will help you make the changes to existing 'tables' and to add new ones on it.

Now as you can see the far left column and the top row are all Text fields (found under Form Tools)

Reason why I picked them is because they allow us to add our own HTML code to them and can be styled with the use of style tools, making it much easier to style them if you are not sure how something is done when it comes to CSS or HTML.
The first thing that I did was to shrink the field and then just duplicate the field


This allows you to set the type of font that you want and then just copy it around, while shrink makes it much easier to style the text field as it:
1. makes it shorter
2. sets all fields to follow the others
3. easy to set to get to a new lineNow after setting up the top row, I set the left row, since it is the same as well with only text being different. We save time by adding it, but now, we do not want it to follow the last object above - in our case cover amount, so we set it to fall into a new line.

This is now the first element of the row and when we duplicate it, it creates a second element - or better to say another first element, but of a second row.
Now once we set the rows, we start by adding the other fields. I went just as I did with Text field - going from top to bottom adding first and then duplicating it and moving it into right position.
Now there is a trick with this. Moving fields that had the shrink feature applied to them can be quite a challenge, but not if you right click on them and select move down or up.


Now once we add all of them there we have something that does not look remotely to the table layout, but since we now have the basis it is easy to style the jotform.
First I had hidden labels for the fields so that the fields take less space. You can do that by adding CSS code similar to this one:
#label_9, #label_12, #label_15, #label_10, #label_13, #label_16, #label_11, #label_14, #label_17 {
display: none;
}Now the way I got the IDs above is through the source code, but there is an easy way anyone can get them and that is explained here: How to find Field IDs & Names
Next we style columns, from first to last (left to right in this case):
#id_1, #id_6, #id_7, #id_8 {
padding: 0;
text-align: center;
width: 180px;
}
#id_3, #id_9, #id_10, #id_11 {
padding: 0;
text-align: center;
width: 230px;
}
#id_4, #id_12, #id_13, #id_14 {
padding: 0;
text-align: center;
width: 160px;
}
#id_5, #id_15, #id_16, #id_17 {
padding: 0;
text-align: center;
width: 120px;
}All you should change here are IDs and the width parameter (the 120px above) - bold segments are what changes.
Now we style headers:
#id_1, #id_2, #id_3, #id_4, #id_5 {
background-color: gray;
border: 2px solid black;
color: white;
font-weight: bold;
}and finally add the lines and implement the distancing that we like to see
I also thought that some Text fields would look nicer if we remove the padding at the top of headers.
#id_1, #id_2, #id_3, #id_4, #id_5, #id_6, #id_7, #id_8 {
padding-top: 0;
}As you can see, there is some work to be done, but end result looks great.
Now you have asked if the same can be done for the above layouts and the answer is yes - yes of course.
Less fields you have in the table, easier it is to style it and can be done faster.
Now a sample of the above questions and answers would be: http://form.jotformpro.com/form/50626597720965
And this is the entire CSS code in it:
#label_9, #label_12, #label_15, #label_10, #label_13, #label_16, #label_11, #label_14, #label_17, #label_18 {
display: none;
}
#id_1, #id_6, #id_7 {
padding: 0;
text-align: center;
width: 300px;
}
#id_4, #id_12, #id_13 {
padding: 0;
text-align: center;
width: 160px;
}
#id_5, #id_17, #id_18 {
padding: 0;
text-align: center;
width: 300px;
}
#id_1, #id_4, #id_5 {
background-color: gray;
border: 2px solid black;
color: white;
font-weight: bold;
}
#id_1, #id_2, #id_3, #id_4, #id_5, #id_6, #id_7, #id_8, #id_9, #id_10, #id_11, #id_12, #id_13, #id_14, #id_15, #id_16, #id_17, #id_18 {
border: 2px solid black;
height: 70px;
margin: 0;
padding: 20px 5px;
}
#id_1, #id_2, #id_3, #id_4, #id_5, #id_6, #id_7, #id_8 {
padding-top: 0;
}
#id_6, #id_12, #id_17, #id_7, #id_13, #id_18 {
min-height: 140px;
overflow-y: auto;
}Hope this helps, but please feel free to post any questions, better it gets explained easier is to be used and changed.
-
martinbondReplied on March 5, 2015 at 2:05 AM
Absolutely brilliant & I can't thank you enough.
Few questions:1, As you know I've created a large form using configurable lists, basically my task now is to duplicate this form using the above method. When I'm duplicating each individual table will I have to replicate the above CSS code for each individual "table" or is there a simple method of adding to the above CSS code to each in one go? If so, please advise.
I gather it will involve pin pointing each ID and tagging it to the appropriate CSS code, if there an easy way to select at once then copy & paste into the CSS code area? Once I follow the instructions in "http://www.jotform.com/help/146-How-to-find-Field-IDs-Names" to multiselect it only gives list of tag names and not ID's, will CSS pick these names up and format accordingly or does it have to be the tag ID?
2, Did you inject the CSS code into the CSS area in form builder area?
3, In some cases, my respondent will need the option to add another row of fields to provide, for instance, more recommended suppliers. This was one of the main bonuses of using configurable lists, is there any way to implement this functionality using your method?
4, Is it possible to hyperlink text using this method?
5, Is it possible to have each row to have alternating colors as per my configurable lists formatting?
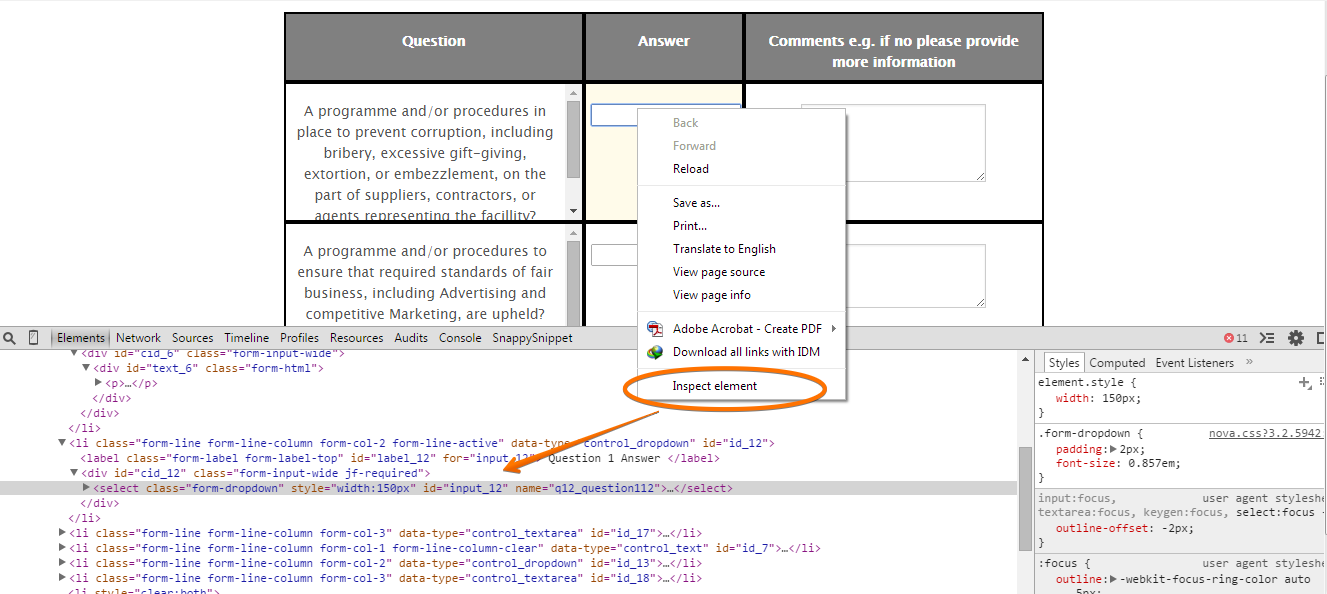
6, I tested your latest sample above in submissions PDF & excel / CSV and the question text is not showing, it's just showing the headings of "Question" "Answer" and "Comments" then the responses, as seen in the screenshot below.

Whereas in your 1st sample you provided the question text appeared and corresponded to the following fields in the rows, which is perfect. Please advise what's missing from the 2nd sample or if I'm misinterpreting the response.
Apologies for the abundance of follow up questions.Kind Regards,
Martin. -
Welvin Support Team LeadReplied on March 5, 2015 at 8:08 AM
Hi Martin,
1. You can copy the styling, but not the ID's since the duplicate fields will have its own ID. You will have to find the ID using the given guide and use it in the custom CSS codes. We can help you about this, just please let us know how many rows you want to add in the form.
I gather it will involve pin pointing each ID and tagging it to the appropriate CSS code....
-Yes, you are correct. You will have to find each field ID.
...if there an easy way to select at once then copy & paste into the CSS code area?
-Unfortunately, you will have to do it per field. There's no way you can just copy the whole ID's and use it directly in the CSS area.
Once I follow the ..........................only gives list of tag names and not ID's, will CSS pick these names up and format accordingly or does it have to be the tag ID?
-In this case, you should use the developers tool in your browser. Usually, right click then inspect element:
2. Yes, in the form preferences > CSS area. Well, you can also do this in the form designer tab. But the CSS codes in the form designer are still added in the Preferences - CSS area in the form builder.
3. Unfortunately, adding the rows dynamically is not possible in this method. You will have to add a number of rows in the form then show per row by adding a conditional logic in the form. You can use this method: https://www.jotform.com/help/297-Show-or-Hide-multiple-fields-at-once-using-form-collapse-tool.
4. Yes, hyperlinking a text is not possible in the Free Text HTML field.
5. Yes, colors are possible using a custom CSS codes.
6. That is because of the field labels. You can always change it and use the actual labeling instead of the sample in my colleague's form.
No worries. If you have any follow up questions, please let us know! We are to help!
Regards
-
martinbondReplied on March 6, 2015 at 7:54 AM
Hi Welvin,
To be honest I'm a tad lost with the above response
Would it be possible for you to create a template for me using the below information. This will be the table with the most text in my form so it will be good to use to get max width etc. On that point, what's the largest px you can have a shrunken HTML field?
Please indicate if your company has any of the following firefighting aids are available for immediate use?
Fire hoses
Fire extinguishers
Fire sprinkler system
On-site fire brigade
Emergency instructions for workers posted in convenient locations at the Company in the local or appropriate language(s)?
Emergency medical supplies placed in convenient locations at the Company for immediate use?
A programme to cooperate with local authorities, including fire and police, in order to manage emergencies and assure public safety
Written guidance that defines and classifies different types of work- related injuries and illnesses?
Upper management who encourage workers to report all work-related injuries or illnesses?
A programme of insurance to compensate for the medical costs of work-related injuries or illnesses?
A programme to manage occupational injuries and illnesses, including treatment of reported cases, investigation, record-keeping, and returning workers to work as soon as they are physically ready?
A programme to control worker exposure to physically demanding work, (e.g., heavy lifting and highly repetitive assembly) to prevent work-related injuries?
If you could create this template to replicate the below configurable list, including styling, dropdown filed and textrarea comments section that would be greatly appriciated.

-
martinbondReplied on March 6, 2015 at 8:00 AM
Please note "Please indicate if your company has any of the following firefighting aids are available for immediate use?" will be the table label with the other text following as questions
I basically want to recreate the following form using the new method - http://form.jotform.me/form/50601680503445
Regards,
Martin. -
martinbondReplied on March 6, 2015 at 8:16 AM
Once I duplicate the provided sample all the fields lose the styling formatting & do not fit into a line as per the example, please advise if there is a way to retain styling etc once I duplicate each one.

-
Welvin Support Team LeadReplied on March 6, 2015 at 9:54 AM
Hi Martin,
We will look at this and get back to you.
As for the styling in your last reply, that is because the duplicate fields have its own ID. They are not the same and you will have to add another set of codes for that.
Thank you!
-
martinbondReplied on March 6, 2015 at 9:57 AM
Thank you so much.
What is the most efficient way to add another set of codes to the duplicates fields? Don't want to be going about it the wrong way from the off.
Sorry for my lack of knowledge.
Regards,
Martin. -
BenReplied on March 6, 2015 at 12:05 PM
To get the ID's Martin you should follow the instructions mentioned by my colleague above:
-In this case, you should use the developers tool in your browser. Usually, right click then inspect element:
You can also find them using this guide: How to find Field IDs & Names
The trick is that you just look at the ID number at the end of the field of interest.
The reason why I say this is because you might see #input_25. Now that tells us that the ID of that element we are trying to hide is #id_5 or #cid_5 (depending which one we are after).
If you go when adding the fields in the same way that I mentioned then your first row is always id+1 meaning that if the first is id_5, second is id_6, id_7 etc
Then if you add all the fields in the first column next, then that column has the same numbers such as
#id_8, #id_9, #id_10
If you continue with the same routine for the following columns, then the same rule applies
#id_11, #id_12, #id13 etc.
I hope that I am explaining it in an easy to follow manner, but if not just let us know I will see if I can come up with something to explain what I mean.
And one more thing Martin, no need to say that you are sorry, we are happy to help and it is always better to ask, so feel free to do so if/when needed. :)
-
martinbondReplied on March 6, 2015 at 12:47 PM
Hi,
Is there any chance you could do a video demo of the full process (including add new rows) as I'm really not getting it to be honest.See screenshot below, I cannot see the ID? Perhaps i'm in the wrong tab or something.

Regards,
Martin
-
MikeReplied on March 6, 2015 at 2:50 PM
We do not provide design services. We will try to look further, and get back to you later.
-
martinbondReplied on March 8, 2015 at 1:38 AM
Hi Mike,
Yes I know Jotform does not provide design services, what I was asking for is a quick demo involving all the steps, something similar to the video in this - http://www.jotform.com/help/146-How-to-find-Field-IDs-Names - as this is all going over my head.
For instance once I click on a "text" field to show properties it only gives the following option, with no text about field ID etc.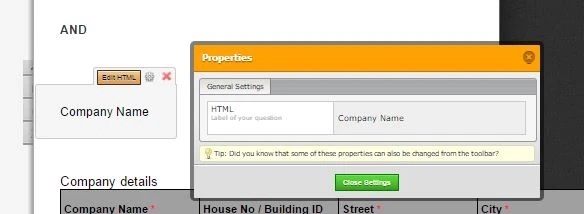
I also cannot see the ID's whilst on developers toolbar as per screenshot in previous comment.
I'm also unaware if I have to copy and paste the below code for every new field / table or do I just add my new ID's to the existing list of ID's?
In response to your colleagues comment "6. That is because of the field labels. You can always change it and use the actual labeling instead of the sample in my colleague's form." - How / where do I change the labeling for HTML fields, I don't see a label option.Regards,
Martin. -
Elton Support Team LeadReplied on March 8, 2015 at 11:10 AM
Hi Martin,
It is easier and convenient if you preview your form first before doing the inspect element.
Here's a short video tutorial: https://shots.jotform.com/elton/2015-03-08_22-52-48.mp4
You're right about the text tool. It doesn't have IDs on its properties because you can actually apply styles directly in the text editor. However, you can get its ID using browser's inspect element.
It doesn't matter if the IDs are used twice or many times separately in the inject CSS editor. You can have it that way. However, if you want to apply the same style into an element from the existing styles you have in your form, you can append the element ID into the selectors separated with comma.
e.g. My new field ID is #id_20 and I want to apply the same style padding:0 to this element. I can simply append it to the existing selectors which has this style separated with comma.
#id_1, #id_2, #id_20{
padding:0;
}
Text (HTML) do not have labels by the way because they are already a text. Is this your last question all about? :)
Thanks!
-
martinbondReplied on March 16, 2015 at 11:35 AM
Hi,
I'm encountering styling issues whilst following the steps above. See screenshot below. Please advise on how to align the fields.
I'm trying to replicate the styling from the sample you provided - http://form.jotformpro.com/form/50626089696973
Link to existing form - http://form.jotformpro.com/form/50682169405962? - 2nd tab
Form saved as "Farid Clone of Compliance Questionnaire - Rolex tower Fitout" in my forms area.
Regards,
Martin.
-
BenReplied on March 16, 2015 at 1:25 PM
Hi Martin,
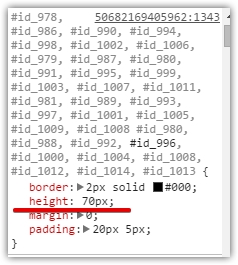
I see that you made a good CSS for the table, it just needed another parameter to make it fall into place.
So it will work if you change this:
#id_964, #id_967, #id_966, #id_965, #id_968 {
background-color: gray;
border: 2px solid black;
color: white;
font-weight: bold;
}to this:
#id_964, #id_967, #id_966, #id_965, #id_968 {
background-color: gray;
border: 2px solid black;
color: white;
font-weight: bold;
margin-right: 0;
}It would look like this:

Now I would also add this code to make it all look like it is of one part:
#text_966 p {
margin-bottom: 7px;
margin-top: 7px;
}
Do let us know if you have any further trouble with this.
-
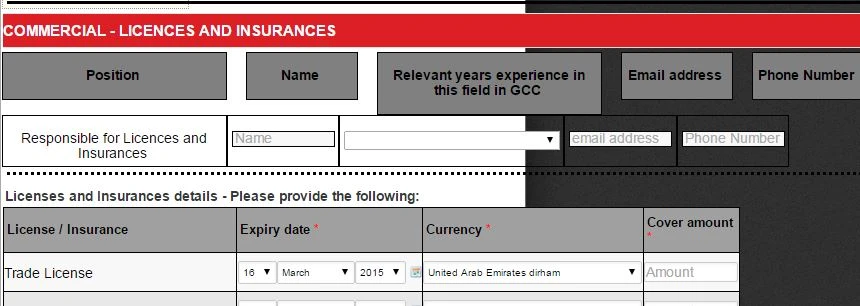
martinbondReplied on March 19, 2015 at 4:11 AM
Hi,
Code is working fine, just getting into the finer styling details now. In the screenshot below all of my currency dropdowns are not centering, only the one in the long for "All risks" is aligning properly. Please advise how to amend this.

-
Welvin Support Team LeadReplied on March 19, 2015 at 6:40 AM
Injecting the following custom CSS codes to your form will fix it:
div#cid_980, div#cid_988, div#cid_992, div#cid_996, div#cid_1000, div#cid_1004, div#cid_1008, div#cid_1012 {
margin-top: -20px;
}
Thank you!
-
martinbondReplied on March 19, 2015 at 6:46 AM
Thank you so much Welvin, works perfectly.
Have a good day :)
-
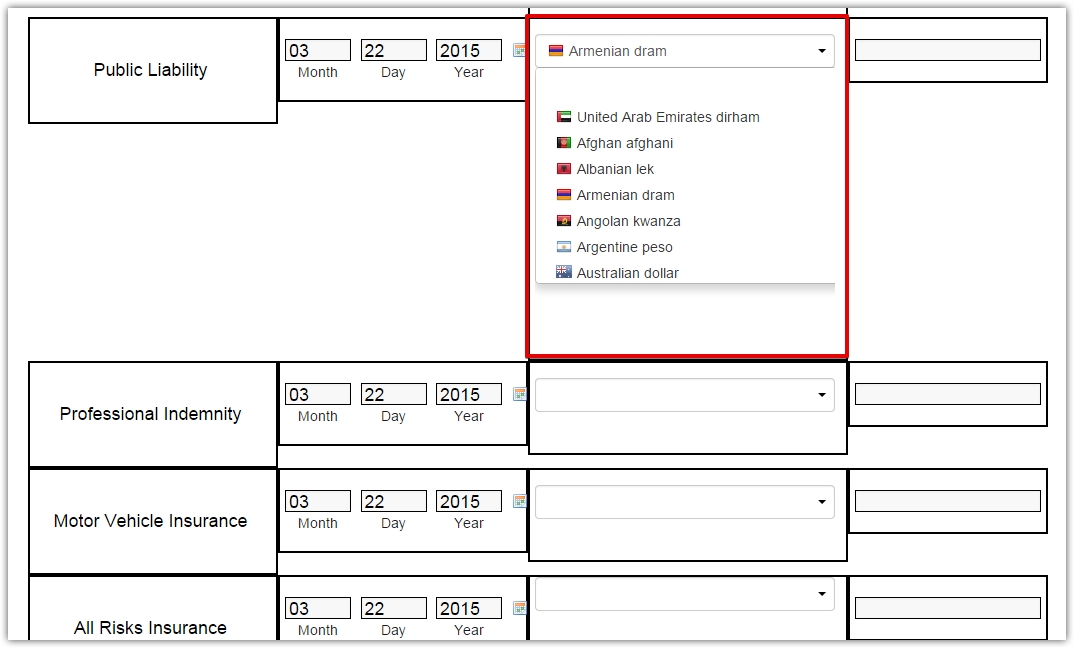
martinbondReplied on March 19, 2015 at 6:58 AM
Hi,
Just testing my form, the currency picker is not displaying correctly once the drop down menu is selected, see screenshot, list is currencies are not clear for respondent to select.

Regards,
Martin. -
Welvin Support Team LeadReplied on March 19, 2015 at 8:17 AM
Hi Martin,
We will check this and get back to you later today.
Thank you!
-
Elton Support Team LeadReplied on March 21, 2015 at 9:37 PM
@Martin,
The currency picker widget you are using should suppose to have dynamic height. The CSS you injected to your form affect its functionality particularly its appearance on select mode.
This is the CSS affecting it.
This is how it is supposed to work, which will obviously distort your table layout since as I said this widget has dynamic height. It extends its height on select.
There are two solutions I know.
1. Either you stay with the currency picker widget with that layout (see screenshot above). Make sure to add this CSS to preserve its dynamic height.
[data-type="control_widget"] {height: auto !important;}
2. Or use regular dropdown fields as seen on my colleagues example: http://form.jotformpro.com/form/50626089696973
Hope this information helps. Thank you!
-
martinbondReplied on March 22, 2015 at 1:04 AM
Hi,
Thanks, I opted for solution 2 above.
Just for the purpose of any other user reading this thread.
I selected all the options in the currency pickers (Ctrl+A), pasted them as text into word. I then copied these options into the normal dropdown boxes to get all the correct currency name.
Thanks for your help on this issue.
Regards,
Martin. -
BenReplied on March 22, 2015 at 5:49 AM
Thank you Martin for updating us and letting others know how they could do it, but I would also like to mention that you could use the Currency picker if you re-style it a bit like so:
http://form.jotformpro.com/form/50801973309961
Basically all we would need is to add this:
#id_18 {
z-index: 2;
}
#id_18 iframe {
overflow: visible;
z-index: 3;
}This tells it that it is on another level compared to other fields - basically being over them, but we still style it to look as if it is one of them, by adding it to the existing layout:
#id_1, #id_2, #id_3, #id_4, #id_5, #id_6, #id_7, #id_8, #id_9, #id_10, #id_11, #id_12, #id_13, #id_14, #id_15, #id_16, #id_17, #id_18 {
border: 2px solid black;
height: 60px;
margin: 0;
padding: 20px 5px;
}Since it did not look just right, I also removed a bit of padding so that it lines up perfectly:
#id_18 {
padding-top: 2px;
}if you take a look at the jotform, you will see that it will be cut off if used with such a small width, which is not possible to change from within JotForm builder, but if you need to use this widget and have some bigger width to give to it, you can apply the above, where #id_18 is the id of the field holding the Currency Picker Widget.
Just wanted to add this in hope it will be useful to you in your other tables :)
- Templates
- Integrations
- INTEGRATIONS
- See 100+ integrations
- FEATURED INTEGRATIONS
 PayPal
- Slack
- Google Sheets
- Mailchimp
- Zoom
- Dropbox
- Google Calendar
- Hubspot
- Salesforce
- See more Integrations
- Products
- PRODUCTS
- Form Builder
- Jotform Enterprise
- Jotform Apps
- Store Builder
- Jotform Tables
- Jotform Inbox
- Jotform Mobile App
- Jotform Approvals
- Report Builder
- Smart PDF Forms
- PDF Editor
- Jotform Sign
- Jotform for Salesforce Discover Now
- Support


