


-
snaplashAsked on February 20, 2016 at 9:40 AM
Hello Jotform!
I am trying to Customize a few things on this widget - could you point me in the right direction please?
Justify/Align the widget to the right of the form
Remove Border-radius
Keep the size at 50px x 50px
I have tried to do all these things but cannot get their div names
https://form.jotform.com/60504200689956
Thank you again Jotform!
Page URL: https://form.jotform.com/60504200689956 -
Kevin Support Team LeadReplied on February 20, 2016 at 9:56 PM
I will provide the code for each thing that you want to achieve.
Justify/Align the widget to the right of the form
li {
margin-left: 100px;
}
You may try using a different value rather than use 100px.
Remove Border-radius
li img{
border-radius:0px;
}
Keep the size at 50px x 50px
li, li img {
width: 50px;
height: 50px;
}
Inject the CSS code by clicking on the widget, then on the wizard icon.

Then click on the CSS tab and paste the code provided above.

Hope this helps.
-
snaplashReplied on February 20, 2016 at 10:06 PM
Thank you so much!
Just one more thing, how do I maintain the
border-radius:0px; after it is clicked?

Thank you Kevin!
Mark.
-
Kevin Support Team LeadReplied on February 20, 2016 at 11:15 PM
You're welcome.
Sure, just add this CSS code:
li.checked img {
border-radius: 0px;
}
Do let us know how it goes.
-
snaplashReplied on February 20, 2016 at 11:51 PM
thank you very much!
Do you have an article to show me how you get the names to apply the styles to?
for example - where do you find li.checked img
I am trying to customize the check box and cannot figure it out.
-
Kevin Support Team LeadReplied on February 21, 2016 at 1:04 AM
If you are using the normal fields, you may follow this guide to get the names and IDs: http://www.jotform.com/help/146-How-to-find-Field-IDs-Names.
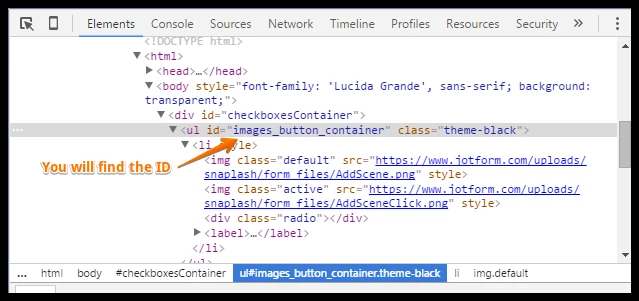
However, it does not work when you are using a widget, because they work with a different method than the normal fields, to know the name or ID of an element, you will need to inspect it using the web console, follow these steps.
1. Right click on the element that you want to know the name/ID and then click on inspect.
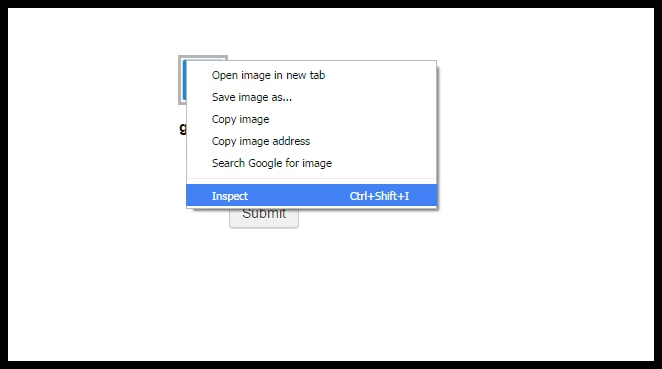
2. You will find the ID of the element, if it would be a form field such as a text field, radio button, check boxes, you will find the name as well.
-
snaplashReplied on February 22, 2016 at 2:26 PM
Thank you for that info!
I am still having a problem aligning the image checkbox to the right.
When I add
li {
margin-left: 900px;
}
as you suggested it disappears. Any suggestions?
-
Kevin Support Team LeadReplied on February 22, 2016 at 3:38 PM
Yes, it will disappear because the field is 900px to the left of the original position, so it is going out of the window, try using a different value such as 200px.

-
snaplashReplied on February 22, 2016 at 4:00 PM
Unfortunately it disappears after 250px
how can I justify it to the very right of the form?
float:right; wont work
-
Kevin Support Team LeadReplied on February 22, 2016 at 5:13 PM
Inject this CSS code:
#id_4 iframe{
width:100% !important;
}
It will display the element where is added the widget on the same with than the form, then you will be able to set the margin-left property for the image to a maximum value of 560px.
-
snaplashReplied on February 24, 2016 at 12:07 AM
Thank you again Kevin.
I am still unable to get my head around this. how do I control the checkbox then? ie remove the chech completely In the Inspect Element thie below works:
.radio {
background: none!important;
}
I cannot figure how to put this into the widget CSS or the Designer CSS. I moved the form to:
https://form.jotform.com/60538081718963?
-
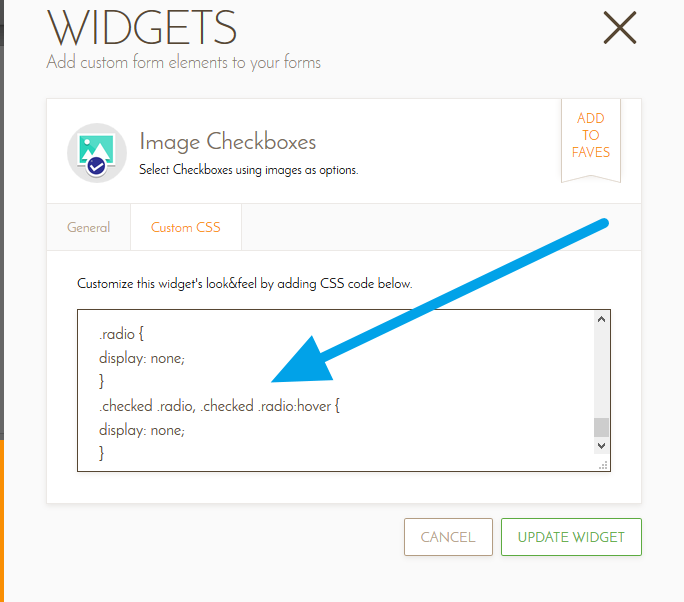
Welvin Support Team LeadReplied on February 24, 2016 at 8:31 AM
.radio {
display: none;
}
.checked .radio, .checked .radio:hover {
display: none;
}
You can inject the above custom CSS codes to your widget to hide the radio button circle, checked/unchecked option.
-
snaplashReplied on February 24, 2016 at 8:33 AM
Thank you so much, I know this thread has dragged on...
Its appreciated.
One again thank you both.
-
snaplashReplied on February 24, 2016 at 8:40 AM
Apologies Welvin, This solution is not working.
I injected the code and nothing changed. I added !important
.radio {
display: none!important;
}
.checked .radio, .checked .radio:hover {
display: none!important;
}
Still nothing. Do I need to add #text_80?
-
Welvin Support Team LeadReplied on February 24, 2016 at 10:10 AM
I mean, you have to inject the codes right into the widget CSS area, not to your form. I just did it for you.
-
snaplashReplied on February 24, 2016 at 10:13 AM
Thank you!
Resolved!
- Templates
- Integrations
- INTEGRATIONS
- See 100+ integrations
- FEATURED INTEGRATIONS
 PayPal
- Slack
- Google Sheets
- Mailchimp
- Zoom
- Dropbox
- Google Calendar
- Hubspot
- Salesforce
- See more Integrations
- Products
- PRODUCTS
- Form Builder
- Jotform Enterprise
- Jotform Apps
- Store Builder
- Jotform Tables
- Jotform Inbox
- Jotform Mobile App
- Jotform Approvals
- Report Builder
- Smart PDF Forms
- PDF Editor
- Jotform Sign
- Jotform for Salesforce Discover Now
- Support


