


-
tracyalexanderAsked on March 11, 2016 at 10:40 AM
https://form.jotformeu.com/60675308484361
The configurable list for cattle entries is too squashed. I would like the AI, AI Class and Sire Name to go onto a second line.
Also is it possible for AI Class and Sire Name only to be shown when AI has Yes selected?
Thank you for your help
Tracy
-
Kiran Support Team LeadReplied on March 11, 2016 at 12:15 PM
Unfortunately, it is not possible to apply conditions with Configurable list widget. I'm working on the CSS code to be applied to the widget in order to display the fields in two lines. I'll get back to you once I complete the CSS code to your form.
Thank you for your patience.
-
Kiran Support Team LeadReplied on March 11, 2016 at 1:09 PM
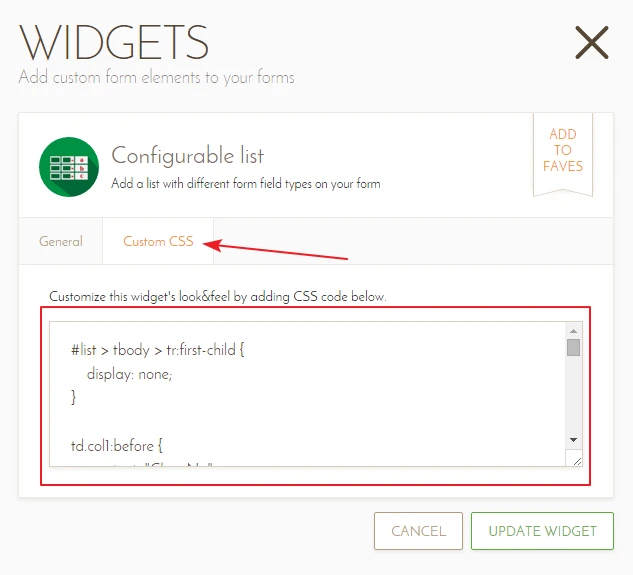
Thank you for being patient. Please inject the following CSS code to the widget to split the columns into two lines.
#list > tbody > tr:first-child {
display: none;
}
td.col1:before {
content: "Class No";
display: block;
}
td.col2:before {
content: "Name of Animal";
display: block;
}
td.col3:before {
content: "Tag No";
display: block;
}
td.col4:before {
content: "AI";
display: block;
}
td.col5:before {
content: "AI Class";
display: block;
}
td.col6:before {
content: "Name of Sire (If In AI Section)";
display: block;
}
td.col4 {
float: left;
left: -310px;
position: relative;
top: 55px;
}
td.col5 {
float: left;
left: -300px;
position: relative;
top: 55px;
}
td.col6 {
float: left;
left: -280px;
position: relative;
top: 55px;
}
td.col7 {
left: -200px;
position: relative;
}
tr {
height: 110px;
}
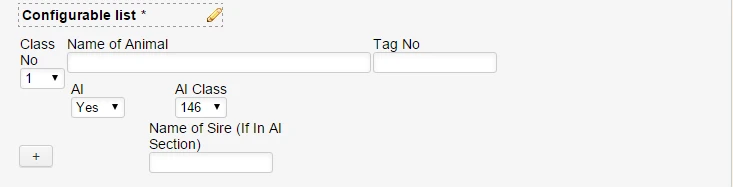
After applying the CSS code above to the widget, it should be displaying the columns in two lines as shown below:

You may change the numbers to change the position as per your requirement.
Please get back to us if you need any further assistance. We will be happy to help.
-
Kiran Support Team LeadReplied on March 11, 2016 at 1:12 PM
Though you may be aware, just to let you know that the CSS code is to be injected to the Custom CSS section of the Configurable List widget. Please see the screenshot below:
Please let us know if we can be of any further help. Thank you!
-
tracyalexanderReplied on March 11, 2016 at 2:00 PM
-
CharlieReplied on March 11, 2016 at 2:07 PM
I have opened a separate thread for the follow up concern that you have, this is to better discuss and help you on it. Please refer to this link instead: http://www.jotform.com/answers/792927. We will address it accordingly. Thank you.
-
tracyalexanderReplied on March 11, 2016 at 2:18 PM
I have been trying to move my fields about but they in a muddle now.
I need text class one to be in one line but dont reduce the size of my other fields in that line
I need Name of Sire to come up on the same line as AI and AI Class. I also want name of sire to be same length as Name of Animal. AI and AI Class can be closer together
I have copied my CSS code in below
Thank you very much
#list > tbody > tr:first-child {
display: none;
}.col2 input[type=text] {
width: 300px;
}
}
.col1 {
width: 70px;
}
td.col1:before {
content: "Class No";
display: block;
}
td.col2:before {
content: "Name of Animal";
display: block;
}
td.col3:before {
content: "Tag No";
display: block;
}
td.col4:before {
content: "AI";
display: block;
}
td.col5:before {
content: "AI Class";
display: block;
}
td.col6:before {
content: "Name of Sire (If In AI Section)";
display: block;
}
td.col4 {
float: left;
left: -428px;
position: relative;
top: 45px;
}
td.col5 {
float: left;
left: -380px;
position: relative;
top: 45px;
}
td.col6 {
float: left;
left: -350px;
position: relative;
top: 45px;
}
td.col7 {
left: -200px;
position: relative;
}
tr {
height: 110px;
}
-
Kiran Support Team LeadReplied on March 11, 2016 at 3:06 PM
Please remove the CSS code from the Custom CSS code in the widget and add the following CSS code to align the fields properly and to have bold labels for headings.
#list > tbody > tr:first-child {
display: none;
}
.col2 input[type=text] {
width: 300px !important;
}
.col6 input[type=text] {
width: 300px !important;
}
.col1 {
width: 70px;
}
td.col1:before {
content: "Class No";
display: block;
font-weight: bold;
}
td.col2:before {
content: "Name of Animal";
display: block;
font-weight: bold;
}
td.col3:before {
content: "Tag No";
display: block;
font-weight: bold;
}
td.col4:before {
content: "AI";
display: block;
font-weight: bold;
}
td.col5:before {
content: "AI Class";
display: block;
font-weight: bold;
}
td.col6:before {
content: "Name of Sire (If In AI Section)";
display: block;
font-weight: bold;
}
td.col4 {
float: left;
left: -504px;
position: relative;
top: 45px;
}
td.col5 {
float: left;
left: -482px;
position: relative;
top: 45px;
}
td.col6 {
float: left;
left: -350px;
position: relative;
top: 7px;
}
td.col7 {
left: -200px;
position: relative;
}
tr {
height: 110px;
}
It should be displaying now as shown below:

Hope this information helps! Please get back to us if you need any further assistance. We will be happy to help.
-
tracyalexanderReplied on March 11, 2016 at 4:27 PM
Hi
I deleted the code had and copied and pasted yours in but Its not showing right (see image) - If I could have it as you show above but have the second line indented in so it starts in line under name of animal that would be perfect

-
Nik_CReplied on March 11, 2016 at 5:15 PM
I modified my colleague's code as you requested, the second line on your form should be indented when you inject the custom CSS code i provided.
#list > tbody > tr:first-child {
display: none;
}
.col2 input[type=text] {
width: 300px !important;
}
.col6 input[type=text] {
width: 300px !important;
}
.col1 {
width: 70px;
}
td.col1:before {
content: "Class No";
display: block;
font-weight: bold;
}
td.col2:before {
content: "Name of Animal";
display: block;
font-weight: bold;
}
td.col3:before {
content: "Tag No";
display: block;
font-weight: bold;
}
td.col4:before {
content: "AI";
display: block;
font-weight: bold;
}
td.col5:before {
content: "AI Class";
display: block;
font-weight: bold;
}
td.col6:before {
content: "Name of Sire (If In AI Section)";
display: block;
font-weight: bold;
}
td.col4 {
padding-left: 75px;
float: left;
left: -504px;
position: relative;
top: 45px;
}
td.col5 {
float: left;
left: -482px;
position: relative;
top: 45px;
}
td.col6 {
float: left;
left: -350px;
position: relative;
top: 7px;
padding-left: 50px;
}
td.col7 {
left: -200px;
position: relative;
}
tr {
height: 110px;
}
To inject custom CSS code you need to add the CSS code to your Custom CSS field in the Configurable list widget wizard.

NOTE: You will have to delete any CSS code that was in the Custom CSS tab text field previously before pasting the new CSS code for this to work.
Please let me know if this this works for you.
-
tracyalexanderReplied on March 11, 2016 at 5:39 PM
Thanks for trying to help me
I deleted all the css code in the configurable list then copy and pasted the code given but it still not looking right?

-
Kiran Support Team LeadReplied on March 11, 2016 at 5:57 PM
I've added the following code to your JotForm directly and see that the configurable list is displaying the fields properly.
.col1 select {
width: 80px;
}
and reduced the left margin to -325px for td.col6.

Please check you JotForm now and let us know if you need any further assistance. We will be happy to assist.
Thank you!
-
tracyalexanderReplied on March 12, 2016 at 2:38 AM
That is perfect
Thanks very much for your help, I appreciate it
-
tracyalexanderReplied on March 25, 2016 at 3:39 PM
Hi
I have just noticed that the 'Delete Entry' button for this configurable list that you made for me is off the page - can you please fix this for me?
https://form.jotformeu.com/60675308484361
Thanks
Tracy
-
Kiran Support Team LeadReplied on March 25, 2016 at 3:48 PM
I've now changed the CSS code for Delete Entry field to display correctly. This is how the button Delete entry is displayed on your form now.

Please let us know if we can be of any further help. Thank you!
- Templates
- Integrations
- INTEGRATIONS
- See 100+ integrations
- FEATURED INTEGRATIONS
 PayPal
- Slack
- Google Sheets
- Mailchimp
- Zoom
- Dropbox
- Google Calendar
- Hubspot
- Salesforce
- See more Integrations
- Products
- PRODUCTS
- Form Builder
- Jotform Enterprise
- Jotform Apps
- Store Builder
- Jotform Tables
- Jotform Inbox
- Jotform Mobile App
- Jotform Approvals
- Report Builder
- Smart PDF Forms
- PDF Editor
- Jotform Sign
- Jotform for Salesforce Discover Now
- Support


