-
GeneKempersAsked on April 14, 2016 at 4:19 PM
Talked to Ben.
Ben said you could help me put custom CSS code into my form called CSS ORDER Form 4-14-2016.
Need Size, Font, Color and Text color on one line.
Need Left Clip Art, Message 1 and Right Clip Art on 2nd line.
Need Left Clip Art, Message 2 and Right Clip Art on3rd line.
Need Message 3 on 4th line.
Message 4 on last line.
This is for an interactive input form that allows an addition of items to be filled out.
-
MikeReplied on April 14, 2016 at 7:46 PM
There is no way to convert standard fields into the configurable list widget. Please add a Configurable List widget with the fields you need and update this thread. Then we will try to help with the CSS part.
-
GeneKempersReplied on April 14, 2016 at 9:04 PM
I updated the form to include a configurable list.
Looks like I have too many items in the Color drop down list.
I need all of them in the drop down.
Thanks for responding so quickly.
-
BorisReplied on April 15, 2016 at 12:26 AM
I see that this is about form 61046308969160, which has a slightly broken list of items/fields:

This was caused by some accidentally placed new lines, which broken of some of your colors into separate fields. You also seem to have an additional "Right Clip Art" field between "Text Color" and "Left Clip Art". To fix it, please use the following as your Configurable List field settings:
Quantity: number : 1
Size : dropdown : 5.5",6",6.5",7",7.5",8",8.5",9.5":
Font : dropdown : Arial,Bradley,Comic,Sans,Eras,Forte,Harrington,IMPACT,Kristen,Ravie,Script :
Color : dropdown : Black,Baby Boy Blue,Blue White Swirl,Dark Navy Blue,Rainbow Swirl,Royal Blue,Brownie Brown,Camo,Clear,Gray,Army Green,Monster,Green,Teal Green,Orange,Tiger,Orange,Baby Girl Pink,Dark Violet,Hot Pink,Light Purple,Pink Lemonade,Pink White Swirl,Red,Red Black Swirl,Red White Blue,White,White Cream Glow,White Glow,Yellow :
Text Color : dropdown : White,Black,Gray,Green,Red,Pink,Blue,Yellow :
Left Clip Art : text : Hint Text
Message 1 : text : Hint Text
Right Clip Art : text : Hint Text
Left Clip Art : text : Hint Text
Message 2 : text : Hint Text
Right Clip Art : text : Hint Text
Message 3 : text : Hint Text
Message 4 : text : Hint TextWhen it comes to positioning the fields into multiple rows, please add the following custom CSS into your widget:
.checkbox, .radio {
margin: 3px 0;
min-width: 70px;
}
th { display: none; }
td.col1, td.col2, td.col3, td.col4, td.col5, td.col6, td.col7, td.col8, td.col9, td.col10, td.col11, td.col12, td.col13 {
display:inline-block;
float: left;
padding: 20px 5px 1px 1px;
}
input[type="text"], select, .stepper-wrap input.stepper { width: 100%; }
td.col1:before { content: "Quantity: "; width: 20%; }
td.col2:before { content: "Size: "; width: 20%; }
td.col3:before { content: "Font: "; width: 20%; }
td.col4:before { content: "Color: "; width: 20%; }
td.col5:before { content: "Text Color: "; width: 20%; }
td.col6:before { content: "Left Clip Art: "; width: 30%; clear: left; }
td.col7:before { content: "Message 1: "; width: 30%; }
td.col8:before { content: "Right Clip Art: "; width: 30%; }
td.col9:before { content: "Left Clip Art: "; width: 30%; clear: left; }
td.col10:before { content: "Message 2: "; width: 30%; }
td.col11:before { content: "Right Clip Art: "; width: 30%; }
td.col12:before { content: "Message 3: "; width: 100%; clear: left; }
td.col13:before { content: "Message 4: "; width: 100%; clear: left; }
td.col1 { width: 25%; }
td.col2 { width: 25%; }
td.col3 { width: 25%; }
td.col4 { width: 25%; }
td.col5 { width: 30%; }
td.col6 { width: 30%; clear: left; }
td.col7 { width: 30%; }
td.col8 { width: 30%; }
td.col9 { width: 30%; clear: left; }
td.col10 { width: 30%; }
td.col11 { width: 30%; }
td.col12 { width: 100%; clear: left; }
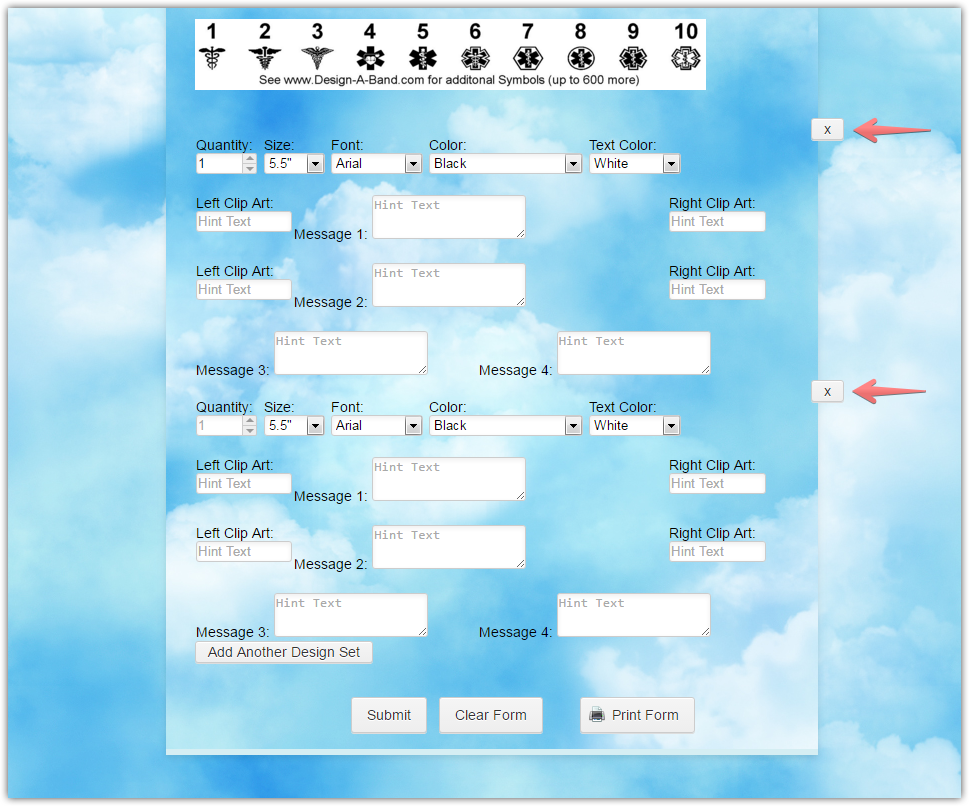
td.col13 { width: 100%; clear: left; }Your form will end up looking like this:

You can modify your Configurable list widget by clicking on its wand-shaped icon:

In order to fix your field configuration, please copy/paste the code with green background from above into your "Fields configuration" field, and click Update widget:

Then, paste the CSS code with orange background from above, into the CSS tab of your widget and click on Update widget:

Let us know if you need any further assistance, we'll be happy to help.
-
GeneKempersReplied on April 15, 2016 at 8:20 AM
I put the new code into the form "CSS ORDER FORM 4-15-2016".
Looks like the CSS code is in the wrong spot.
Don't know how to fix it.
Thanks
Gene
-
CharlieReplied on April 15, 2016 at 10:22 AM
The CSS code created by my colleague is for the form "CSS ORDER FORM 4-14-2016", but it seems like you have deleted it and you have a new form titled "CSS ORDER FORM 4-15-2016". You have also pasted your CSS code in the wrong area. You should paste it under the "Custom CSS" tab in the widget. Please see the screenshot below and the ones shared by my colleague above.

I cloned your form and simply corrected the mistakes. You can find my form on this link to see how it looks like: https://form.jotform.com/61053971997973. If you wish to have that version of the form in your account, you can simply clone it by following this guide: https://www.jotform.com/help/42-How-to-Clone-an-Existing-Form-from-a-URL
Let us know if that works.
-
GeneKempersReplied on April 15, 2016 at 11:40 AM
Good.
Got that figured out.
Can text Messages 1, 2, 3 and 4 have more than one line of data.
Would like three lines each.
Thanks for your help.
Gene
-
CharlieReplied on April 15, 2016 at 1:00 PM
I presume you are referring to these ones:

I'm not sure if I am visualizing it correctly, they are in a text box, a text box can only have one single line box. Perhaps what you would like to use is a "Text area"? You can find the text area mentioned in this guide: https://www.jotform.com/help/282-How-to-Set-Up-the-Configurable-List-Widget. A text area allows your users to have an input showing in a paragraph like format in multiple rows.
If you can show a screenshot or a layout of what you are expecting to see, that would help us a lot.
-
Gene KempersReplied on April 15, 2016 at 2:12 PM
Just a few more questions:
1. Can I get the X at the end of the form entry so the user can remove the selected input data?
2. Can I get a Reset Button to clear all of the form data?
3. Can I replace the + sign used to add another form set of data to a custom text
like "Add Another Design Set"?
4. Is there a duplicate button that will duplicate the last entry data set
so they can duplicate and edit a few changes.
Thanks again for your help.
Gene Kempers
-
MikeReplied on April 15, 2016 at 3:53 PM
1. Can I get the X at the end of the form entry so the user can remove the selected input data?
There is an X (remove entry) option available which is automatically added when user has more than one item within Configurable List widget.
2. Can I get a Reset Button to clear all of the form data?
This is possible to enable a Reset Button on the Submit button section, please see the next animation.

However, that button will not clear widget values, since widgets are different from the standard form fields.
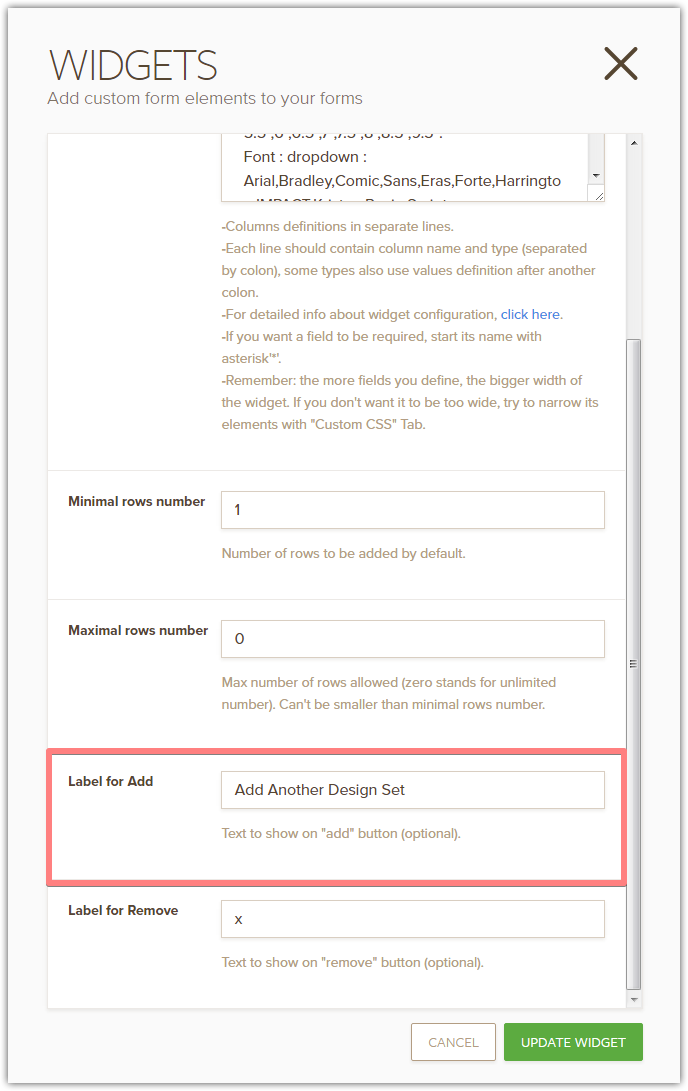
3. Can I replace the + sign used to add another form set of data to a custom text like "Add Another Design Set"?
Yes, you will need to update a 'Label for Add' parameter to do this.
4. Is there a duplicate button that will duplicate the last entry data set so they can duplicate and edit a few changes.
Unfortunately, there is no such functionality provided with the Configurable List widget.
- Templates
- Integrations
- INTEGRATIONS
- See 100+ integrations
- FEATURED INTEGRATIONS
 PayPal
- Slack
- Google Sheets
- Mailchimp
- Zoom
- Dropbox
- Google Calendar
- Hubspot
- Salesforce
- See more Integrations
- Products
- PRODUCTS
- Form Builder
- Jotform Enterprise
- Jotform Apps
- Store Builder
- Jotform Tables
- Jotform Inbox
- Jotform Mobile App
- Jotform Approvals
- Report Builder
- Smart PDF Forms
- PDF Editor
- Jotform Sign
- Jotform for Salesforce Discover Now
- Support