
If you attended our webinar, Introducing Jotform Approvals, you know there are so many ways to customize your approval workflows that we couldn’t fit them all into one session. If you’re eager for more Approvals resources, check out “Advanced Jotform Approvals” below.
In this webinar, we covered advanced workflow options, went into more depth about the customizations available for approvers, and showed an overview of mobile Jotform Approvals. We included examples of
- Parallel approvals that incorporate the Merge Branches element
- Flows routed using if-else logic and conditional branches
- A workflow that allows approvers to request more information
The examples in this webinar are based on some of your most frequently asked questions, so maybe you’ll even see your workflow included!
Full Webinar Transcript
[0:02]
Morgan Ziontz: Hey everyone, Morgan Ziontz here at JotForm. I am our webinar manager and I will be the host of today’s webinar, Advanced Jotform Approvals. Two quick housekeeping items before we get started. First, we have disabled chat for this session. So, if you do have questions, please enter them into the Q&A. We’ve just done that so that all of the questions will be in one place for me to be able to easily monitor at the end of the session. When we close out with today’s demo, we’ll have plenty of time to go through Q&A and David Wilson from our support team on the line to help out with that. Second housekeeping item is that, if you haven’t already seen our introducing Jotform approvals webinar, you’ll still absolutely be able to follow along today. I’m going to show some more advanced workflows but certainly nothing that’s so advanced, you can’t understand it. But I do recommend checking that out whenever you can. It’s a good resource. And it points to a number of other resources that we have available as you start to learn more about approvals.

Webinar Agenda
[1:13]
So here’s our agenda today you already got a little sneak preview of the agenda, but I’m going to give a very brief overview of using the Jotform Mobile Forms app to do approvals, and I’ll spend most of the session today in a demo where I’ll show a few different examples of how to get started. A few different examples of how to use workflows. I will end the demo by showing some of the advanced options that you have available for approvers, as well as what those look like to approvers, and where they can find them. And finally, as I mentioned, we’ll close with Q&A.
Jotform Mobile Forms App
[1:56]
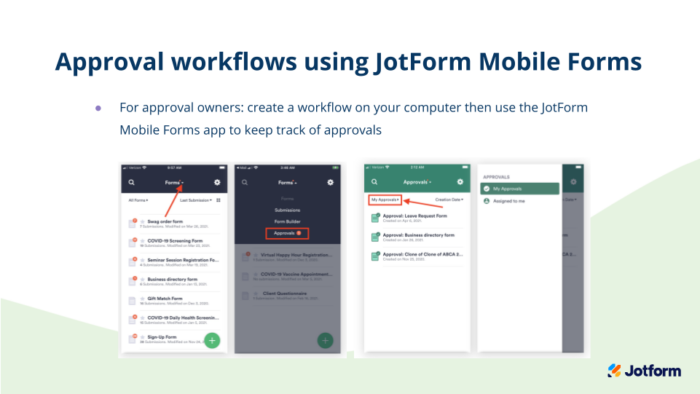
So, a very brief overview of using the Jotform Mobile Forms app to do approvals. If you are currently using the app or if you want to or plan to, you can absolutely manage your approvals in the app as well. If you’re an approval owner, you will need to create your workflow on a computer logged into your account first. Considering that that screen is a lot bigger than your mobile screen that probably makes sense to do anyway. Once that’s in place you can go ahead and use the app to keep track of your approvals, see where they are in the process, etc.
Jotform Mobile Forms for Approval Owners
[2:35]
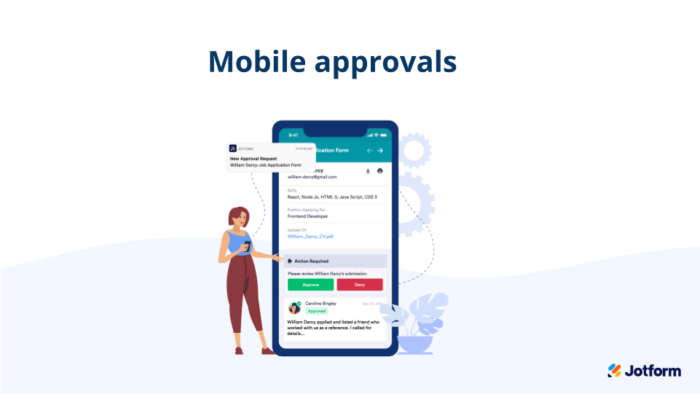
You’ll look for that dropdown menu at the top of the screen when you log into the app and navigate to approvals, and then you’ll see all of the approvals that you have available. For those who are approvers, this makes it so that they can make decisions on time, and on-the-go.
Jotform Mobile Forms for Approvers
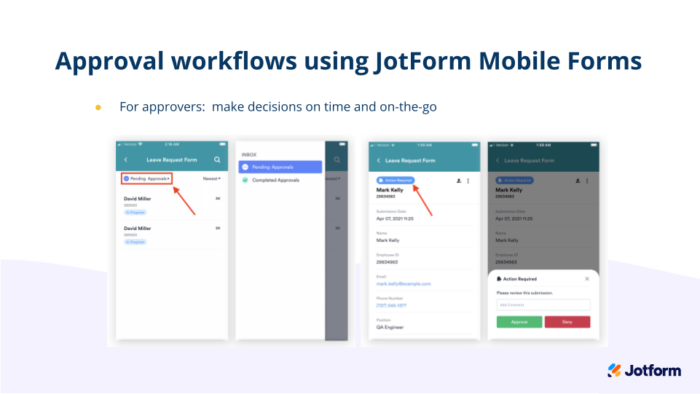
[2:54]
Even the most time sensitive approvals can be done using the app. They’ll see their pending approvals, waiting for them, as well as all of the information from the submission, and their options to act on that make their decision about whether to approve or deny, etc. So in that sense, it functions very similar to signing into their accounts on their computer.
Jotform Approvals Demo
[3:19]
That is really the key takeaway about the app that I want to mention at this point. So again that’s just that you can use the app to manage your approval flows, and I’m going to go out into our demo for the rest of today’s session. So, a quick refresher or quick introduction for those of you who might be brand new to approvals: Approvals start with a form, and your approval flow will kick in when somebody submits to that form. You can add an approval flow in one of two ways. The first is to add it directly to one of your forms. So whether it’s a brand new form, or one that is like I have in place and want to add a flow to. All you need to do is go into settings and look for this approval flow section and click to create an approval flow here. Your other option on how to get started is back at your home screen to navigate to your Approvals tab. This is where you’ll get to do all things approvals so in addition to creating an approval by clicking this green button. If you’re an approver you’ll see any approvals assigned to you here, any active approval flows are in the center of the page. If you need to edit any of those you can do so by hovering and looking for the edit button. I’m going to click to create an approval to show you how you can get started.
Creating an Approval Flow
[4:49]
From the approval flow you have a few ways to get started. The first is a one-step approval – the middle one- in this case but the first I’m going to talk about is a one-step approval. This will automatically add in one level of approvals, with either approve or deny outcomes. You can continue to build on that; however you do need to use that as a starting point to create even the most complex flow, adding in levels of approvals, adding in as many outcomes as you need. When you’re starting with a form, this is your option on how to get started that you know you don’t have other options the system automatically adds in this one-step approval that again you can use as your starting point. You also have the option to choose a template. We have over 100 templates available, organized by category. So you can come in, find one that looks good for your purposes, and click to use flow. Your last option is to start from scratch, which gives you a blank canvas, and that’s what I’m going to use for the two examples that I’ll show today.
I would love to have been able to show you examples of all of the questions that I’ve gotten and, of course, for the sake of time, we can’t do that. But I’ve designed these two examples to meet the majority of the questions I’ve received, and to show off all of the different elements that are available. So, my hope is that you’ll see something in here that makes sense to you, as far as what you need to get started and you can take it forward from there. So for my first example here, I’m going to create a parallel approval process. Let’s say I am the HR manager for a company and our process is that when somebody requests time off. It comes both to me and their manager to approve, and both of us have to approve before that request can go through. The first thing I’m going to do is move this all the way over and I will make this my HR approval. So, that will be me and we’ll assume that all of the default settings for my approval are exactly what I need here. I’m not going to make any changes. For the managers, I’m going to use a conditional branch to tell the form, which manager to go to. So, on the form itself, you’ll see this manager field, which is a dropdown, and we have the three managers listed. So I’m going to set up the flow so that when somebody selects their manager, the form goes to their particular manager for approval.
Creating the Conditional Logic
[7:25]
There are three pieces that you need to add in that conditional logic for the flow. So, the first is to actually create the logic, which I’m going to do with the conditional branch. The second will be to add in the approval itself, which I’ll do momentarily and then the last piece is to connect the two so that the branch leads into the approval. So, this conditional branch piece is really sort of a waystation to get to the appropriate manager in this case and I’m going to open the settings to add in my branches. And see, I add a new branch, and for this I’m going to say if the manager is equal to and that’s one of my branches. The second branch is if the manager is equal to Michelle. And then the final branch will be if the manager is equal to Sharlene. You can create this logic based on really anything within the form so you can see when I go to the fields I can select any field that has contents. These two are just pieces of the form, they’re not actually fields that you can know that anybody is entering data into, but I can use any of these in the conditions depending on the field you’re selecting. For the manager, I had four options: either “empty”, “field”, “is equal to” or “is not equal to” but you can see for date I have a number of other statements as options as well to build my logic. So, really you can use this to create flows in any number of ways. And there’s no limit on how many of these conditional branches you can create.
So, I now have my branches in place. The next piece as I mentioned, is to actually add in the approval. I’m going to make sure that that’s on the same line as my HR approval so it’s clear. Visually speaking that these are happening at the same time. So, you can see all of the approvals are in the same space. So, these are happening simultaneously. They’re parallel approvals. In this case, I’m just going to change the label name to manager approval and I’m going to change the approver email address. I’m going to change the approver email address to ann@company.com. She’s our first manager. So, that has changed automatically. I can just duplicate and to create Michelle’s and all I need to do is edit the email address. Finally, same thing for Sharlene’s, so that each of our managers has their approval section here.
And I will just change this to Sharlene. So, now I have the logical statements, and I have the approvals, the last piece is to connect the two.
[10:13]
First, I’m going to make sure that my form is connected to the conditional branch. And then I’m going to say, in this case, that the first branch is if “manager is equal to Ann”. If that’s selected, then send it to Ann for approval. Second, if the manager is equal to Michelle, we want to send it to Michelle. And finally, if the manager is equal to Sharlene, we want to send this to Sharlene for approval. Now this is set up so that when somebody submits their time off, it goes directly to me, as well as directly to their manager by way of the conditional branch, showing the form, which manager to go to.
Using Merge Branches
[11:02]
Now again these approvals are happening simultaneously. Both of us should be approving independently. In this case, I’m going to use the “merge branches” elements to pull the flow forward. Once both parties have approved, and in your merge branches you have an option. You have two options to either wait for all branches to be complete, or wait for either brands to be complete. In this case, I want to make sure that both branches are completed before we’re sending any sort of notification to the employee that their time has been approved. I’m going to again use this as our way station to the next step. Then, I’m going to select “approve” here. And I will also connect all of these managers into the merge branches, so that when they approve and HR approves the next piece of the flow can kick in.
Ending Approval Flow
[11:50]
The last piece of this flow that I’m going to add will be an email going out to the employee that their time off has been approved. So, the “request approved”. And now that both of those branches are pulled together. I can send this request approved from there. The last piece would need it and the flow there. And so the flow will end with the email. And of course, if we have to reject for any reason. We can also connect that as well. Approvals have to come from both of us, rejections will come from either of us, either I as the HR person, or the manager can reject. Let’s say “we’re sorry for whatever reason we can’t accept your request”. We can edit the email itself. And then that as well will be the last step, if we’re rejecting. I would do the same thing for managers as well. I’m just not doing that now for the sake of time, but hopefully that makes sense. The flow in its entirety, is that somebody submits again it comes to me and the manager. If we both approve, the employee gets the request approved email. If either of us deny, they’ll get a sorry email, and the flow will end once that email goes out. So, this flow again shows a parallel approval process where two or more parties are approving at the same time. It also uses the conditional branch, which gives you options on how to send your flow forward in any number of ways.
If/Else Condition
[13:23]
For our next example, I am going to show an example of using the if/else condition, which is another conditional logic piece that you have available to you. The conditional branch again, makes it so that you can send your flow in any number of ways, based on any number of responses or types of response. The if/else condition is going to send your form through the process based on whether a single statement is true or false. So, it’s a little bit cleaner but it does have less functionality and less ability to do things with it but it is very nice if you have a true or false statement that you use. So in this case, I am going to pretend I am a camp counselor for a youth soccer camp. We serve kids six through twelfth grade, and I am the counselor for the sixth, seventh and eighth graders, and I have a colleague who manages the teams of the ninth through twelfth graders. So in this case, I am going to send the form through the flow based on the response to this grade field here.
The last example we use the dropdown. Here is just a free form text box or number box. So you can see again that you can build the logic, whichever logic you’re using on any of the fields within here. ınstead of immediately sending the form to both of us, in this case I’m going to first add in the if/else condition. So, same as the conditional branch, the three pieces are to create the condition, create the approval, and then to build the connecting piece. So again, in this case, this section is where we would define what the condition is. I’m going to say if the grade is less than the value, nine. So that means that, six, seven and eight, will go one way and nine through twelve will go the other way, we’ll save that. Next, I can add in my approvals. So first, this will be me, youth counselor approval, and I am going to edit my outcomes here. Again, these can be edited, you can add as many outcomes as you need as well so we’ll have “to enroll”, and “not enroll”. Hopefully we don’t have to turn too many kids away from summer camp but in the event that we have to, there is that option as well. Again I’m just going to duplicate this for my colleague, the teen counselor. The settings will be the same. I’ll change this to teen counselor approval, and I’m going to update this to be her email address, teencounselor@camp.com. Now I can use this statement to send the form to the appropriate approver. I’ll say if the statement grade is less than nine is true, it’s going to come to me and if grade less than nine is false, it will go to my colleague here.
Parallel Approval
[16:37]
Again in this case, I’m going to use the “merge branches” piece to move the flow forward, if both of us approve. If either of us approved a student for enrollment in camp, the same email is going to go out to everyone who’s being enrolled. So, we’ll have to send an email here and this will be “Welcome to Camp”. This piece will connect to that over a little bit. I will connect both of our “enroll” options to that again to the “merge branches” piece to move it forward. And in this case we’ll change the branch so that if any branch is completed, it will move forward. Also I’ll add in “do not enroll” so that if we have to decline any students, they will get an email as well. So “do not enroll” and again I’ll just duplicate that and drag it over. So that’s my colleague, as his email in place or her email in place. There we go, the flow is pretty much complete, the last piece again is to just end the flow so that it’s clear that the flow and once that email has gone out, whether it’s a rejection email or an enrollment email. The enrollment email as well I mentioned, emails can be edited in their entirety. If you want to direct people to your camp website for more information you can use this space to add in that link. If you want to send people to a second job form where they could complete, final agreement approval to enroll a student whatever consent forms, as well as accept payment for example you could direct them to the other form. And if you wanted to include anything like first day of camp information on where to drop your students off or camp schedule or anything you need for parents to know for camp, you can upload files here as well. Let’s say we actually need a second level of approval so once either I or my colleague have approved, we really need to go to the camp director for final approval. It’s very easy to make that change or that addition, and you can see I’ve just kind of drag and drop to move those down. I’m going to do the same thing, drag and drop approval. You can see as I start to drag these plus signs show up as places where I can automatically and this where it will, or where I can have this will automatically incorporate into the flow. So, once I get that in the right spot, rather than the merge going directly to the “welcome”, the merge is going to the camp director for approval. When the camp director decides to approve an applicant, then they’ll get that “Welcome to Camp” email.
Sequential Approvals
[19:34]
So in the last example, I showed a parallel approval, in this case we have a sequential approval where once I or my colleague approve it’s going immediately to the next level of approvals. We’ve got a number of questions like “do you have to send an email as the end result for approvals?” and it really depends on your flow. So in this case, it doesn’t make sense to have that email go out until the very final approval. If you’re doing something like a job application where you need to be in contact with the submitter throughout the process, then you might want separate approvals, separate emails to go out along the way. But again here just to go through the flow in its entirety. Registration comes in, the condition tells it which of us to go to. If either of us enroll, if I enroll one of my youth or if my colleague enrolls one of their teens, the merge branch pulls it together to go to the camp director for approval, and once the camp director approves “the Welcome to Camp” email goes out. If we have to decline for any reason, they’re getting the “we are sorry” email, I can also add one of those into the camp director, and again the flow ends once those emails have gone out, in this case.
Those are the two examples that I wanted to show. I know that I can’t go into further detail and build the exact things that you’re all looking for but my hope was showing you all of the elements and how you use them, as well as giving you examples of parallel and sequential approvals will give you a sense on how you might get started with building your flow.
Advance Approval Properties
[21:13]
The last piece that I want to show here is the advanced options for approvers, and I’m going to use my approval here for that. So I’m going to go into advanced properties here. I did talk about some of these briefly in the last webinar, like allowing comments. I think that’s pretty straightforward. The four last options here, I’m jumping around a little bit on this menu but the last four options are things that you can do, if the approver is not approving in a timely manner. So you as the approval flow owner will be the person to set these, you can escalate a task, expire, automatically finish the task and send reminder emails. For each of these, you’ll be asked to define the time period at which that should happen. You can see it escalate after one or however many hours days, weeks or months or a custom date. And then you’ll also be asked to define what action should be taken when that time period elapses. For escalating a task, who are you sending it to instead. Maybe if I don’t approve in time we want to send it to the camp director for approval. Expiration date will just expire the task so there’s no additional action you just set the time period. Automatic finishing, you’ll need to decide how the task should be finished. For example if the camp is full and we have to launch into planning mode, and we don’t even have time to go in and do approvals at this point, we can set this to automatic finish with the outcome of “do not enroll”. So that the students who have come later or the parents who tried to register late are immediately getting the message that they’re not enrolled. We could even edit the email to say “sorry camp is full we’d love to see you next year”. The last option, send reminder emails again you’re defining when those should go out but you also have the option to edit that email. So that it’s very clear to your approver, what action needs to be taken.
Allow Reassign
[23:19]
The last two pieces here that I want to talk about are “allow reassign” the very first item here, and “request more information”. I did talk about “allow reassign” in the last webinar, using a vacation as an example. I want to talk about it and share another example here because I think that this is another really good use case, this camp example. So again, if I’m handling the sixth, seventh and eighth graders, let’s say I have a fourteen year old eighth grader who’s come to camp the last two years. She’s really good. She’s been playing since, as long as she could walk, and it really doesn’t make sense for her to be in camp and learning with younger kids, we should play her up instead. If “allow reassign” is enabled, I could send this to the teen counselor. I can include a note saying, “hey, she’s actually a better fit for your group”, and then the team counselor would be the person to make the approval.
Request More Information
[24:14]
I think saving the best for last, or the most frequently asked question for last at least requests more information. I’ve gotten a number of questions about how you can incorporate this sort of piece into your flow if you need to get more information from the person who’s submitting. And this is exactly where you would do that. No action will be taken on the task, if you use the request for more information. So if this is enabled, what your approvers will see is an option for them to request for information, which pops up an email that they can edit. The email has a very clear, resubmit or submit form link, edit form link. So that it’s very clear to the recipient, what action needs to be taken. The email can be edited to specify what additional information you need. In the meantime, rather than making a decision on the task like enroll or not enroll or even a decision like ask for more information. This just leaves the task in limbo, and no action is taken, until you have the information or your approver has the information they need, and then they can go in and make their decision from there.
Approver Options
[25:30]
The last piece here is that I’m going to show those approver options from the approver perspective. So first let’s pretend that I am the parent of a student named, Student Athlete. She is indeed an eighth grader who’s fourteen and we’ll assume that mom fills out all the information here, consents, etc., then submits the form. Now if you remember, I’m Morgan and the approver for the sixth, seventh and eighth graders, so this will come automatically to me. It will look like this. One thing I haven’t talked about in this webinar but did mention last time, you have the option about whether or not to require your approvers to log into JotForm. If you’re not requiring your approvers to log in, they can make their decision here in the email. If you are requiring approvers to log in, clicking either of these will take them to their Jotform account.
[26:34]
So, let me go back to my home screen. When I log into my accounts, I can then follow this little red dot trail to get to any pending approvals. So in this “assigned to me section” you can see that I have two approvals, waiting for me to approve, and I can hover over and click to view. And here’s our submission. If I have everything I need, I can make my decision about whether to enroll or not enroll right away. I can also use the reassign here that I just talked about. So if I want to send this over to my colleague, I can send it to teen counselor. I can again include a message “we know her, she’s really good, let’s include her with the older kids. All I need to do is reassign and it will go over to the teen counselor to approve or to not approve. In this case, enroll or do not enroll.
[27:24]
The last thing that I mentioned, the “request more information”. So your approvers will find that here. Clicking on that opens an email, again it’s a very clear edit form link, and again you can add it to the email. So you can include text that explains what additional information you need. if your approvers want to make sure that they’re reminded to come back, they can snooze and select the time period for snooze. Let’s say I think mom will get back to me in about three hours, I can see that this task moves from my pending approvals into my snooze approvals. Let’s assume it’s been updated at this point and now I can make my decision to enroll. That’s the entirety of the flow and again that’s what privacy is. So on that note, I am done with demos, and I am going to open up for a Q&A. We’re starting Q & A with a few questions that we’ve gotten in advance or gotten pretty frequently. So if one of these sounds similar to a question you’ve asked but not exactly. I’ve tried to summarize, so that we’re addressing as many questions as possible. So, David, I have a few questions for you to get started and then I will pull from the Q&A.

Q&A
[28:47]
The first question that we’ve gotten a lot, we did address in the last webinar, but I know that this is really important to a lot of people. Are you able to add an e-signature? I know that you can’t add it directly to the approval but David, could you talk more about the workaround for that?
[29:05]
David Wilson: Sure. There’s an option in the approval emails or in any sort of step approval or step emails to include an edit submission link, which would allow for recalling the submission data into the form, and then you can do things like fill out additional fields, or add signatures to signature fields and make those sorts of updates. There’s also the ability to log into an account that is a part of that approval flow. If you log into the account, either via the inbox view or the tables view, you can make those sorts of updates directly in the data or use the edit submission function in either of those locations. To be able to edit the submission at signatures and do whatever else you need, and then move on to the approval or denial step or whatever actions you need to take.
[30:04]
Morgan: Great. I think we have a related question in the chat. Is it possible for the first approver to edit info in the form before passing it along to the next approver?
[30:16]
David: Yes. Same exact sort of scenario. You can either have that edit submission link, or adjust the date or edit the data directly in the table, and then that information. If those fields are included in the subsequent steps of the approval process that data would also be included in those approval or denial or whatever other action emails.
[30:42]
Morgan: Great, thank you. Is there a limit to the number of conditional branches that you can include? I know I talked briefly about that but, do you want to share a little bit more about that?
[30:55]
David: Sure, so there is no hard limit that I’m aware of. I’m sure, if someone went really crazy and tried to add 1000 sort of conditional steps or something like that, there might be a soft limit somewhere, but the space for creating the approvals and spreading everything out, will expand essentially indefinitely. So, there is no hard limit for the number that you can add. But again, I’m sure that somewhere along the process either memory would run out or it would be too complex for the browser to handle, but again no soft limit, or no hard limit rather.
[31:38]
Morgan: Yes. I know we’ve gotten a number of questions, it’s like, I have 100 managers. Yes exactly you can do that. I think another limitation might be the amount of time that it would take you to set that up to. So you know if that really makes sense for you to use this workflow and set up conditional branches, you absolutely can go for that. Just as David mentioned, no hard limits on how many approvals or branches that you can put.
[32:06]
David: A quick side note on that, it might be best if you have that many sort of managers or something to do a bit more conditional logic in the form itself, and then map those approvals to a form field, rather than to a specific address. So like if they select their manager in the form from a list of 100 managers, and then that updates an email field in the form with the manager’s email address. It might be easier to then pull that email address instead of having 100 different conditional approvals in the approval flow, having a small condition in the form itself.
[32:49]
Morgan: Great, thank you. One of the questions from the chat. I have two approvers and I want something to be approved if either one of them approves the request cannot be supported.
[33:02]
David: Yes, I believe you actually showed that in your demo that sort of, if this person approves or if either of these people approve, then it moves onto the next step. Yes, definitely possible.
[33:02]
Morgan: Yes and that merge branches piece, there are the two options there to either require that both branches are approved or make it so that either branch is approved. If you’re using that “either branch”, it will expire the branch that isn’t the one approving, if that makes sense. So, you might think about using the merge branches as part of that workflow as well. Let’s see. Can you add multiple workflows to one form or can you combine multiple forms into one workflow?
[33:02]
David: No, it’s one sort of overall flow performed, and multiple forms can’t be used in the same flow. You can reference a separate form in the emails that are sent. So if you wanted to put a link to a separate form or something like that, as a part of the flow, you can have them fill out another form. But it wouldn’t be possible for that, for the flow in that specific form to reference any content or any actions performed in the separate form.
[34:24]
Morgan: Yes, I mentioned that briefly earlier as well. So again that email that goes out, once you have made your decision. That is entirely flexible you can create, you know add whatever you need to for that so if you want to use that as a space to send somebody to the next level of forms that you’re using. You can do that. There is another question from the chat. Can you set up a flow so that each approver can accept or deny even if an earlier approver had denied.
[34:49]
David: No. I mean you could have another step, so that if it did not, it’s denied. Then it goes to another approver. I believe that’s what they’re looking for.
[35:16]
Morgan: Yes, I think that makes sense. I don’t think I have anything to add to that one, but I’d be happy to test it out and see how it goes. It is another question from the chat. Where can I create reports and view activity logs related to my approval workflows?
[35:38]
David: The activity logs would be available from the inbox view, or the tables view for the form. I haven’t checked if they’re exportable quite yet, but any sort of approvals or denials or any actions would be listed in either of those two views, and the full history would be available. So if Morgan approved something, it would say approved as the action and then Morgan as the person who did it.
[36:07]
Morgan: Yes, I did check this out the other day and currently. When you go to print those do not show up but yes, so you may have noticed that when I did my approval at the very end of the demo, very briefly on the screen. There was the approval itself showing a box at the bottom. That was the activity log for that saying that I approved. So, any actions that are taken on your approval will show up as an activity log at the bottom there so if you’re requesting more information, it will show up there. If the person you’re requesting more information from edits the form or anyone edits the form that will all show up there as well and so if you do need to print that I think maybe the best option currently would be to do a screenshot of that entire page.
[36:55]
David: Just a side note on that one though, I believe we do have it in the works to make the approval steps in history and actions available to integrations. When that becomes available, like if you have a Google Doc Spreadsheet integration for example, the approval, actions and steps and everything, aren’t currently populated into the sheet. But I believe in the near future we will have the ability to have that specific data sent over via integrations, and then it should also be included in data exports as well.
[37:35]
Morgan: Great, good to hear it. There’s another sort of related question that asks if there are multiple approvers will be able to see comments from the previous approver. Yes, so along those same lines, you would see comments that any approver leaves as part of the activity log for that approval as well. So I just wanted to quickly address that one. I got a number of questions prior to the webinar today about using approvals to have customers approve something. So one of the examples was they’re a design firm and they need customers to sign off on a design. So, David, could you talk a little bit more about how that might work.
[38:24]
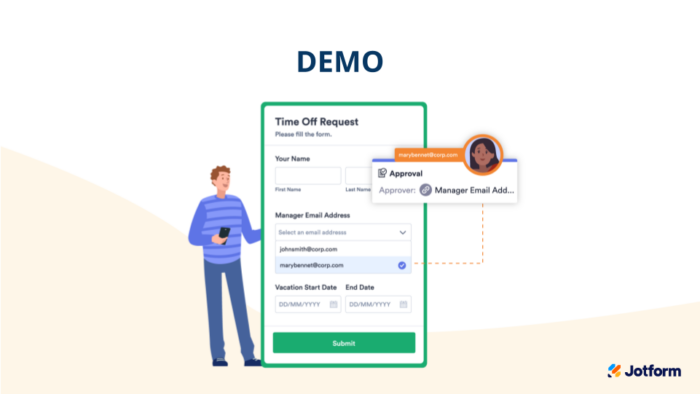
David: Sure, so rather than mapping the approval step or the step in the process to a specific email address, those can be mapped to a form field. And so you could have similar autoresponder emails get sent out to the address entered in the form. Those approval emails can also get sent out to an address entered in the form. So, you just have a field where they can enter their address or their email address, and then you’d map that field, as the field or as the recipient for that approval step.
[38:59]
Morgan: Yes, great, thank you. I know I’ve talked to a few people about that already. But if you do have questions along those lines. I have screenshots ready to go if you want to email me, I’d be happy to share those. Somebody asked me if the camp approval will be added to templates. The two examples that I showed were both templates that we have available in forms, so the form templates are in there. I made some very minor changes to those so if you want to use those forms you can. The approvals, themselves, not specifically I created those from scratch, but this webinar will be sent out after we should have it up on our website. You’ll get an email with a link to the webinar sometime next week. So I would recommend just kind of relaunching or scrolling forward to that section and just kind of duplicating what you see. There may be something in the approval templates that’s similar. So you might also want to just go into there and look for registration templates for approvals as well.
Just trying to work through it one other question that I’ve gotten pretty frequently is, whether again rather than sending out an email as the final step of the process for the person who is submitted if you can send them directly to a website or JotForm. I think we’ve talked about this a little bit but just to clarify and reiterate that email space is a great place to add whatever you want and you can entirely edit it to do whatever you want it to do. So, you would still send the email but the email can directly send that person to a website, or another Jotform, or whatever the case may be. It’s a little hard to talk and read Q&A at the same time so I’m trying to get through as many of these as I can. Another question David: Can two or more people collaborate on the same approval in the builder?
[41:23]
David: I don’t believe so. On enterprise, there’s the ability to have a form shared in between accounts, which would allow for multiple people to not only work on the form but to work on the approval process. But for our standard accounts, it’s supposed to be one person per account. So there isn’t a sort of collaboration feature for the approval flows.
[41:50]
Morgan: Great. Thank you. Let’s do one or two more questions. Can we send the final decision to a printer to print out?
[42:12]
David: The email could be printed, but there isn’t an option to like directly have the decisions sent over a network to the printer. Instead, it would just need to be printed out via the email that is sent.
[42:27]
Morgan: All right, so the last question here, and again I apologize if we didn’t get to your question, I’m trying to read through and talk and listen to David’s responses at the same time. I will try to follow up with anybody that we missed, and you’re always welcome to email me morgan@jotform.com with additional questions. One final question: If so, using like the example of sending a payment after approving camp, if we’re sending somebody to a new form after they’ve been approved and we want that form to be the place where we accept payment is there a way to automatically have the form include what that payment amount should be so the second form that they would go to?
[43:25]
David: I believe so, but I haven’t tested that yet. There’s the ability to pass data from one form to another order, pre-populate form fields using URL parameters. So with a fixed amount, yes, you just have a customized link to the second form with a parameter that has a field being prefilled with the amount and then that amount gets passed into the payment field for payment. But I haven’t checked to see if you could use a field ID, and have that field ID referenced in that final email. So it could be possible with very variable amounts, it’s definitely possible with specific values.
[44:08]
Morgan: Great, thanks. All right, so at this point I’m going to wrap up. I’ll try to respond to you individually if I missed any of these questions. You’re welcome to email me morgan@jotform.com if you have any questions or comments. This webinar will be available on jotform.com/webinars/. You should receive an email with a link to this recording. We will also include links to other related resources such as the earlier webinar that I mentioned the last day introducing Jotform Approvals, as well as a couple of different blogs that we’ve written. And hopefully that helps you learn everything you need to know about using approvals. Thank you all for being here today, and we’ll see you at the next webinar, bye.


Send Comment:
1 Comments:
More than a year ago
How will work start