The first thing you’ll need to do is identify how many payment methods you would like to use. In this example, we’ll have two payment methods, PayPal Standard and Purchase Order.
In our case, we will have a total of three forms:
- Main Form – the primary form that will house the two forms.
- PayPal Standard Form – will be the first payment method.
- Purchase Order Form – will be the second payment method.

Step 1: Build the First Form
- Go to your Form Builder and add a Single Choice element and label it as “Payment Method”.
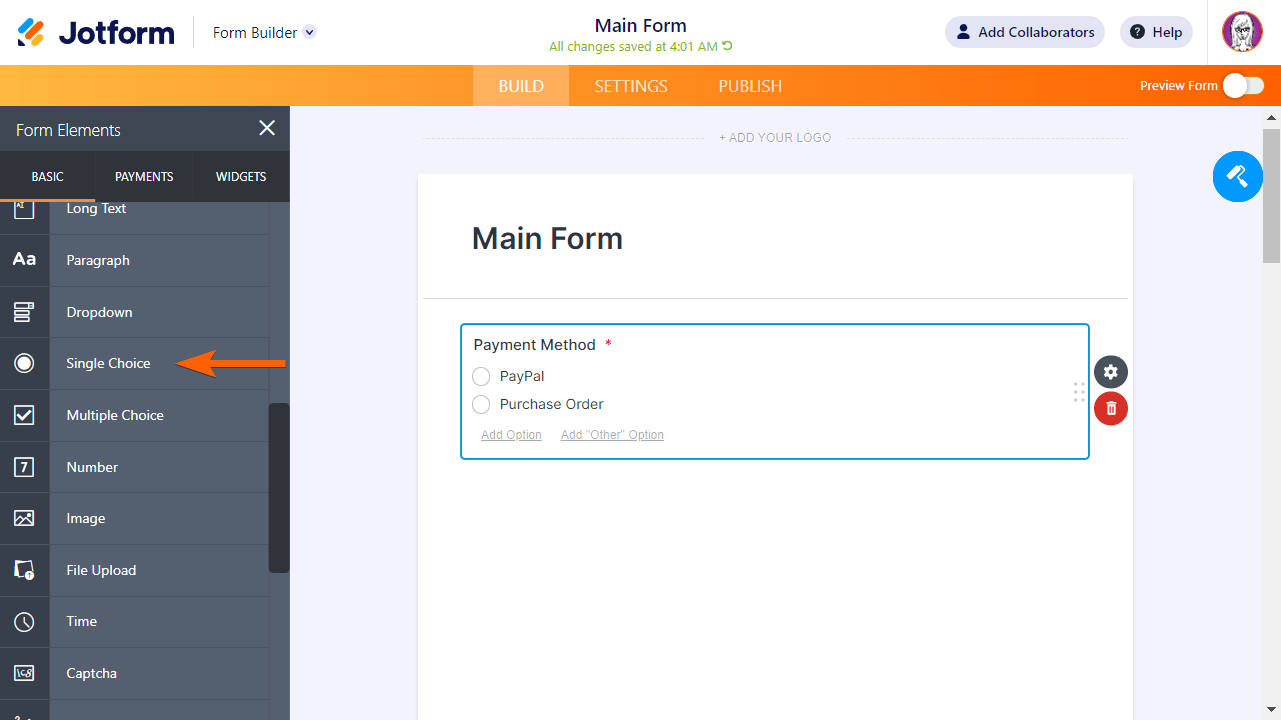
This will serve as the option for the users to choose what payment method they prefer. You could use other fields, although we only want users to choose one type of payment method, so you can choose either a radio button or a dropdown.
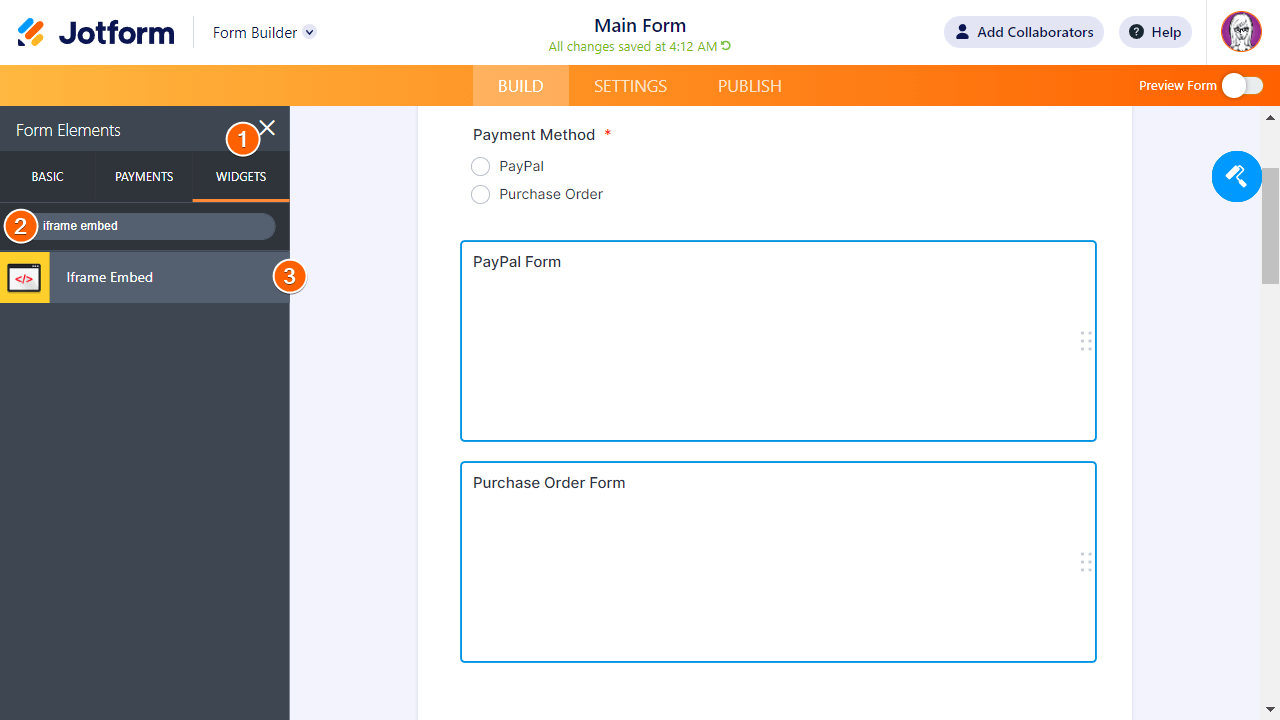
- We will then add two iFrame Embed widgets where the payment forms PayPal Standard Form and Purchase Order Form will be embedded or loaded.
We will leave the main form with that for now.
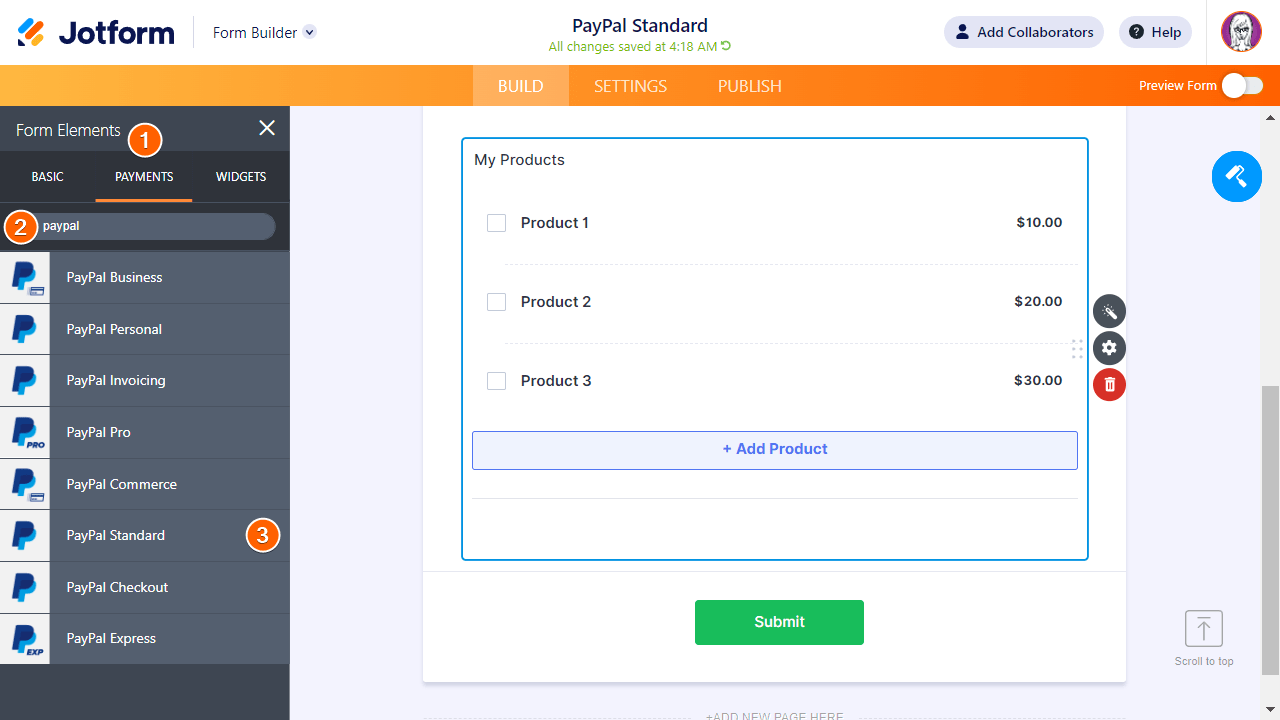
Step 2: Set Up the First Payment Form (PayPal Standard)
We’ll create a new form and set up a PayPal Standard payment gateway. Under the Payments tab, choose PayPal Standard and add it to your form.
To learn more about setting up the payment integrations, you can start with these guides:
Step 3: Set Up the Second Payment Form (Purchase Order)
Just like step two, we will create another payment form. This time we will use Purchase Order as the payment gateway.
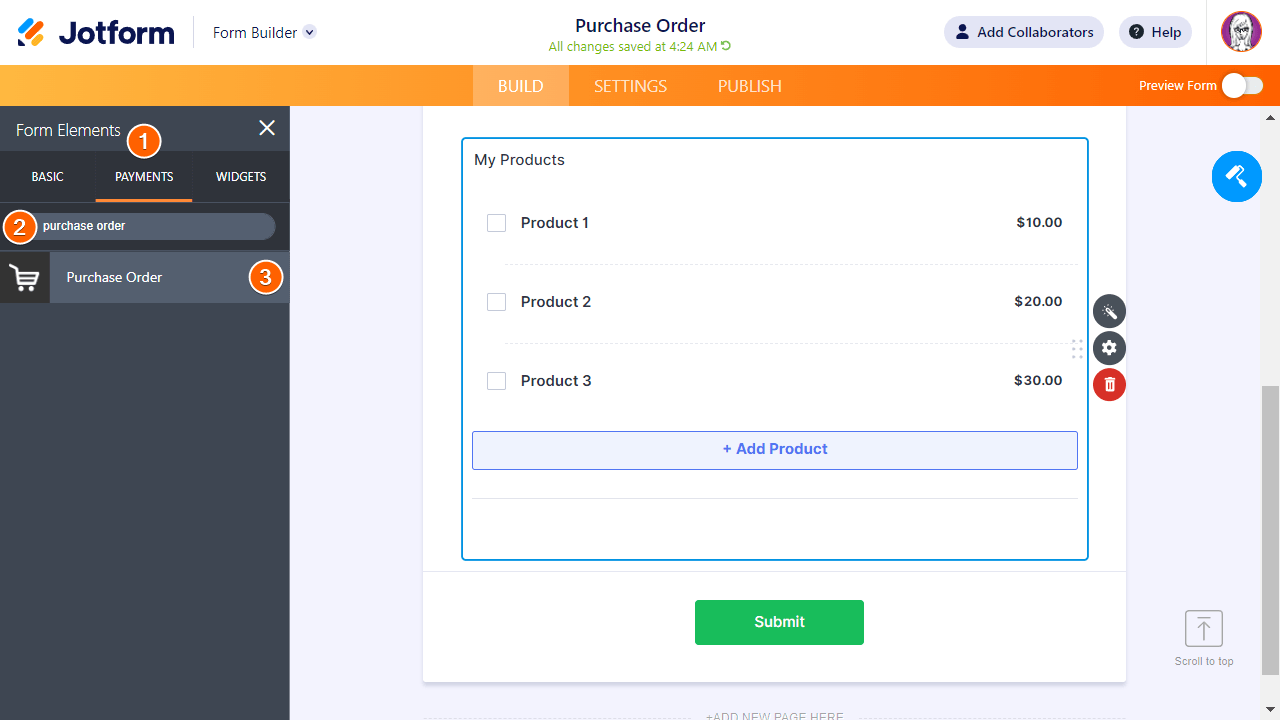
The Purchase Order payment gateway is not integrated with any third party payment services. This is usually used if you want your users to pay via wire transfer or deposit in your bank account. You can use a Paragraph element to instruct the users where to send the payments.
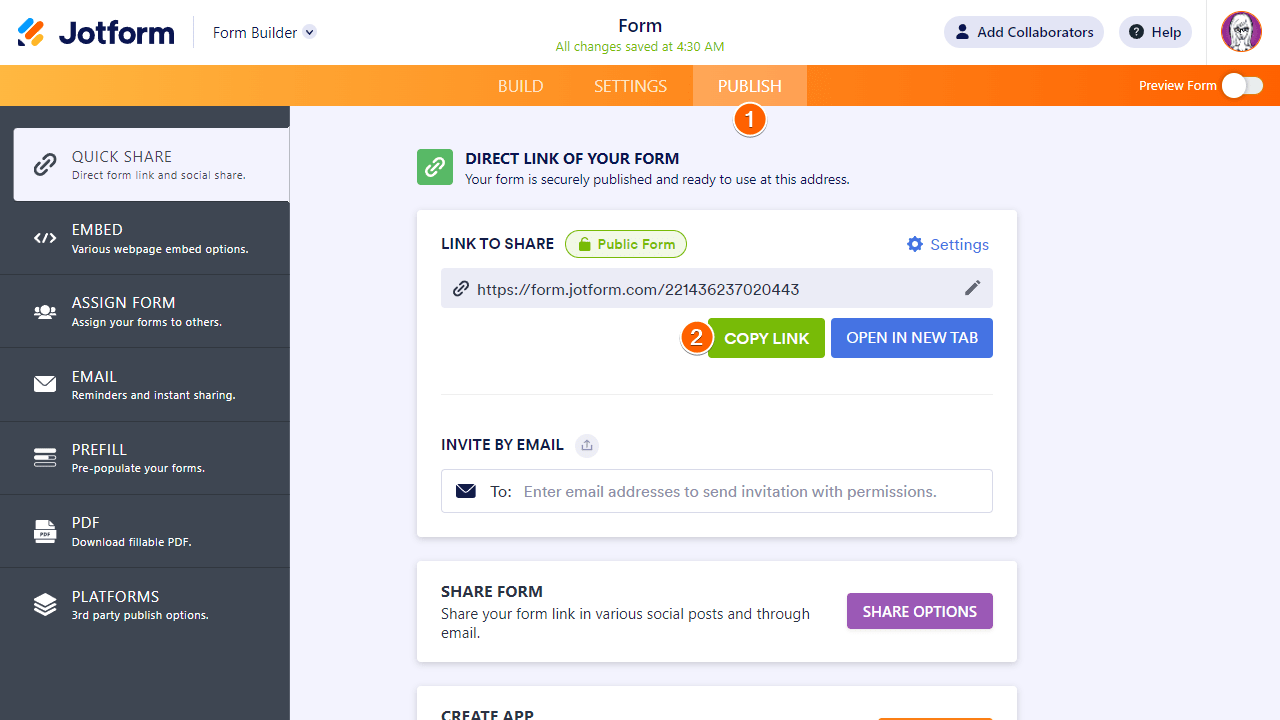
Step 4: Get the URL of the Payment Forms
The form URL can be found in the Form Builder’s Publish tab.
Step 5: Embed the Payment Forms in the Main Form
Now go back to the main form and set the URLs for each of the iFrame Embed widgets.
- Open the Widget Settings panel by clicking on the widget’s wand icon.
- Paste the PayPal Standard Form’s URL in the Frame URL field.
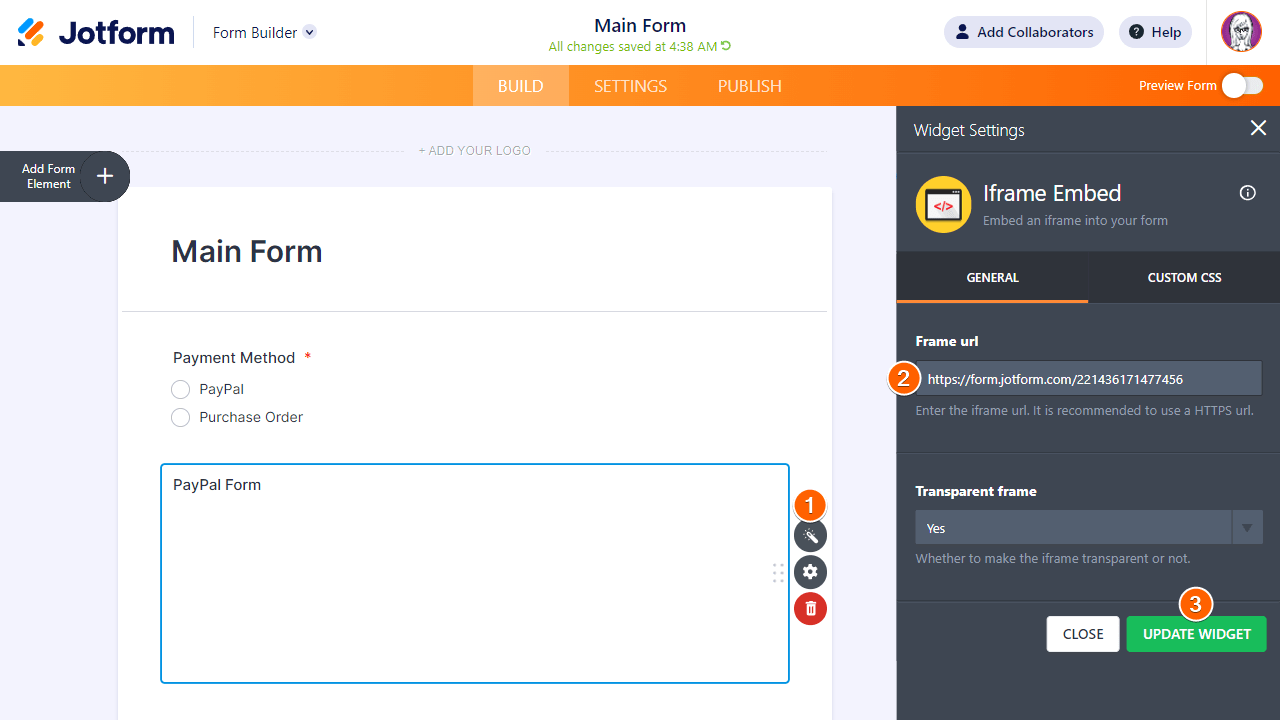
- Do the same on the other widget for the Purchase Order Form.
Step 6: Set Up the Conditions
We only want to display the payment form depending on the choice the user made on the radio button. To do that, we will use the Show/Hide Field condition. If you need to dive deeper into this topic, here’s a guide on “How to Show or Hide Fields Based on User’s Answer”.
- Click Settings at the top then Conditions on the left. Here, you can create a Show/Hide Field condition.
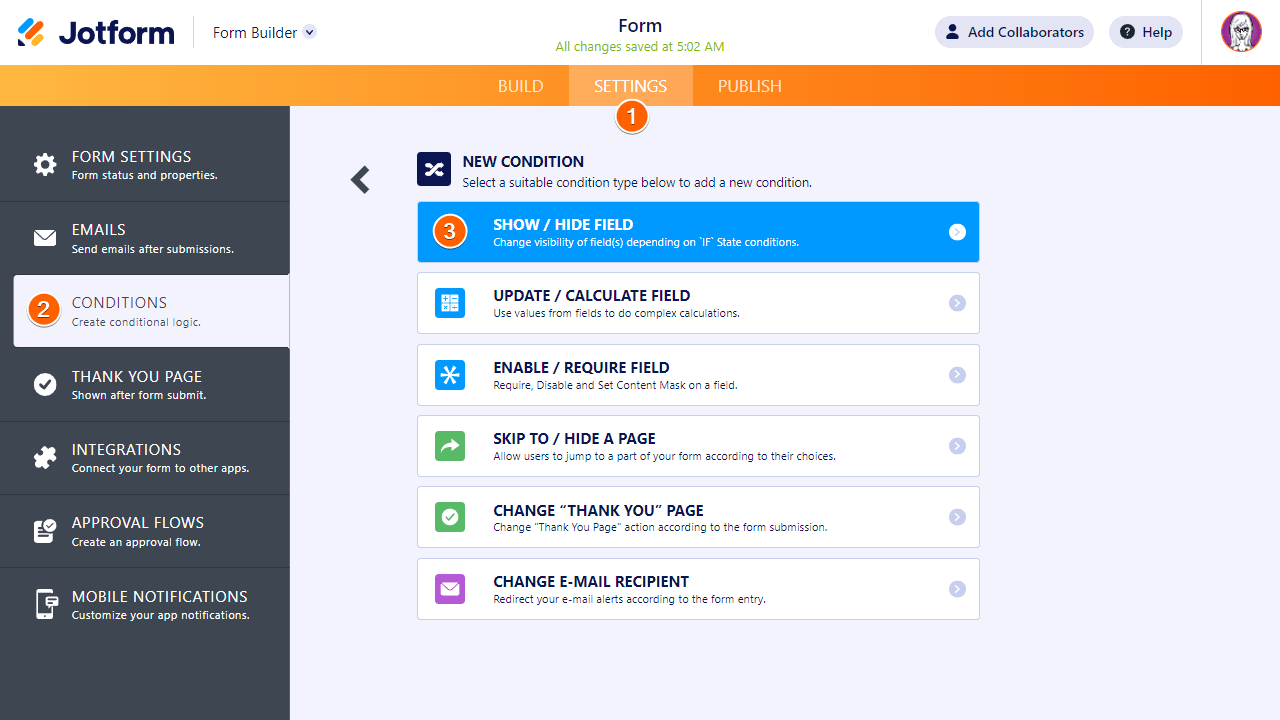
- Now create two conditions that will show the specific Iframe Embed widget based on the selected payment method:
- If the Payment Method is equal to “PayPal”, then show the PayPal Form iFrame.
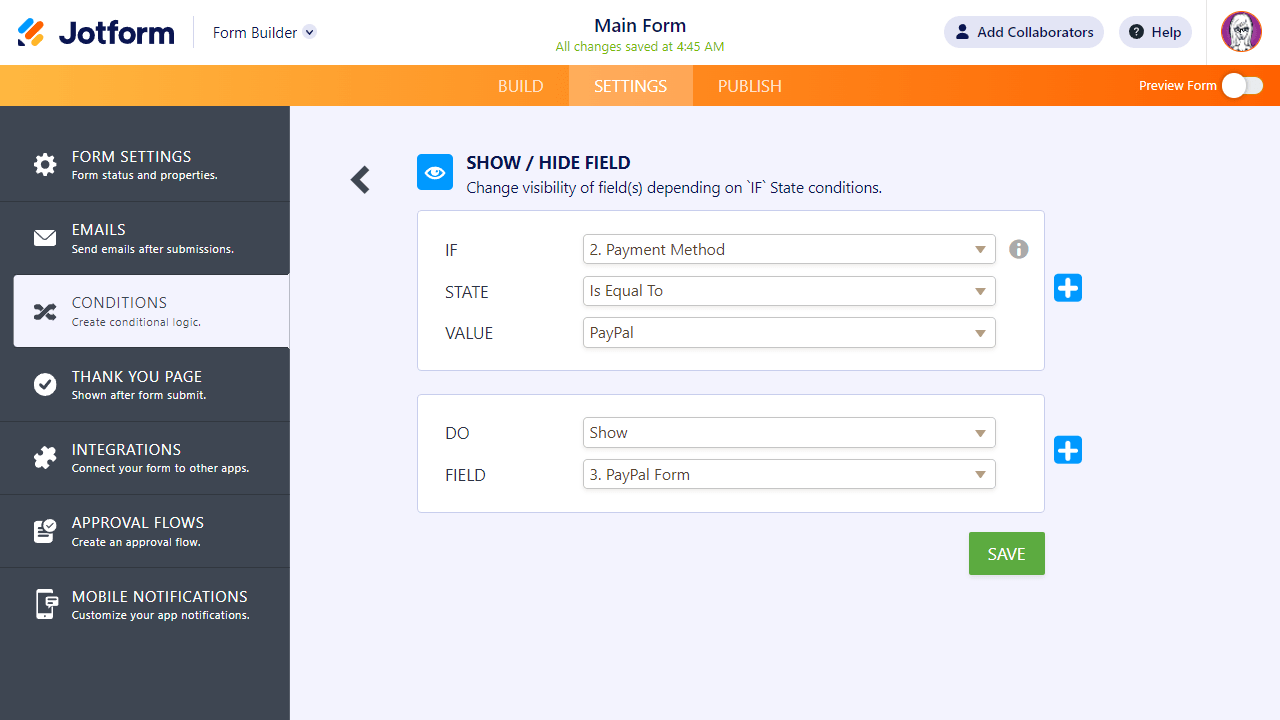
- If the Payment Method is equal to “Purchase Order”, then show the Purchase Order Form iFrame.

You now have forms that allow you to have multiple payment options.
Note
Make sure to remove the submit button from your main form. The users will submit the entries from one of the payment forms.
You can see how my main form works on this form link: https://www.jotform.com/213133454169958
For a more complex form, you can read this user guide on how to update a multiple payment form using the multiple payment form from the Form Gallery: How to Update the Multiple Payment Form
Another alternative option is to redirect users to a different form URL based on the selected payment method. Here’s a guide on how to “Change the Thank You Page URL Based on a Condition”.

Send Comment:
59 Comments:
282 days ago
I wish I could have
debit/credit
cashapp
applepay
zelle
paypal
or at least the first 3
283 days ago
I echo the comments of all of those before me. This is a workaround, and not a solution. It is complex, unwieldy, and time-consuming. Please build-in native integration for multiple payment solutions.
285 days ago
It would be really helpful if you built a feature for this instead of this workaround. Please consider the requests from your loyal customers.
331 days ago
While the workaround does work, it requires changing products and prices in several forms. This is the single reason I consider switching to another product, and as everyone else in the comments am at a loss as to why no priority is given to fixing this.
338 days ago
Really? I spend a lot of money for Jotform and I can't accept in the same form: Stripe and Paypal? 2025? AI revolution? No Comment!
348 days ago
Still no proper workaround? Two or more payment methods in the same form? It's 2025 guys, c'mon
More than a year ago
2 years later & they haven't fixed this issue...
More than a year ago
Thank you So MUCH!
More than a year ago
S'il vous plaît envoyer moi les liens pour inscrire
More than a year ago
OK, still hoping to find a way to avoid dealing with 3 forms for the same list of ever-changing products that I need to duplicate. Would it be possible to bypass the Stripe payment with some sort of conditional logic? E.g. user selects products to buy, but decides not to pay with credit card, but rather using direct transfer. Total is calculated, but rather than the credit card mask, radio buttons are offering payment options. If credit card is selected, Stripe mask pops up, if not, banking details appear. In both cases, forms gets submitted. Can this solution be realised? Is there any solution that affords payment choice between Stripe and direct transfer without needing to fork into separate forms with duplicate product lists?
More than a year ago
Hello, while this does work, it requires me to make changes for products in two separate forms, which is quite time-consuming, and prone to mistakes. Are you working on a solution for one form-two payment options, please?
More than a year ago
I did exactly this, but it did not work. My two payment methods were Credit Card(Stripe) and Bank Transfer details (not an app)...
More than a year ago
What about the submissions ?
Are they stored all in the same Table (the one for the main form) ? or in two differents table, one for paypal and the other for Purchase order ?
More than a year ago
OK, so, basically if I want to give folks different payment options AND I want to collect information about them through input fields, I have to copy the fields into both the second and third forms and collect the data there?
If so, then that means that I have to ask them at the beginning which payment option they would prefer before they fill out any other information. Honestly, that's a terrible user experience. I just paid for a subscription to jotform so I could sell tickets to my event. But I'm realizing now that that was a mistake and I'll be requesting a refund.
With that said, Jotform is great if you don't need to accept multiple payment options.
More than a year ago
Some of your solutions just don't work for me. I want people to either pay, mail it in, venmo me, or pay at the door. We are flexible! First I followed the directions without multiple forms and of course that didn't work since I couldn't have multiple product lists. Then I followed the above and now am not able to retain the data entered on my master form. That is ridiculous. Or as mentioned below I could ask them their payment method as question number one and duplicate all the questions on two forms. That is a headache if maintenance is involved and also is just wierd from a user perspective. Haven't decided which way I will go but jotform you started out so promising and went down hill fast for me.
More than a year ago
Unfortunately the widget does not open. It only shows a very small portion of an image of the form
More than a year ago
How does the primary form close after one of the secondary forms has been submitted?
More than a year ago
Hi. What happens to the data inputted in the first form when the user submits payment in the 2nd (or 3rd) form?
I have email notifications set up for the first form - but as per your instructions here I will be removing the submit button from the main form, so will I still recieve an email containing the user submitted data from the FIRST FORM when the user submits payment?
More than a year ago
I've done all this. But when the form is submitted, the only thing I see is the embedded form chosen; not the completed order form with the embedded links? I need to see the complete order.
More than a year ago
Hi, this is great but I have an issue with conditions set on the underlying forms! they don't come up on the main form whilst filling, what can I do to fix that?
More than a year ago
Hello Jotform,
Are you ever going to provide a solution to at least let the main from pass all the details out to the 2nd forms in the iframe so when a payment has been made, an invoice with paper order details can be sent out to the buyer?
More than a year ago
What a silly work around described above here.
Never mind that we need 3 forms instead of 1 (tripling Jotform's profit and our expense), but asking the user to select payment method at the beginning is a terrible user experience.
You can see by the comments below how everyone is shaking their heads because such a simple feature is not offered. What is most frustrating is there could be an easy solution by JotForm.
You have various Payment Widgets that all act the same way. Then, you have the Purchase Order widget which acts exactly as a payment Widget, with respect to how it handles products and totally.
In order to facilitate a cash vs credit card option, you just have to create a widget like Purchase Order BUT, just let that render the final total. It merely acts as the product list and shopping cart.
Then, based on their choice of payment method, we can either send them instructions on how to pay (cash etc..) or assign the total to a proper payment widget to process a credit card.
Gotta up your game Jot. JotForms is awesome, mostly, but big fail here.
More than a year ago
Buongiorno, come faccio a fare un form con carta di credito e non paypal?
Come faccio a connettere il pagamento alla mia banca?
Grazie mille
Sara
More than a year ago
will the information filled in the PRIMARY FORM be submitted?
is there a way to transfer the information inserted to the TOTAL FIELD in the PRIMARY FORM to the TOTAL FIELD in the PAYMENT FORM?
More than a year ago
How do I remove the Submit button from your Main Form.
Thank you