Jotform’s Order Forms allow you to sell single or multiple items, collect subscriptions, or get donations online. Powered by the most secured payment gateways, accepting customer payments is easier and more convenient.
Using Jotform’s intuitive drag-and-drop Form Builder, you can set up your first order form in just a few minutes of your time.
Adding and Setting Up the Payment Element
For this example, we will use PayPal Personal to create the order form. However, this guide applies to all of our payment tools. There may be differences, but they are mostly related to connecting your account with the selected gateway. Let’s start!
- In the Form Builder, click the Add Form Element button.
- Go to the Payments tab.
- Search for PayPal Personal from the list and click it to add. You can also drag/drop it to the form.
- In the Payment Settings, you have some immediate settings. For PayPal Personal, you must set the following:
- PayPal Account — This will be your registered Email Address with PayPal.
- Currency — Select the currency based on the chosen gateway. PayPal Personal supports multiple currencies.
- Payment Type — Most payment gateways support selling products or subscriptions. It will also allow you to accept user-defined amounts and collect donations.
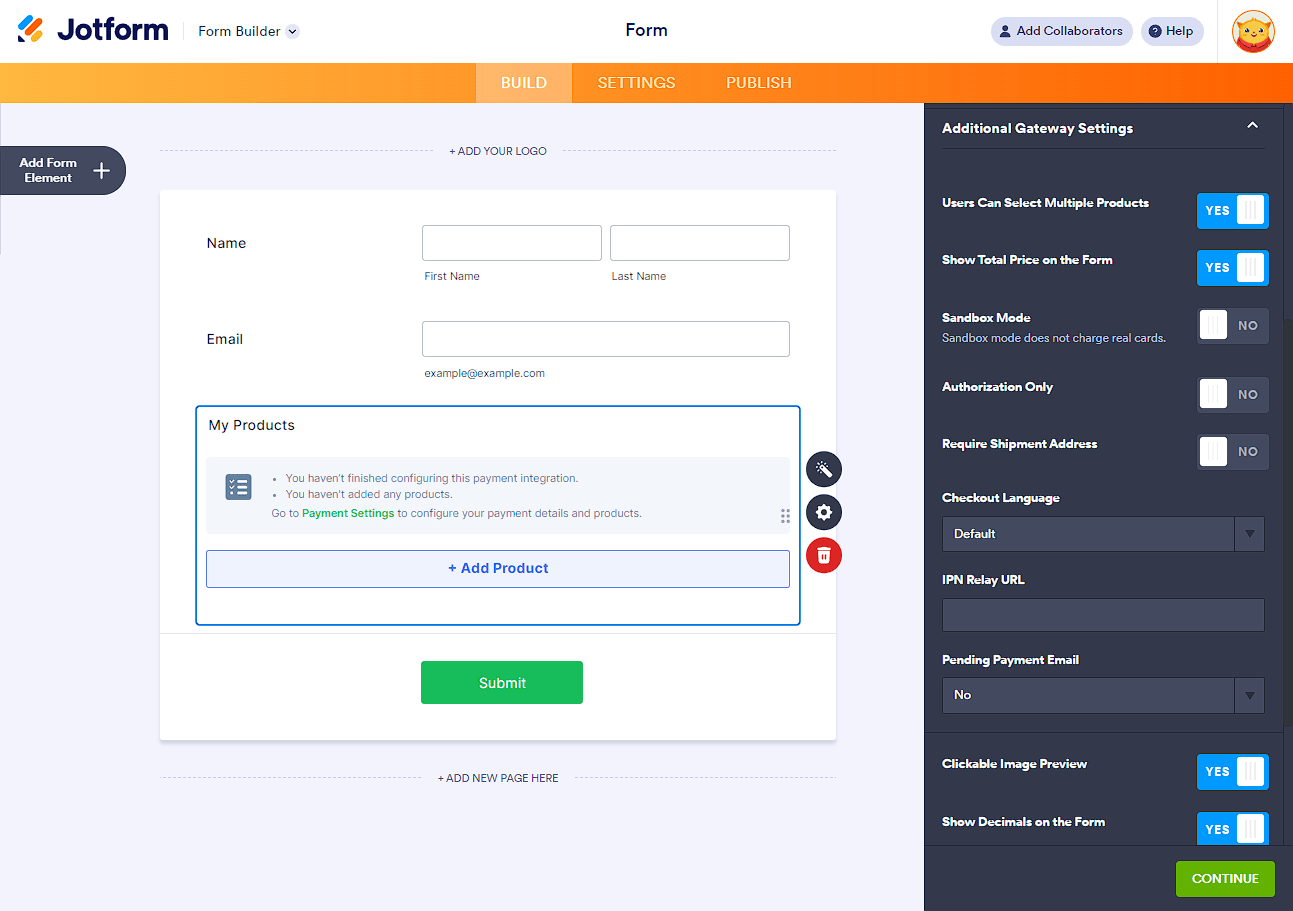
Optionally, expand the Additional Gateway Settings section to see and set up the additional settings for the payment getaway. You’ll see it like this:
With PayPal Personal, you’ll find the following options:
- Users Can Select Multiple Products — Select Yes if you want users to be able to select multiple products.
- Show Total Price on the Form — Select Yes to show the total amount in the form.
- Sandbox Mode — Select Yes to enable PayPal Sandbox. Visit How to Test your PayPal Payment Form to learn more.
- Authorization Only — Enable this option if you want to collect orders and charge customers at a later date. To learn more about this feature, check this guide: How to Enable Payment Authorization.
- Require Shipment Address — Toggle this if you’ll be shipping a product to the user or need an address for other purposes.
- Checkout Language — Select the language to use on your checkout page.
- IPN Relay URL — Allows you to send the IPN data from PayPal to your POST URL. For more information, please check the user guide: PayPal Incomplete Payments.
- Pending Payment Email — This option allows you to email customers who fail to submit their payment on time. Visit How to Set up an Incomplete Payment Notification Email for more details.
- Clickable Image Preview — Enable this option to open product images in a lightbox window.
- Use Decimals — Enabled by default. Select No if you don’t want to use decimals.
- Decimal Separator — You can choose to use decimal points or commas.
- Redirected PayPal Page Style — Enter your Page Style Name in this box. Please visit PayPal’s Custom Payment Pages to learn more about this.
- Checkout Logo — Upload your custom logo on the checkout page. The image you upload will replace your email address or merchant ID.
- Checkout Cart Color — Set a border color around the selected product items on the checkout page.
- Now, assuming you’ve chosen to sell products or subscriptions, click the Continue button to add your product/subscription items.
Adding and Setting up a Product Item
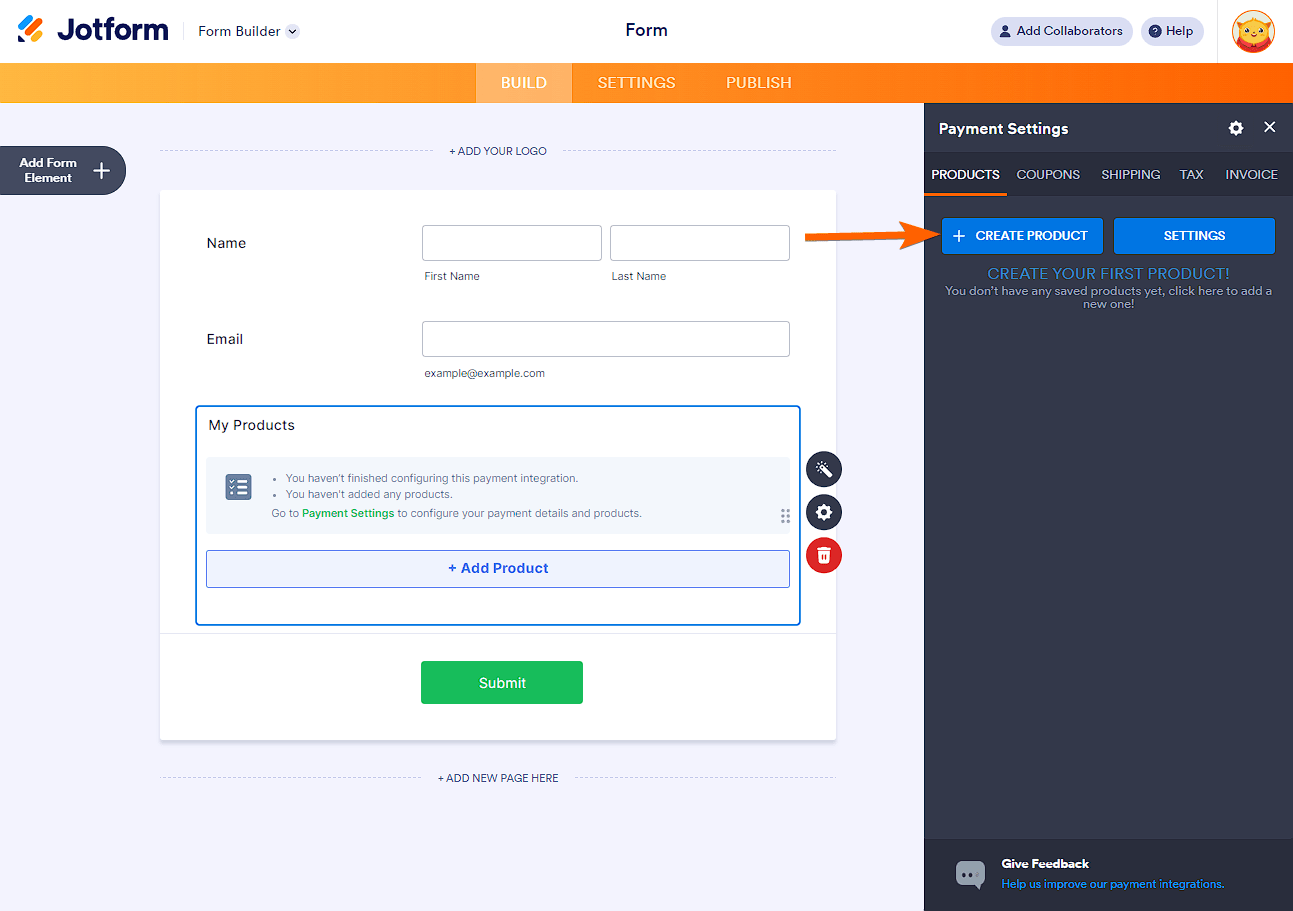
After setting up the payment settings, the Continue button will take you to the Products tab. Add and set up your product items as detailed below:
- Click the Create New Product button.
- Set up your product item accordingly. In the Basic tab, you’ll have to provide the following:
- Name
- Price & Currency
- Description
- Image — You can upload multiple product images.
- Auto Scale Images — Keep this enabled if your product images are not the same size. This option will automatically scale the images to display them correctly in the product image window.
- Required — Enabling this will make the product uncheckable, which will always make it part of the total order.
- Selected by Default — Enable this to select the product in the form by default. If the Required is not enabled, customers can uncheck the product item. If the Required option is enabled, this is automatically enabled, and you can’t toggle it.
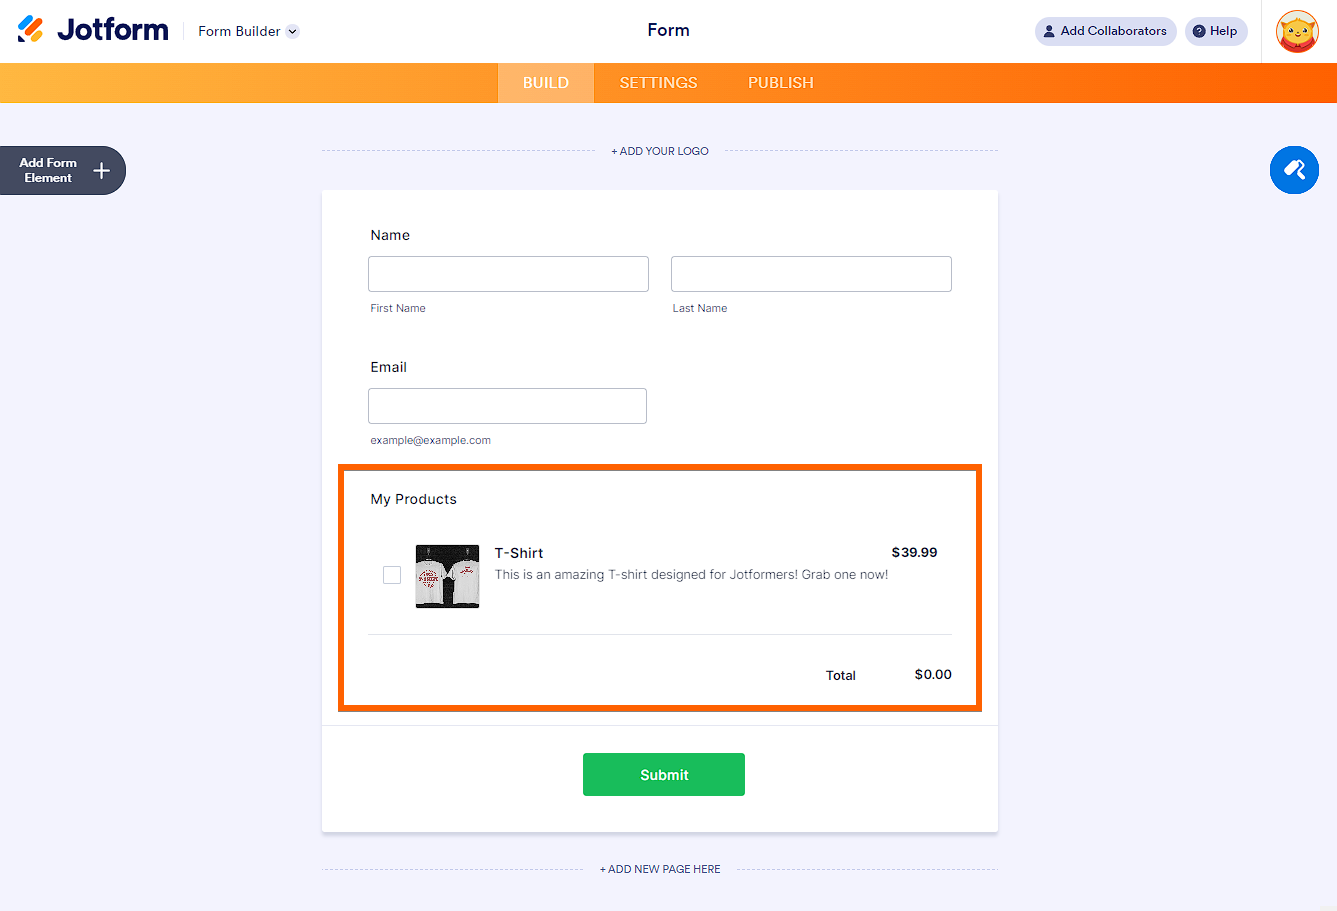
- Click the Save button at the bottom to save the product item. Here’s an example of a simple product setup:
Adding Quantity and Options to Your Products
If you’re selling a T-shirt, you can ask users to select a quantity, color, and size. To do this, you must add them through the Options tab of the Product Settings.
- On the Products tab, hover your mouse on the product you just added and click the Pencil icon to edit it.
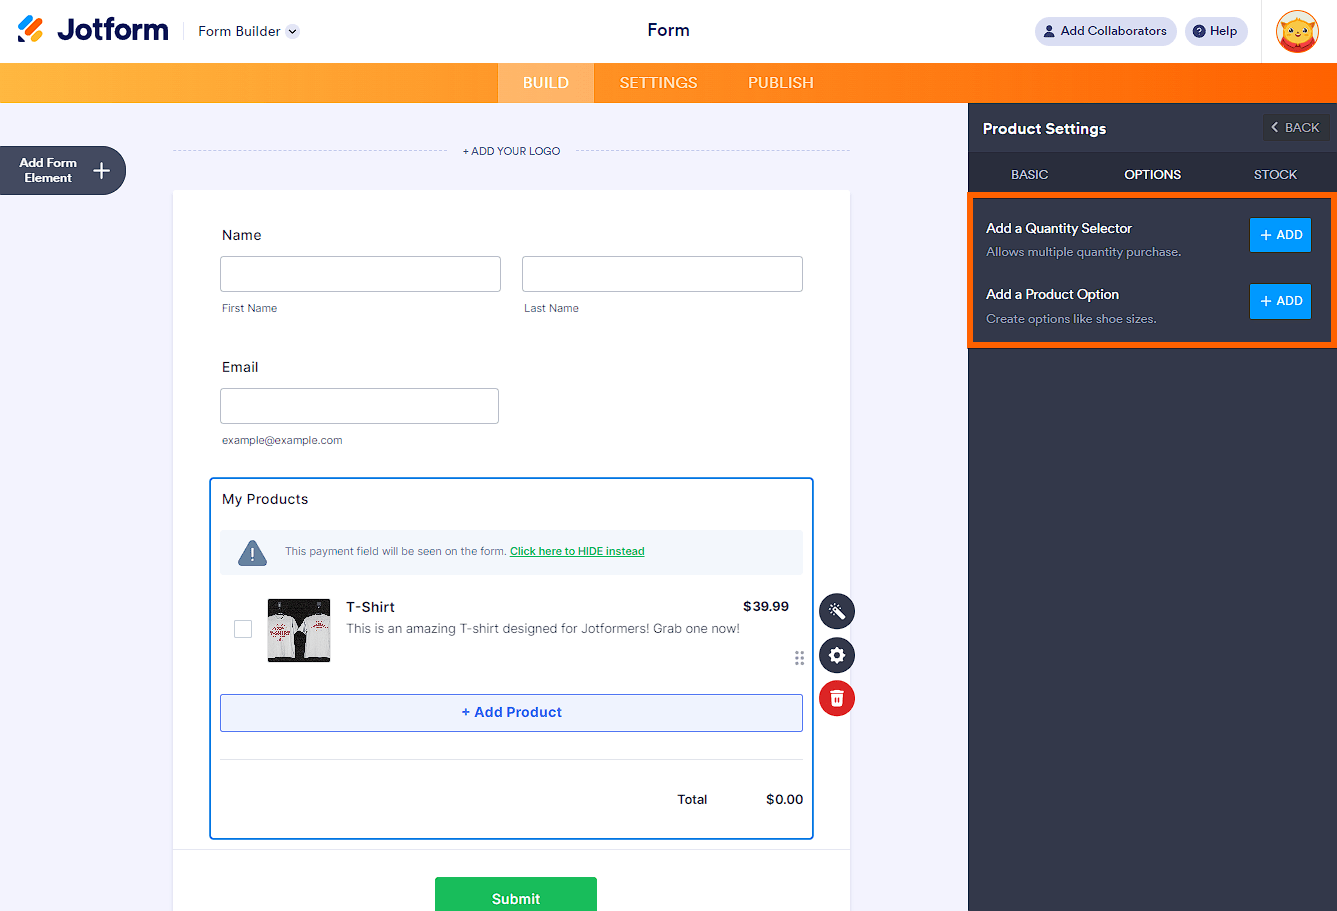
- Go to the Options tab. There, you’ll find two options:
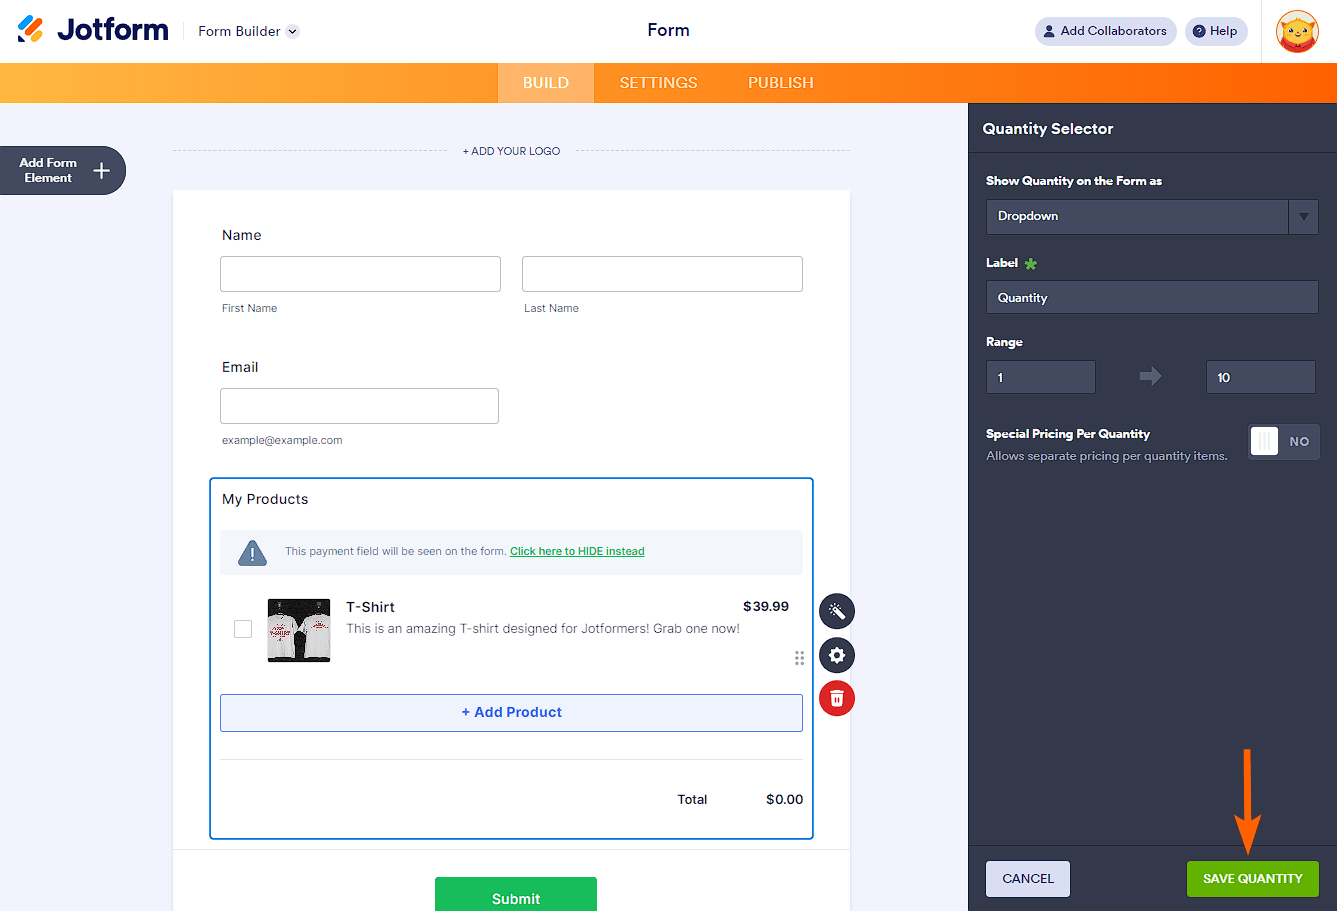
- Add a Quantity Selector — To add a quantity selector or input.
- Add a Product Option — Add product options such as Sizes, Colors, etc.
When adding a quantity, you can show it as a Dropdown or Textbox. Based on the chosen selector, you’ll find the following options
- Label — You can leave it as it says or set your own.
- Default Quantity — Shown when you select Textbox. Set 1 as the default or any default you want.
- Range — Shown when you select Dropdown as the selector. The first box is the minimum, and the second one is for the maximum quantity.
- Special Pricing Per Quantity — Enable this to offer fixed pricing based on the quantity. Visit How To Set Up the Special Pricing Option in the Payment Form for more details.
When adding a product option, you can set the following:
- Label — Set the label of the option you set.
- Create Sub Products from Options — Sub Product means the variation of the Options you’ve added. Please visit our user guide on how to Create Sub-Products Based on a Product Option for more details.
- Special Pricing Per Option — Set a different pricing for the options. Visit How to Set Up the Special Pricing Option in the Payment Form for more information.
- Populate Options from Presets — Jotform has a present for the Color, T-Shirt Size, Print Size, Screen Resolution, and Shoe Size. Select one to populate the options automatically.
See also: How to Add Options to Payment Forms.
Here’s an example of a product item with the quantity selector and product options with sub-products and special pricing:
Enabling Stock Control
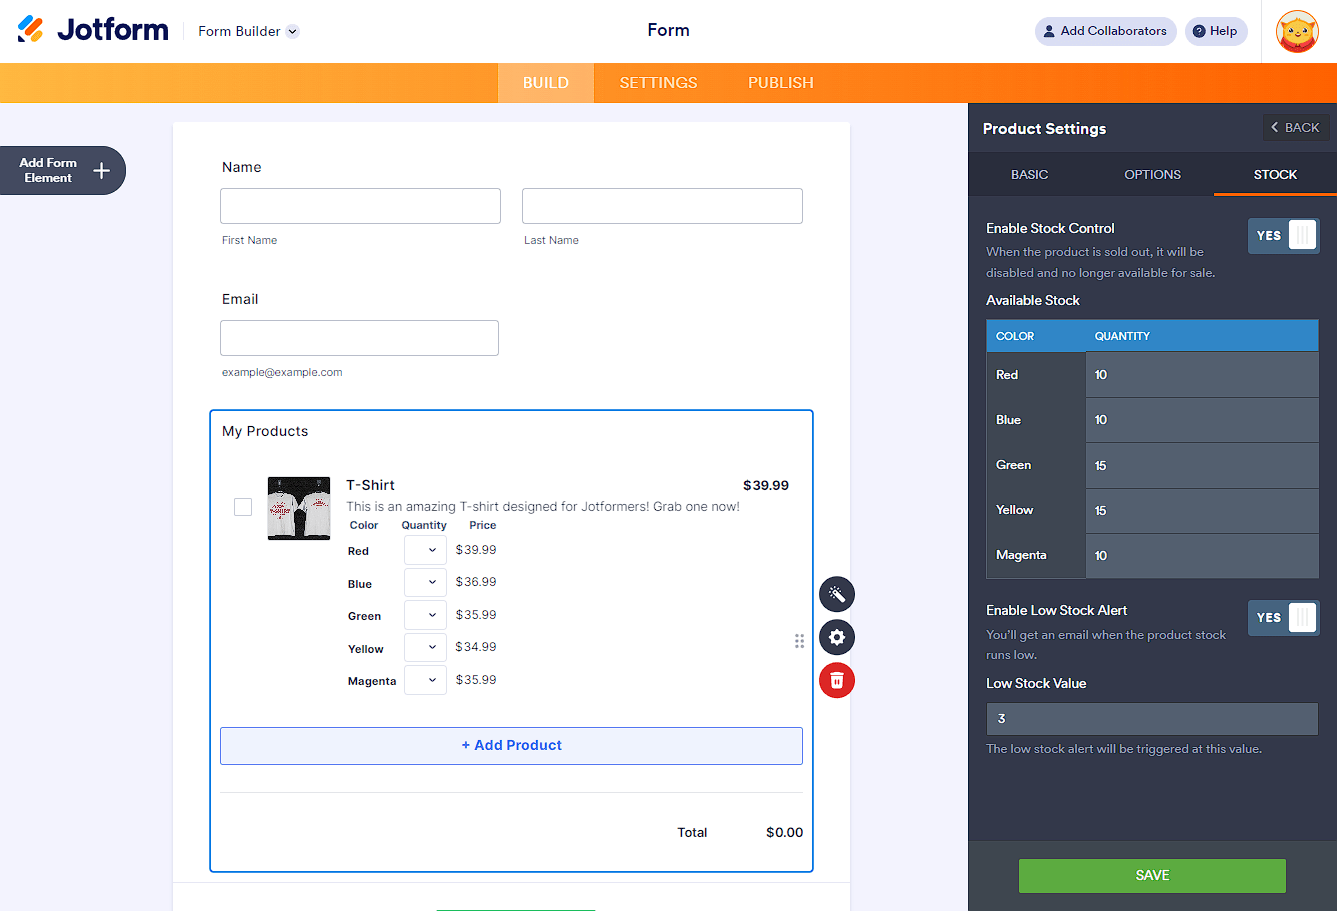
Stock control will help you manage the number if you offer limited products. You can set this up on each product item you add. Go to the Stock tab and toggle Enable Stock Control. Set the options accordingly:
- Available Stock — This is the total quantity of products in your inventory.
- Enable Low Stock Alert — Toggle this option if you want to be notified if your inventory runs low.
- Low Stock Value — Set the value to trigger the low stock alert.
See How to Enable and Manage Product Stock in Payment Fields for more details.
You can view our demo form here.







Send Comment:
91 Comments:
218 days ago
I have 3 payment options, check, PayPal & Zelle. no matter which one you click, it takes you to the PayPal QR Code. How can this be rectified?
280 days ago
I am delighted with your dedication to helping me. However, I would need the shopping cart function, something I only found in the APP and not in the form.
I really see a lot of limitations that discouraged me having to create a new form with everything I've already done and losing 3 days of work!
285 days ago
I am having trouble getting my Square to connect. Can you help?
More than a year ago
I cant get the credit card information to show properly when the jot form is shared, which means people can't pay, can you help?
More than a year ago
I used to have a registration fee for first time users on my account by now it's gone. Please assise.
More than a year ago
I want to delete the account i made earlier,will you consider doing this?for suspicion of Phishing, i just want my details out in Jotform,Thank you,hoping you can consider deleting this, including my Trustwallet address..😥,can i have a reply from you,in the soonest time possible?
More than a year ago
How can I put a send a check option in the payment section
More than a year ago
I would like to sell custom 3-packs. Could be anything. Color options red, white, blue, or green in any combination of 3. How can I make the form verify that they have entered quantities in multiples of 3?
More than a year ago
people are not buying and I need money
More than a year ago
Is there any development on the roadmap for allowing form variables to process a stripe transaction? I'd subscribe in a heartbeat if that were possible :)
More than a year ago
The more powerful approach would be to allow the field value variables from the form itself (email, product name, qty, price) to enable the payment transaction to proceed. Anyone using Jot forms as an addition to their existing no-code stacks, especially Airtable will agree. This is a problem I see again and again with platforms integrated with Airtable. Much of their appeal is the way in which they enhance a powerful, existing tool like Airtable. But instead of leaning in, features are added to restrict and block the power of those tools.
More than a year ago
When I embed the iframe to my WIX website the product description and $$ amount is cut off how can this be resolved.
More than a year ago
Hi,
Regarding to my last post last week, thank you but I already did the Special Pricing Per Option. What I meant is that we just want the option to add the same product to our submission but a different size or color and different quantity
Let's take for example in our product "HP 508A, Laserjet Toner Cartridge" the customer wants to buy 1 Black which costs PHP 8,600 and 2 Cyan which costs PHP 10,800 each in just one submission of the order form.
Is this possible?
Hoping for your soonest response!
More than a year ago
Hi!
In my "Office and Toner Supplies Product Order Form", I have certain products wherein there are a lot of options with different prices. Is there an option wherein people can select multiple variation of a product in just one order form? For example, customer wants to buy 1 HP 995XL Ink Cartridge in Black which is 1,600 PHP and Cyan which is 1,100 PHP.
Hoping for your soonest feedback on this.
Thank you!
-Caithleen
More than a year ago
Is there a way to require user to select T-shirt size? Right now they can select they want T-shirt but I don’t want them to forget to select size and other options.
More than a year ago
I would like to add the in the payment option in my product section so customers can either choose to pay with a credit card online or choose to pay in the store
More than a year ago
Hi,
I am trying to set up an order form on the form titled "Play at Home Equipment Bag Order Form" on our Minisport account, but for some reason when we try to test the form, no cards details are requested...
Would you be able to help?
Thanks alot!
More than a year ago
I am trying to create a form where the first submission is free and thereafter there is a price per each. However, when anyone submits just a single entry the form won't submit and there is a message "minimum $1 ) that appears. How do I fix this such that one free submission can be made? Thank you.
More than a year ago
Now you sold the t-shirt do your send by email?
More than a year ago
Can I offer a discount coupon code?
More than a year ago
Hello.
I want the layout with the image, the price and quantity but I don't need the payment integration. I just want people to send me the order details and pay in person when they pick it up.
Is that possible?
More than a year ago
Can we set up reoccurring payments with Jotform? For example: a constituent wants a monthly reoccurring charge on their credit card for 12 months.
More than a year ago
I am building a registration form for a summer camp. Ideally I would like to collect a non-refundable deposit payment at the time of registration (filling out this form) and the remainder at a later date. Is there a payment app that I can integrate that will allow me to do this? Currently I am using PayPal, but I don't know how to collect a partial payment now, save the payment info, and process the remaining payment later. Do you have a suggestion?
More than a year ago
How do I add multiple payment method options? I have selected and added Square successfully, but I would also like to give people the option of using PayPal.
More than a year ago
Somagenerastore wants to pay me through stripe but they are not getting my info on stripe