PayPal makes it easy to collect payments online, and with Jotform, you can integrate it into your forms in just a few steps. Whether you’re selling products, accepting donations, collecting event fees, or charging for services, adding PayPal gives your customers a secure and familiar way to pay.
Once your form is connected, payments are processed through your PayPal account, making it simple to manage transactions while providing a smooth checkout experience for your form fillers.
Creating a PayPal Payment Form with Reusable Payment Connections
With Jotform’s Reusable Payment Connections, you can set up payment integrations like PayPal and reuse the same configuration on other forms you created with Jotform, without needing to configure it again. Here’s how to set it up:
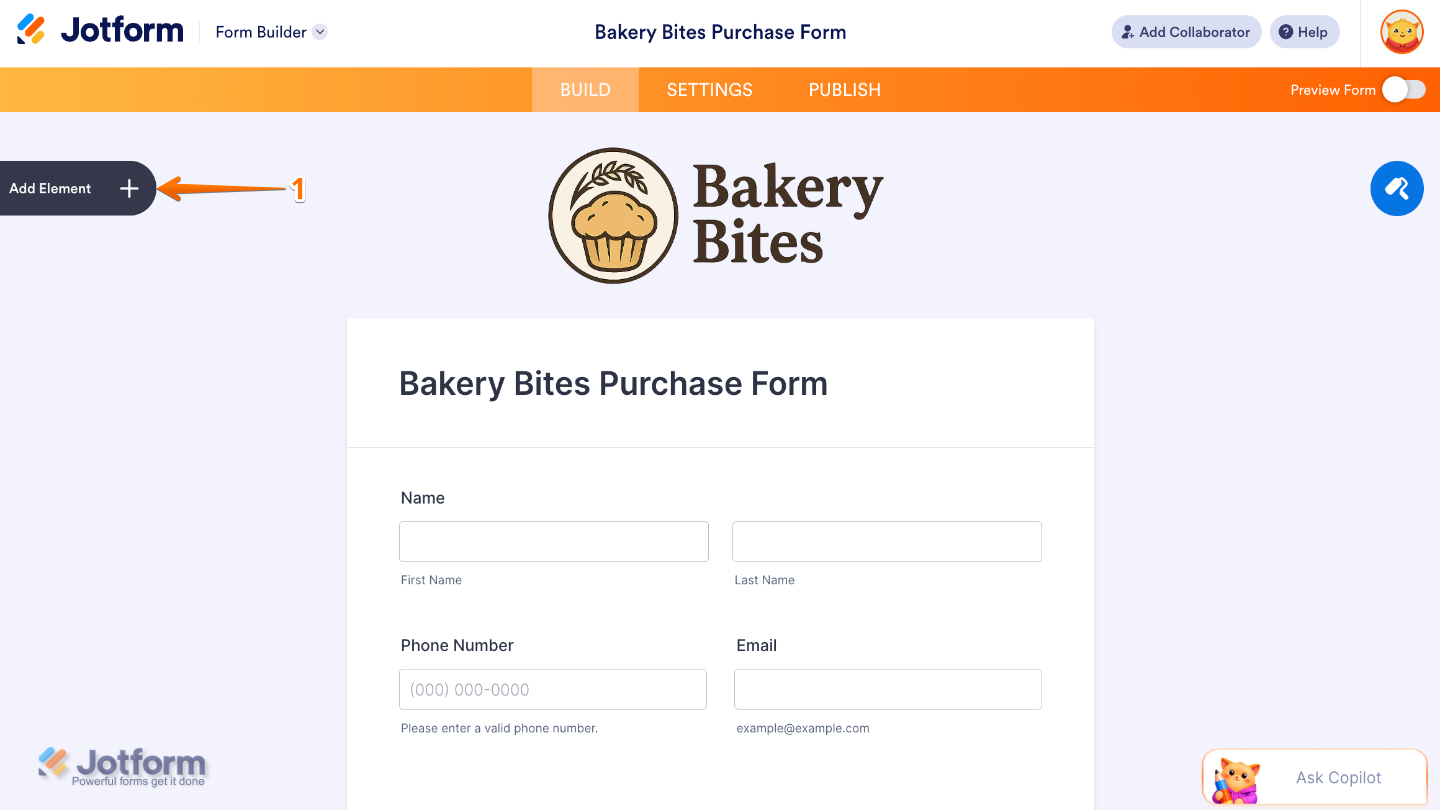
- In Form Builder, click on Add Element on the left side of the page.
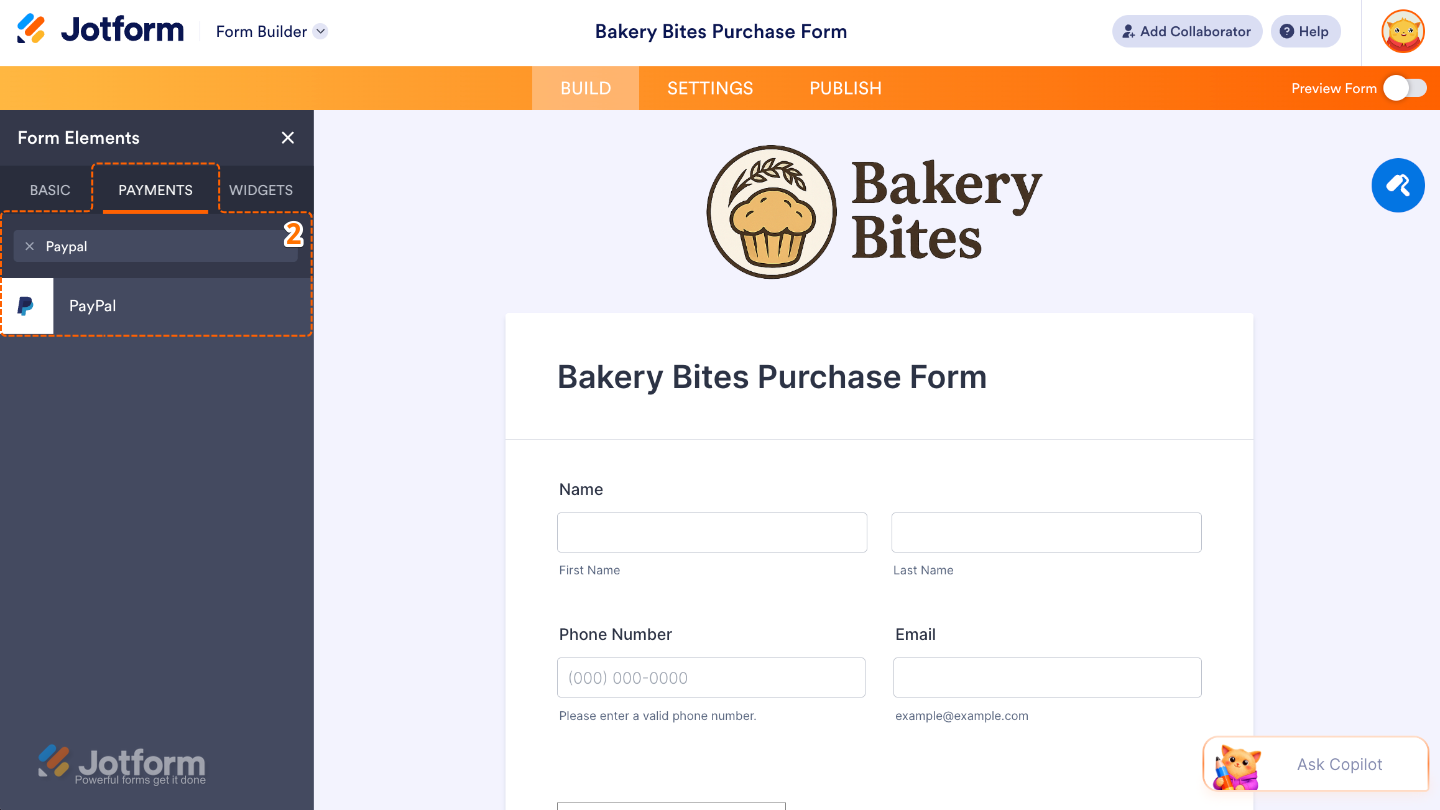
- Now, in the Form Elements menu, under the Payments tab, search for PayPal, and then click on it. Or, just drag and drop it to where you want it to be on your form.
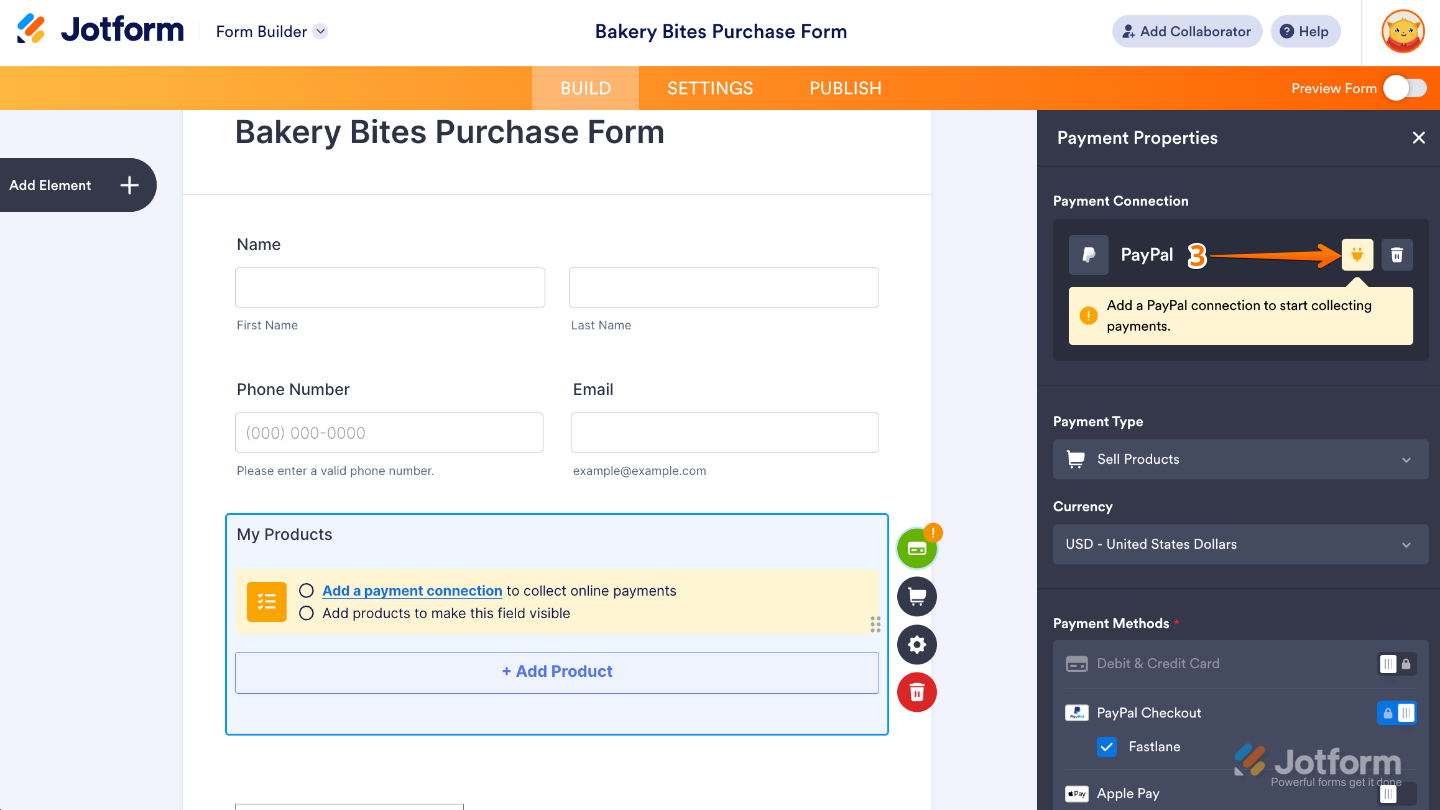
- Then, in the Payment Properties section that opens on the left side of the page, click on the Plug icon.
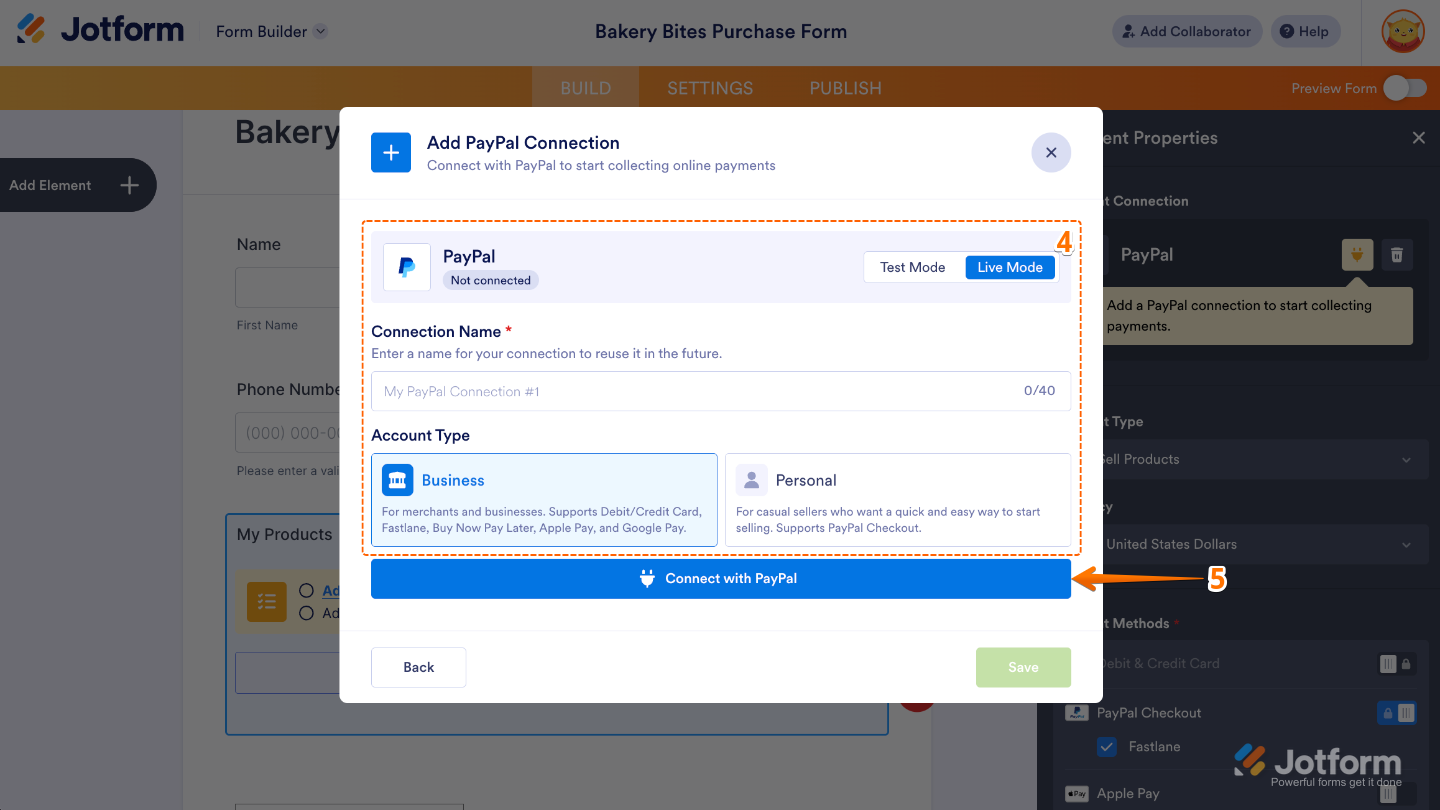
- Next, in the PayPal Standard Connection window, configure these things:
- Payment Mode — Choose whether to connect PayPal in Test Mode to simulate payments during setup or Live Mode to accept real payments from customers.
- Connection Name — Enter a custom name for your PayPal connection to help you easily identify it later, especially if you have multiple PayPal accounts or payment connections.
- Account Type — Select the type of PayPal account you’re connecting, such as Personal or Business, depending on how your PayPal account is set up.
- Once everything is set, click on Connect with PayPal Standard.
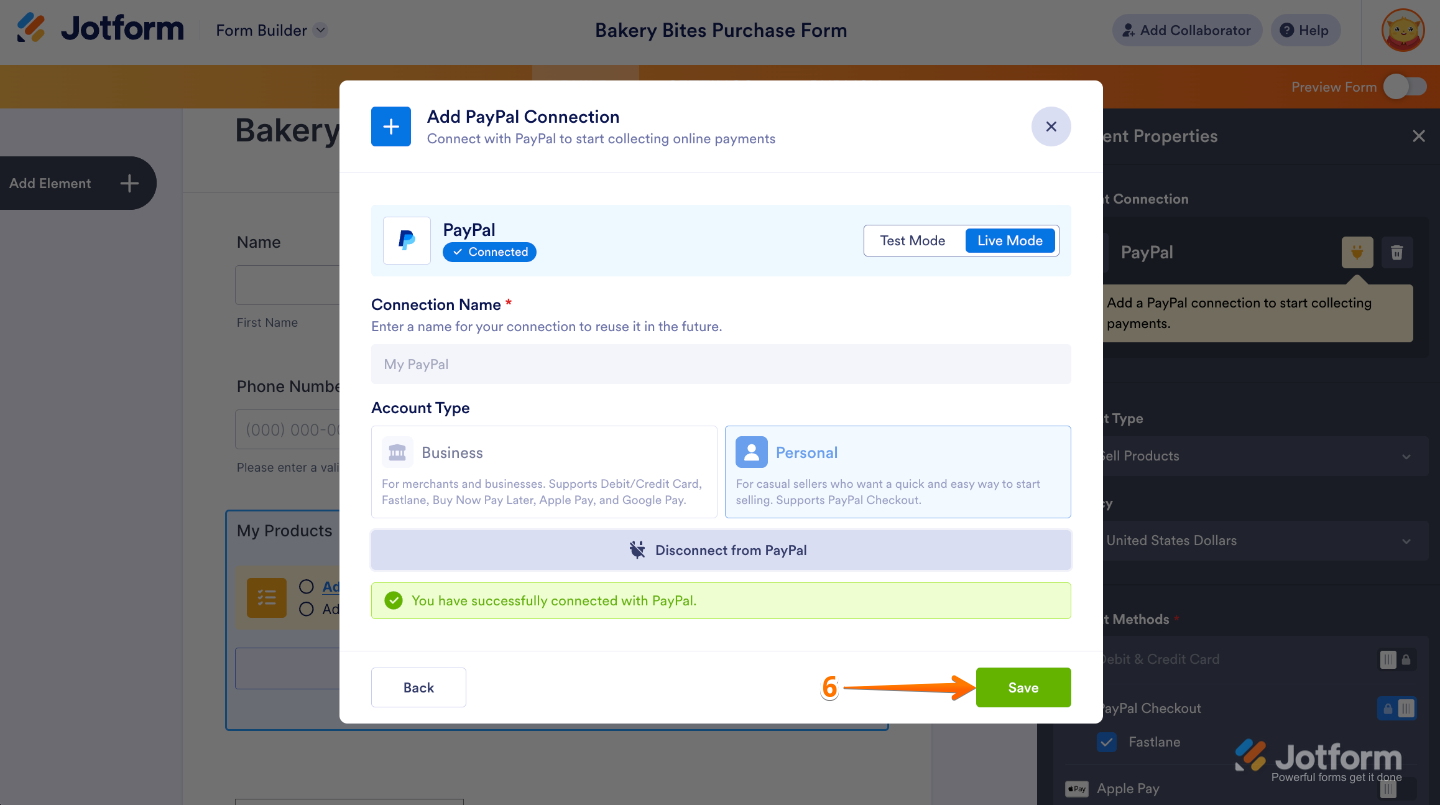
- Once your PayPal Standard Account is successfully connected, click on Save.
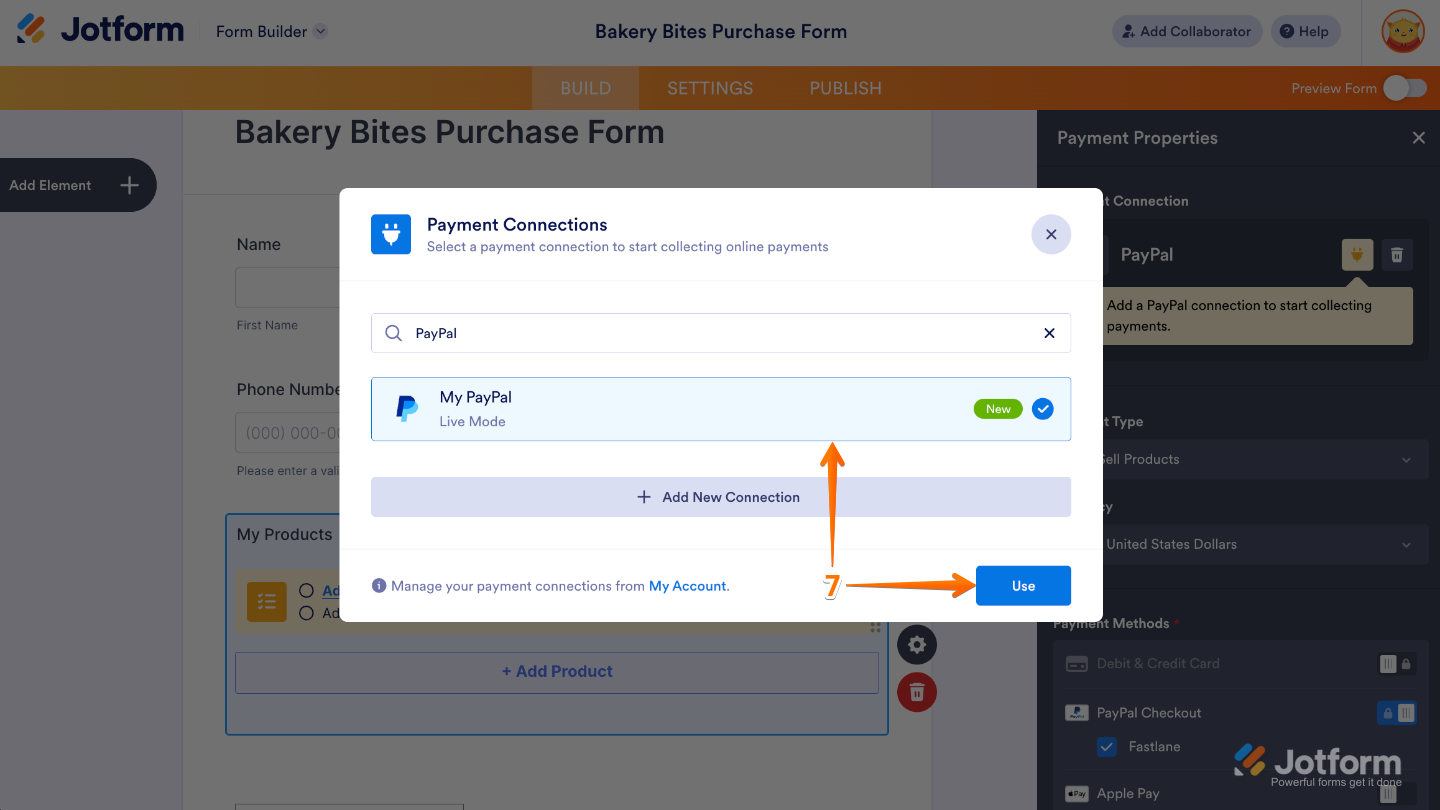
- Now, in the Payment Connections window, click on the PayPal Standard Connection you’ve just added, and then click on Use.
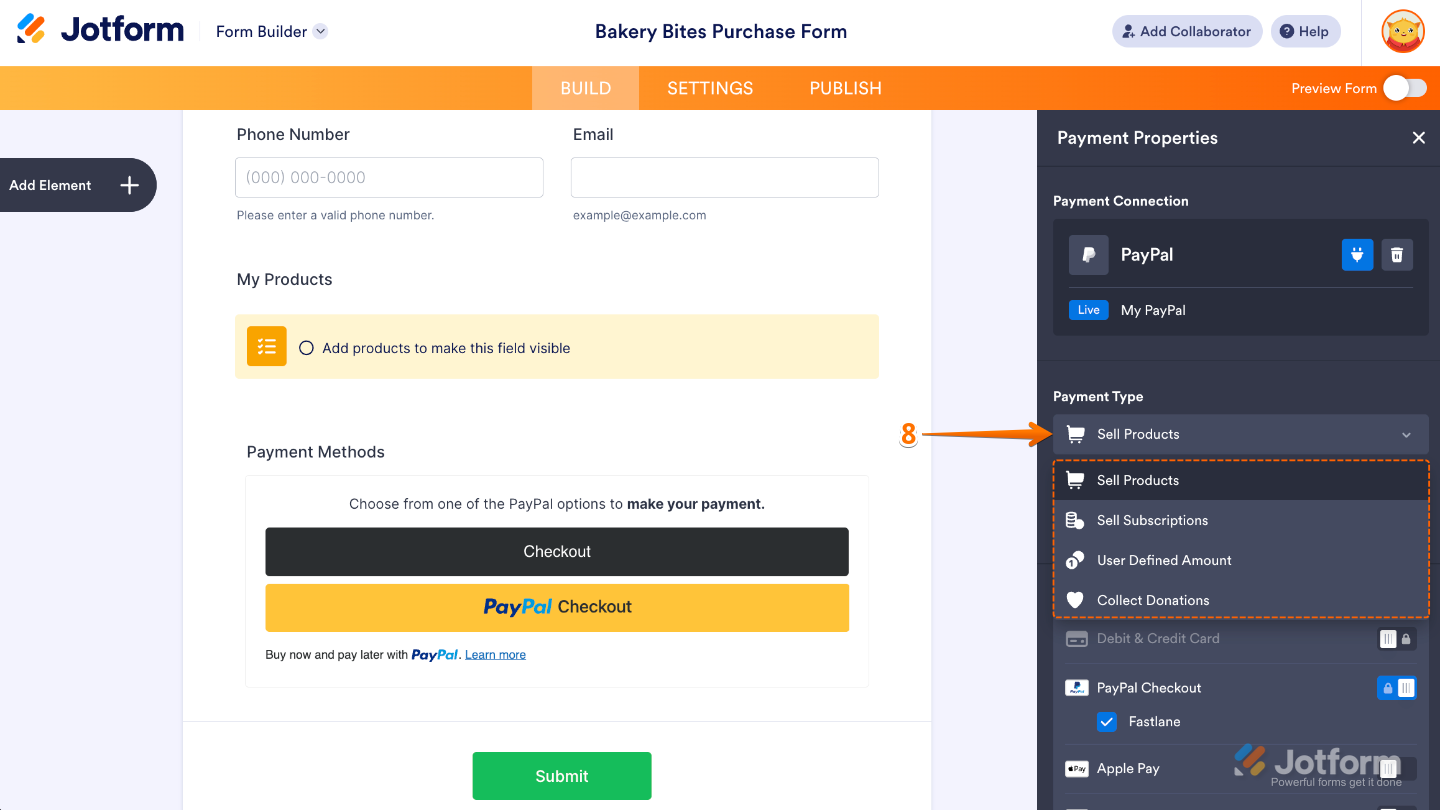
- Then, in the Payment Type Dropdown menu, select what you’d like the payment to be processed for:
- Sell Products — This is selected by default. Use this to sell physical or digital goods at a fixed price, allowing customers to make a one-time purchase.
- Sell Subscriptions — Choose this to charge customers on a recurring basis for services, memberships, or other ongoing access.
- User-Defined Amount — This lets customers enter the amount they want to pay. It’s useful for tipping, custom amount pricing, or flexible payments.
- Collect Donations — Select this to accept voluntary contributions. It’s commonly used for fundraising, nonprofit support, or charitable causes.
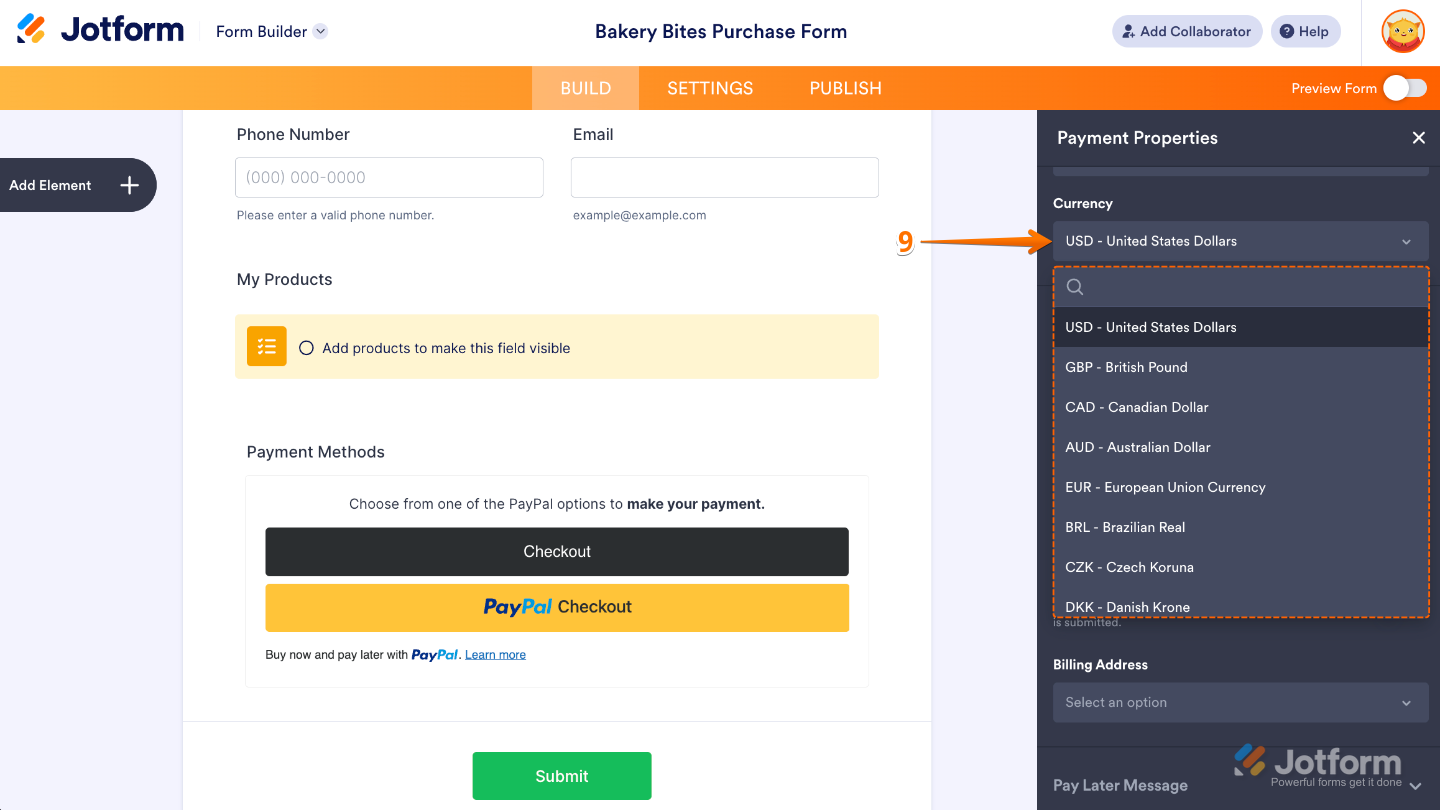
- Next, in the Currency Dropdown menu, select one of the currencies available with the integration. Our PayPal’s Supported Currencies page has a complete list of those.
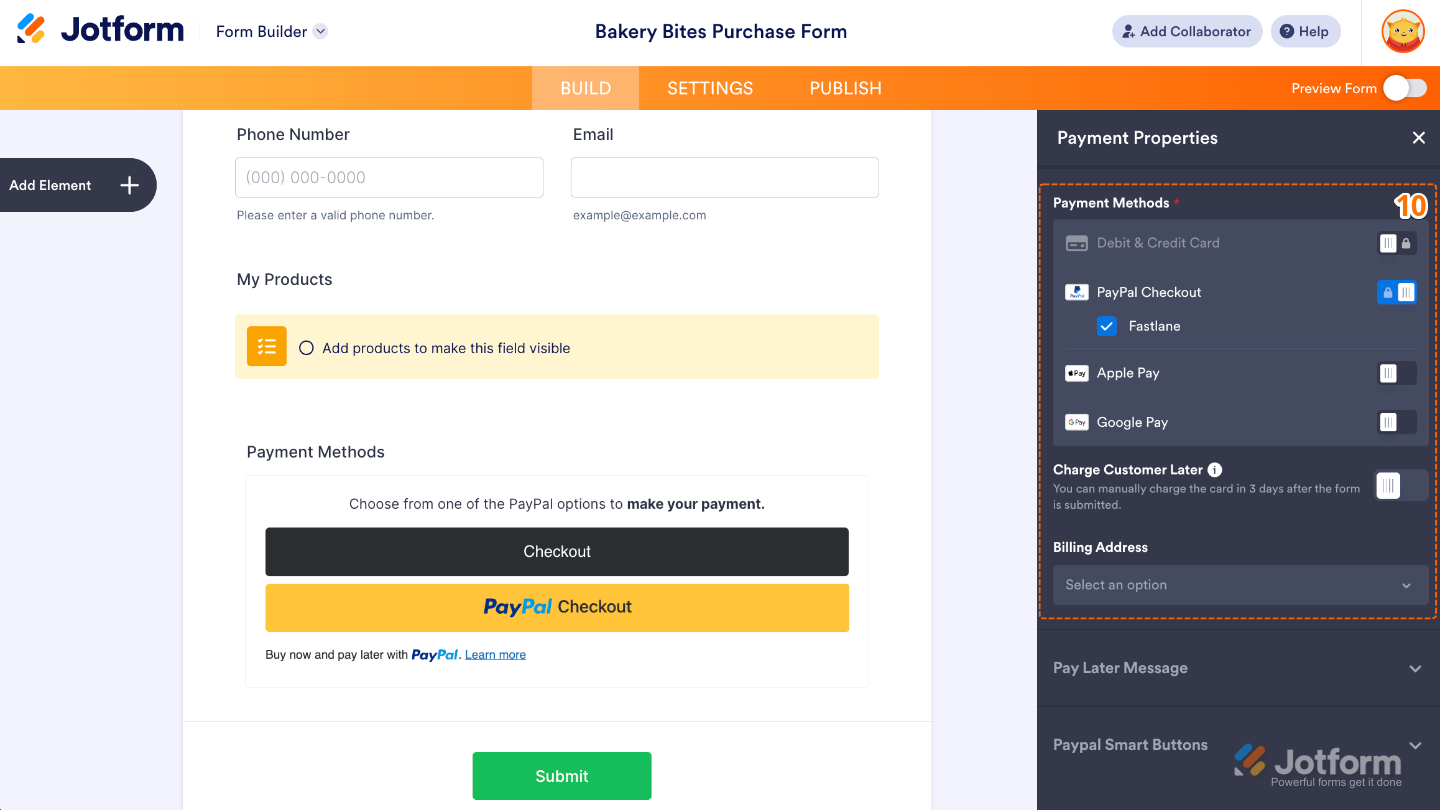
- Then, scroll down and configure these options:
- Payment Methods — Choose which PayPal payment methods are available for your customers during checkout.
- Charge Customer Later — Allow customers to complete the form now and pay at a later time instead of charging them immediately.
- Billing Address — Collect your customers’ billing address as part of the payment process.
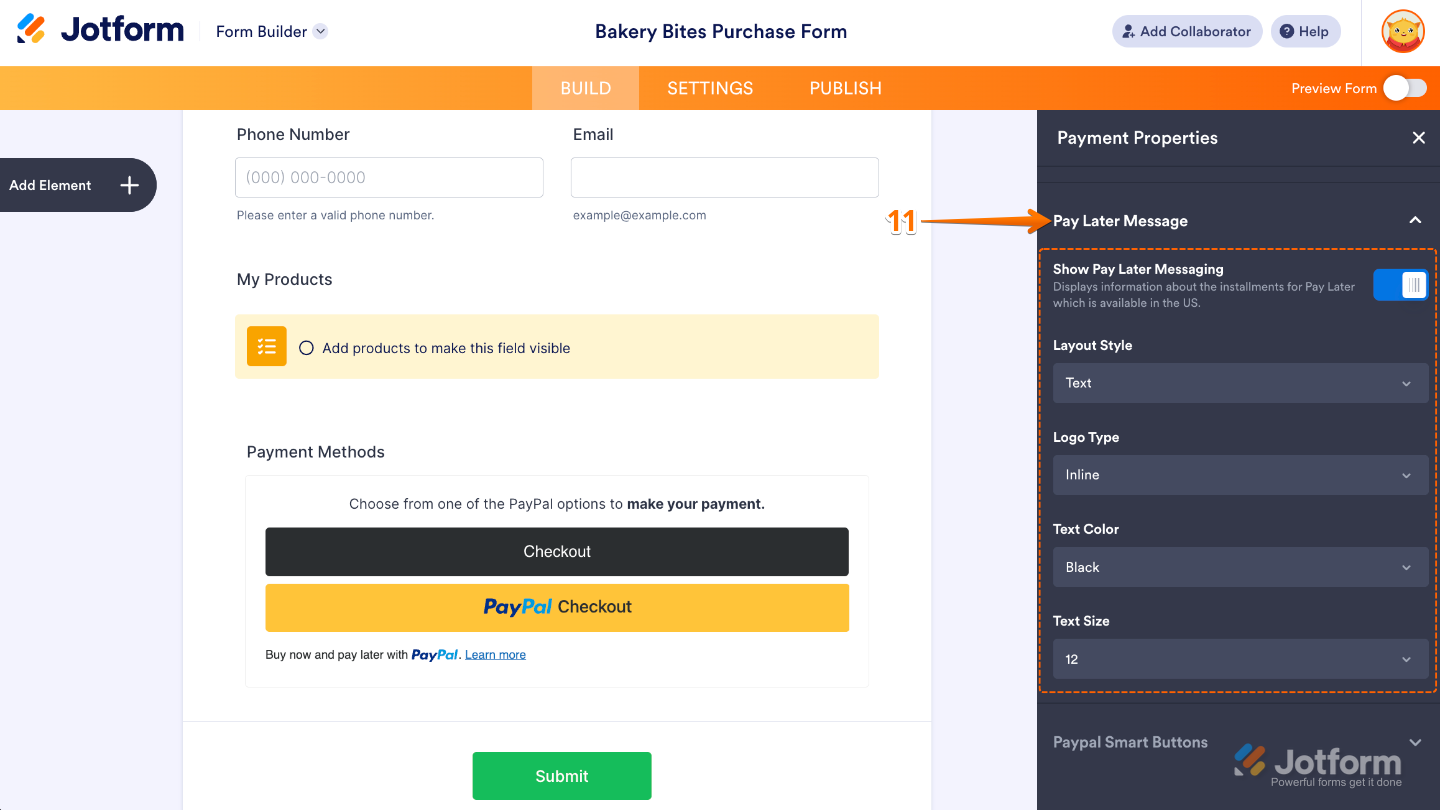
- After that, click on the Pay Later Message and then set up these options:
- Show Pay Later Messaging — Display a Pay Later message to let customers know they can split their purchase into installments, if eligible.
- Layout Style — Choose how the Pay Later message is displayed on your form.
- Logo Type — Select the PayPal logo style shown with the Pay Later message.
- Text Color — Choose the color of the Pay Later message text to match your form’s design.
- Text Size — Adjust the size of the Pay Later message text.
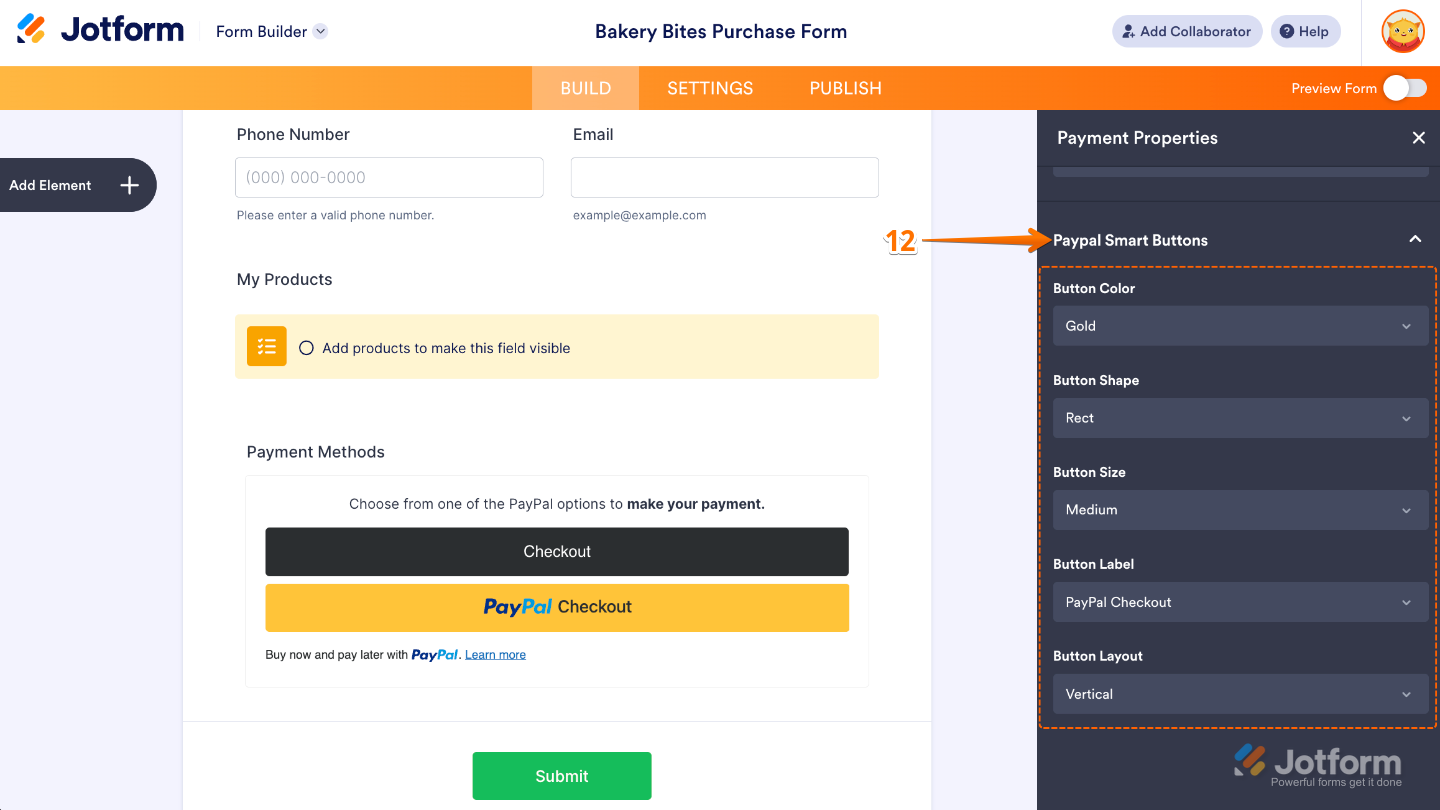
- Finally, scroll down to the bottom and then click on PayPal Smart Buttons to configure these things:
- Show Pay Later Messaging — Display PayPal Smart Buttons to provide customers with a faster and more convenient checkout experience.
- Layout Style — Choose how the PayPal Smart Buttons are arranged, such as vertically or horizontally.
- Logo Type — Select the PayPal logo style displayed on the Smart Buttons.
- Text Color — Choose the color of the text displayed on the Smart Buttons.
- Text Size — Adjust the size of the Smart Button text.
That’s it. Your PayPal payment form is now ready to accept payments. Simply share your form with your customers, and they can securely complete their payments through PayPal. Before publishing, consider submitting a test payment to make sure everything is working as expected.
Looking for more info on payment form setups? We’ve got a whole range of guides that have what you need:
- Setting Up Your First Order Form
- How to Set Up a Recurring Payment Option
- How to Add Options to Payment Forms
- How to Add Coupon Code to Payment Forms
- How to Add Tax to Your Payment Form
- How to Add Shipping Cost to Payment Forms
- How to Generate an Invoice for Your Payment Form
- How to Enable and Manage Product Stocks in Payment Fields

Send Comment:
119 Comments:
November 21, 2023
When there are custom fields and you are using PayPal business, will the custom field information be sent to PayPal as well?
January 9, 2023
How do I take PayPal off the form?
August 27, 2022
Trying to add PayPal personal to my form - it’s saying can only have 1 payment method but I don’t have any - what am I doing wrong please?
March 3, 2021
I setup the integration, and the money is going to PayPal on Submit of the Survey, but the data isn't going anywhere on Submit.
December 1, 2020
Hello,
To whom it may concern, I'm trying to verify that my transactions are going through to paypal. So far my form has generate 5 payments to my paypal however I don't show any funds in my account. Is there a delay? Any help will be appreciated.
Thanks,
Ryan Goheen
September 9, 2020
I need to set up a donation form with multiple products. Some will be a one time donation and others will be a monthly subscription or annual subscription. How can we set up this for paypal?
August 7, 2020
I set up the integration, but I listed it as a Personal PayPal instead of Business PayPal. Will that matter and, if so, how do I change it? I tried, but it wouldn’t let me back in.
June 26, 2020
can i include cashapp to my payment option form?
March 16, 2020
When I added the Paypal Checkout widget, the Submit button went away. When you complete a form and checkout via paypal, does the form data get submitted to the email, etc. just as it does when the Submit button is used? Thank you.
November 6, 2019
Can you use the PayPal Checkout with only a linked personal Paypal account? Or do you have to have a business account?
September 19, 2019
I'm new to PayPal just need the basic sign up form for a non working disabled person
August 19, 2019
I've tested several times and I keep getting a "Security Error" message. The form is also defaulting to a PayPal Pro and not allowing me to do a regular PayPal account. Please advise.
July 22, 2019
I am not able to select any payment button (Paypal, Square, anything). Why is this?
July 6, 2019
ORDER ID is missing from the form submission.
ORDER ID is missing!
I DO NOT UNDERSTAND WHY I AM GETTING THIS MESSAGE. EVERYTHING WAS WORKING FINE A FEW WEEKS AGO NOW I AM GETTING ERROR. I HAVE NOT MADE ANY CHANGES. THANK YOU.
July 6, 2019
Student Registration Fee:
Registration Fee $ 75.00
Total $ 0.00
loading smart payment buttons..
March 20, 2019
What does it mean when a payment says "client authentication failed?"
January 19, 2019
User defined amount shows the word “free” if I don’t input a value. This is annoying as I don’t want it to show up because there are different values for different quantities. How to remove this?
September 4, 2018
I have a payment submission. How do I collect?
August 16, 2018
will a paypal button appear on form while in edit mode or after publishing ?
August 9, 2018
I am facing some errors there.
July 13, 2018
how can we separate the products on different pages?
June 29, 2018
I am trying to set up a paypal form but am getting an error.
It says this intergration has not yet been configured. Please run the wizard for configurations.
what can I do to get this working.
June 12, 2018
How much does jotform charges by using paypal, cause i got charged more than the total amout said
May 24, 2018
I am creating a membership application form and testing in Sandbox mode using my own info. Using PayPal. When I hit SUBMIT it takes me to "Log in to your PayPal account" but has no option for them to just use their credit card thru PayPal with NO account. Your tutorial shows that there should be 2 options after submit - use their existing account or a one time use with credit card. Am I doing something wrong?
May 12, 2018
I can't get the subscription buttons to work. Once I select subscription and review and submit form it just gets stuck on please wait...
It never redirects, submits, or anything.