Jotform makes it easy to collect payments using PayPal—a popular payment solution. Customers can pay using credit or debit cards, PayPal, PayPal Credit, and PayPal Fastlane, and other options like Venmo (in the US), iDEAL, and Giropay (in select European countries).
With Jotform’s payment, order, and credit card forms, you can set up a simple and smooth checkout in just a few steps. You also have full control over how people pay—and now, you can even let them use Google Pay and Apple Pay for faster checkout.


Note
- You must have a PayPal Business account to use the PayPal integration and collect money through your Jotform payment forms.
- PayPal Complete Payments (PPCP) Advanced Credit Card is only available for verified Business accounts, so if you toggle on Show Debit or Credit Card, ensure that you have a verified PayPal Business account. Otherwise, your form will display an error message that says Hosted Fields Are Not Eligible. Our guide on PayPal: Activate Business Account has all the details.
- The Fetch Subscriptions from the PayPal Account toggle under the Additional Gateway Settings when choosing Sell Subscription from the Payment Type can only fetch Fixed-based Pricing items. It can’t fetch items that use Quantity, Volume, or Tiered pricing.
- Sofort is no longer available as an Alternative Payment Method, as Klarna is in the process of phasing it out.
Integrating Your Form with PayPal
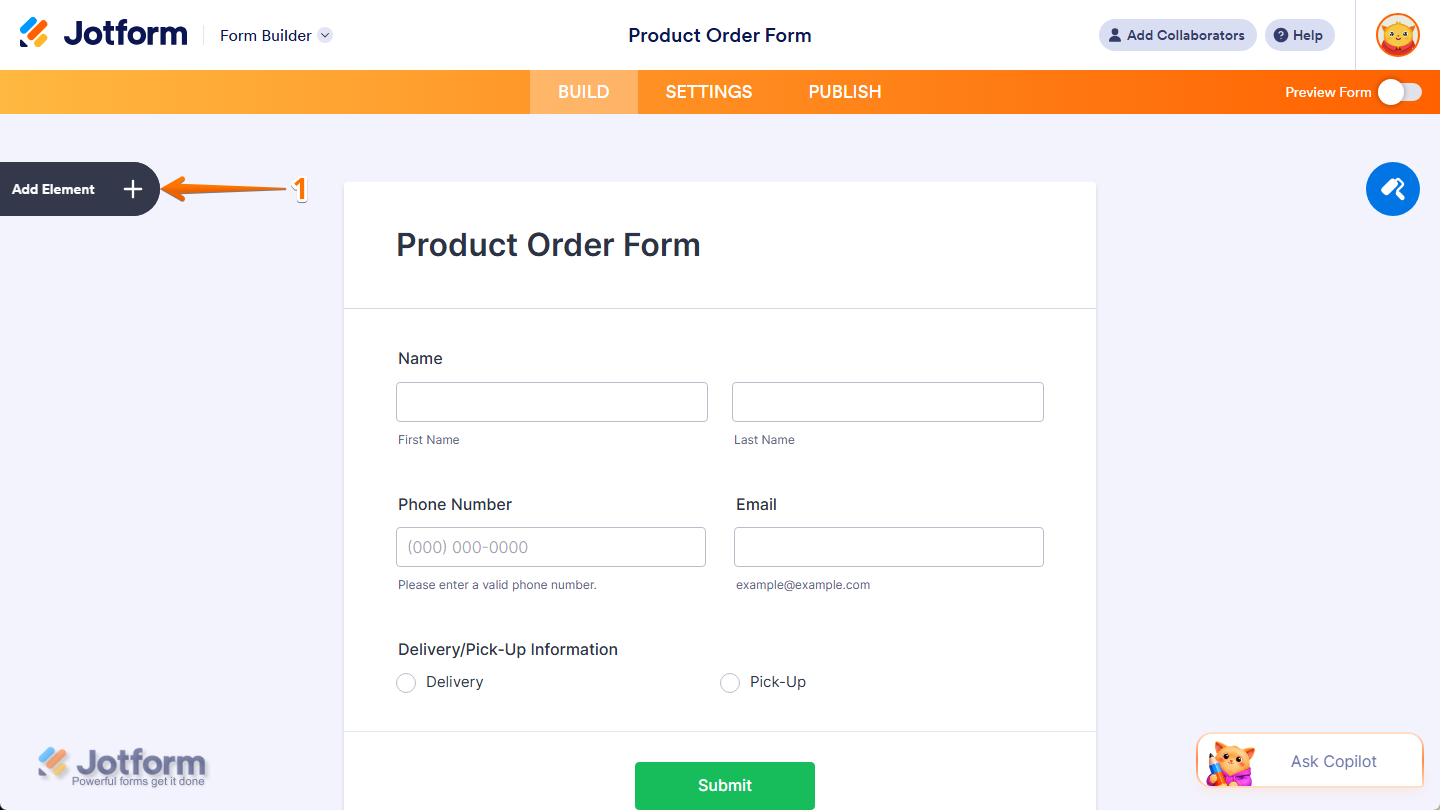
Whether you’re creating a new form or updating an existing one, you can add and set up the PayPal payment field. Getting started is simple—here’s what to do:
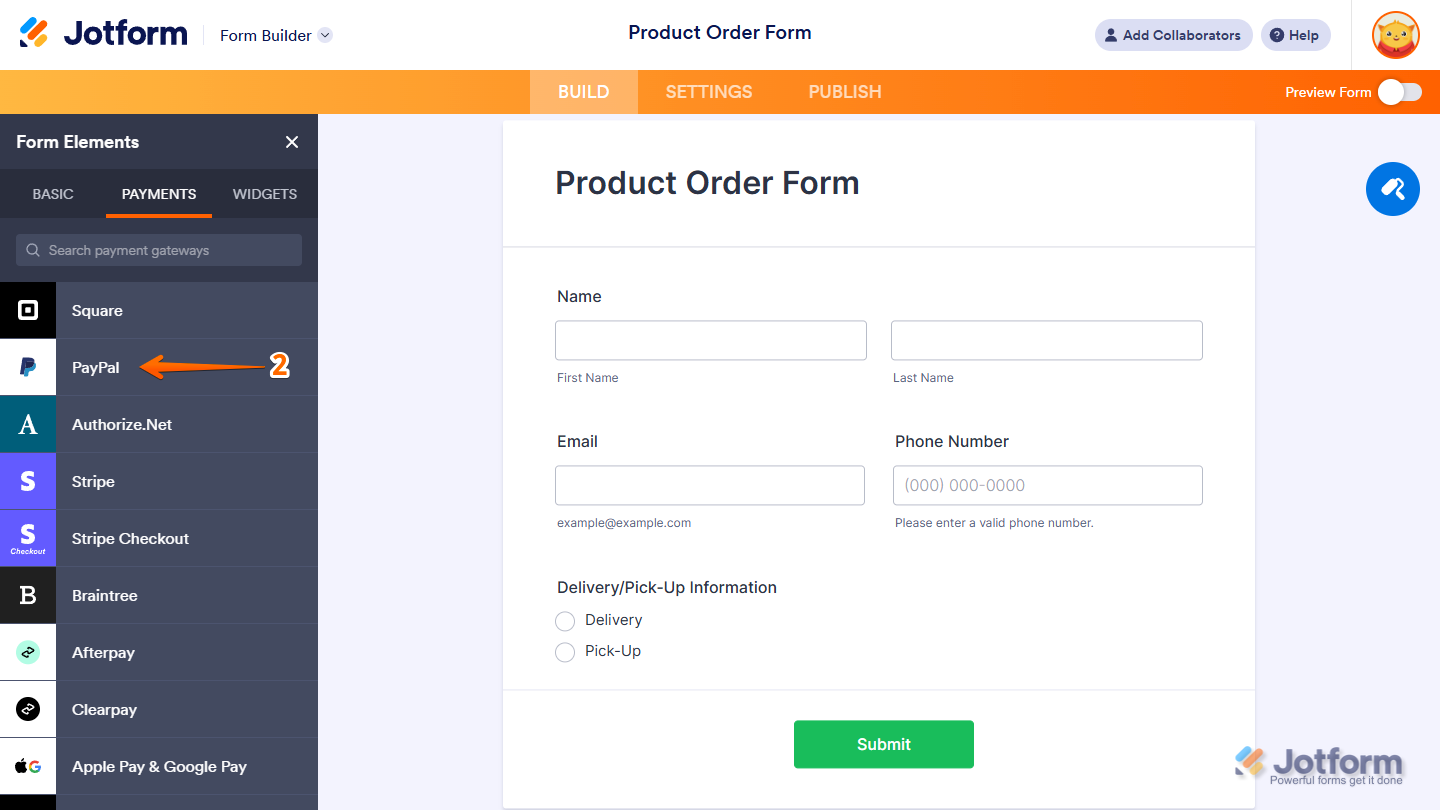
- In Form Builder, click on Add Element on the left side of the page

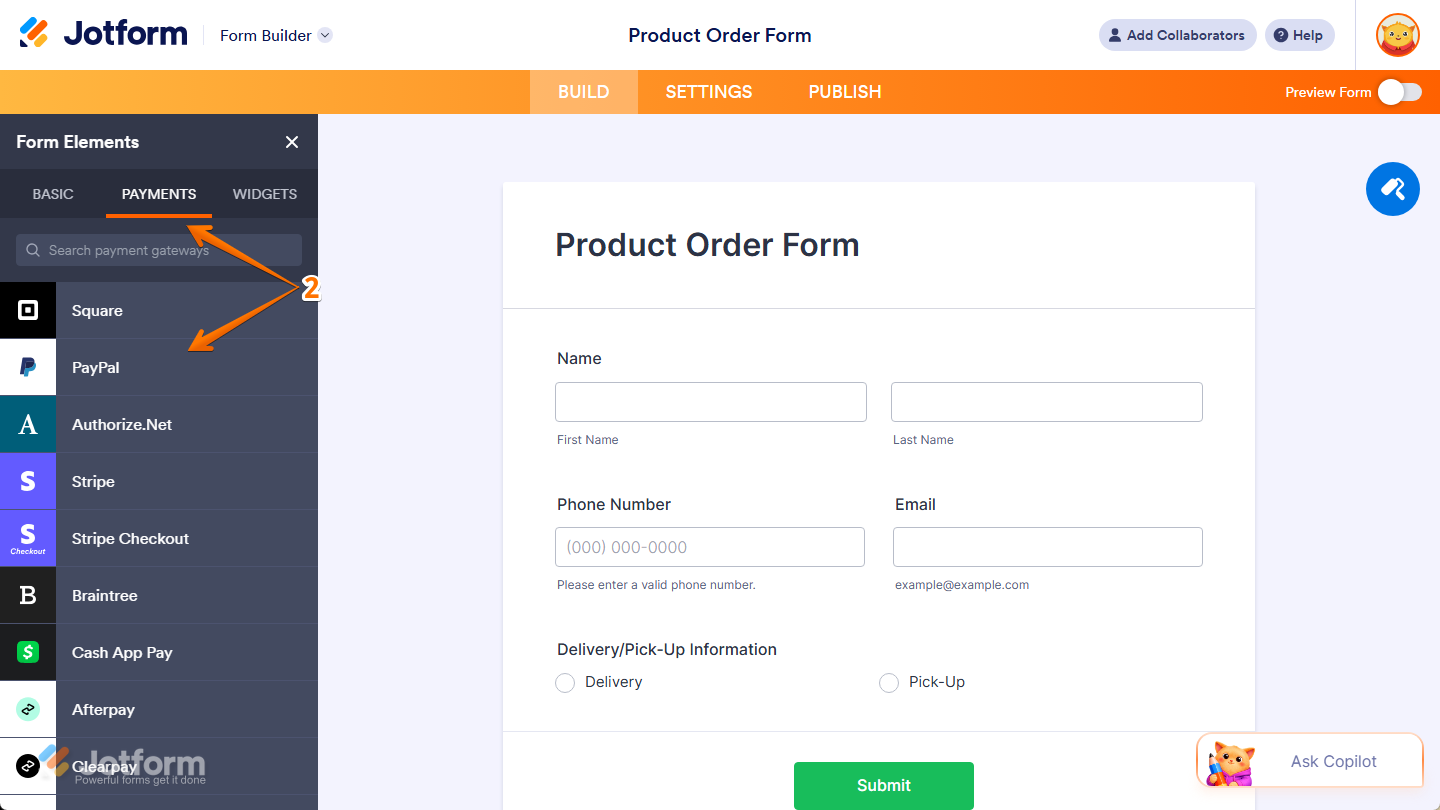
- Now, in the Form Elements menu, under the Payments tab, click on PayPal to add it to your form.
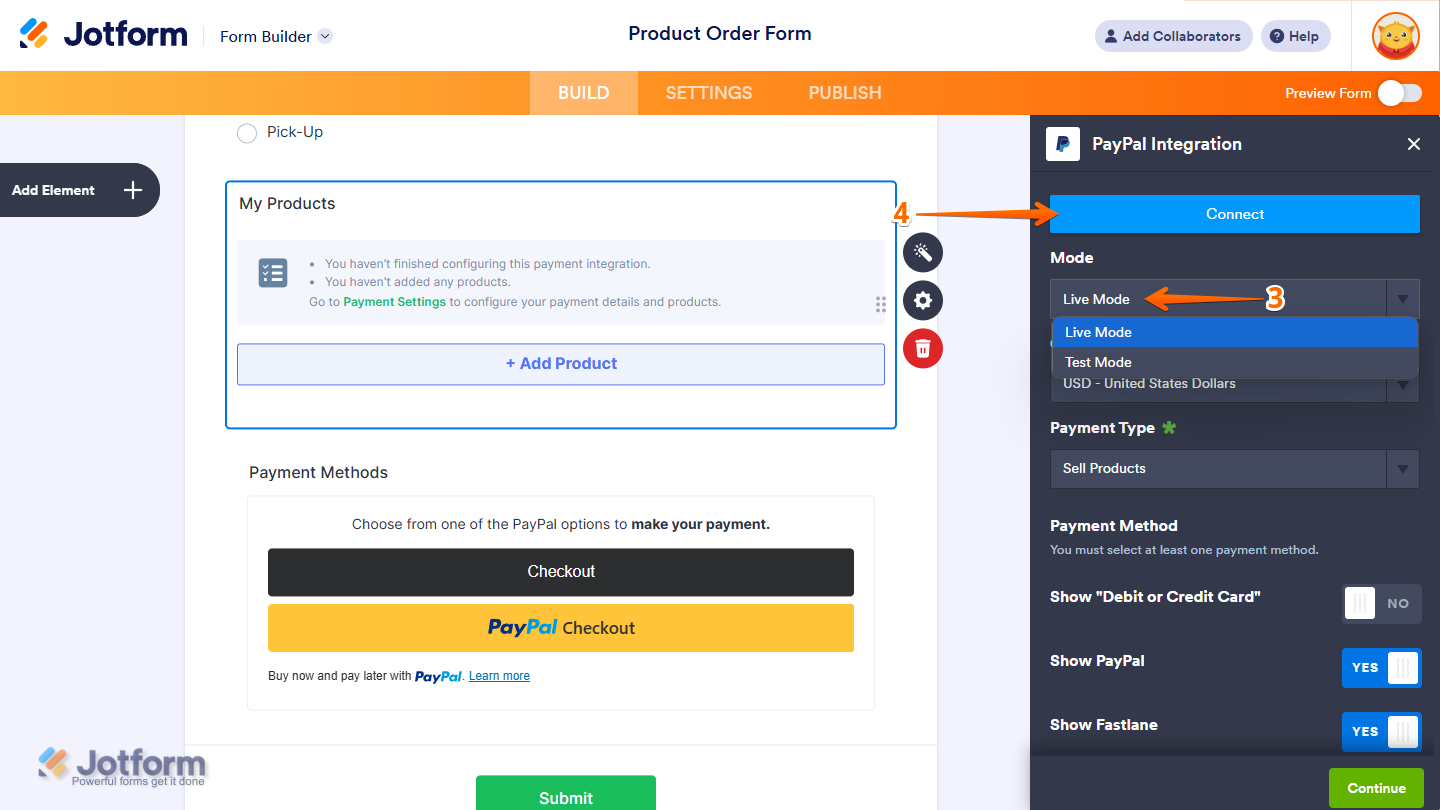
- Next, in the PayPal Integration window that opens on the right side of the page, select one of these modes from the Mode Dropdown menu:
- Live Mode — Connects to your registered PayPal Business account.
- Test Mode — Uses your PayPal Sandbox account for testing transactions.
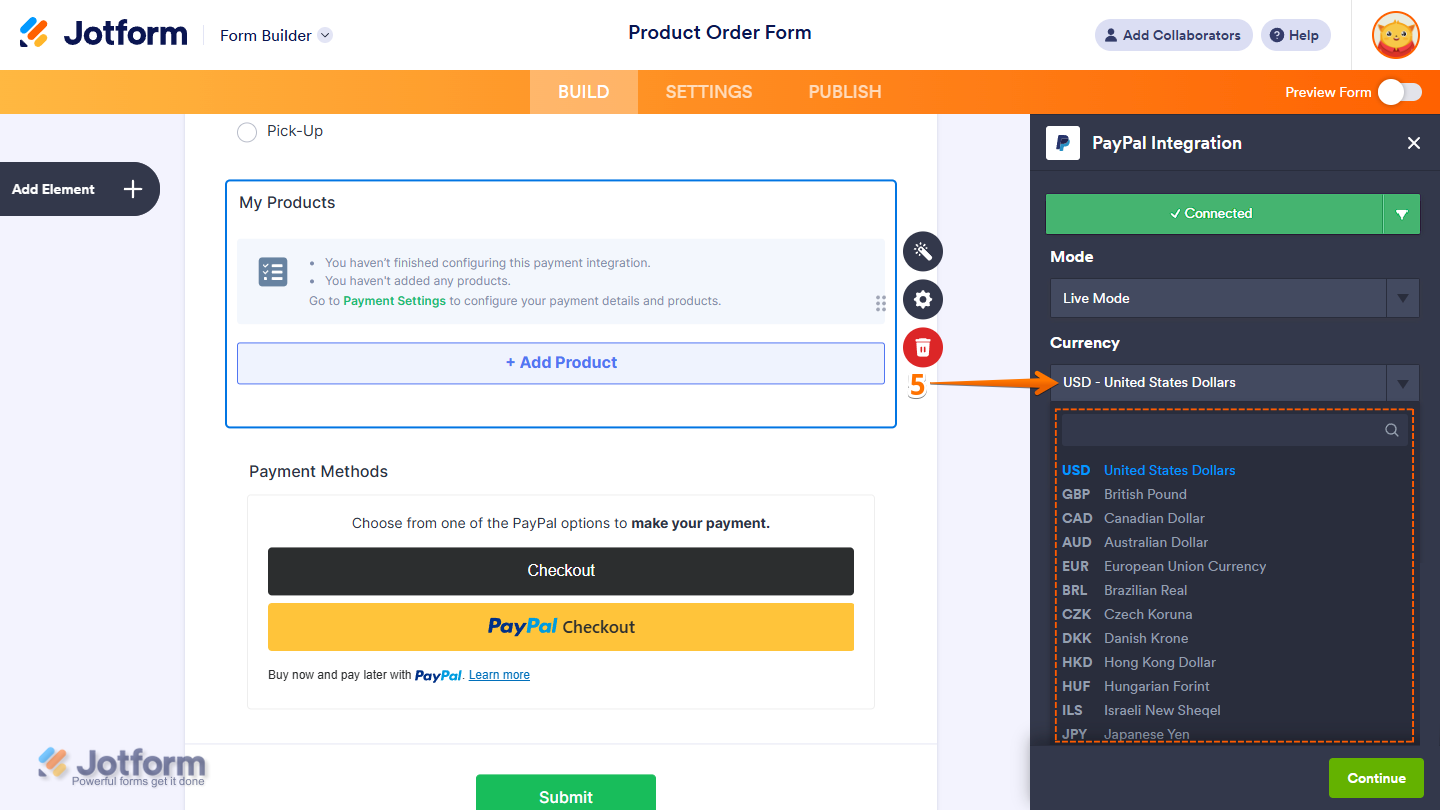
- Now, click on Connect and sign in to the PayPal account linked to it.
- In the Currency Dropdown menu, select one of the currencies available with the integration. You’ll find a complete list of currencies available with PayPal here.
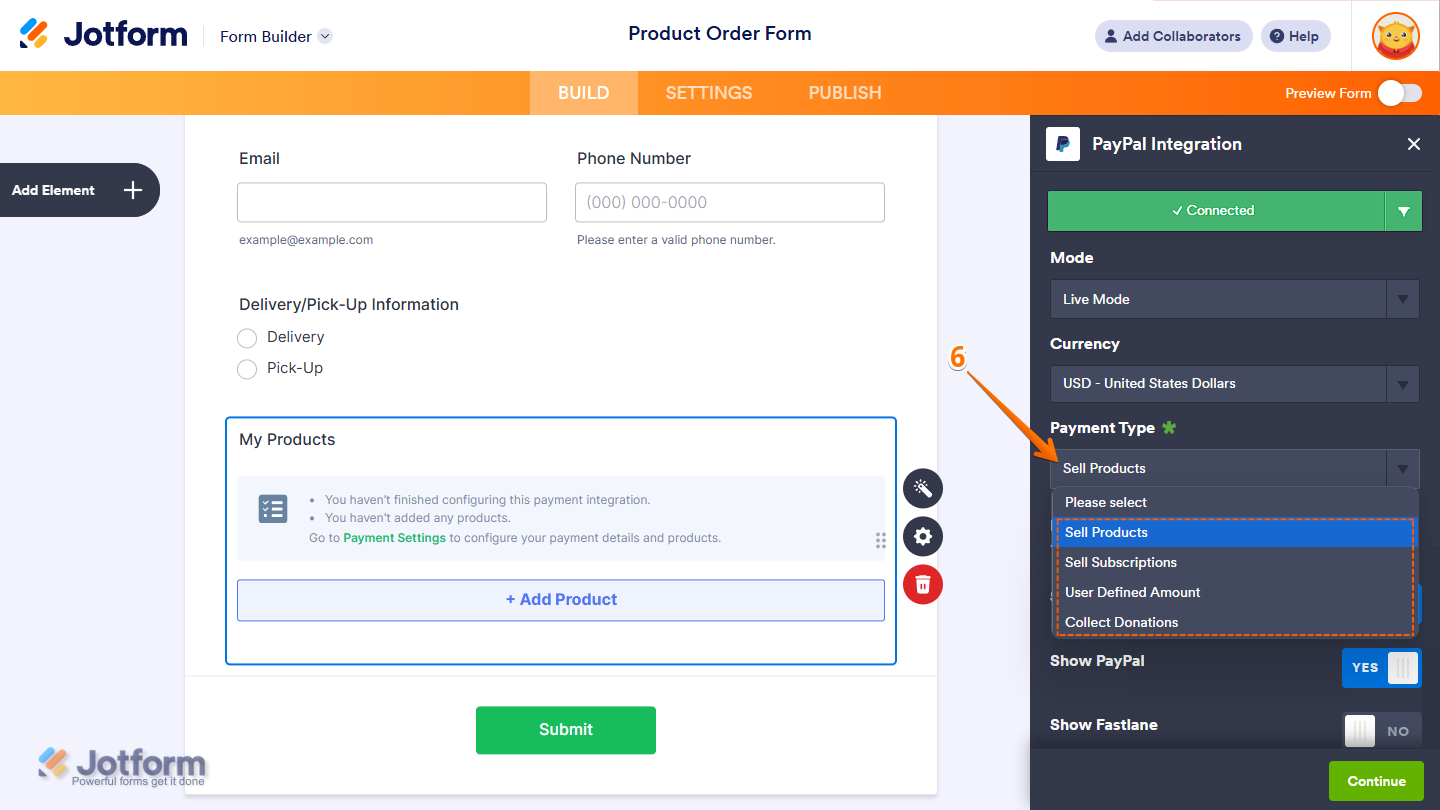
- After that, in the Payment Type Dropdown menu, select what you want the payment to be processed for:
- Sell Products — This is selected by default. Use this to sell physical or digital goods at a fixed price, allowing customers to make a one-time purchase.
- Sell Subscriptions — Choose this to charge customers on a recurring basis for services, memberships, or other ongoing access. Switching to subscriptions will make credit card payments and other payment types unavailable.
- User-Defined Amount — This lets customers enter the amount they want to pay. It’s useful for tipping, custom amount pricing, or flexible payments.
- Collect Donations — Select this to accept voluntary contributions, commonly used for fundraising, nonprofit support, or charitable causes.
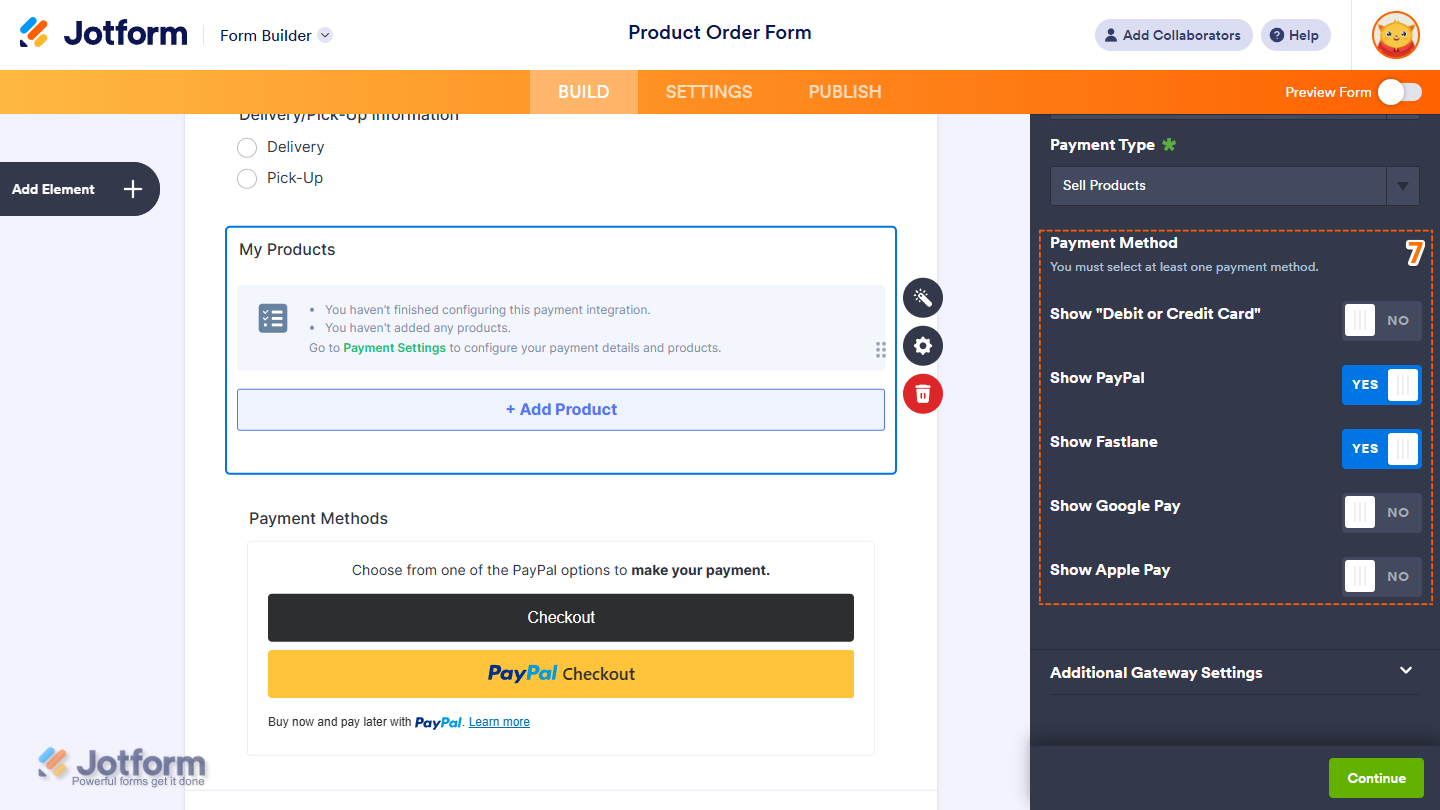
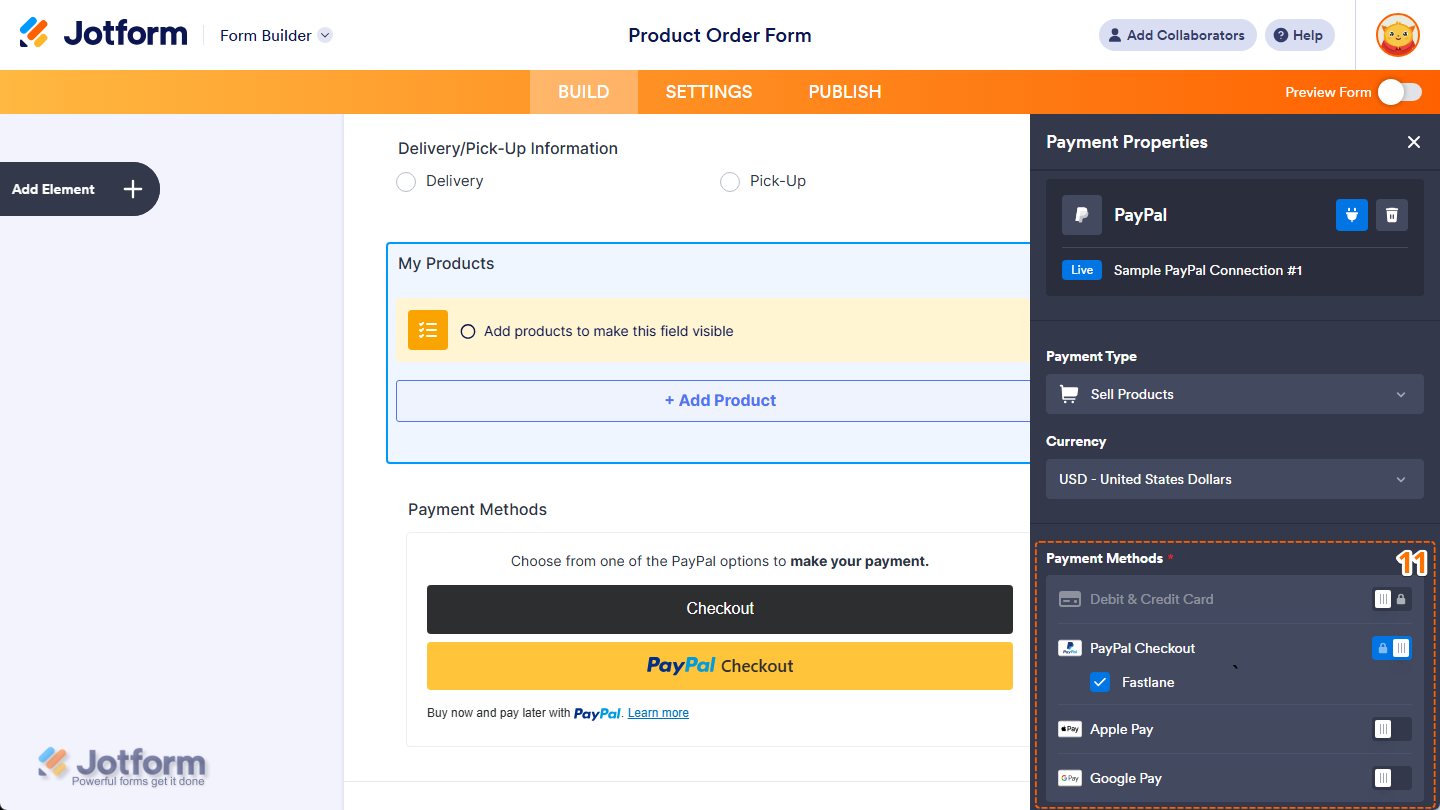
- Now, in the Payment Method section, toggle the options you want to add to your payment form to Yes or No:
- Show Debit or Credit Card — Let customers pay using their debit or credit cards. Turning this On disables the Fastlane option.
- Show PayPal — PayPal is shown by default for customers to use for payments.
- Show Fastlane — Fastlane is shown by default for faster checkout. Check out these Fastlane Notes to learn more about it.
- Show Google Pay — Toggle this On to offer Google Pay as a payment option.
- Show Apple Pay — Toggle this On to offer Apple Pay as a payment option.
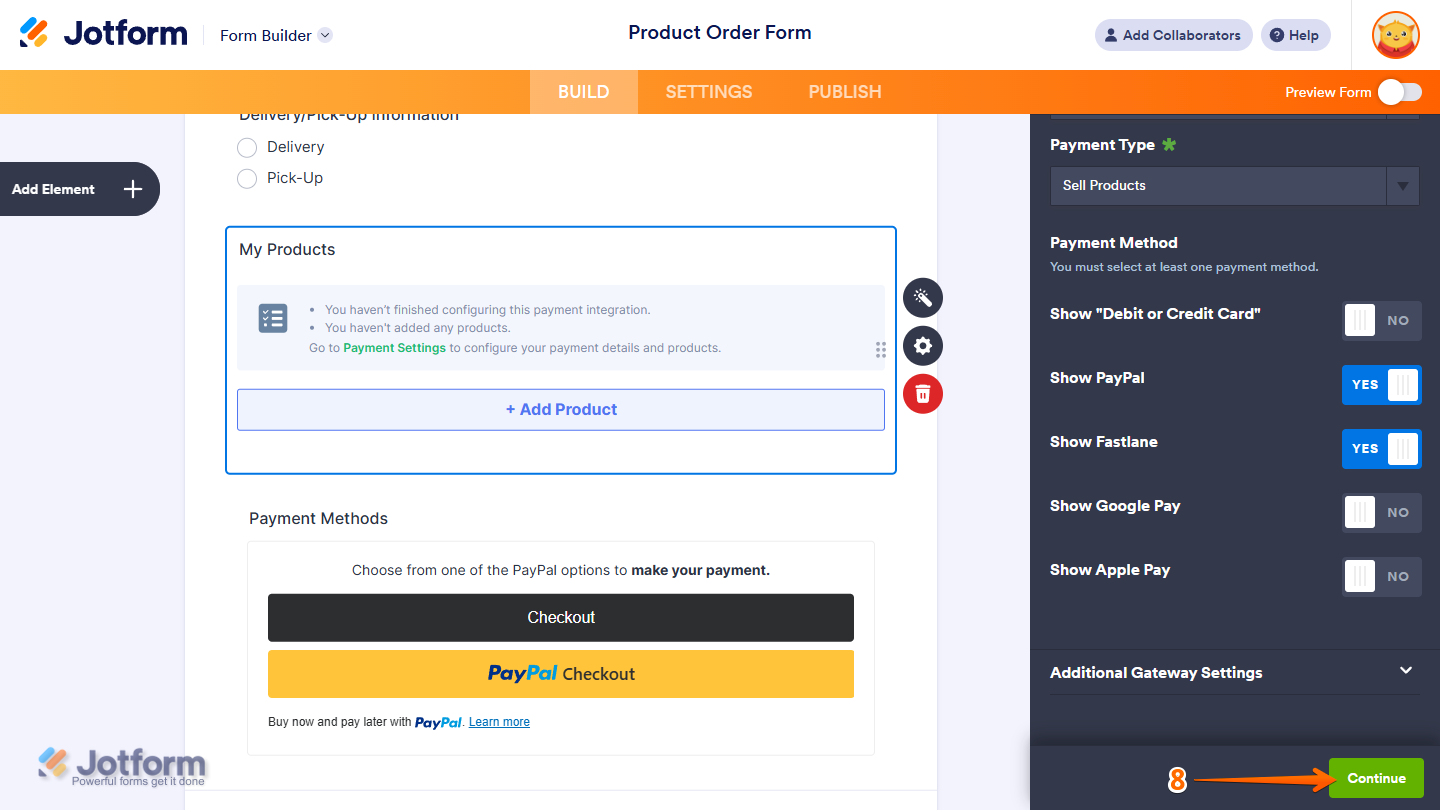
- Once everything’s set for the Sell Products and Sell Subscriptions payment types, click on Continue to create products and subscriptions for your payment field. For the User-Defined Amount and Collect Donations payment types, just click on Save at the bottom.
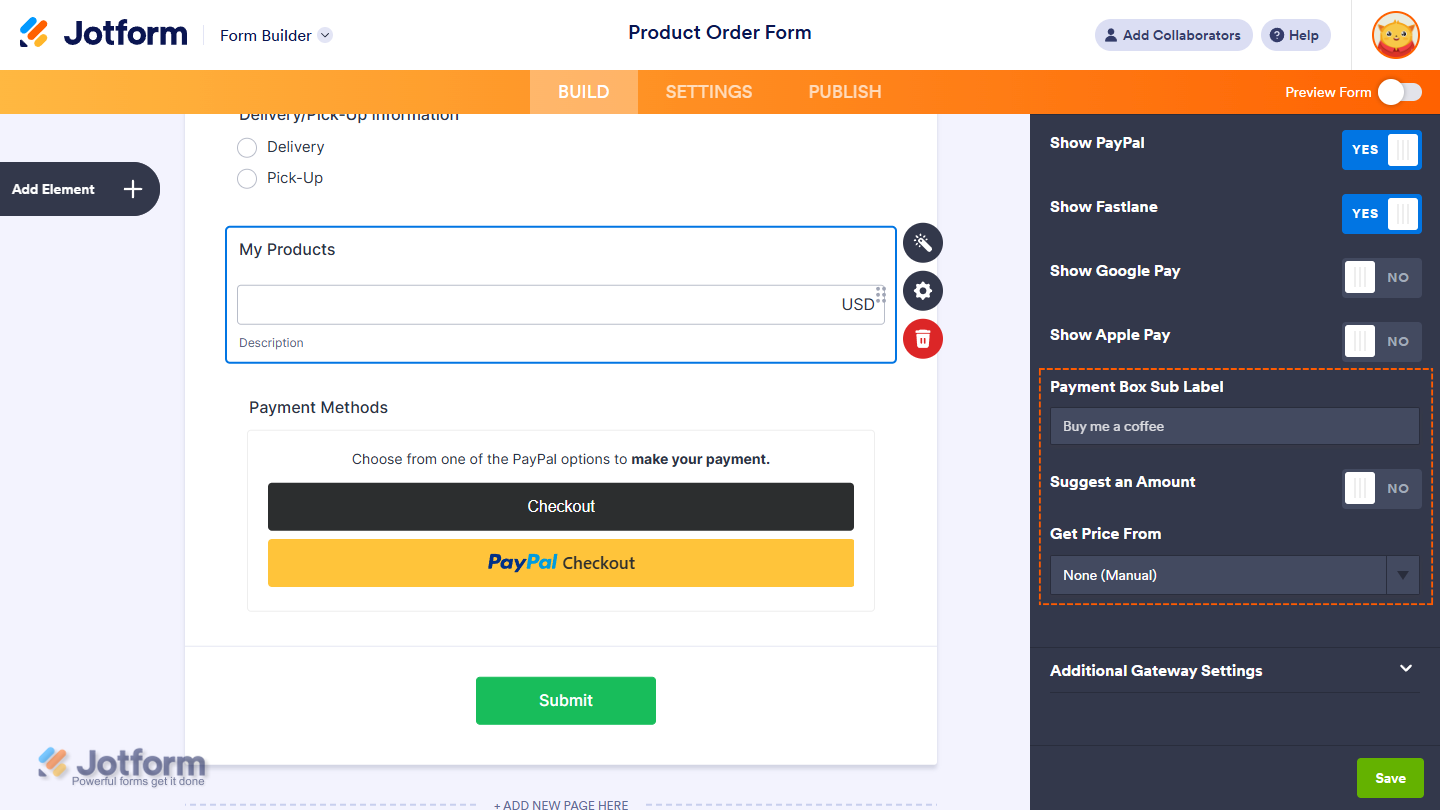
For the User-Defined Amount and Collect Donations payment types, you can add a description that appears below the payment box on your form. You can also set a suggested amount, make it the minimum, or get the price from a Form Calculation widget. This is useful when you want to pass a calculated amount to your payment field instead of having users enter it. Our guide on How to Pass a Calculation to a Payment Field walks you through everything.
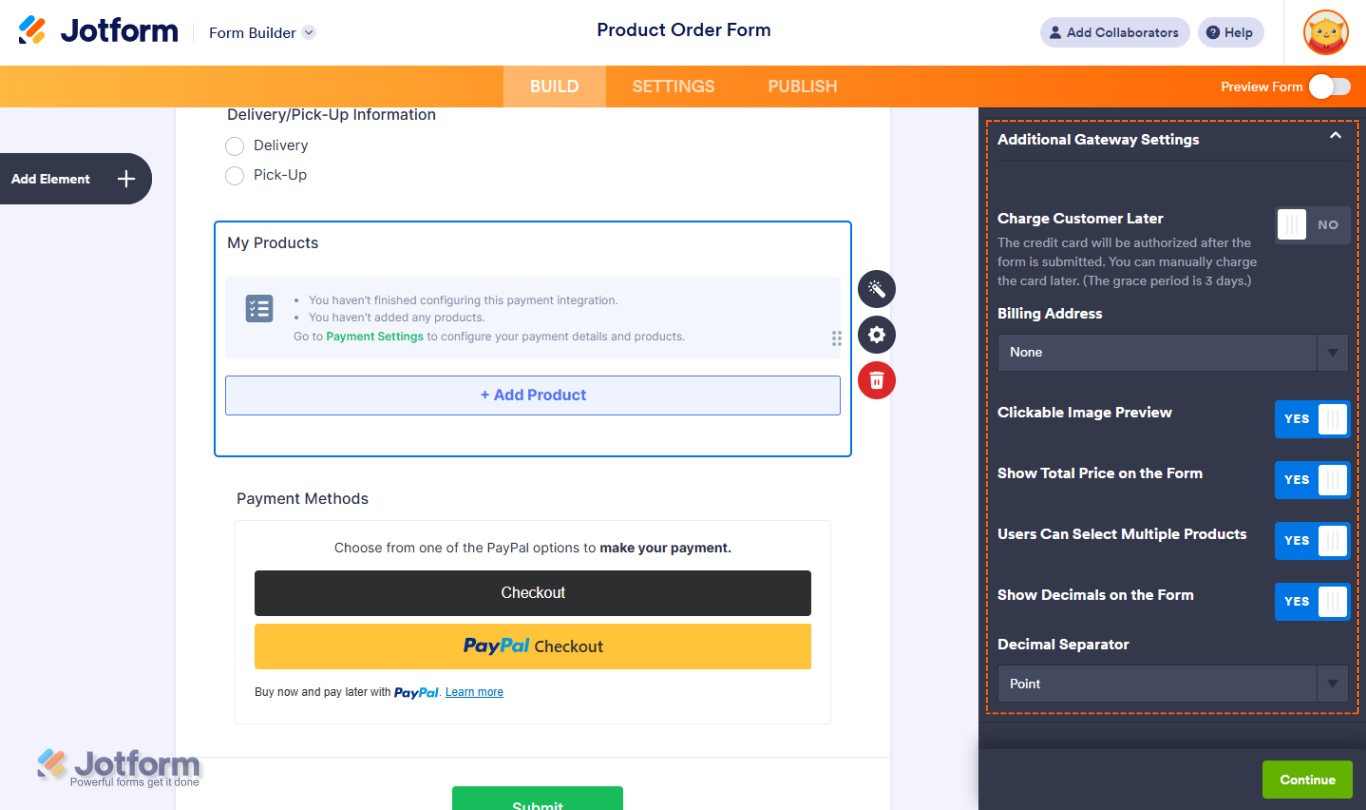
When you expand the Additional Gateway Settings in the PayPal Integration section, you’ll see this list of options you can adjust based on the payment type you chose:
- Charge Customer Later — Toggle this On to manually charge customers in 6 days after authorizing the payment. Want a step-by-step walkthrough? Our guide on How to Enable Payment Authorization has you covered.
- Billing Address — Select an Address field to collect the Business Addresses of your customers.
- Clickable Image Preview — Toggle this On to allow customers to click on and preview images.
- Show Total Price on the Form — Toggle this On to display the total price on the form.
- Users Can Select Multiple Products — Available only with the Sell Products payment type and enabled by default. Toggle it Off to allow customers to select only one product per submission.
- Show Decimals on the Form — Toggle this On to display decimals for pricing.
- Decimal Separator — Choose the character to separate decimals (e.g., a period or comma).
- PayPal Smart Payment Button Style — Customize how your PayPal button looks using the options below:
- Button Color — Choose the color you want it to be.
- Button Shape — Select a shape for it.
- Button Size — Set the size of the PayPal button.
- Button Label — Choose the text that appears on it.
- Button Layout — Define how it’s displayed.
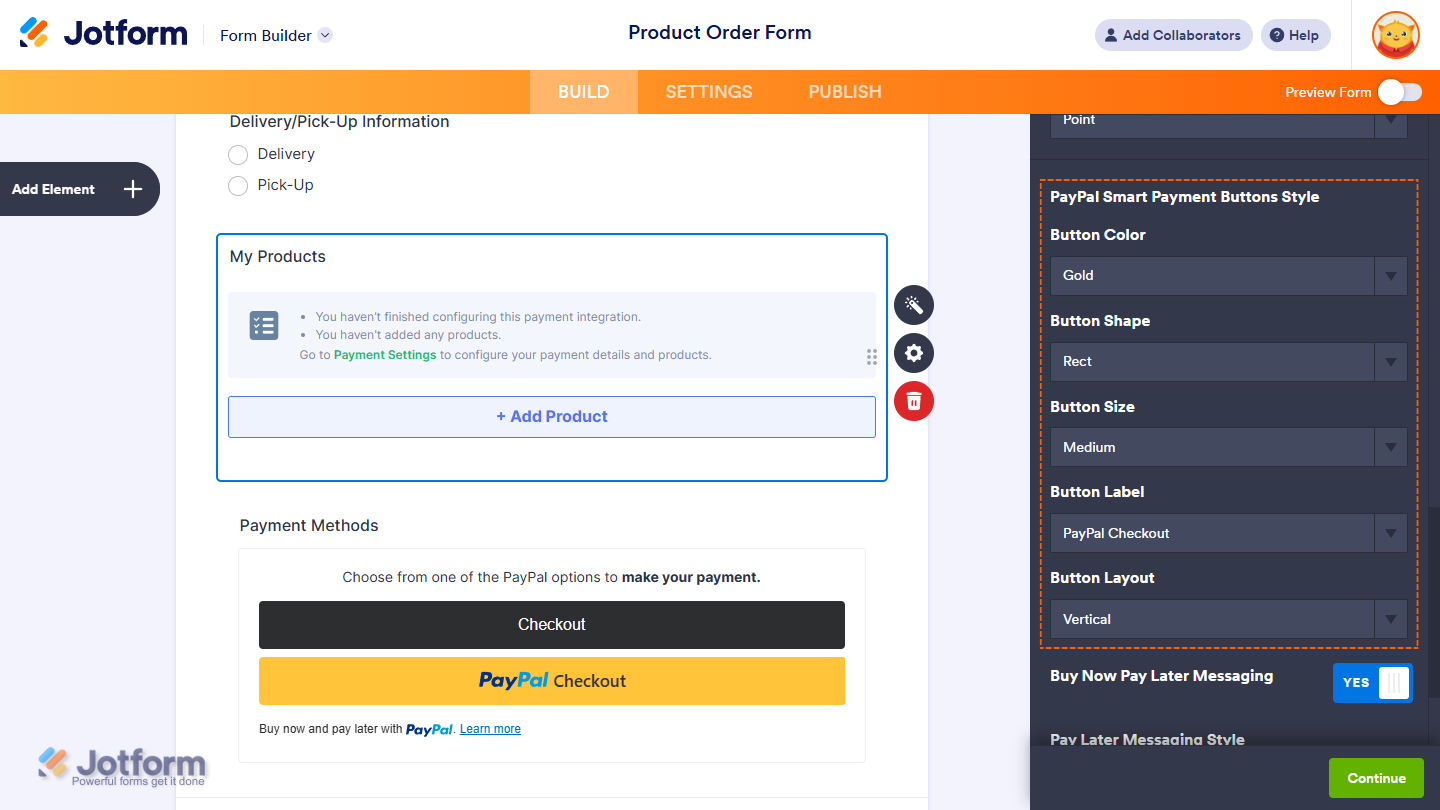
- Buy Now Pay Later Messaging — Toggle this to On to customize how the pay later messaging is displayed using the options below:
- Layout Style — Choose how the messaging layout appears on the form.
- Logo Type — Select the logo style to show with the message.
- Text Color — Pick a color for the message text.
- Text Size — Set the size of the message text.
Setting Up PayPal with Reusable Payment Connections
Jotform’s Reusable Payment Connections feature allows you to set up payment integrations like PayPal and reuse the same configuration on your other forms or apps created with Jotform without needing to configure it again. Here’s how to set it up:
- In Form Builder, click on Add Element on the left side of the page.
- Now, in the Form Elements menu, under the Payments tab, click on PayPal to add it to your form.
- Then, in the Payment Properties section that opens on the right side of the page, click on the Plug icon.

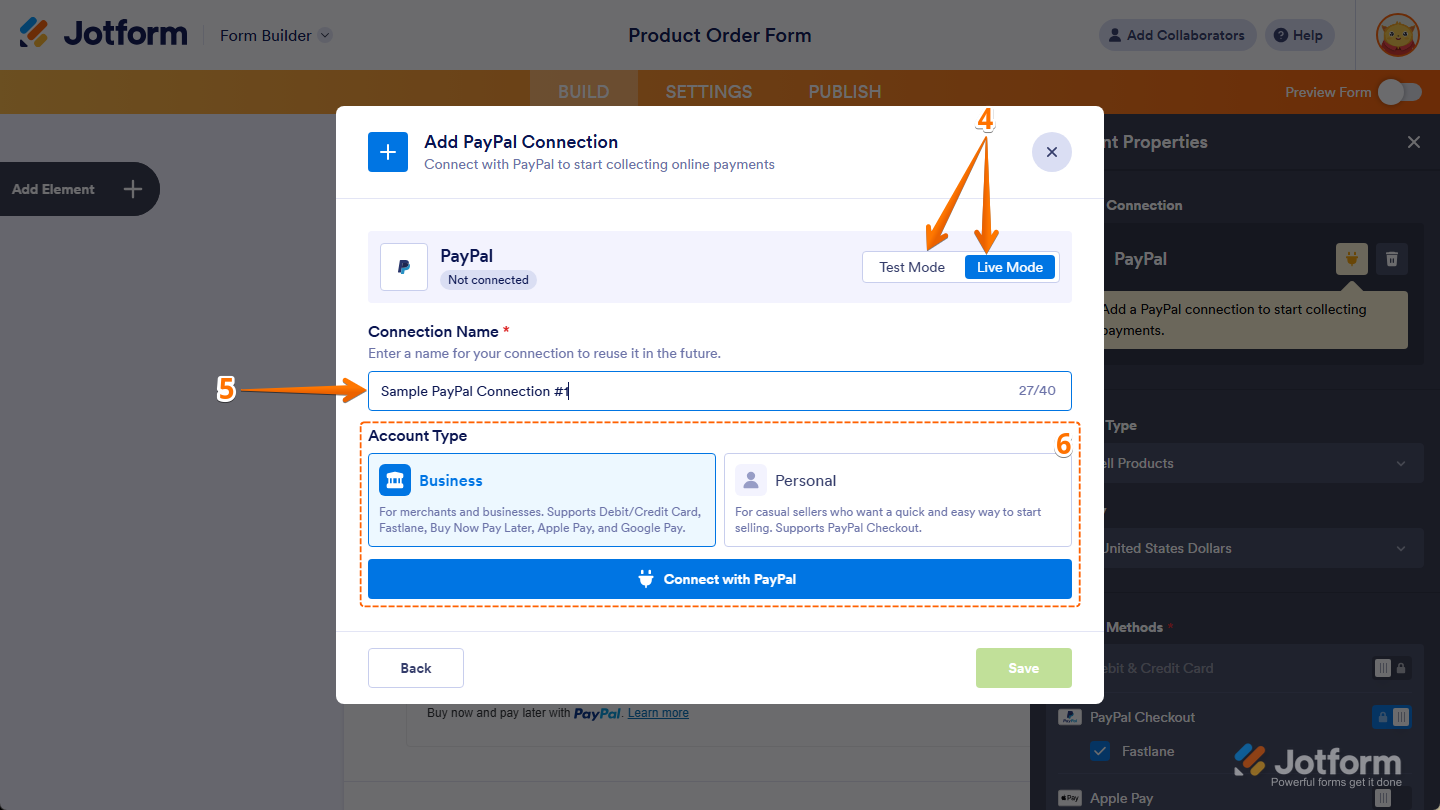
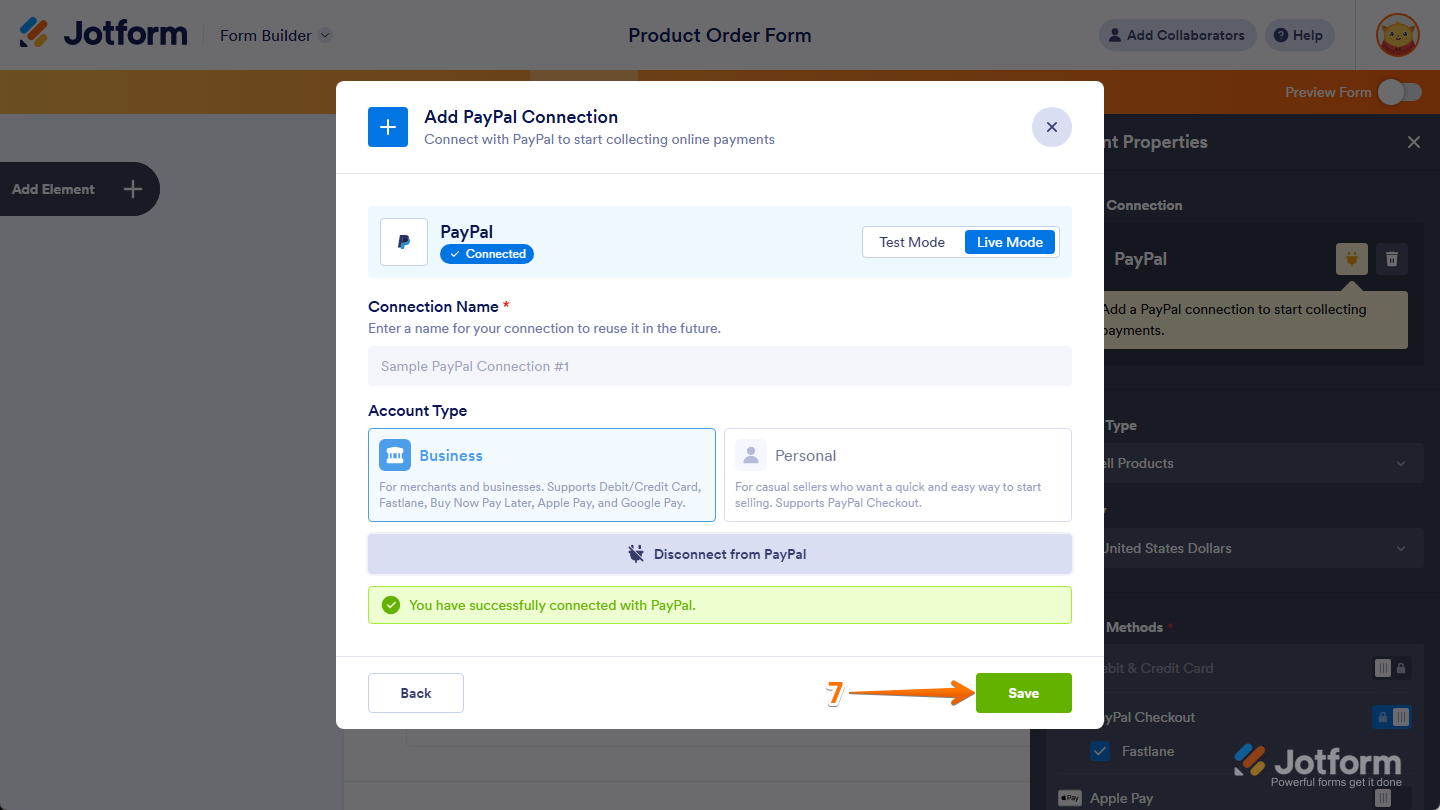
- Now, in the Add PayPal Connection window, click on either Test Mode or Live Mode at the top to select the environment for your payment connection.
- In the Connection Name section, enter a name you haven’t used in other reusable payment connections in your account, if there are any.
- After that, in the Account Type section, keep the Business option selected and click on Connect With PayPal at the bottom.
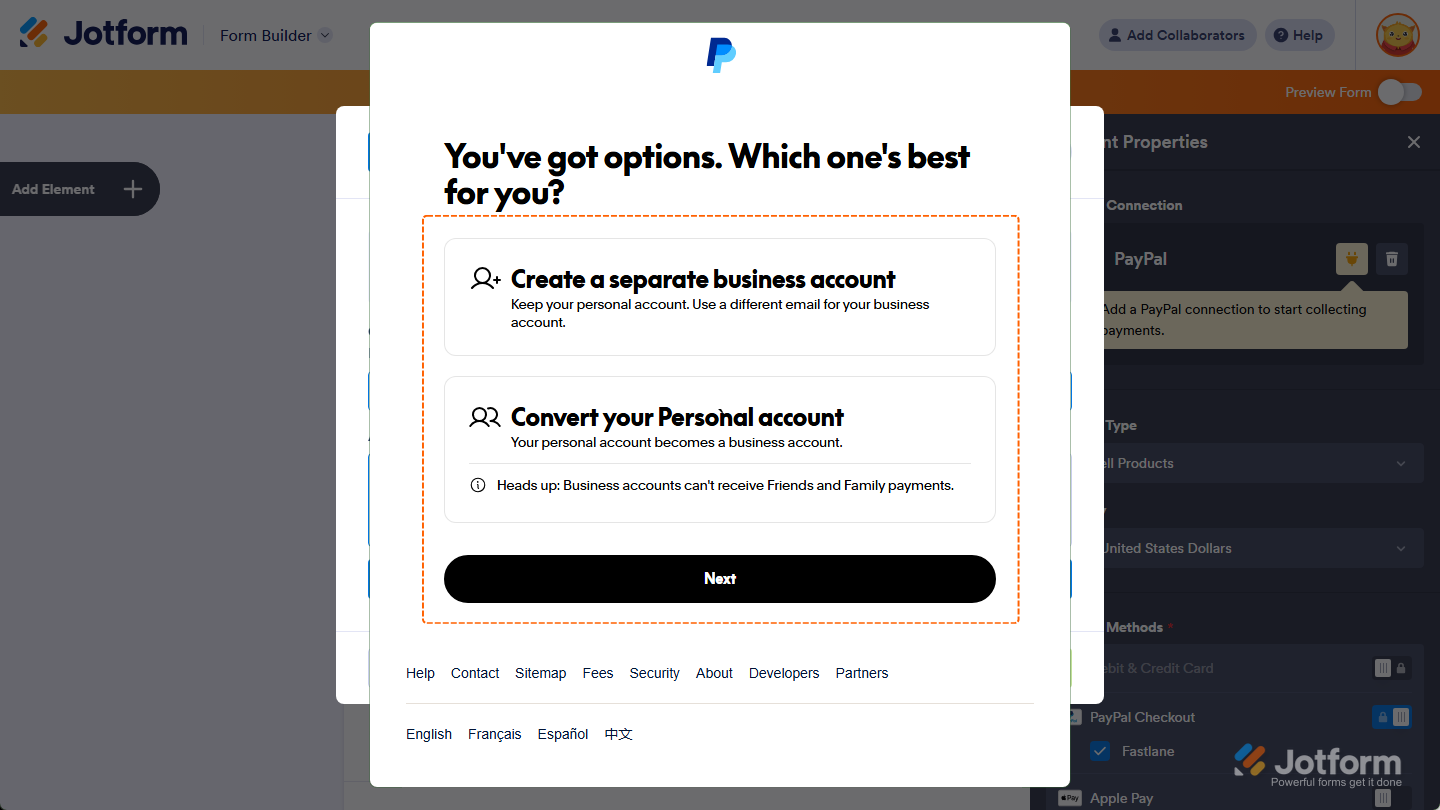
- In the window that pops up, log in to your PayPal account and connect your form to it.
If you log in to your PayPal Personal account, you’ll have the option to upgrade to a PayPal Business account or create a new one to use with your form.
Note
If you connect a PayPal Personal account, your form will use PayPal Checkout for payments. Upgrading to a PayPal Business account lets you offer additional payment methods, such as:
- Debit & Credit Cards
- Apple Pay
- Google Pay
- Fastlane
- Buy Now Pay Later
- Venmo
- Once your PayPal Business Account is connected, click on Save at the bottom of the window.
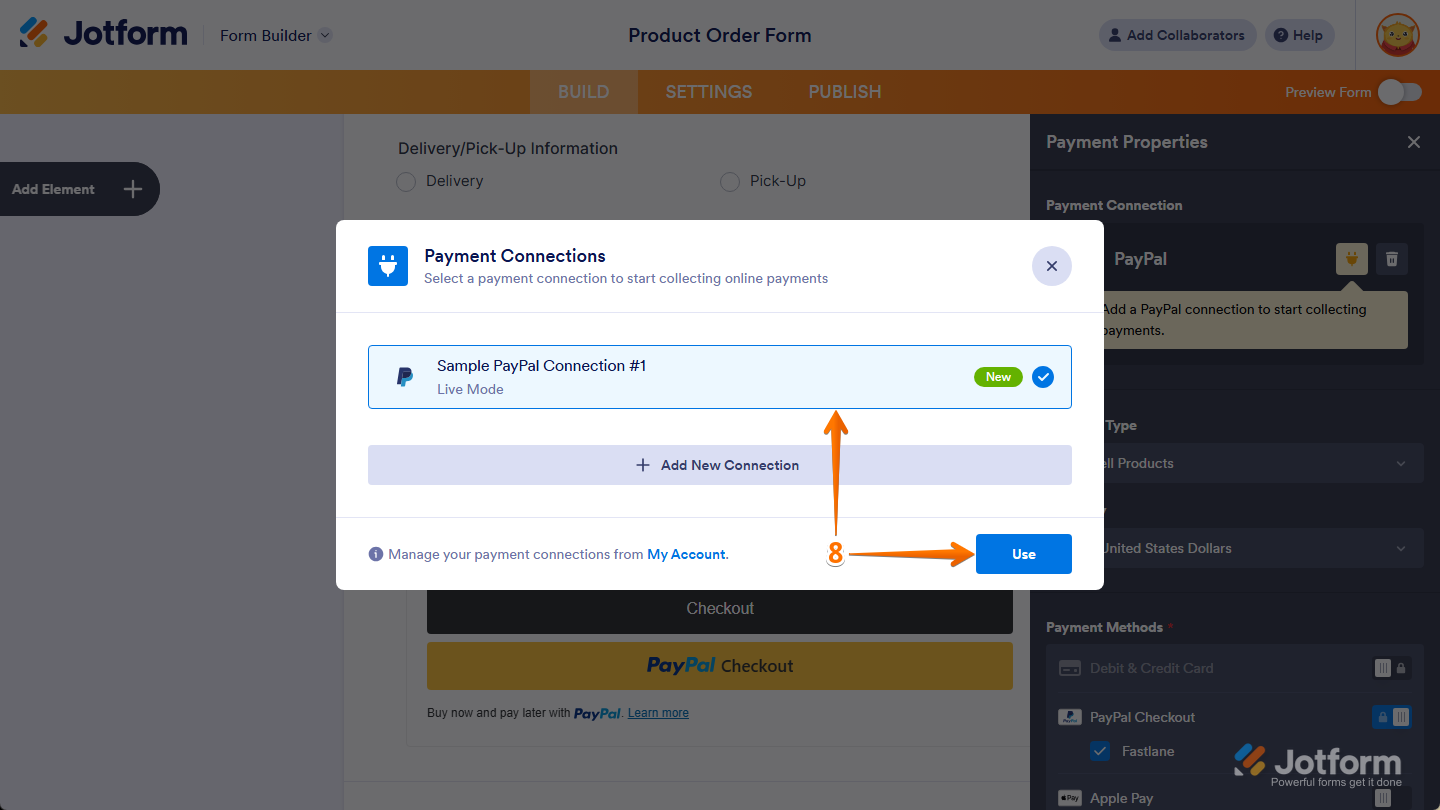
- Now, in the Payment Connections window, click on the PayPal Payment Connection you just added, and then click on Use at the bottom.

- In the Payment Type Dropdown menu, select what you want the payment to be processed for:
- Sell Products — This is selected by default. Use this to sell physical or digital goods at a fixed price, allowing customers to make a one-time purchase.
- Sell Subscriptions — Choose this to charge customers on a recurring basis for services, memberships, or other ongoing access.
- User-Defined Amount — This lets customers enter the amount they want to pay. It’s useful for tipping, custom amount pricing, or flexible payments.
- Collect Donations — Select this to accept voluntary contributions, commonly used for fundraising, nonprofit support, or charitable causes.
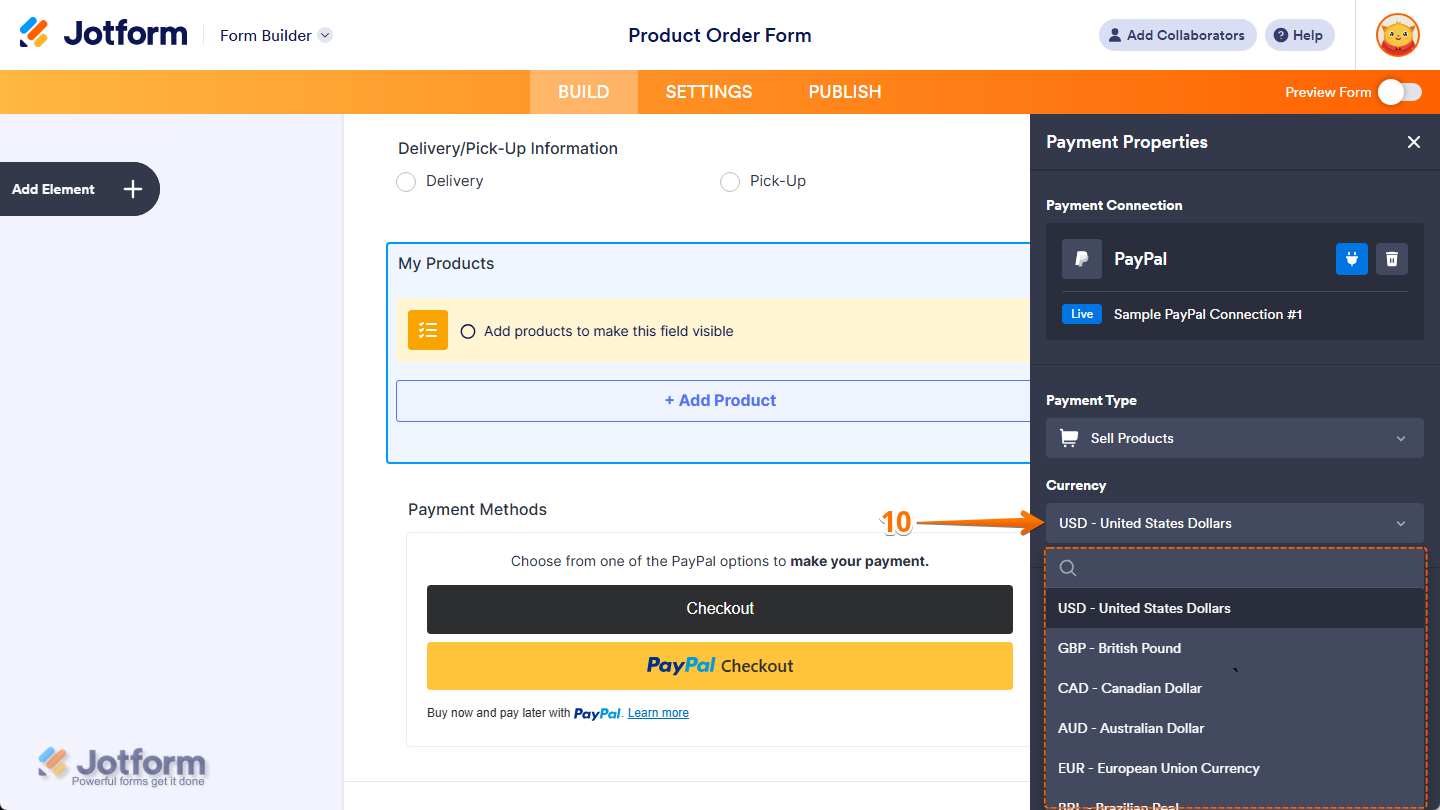
- Then, in the Currency Dropdown menu, select one of the currencies available with the integration. Or, search for it in the Search bar. We’ve got a complete list of the currencies available with PayPal here.
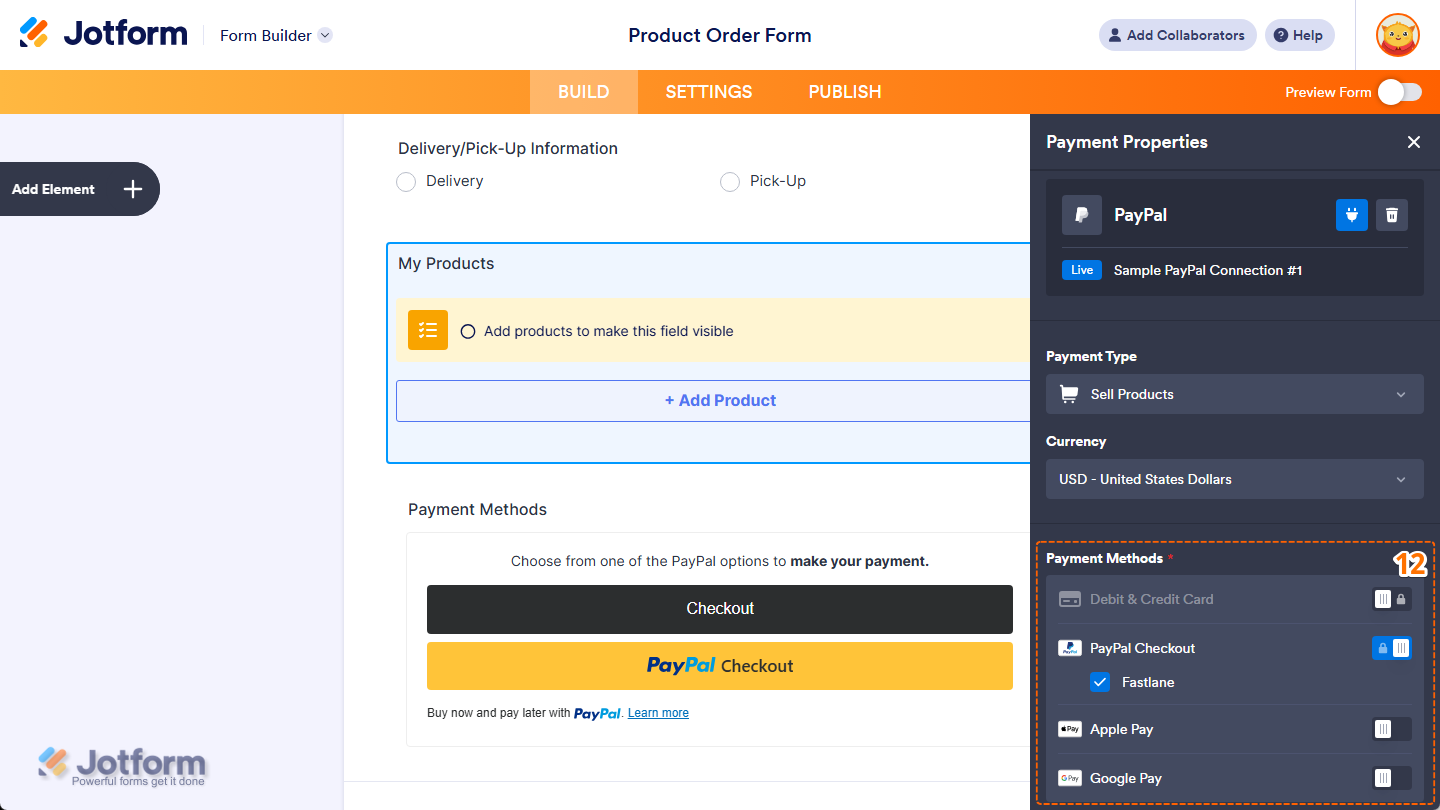
- Now, in the Payment Methods section, select the options you want to add to your payment form:
- Debit or Credit Card — Allow customers to pay using debit or credit cards.
- PayPal Checkout — PayPal Checkout is shown by default for customers to use for payments.
- Fastlane — This is checked by default for faster checkout. Check out these Fastlane Notes to learn more about it.
- Google Pay — Toggle this On to offer Google Pay as a payment option.
- Apple Pay — Toggle this On to offer Apple Pay as a payment option.
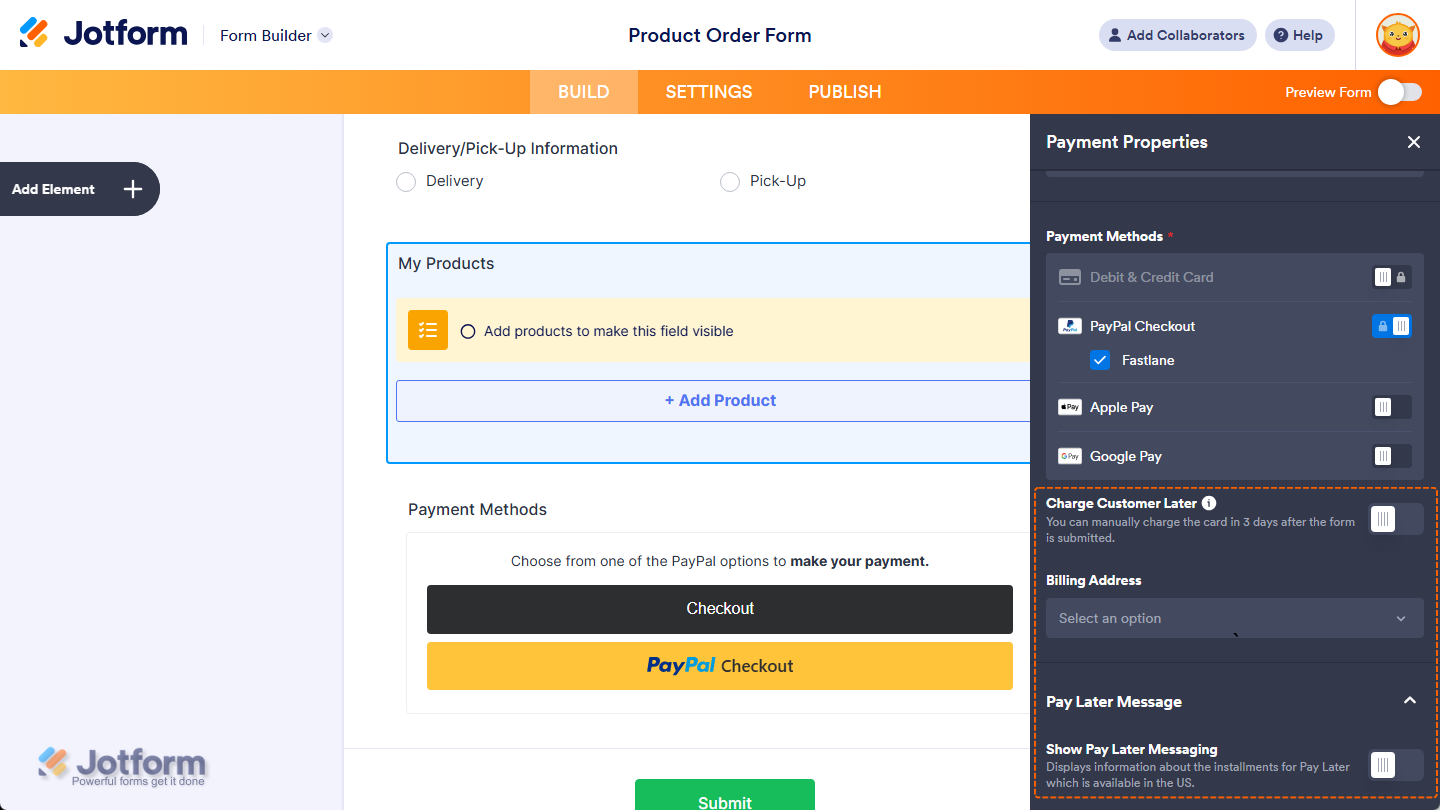
And here are some other gateway settings you can set up if you need them:
- Charge Customer Later — Toggle this On, to manually charge customers later after authorizing the payment. For a quick how-to, check out our guide on How to Enable Payment Authorization to learn more about it.
- Billing Address — Select an Address field to collect the Business Addresses of your customers.
- Pay Later Message — Expand this section to access the Show Pay Later Messaging option. Toggle it On to display installment information for Pay Later (available in the US). Additional customization options will also be shown.
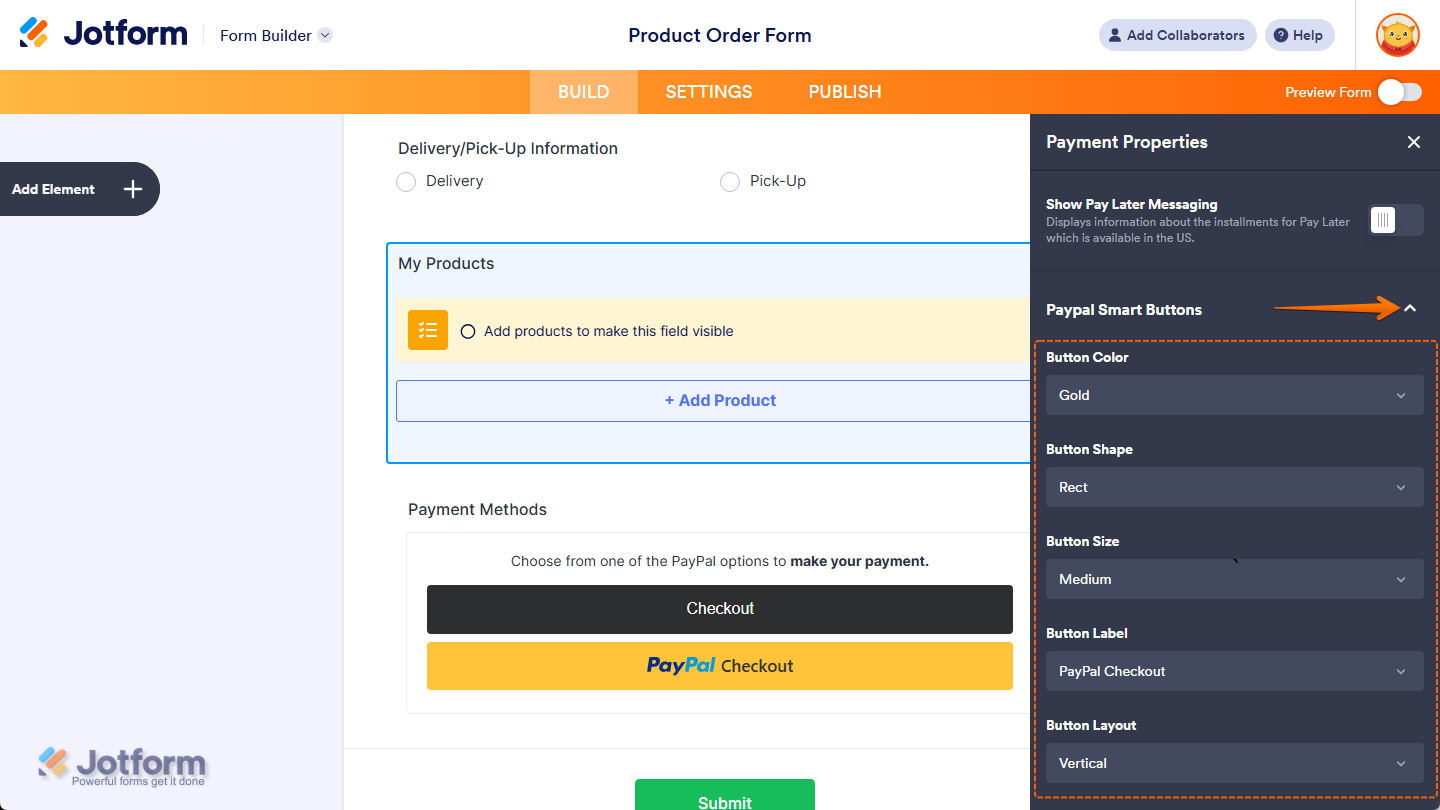
- PayPal Smart Payment Button Style — Expand this section to adjust how the PayPal button looks:
- Button Color — Choose the color of the PayPal button.
- Button Shape — Select the button’s shape.
- Button Size — Set the size of the PayPal button.
- Button Label — Choose the text that appears on the button.
- Button Layout — Define how the button is displayed.
And you’re all set! You’ve successfully set up your PayPal Reusable Payment Connection. Now, you can use this same configuration on any other form or app you create. We’ve got a guide on How to Add and Manage Reusable Payment Connections that makes it simple.
Notes
- Sell Subscription is not supported with PayPal Fastlane.
- Fastlane will be the default Payment Method for all new PayPal forms.
- If Fastlane is enabled, PayPal and PayPal Checkout will always be active and can’t be turned off.
- Fastlane supports credit card payments, so Fastlane and credit/debit card payments can’t be active at the same time. Enabling debit or credit card payments will automatically disable Fastlane.
- Fastlane fast checkout is only available in the US. Users in other countries will only have access to the standard credit/debit card payment option.
PayPal Supported Currencies
PayPal supports a variety of currencies for international transactions. Below is a list of the currencies available for use with PayPal. You can also check out their Paypal Currency page to learn more about it.
- USD — United States Dollars
- GBP — British Pound
- CAD — Canadian Dollar
- AUD — Australian Dollar
- EUR — European Union Currency
- BRL — Brazilian Real
- CZK — Czech Koruna
- DKK — Danish Krone
- HKD — Hong Kong Dollar
- HUF — Hungarian Forint
- ILS — Israeli New Sheqel
- JPY — Japanese Yen
- MYR — Malaysian Ringgit
- MXN — Mexican Peso
- TWD — New Taiwan Dollar
- NZD — New Zealand Dollar
- NOK — Norwegian Krone
- PHP — Philippine Peso
- PLN — Polish zLoty
- RUB — Russian Ruble
- SGD — Singapore Dollar
- SEK — Swedish Krona
- CHF — Swiss Franc
- THB — Thai Baht
- INR — Indian Rupee
Alternative Payment Methods
PayPal supports Alternative Payment Methods to offer localized payment options to your customers based on their region. You can view the full list of supported methods on PayPal’s developer page.
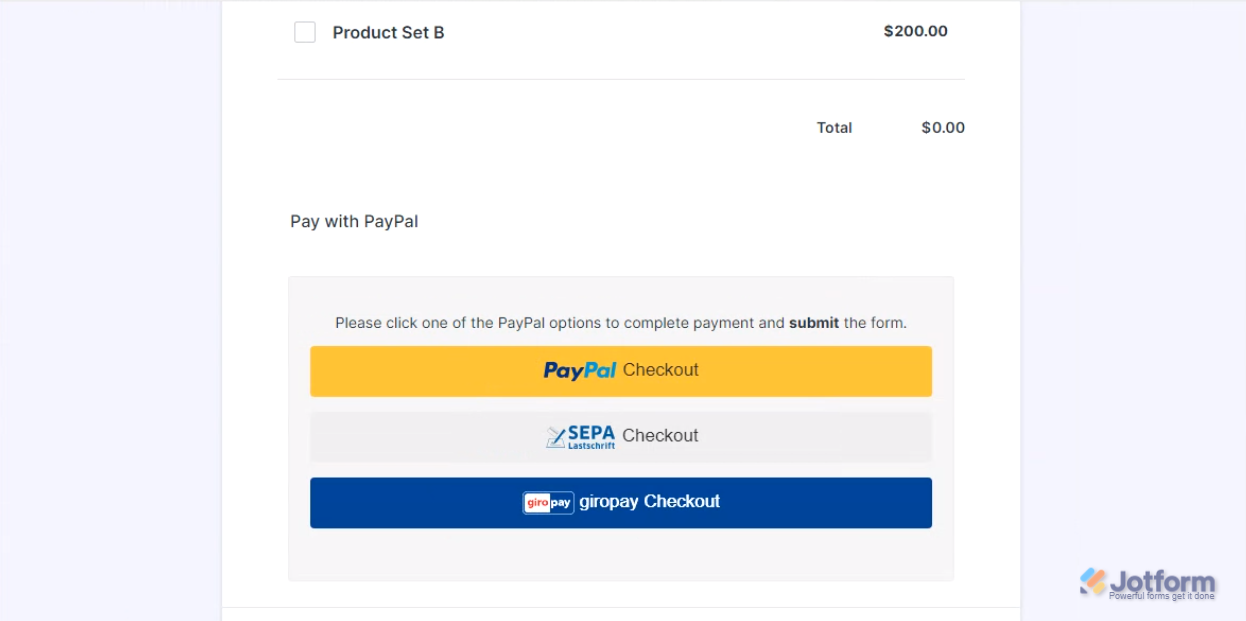
For example, if a customer from the Netherlands accesses your form, PayPal automatically displays Sepa and GiroPay as payment options beneath the main PayPal buttons:
Venmo Payments
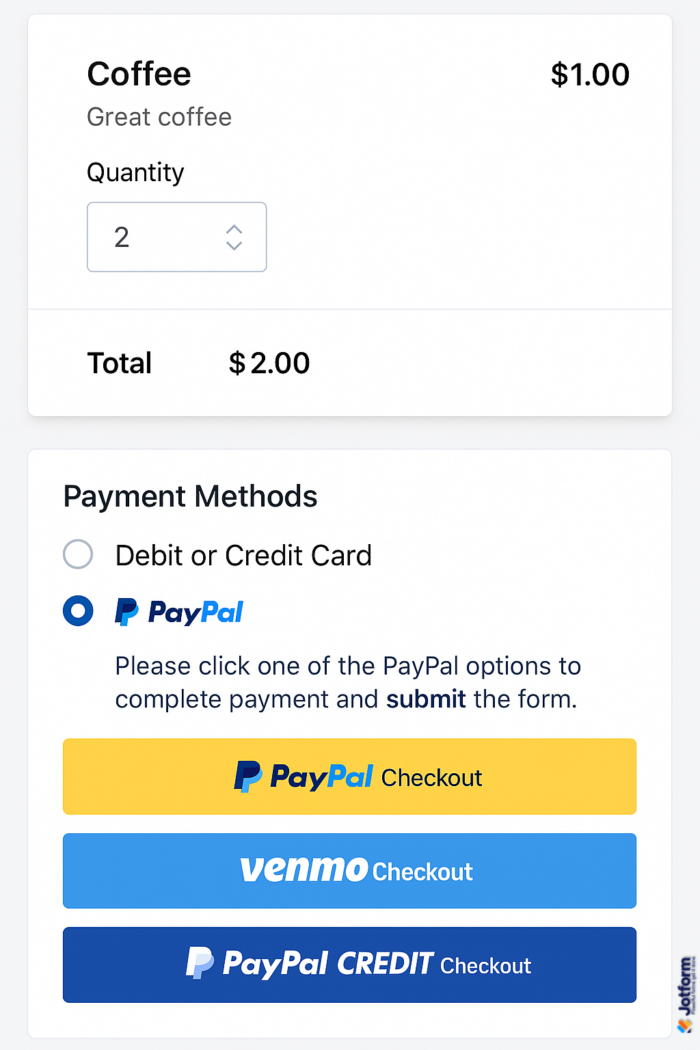
PayPal also supports Venmo as a payment method. Customers in the US will see the Venmo option during checkout and can pay directly through their Venmo accounts:
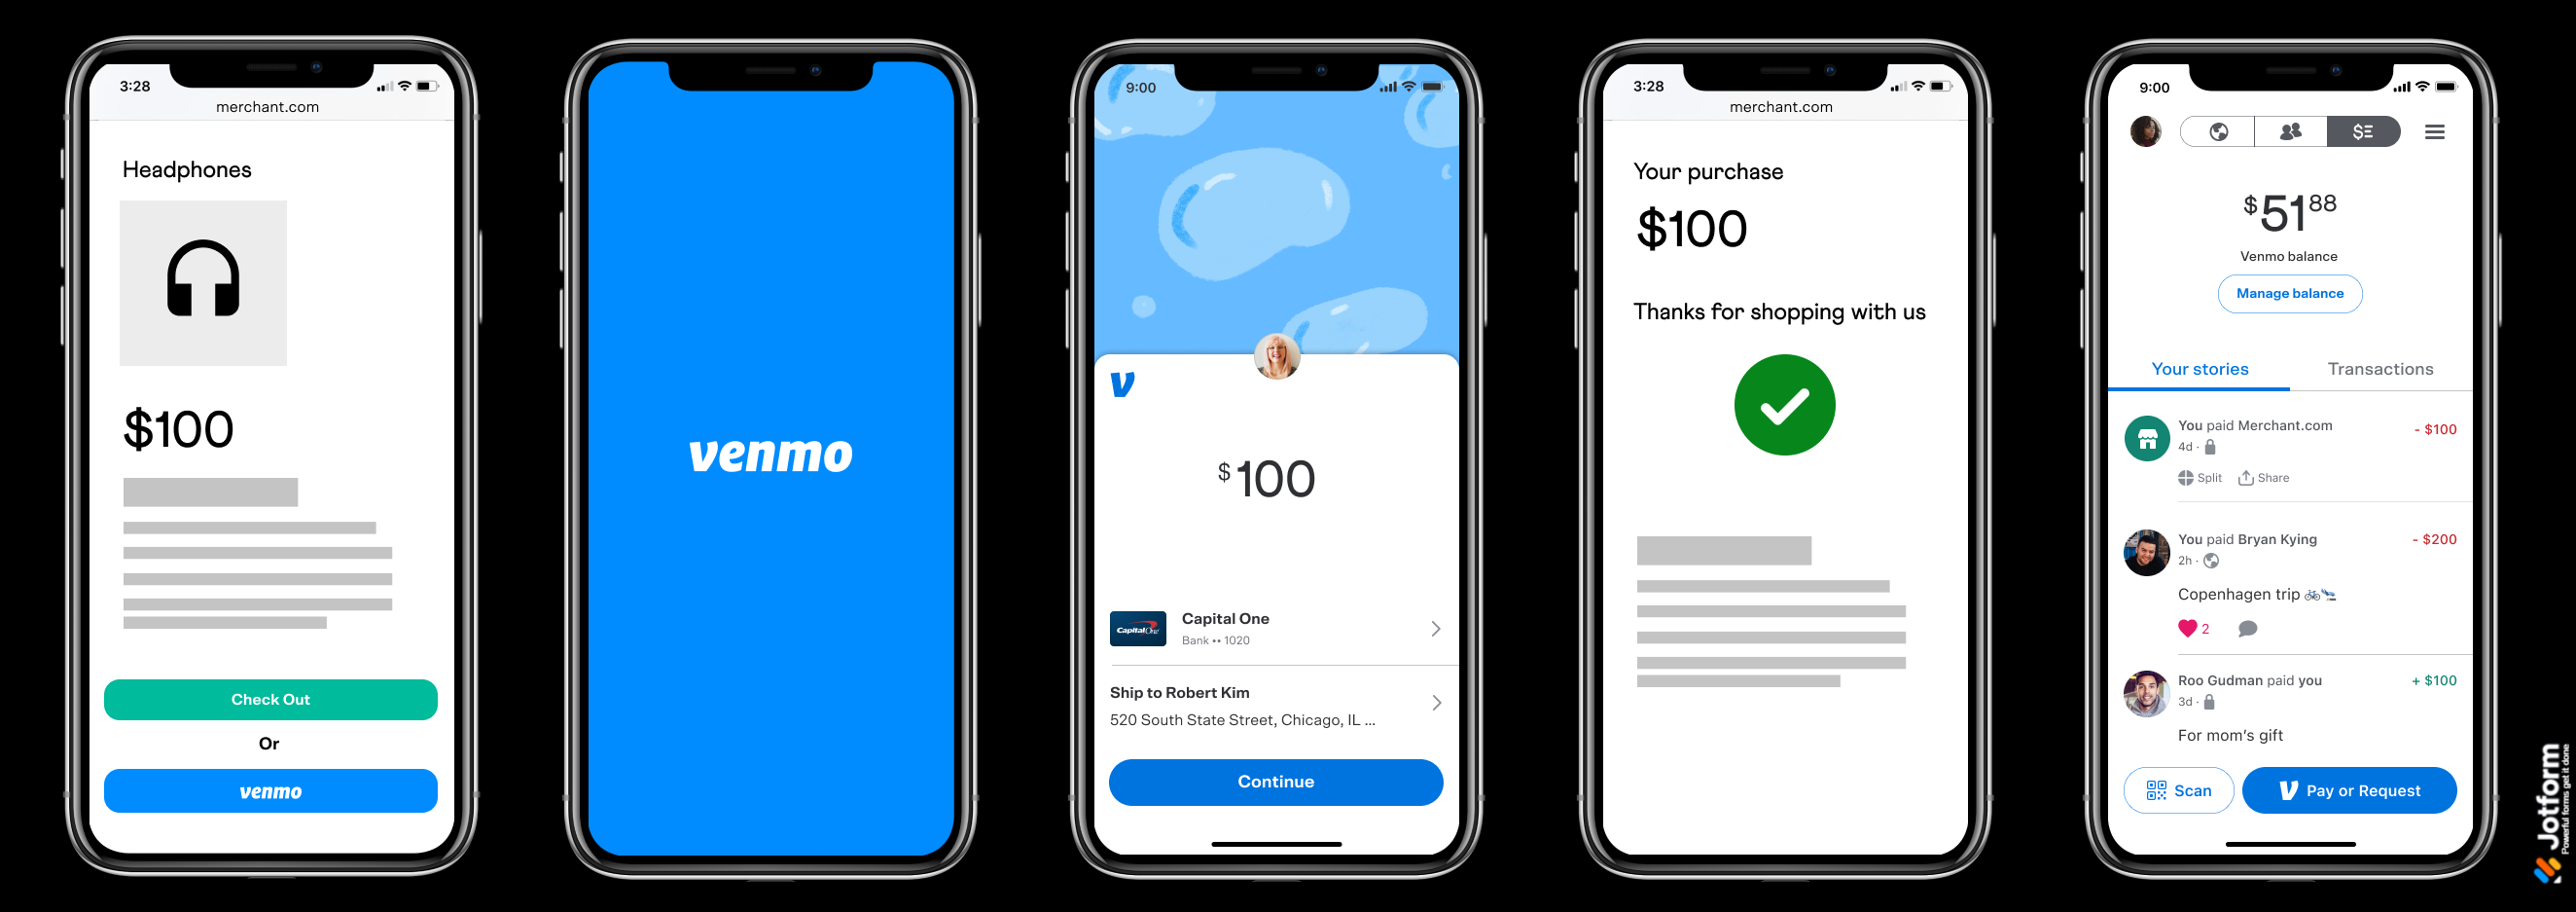
Venmo Mobile Experience
- The buyer taps on the Venmo button.
- Their mobile device then switches to the Venmo app.
- They review and complete the payment.
- They’re then redirected back to your form.
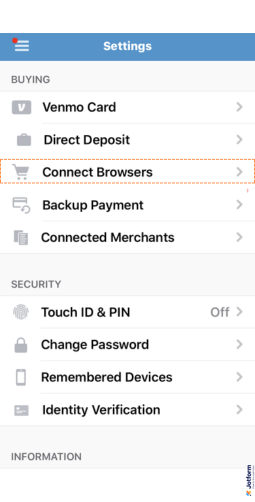
Venmo Mobile Requirements
- Buyers must use a mobile phone for checkout.
- The Venmo app should be installed.
- For iPhone users, ensure Safari is selected under Connected Browsers in the Venmo settings (not required for Android users).
Venmo Desktop Experience
The buyers scan a QR code using their Venmo app to authorize and complete the payment.
- The buyer clicks on the Venmo button on the desktop to generate the QR code.
- They then scan the QR code from the Venmo app on a mobile device.
- They complete the payment review on the Venmo app.
- They’re then routed back to your form to complete the payment.

You can also check out these guides about:
- Setting Up Your First Order Form
- How to Set Up a Recurring Payment Option
- How to Add Options to Payment Forms
- How to Add Coupon Code to Payment Forms
- How to Add Tax to Your Payment Form
- How to Add Shipping Cost to Payment Forms
- How to Generate an Invoice for Your Payment Form
- How to Enable and Manage Product Stocks in Payment Fields

Send Comment:
21 Comments:
December 8, 2025
Looks like when we choose sell-subscription with PayPal gateway, you can no longer accept credit card payments directly within the Jotform. Instead, the user is redirected to PayPal's website. Correct?
Thank you so much!
May 12, 2025
I'm having a problem connecting my Paypal Business to the form. I have followed the steps, I clicked on Live Mode, then a window pops up and asks me to log in to Paypal. I have already logged in 4 times. I am stuck on the page that says"You're ready to get paid with PayPal on Jotform Inc!" with the 2 recommended steps part, I already did one step. then at the bottom it says "All done? Feel free to keep working on your store.". A button below says "Return to Jotform Inc". I click on that but it doesn't get me anywhere. The last page(Connections) I came from was the "Add Paypal connection" widget. It's still not connected. What should I do to get connected?
https://www.jotform.com/myaccount/connections
June 3, 2024
Is there a limit to the number of transactions you can process with PayPal Checkout?
May 30, 2024
We are new to jotforms. Can we set up paypal and a credit card option? Also, we use zettle through paypal will that work?
May 30, 2024
How do I remove paypal from my page?
February 14, 2024
Hello, there is one question.
I couldn't find "South Korea" in the country list.
Is it available for Korean to connect PayPal account?
January 10, 2024
Cannot link form to PayPal. Get error message PayPal Script couldn't load as expected, please reload your page.
November 22, 2023
It's not staying connected when trying to integrate PayPal payment options to form
January 29, 2023
The PayPal business widget for connection is broken - it doesn't take me to a connection screen, it just redirects and loads Paypal.com
July 2, 2022
Here in United States at least on my Venmo app there is no spot for connect browsers.
Everything else on the screen is the same except that is missing ?
I uninstalled and reinstalled the app twice and still getting the same thing
I’m wondering if I get an older version of the app maybe that will show it
December 7, 2021
Hi Team
The Paypal Business widget has changed per the instruction above. I am in testing mode and want to remove the pay later option that is in step #23 and I am not allowed. Please help. Also, why can't I put anything after the checkout box?
May 29, 2021
Hallo,
ich bekomme nie die Bestätigungsmail :(
Ich habe schon im SpamFilter nachgeschaut und da ist auch nix.
Habe mehrmals innerhalb mehrere Tage die Prozedure erneut gemacht und es kommt nie eine Mail...
January 25, 2021
My form is having trouble taking payments. when we try to process an order, a message that says "transaction refused" pops up. help
December 30, 2020
كيف اربح من خلال هذا موقع
September 23, 2020
I am having trouble with a "field is too short or too long" error message.
August 30, 2020
I have a Business Paypal Account for my Non-Profit organisation that I want to integrate to Jotform but when I click "Cennect" I typed in PayPal log in detail, it send me to the paypal account without any confimation message. Also there is a message "Don't see the secure PayPal browser? we'll help you re-launch the window to complete your flow..." but when I click "Continue" it did not take me anywhere. Please advise.
August 26, 2020
How can we add a CART for customers to make 1 PAYMENT after selecting more than one product?
All our products are using Jotform and go directly to payment via PayPal.
Please advice. Can we add a shopping cart?
I would love to have someone walk me through it.
You can email me directly at sonya@ssmoakartist4god.com or
call 8172129031
Sonya
August 7, 2020
When someone tries to click the PayPal or PayPal Credit button button to pay they get an error message that says "This Field Is Required." and it won't go to PayPal for payment. What am I missing here?
June 26, 2020
Pretty painful experience of trying to set up paypal payment
Have spent few hours already trying to get this going
- while trying to use a test mode, the integration widget would everytime loose the connection with paypal account. So never managed with it
Giving up testing mode and using "live mode":
- still wasn’t able to make a payment from a bank card. The fields of the card number, expiration date and CVC code stayed inactive in the form. If hitting the submit form button regadless at this stage – form hangs endless with “please wait” message
Help!
June 10, 2020
Hi My form named - "Standard contract" has a PayPal function on it for the client to pay £50.00 to my business PayPal. A client has just tried to pay and I haven't received the money.
Can you advise.
June 10, 2020
Are there any additional fees for using PayPal business Integration?