PayPal Checkout provides users with a simple and secure checkout experience that doesn’t require navigating away from a website or mobile app to make a payment. With PayPal’s Smart Payment Buttons, payment methods, such as PayPal Credit, are displayed automatically, making it easier for users to complete payments.
Notes
- You must have a premier or business PayPal account to use this integration.
- PayPal Checkout doesn’t support users in Japan and Israel. If you are in one of these countries, you can use our other PayPal integrations: Payments Pro and Invoicing.
What Can You Do With Jotform’s PayPal Checkout Integration?
With PayPal Checkout, you can do the following:
- Sell products
- Collect donations
- Accept custom payments
How Do You Integrate Your Forms with PayPal Checkout?
Create a new or edit an existing form and follow the steps below to integrate PayPal Checkout.
- Click the Add Form Element button in the top-left part of the Form Builder.
- Go to the Payments tab.
- Search and click on PayPal Checkout to add it to your form.

Note
When you add PayPal Checkout, its Payment Settings will automatically open. If not, click the Wand icon to open it.
- In the Payment Settings, select the Environment first. While this is next to the Connect button, we highly recommend choosing a mode first, as this tells you which PayPal account to use. Test Mode requires a Sandbox account.
- Next, click the Connect button to connect your PayPal account. Here’s a short GIF of this step.
Note
If PayPal detects you have not completed your Business Application with them, they’ll prompt you to go through the same process again when you click the Connect button in the integration panel. It is recommended to contact PayPal first regarding the status of your application before setting up the PayPal Checkout integration.
- Once connected, set up the rest of the options:
- Currency — The prices and amounts displayed on the form are based on the selected currency. PayPal Checkout only supports a limited number of currencies.
- Payment Type — Specify whether to process payments for products, user-defined amounts, or custom donations.
- Replace Submit Button With PayPal — Toggle to display the submit button for manual form submission.
- Enable PayPal Credit — Toggle to enable PayPal Credit for US-based customers.
- Enable Card Payments — Toggle to enable card-based payments instead of just PayPal.

Under the Additional Gateway Settings, you can set up a few additional options, which include the following:
- Enable Elektronisches Lastschriftverfahren — ELV is an electronic direct debit payment method for banks in Germany.
- PayPal Smart Buttons — This option allows you to change the appearance of the PayPal buttons.
- Show Pay Later Messaging — Pay Later is PayPal’s loan feature for its customers based in Australia, France, Germany, Italy, Spain, the United Kingdom, and the United States.

- If you’ve selected Sell Products from the Payment Type, click the Continue button to add your product items. If you have chosen User Defined Amount or Collect Donation options, click the Save button to complete the integration.
See also:
- Setting Up Your First Order Form
- How to Add Options to Payment Forms
- How to Add Coupon Code to Payment Forms
- How to Add Tax to Your Payment Form
- How to Add Shipping Cost to Payment Forms
- How to Generate an Invoice for Your Payment Form
Notes
- Funding sources, such as PayPal Credit and Card Payments, are dynamically displayed for users based on location and browser cookies.
- Venmo will be displayed automatically to eligible consumers and cannot be enabled or disabled.
How Does PayPal Checkout Payment Work?
The payment is authorized and executed only when the form is submitted. Below are demos of payment flow when paying through Paypal Credit or Debit/Credit Card.
PayPal Checkout
You will see from this demo that PayPal Credit is available on the checkout page. PayPal Credit is also displayed on the form for eligible users.
Debit/Credit Card
For Debit or Credit Card payments, it is important to remember that cards attached to a PayPal account cannot be used for this type of payment.
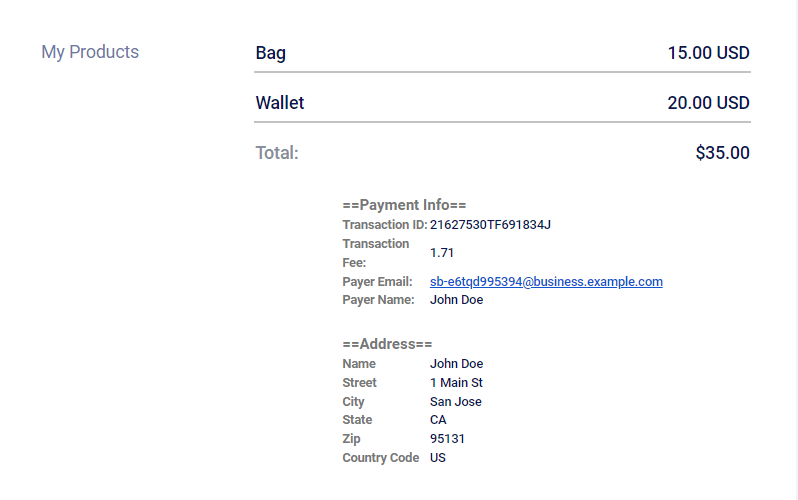
The payment information will include Transaction ID, Transaction Fee, Payer Email, and Payer Name on the form submission page and in notification emails.

If you have questions, suggestions, or feedback, let us know in the comment box below or contact us by creating a support ticket.


Send Comment:
3 Comments:
More than a year ago
After a Paypal transaction completes successfully and returns control to Jotform, how do we access the specific, unique data elements from the payment widget (class?). Data elements like quantity, order total, etc.
We can see the payment widget in the Jotform Tables/Submissions for the forms submitted. We can even see the payment widget details when we export the Submissions table to PDF. But we need to access the specific data elements from there transaction confirmation. Thanks!
More than a year ago
Hi i am in the manila and can i integrate my local bank for receiving payment? Because i don't have a paypal business account
More than a year ago
Very helpful. I set it up and even tho your info says Venmo will show, it doesn't.