


Tarkastele kaikkien kolmannen osapuolen integraatioidesi lokeja ja hallitse tietoputkia koko organisaatiossasi.
Yhdenmukaista analytiikka, hallinta ja turvatoimet jokaiselle tiimille, omaisuuserälle ja integraatiolle keskitetyssä keskuksessa. Admin Console nopeuttaa työtä, varmistaa entistä paremman turvallisuuden ja mahdollistaa yrityksesi älykkäämmän johtamisen.

Varmista turvallinen käyttöoikeus tiimin jäsenille säilyttäen saumaton yhteistyö. Admin Consolessa voit hallita käyttäjärooleja, vierastunnuksia ja työtiloja keskitetystä alustasta.
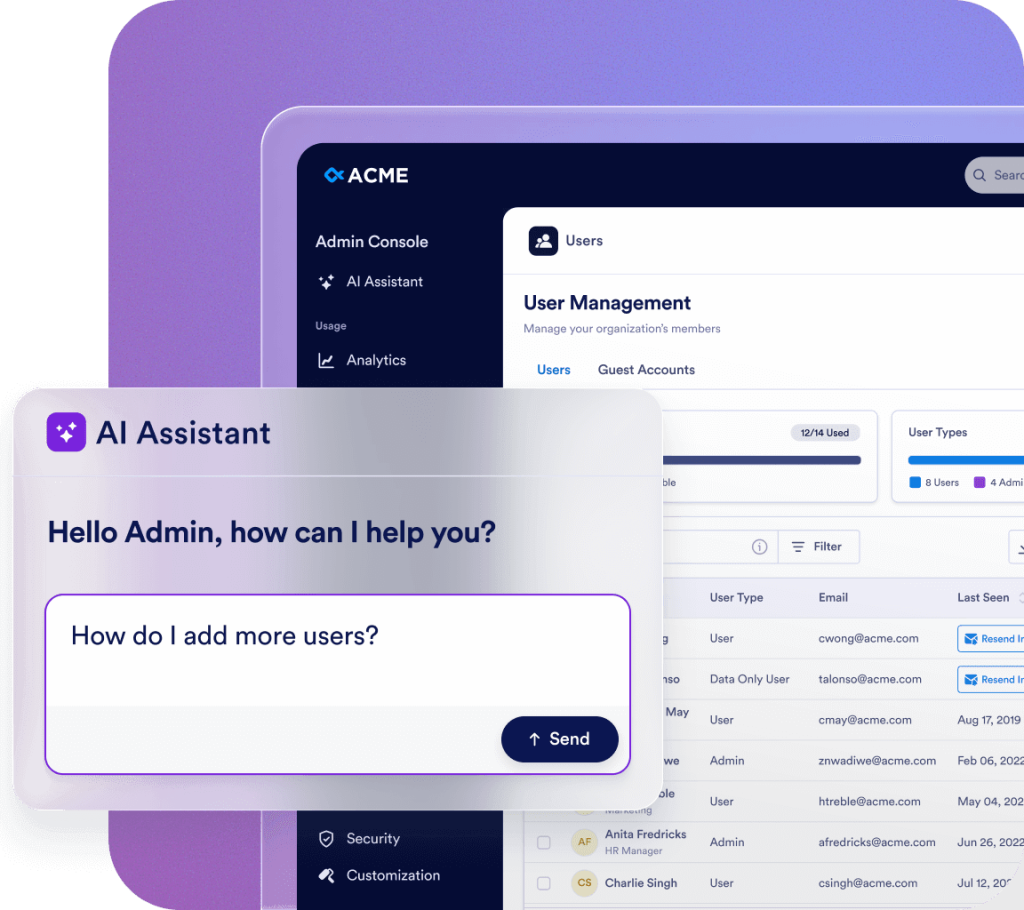
Streamline your administration with Jotform AI. Whether you need to navigate the Admin Console, manage users, or update organization settings, just ask. Get instant answers or let AI handle the task for you—all in one place.


Tarjoa yhtenäinen brändielämys koko organisaatiossasi täysin muokattavien visuaalisten elementtien, kirjautumisnäyttöjen ja lomaketyyppien avulla. Anna käyttäjien valita oman työtilansa ulkoasu tai pakota yhtenäinen ilme, joka heijastaa organisaatiosi identiteettiä jokaisessa kosketuspisteessä.

Jotform Enterprise mukautuu helposti tarpeisiisi nopeamman ROI:n saavuttamiseksi. Siirrä tietoja, räätälöi työnkulkuja ja mukauta widgettejä helppokäyttöisen API-rajapintamme ja satojen integraatioiden avulla. Käytä webhookeja käynnistämään tiedonkulun tai ohjaa lähetysilmoitukset määritettyyn URL-osoitteeseen.
Tarkastele kaikkien kolmannen osapuolen integraatioidesi lokeja ja hallitse tietoputkia koko organisaatiossasi.

Lisää uusia maksuportteja, linkitä ne resursseihin, määritä maksuasetukset ja ylläpidä koko organisaation kattavaa valvontaa vaivattomasti.

Lisää, seuraa ja hallinnoi lähettäjän sähköpostiosoitteita koko organisaatiossasi.

Nauti sujuvasta käyttöönottokokemuksesta ensimmäisestä päivästä lähtien. Oma asiakasvastaavasi tarjoaa suoraa tukea organisaatiollesi. Saat reaaliaikaista ohjausta Zoomin kautta tai nopeita vastauksia lähettämiisi kysymyksiin. Voit myös hyödyntää kattavia ja ajantasaisia resursseja, kuten e-kirjoja, käyttöoppaita ja uutiskirjeitä.

Yritystason tietoturva sisältää palvelinlaajuiset hallintaominaisuudet, kuten kertakirjautumisen (SSO), rooliperusteisen käyttöoikeuksien hallinnan, kaksivaiheisen tunnistautumisen, istuntojen aikakatkaisut ja IP-rajoitukset. Jotform Enterprise noudattaa GDPR- ja CCPA-säädöksiä ja tarjoaa valinnaisia HIPAA-yhteensopivia lomakkeita. Voit myös tallentaa kaikki tietosi paikalliseen tietojen säilytyskeskukseen.
Ota yhteyttä myyntitiimiin
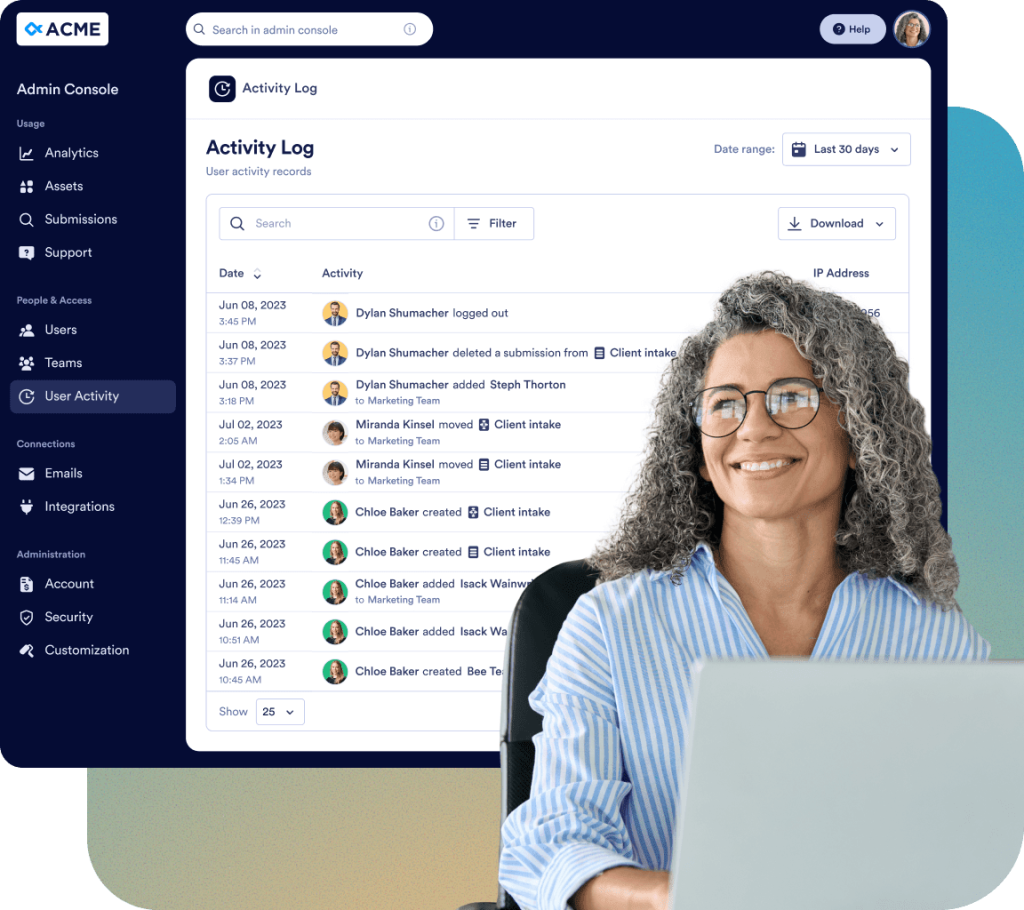
Seuraa kaikkia muutoksia koko organisaatiossasi yksityiskohtaisten lokien avulla:

Pyynnöstä Jotform-tiimi rakentaa ja ylläpitää räätälöidyn, natiivin mobiilisovelluksen organisaatiollesi. Käytä Jotform Enterprisea milloin ja missä tahansa turvallisessa ympäristössä, joka on brändätty heijastamaan organisaatiosi identiteettiä. Voit helposti seurata käyttäjiä ja laitteita ja kutsua tiimisi lataamaan sovelluksen.

Omistautunut tiimimme varmistaa sujuvan käyttöönoton, joka on räätälöity organisaatiosi tarpeisiin. Saat asiantuntevaa opastusta koko matkan ajan, lomakkeiden luomisesta työnkulun optimointiin. Anna meidän valmistaa yrityksesi menestykseen.
Admin Console on keskitetty hallinta-alue, jossa järjestelmänvalvojat voivat hallita kaikkia organisaatioon liittyviä asetuksia. Sieltä voit hallita käyttäjiä ja vierastilejä, määrittää suojausasetuksia, valvoa lokeja, hallita resursseja, tarkastella käyttötilastoja ja käyttää kaikkia organisaatioosi liittyviä tili- ja laskutustietoja.
Jos sinulla on järjestelmänvalvojan rooli, napsauta Avatar-välilehteä ja valitse sitten avautuvasta valikosta Admin Console -vaihtoehto. Sinut ohjataan Admin Console -etusivulle.
Kyllä. Admin Consolessa valitse vasemmasta valikosta Käyttäjät. Löydät kaksi erillistä välilehteä: Käyttäjät ja Vierastilit. Sieltä voit lisätä uusia jäseniä, päivittää heidän roolejaan ja tehdä tietoturvaan liittyviä muutoksia.
Kyllä. Hallintakonsolissa siirry kohtaan Käyttäjät > Vierastilit. Voit tarkastella kaikkia organisaatiosi vieraskäyttäjiä, tarkistaa heille määritetyt resurssit ja peruuttaa heidän käyttöoikeutensa tarvittaessa.
Kyllä. Admin Consolessa siirry vasempaan valikkoon ja napsauta Käyttäjät-osiota. Voit tarkastella kaikkien käyttäjien luetteloa, ja napsauttamalla kolmen pisteen toimintopainiketta kunkin luettelossa olevan käyttäjän oikealla puolella avautuu sivupalkki, josta voit tarkistaa Resurssit-välilehden nähdäksesi kunkin oikeutetun käyttäjän omistamat, jaetut ja osoitetut resurssit, ja peruuttaa käyttöoikeuden tarvittaessa.
Ei. Kun poistat käyttäjän, näkyviin tulee vahvistusikkuna, jonka avulla voit siirtää kaikki liitetyt resurssit toiselle aktiiviselle käyttäjälle ennen poiston suorittamista.
Kyllä. Siirry Admin Consolen vasempaan valikkoon ja valitse Tili ja laskutus > Laskut. Voit tarkastella kaikkien laskujen luetteloa, mukaan lukien maksetut ja maksamattomat tilat.
Siirry hallintakonsolissa vasemmasta valikosta kohtaan Tili ja laskutus > Tili. Voit seurata sekä kuukausittaisia SMS- (1 000 viestiä) että puhelu- (1 000 minuuttia) agenttirajoja ja tarkastella käyttökynnysarvoihin liittyviä hälytyksiä. Nämä rajat näkyvät tällä sivulla, jos olet ottanut agentit käyttöön organisaatiollesi kohdassa Resurssit > Agentit > Asetukset.
Kyllä. Siirry Admin Consolessa vasemmasta valikosta kohtaan Tili & Laskutus > Laskutustiedot. Tältä sivulta voit tarkistaa ja päivittää organisaatiosi laskutusosoitteen, laskutuksen yhteyshenkilön tiedot ja muut asiaan liittyvät tiedot varmistaaksesi, että laskutustietosi pysyvät tarkkoina ja ajan tasalla.
Kyllä. Siirry Admin Consolessa vasemmasta valikosta kohtaan Customization. Tässä osiossa voit avata Workspace-, Login Page- tai Error Page -välilehdet suunnitellaksesi ja mukauttaaksesi kunkin sivun ulkoasua ja sisältöä organisaatiollesi.
Kyllä. Admin Console -hallintapaneelissa mene vasemmasta valikosta kohtaan Resurssit ja valitse Lomakkeet > Lomakeasetukset. Avaa sitten Lomaketeema-välilehti luodaksesi mukautetun lomaketeeman organisaatiollesi. Voit mukauttaa logon, koon, taustavärin ja yleisen tyylin. Teema koskee vain perinteisiä lomakkeita ja se voidaan asettaa oletukseksi tai pakottaa kaikille käyttäjille.
Kyllä. Siirry Admin Consolessa vasemmanpuoleisesta valikosta kohtaan Mukauttaminen ja avaa Brändipaketti-välilehti. AI:n avulla voit luoda automaattisesti täydellisen brändipaketin organisaatiosi logon tai verkkosivuston avulla. Sieltä voit tarkastella ja säätää ehdotettuja värejä, fontteja ja tyylejä vastaamaan organisaatiosi visuaalista identiteettiä. Kun paketti on viimeistelty, voit soveltaa tätä brändipakettia kirjautumis-, virhe-, työtila- ja muihin mukautettaviin sivuihin.
Kyllä. Admin-konsolissa siirry vasemmasta valikosta kohtaan Integraatiot ja valitse Lokit-välilehti. Voit tarkastella kaikkia organisaatiosi yhdistettyjä integraatioita, tarkistaa yksityiskohtaiset lokit jokaisesta integraatiosta, seurata käyttötietoja ja tunnistaa nopeasti epäonnistuneet kutsut tai virheet. Tämän ansiosta voit seurata integraation suorituskykyä ja ratkaista ongelmia tehokkaasti.
Kyllä. Siirry Admin-konsolissa vasemman valikon Integraatiot-kohtaan ja avaa Asetukset-välilehti. Täältä voit tarkastella kaikkia organisaatiosi käytettävissä olevia integraatioita ja määrittää niiden näkyvyyden. Voit piilottaa tai näyttää tietyt integraatiot käyttäjille lomakerakentajassa tai jopa piilottaa koko Integraatiot-osion tarvittaessa. Tämän avulla voit hallita, mitkä integraatiot ovat käyttäjien käytettävissä, ja varmistaa sujuvan kokemuksen lomakerakentajassa.
Kyllä. Siirry Admin Consolessa vasemmasta valikosta kohtaan Sähköpostit ja valitse Lokit-välilehti. Voit seurata kaikkia organisaation laajuisia sähköposteja, mukaan lukien automaattivastauksia ja vastaanottajien ilmoituksia. Lokien avulla voit suodattaa sähköposteja päivämääräalueen mukaan, tarkistaa toimitustilan, tunnistaa virheet tai epäonnistumiset sekä ladata lokitiedot raportointia tai auditointia varten. Tämä tarjoaa täyden näkyvyyden organisaatiosi sähköpostitoimintoihin.
Kyllä. Siirry Admin-konsolissa vasemmanpuoleisesta valikosta kohtaan Sähköpostit ja avaa Asetukset-välilehti. Täältä voit lisätä uusia lähettäjän sähköpostiosoitteita, olivatpa ne sitten mukautettuja, Microsoft- tai Google-osoitteita, ja päättää, onko jokainen sähköpostiosoite valinnainen vai pakollinen kaikille käyttäjille. Tämä auttaa pitämään lähettäjän tiedot yhdenmukaisina ja helpottaa sähköpostiasetusten hallintaa koko organisaatiossasi.
Kyllä. Siirry Admin Consolessa vasemmanpuoleisesta valikosta kohtaan Resurssit. Pääset käsiksi kaikkiin resurssityyppeihin, mukaan lukien Forms, AI Agents, Sign Documents, Apps ja Workflows. Jokaisen resurssin kohdalla voit tarkastella tietoja, muokata asetuksia, poistaa tai ladata sen. Voit myös tarkastella lähetyksiä ja avata analytiikkasivun valvoaksesi käyttöä ja suorituskykyä koko organisaatiossasi.
Voit muuttaa vain Lomake-resurssien omistajaa. Jos lomake on linkitetty toiseen resurssiin, kuten työnkulkuun, liittyvän työnkulun omistajuus päivittyy automaattisesti aina kun lomakkeen omistajaa vaihdetaan.
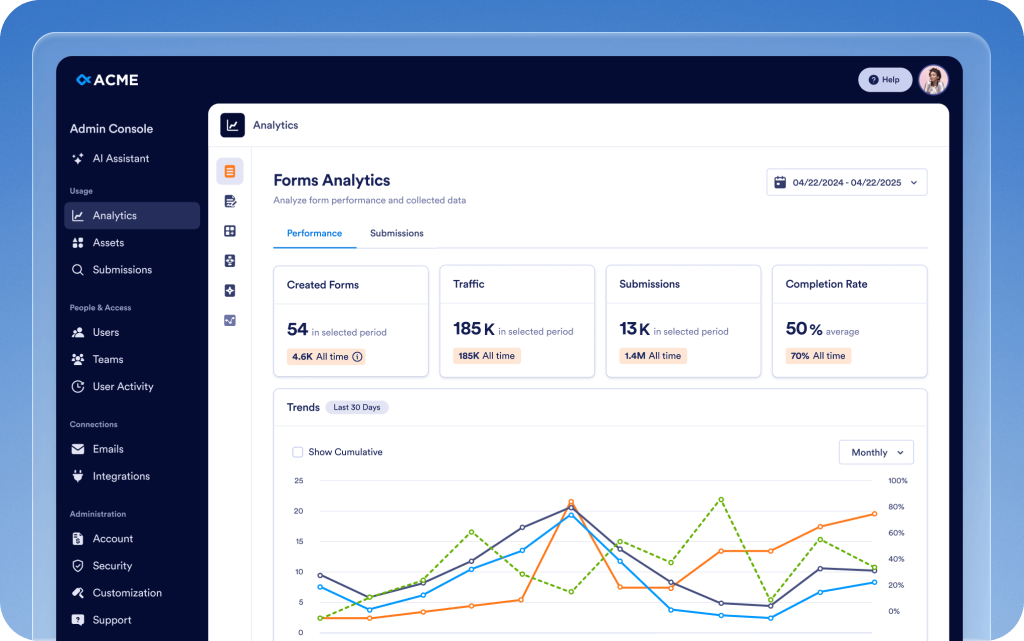
Kyllä. Admin Consolessa siirry vasemmanpuoleisesta valikosta kohtaan Analytiikka. Voit tarkastella koko organisaation laajuista käyttötietoa lomakkeista, tekoälyagenteista, allekirjoitusasiakirjoista, sovelluksista ja työnkuluista. Lisäksi voit avata kunkin resurssin yksityiskohtaisen sivun tarkastellaksesi yksittäisiä käyttötilastoja, lähetystietoja ja suorituskykyyn liittyviä oivalluksia, mikä auttaa sinua seuraamaan toimintaa ja tekemään tietoon perustuvia päätöksiä.
Kyllä. Admin-konsolissa siirry vasemmanpuoleisesta valikosta kohtaan Resurssit > Mobiilisovellus. Voit ladata Enterprise-sovelluksesi, kutsua käyttäjiä organisaatiostasi ja jopa luoda mukautetun mobiilisovelluksen lisämaksusta. Voit personoida sitä organisaatiosi brändäyksellä, mukaan lukien logo, nimi ja värit, vastaamaan visuaalista ilmettänne.
Kyllä. Siirry Admin-konsolissa vasemman valikon kautta kohtaan Turvallisuus. Tässä osiossa voit määrittää kaikki organisaationlaajuiset turvallisuusasetukset, kuten pääsynvalvonnan, todennusvaihtoehdot ja muut käytännöt, varmistaaksesi, että organisaatiosi tiedot ja resurssit pysyvät turvassa.
Voit ottaa SSO:n käyttöön, kun se on aktivoitu tilillesi. Jos SSO ei ole vielä käytössä, ota yhteyttä asiakkuuspäällikköösi pyytääksesi aktivointia. Kun se on aktivoitu, Lisää SSO-palveluntarjoaja -painike aktivoituu Turvallisuus-osiossa, minkä jälkeen voit yhdistää ja määrittää SSO-palveluntarjoajasi organisaatiollesi.
Kyllä. Admin-konsolissa siirry vasemmanpuoleisesta valikosta kohtaan Turvallisuus > Kaksivaiheinen todennus (2FA). Voit ottaa 2FA:n käyttöön organisaatiollesi ja valita sen pakolliseksi kaikille käyttäjille, mikä auttaa parantamaan tilin turvallisuutta ja suojaamaan organisaation tietoja.
Kyllä. Ensin Admin Consolessa, vasemmasta valikosta, mene Turvallisuus-kohtaan ja ota 2FA käyttöön organisaatiollesi. Sitten, mene Käyttäjät-kohtaan, napsauta kolmen pisteen valikkoa tietyn käyttäjän vieressä ja valitse 2FA-asetukset määrittääksesi kaksivaiheisen todennuksen yksilöllisesti kyseiselle käyttäjälle.
Kyllä. Siirry Admin Consolessa vasemmasta valikosta kohtaan Suojaus > Istunnon aikakatkaisu. Voit määrittää istunnon aikakatkaisun kestot kaikille organisaatiosi käyttäjille, vaihtoehtoina ovat Ei koskaan, 15 minuuttia, 30 minuuttia, 1 tunti tai 2 tuntia, mikä auttaa hallitsemaan turvallisuutta ja käyttäjien toimintaa tehokkaasti.
Kyllä. Hallintakonsolissa siirry vasemman valikon kautta kohtaan Turvallisuus > IP-osoiterajoitukset. Voit lisätä tiettyjä verkko-osoitteita käyttämällä Lisää verkko -välilehteä ja merkitä ne Luotetuiksi tai Rajoitetuiksi. Tämän avulla voit tehokkaasti hallita palvelimen käyttöoikeuksia ja verkon käyttöoikeuksia koko organisaatiossasi.
Hallintakonsolissa siirry vasemmasta valikosta kohtaan Tuki. Voit tarkastella kaikkia organisaatiossasi luotuja tukipyyntöjä, luoda uusia pyyntöjä ja jopa varata Zoom-puheluita tukitiimin kanssa ongelmien tehokkaaseen ratkaisemiseen.
Kyllä. Siirry Admin Consolessa vasemmanpuoleisesta valikosta kohtaan Tiimit. Näet kaikki organisaatiosi tiimit, voit päivittää tiimijäseniä, muokata käyttöoikeuksia ja säätää näkyvyysasetuksia (yksityinen tai organisaatiokohtainen). Luodaksesi uuden tiimin käytä Luo tiimi -painiketta. Voit myös napsauttaa Asetukset-painiketta samalla sivulla määrittääksesi yleisiä tiimeihin liittyviä vaihtoehtoja ja asetuksia.
Siirry hallintakonsolissa vasemman valikon Activity Logs -osioon. Voit tarkastella kaikkia organisaation laajuisia toimintalokeja, suodattaa niitä käyttäjän, toiminnon (esim. resurssin luonti, poisto tai päivitys), resurssin tyypin ja päivämäärävälin mukaan sekä ladata suodatetut lokit tarvittaessa.