


Consultez les journaux de toutes vos intégrations tierces et gérez les tunnels de données à l'échelle de toute votre organisation.
Centralisez l'analyse, la gestion et la sécurité de chaque équipe, ressource et intégration dans une plateforme unique. La console d'administration accélère le travail, renforce la sécurité et vous permet de gérer votre entreprise plus efficacement.

Assurez un accès sécurisé aux membres de l'équipe tout en maintenant une collaboration fluide. Dans la Console d'Administration, vous pouvez gérer les rôles des utilisateurs, les comptes invités et les espaces de travail depuis une plateforme centralisée.
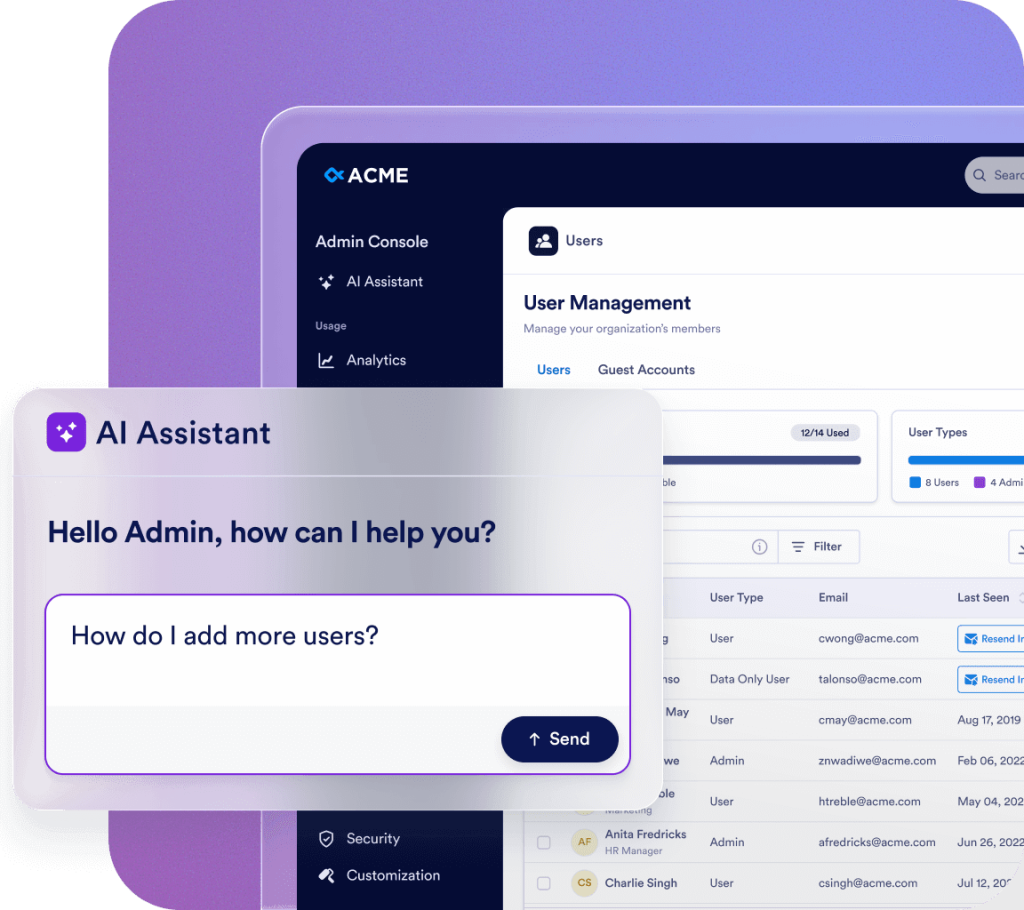
Streamline your administration with Jotform AI. Whether you need to navigate the Admin Console, manage users, or update organization settings, just ask. Get instant answers or let AI handle the task for you—all in one place.


Offrez une expérience de marque cohérente dans toute votre organisation grâce à des visuels, des écrans de connexion et des thèmes de formulaire entièrement personnalisables. Permettez aux utilisateurs de choisir l'apparence de leur propre espace de travail ou imposez un aspect unifié pour refléter l'identité de votre organisation à chaque point de contact.

Jotform Entreprise s'adapte facilement à vos besoins pour un retour sur investissement plus rapide. Transférez des données, personnalisez les flux de travail et les widgets grâce à notre API intuitive et à nos centaines d'intégrations. Utilisez des webhooks pour déclencher le flux de données ou diriger les notifications de soumission vers une URL spécifique.
Consultez les journaux de toutes vos intégrations tierces et gérez les tunnels de données à l'échelle de toute votre organisation.

Ajoutez de nouvelles passerelles de paiement, liez-les aux actifs, configurez les paramètres de paiement et assurez une supervision à l'échelle de l'organisation sans effort.

Ajoutez, suivez et gérez les emails d'expéditeur de votre organisation.

Profitez d'une expérience d'intégration fluide dès le premier jour. Votre gestionnaire de réussite client dédié fournit une assistance directe pour votre organisation. Obtenez des conseils en direct via Zoom ou des réponses rapides à vos questions soumises. Vous pouvez également profiter de ressources complètes et à jour, notamment des e-books, des manuels de l'utilisateur et des newsletters.

La sécurité de niveau entreprise comprend des contrôles au niveau du serveur tels que l'authentification unique (SSO), les autorisations basées sur les rôles, l'authentification à deux facteurs, les délais d'expiration de session et les restrictions IP. Jotform Entreprise respecte les exigences du RGPD et de la CCPA, et propose des formulaires compatibles HIPAA en option. Vous pouvez également stocker toutes vos données dans un centre de résidence de données local.
Contacter l'équipe commerciale
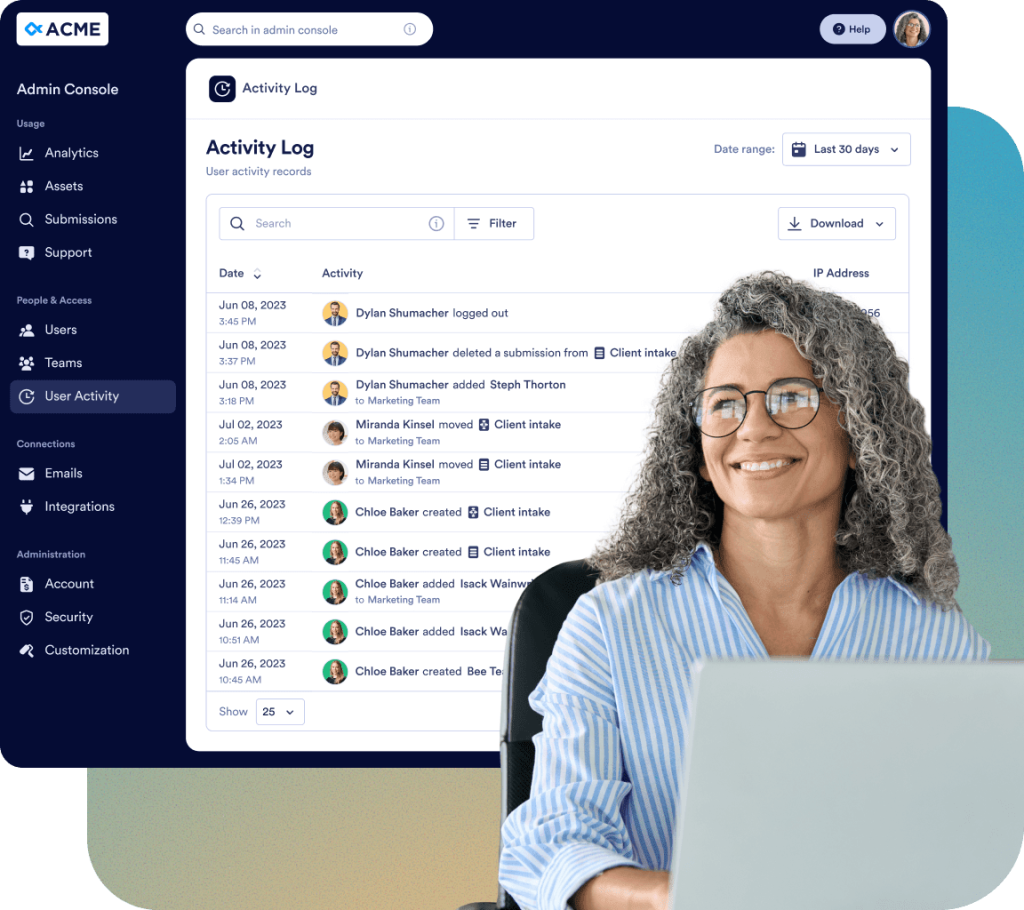
Surveillez chaque changement au sein de votre organisation grâce à des journaux détaillés :

Sur demande, l'équipe Jotform conçoit et assure la maintenance d'une application mobile native et personnalisée pour votre organisation. Accédez à Jotform Entreprise à tout moment et où que vous soyez, dans un environnement sécurisé et aux couleurs de votre entreprise. Suivez facilement les utilisateurs et les appareils connectés, et invitez vos collaborateurs à télécharger l'application.

Notre équipe dédiée est là pour assurer une mise en œuvre fluide et adaptée aux besoins de votre organisation. Bénéficiez d'un accompagnement expert à chaque étape, de la création des formulaires à l'optimisation des flux de travail. Confiez-nous la préparation de votre entreprise à la réussite.
La console d'administration est l'interface centrale de gestion permettant aux administrateurs de gérer tous les paramètres de l'organisation. Elle permet notamment de gérer les comptes utilisateurs et invités, de configurer les paramètres de sécurité, de consulter les journaux, de gérer les ressources, d'analyser les statistiques d'utilisation et d'accéder à toutes les informations relatives aux comptes et à la facturation de l'organisation.
Si vous avez un rôle d'administrateur, cliquez sur votre onglet Avatar, puis sélectionnez l'option Console d'administration dans le menu déroulant. Vous serez redirigé vers la page d'accueil de la Console d'administration.
Oui. Dans la console d'administration, accédez au menu de gauche et sélectionnez Utilisateurs. Vous trouverez deux onglets distincts : Utilisateurs et Comptes invités. Vous pourrez alors ajouter de nouveaux membres, modifier leurs rôles et effectuer des modifications liées à la sécurité.
Oui. Dans la console d'administration, accédez à Utilisateurs >Comptes invités. Vous pouvez y consulter tous les utilisateurs invités de votre organisation, vérifier les ressources qui leur sont attribuées et révoquer leur accès si nécessaire.
Oui. Dans la console d'administration, accédez au menu de gauche et cliquez sur la section Utilisateurs. Vous pouvez consulter la liste de tous les utilisateurs. En cliquant sur les trois points à droite de chaque utilisateur, vous ouvrez la barre latérale où vous pouvez consulter l'onglet Ressources pour visualiser les ressources possédées, partagées et attribuées de chaque utilisateur autorisé, et révoquer l'accès si nécessaire.
Non. Lors de la suppression d'un utilisateur, une fenêtre modale de confirmation apparaîtra, vous permettant de transférer tous les actifs associés à un autre utilisateur actif avant de finaliser la suppression.
Oui. Dans la console d'administration, accédez au menu de gauche et sélectionnez Compte et facturation > Factures. Vous pourrez alors consulter la liste de toutes les factures, y compris leur statut (payées ou impayées).
Dans la Console d'administration, depuis le menu de gauche, accédez à Compte et facturation > Compte. Vous pouvez surveiller les limites mensuelles de SMS (1 000 messages) et de voix (1 000 minutes) de l'assistant, et consulter les alertes liées aux seuils d'utilisation. Ces limites sont visibles sur cette page si vous avez activé les assistants pour votre organisation depuis Actifs > Assistants > Paramètres.
Oui. Dans la console d'administration, dans le menu de gauche, accédez à Compte et facturation > Informations de facturation. Sur cette page, vous pouvez consulter et mettre à jour l'adresse de facturation de votre organisation, les coordonnées de la personne à contacter pour la facturation et d'autres informations connexes afin de garantir l'exactitude et la mise à jour de vos données de facturation.
Oui. Dans la console d'administration, dans le menu de gauche, accédez à Personnalisation. Dans cette section, vous pouvez ouvrir les onglets Espace de travail, Page de connexion ou Page d'erreur pour concevoir et personnaliser l'apparence et le contenu de chaque page pour votre organisation.
Oui. Dans la console d'administration, accédez à Ressources dans le menu de gauche, puis sélectionnez Formulaires > Paramètres des formulaires. Ouvrez ensuite l'onglet Thème du formulaire pour créer un thème personnalisé pour votre organisation. Vous pouvez personnaliser le logo, la taille, la couleur d'arrière-plan et le style général. Ce thème s'applique uniquement aux formulaires classiques et peut être défini comme thème par défaut ou imposé à tous les utilisateurs.
Oui. Dans la console d'administration, accédez à Personnalisation dans le menu de gauche et ouvrez l'onglet Kit de marque. Grâce à l'IA, vous pouvez générer automatiquement un kit de marque complet à partir du logo ou du site web de votre organisation. Vous pourrez ensuite examiner et ajuster les couleurs, polices et styles suggérés afin de les adapter à l'identité visuelle de votre organisation. Une fois finalisé, ce kit de marque sera applicable à vos pages de connexion, d'erreur, d'espace de travail et autres pages personnalisables.
Oui. Dans la console d'administration, accédez à Intégrations dans le menu de gauche, puis sélectionnez l'onglet Journaux. Vous pourrez ainsi visualiser toutes les intégrations connectées au sein de votre organisation, consulter les journaux détaillés de chaque intégration, suivre l'historique d'utilisation et identifier rapidement les appels ayant échoué ou les erreurs. Cela vous permettra de surveiller les performances des intégrations et de résoudre efficacement les problèmes.
Oui. Dans la console d'administration, accédez à Intégrations dans le menu de gauche et ouvrez l'onglet Paramètres. Vous pourrez alors consulter toutes les intégrations disponibles pour votre organisation et configurer leur visibilité. Vous pouvez choisir d'afficher ou de masquer certaines intégrations pour les utilisateurs dans l'éditeur de formulaires, ou même masquer toute la section Intégrations si nécessaire. Cela vous permet de contrôler les intégrations accessibles aux utilisateurs et de garantir une expérience optimale dans l'éditeur de formulaires.
Oui. Dans la console d'administration, accédez à Emails dans le menu de gauche, puis sélectionnez l'onglet Journaux. Vous pouvez ainsi faire un suivi de tous les emails de l'organisation, y compris les répondeurs automatiques et les notifications aux destinataires. Les journaux vous permettent de filtrer les emails par plage de dates, de consulter leur statut de distribution, d'identifier les erreurs ou les échecs, et de télécharger les données des journaux à des fins de reporting ou d'audit. Vous bénéficiez ainsi d'une visibilité complète sur l'activité email de votre organisation.
Oui. Dans la console d'administration, accédez à Emails dans le menu de gauche et ouvrez l'onglet Paramètres. Vous pouvez alors ajouter de nouvelles adresses email d'expéditeur (personnalisées, Microsoft ou Google) et définir si chaque email est facultatif ou obligatoire pour tous les utilisateurs. Cela permet d'assurer la cohérence des informations d'expéditeur et simplifie la gestion des paramètres de messagerie au sein de votre organisation.
Oui. Dans la console d'administration, dans le menu de gauche, accédez à Ressources. Vous pouvez accéder à tous les types de ressources, notamment les formulaires, les assistants IA, les documents à signer, les applications et les flux de travail. Pour chaque ressource, vous pouvez consulter les détails, modifier les paramètres, la supprimer ou la télécharger. Vous pouvez également consulter les soumissions et accéder à la page d'analyse pour suivre l'utilisation et les performances au sein de votre organisation.
Vous pouvez uniquement modifier le propriétaire des ressources des formulaires. Si un formulaire est lié à une autre ressource, comme un flux de travail, le propriétaire de ce flux de travail sera automatiquement mis à jour dès que le propriétaire du formulaire sera modifié.
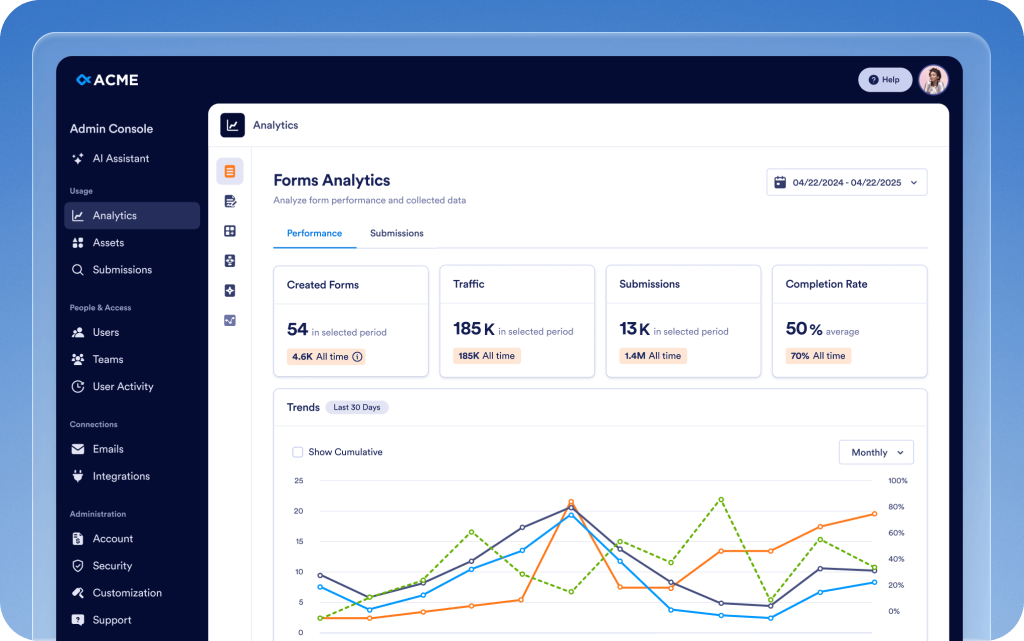
Oui. Dans la console d'administration, dans le menu de gauche, accédez à Données analytiques. Vous pouvez consulter les données d'utilisation de l'organisation concernée pour les Formulaires, les assistants IA, les documents signés, les applications et les flux de travail. De plus, vous pouvez ouvrir la page détaillée de chaque ressource pour consulter les indicateurs d'utilisation, les données de soumission et les informations sur les performances, ce qui vous permet de suivre l'activité et de prendre des décisions éclairées.
Oui. Dans la console d'administration, dans le menu de gauche, accédez à Ressources > Application mobile. Vous pouvez télécharger votre Application Entreprise, inviter des utilisateurs de votre organisation et même créer une application mobile personnalisée moyennant un supplément. Vous pouvez la personnaliser aux couleurs de votre organisation, changer le logo, le nom et les couleurs, afin d'exploiter votre identité visuelle.
Oui. Dans la console d'administration, dans le menu de gauche, accédez à Sécurité. Dans cette section, vous pouvez configurer tous les paramètres de sécurité de l'organisation, notamment les contrôles d'accès, les options d'authentification et autres politiques, afin de garantir la sécurité des données et des actifs de votre organisation.
Vous pouvez activer l'authentification unique (SSO) une fois qu'elle aura été activée pour votre compte. Si l'authentification unique n'est pas encore activée, contactez votre gestionnaire de compte pour en demander l'activation. Une fois activée, le bouton Ajouter un fournisseur SSO deviendra actif dans la section Sécurité, vous permettant ainsi de connecter et de configurer votre fournisseur SSO pour votre organisation.
Oui. Dans la console d'administration, dans le menu de gauche, accédez à Sécurité > Authentification à deux facteurs (2FA). Vous pouvez activer la 2FA pour votre organisation et choisir de l'imposer à tous les utilisateurs, ce qui contribue à renforcer la sécurité des comptes et à protéger les données de l'organisation.
Oui. Tout d'abord, dans la console d'administration, dans le menu de gauche, accédez à Sécurité et activez l'authentification à deux facteurs pour votre organisation. Ensuite, accédez à Utilisateurs, cliquez sur le menu à trois points en regard de l'utilisateur concerné et sélectionnez Paramètres d'authentification à deux facteurs pour configurer l'authentification à deux facteurs individuellement pour cet utilisateur.
Oui. Dans la console d'administration, dans le menu de gauche, accédez à Sécurité > Délai d'expiration de session. Vous pouvez définir la durée d'expiration de session pour tous les utilisateurs de votre organisation, avec des options telles que Jamais, 15 minutes, 30 minutes, 1 heure ou 2 heures, ce qui permet de gérer efficacement la sécurité et l'activité des utilisateurs.
Oui. Dans la console d'administration, dans le menu de gauche, accédez à Sécurité > Restrictions d'adresse IP. Vous pouvez ajouter des adresses réseau spécifiques via l'onglet Ajouter un réseau et les marquer comme Approuvées ou Restreintes. Cela vous permet de contrôler efficacement l'accès aux serveurs et de gérer les autorisations réseau au sein de votre organisation.
Dans la Console d'administration, depuis le menu de gauche, accédez à Assistance. Vous pouvez consulter toutes les demandes d'assistance créées au sein de votre organisation, créer de nouvelles demandes et même planifier des appels Zoom avec l'équipe d'assistance pour résoudre les problèmes efficacement.
Oui. Dans la console d'administration, dans le menu de gauche, accédez à Équipes. Vous pouvez consulter toutes les équipes de votre organisation, mettre à jour les membres, modifier leurs autorisations et ajuster les paramètres de visibilité (privée ou publique). Pour créer une équipe, utilisez le bouton Créer une équipe. Vous pouvez également cliquer sur le bouton Paramètres sur la même page pour configurer les options et préférences générales relatives aux équipes.
Dans la Console d'administration, accédez à la section Journaux d'activité depuis le menu de gauche. Vous pouvez consulter tous les journaux d'activité, les filtrer par Utilisateur, Activité (par exemple, création, suppression ou mise à jour d'actifs), Type d'actif et Plage de dates, et télécharger les journaux filtrés si nécessaire.