-
hriveraxxFecha de consulta 8 de diciembre de 2023, 20:53
Exporte la tabla de mi formulario a google drive https://docs.google.com/spreadsheets/d/1tZyVuktFg3C3jsEVruqdxkunGku5AHg5VSu5fGH_Q-Y/edit#gid=1479784396
Los primeros 250 registros se almacenaron con el usuario hriveraxx
https://www.jotform.com/uploads/hriveraxx/233344694118661/5778815614325690736/5778815614325690736_base64_165_1702072362.png
y luego yo cambie el usuario a HarveyR en mi cuenta
https://www.jotform.com/uploads/HarveyR/233344694118661/5778820885717911010/5778820885717911010_base64_165_1702072889.png
Cuando voy a ver las imágenes con el link del usuario hriveraxx sale esta pantalla
¿Cómo puedo ver mis imágenes con el usuario hriveraxx?

-
Sheena Jotform SupportFecha de respuesta 9 de diciembre de 2023, 2:14
Hi hriveraxx,
Thanks for reaching out to Jotform Support. Unfortunately, our Spanish Support agents are busy helping other Jotform users at the moment. I'll try to help you in English using Google Translate, but you can reply in whichever language you feel comfortable using. Or, if you'd rather have support in Spanish, let us know and we can have them do that. But, keep in mind that you'd have to wait until they're available again.
Now, let me help you with your question. I downloaded your form as excel and I can see that the link has been updated with your current username.
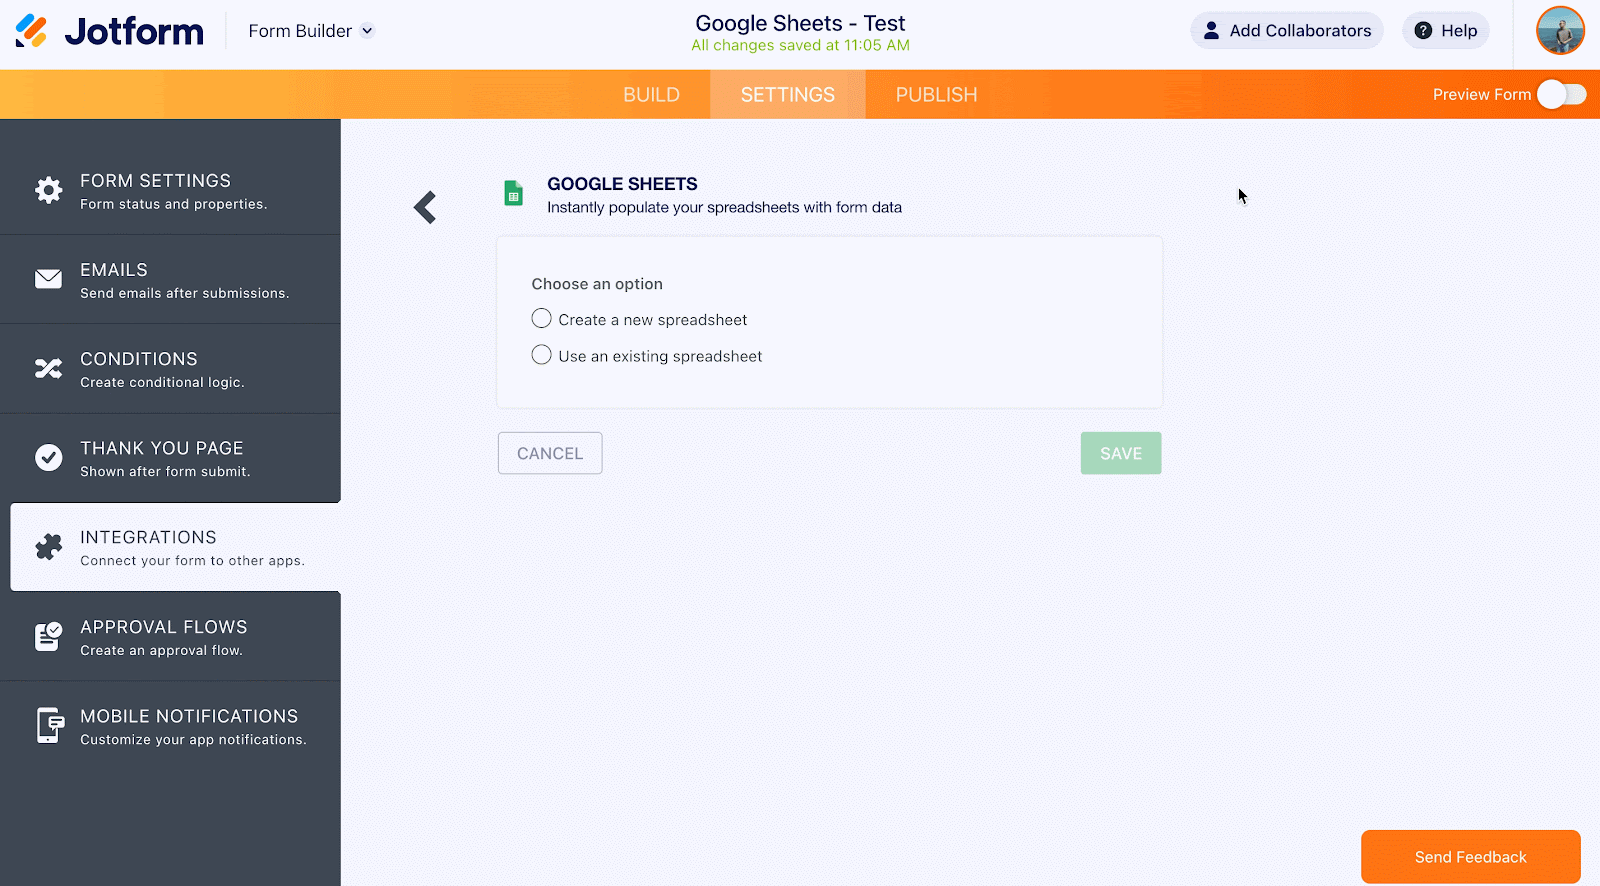
To troubleshoot further, can you please remove the Google Sheets integration and then add it back? This will generate a new sheet with the correct URL format. Let's do it:
- In Form Builder, in the orange navigation bar at the top of the screen, click on Settings.
- In the Settings menu, click on the Integrations option on the left side of the screen.
- Select the Google Sheets integration.
- Then, click on Remove Integration and then Yes, Remove!
- Now, let's connect the Google Sheets Integration again:
- In Form Builder, circle back to Settings at the top of the page.
- In the Settings menu, click on the Integrations option and Google Sheets integration again.
- Now, select and connect your Google account.
- Select an option.
- Choose your form fields.
- Click on Save, and that's it, you're done.
We also have a guide about Google Sheets integration that you can check out.
Reach out again if you need any more help..
- Plantillas
- Integraciones
- INTEGRACIONES
- Ver más de 100 integraciones
- INTEGRACIONES DESTACADAS
- PayPal
- Slack
- Hoja de Cálculo de Google
- Mailchimp
- Zoom
- Dropbox
- Google Calendar
- Hubspot
- Salesforce
- Ver más Integrations
- ALMACENAMIENTO
- Google Drive
- Dropbox
- OneDrive
- Caja
- Egnyte
- FTP
- Galerías
- Ver más Storage Integrations
- Producto
- PRODUCTOS
- Creador de formularios
- Jotform Empresarial
- Apps de Jotform
- Creador de tiendas
- Jotform Tables
- Jotform Inbox
- Jotform Mobile App
- Jotform Aprobaciones
- Creador de Reportes
- Formularios PDF Inteligentes
- Editor PDF
- Jotform Firmas
- Jotform para Salesforce Descubrir ahora
- Soporte