


Bekijk logboeken voor al je integraties van derden en beheer gegevensstromen binnen je hele organisatie.
Beheer de statistieken, functies en veiligheidscontroles voor alle teams, items en integraties op één centrale plek. De beheerdersconsole stroomlijnt bedrijfsprocessen en verbetert de veiligheid om de operationele efficiëntie te optimaliseren.

Bied teamleden veilige toegang voor naadloze samenwerking. De beheerdersconsole biedt één centraal platform om gebruikersrollen, gastaccounts en werkruimten te beheren.
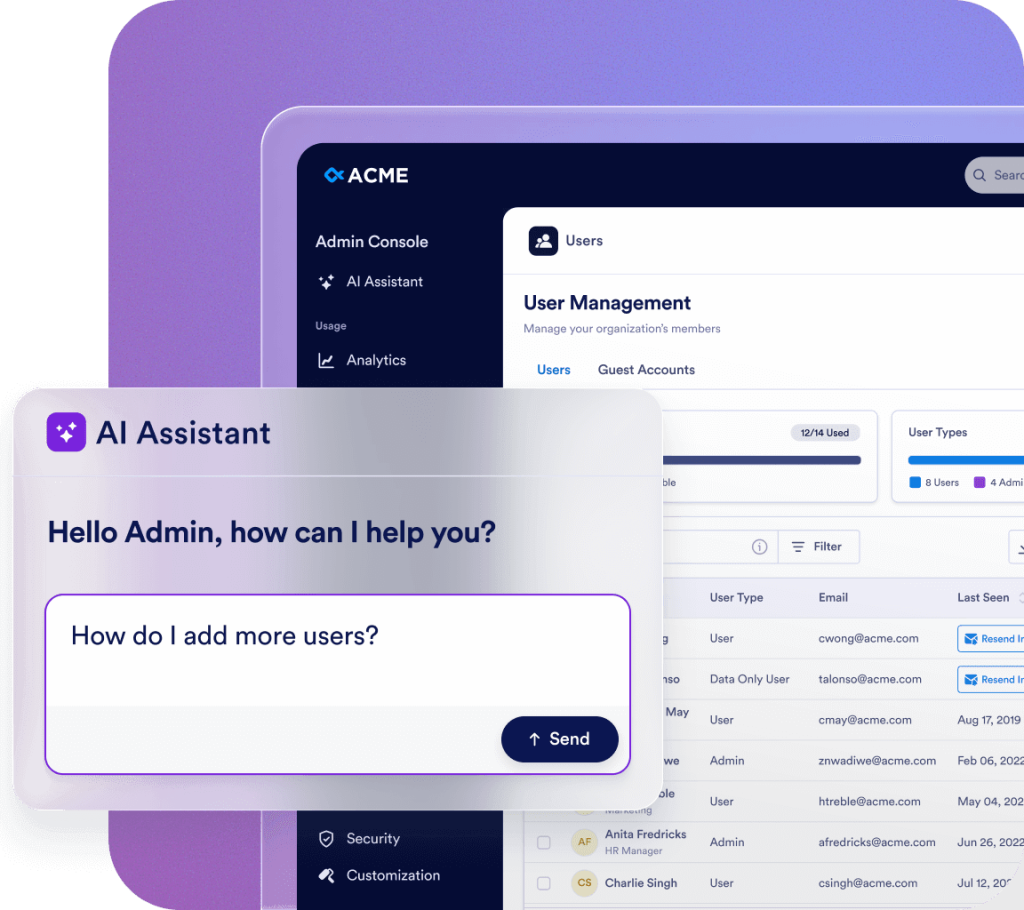
Streamline your administration with Jotform AI. Whether you need to navigate the Admin Console, manage users, or update organization settings, just ask. Get instant answers or let AI handle the task for you—all in one place.


Zorg voor een consistente merkervaring binnen je hele organisatie met volledig aanpasbare visuele elementen, inlogschermen en formulierthema's. Laat gebruikers het ontwerp van hun eigen werkruimte kiezen of zorg voor een consistente uitstraling die op de identiteit van je organisatie is afgestemd.

Jotform Enterprise kan volledig op je behoeften worden afgestemd om processen te stroomlijnen. Met onze gebruiksvriendelijke API en honderden integraties kun je gegevens overdragen, workflows personaliseren en widgets aanpassen. Je kunt webhooks gebruiken om de gegevensstroom te activeren of meldingen over ingediende formulieren naar een opgegeven URL te sturen.
Bekijk logboeken voor al je integraties van derden en beheer gegevensstromen binnen je hele organisatie.

Voeg nieuwe betalingsgateways toe, koppel ze aan items en configureer de betalingsinstellingen voor een organisatiebreed overzicht.

E-mailadressen van de afzender toevoegen, bijhouden en beheren voor je hele organisatie.

Geniet vanaf dag één van een soepele onboardingervaring. Je toegewijde customer success manager biedt directe ondersteuning voor je organisatie. Krijg livebegeleiding via Zoom of snelle antwoorden op je ingediende vragen. Je kunt ook profiteren van uitgebreide, actuele bronnen, waaronder e-books, gebruikershandleidingen en nieuwsbrieven.

Enterprise-grade security includes server-wide controls like single sign-on (SSO), role-based permissions, two-factor authentication, session timeouts, and IP restrictions. Jotform Enterprise follows GDPR and CCPA regulations, and offers optional HIPAA-enabled forms. You can also store all your data in a local data residency center.
Neem contact met ons op
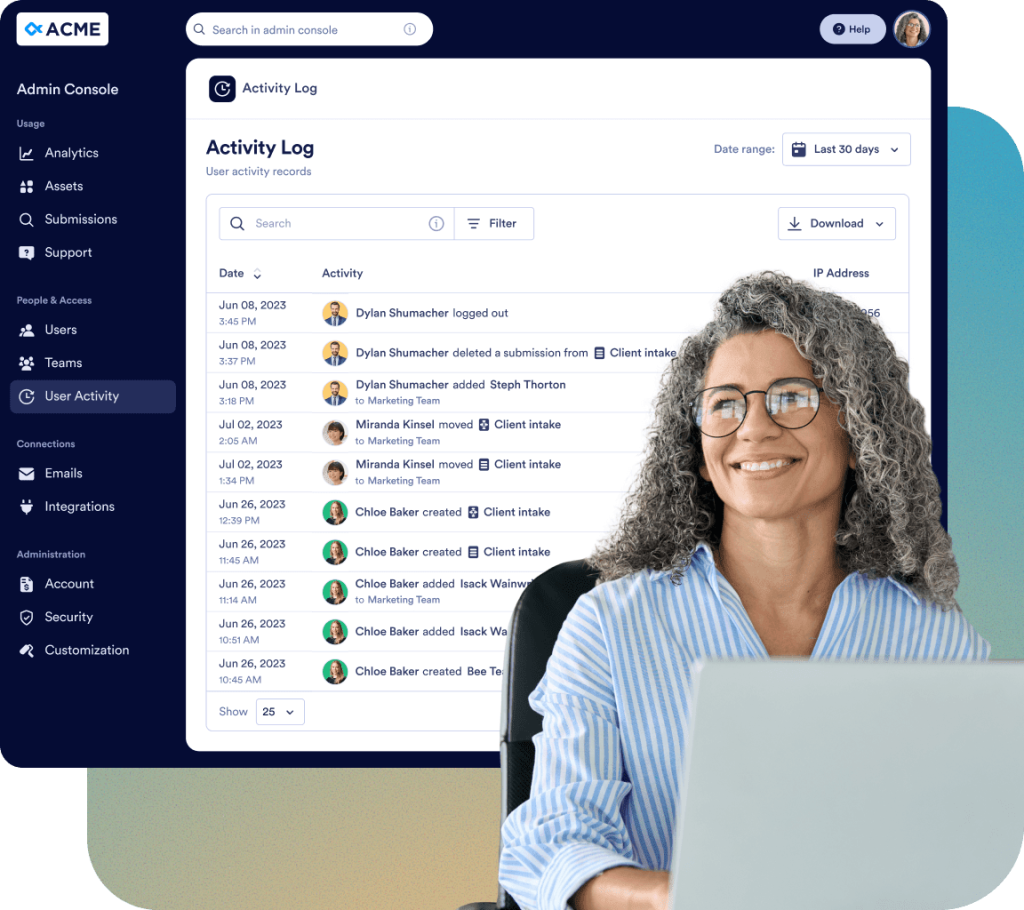
Houd alle wijzigingen binnen je organisatie bij met gedetailleerde logboeken:

Op verzoek bouwt en onderhoudt het Jotform-team een aangepaste, native mobiele app voor je organisatie. Krijg altijd en overal toegang tot Jotform Enterprise in een veilige omgeving die is voorzien van je eigen huisstijl. Je kunt eenvoudig gebruikers en apparaten bijhouden en je team uitnodigen om de app te downloaden.

Ons toegewijde team staat klaar om een naadloze implementatie te garanderen die op de behoeften van je organisatie is afgestemd. Ontvang deskundige begeleiding bij elke stap, van het maken van formulieren tot workflowoptimalisatie. Laat ons je onderneming voorbereiden op succes.
De beheerconsole is het centrale beheergebied waar beheerders alle organisatiegerelateerde instellingen kunnen beheren. Vanaf hier kun je gebruikers en gastaccounts beheren, beveiligingsinstellingen configureren, logboeken monitoren, items beheren, gebruiksanalyses bekijken en toegang krijgen tot alle account- en factureringsinformatie die verband houdt met je organisatie.
Als je een beheerdersrol hebt, klik je op het avatar-tabblad en selecteer je de optie Admin Console in het vervolgkeuzemenu. Je wordt doorgestuurd naar de startpagina van de Admin Console.
Ja. Ga in de beheerconsole naar het linkermenu en selecteer Gebruikers. Je vindt daar twee afzonderlijke tabbladen: Gebruikers en Gastaccounts. Vanaf daar kun je nieuwe leden toevoegen, hun rollen bijwerken en beveiligingsgerelateerde wijzigingen aanbrengen.
Ja. Ga in de Admin Console naar Gebruikers > Gastaccounts. Je kunt alle gastgebruikers in je organisatie bekijken, hun toegewezen items controleren en hun toegang intrekken wanneer dat nodig is.
Ja. Ga in de beheerconsole naar het linkermenu en klik op de sectie Gebruikers. Je kunt de lijst met alle gebruikers bekijken. Door op de actieknop met drie puntjes rechts van elke vermelde gebruiker te klikken, open je de zijbalk waar je het tabblad Items kunt raadplegen om de items in eigendom, gedeelde items en toegewezen items van elke gemachtigde gebruiker te bekijken, en indien nodig de toegang intrekken.
Nee. Wanneer je een gebruiker verwijdert, verschijnt er een bevestigingsvenster waarin je alle gekoppelde items kunt overdragen aan een andere actieve gebruiker voordat je de verwijdering voltooit.
Ja. Ga in de Admin Console naar het linkermenu en selecteer Account en facturering > Facturen. Je kunt een lijst met alle facturen bekijken, inclusief de status betaald en onbetaald.
Ga in de beheerconsole via het menu aan de linkerkant naar Account & Facturering > Account. Je kunt de limieten voor zowel maandelijkse sms-berichten (1.000 berichten) als spraakoproepen (1.000 minuten) van assistenten bijhouden en waarschuwingen bekijken die verband houden met gebruiksdrempels. Deze limieten zijn op deze pagina zichtbaar als je assistenten voor je organisatie hebt ingeschakeld via Items > Assistenten > Instellingen.
Ja. Ga in de Admin Console via het linkermenu naar Account en Facturering > Factureringsgegevens. Op deze pagina kun je het factuuradres van je organisatie, de contactgegevens van de factuurcontactpersoon en andere gerelateerde informatie bekijken en bijwerken om ervoor te zorgen dat je factureringsgegevens accuraat en up-to-date blijven.
Ja. Ga in de Admin Console via het menu aan de linkerkant naar Customization. In dit gedeelte kun je de tabbladen Workspace, Login Page of Error Page openen om het ontwerp en de inhoud van elke pagina voor je organisatie aan te passen.
Ja. Ga in de Admin Console naar Items in het linkermenu en selecteer Formulieren > Formulierinstellingen. Open vervolgens het tabblad Formulierthema om een aangepast formulierthema voor je organisatie te maken. Je kunt het logo, de grootte, de achtergrondkleur en de algemene stijl aanpassen. Het thema is alleen van toepassing op klassieke formulieren en kan als standaard worden ingesteld of voor alle gebruikers worden afgedwongen.
Ja. Ga in de Admin Console naar Aanpassing in het linkermenu en open het tabblad Brand Kit. Met behulp van AI kun je automatisch een complete brand kit genereren op basis van het logo of de website van je organisatie. Vervolgens kun je de voorgestelde kleuren, lettertypen en stijlen bekijken en aanpassen om deze op de visuele identiteit van je organisatie af te stemmen. Zodra de brand kit is afgerond, kun je deze toepassen op je inlog-, foutmeldings-, werkruimte- en andere aanpasbare pagina's.
Ja. Ga in de Admin Console naar Integraties in het linkermenu en selecteer het tabblad Logs. Je kunt alle gekoppelde integraties in je organisatie bekijken, gedetailleerde logs voor elke integratie bekijken, het gebruiksverleden bijhouden en mislukte aanroepen of fouten snel identificeren. Hierdoor kun je de prestaties van integraties controleren en problemen effectief oplossen.
Ja. Ga in de Admin Console naar Integraties vanuit het linkermenu en open het tabblad Instellingen. Hier kun je alle beschikbare integraties voor je organisatie bekijken en de zichtbaarheid configureren. Je kunt ervoor kiezen om specifieke integraties voor gebruikers in de formulierbouwer te verbergen of weer te geven, of zelfs de hele sectie Integraties te verbergen indien nodig. Hiermee kun je bepalen welke integraties toegankelijk zijn voor gebruikers en zorgen voor een gestroomlijnde ervaring in de formulierbouwer.
Ja. Ga in de beheerconsole naar E-mails in het linkermenu en selecteer het tabblad Logboeken. Je kunt alle e-mails binnen je organisatie bijhouden, inclusief automatische antwoorden en meldingen voor ontvangers. Met de logboeken kun je e-mails filteren op datumbereik, de bezorgstatus bekijken, fouten of mislukkingen identificeren en de logboekgegevens downloaden voor rapportage- of controledoeleinden. Op deze manier krijg je volledig inzicht in de e-mailactiviteit van je organisatie.
Ja. Ga in de beheerconsole naar E-mails in het menu aan de linkerkant en open het tabblad Instellingen. Hier kun je nieuwe e-mailadressen van afzenders toevoegen, of het nu aangepaste, Microsoft- of Google-adressen zijn, en bepalen of elk e-mailadres optioneel of verplicht is voor alle gebruikers. Dit helpt om de informatie van afzenders consistent te houden en maakt het eenvoudiger om e-mailinstellingen binnen je organisatie te beheren.
Ja. Ga in de beheerconsole via het linkermenu naar Items. Je hebt toegang tot alle itemtypen, waaronder Formulieren, AI-assistenten, Sign-documenten, Apps en Workflows. Voor elk item kun je details bekijken, instellingen bewerken, verwijderen of downloaden. Je kunt ook inzendingen bekijken en de analysepagina openen om het gebruik en de prestaties binnen je organisatie te controleren.
Je kunt alleen de eigenaar wijzigen van Formulier-items. Als een formulier is gekoppeld aan een ander item, zoals een workflow, wordt het eigenaarschap van de gerelateerde workflow automatisch bijgewerkt wanneer de eigenaar van het formulier wordt gewijzigd.
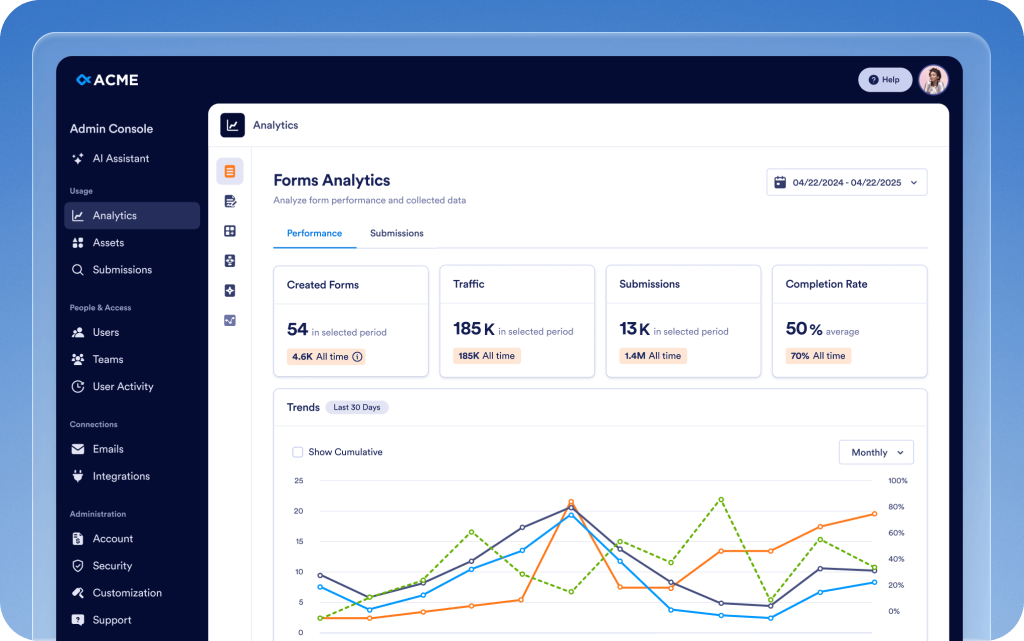
Ja. Ga in de beheerconsole via het linkermenu naar Analytics. Je kunt gebruiksgegevens voor de hele organisatie bekijken voor Formulieren, AI-assistenten, Sign-documenten, Apps en Workflows. Daarnaast kun je de detailpagina van elk item openen om individuele gebruiksstatistieken, inzendingsgegevens en prestatie-inzichten te bekijken, zodat je activiteit kunt monitoren en weloverwogen beslissingen kunt nemen.
Ja. Ga in de Admin Console naar Items > Mobiele App in het linkermenu. Je kunt je Enterprise App downloaden, gebruikers uit je organisatie uitnodigen en zelfs tegen een extra vergoeding een aangepaste mobiele app maken. Je kunt de app personaliseren met de huisstijl van je organisatie, inclusief het logo, de naam en de kleuren, zodat deze aansluit bij je visuele identiteit.
Ja. Ga in de beheerconsole via het linkermenu naar Beveiliging. In dit gedeelte kun je alle beveiligingsinstellingen voor de hele organisatie configureren, inclusief toegangscontroles, verificatieopties en ander beleid om ervoor te zorgen dat de gegevens en items van je organisatie veilig blijven.
Je kunt SSO inschakelen zodra het is geactiveerd voor je account. Als SSO nog niet is ingeschakeld, neem dan contact op met je accountmanager om activering aan te vragen. Zodra het is geactiveerd, wordt de knop SSO-provider toevoegen actief in de sectie Beveiliging, zodat je de SSO-provider voor je organisatie kunt koppelen en configureren.
Ja. Ga in de Beheerconsole in het linkermenu naar Beveiliging > Tweefactorauthenticatie (2FA). Je kunt 2FA voor je organisatie inschakelen en ervoor kiezen om dit voor alle gebruikers verplicht te stellen, zodat de accountbeveiliging wordt verbeterd en organisatiegegevens worden beschermd.
Ja. Ga in de beheerconsole eerst naar Beveiliging in het linkermenu en schakel 2FA in voor je organisatie. Ga vervolgens naar Gebruikers, klik op het menu met drie puntjes naast een specifieke gebruiker en selecteer 2FA-instellingen om tweefactorauthenticatie afzonderlijk voor die gebruiker te configureren.
Ja. Ga in de beheerconsole via het linkermenu naar Beveiliging > Sessietime-out. Je kunt de duur van de sessietime-out voor alle gebruikers in je organisatie instellen. Je kunt kiezen uit de volgende opties: Nooit, 15 minuten, 30 minuten, 1 uur of 2 uur. Dit helpt je om de beveiliging en gebruikersactiviteit efficiënt te beheren.
Ja. Ga in de Admin Console via het linkermenu naar Beveiliging > IP-adresbeperkingen. Je kunt specifieke netwerkadressen toevoegen via het tabblad Netwerk toevoegen en deze markeren als Vertrouwd of Beperkt. Hiermee kun je servertoegang effectief beheren en netwerkmachtigingen binnen je organisatie regelen.
In de beheerconsole ga je in het linkermenu naar Ondersteuning. Je kunt alle ondersteuningstickets bekijken die binnen je organisatie zijn aangemaakt, nieuwe tickets aanmaken en zelfs Zoom-gesprekken met het ondersteuningsteam plannen om problemen efficiënt op te lossen.
Ja. Ga in de beheerconsole via het menu aan de linkerkant naar Teams. Je kunt alle teams in je organisatie bekijken, teamleden bijwerken, rechten wijzigen en zichtbaarheidsinstellingen aanpassen (privé of organisatie). Gebruik de knop Team maken om een nieuw team te maken. Je kunt ook op de knop Instellingen op dezelfde pagina klikken om algemene teamgerelateerde opties en voorkeuren te configureren.
Ga in de Admin Console naar het gedeelte Activiteitenlogboeken in het linkermenu. Je kunt alle activiteitenlogboeken van de hele organisatie bekijken, filteren op Gebruiker, Activiteit (bijv. het aanmaken, verwijderen of bijwerken van items), Itemtype en Datumbereik, en indien nodig gefilterde logboeken downloaden.