-
nosferus.internetGevraagd op 16 april 2024 om 10:44
Beste hoe krijg ik een zelfde tabel met keuze optie's in de formulier zoals de image hieronder.
Tevens voor mobielweergave duidelijk.

-
Rhina Jotform SupportGeantwoord op 16 april 2024 om 12:58
Hi nosferus.internet,
Thanks for reaching out to Jotform Support. Unfortunately, our Dutch Support agents are busy helping other Jotform users at the moment. I'll try to help you in English using Google Translate, but you can reply in whichever language you feel comfortable using. Or, if you'd rather have support in Dutch, let us know and we can have them do that. But, keep in mind that you'd have to wait until they're available again.
Now, coming back to your question, you can use the Configurable List widget. The Configurable List widget is easy to use. Let me show you how:
- In Form Builder, click on the Add Form Element menu on the left side of the page.
- Under the Widgets tab, add the Configurable List widget into your form.
- You can customize the fields using the Fields Configuration Box. In the box, use the syntax below (click here to learn more).
{label} : {type} : {placeholder}
- After finishing all of the customizations, click on Update Widget and you're done.
See example below:
You can also check out the guide here on how to set up the configurable list widget. Another option is using the Input Table field.
Give it a try and let us know how it goes.
-
nosferus.internetGeantwoord op 17 april 2024 om 04:36
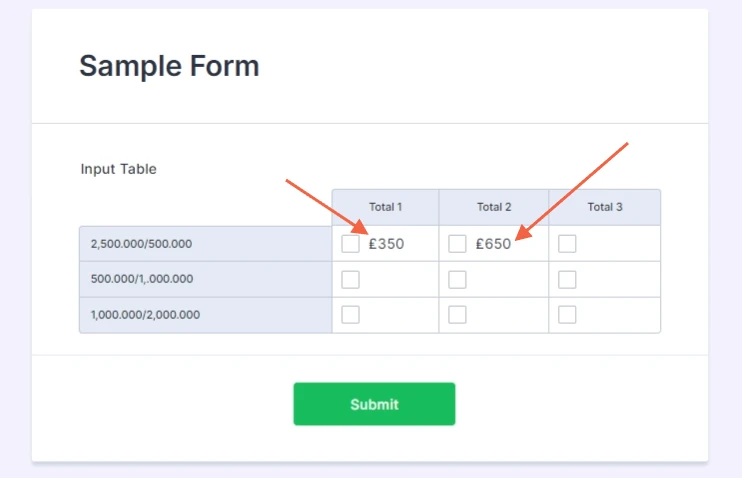
Can you please make an example like this image:
-
nosferus.internetGeantwoord op 17 april 2024 om 04:58
Also possible to put option fields in tables of the text widget?
-
Lorenz Jotform SupportGeantwoord op 17 april 2024 om 08:07
Hi nosferus.internet,
Thanks for getting back to us. The closest to your requirement is using the Input Table element, as what was suggested by my colleague earlier. However, if you're looking to add an option label beside the checkbox fields within the table, there's currently no option in the Input table's property to specify them. But, it can still be achieved using Custom CSS code. Check this out:
I would suggest you work on the rows/columns and fields first, let us know once you're done and tell us more about the option labels you would like to implement, and we'll help you out with the code to use.
Once we hear back from you, we'll be able to help you with this.
-
nosferus.internetGeantwoord op 19 april 2024 om 03:18
Hi,
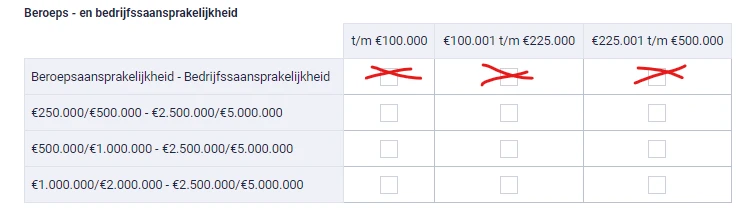
I have used input Table element (image). How to get rid of first line checboxes adn add the amounts like you did like the original pdf.
-
Lorenz Jotform SupportGeantwoord op 19 april 2024 om 05:36
Hi nosferus.internet,
Thanks for getting back to us. We can use Custom CSS code to remove the first line of checkboxes. Let me walk you through it:
1. In the Form builder, click on the blue Roller Paint icon.
2. From the Form Designer panel, select the Styles Tab.
3. Next, scroll down a bit and add the code below inside the Inject Custom CSS area.
/* Remove first line of checkboxes in input table */

.form-matrix-table tbody tr:nth-child(2) td input {

display: none !important;

}

/* end */
As for adding the amount, you can add the code below to the same section as well. I've added comments above each line, for you to easily identify which column to adjust the amount.
/* first checkbox column */

.form-matrix-table tbody tr:nth-child(2) td:nth-child(2):before {

content: "$200";

}


/* second checkbox column */

.form-matrix-table tbody tr:nth-child(2) td:nth-child(3):before {

content: "$400";

}


/* third checkbox column */

.form-matrix-table tbody tr:nth-child(2) td:nth-child(4):before {

content: "$600";

}
Here's how it looks:
Give it a try and let us know if there's anything else we can help you with.
-
DadGeantwoord op 19 april 2024 om 07:55
I need the amounts behind the checkboxeslike this image. And tje first row empty. Check original pdf table.
-
Lorenz Jotform SupportGeantwoord op 19 april 2024 om 08:58
Hi nosferus.internet,
Thanks for getting back to us. You already have the first row as a static text, but it seems like you've included the text 'Beroepsaansprakelijkheid - Bedrijfssaansprakelijkheid' as part of the official first row, where there are active checkbox fields. Let met walk you through with the adjustment.
1. First, remove the first row from the table.
2. After removing the first column, make sure to double check the boxes connected to the Original PDF and make some adjustments if necessary. Check this out:
3. After that, simply replace the code I shared earlier with the one below:
.form-matrix-values input {

  position: relative;

}

.form-matrix-values {

    text-align: left;

    padding-left: 10px;

}


/* static header columns - row 1*/

.form-matrix-table tbody tr:first-child th:first-child{

    background: #EFF1F8;

    color: #1C2643;

    border-color: #DEE2ED;

}

.form-matrix-table tbody tr:first-child th:first-child:after {

    content: "Beroepsaansprakelijkheid - Bedrijfssaansprakelijkheid";

    font-weight: 400;

    font-size: 14px;

    text-wrap: nowrap;

}

/* end */


/* First row option labels */

.form-matrix-table tbody tr:nth-child(2) td:nth-child(2):after {

    content: "€350";

    margin-left:10px;

}

.form-matrix-table tbody tr:nth-child(2) td:nth-child(3):after {

    content: "€500";

    margin-left:10px;

}

.form-matrix-table tbody tr:nth-child(2) td:nth-child(4):after {

    content: "€700";

    margin-left:10px;

}

/* end */


/* Second row option labels */

.form-matrix-table tbody tr:nth-child(3) td:nth-child(2):after {

    content: "€650";

    margin-left:10px;

}

.form-matrix-table tbody tr:nth-child(3) td:nth-child(3):after {

    content: "€725";

    margin-left:10px;

}

.form-matrix-table tbody tr:nth-child(3) td:nth-child(4):after {

    content: "€900";

    margin-left:10px;

}

/* end */


/* Third row option labels */

.form-matrix-table tbody tr:nth-child(4) td:nth-child(2):after {

    content: "€775";

    margin-left:10px;

}

.form-matrix-table tbody tr:nth-child(4) td:nth-child(3):after {

    content: "€850";

    margin-left:10px;

}

.form-matrix-table tbody tr:nth-child(4) td:nth-child(4):after {

    content: "€1.150";

    margin-left:10px;

}

/* end */
Here's how it looks on the live form:
Give it a try and let us know if there's anything else we can help you with.
- Sjablonen
- Integraties
- GEÏNTEGREERD INTEGRATIES
- PayPal
- Slack
- Google Sheets
- Mailchimp
- Zoom
- Dropbox
- Google Calendar
- Hubspot
- Salesforce
- Zie meer Integrations
- Bekijk meer dan 100 integraties
- Producten
- PRODUCTEN
- Formulierbouwer
- Jotform Enterprise
- Jotform Apps
- Store Builder
- Jotform Tabellen
- Jotform Inbox
- Jotform Mobiele App
- Jotform Approvals
- Rapport Bouwer
- Slimme PDF Formulieren
- PDF Editor
- Jotform Sign
- Jotform voor Salesforce Ontdek Nu
- Ondersteuning
- ONTVANG HULP
- Contact opnemen met Support
- Help Centrum
- FAQ
- Toegewijde ondersteuning
Krijg een toegewijd ondersteuningsteam met Jotform Enterprise.
Contacteer Ons - Professionele DienstverleningExplore