UPDATE: You can now categorize your product listing without the need for the below workaround. In our Payment Tools or Product List payment settings, toggle Enable Categories to Yes.
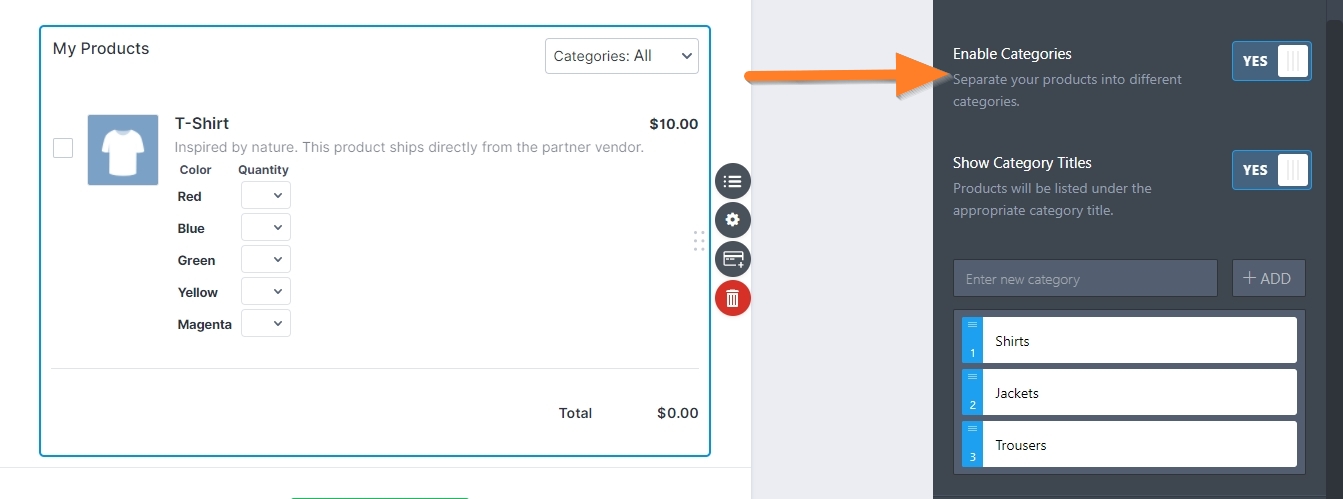
Please visit the following user guide to know more about Product Categories: How to Add Product Categories to Payment Fields.
Have a long line-up of products in your Payment Form? Wouldn’t it be better if they are organized into grouped categories or have sub-labels to easily spot them among the long list of items or products?
This guide will show you how to add Sub-labels in the Products of a Purchase Order form.
1. Add Products with a price of “0” (Free) to your Purchase Order form. These will serve as the product sub-labels.


2. Get the source code of your form to get the Label ID# of the Free ($0) Products you just added. Follow this guide: How to get your Form Source Code
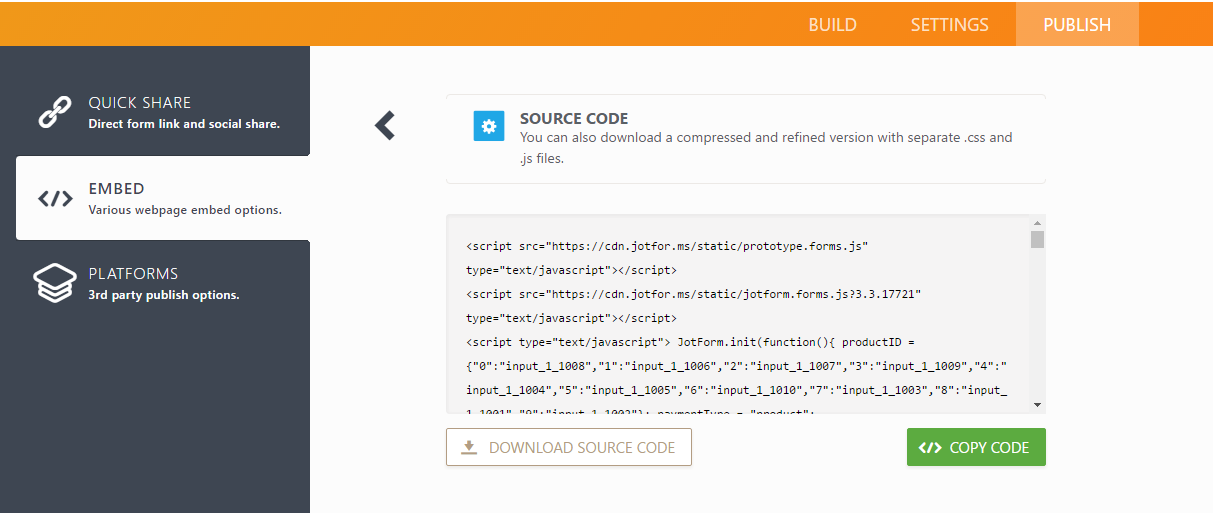
3. Get the numbers in the “for” attribute of the “label” tag of the Free Products. For example:

In the sample form, the numbers are 1008, 1009 and 1010.
4. Copy those numbers then use it in the CSS snippet below. Replace the input number with the actual number you got from the source code.
input[id*=”input number“] {
display:none;
pointer-events: none;
}
label[for*=”input number“] .form-product-details {
display:none;
}
label[for*=”input number“] {
font-weight: bold;
text-decoration: underline;
pointer-events: none;
}
If you added multiple Free Products (sub-labels), simply duplicate the CSS selectors above by separating each with a comma. Make sure you also change the respective input ID numbers. For example:
input[id*=”1008“], input[id*=”1009“], input[id*=”1010“] {
display:none;
pointer-events: none;
}
label[for*=”1008“] .form-product-details, label[for*=”1009“] .form-product-details, label[for*=”1010“] .form-product-details {
display:none;
}
label[for*=”1008“], label[for*=”1009“], label[for*=”1010“] {
font-weight: bold;
text-decoration: underline;
pointer-events: none;
}
5. Copy your finalized CSS codes then inject them to your Form Builder by following this guide: How to Inject Custom CSS Codes
Test and preview your form. If done correctly, the form should look and function similar to this form.
Comments and suggestions are welcome below. If you have a question, post it in our Support Forum so we can assist you.

Send Comment:
44 Comments:
More than a year ago
I did everything the way I suppose to and it still showing "free"
More than a year ago
I also have the Free after the sub category....Any resolution to this?
More than a year ago
Yes i have done this but i fell the list is to long even under sub categories. I would like to have 3 categories
Big head Roses Click on it it open that with its products under it
Small head Rose Click on it it open that with its products under it
Other flowers and Greenery Click on it open that with its products under it
This all happening in purchase order under payments and allowing the person to see the total and submit button without taking 5 mints to get to the bottom of the page due to using purchase order
? a section collapse how to fit it in.
More than a year ago
I am also unsure how to remove "free" after the subheading. Could someone please provide instructions?
More than a year ago
So if someone from EU fills out my Jotform Contact Us form, do I still get the email notification with their contact info, or does the email not get sent because that would be transferring it to the US?
More than a year ago
how can i get a link to download the form directly into my download folder, instead of submitting and getting in via email? because when it is coming via email the form changes into text and it is not appropriate.
More than a year ago
Hi, is there any way to remove the "free" after the new subheading?
More than a year ago
hello i have a similar issue to some people below. The subheadings thing worked but it's still showing FREE. How do i remove this?
More than a year ago
There is error to continue on my form and how can I correct it.
More than a year ago
I work for a US-based company with a regional EU headquarters. I want some forms to store data in the EU, and others to store data in the US. It seems where I create the form determines if the published URL is EU or US. Is it possible to make this decision on each form?
More than a year ago
I'd like to have the check boxes removed as well. Thanks!
More than a year ago
yes, the language used is not good.
Safharbour failed to protect the data of countries covered by the agreement. US institutions were still misusing the data and ignoring the alleged protections in the "Safeharbour" agreement. Because of these failures the agreement was annulled. This was not just Facebook, but US government agencies as well as hosting companies. I.e. The US cannot be trusted irrespective of what they say and there was no recourse when the abuses were identified.
More than a year ago
Resolved please ignore my last questions, finger trouble :-)
More than a year ago
Thanks for all of this, I have applied this to my form and I am still seeing the 'free' option. I have tried several of the solutions provided to remove these but I am still having no success..please advise...here is my form, pink highlighted fields where the 'free' should be removed thanks
More than a year ago
This feed doesnt apply with the updated 4.0 designer. The instructions are no longer applicable. Can I have an update please.
More than a year ago
My category is still showing the "Free" in the category. How do I get rid of the price?
More than a year ago
جيد
More than a year ago
Hi, I am in Australia and wish to use your forms to collect sensitive information from clients. Do you have plans for an Australian server or would it be appropriate for me to use the EU server? Thank you.
More than a year ago
I noticed that our form was automatically given an eu address and when I checked My Account Settings storage in the EU had been ticked. This is fine with me, but it does seem to cut across the instructions elsewhere on the site about opting in to this choice. Has this now changed?
Thanks, Rachel
More than a year ago
Nevermind! It worked. I had the CSS code in the wrong place. Thanks!
More than a year ago
Hi there-
I tried this and it worked. However, I still have a little checkbox right beside my item heading. How do I get rid of this? Thanks!
More than a year ago
I love the way you write 'unfortunately' the EU have changed the rules. They have done so to protect European users information being mis-used. It means that the EU cares about the privacy and the rights of its inhabitants.
Jotform's attitude here is very disappointing. Twisting the info to make the concern for data integrity shown by Europeans seem like a red tape inconvenience.
Judging by the comments here it seems like too many people are foolish enough to swallow it.
More than a year ago
Thanks for all these info... one detail it is FREE to move the data in EU or we need to pay something ?
Thanks !
More than a year ago
So this would mean that under no circumstances, my data on your EU servers can be accessed in the US?
Do you have a separate European office that is will be dealing with European users?
More than a year ago
Hi,
will this effect the url of the forms itself? We published al lot of forms with the jotform.com-url. Di we have to change the url of each form or will it be redirected to the eu-url?
Thank You