Overview
What is a Widget?
Jotform Widgets allow you to create custom form fields that can be added to Jotform forms.
They can be used to show content in forms (Youtube Widget) or get input from users (DrawingBoard Widget).
How to Create a Widget?
Creating your own widgets is pretty easy.
You create a standalone widget that can be accessed by a URL.
Register it with Jotform and once it is approved, all Jotform users can easily use it.
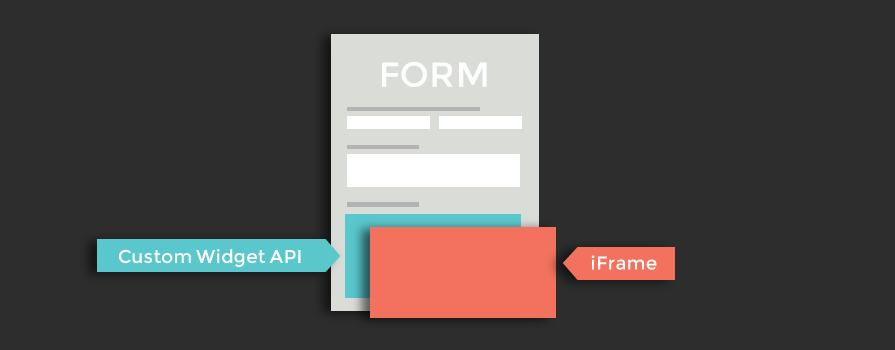
Widgets are included in the forms inside an IFrame container.
How does Jotform Users Use a Widget?
The widgets are listed on widgets gallery
and in Jotform form builder.
Jotform users can see screenshots and description of a widget and easily add them to their forms.
To add a widget users may need to enter some parameters defined by you.
For example, if you create a YouTube widget, you can ask user to enter the video's URL.
Widget Types
Type 1: Ask for Embed Code
Embed Code Widgets can be used for services like Youtube that provide full embed code.
The user simply copies and paste the embed code provided in the 3rd party website.
You do not need to provide an iframe URL for embed code widgets. Simply provide the default size
for the embed and that's it.
Type 2: iFrame Widget
iFrame Widgets are hosted by you on an external website.
The widget is then included within an iFrame on the form.
Using the JotFormCustomWidgets.js library you can communicate with the form.
You can resize the widget, send data to the form and subscribe to form events.
Tutorial - Creating Your First Custom Widget
This is a step by step tutorial on how to create a custom widget. We will create a very simple widget. It will ask user to enter some text and then we will display this text within our widget and we will send this text with the form data. Here is what the end result will look like.
Step 1: Create Widget HTML
Launch your favorite text editor. Copy and paste the code below to your HTML file. Let's name it simple.html
<!DOCTYPE html>
<html>
    <head>
        <script src="//js.jotform.com/JotFormCustomWidget.min.js"></script>
    </head>
    <body>
        <div id="main">
            <h3>This is my first widget.</h3>
            <span id="labelText"></span>
            <input type="text" id="userInput">
        </div>
        <script type="text/javascript">
            //always subscribe to ready event and implement widget related code
            //inside callback function , it is the best practice while developing widgets
            JFCustomWidget.subscribe("ready", function(){
                var label = JFCustomWidget.getWidgetSetting('QuestionLabel');
                document.getElementById('labelText').innerHTML = label;
                //subscribe to form submit event
                JFCustomWidget.subscribe("submit", function(){
                    var msg = {
                        //you should valid attribute to data for JotForm
                        //to be able to use youw widget as required
                        valid: true,
                        value: document.getElementById('userInput').value
                    }
                    // send value to JotForm
                    JFCustomWidget.sendSubmit(msg);
                });
            });
        </script>
    </body>
</html>
Upload simple.html to your web server and test URL using browser.
Step 2: Register Widget
Go to Add Widgets page to begin registering your field.
-
Name
Name of your widget. It is used while we are showing the widget to Jotform users. Write down "My Simple Widget" for this tutorial.
-
Widget Type
Select iFrame Widget option.
-
Widget IFrame URL
Enter URL of simple.html in your website.
-
Widget width and height
Determine your widget size
-
Additional parameters
Parameters defined here will be appended to your iframe URL as query parameters with given parameter name. These parameters will be prompted to users who select your widget with given human readable name. For this tutorial add new parameter with name QuestionLabel and human readable name Enter Text to Display
After successful registration, go to Jotform Form Builder and click "Widgets" toolbox. Click on your widget name to add it to your form. Test out your widget.
Your widget is currently only visible only to you. When your widget is complete Integrations, find your widget and change status to "Send for approval". After we review your widget it will public to all Jotform users!
Sample Widgets
Custom Widget API
Jotform Custom Widget API allows developers to implement new form fields to be used in Form Builder.We achieved this by leveraging postMessage and cross-document messaging. That means Jotform Custom Widget API provides a bridge between your widget and Jotform.
Loading the Custom Widget API
Jotform Custom Widget API can be loaded with the following script include:
<script src="//js.jotform.com/JotFormCustomWidget.min.js"></script>
Loading the Custom Field API asynchronously
For improved page load time, you can load JavaScript asynchronously. This allows the browser to load page and script file in parallel. For the best performance place the following JavaScript before your </body> tag.
        <script type="text/javascript">
          (function() {
            var po = document.createElement('script'); po.type = 'text/javascript'; po.async = true;
            po.src = '//js.jotform.com/JotFormCustomWidget.min.js?onload=onLoadCallback';
            var s = document.getElementsByTagName('script')[0]; s.parentNode.insertBefore(po, s);
          })();
        </script>
You can use the onload callback when using the asynchronous loading to start the execution of your code after all of the dependencies have loaded.
Core Events
JFCustomWidget.subscribe("ready", callback)
This event will be fired when form is ready and your field iframe loaded successfully. It will pass following parameters to your callback function.
-
formId
Type:
string
ID of form in which your custom field is used. Most widgets do not need to use this information. For example if you have a chat widget you can use formId as chat room ids. -
value
Type:
string
Submitted value alue of your widget. This attribute is particularly useful when users edit submissions. You can initialize your widget according to this value.
Tip: You must and always listen to this event before you begin to write your widget code. This is to ensure that the settings for your widgets was successfully fetched.
JFCustomWidget.subscribe("submit", callback)
This event will be fired when form is submitted or when the 'Next' button is pressed which is only available for multi-page forms(page-breaks).
Example callback function can be:
        function() {
            var result = {}
            //this part will be used if your field is required. If your widget is required valid
            //property will be expected before form can be submitted
            result.valid = true;
            //this is your field result. You are expected to send value property as string
            result.value = "my precious data"
            //most probably you will call sendSubmit method
            JFCustomWidget.sendSubmit(result)
        }
Tip: If your widget is only for showing something to your users. You don't have to listen to this event.
Core Methods
JFCustomWidget.sendData(data)
You can use this method to send your field's results to Jotform at anytime
data object should include following attributes
-
value
Type:
string
This is your actual field result. It should be string (may be stringified JSON data)
JFCustomWidget.sendSubmit(data)
Use this method if you subscribed to "submit event". It is similar to sendData except you should send "valid" attribute in data. You should use this method if you want your widget to be able to be required.
data object should include following attributes
-
valid
Type:
booleanDefault:false
If valid is true then your field will pass required condition in Jotform.You should always pass valid, this way we can make your widget required. -
value
Type:
string
This is your actual field result. It should be string (may be stringified JSON data)
JFCustomWidget.requestFrameResize(data)
Use this method if you need to resize your iframe in Jotform
data object should include following attributes
-
width
Type:
numberDefault:undefined
If given it will your new iframe width -
height
Type:
numberDefault:undefined
If given it will your new iframe height
JFCustomWidget.getWidgetSetting(parameterName)
Utility function to obtain value with given name from widget parameters. You may need this function if you register your field with additional parameters
JFCustomWidget.getWidgetSettings()
The same concept with the getWidgetSetting function. Only it fetch all the widget parameters and store it on an object array. You may need this function if you register your field with additional parameters
JFCustomWidget.replaceWidget(inputType)
Use this method if you want to replace your widget with native form fields. It is useful for widgets that do not work in all browsers. Input Type may be "control_fileupload", "control_textbox" or "control_textarea"
-
inputType
Type:
string
may be "control_fileupload", "control_textbox" or "control_textarea" -
height
Type:
numberDefault:undefined
If given it will your new iframe height