With Show/Hide Field conditional logic, you can make your form feel smarter by showing or hiding fields based on how someone answers a question. This helps keep your form clean and focused, so users only see what’s relevant to them—making the whole experience quicker, clearer, and more enjoyable to fill out.
Showing or Hiding Fields Conditionally
In this example, we’ll walk you through how to set things up so a field appears only when a user chooses a specific answer. It’s a simple way to make your form more responsive and personalized—here’s how it works step by step:
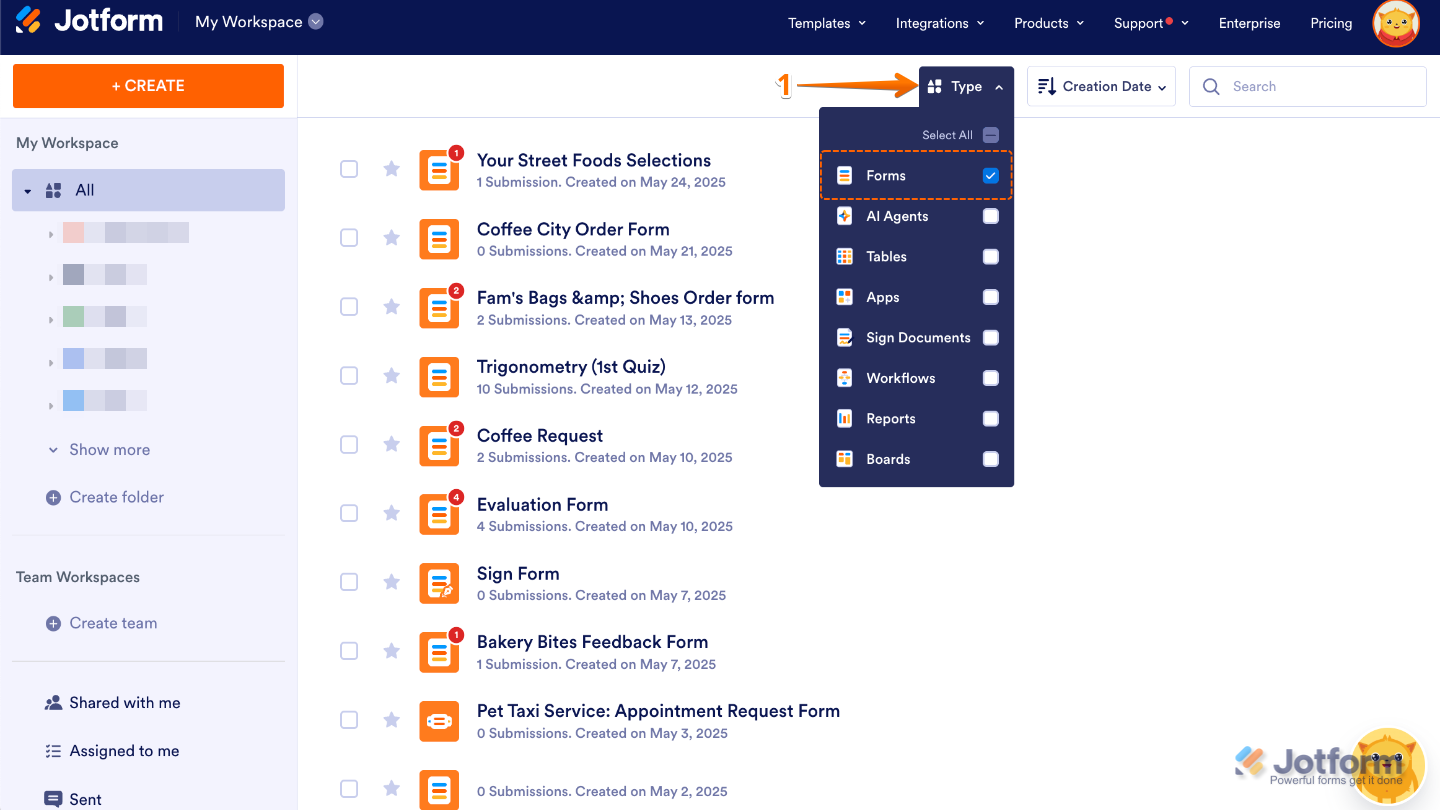
- On your Workspace page, click on Type at the top, and in the Dropdown menu that opens, uncheck the boxes next to all the assets except Forms, so only they’ll be shown on the page.
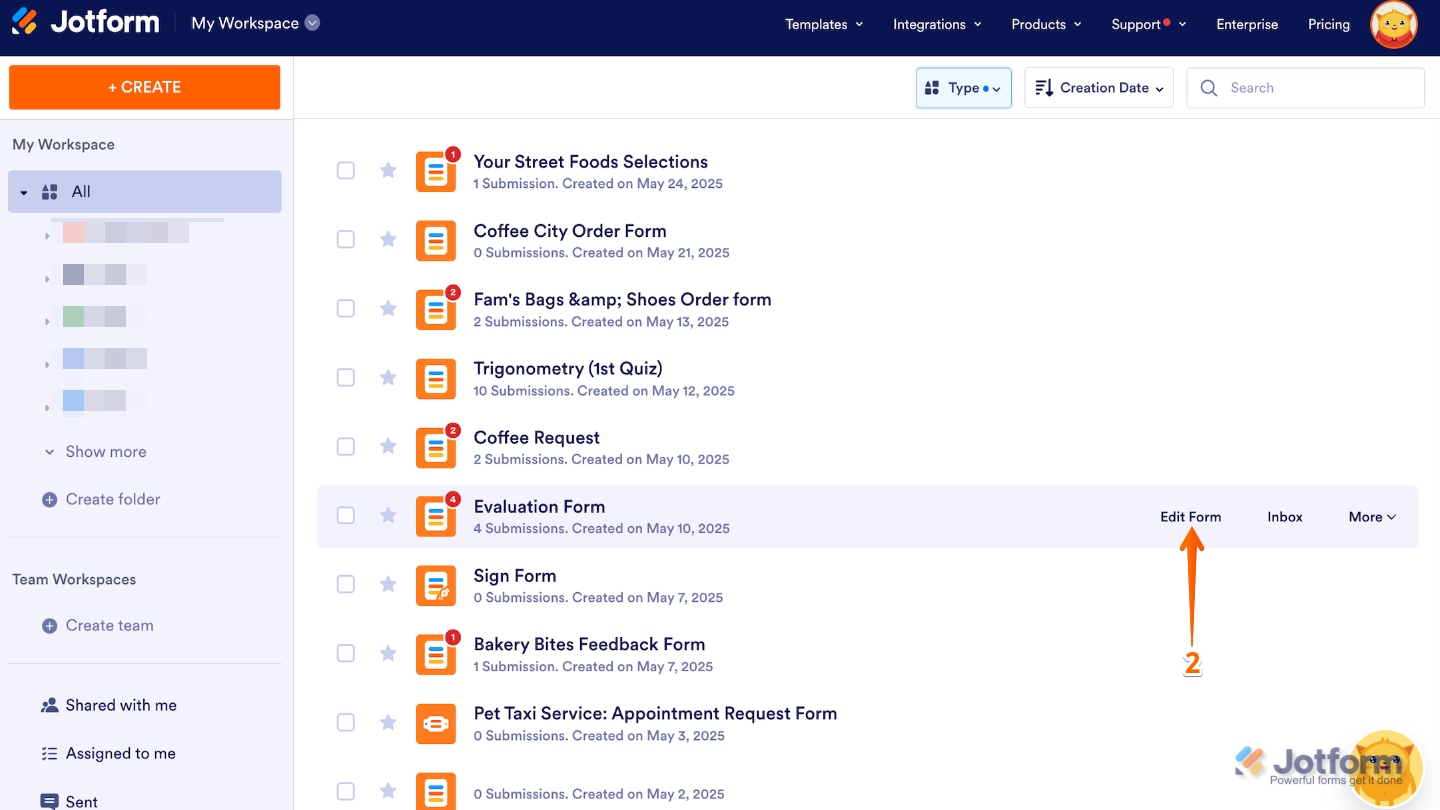
- Now, hover your mouse over the form you want to manage, and click on Edit Form on the right side of the page.
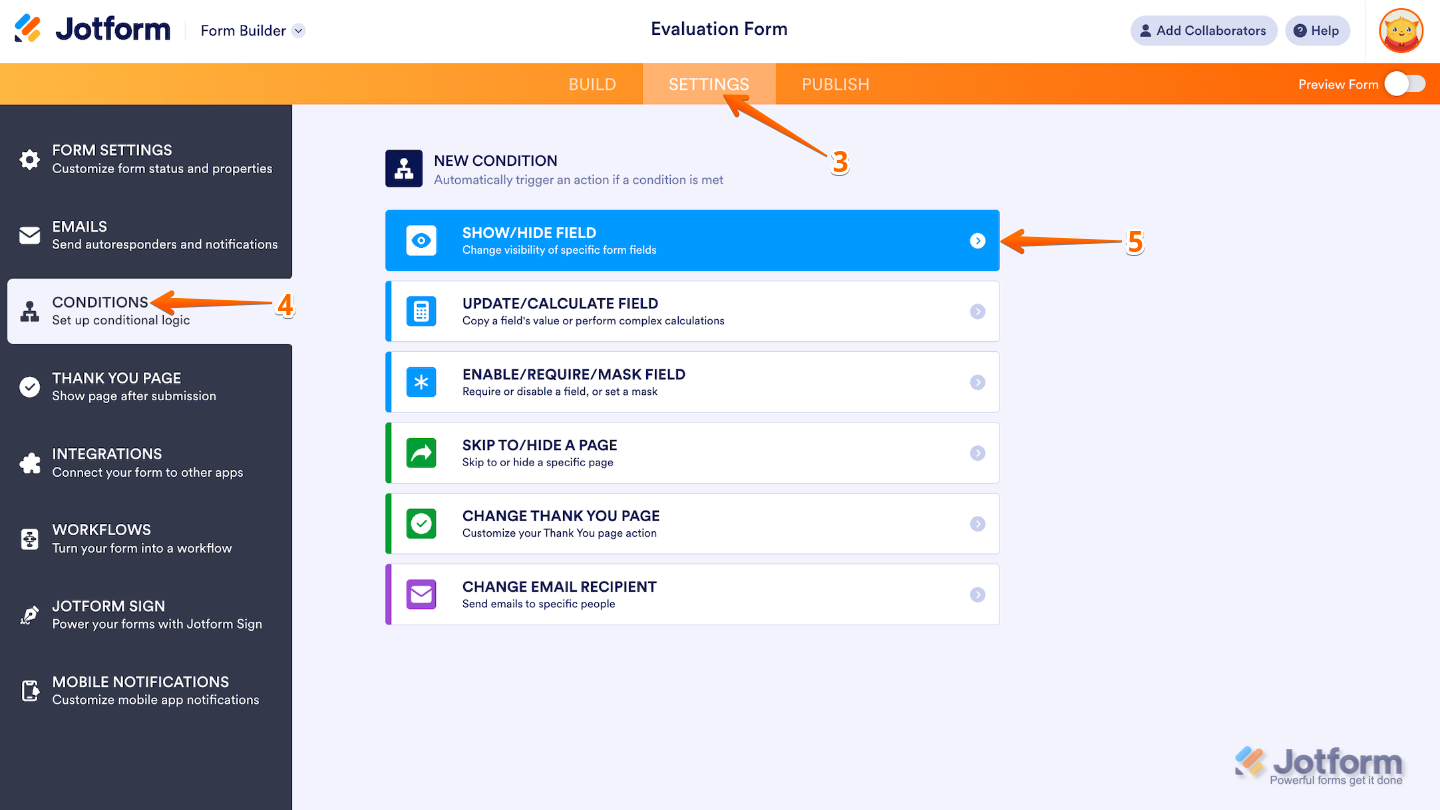
- Next, in Form Builder, in the orange navigation bar at the top of the page, click on Settings.
- In the menu on the left side of the page, click on Conditions.
- Then, in the New Condition menu, click on Show/Hide Field.
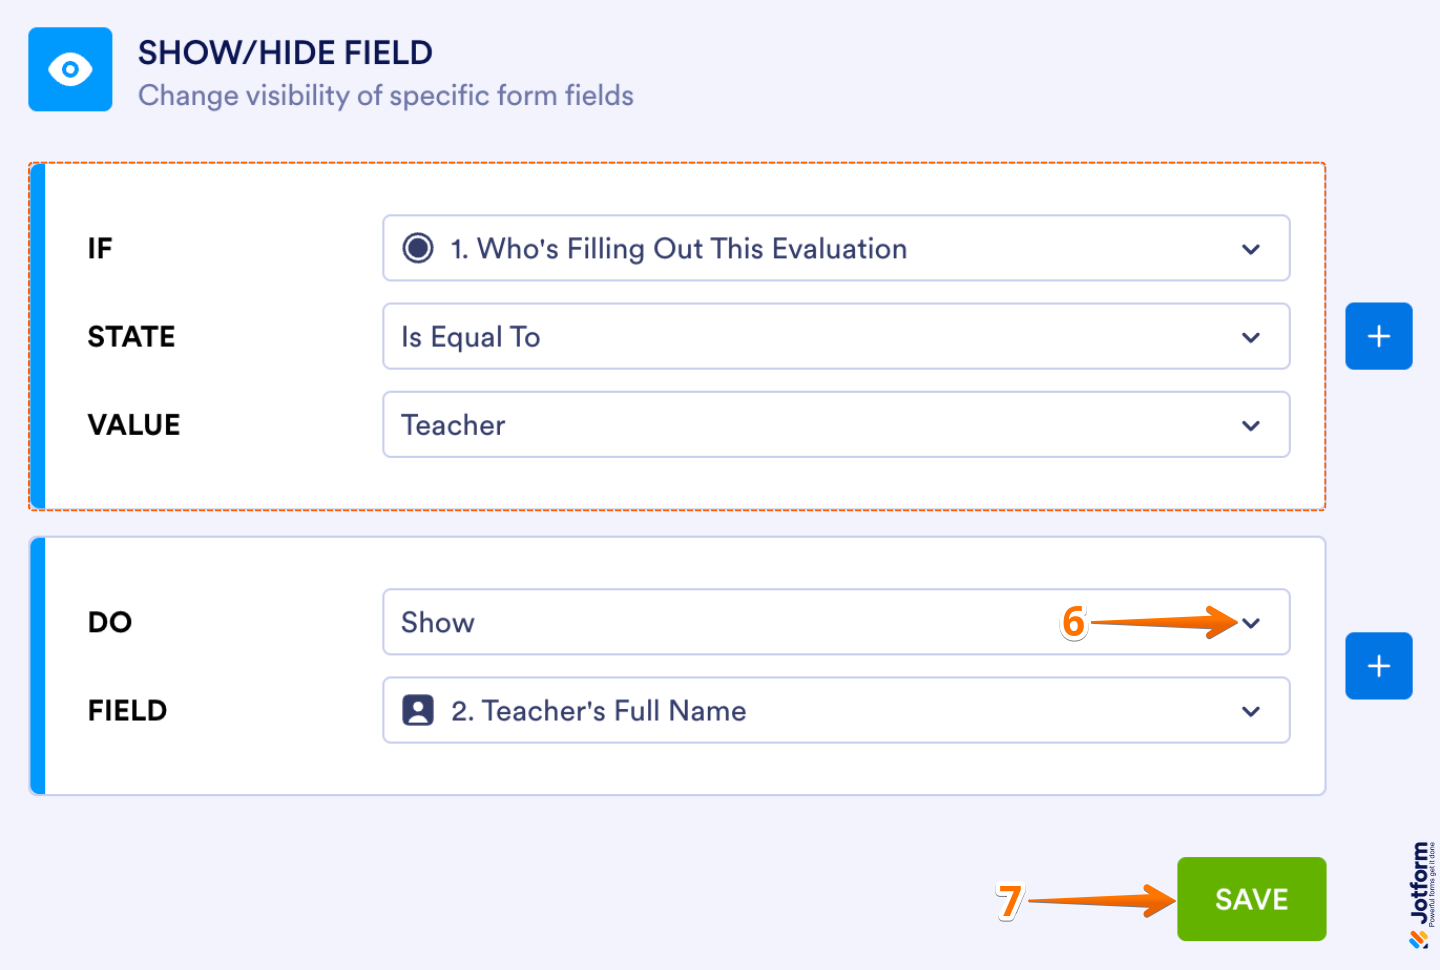
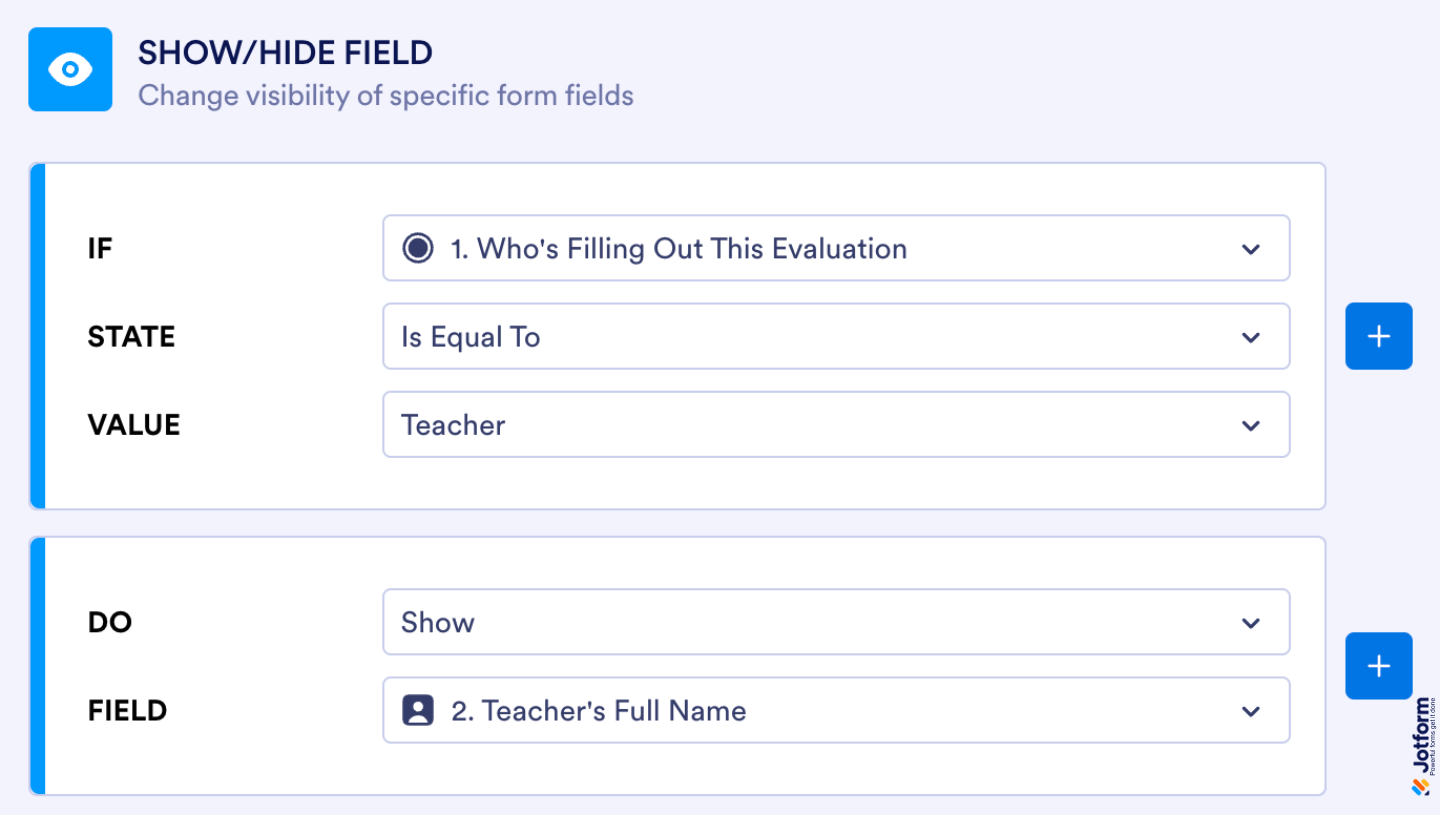
- Now, in the Show/Hide Field section, configure these fields to set an If rule for your condition, and then set Do to Show or Hide the selected Field:
- IF — Select a supported form field whose value or status will determine when the condition triggers. You can use the Search bar at the top of the menu to find a specific one easily.
- STATE — Select the status that the condition should check for in the field you chose. You can use the Search bar at the top of the menu to find a specific one easily.
- TARGET — This appears when the selected status is neither Is Empty nor Is Filled. Select whether you want to compare the value or selection of the field you chose to a specified value or to the value of another field.
- VALUE — This appears when Value is selected as the target. Enter a specific text that the selected field’s value will be compared to.
- DO — This defines the action that should happen when the condition is met. For the Show/Hide Field, it either make a field appear or disappear.
- FIELD — This appears when Field is selected as the target. Choose the field whose value will be compared to the field you selected in the If Dropdown menu. You can use the Search bar at the top of the menu to find a specific one easily.
- Once done, click on Save.
You’re all set. Below is an example of what your form will look like from a user’s point of view when the condition you set is met, showing the relevant fields right when they’re needed. Check out this demo to see exactly how it works in action. In this example, the condition is as follows:
Jotform’s Show/Hide Condition is a great way to gently guide users through your form and keep things focused and relevant. By showing only the fields that matter based on their answers, you can create a smoother, more personalized experience from start to finish—without overwhelming them with unnecessary questions.
Note
You can add as many rules as you like and hide or show as many fields as needed to match your form’s flow. This gives you full flexibility to fine-tune the experience, so users only see what’s relevant to them at each step and can move through your form with ease. You can check the guide about How to Hide or Show Multiple Fields Conditionally and How to Show or Hide Multiple Fields Conditionally With Section Collapse to learn more.
Pro Tips
- Try not to overload your form with too many conditions—having too many rules can make it tricky to troubleshoot or update later.
- Use clear and descriptive field names when working with lots of conditions. This makes managing and editing your logic a breeze.
- Double-check your IF and DO statements when setting conditions. Even a small slip, like picking the wrong field or condition type, can change how your form behaves.
- After setting up your conditions, test your form in Preview mode. Try out different scenarios to make sure everything works exactly as you want.
- Avoid creating conditions that depend on each other in a loop—it can confuse your form and lead to unexpected results.
- Keep in mind that matching text values in conditions is case-sensitive, so make sure your expected inputs match exactly.
- Show/Hide conditions pair perfectly with calculation fields, form collapse sections, and page breaks, helping you create a more dynamic and interactive form experience for your users.

Send Comment:
8 Comments:
April 18, 2025
I have a single option element on a form, and 2 hidden fields.
When a person selects Option 1 I want to unhide field 1 and hide field 2. At this point it is.
When a person toggles to Option 2 I want to hide field 1 and unhide field 2.
Likewise, when a person toggles back to Option 1 I want to unhide field 2 and hide field 2.
The only way I found to simulate this is to add 2 conditional show/hide rule. Yet, the way your rules are processed cause a conflict and this doesn't work.
How do I solve this?
August 22, 2024
Is it possible to create hidden fields on a form and then use the API to fill those hidden fields with specific data? What I am interested in is having a person fill in the fields they can see and on the same form, have the API fill in information that the user can not see. In my use case, I have a lot of product related information that will be important to an efficient follow up to the form submission but I don't want to force the user to fill in 20 fields to submit the form.
November 28, 2023
Hi there,
Is it possible to create a conditional if the customer select the product another field automatically appear?
For example, I have a package that has the minimum of 5 people to buy, when selected appears the options that these people has.
Asking because there's no option to use as equal and higher than...
I hope this make some sense... :/
November 15, 2023
Hi there
I am trying to remove a field which had around uploading COVID vaccinations on our form. I have removed all conditions for this field, and I have also selected Hide Field from the form, however it is still showing when we use the link on our website...
September 5, 2023
Please send code
January 29, 2023
Thanks for your response. I haven't tried at it yet but I follow the advice offered.
However, one point remains to be clarified in my mind.
For arguments sake let's say there are two categories, category A and category B with a maximum response of, say, 50 responses.
Category A only allows one response per submission, so the first would reduce the number then available to 49.
Category B allows up to four responses per submission, so after a single category A response as above a category B response could be for one (reducing number available now to 48) *or* for two (reducing the number available to 47), *or* for three (reducing the number available to 46) *or* for four reducing the number now available to 45. The number of responses in a category B submission (i.e. one, two, three or four) to reduce the total number available, Or would that be a step too far?
August 23, 2022
Has there been a solution to this issue yet? I am having the same problem. I am trying to create an order form for building materials. I have each material with a drop down box for qty and one for color but I need a text box for each one as the length will always be different for each order and for each product in each order. Jotform has exceeded all of my expectations and has been so helpful I’m surprised this option isn’t available as I’m sure it is a relatively common feature.
December 10, 2021
This is helpful however does not cover dynamic dropdowns.