
We’re excited to announce that our Stripe payment integration is now compatible with Link, an accelerated checkout experience built by Stripe.
Link automatically fills in a customer’s saved financial account details, enabling them to check out in seconds. Stripe is already one of Jotform’s most popular payment gateways, and Link makes it even more powerful. Enabling Link increases conversion rates by speeding up the checkout experience.
You can quickly add Link by clicking a single button in the Jotform Form Builder — it really couldn’t get any simpler.
Link features at a glance
- Payment accounts detected at checkout
- Prefilled payment methods
- Multiple saved payment methods
- Shipping address management
- Identity verification
- Data privacy
Ready to add Link to your Stripe payment gateway? Click here to get started now.
Convert more sales with Link
According to a global study from Stripe, businesses using Stripe Link experience a 7 percent higher conversion rate from their logged in customers. Stripe also reports that Link customers can pay for goods and services in just six seconds. That’s nine times faster than shoppers who don’t use Link.
Link encrypts and secures all payment information. Once a customer adds their payment info to Link, it will automatically appear when they make purchases, enabling one-click checkout. In addition, customers can add more than one payment method so they can pick from their saved payment options and breeze through checkout in seconds.
Link recognizes customers via web cookie, email address, or phone number. When customers use Link on a new site or new device, they’ll receive a one-time code via SMS to verify their identity and keep their payment information secure.
Just as it’s easy for customers to make purchases with Link, it’s exceptionally easy to enable Link in your Stripe payment gateway. Let’s take a look at how to do it.
Pro Tip
Link is available via two Jotform integrations: Stripe Checkout and Stripe. The Stripe Checkout integration features popular payment options like Apple Pay, Google Pay, and alternative payment methods. It redirects users to the Stripe website to complete payment.
The Stripe integration also accepts dozens of payment methods, but it does so with a secure, embeddable component that processes payment directly on your form.
Enable Link in the Form Builder
Link is conveniently activated within the Stripe payment gateway. So before we go over how to activate Link, let’s review how to add Stripe to your payment form.


Did you know?
Jotform users processed an average of $2.3 million with Stripe each week during the first quarter of 2023.
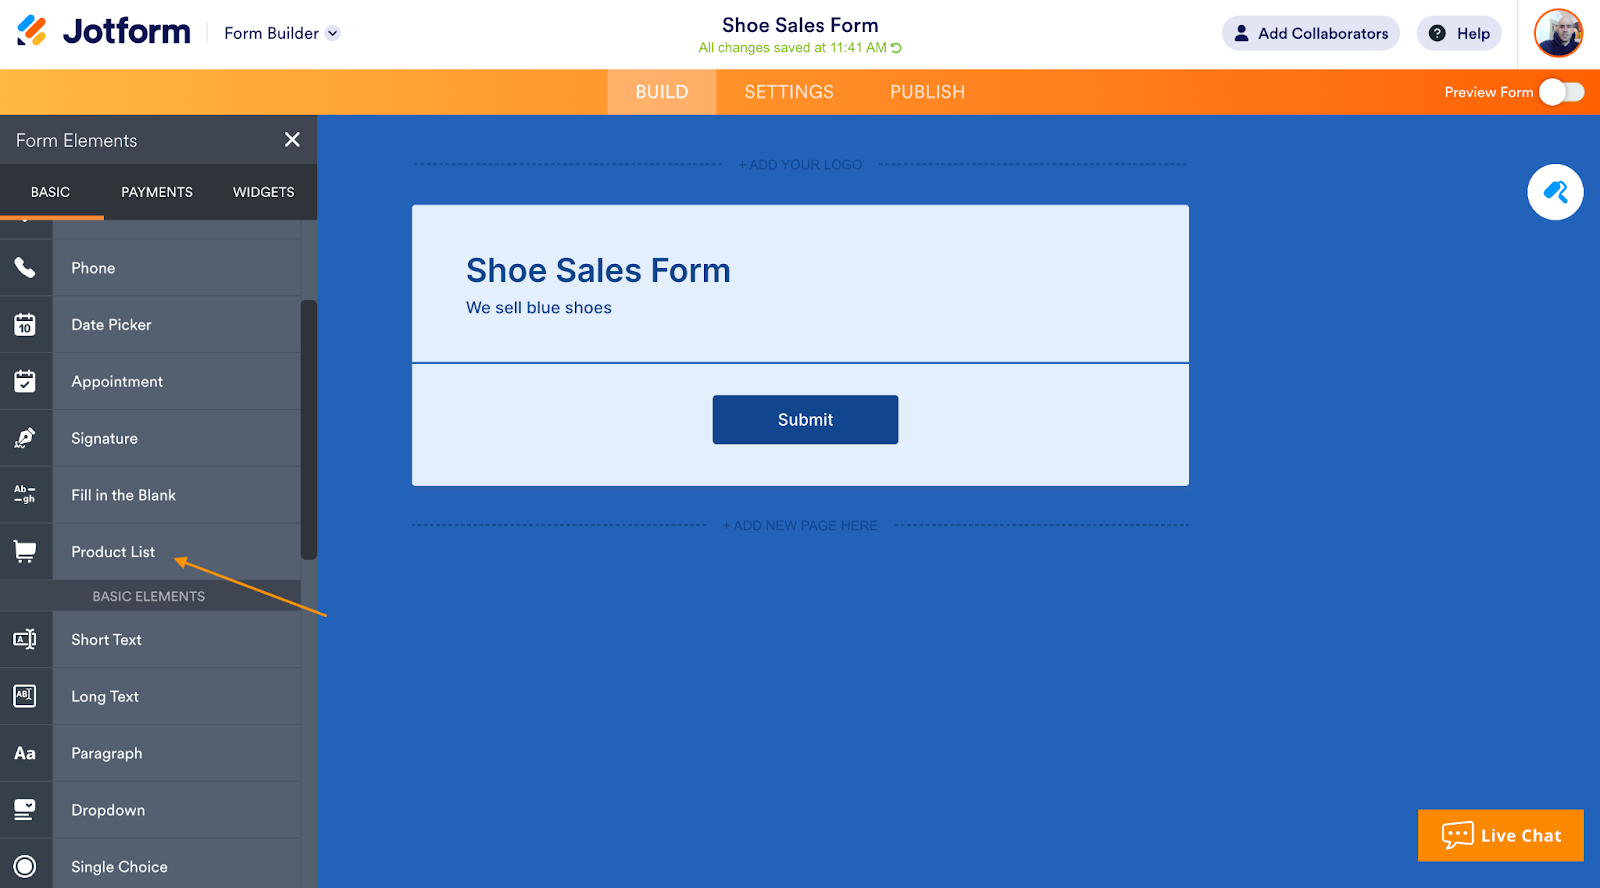
To build your payment form, add a Product List element to a form template or a form you’ve started from scratch. You’ll find the element on the left side of your screen in the Form Elements menu.
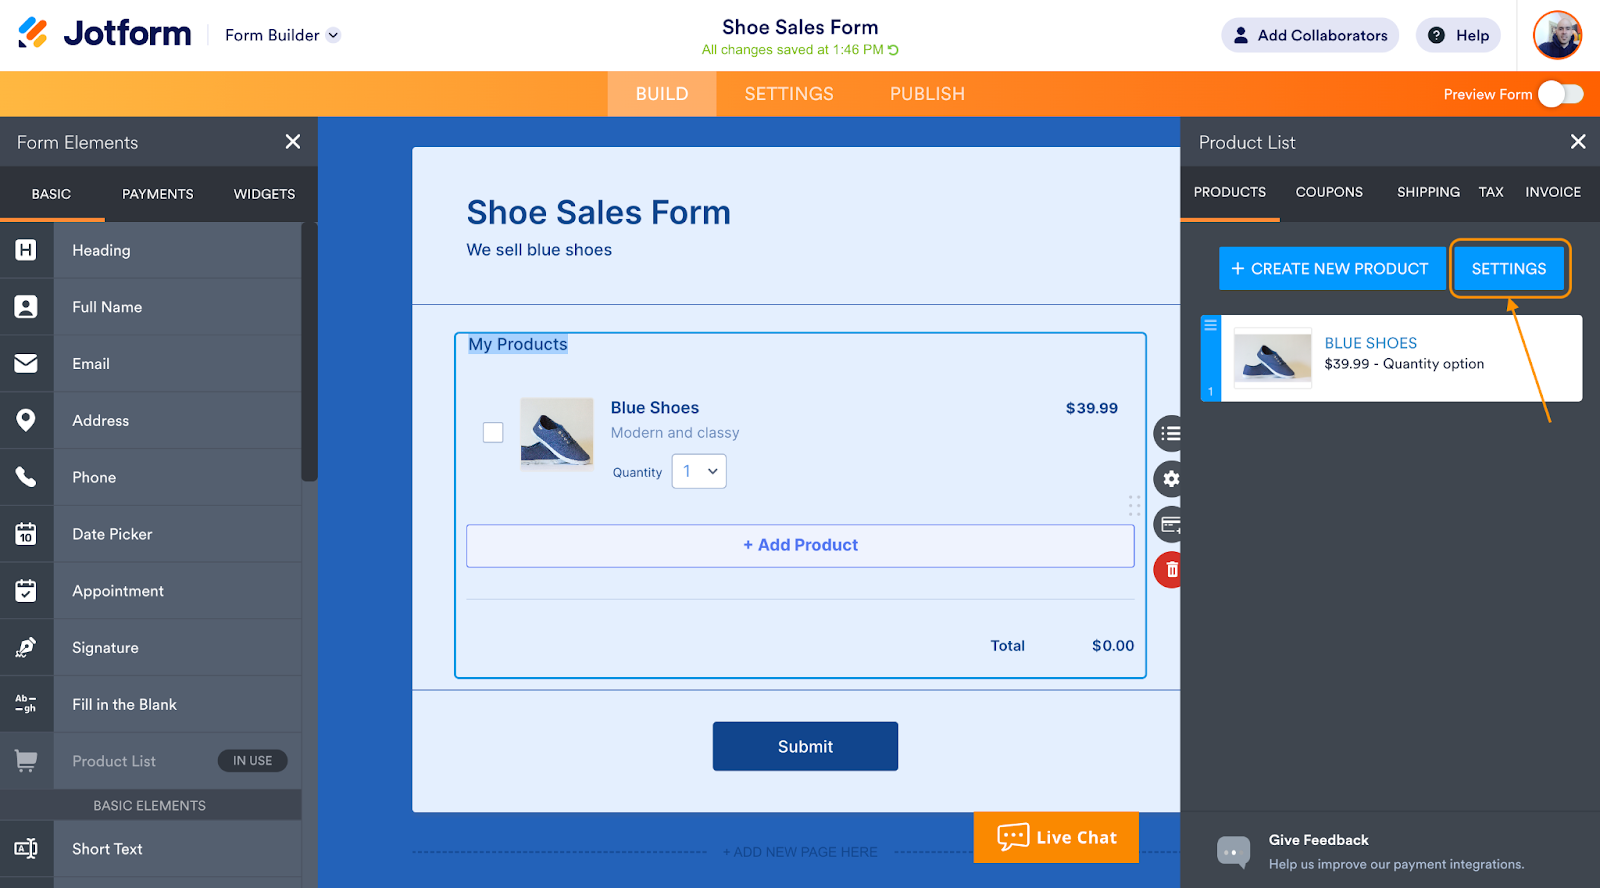
To add Stripe to your Product List, click the Settings button found within the Product List options menu. This menu will open automatically after you add your Product List.
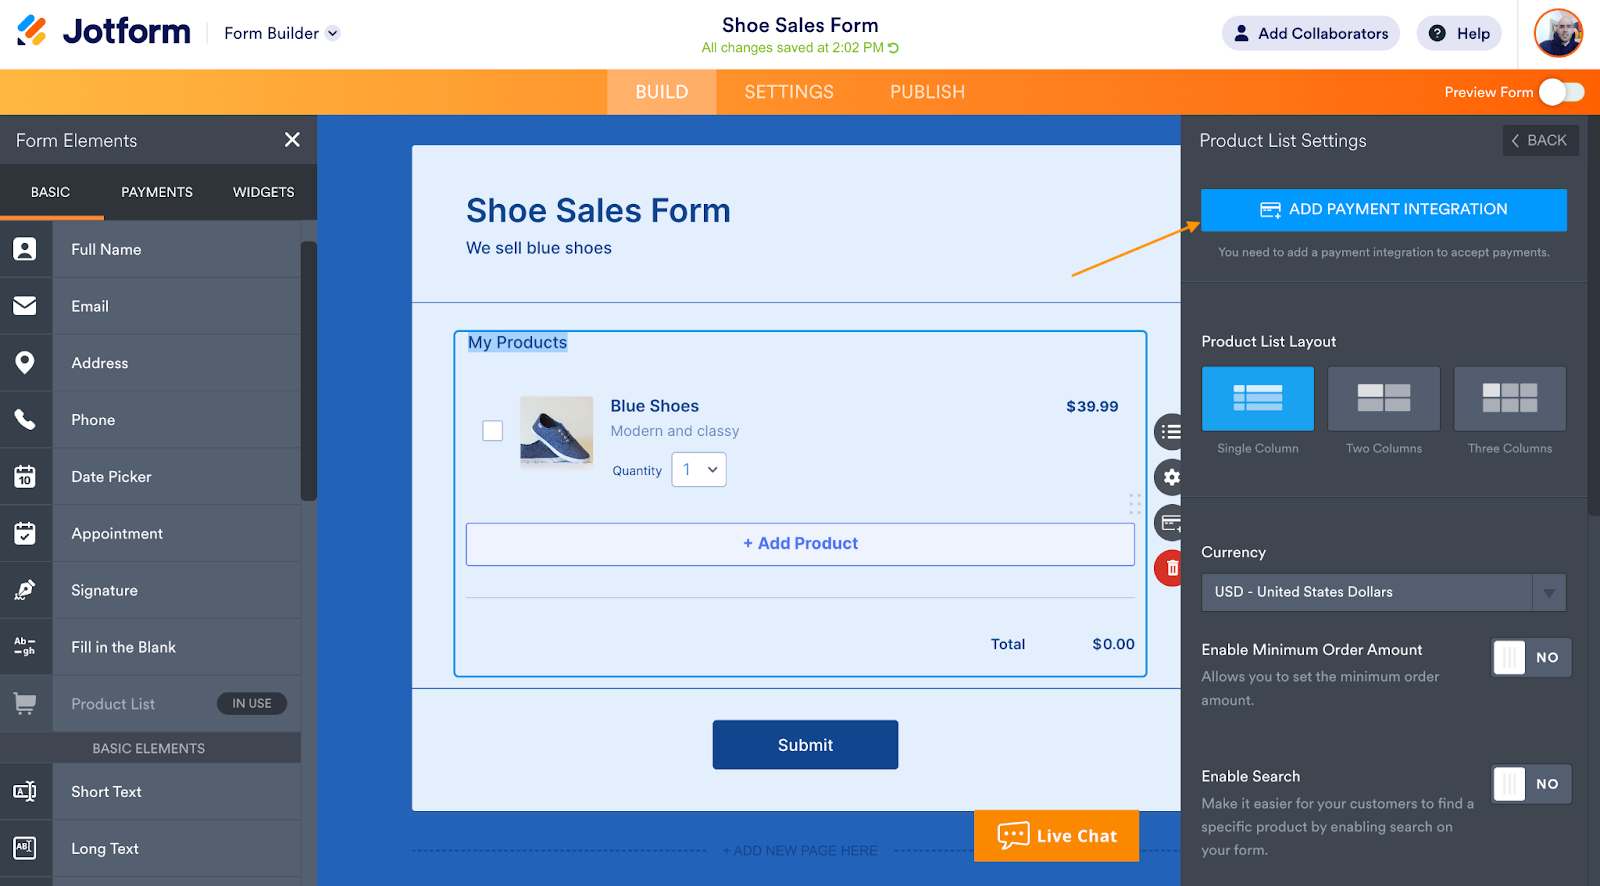
Click the Add Payment Integration button at the top of the menu.
Pro tip
Since Link is part of the Stripe payment gateway, it’s compatible with Jotform Store Builder and Jotform Apps. When you select one of Jotform’s Store Builder templates, you’ll be prompted to add a payment integration. Choose Stripe and switch on the Link toggle button in the Stripe Integration Advanced Settings. As for Jotform Apps, you can add a Product List to any app you create, select Stripe as your payment gateway, and enable Link.
After clicking Add Payment Integration, a list of Jotform’s payment processor integrations will appear in a popup menu. Choose Stripe and then click the Connect button. After you verify your Stripe account information in the popup window, Stripe will be ready to process payments on your form.
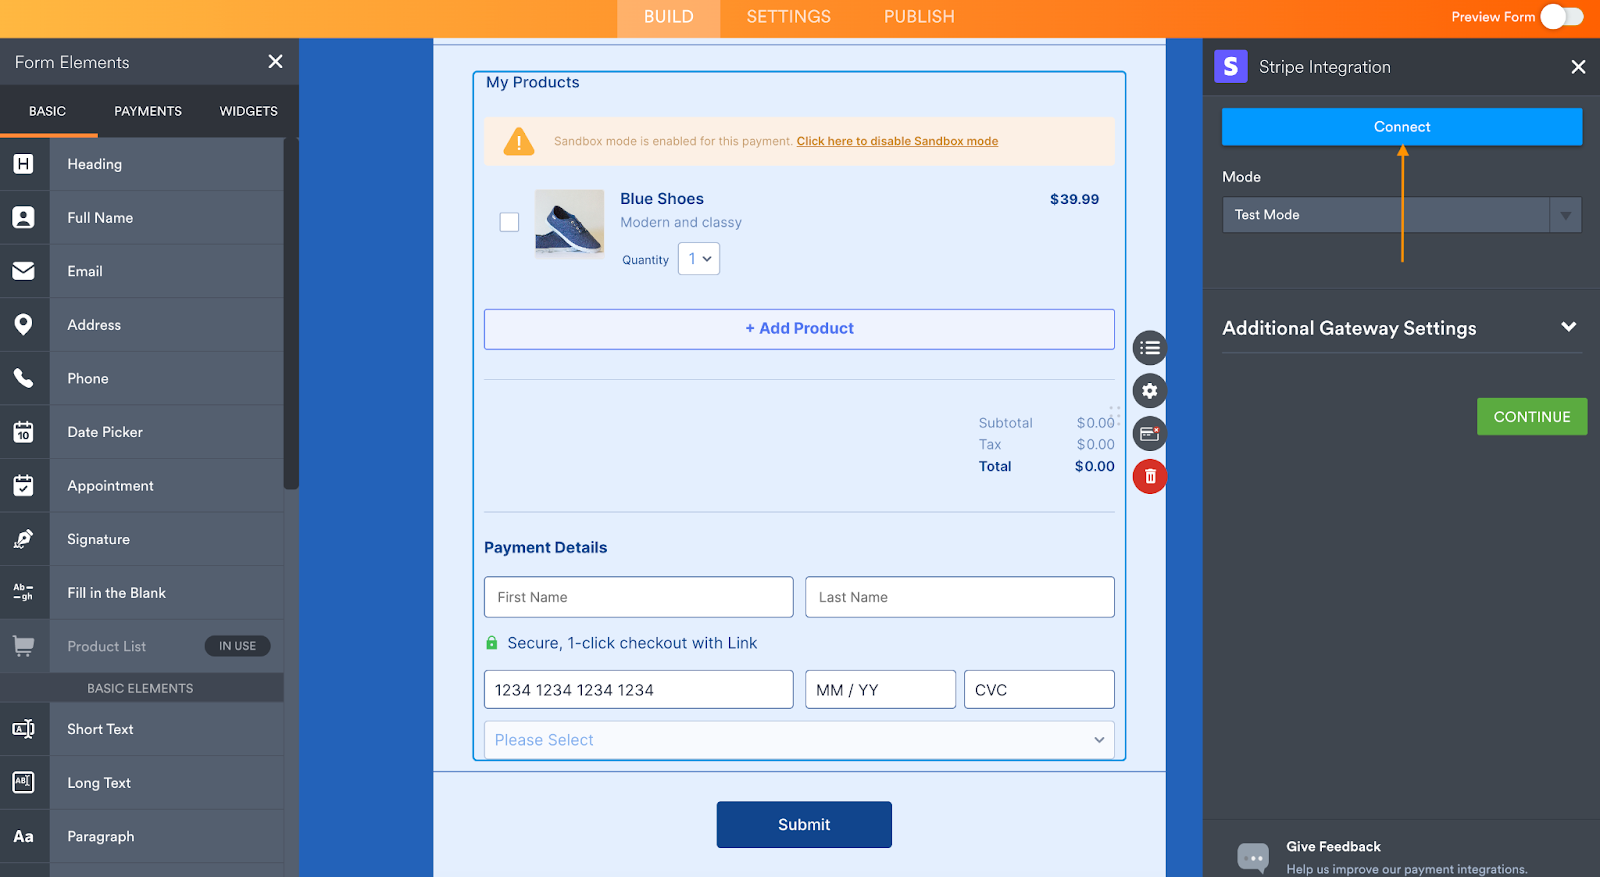
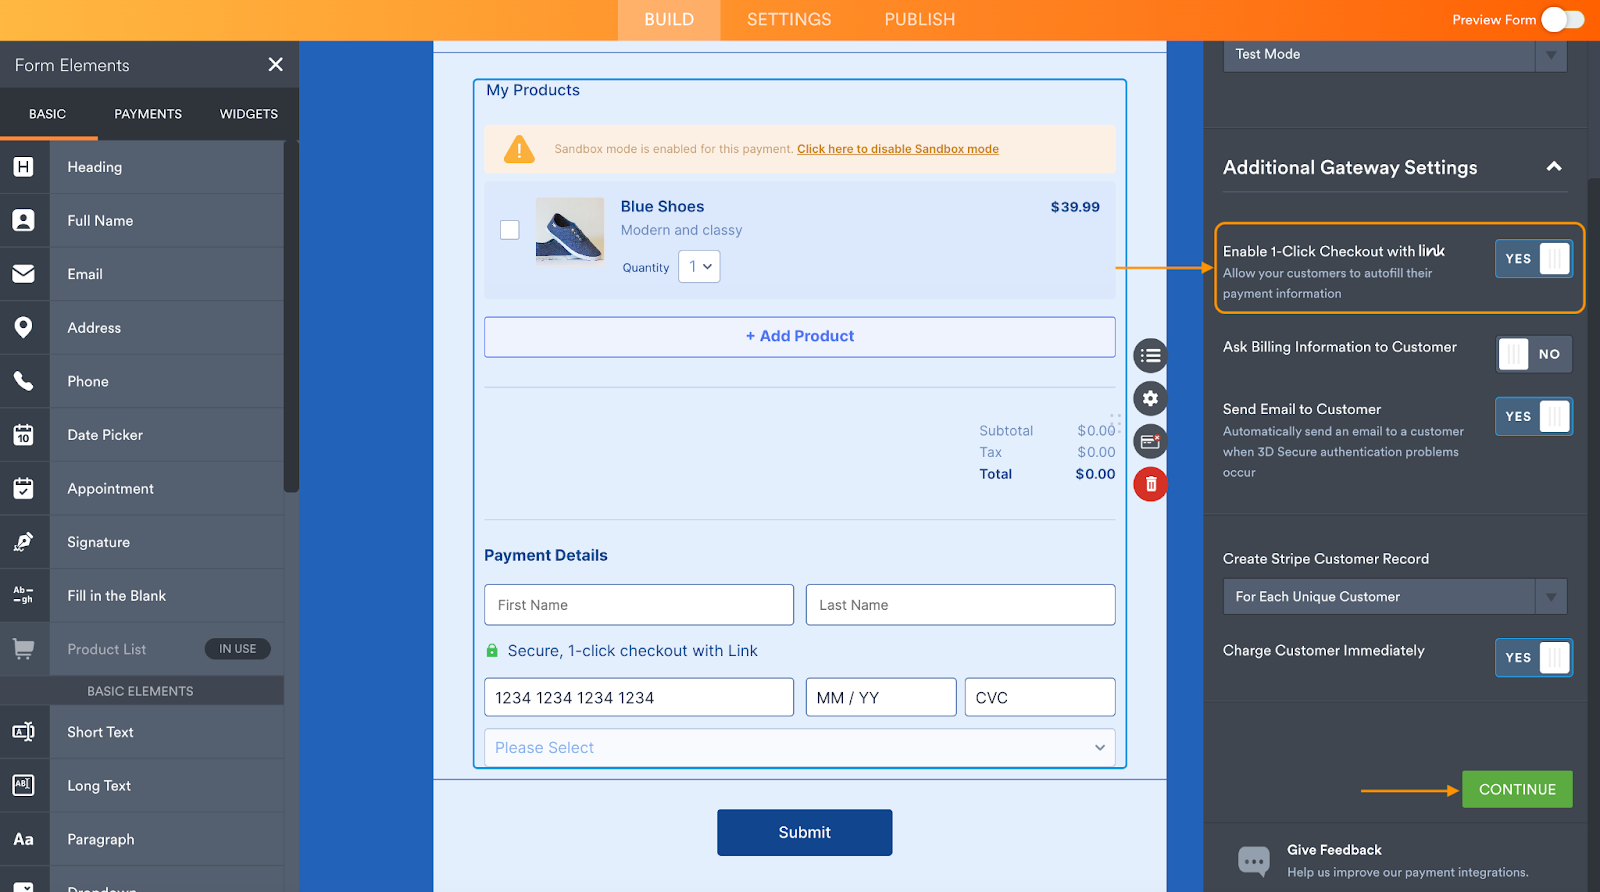
Now you can enable Link. Simply toggle on the Enable 1-Click Checkout with Link button located in the Additional Gateway Settings.
Be sure to click the Continue button at the bottom of the screen.
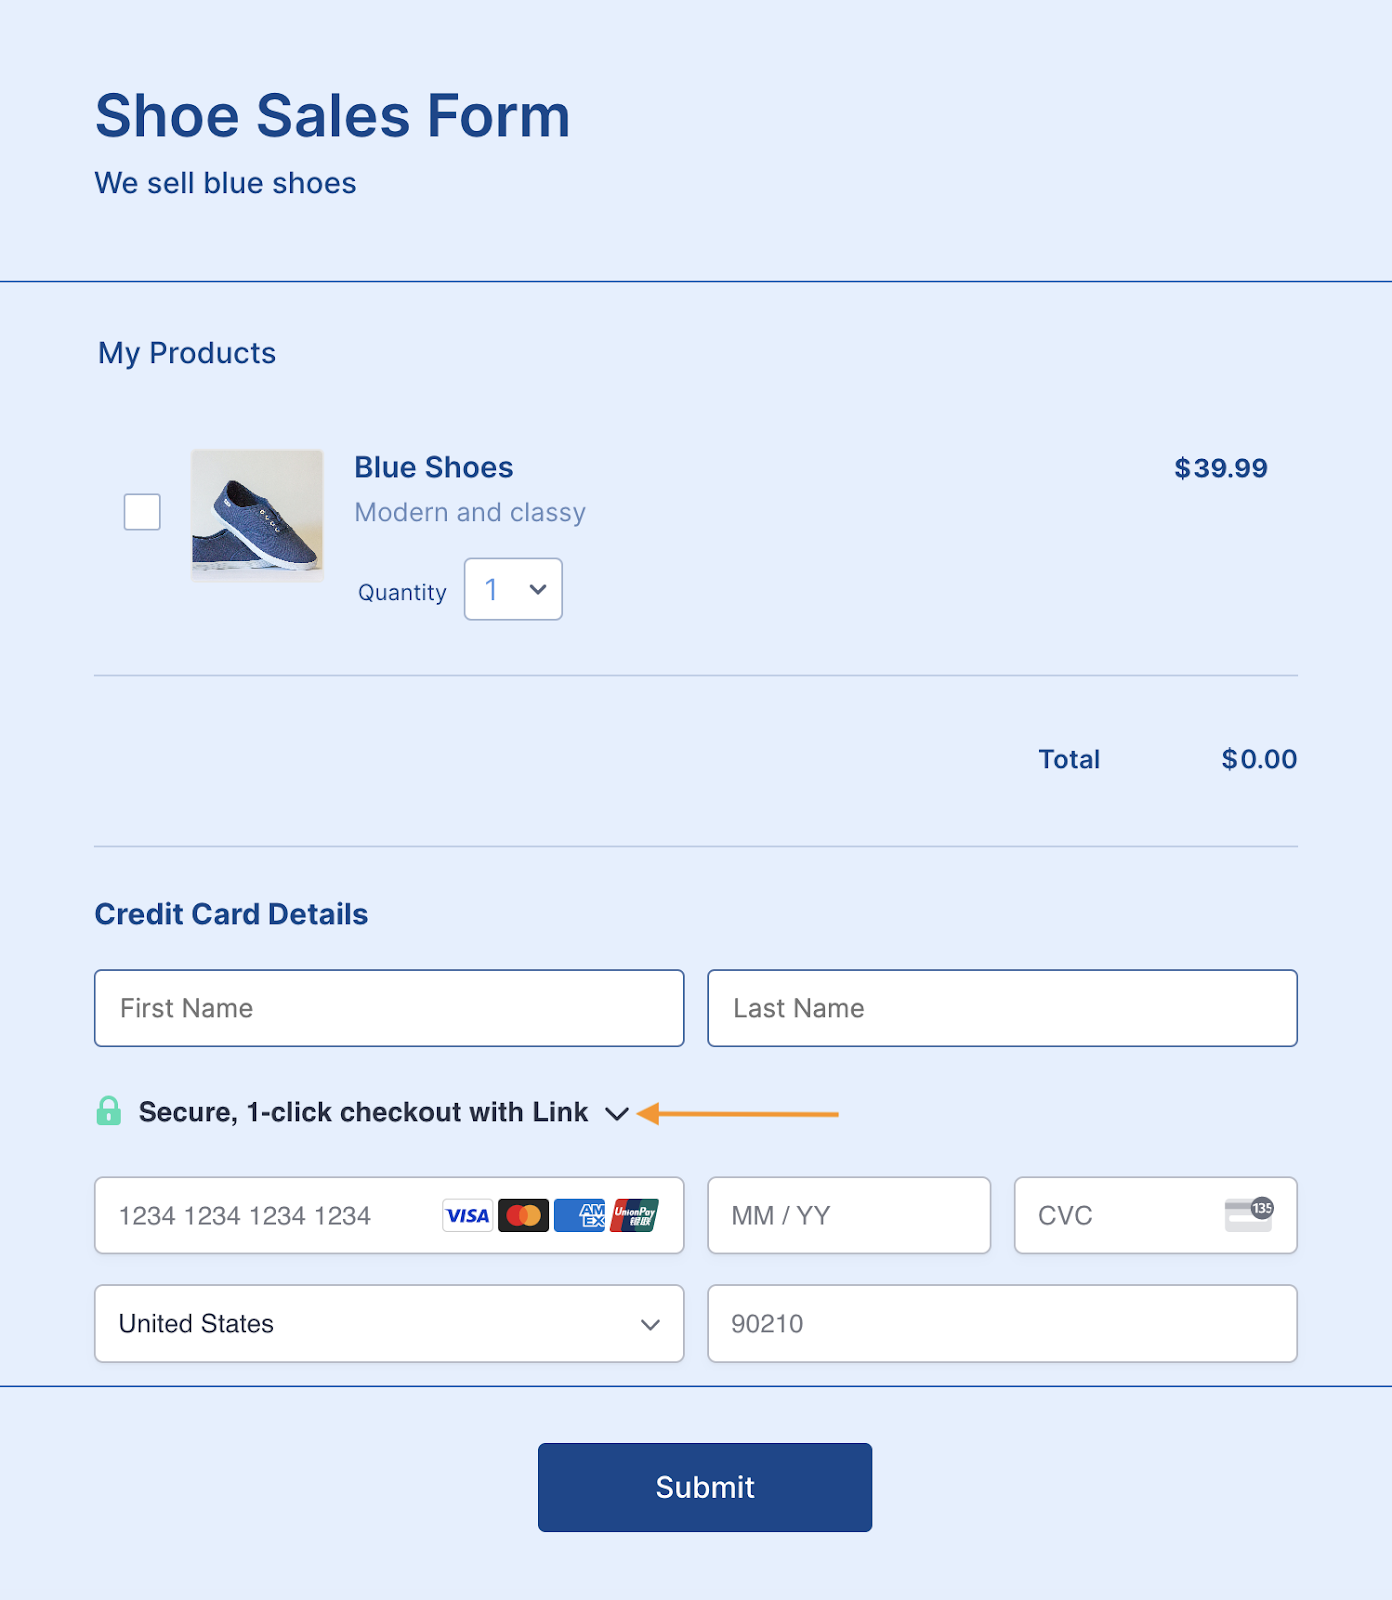
Customer experience
Now that your payment form is ready, it’s time for your customers and clients to take advantage of your new integration. When a customer is ready to pay, they’ll see an option to activate one-click checkout with Link. A dropdown menu will appear upon clicking the Link option.
Pro Tip
You can share your Link-enabled payment form via social media, QR code, or email. Additionally, you can embed your form into any website with a variety of ready-made embed codes.
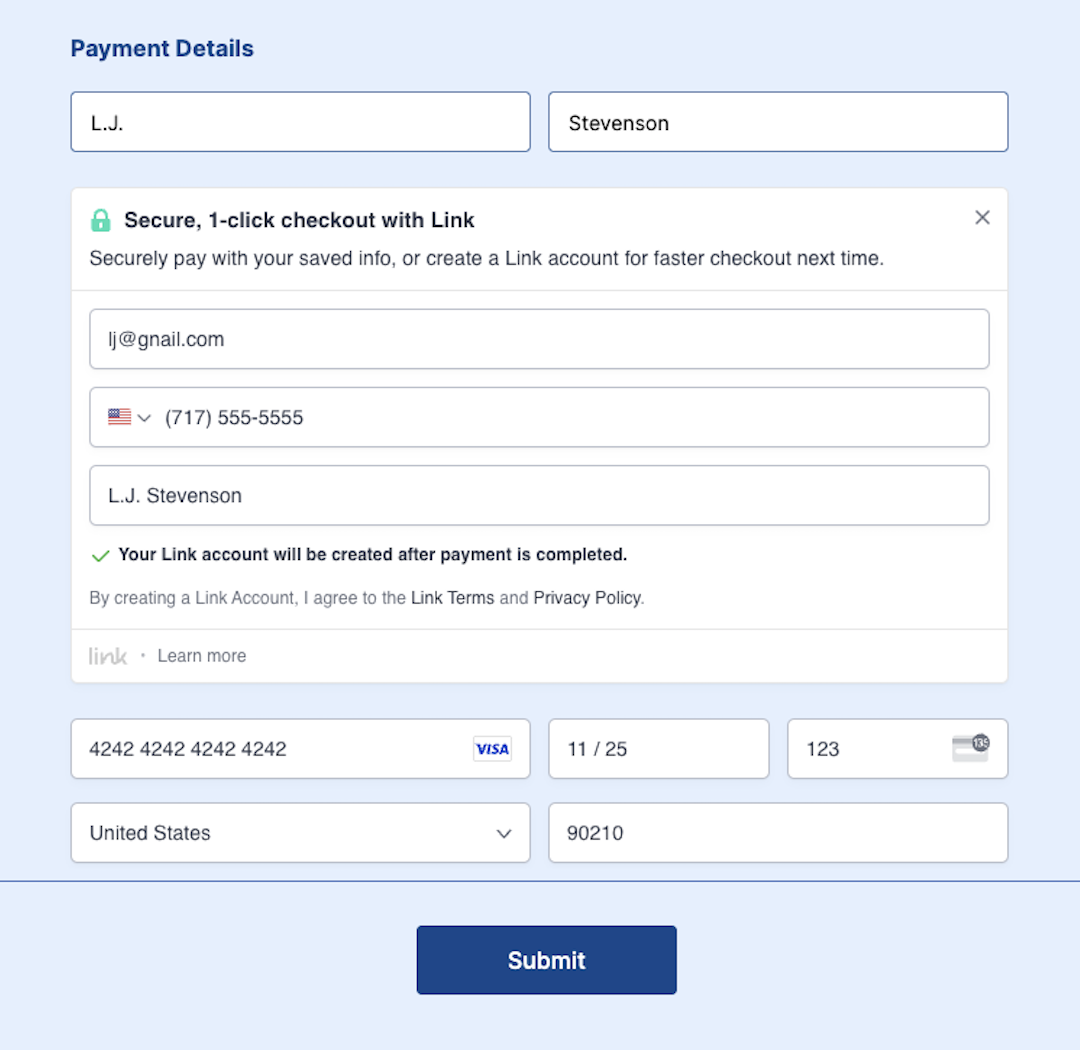
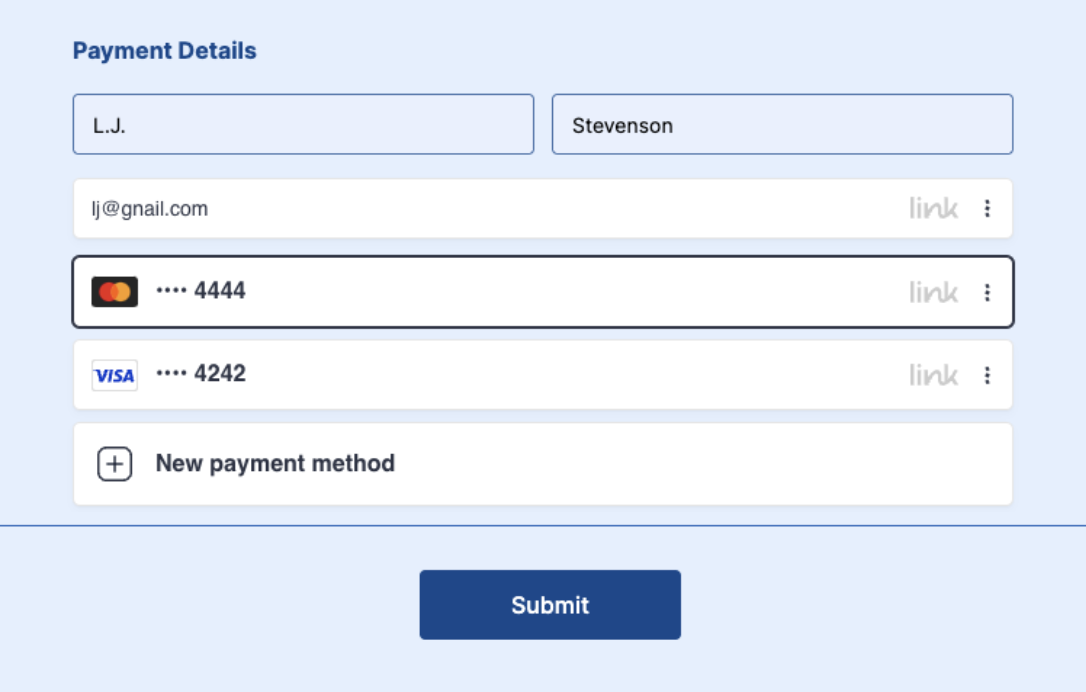
For first-time Link users, the dropdown menu will prompt them to create a new Link account. (The account is created after the payment process is completed.) Link will store the information entered with the highest of security standards. Both Link and Jotform are PCI Service Provider Level I compliant.
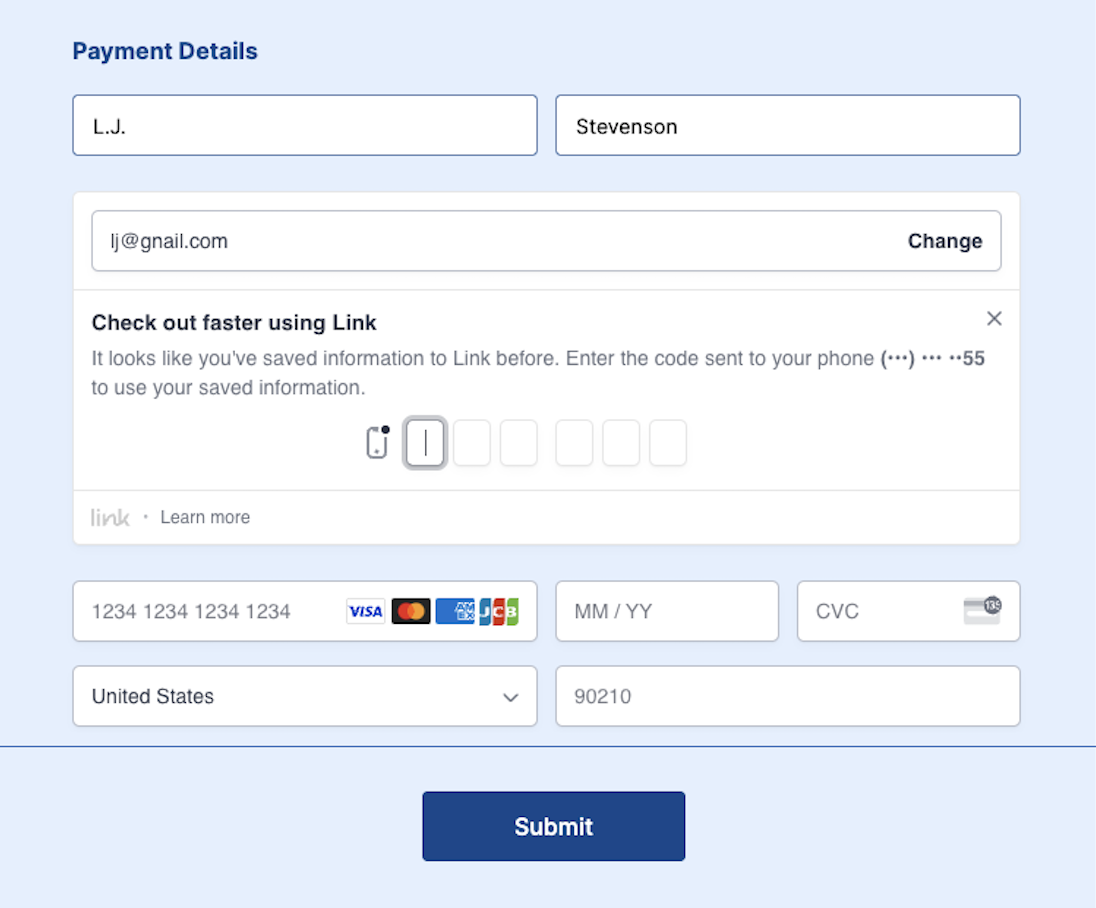
The next time the customer selects Link during checkout, Link will recognize their account after they enter the email address associated with the account. Payment information is auto-filled and one-click payment activated. When the customer uses your Link-enabled form for the first time or on a new device, the user’s identity will be verified with a code sent to their mobile phone.
After an initial payment method is securely saved on your form with Link, customers can add more payment methods to their Link account during checkout. Additionally, they can manage their shipping address from their Link account.
A popular way to pay just got better
In 2022, Jotform users increasingly chose Stripe when adding a payment element to their form. With the addition of Link, more growth seems like a sure bet.
“Stripe created Link to make online checkouts faster and easier. We’re excited to be working with Jotform to help even more businesses offer a better, accelerated checkout experience for consumers,” says Lily Q. Jolly, Product Lead, Consumer at Stripe.
Considering how easy it is to use Link, Jotform made sure it’s just as easy to add it to your payment forms, apps, or online store. If you already use Stripe, go ahead and switch on the Link toggle button in the Form Builder to provide your customers with an easier way to pay. For those who have yet to use Stripe, now is the perfect time to get started.


Send Comment:
2 Comments:
August 2, 2023
Mw aplike nn jotfom depi 7 mars 2023.mw poko jwenn anyen.
April 26, 2023
great info it works better for me hope you will do your great job.