Jotform’s Facebook Feed widget lets you add posts from your Facebook page directly to your website. It’s an easy way to keep visitors up to date with your latest Facebook content while giving them a way to explore your social media activity without leaving your site.
Whether you’re sharing business updates, announcements, promotions, or other Facebook posts, the Facebook Feed widget helps you keep your website fresh and makes it easier for visitors to stay connected with your brand.
To embed a Facebook Feed on your website, you’ll first need to set up the Facebook Feed widget and copy the embed code for it. Here’s how to get going:
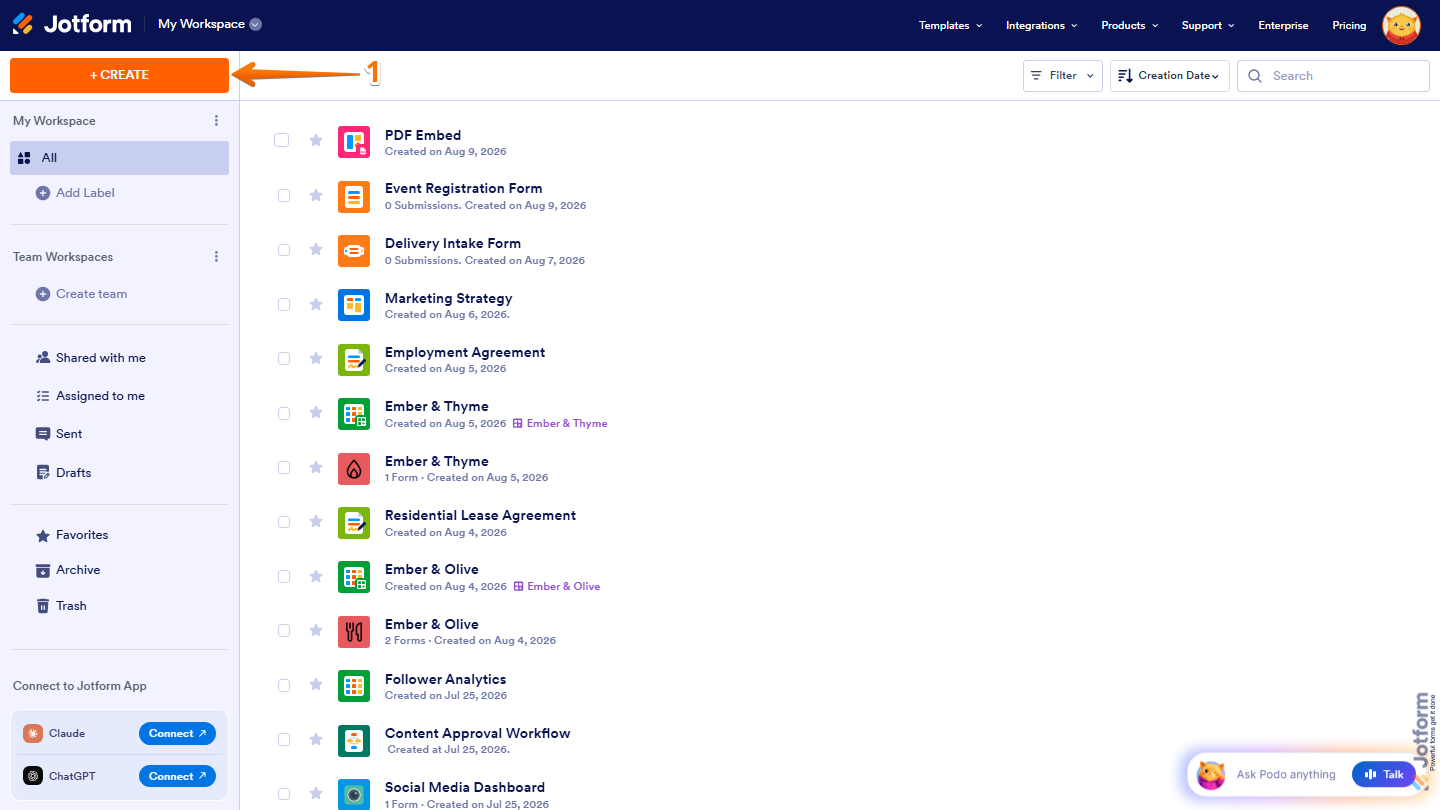
- On the top-left side of your Workspace page, click on Create.
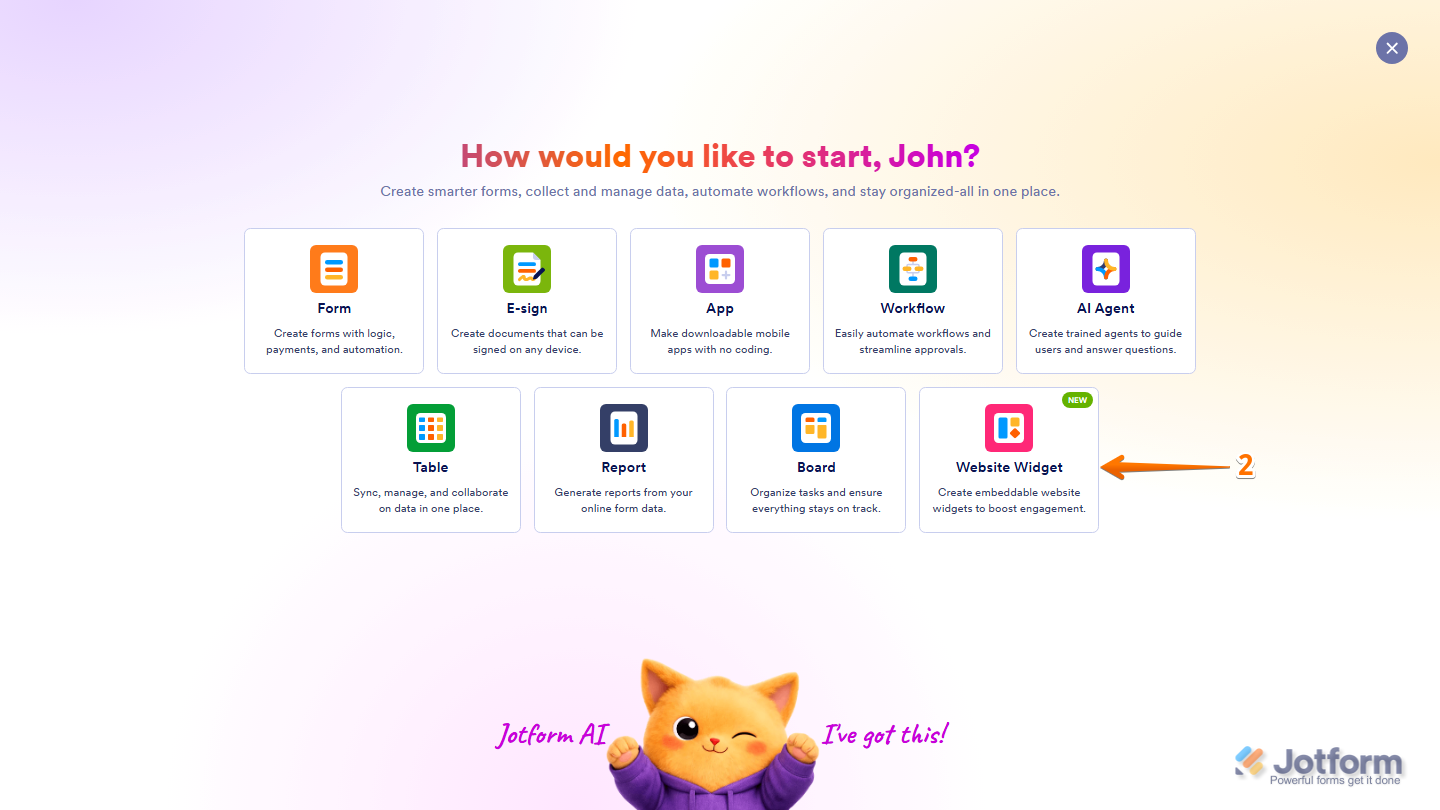
- Then, in the menu that opens up, select Website Widget.
- Next, in the Search bar in the upper-left corner of Choose Website Widget, enter the Facebook Feed.
- Then, in the search results, click on Use Widget.

- Now, in the Widget Properties menu that opens on the right side of Website Widgets, under the Connected Sources section, click on Add First Source.

- Then, in the Add Source menu that opens, click on Connect and log in to your Facebook Account.

Note
Your Facebook account must have a connected or configured Facebook Page
- Once you’re logged in, under the Connected Facebook Page section, click on the Downward Arrow icon and select the page you want to display.
- Then, click on Connect.

- After everything’s set, click on Back to return to the Widget Properties menu.

- Now, scroll down and set up these things:
- Header — Show or hide the title and description above the feed.
- Title — Enter the name you want to display above the social feed.
- Description — Enter a short introduction to display in the feed header.
- Post Limit — Set the maximum number of fetched posts to display in the feed.
- Author Name — Show or hide the author name or page name on each post.
- Author Picture — Show or hide the generated avatar for each source.
- Publication Date — Show or hide the publication date on each post.
- Post Text — Show or hide post captions and descriptions.
- Source Label — Show or hide the social platform name on each post.

- Next, under the Style tab, customize these properties:
- Theme — Choose the overall appearance of the feed.
- Corner Radius — Choose how rounded the corners of post cards and source badges should be: Square, Rounded, or Circular.
- Post Style — Choose the visual style of the post cards.
- Action on Post Click — Choose what happens when visitors select a post card.
- External Links — Allow post links to open the original social content.
- Popup Style — Choose the content layout shown when a post is opened in a popup.

- Next, scroll down and continue to customize these properties:
- Image Ratio — Choose how post images are cropped.
- Post Meta data — Show or hide like and comment information.
- Text Size — Adjust the size of the post text.
- Card Shadow — Show or hide a subtle shadow around post cards.
- Source Style — Choose how platform labels appear.
- Jotform Branding — Show or hide Powered by Jotform in the widget.
- Font — Toggle this on, click on the Downward Arrow icon below it, and in the Dropdown menu, select Site Font to match your website’s font, System to use each visitor’s device font, or another available font.
- Custom CSS — Add custom CSS to customize the widget’s appearance.

- Next, under the Layout tab, configure these options:
- Layout — Select one of the following options to choose how posts are displayed:
- Grid — Displays posts in a grid layout.
- Masonry — Displays posts in a masonry layout with variable post heights.
- List — Displays posts in a vertical list.
- Carousel — Displays posts in a horizontal carousel.
- Slider — Displays posts one at a time in a slider.
- Width — Enter the maximum feed width in pixels.
- Columns — Specify the number of columns to display in Grid and Masonry layouts.
- Rows — Enter the maximum number of rows to display before additional posts are hidden.
- Space Between Items — Set the spacing between post cards in pixels.
- Header Alignment — Select one of the following options to choose how the widget header is aligned:
- Left — Aligns the widget header to the left.
- Center — Centers the widget header.
- Right — Aligns the widget header to the right.
- Layout — Select one of the following options to choose how posts are displayed:
- Once everything’s set, in the pink navigation bar at the top of the page, click on Publish.

Note
You’ll be asked to log in to your Jotform account, if you’re not already, or sign up for one. Once you’ve done that, you’ll be able to get the embed code for your widget.
- Then, in the Embed section, click on Copy Code, and, if you already know how, paste that into the Embed section on your platform, and you’re good to go.
- To view embedding instructions for your widget, click on Platforms in the menu on the left side of the page.

- Next, in the Platforms section on the right, select the platform you want to view embedding instructions for. Or, use the Search bar at the top of the section to find it easily.

- Then, follow the steps in the How to Embed Your Widget section to add it to your website.

That’s it! Your Facebook Feed widget will appear on your website just the way you customized it. See the screenshot below for an example of how it’ll look:

Note
You can manage the website widgets you’ve created at any time from your account. For a full breakdown of how to do it, head over to our guide on How to Manage Website Widgets.




Send Comment: