With the Image Slider widget, it’s easy to create responsive image or video slideshows without any coding experience. Jotform lets you add images and videos, customize transitions and navigation controls, adjust the slider’s layout and appearance, and seamlessly match the widget to your website’s overall design.
Whether you’re highlighting featured products, promoting special offers, showcasing portfolio work, or sharing important announcements, the Slider widget helps you present multiple pieces of content in a clean, interactive space. It’s an effective way to capture visitors’ attention, keep them engaged, and make the most of your website’s screen space.
Creating and Getting the Embed Code of Your Image Slider Widget
To embed a media slider on your website, you’ll first need to configure the Slider widget and copy its embed code. Here’s how to get started:
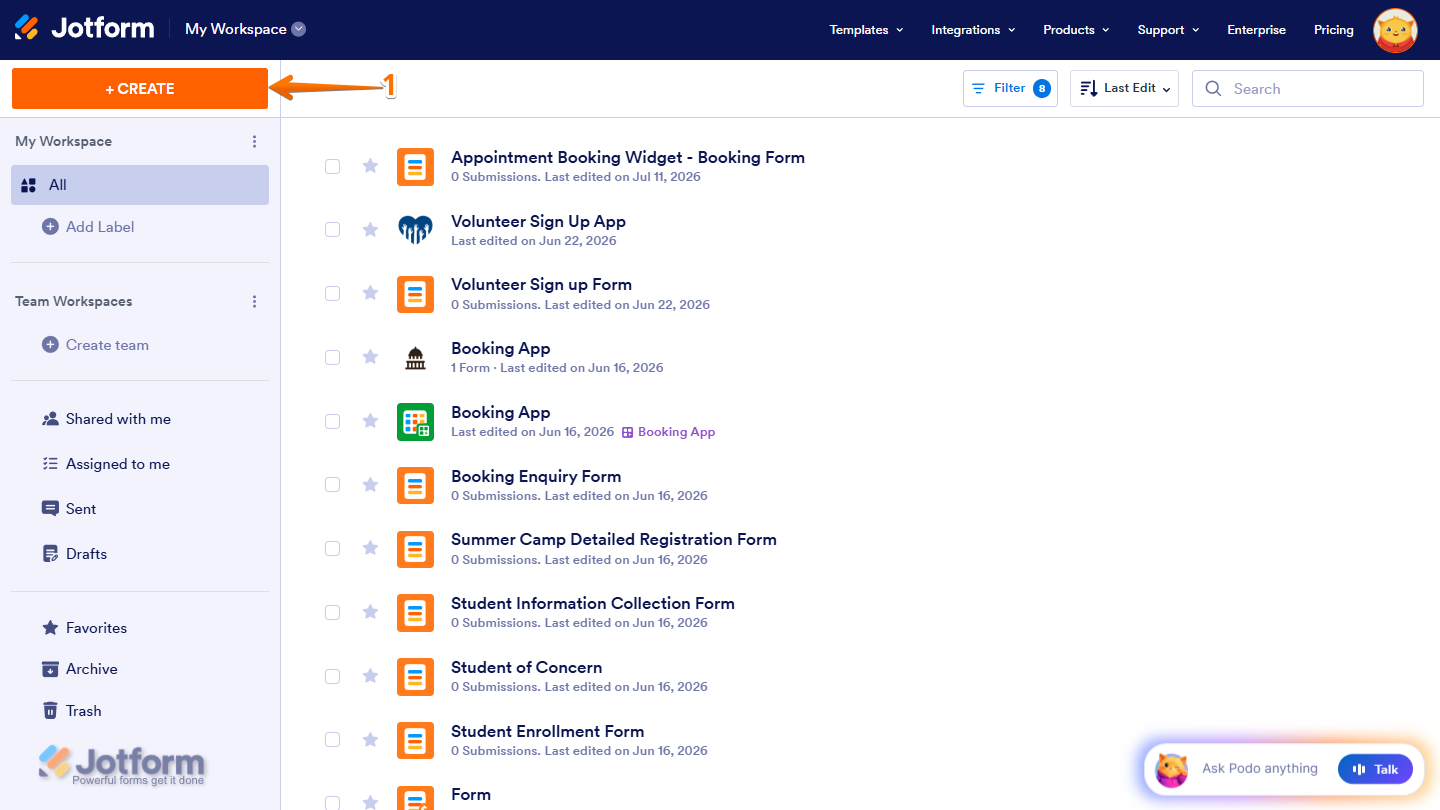
- On the top-left side of your Workspace page, click on Create.
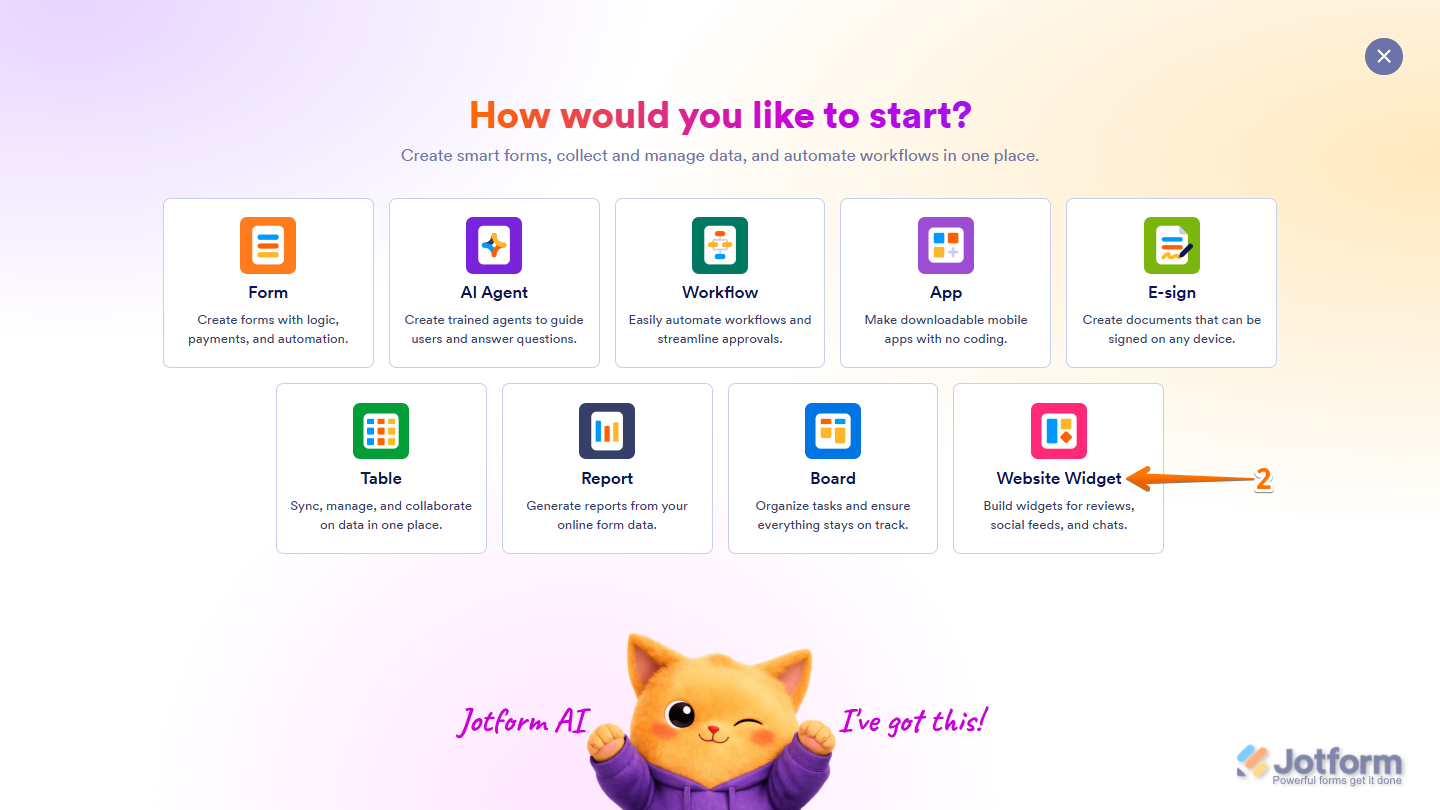
- Then, in the menu that opens up, select Website Widget from the assets.
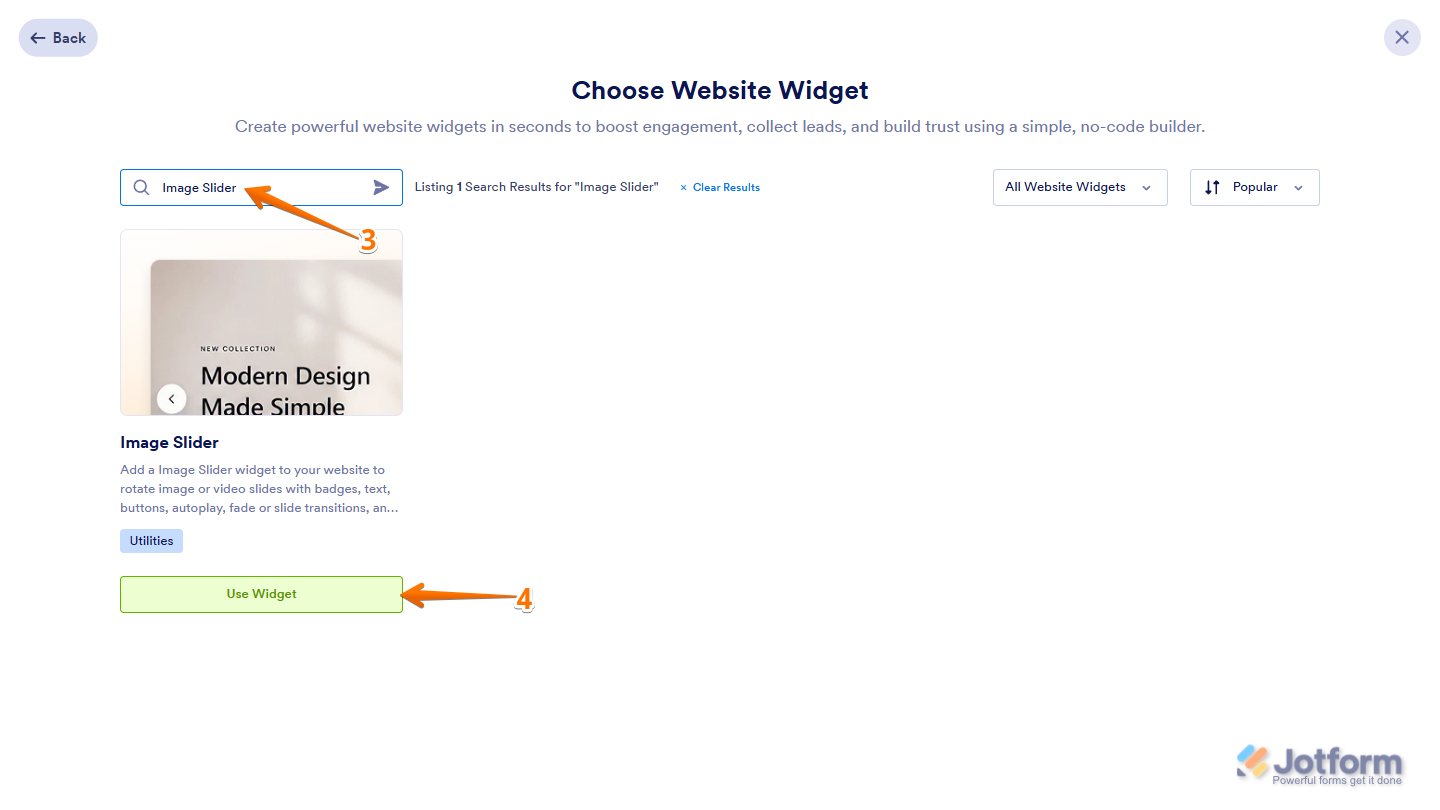
- Next, in the Search bar in the upper-left corner of the Choose Website Widget, enter Image Slider.
- Then, at the bottom of the search results, click on Use Widget.
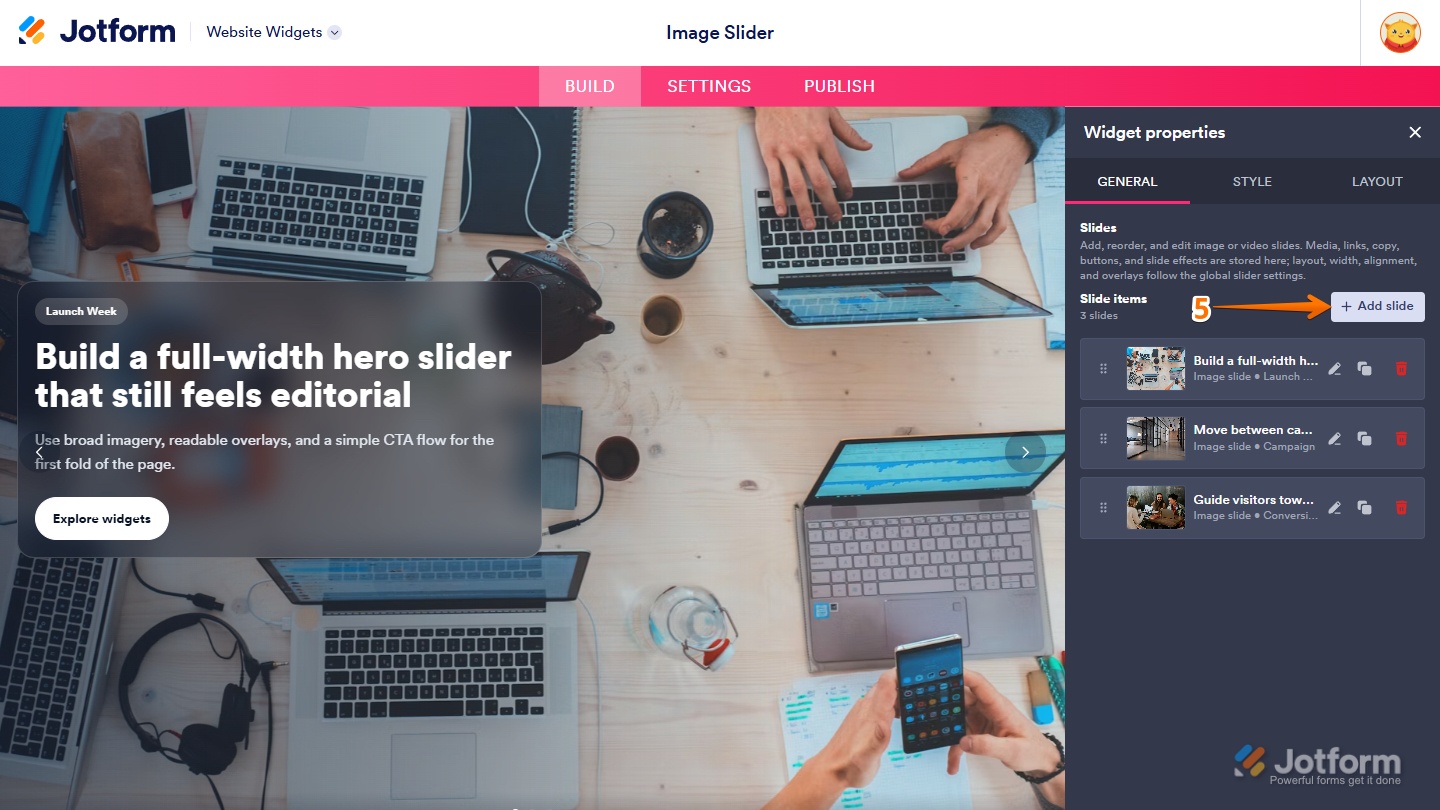
- Now, in the Widget Properties menu that opens on the right side of Website Widgets, under the General tab, click on the Add Slide button.
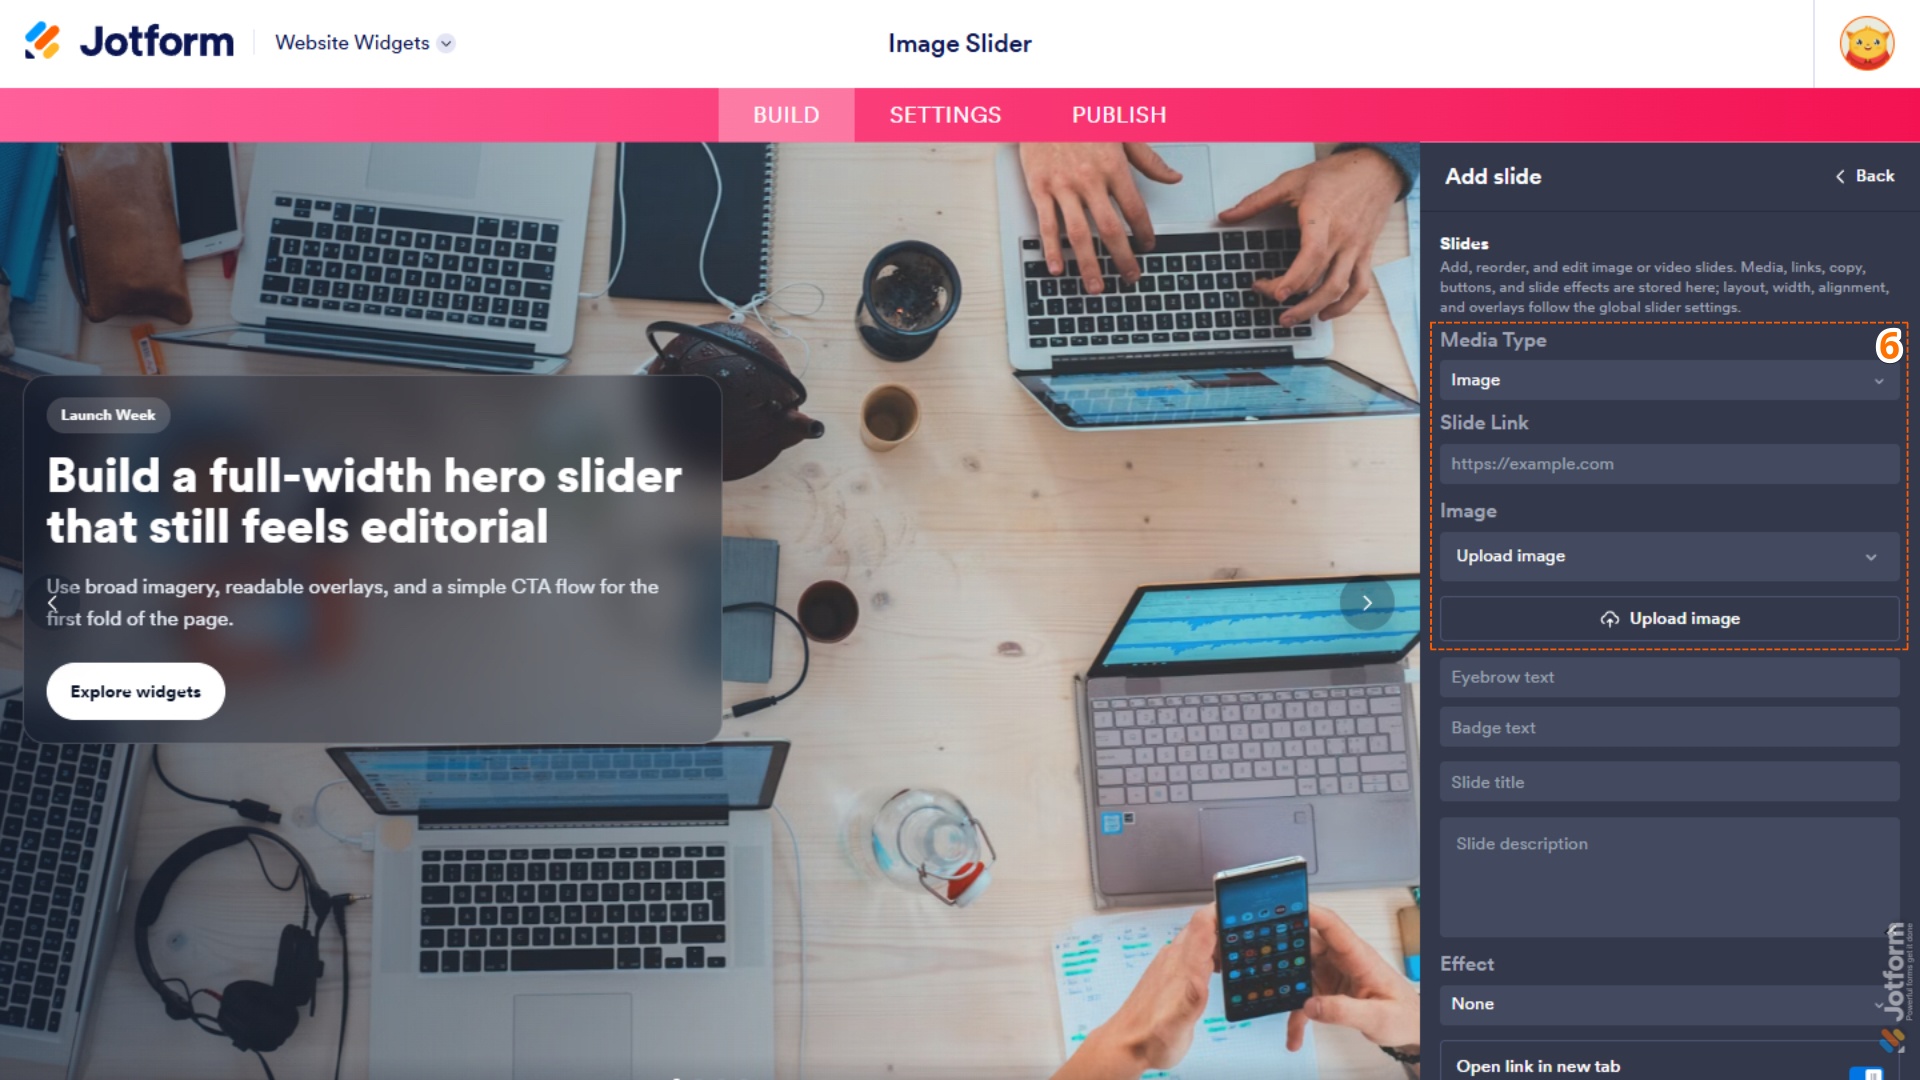
- Then, on the Add Slide menu on the right, configure the following:
- Media Type — Select whether the slide displays an image or a video.
- Slide Link — Enter a URL to make the slide clickable.
- Image — Upload an image for the slide or enter the URL of an online image.
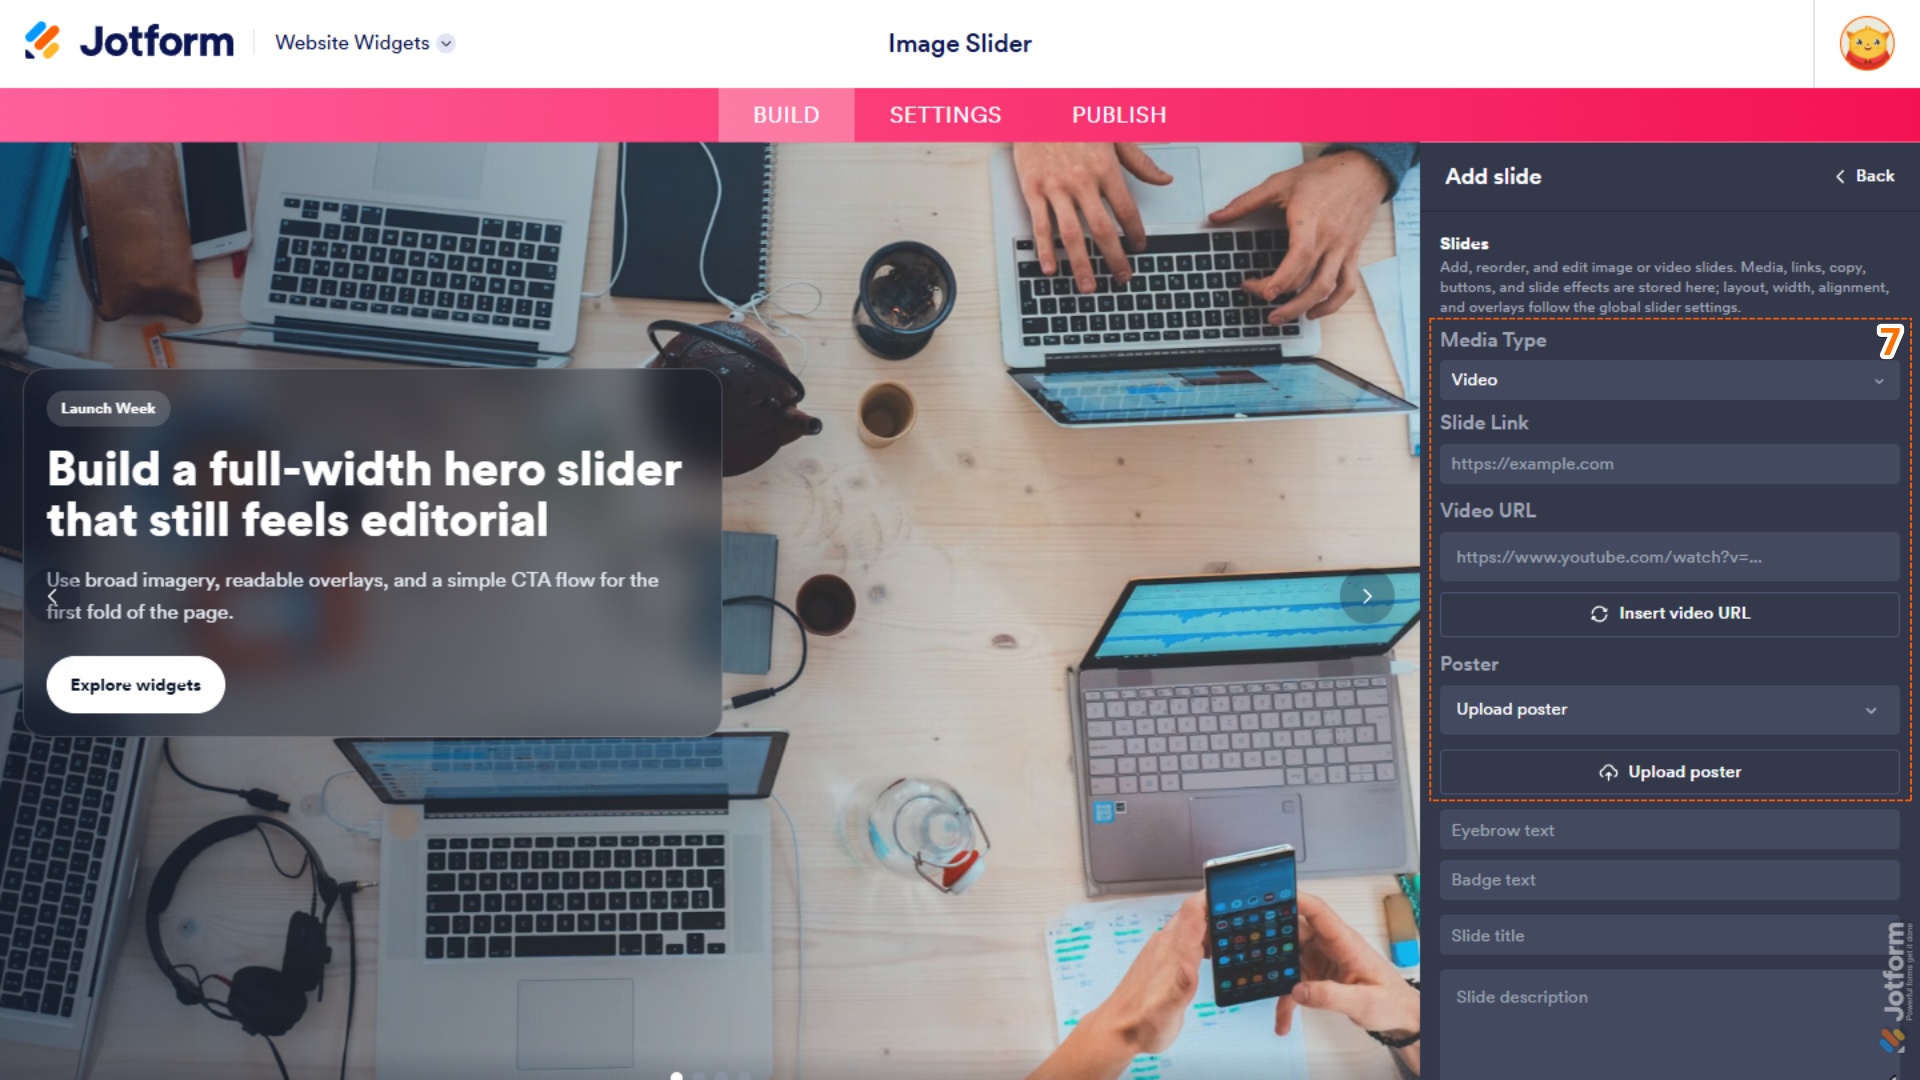
- Or, if you select Video from the Media Type Dropdown menu, set up the following:
- Video URL — Enter the YouTube URL for the video you want to display in the slide.
- Poster — Upload an image or enter an image URL to display as the video’s poster before playback.
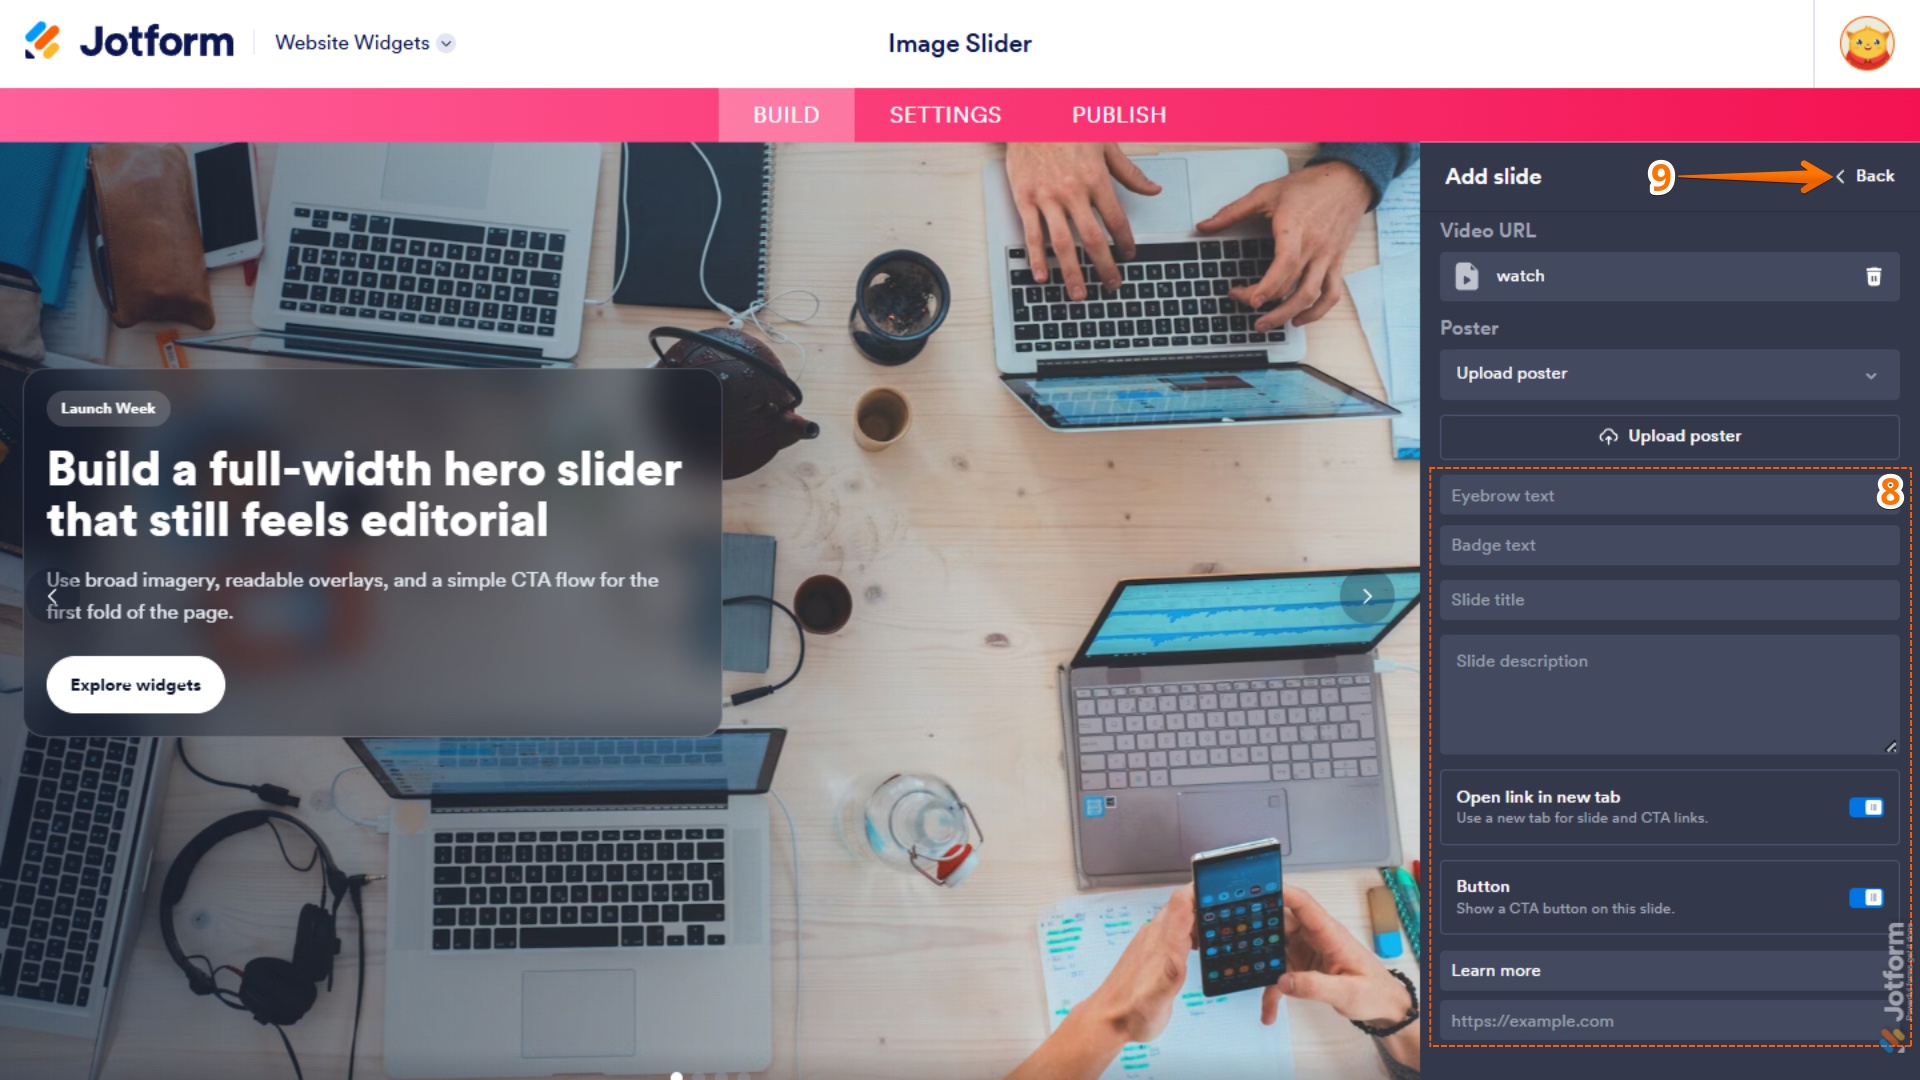
- Next, scroll down and complete these things:
- Eyebrow Text — Enter the text displayed in the top-left corner of the slide’s text area.
- Badge Text — Enter the text displayed in the top-right corner of the slide’s text area.
- Slide Title — Enter the main heading for the slide.
- Slide Description — Enter the text displayed below the slide title.
- Open Link in New Tab — Open the CTA button link in a new browser tab.
- Button — Show a call-to-action (CTA) button on the slide.
- Button Text — Enter the label displayed on the CTA button.
- Button URL — Enter the URL the CTA button links to.
- Now, click on Back at the top-right of the Add Slide menu to save the slide.
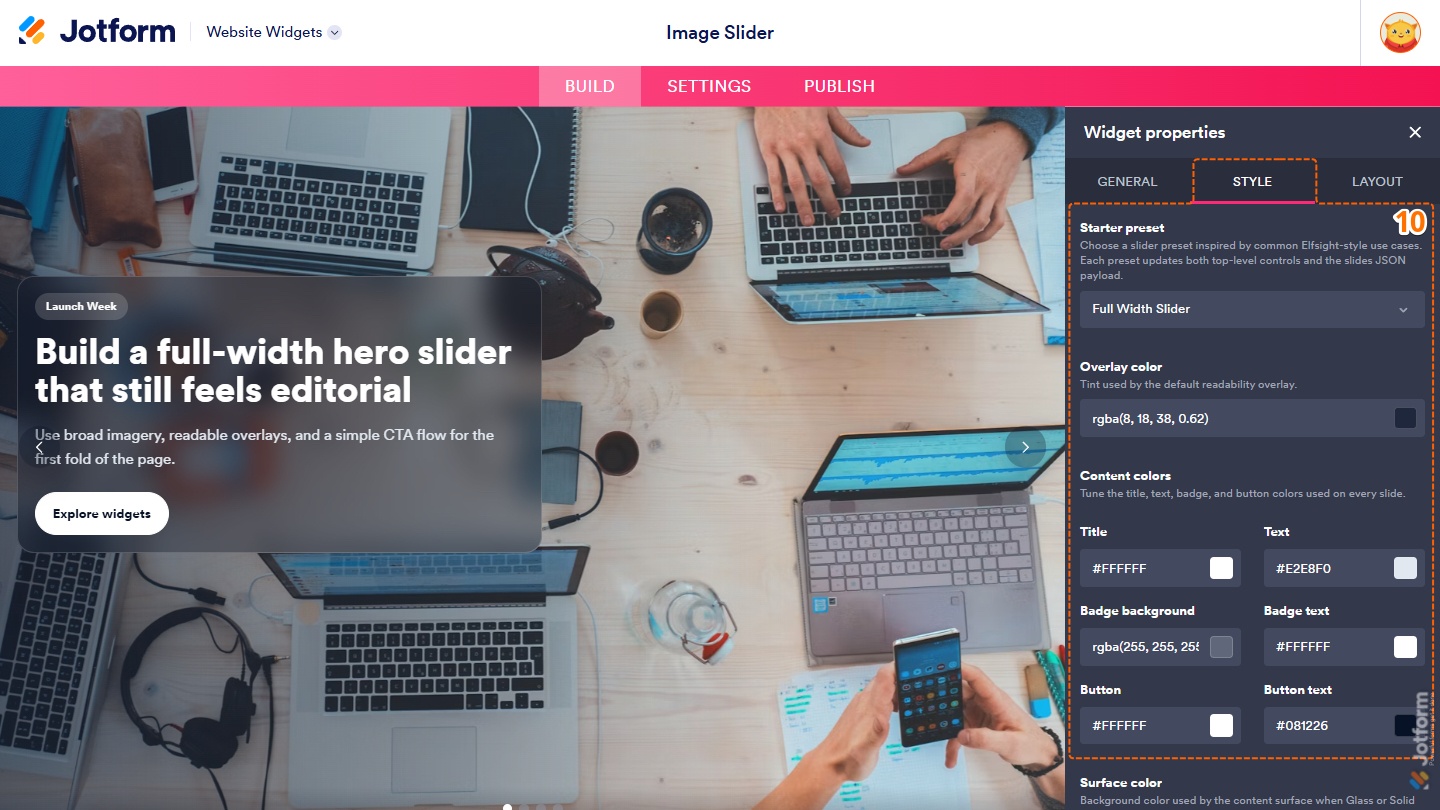
- Then, click on the Styles tab and manage the following options:
- Starter Preset — Select a preconfigured slider layout inspired by common use cases to get started quickly.
- Overlay Color — Set the color of the overlay applied to slides to improve content readability.
- Content Colors — Customize the colors of the slide title, description, badge, and button across all slides.
- Title
- Text
- Badge Background
- Badge Text
- Button
- Button Text
- Next, scroll down and continue setting up these things:
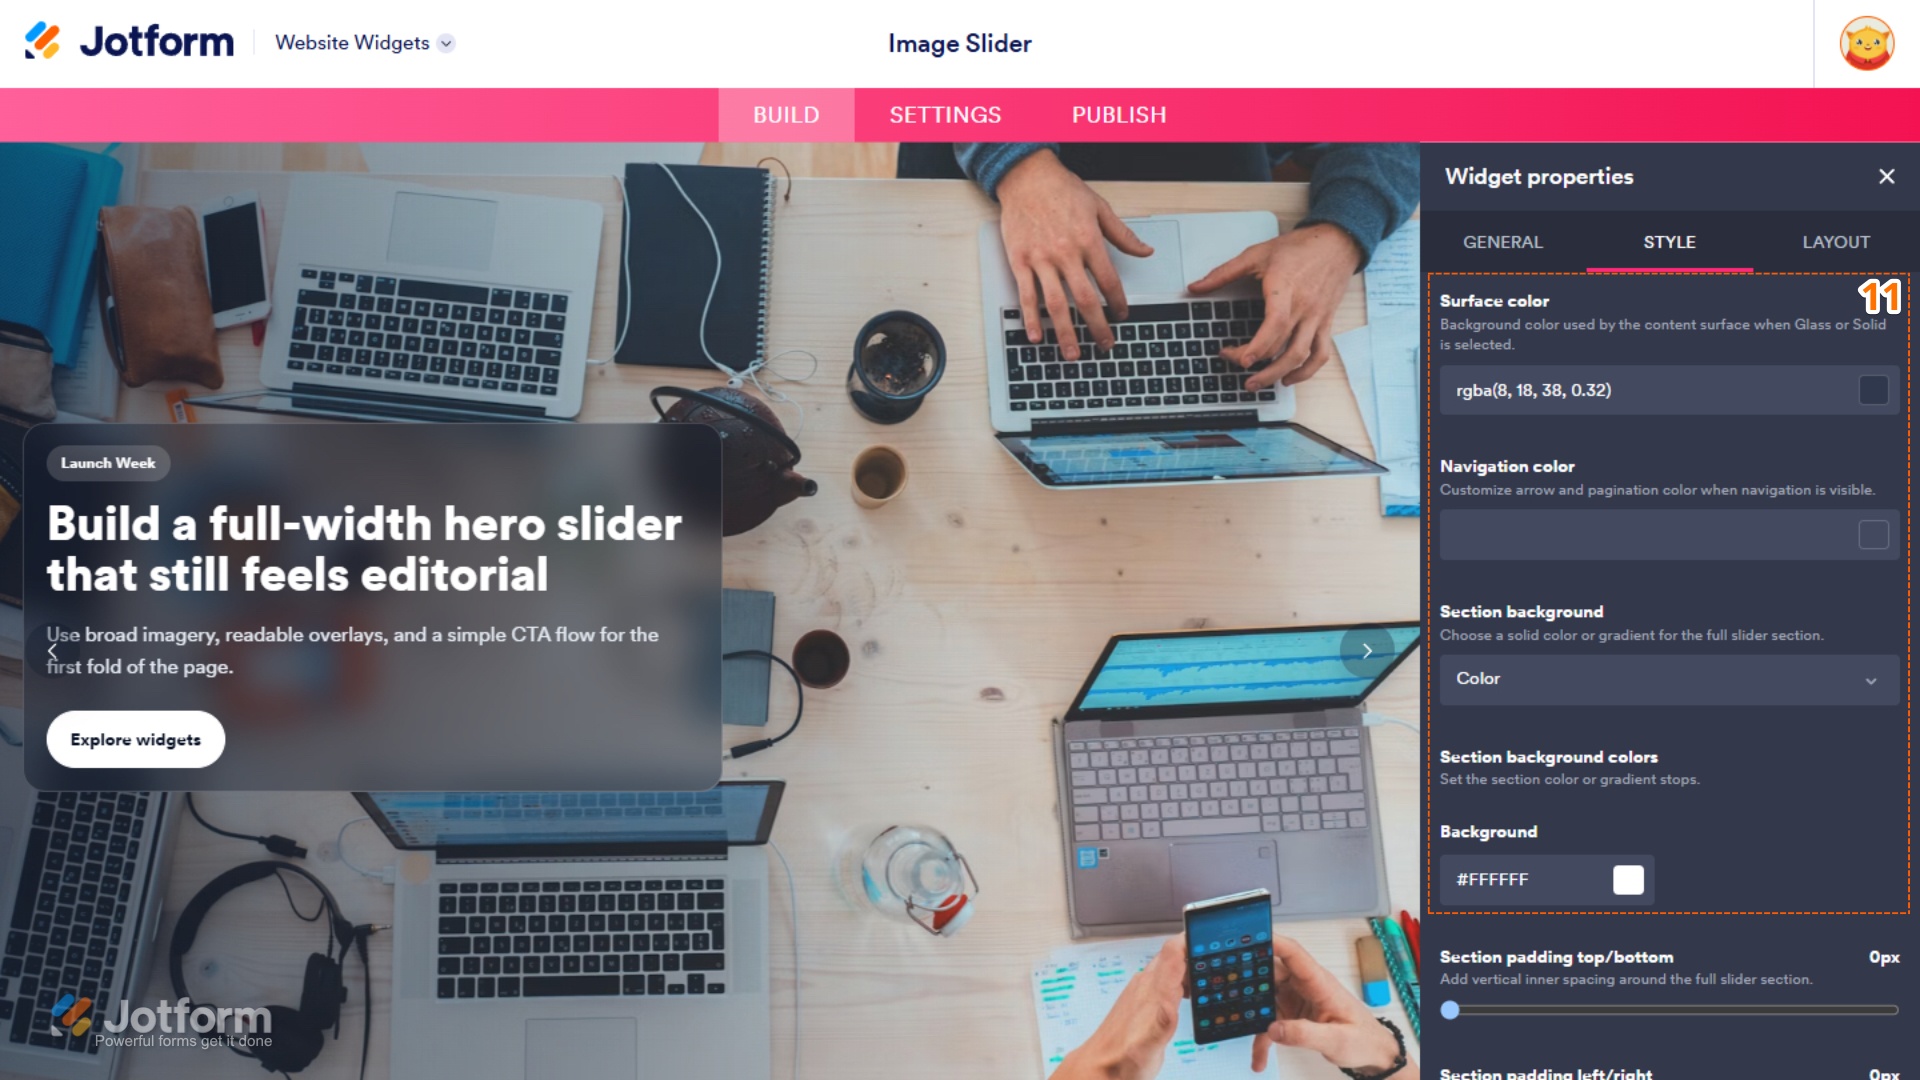
- Surface Color — Set the background color of the content surface when Glass or Solid is selected.
- Navigation Color — Customize the color of the navigation arrows and pagination indicators.
- Section Background — Select whether to use a solid color or a gradient for the slider section background.
- Background — Set the background color when Color is selected for Section Background.
- Gradient Start — Set the starting color of the background gradient when Gradient is selected for Section Background.
- Gradient End — Set the ending color of the background gradient when Gradient is selected for Section Background.
- Gradient Direction — Set the angle of the background gradient when Gradient is selected for Section Background.
- After that, continue scrolling and set up these things:
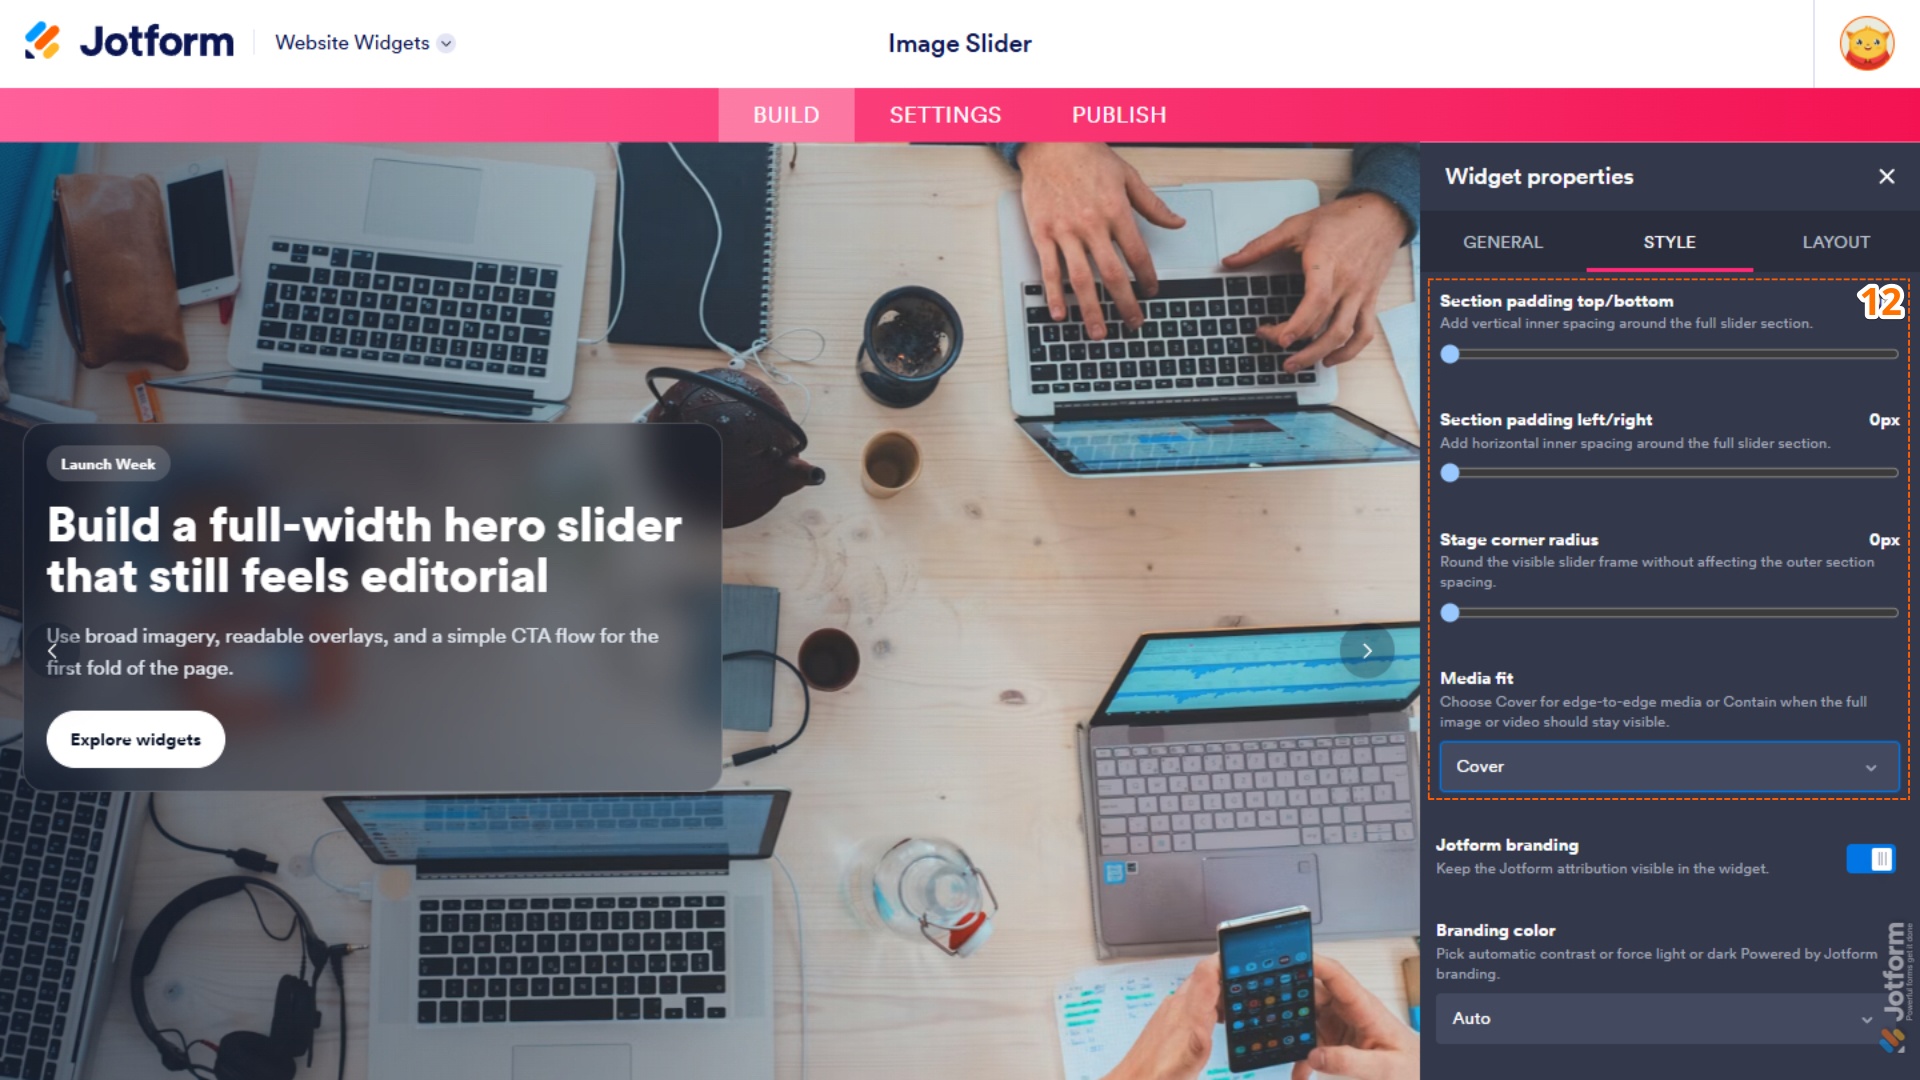
- Section Padding Top/Bottom — Set the vertical padding around the slider section.
- Section Padding Left/Right — Set the horizontal padding around the slider section.
- Stage Corner Radius — Round the corners of the visible slider frame.
- Media Fit — Select Cover to fill the slide area or Contain to keep the entire image or video visible.
- Now, scroll down to the bottom and complete these options:
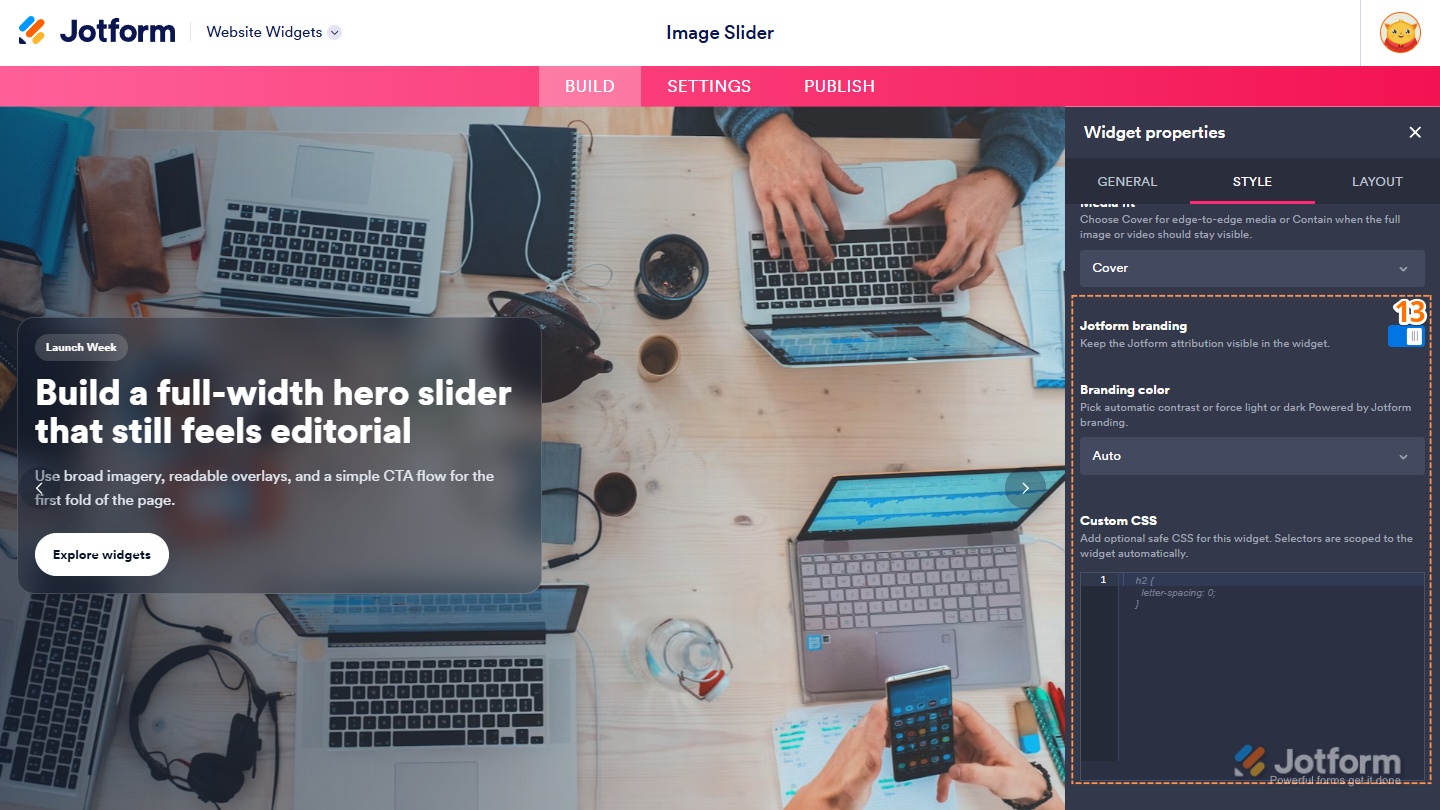
- Jotform Branding — Show the Powered by Jotform attribution in the widget.
- Branding Color — Select Auto, Light, or Dark for the Powered by Jotform branding.
- Custom CSS — Add custom CSS to further customize the widget’s appearance.
- Next, click on the Layout tab and configure these options:
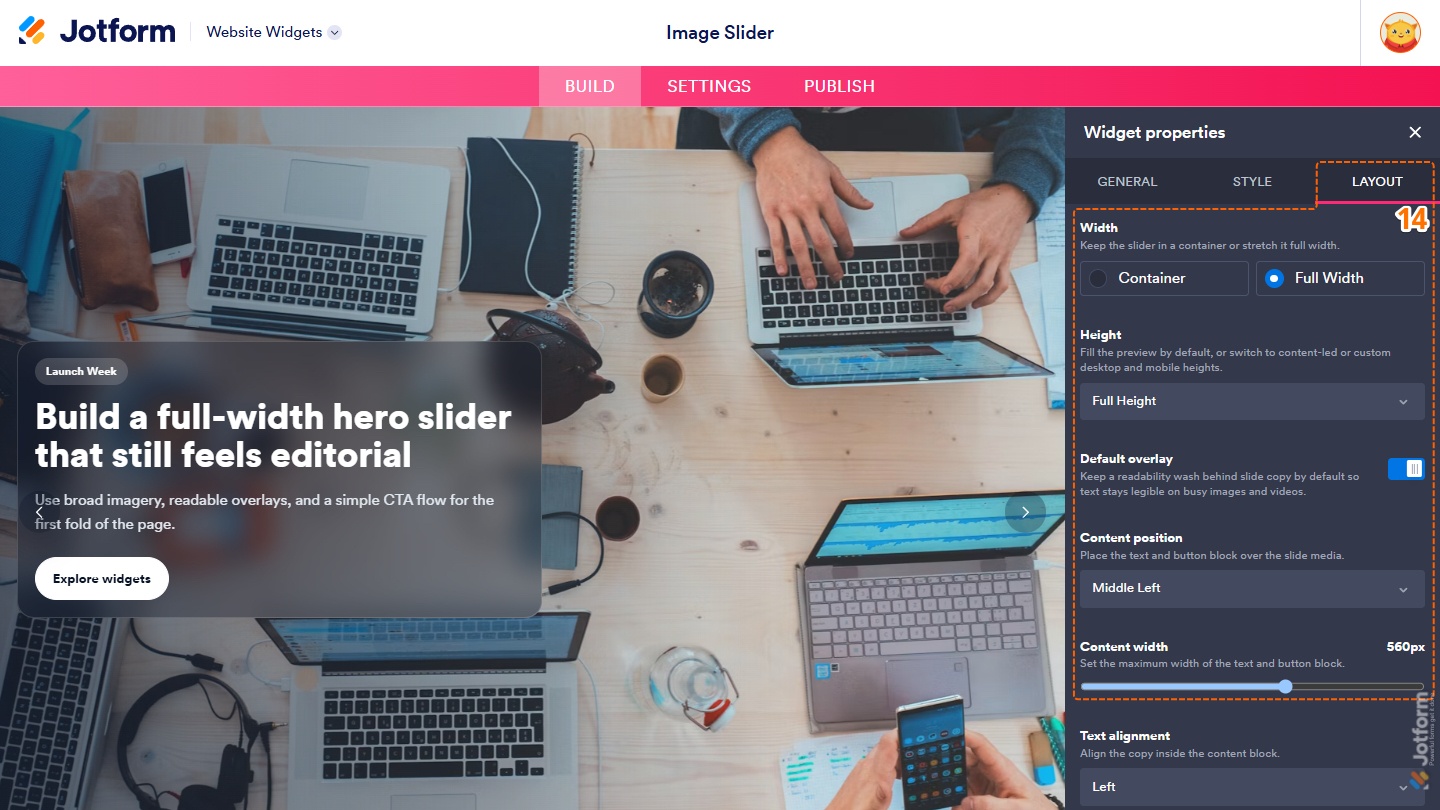
- Width — Select whether to display the slider within a container or stretch it to the full width of the page.
- Height — Select whether the slider fills the available space, adjusts to its content, or uses custom heights for desktop and mobile.
- Default Overlay — Show a readability overlay behind slide content to improve text visibility on images and videos.
- Content Position — Select where the text and button block appear on the slide.
- Content Width — Set the maximum width of the text and button block.
- Then, continue scrolling and set up these things:
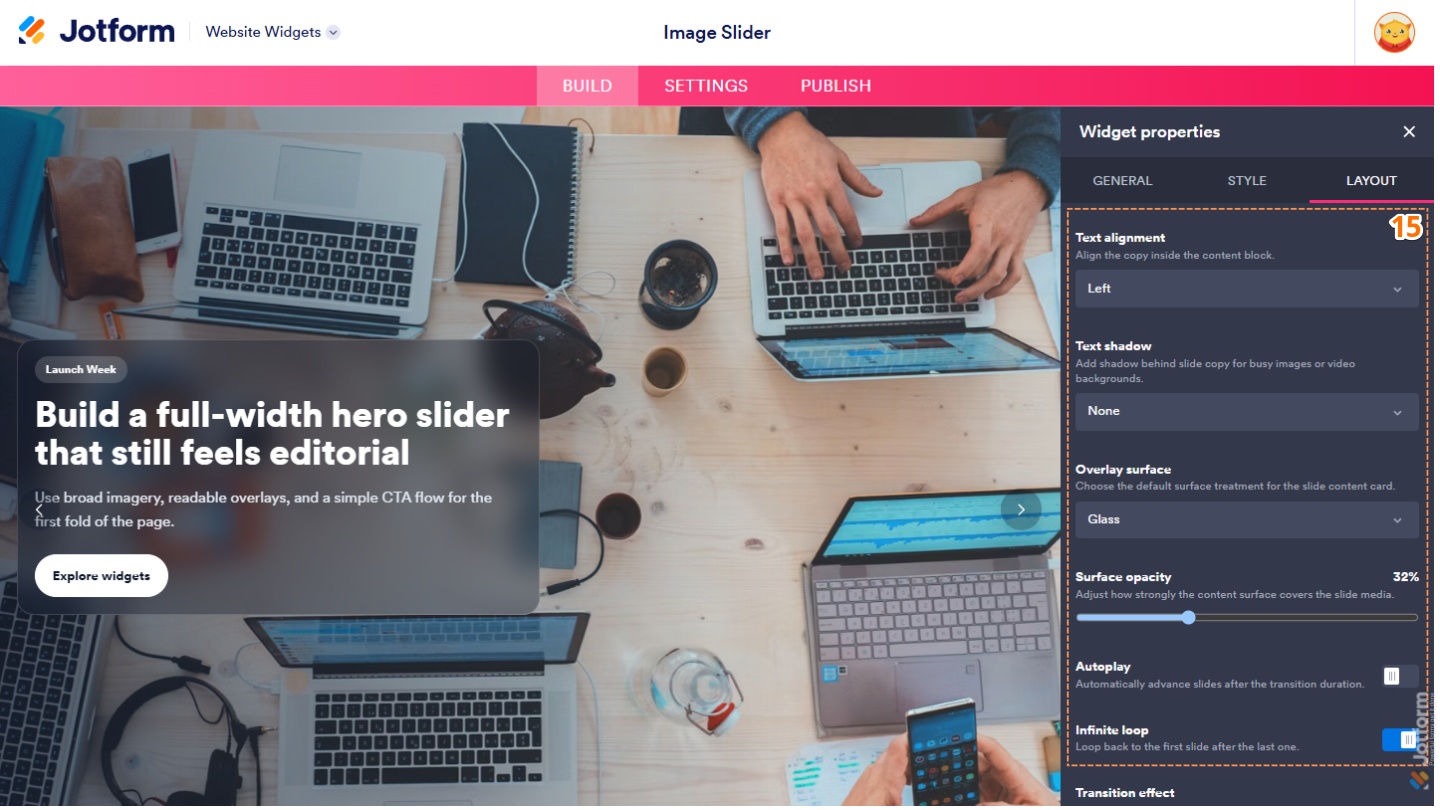
- Text Alignment — Set the alignment of the text within the content block.
- Text Shadow — Add a shadow behind the slide text to improve readability on images and videos.
- Overlay Surface — Select the default background style for the slide content area.
- Surface Opacity — Adjust the transparency of the content surface over the slide media.
- Autoplay — Automatically advance to the next slide after the selected interval.
- Infinite Loop — Continuously cycle through the slides by returning to the first slide after the last.
- Now, scroll down to the bottom and complete these things:
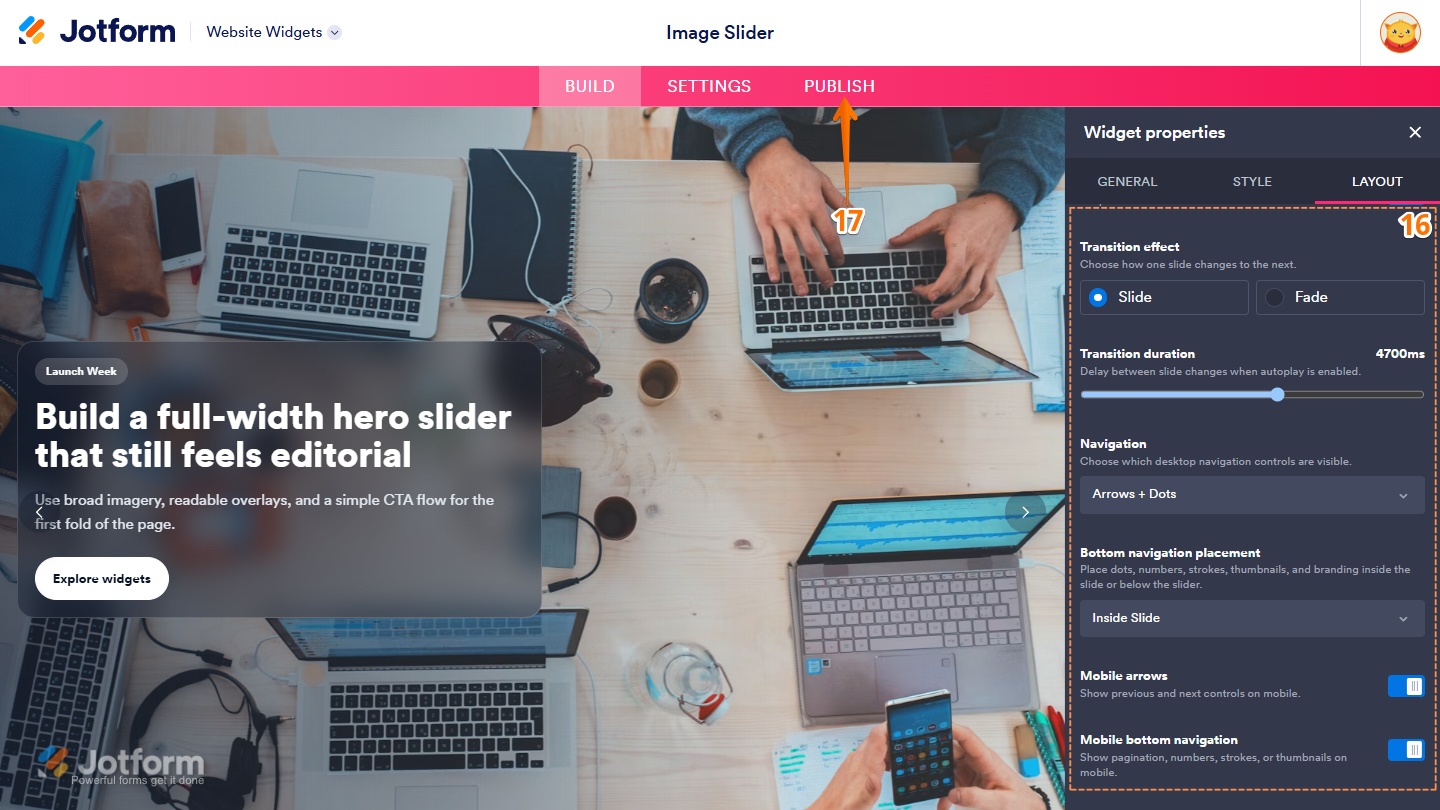
- Transition Effect — Select how one slide transitions to the next.
- Transition Duration — Set the time between slide changes when Autoplay is enabled.
- Navigation — Select which navigation controls are displayed on the desktop.
- Bottom Navigation Placement — Display pagination, numbers, strokes, thumbnails, and branding inside the slider or below it.
- Mobile Arrows — Show or hide the previous and next navigation arrows on mobile devices.
- Mobile Bottom Navigation — Show or hide pagination, numbers, strokes, or thumbnails on mobile devices.
- Once everything’s set, in the pink navigation bar at the top of the page, click on Publish.
Note
If you’re not logged in, you’ll be asked to log in to your Jotform account or sign up for one. Once you’ve done that, you’ll be able to get the embed code for your widget.
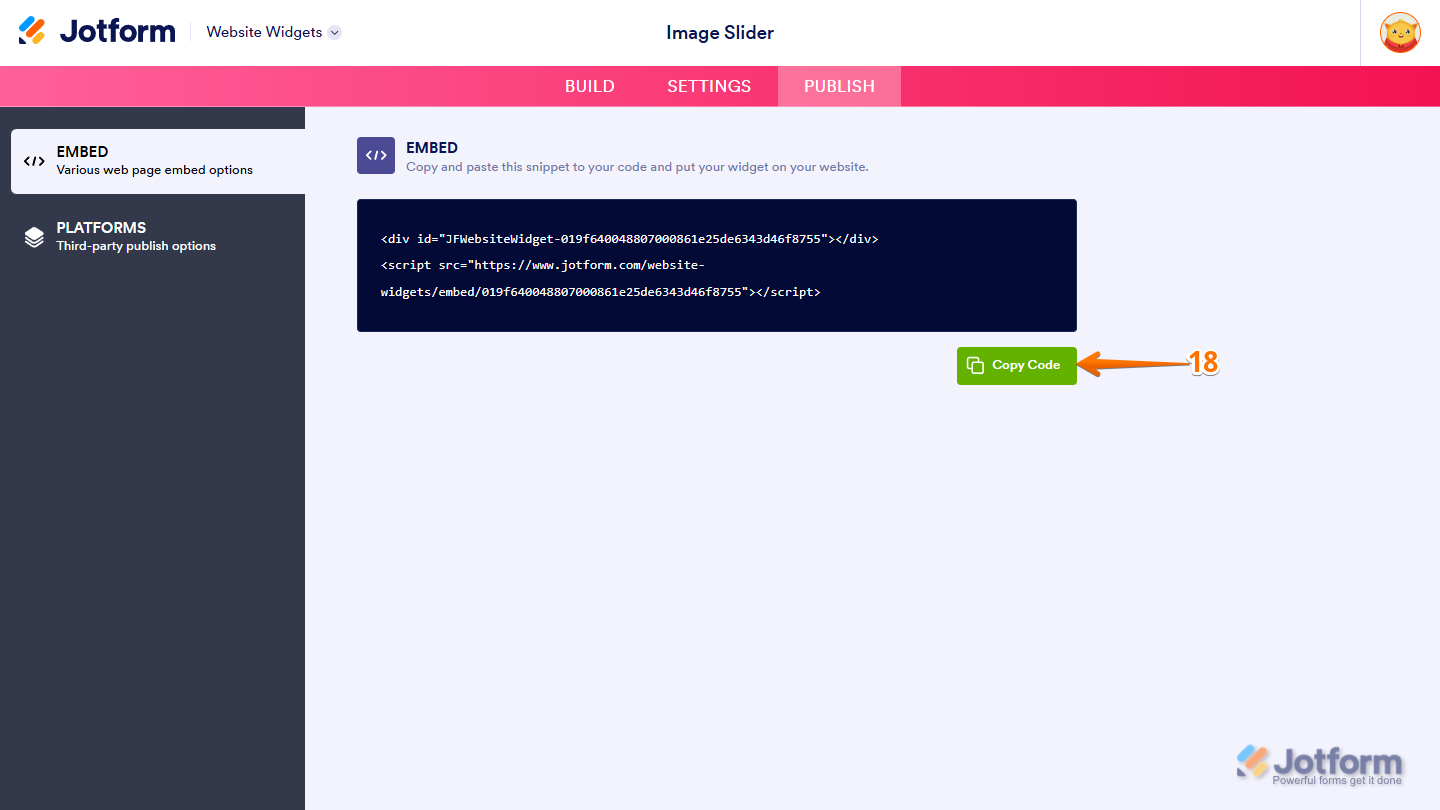
- Then, in the Embed section, click on Copy Code, and, if you already know how, paste that into the Embed section on your platform.
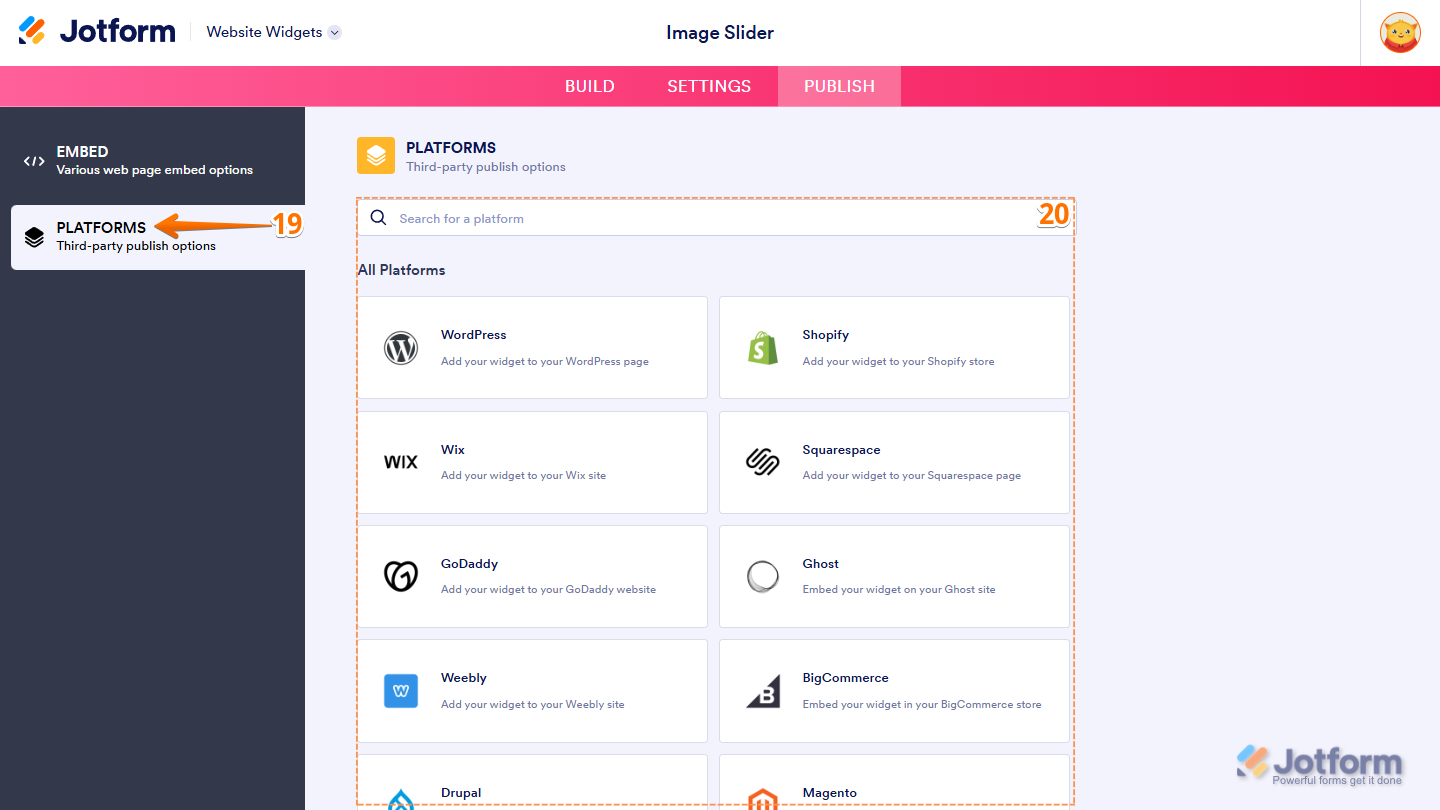
- To view embedding instructions for your widget, click on Platforms in the menu on the left side of the page.
- Next, in the Platforms section on the right, select the platform you want to view embedding instructions for. Or, use the Search bar at the top of the section to find it easily.
- Then, follow the steps in the How to Embed Your Widget section to add it to your website.
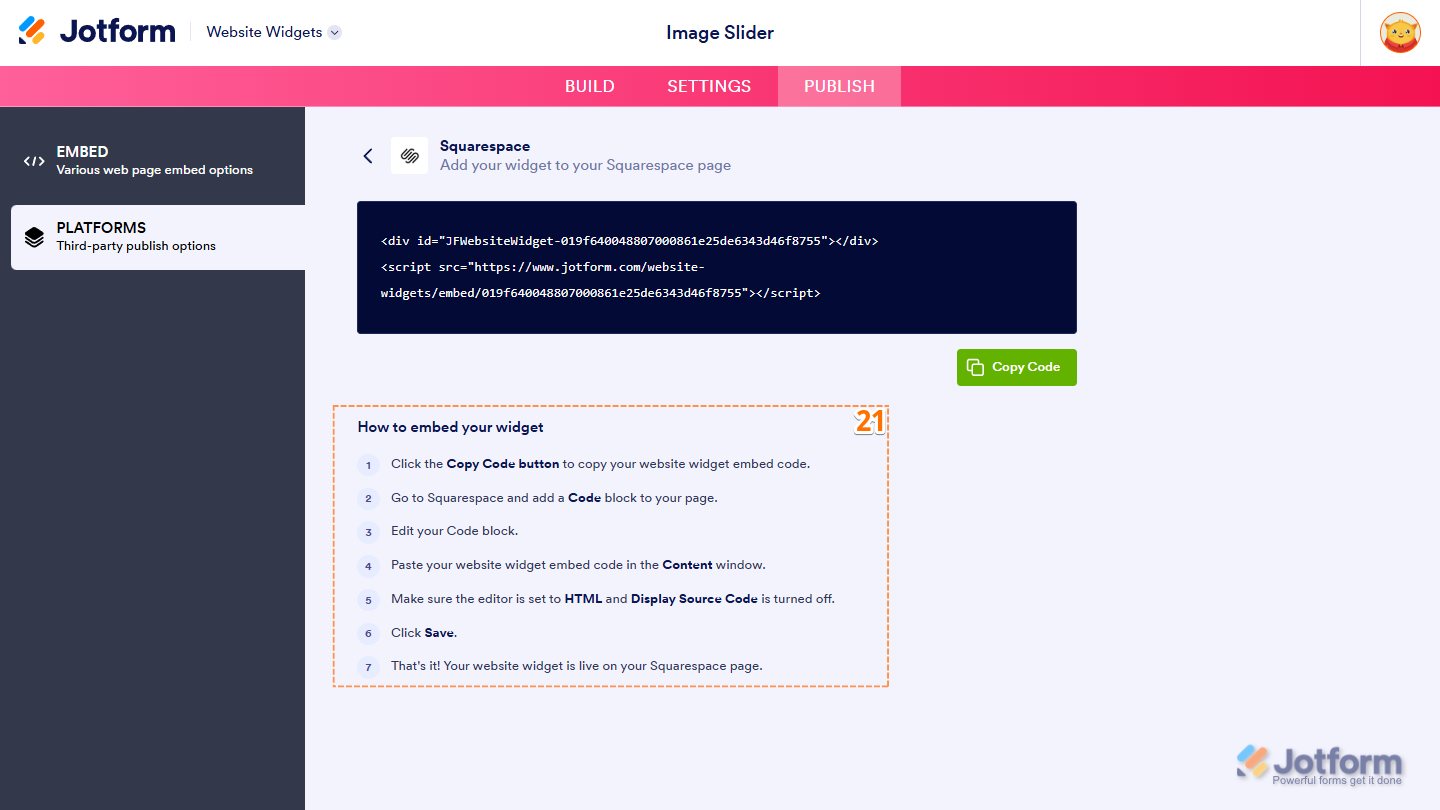
That’s it! Your Image Slider widget will appear on your website just as you customized it. Take a look at the screenshot below to see how it looks on a website.

Updating Your Image Slider Widget
You can make changes to the Image Slider widget at any time to update its content, appearance, or layout. Here’s how:
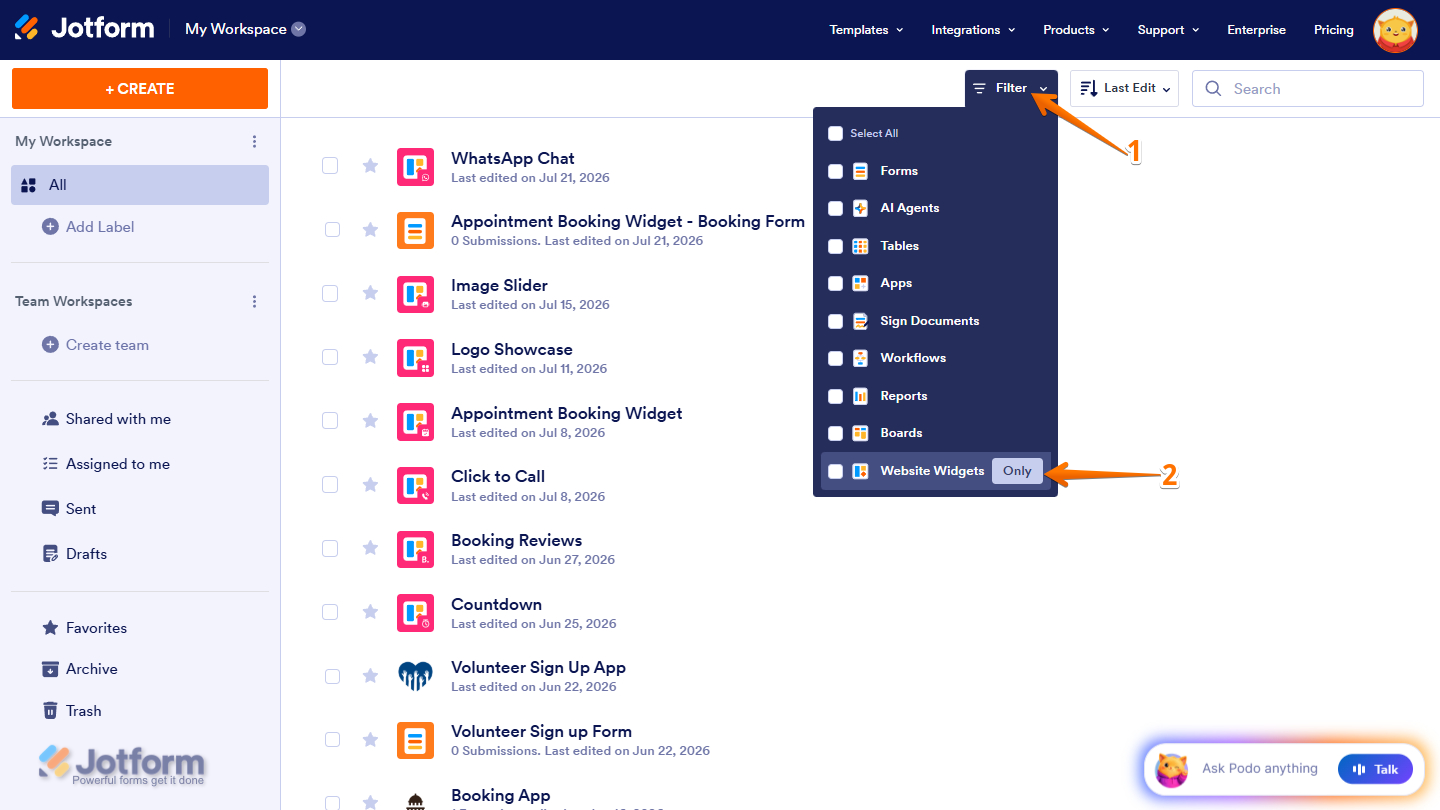
- At the top of your Workspace page, click on Filter.
- Then, in the Dropdown menu that opens, hover your mouse over Website Widgets, and on the right side of it, click on Only.
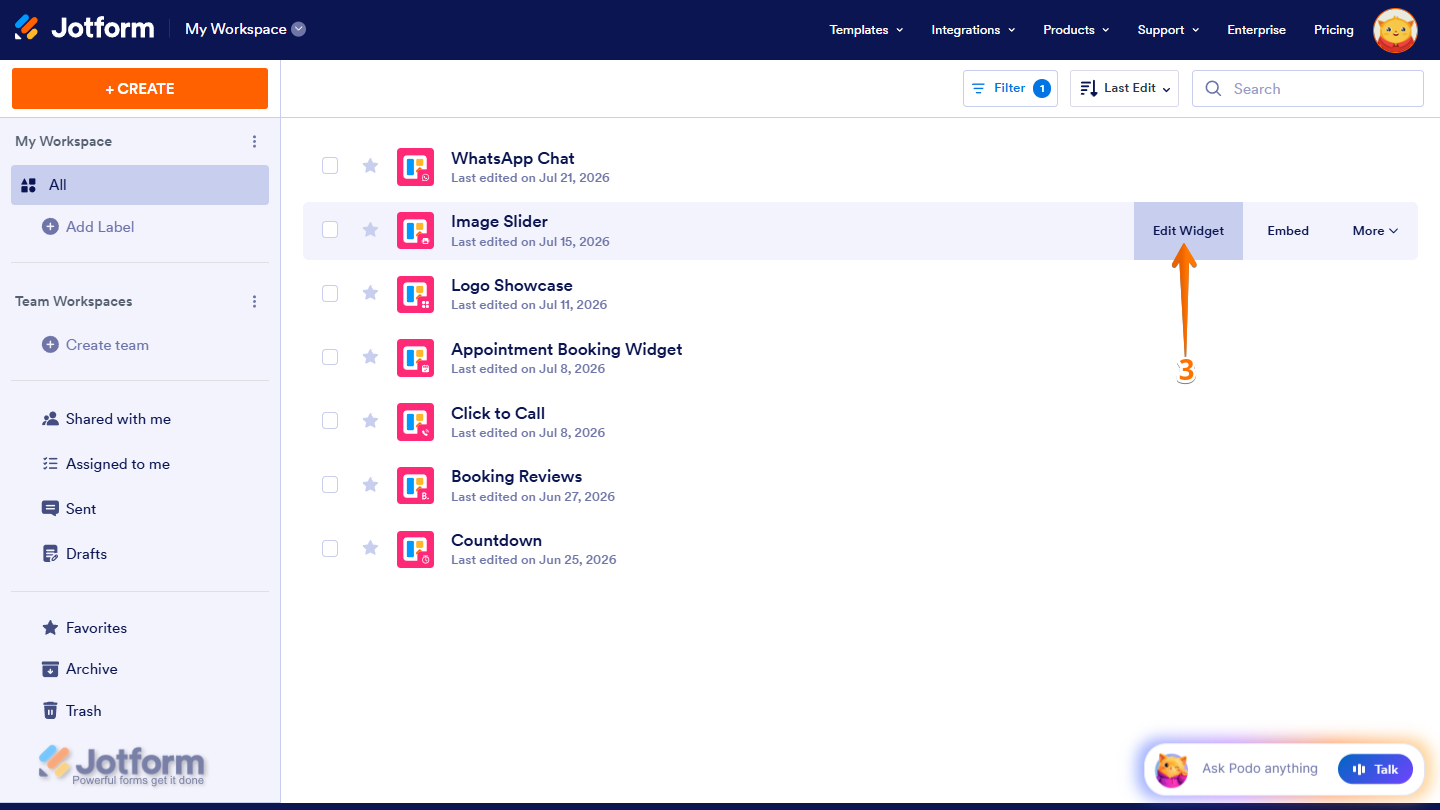
- Next, hover your mouse over the Image Slider widget you want to update, then click on Edit Widget on the right side of the page.
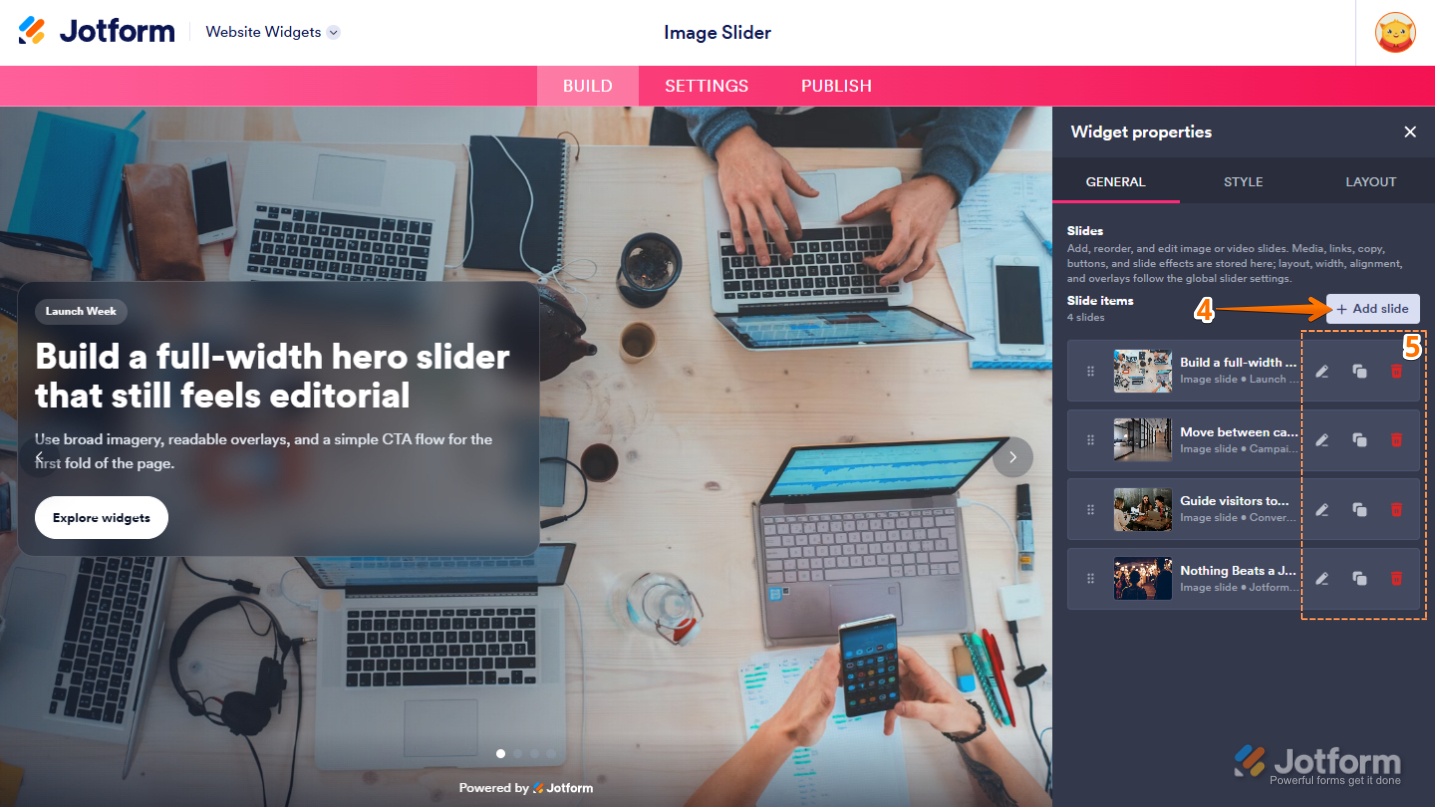
- Now, in the Widget Properties menu that opens on the right side of Website Widgets, under the General tab, click on Add Slide to add a new slide to the widget.
- To manage your slides, use the following icons:
- Pencil Icon — Edit the selected slide.
- Duplicate Icon — Create a copy of the slide, including all its current settings.
- Trash Can Icon — Permanently delete the slide.
- To customize how your widget looks and works, go to the Style and Layout tabs.
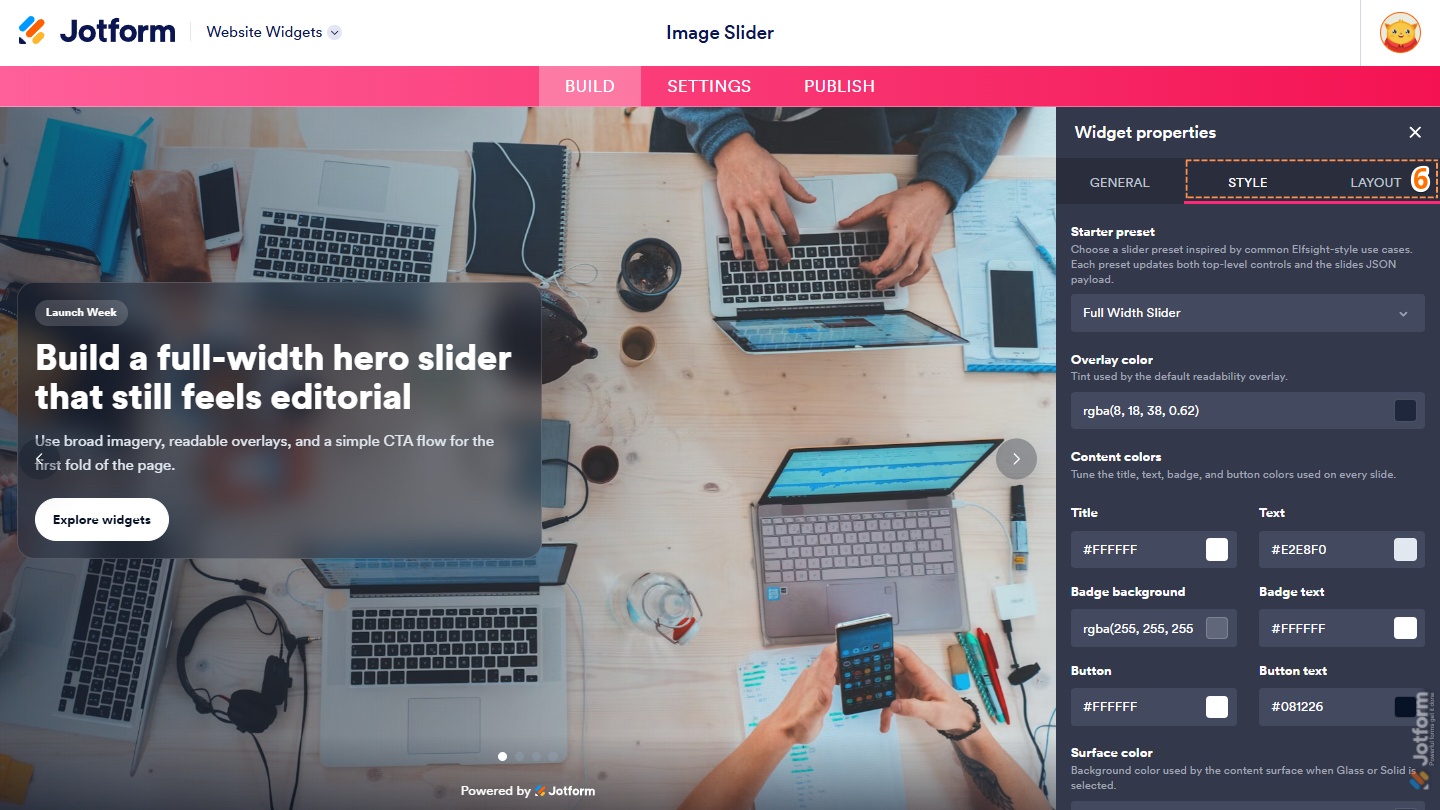
That’s it. You’ve successfully updated your Image Slider widget.
Note
Any changes you make in the Widget Properties menu are automatically saved and reflected in the Image Slider widget on your website.


Send Comment: