With Jotform’s Spinning Wheel Widget, you can add an interactive wheel to your website and let visitors spin for discounts, coupons, rewards, or other offers. Customize each segment, embed the wheel, and turn promotions, giveaways, and lead generation into a more engaging experience.
Creating Your Spinning Wheel Widget and Getting the Embed Code for It
Before you can add the Spinning Wheel widget to your website, you’ll first need to enter your data, customize how it looks, and copy the embed code for it. This is how it’s done:
- On the top-left side of your Workspace page, click on Create.
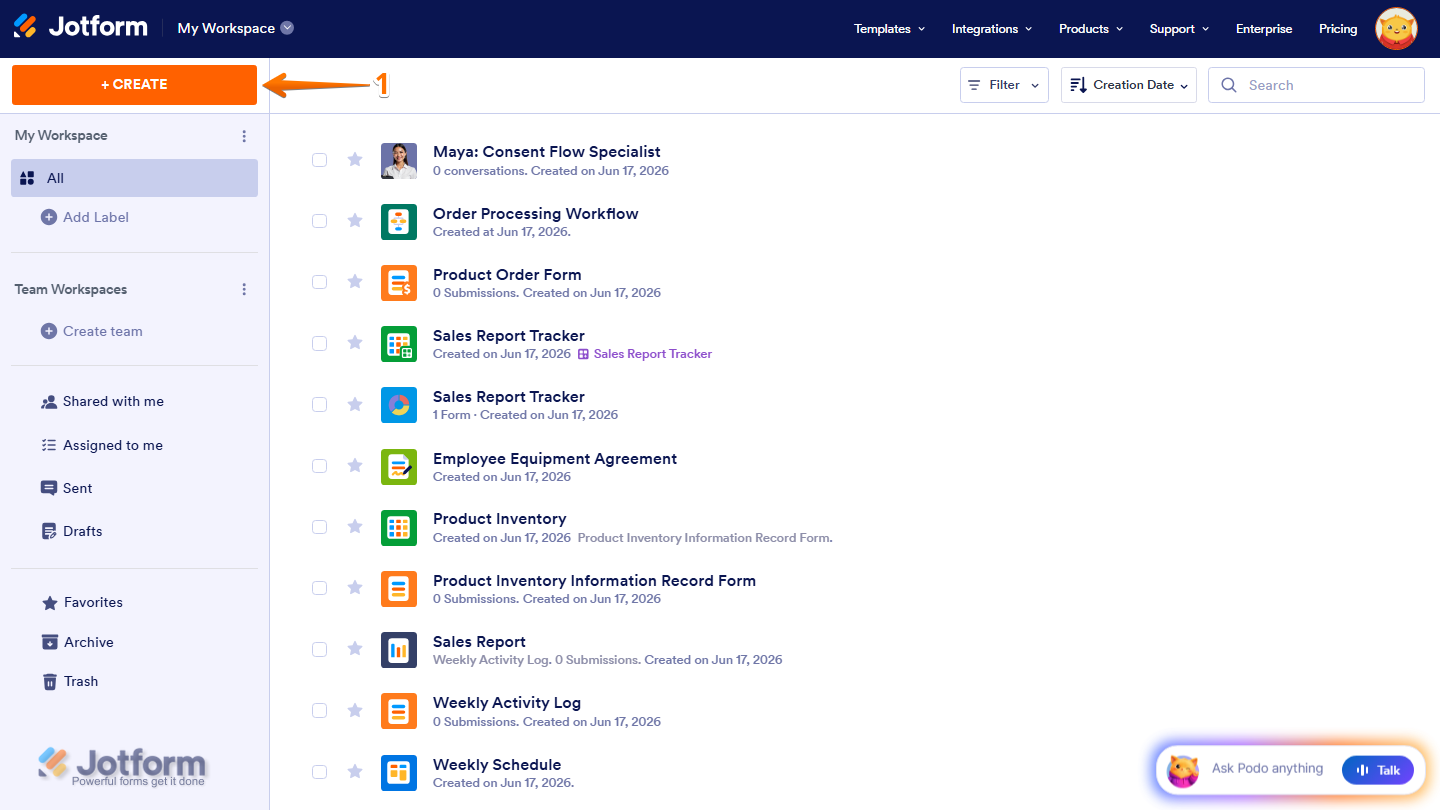
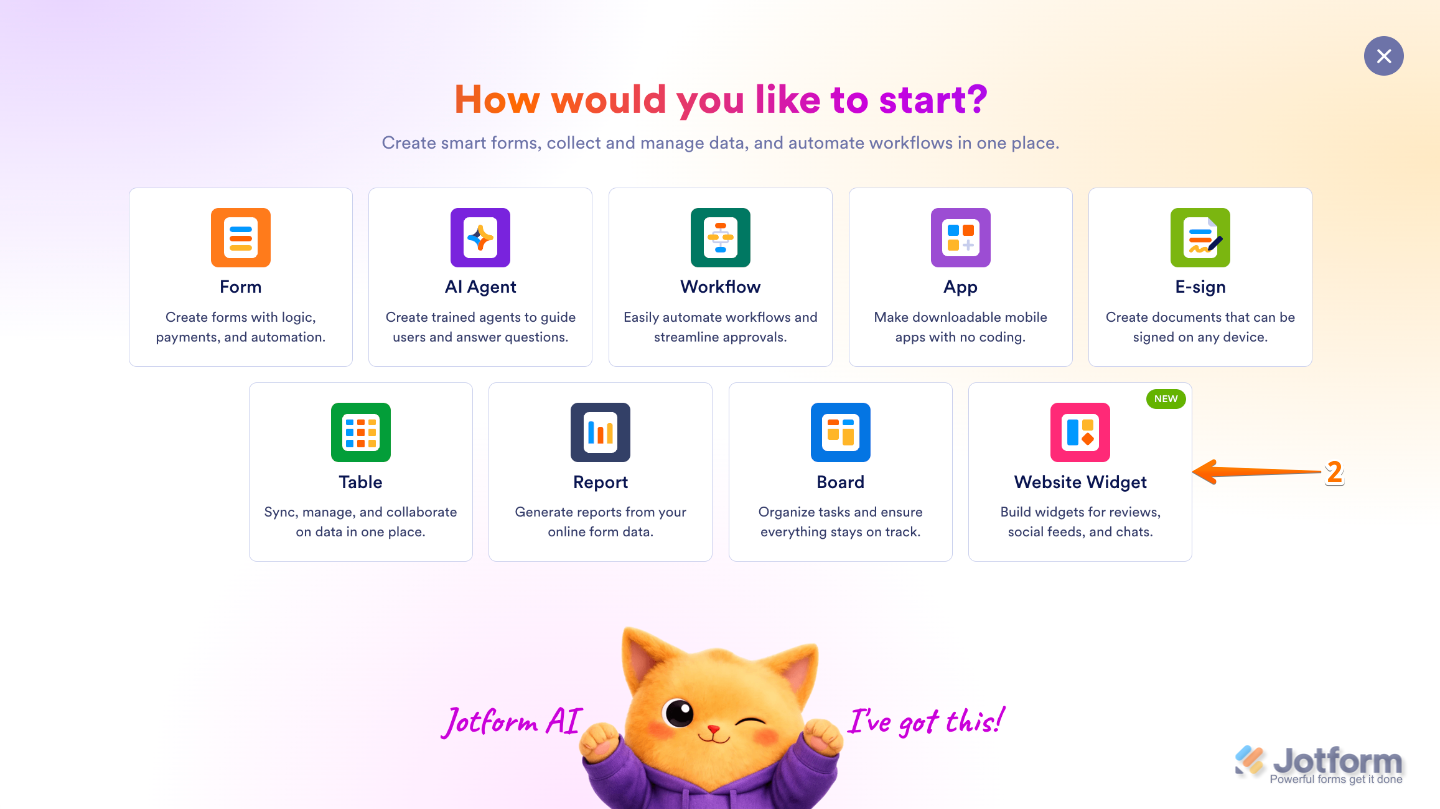
- Then, in the menu that opens up, select Website Widget.
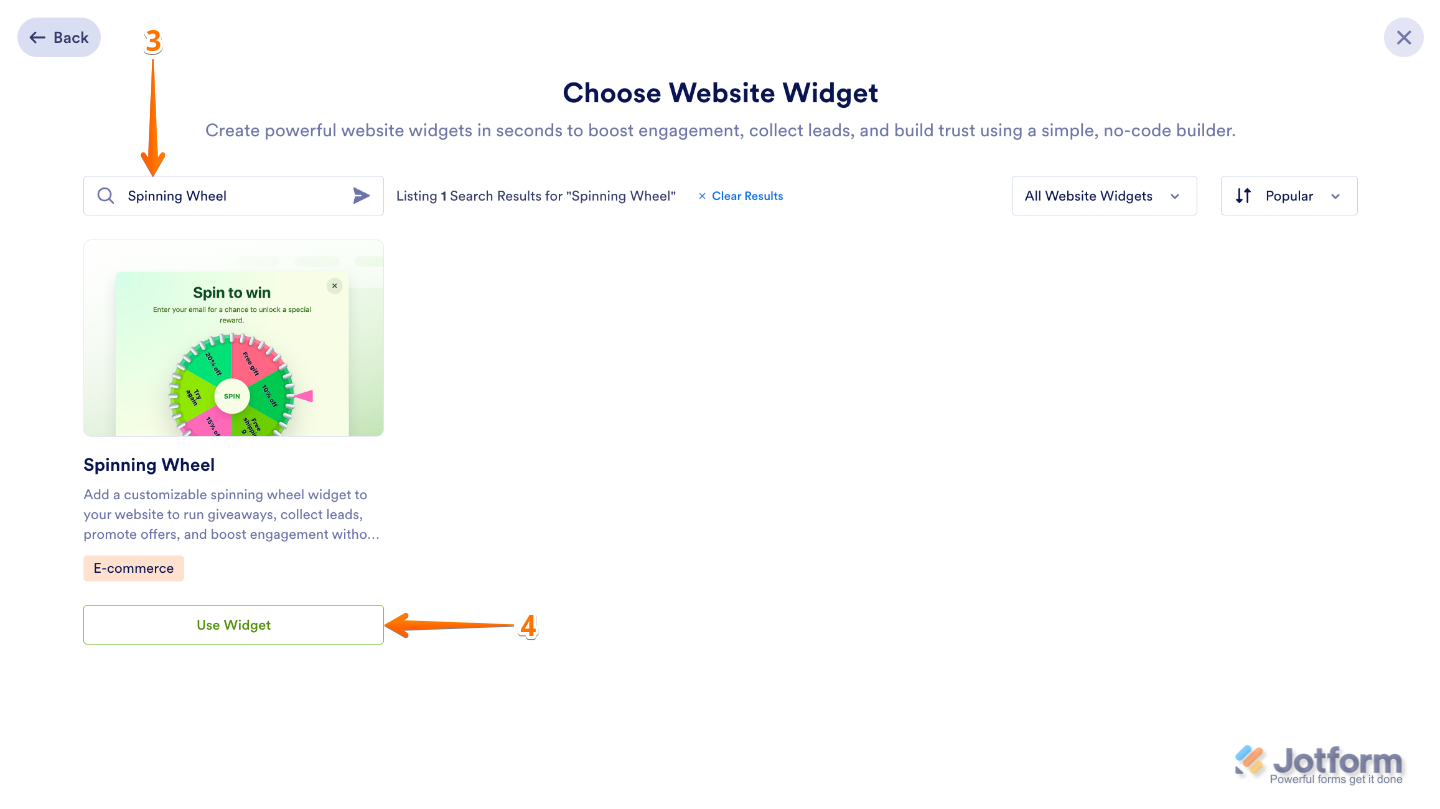
- Next, in the Search bar at the top of the Choose Website Widget page, search for the Spinning Wheel.
- Then, in the search results, click on Use Widget.
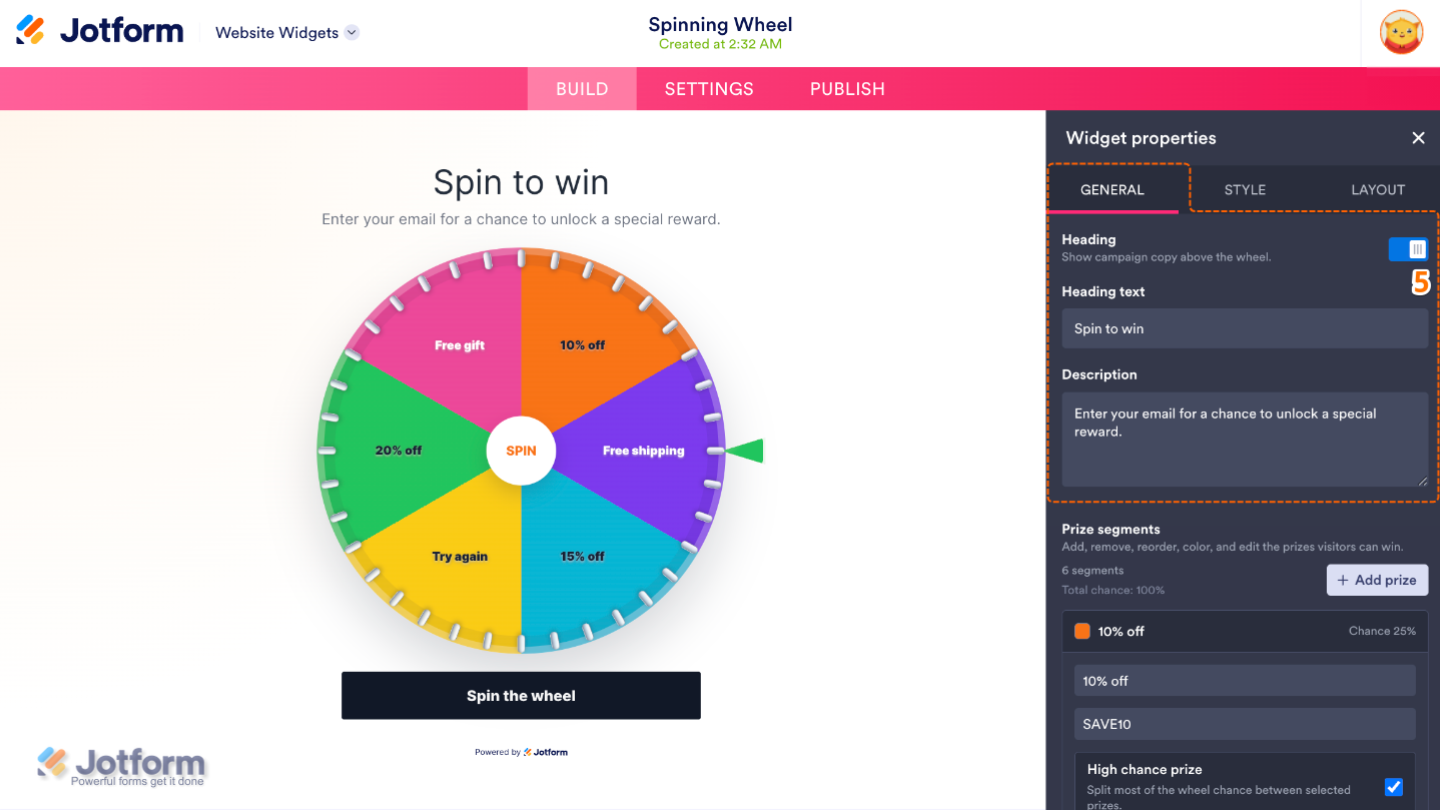
- Now, in the Widget Properties menu that opens on the right side of Website Widgets, set up these properties:
- Heading — Show or hide the heading section displayed at the top of the Spinning Wheel.
- Heading Text — Customize the main title displayed above the Spinning Wheel to introduce your promotion or encourage visitors to participate.
- Description — Add a short description below the heading to explain how the Spinning Wheel works, highlight the available prizes, or provide any additional instructions.
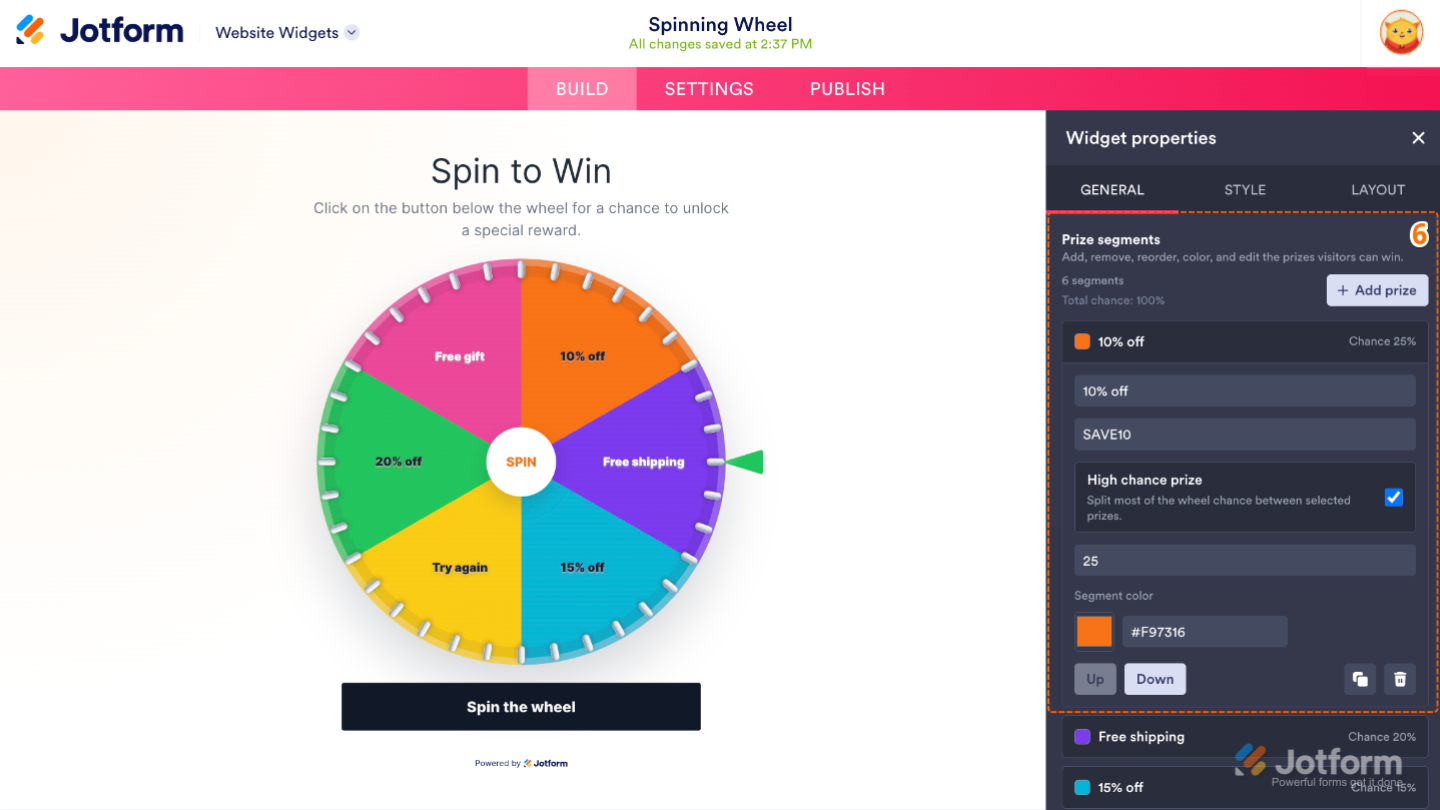
- Then, scroll down and click each Prize Segment to configure these settings:
- Add Prize — Add a new prize segment to the Spinning Wheel.
- Prize Name (First Field) — Edit this to specify the text displayed on the wheel segment and in the winning result when a visitor lands on that prize.
- Promo Code (Second Field) — Use this to store the coupon or redemption code associated with the prize. Visitors can use this code to claim their reward after winning.
- High Chance Price — Toggle this on to mark the prize as a high-probability reward.
- Chance (Third Field) — Set up the likelihood of landing on this prize. Higher values make the prize more likely to be won. The sum of all prize chances equals 100%.
- Segment Color — Change the color of the prize segment on the wheel, making it easier to distinguish different prizes or match your brand colors.
- Up — Click on this to move the prize one position higher in the prize list, changing where it is on the wheel.
- Down — Move the prize one position lower in the prize list.
- Duplicate (Duplicate Icon) — Click on this to create an exact copy of the prize, including the label, promo code, chance, and color. This is useful when creating similar prizes.
- Delete (Trash Icon) — Use this to permanently remove the prize segment from the wheel.
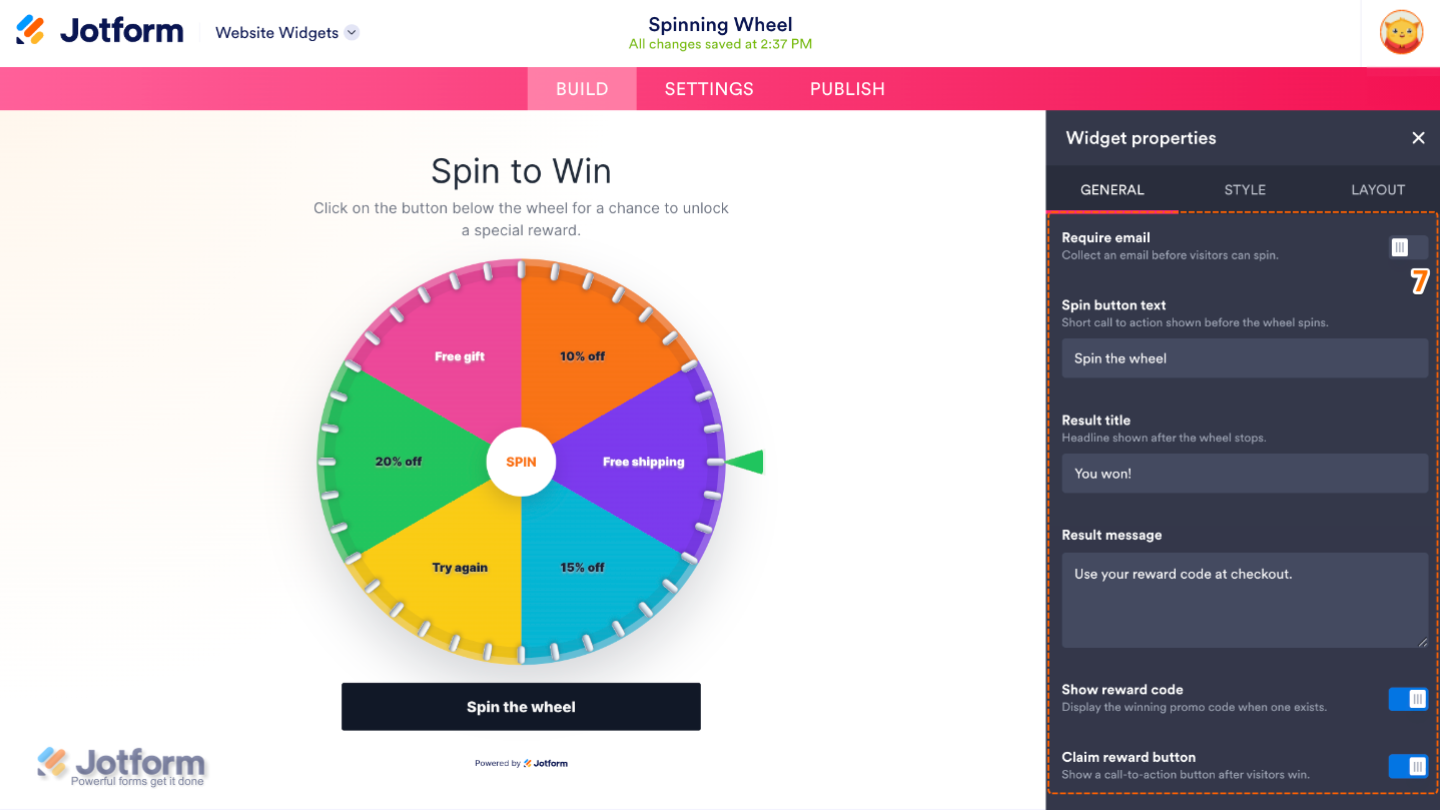
- Next, continue scrolling and adjust these options:
- Require Email — Require visitors to enter their email address before spinning the wheel. This is useful for collecting leads or growing your mailing list.
- Spin Button Text — Customize the text displayed on the button visitors click to spin the wheel.
- Result Title — Set the title displayed after the spin is complete, such as Congratulations! or Better Luck Next Time!.
- Result Message — Customize the message shown after the spin to provide additional information about the prize or outcome.
- Show Reward Code — Display a reward or coupon code to visitors after they win a prize.
- Claim Reward Button — Show a button that lets visitors claim or redeem their prize.
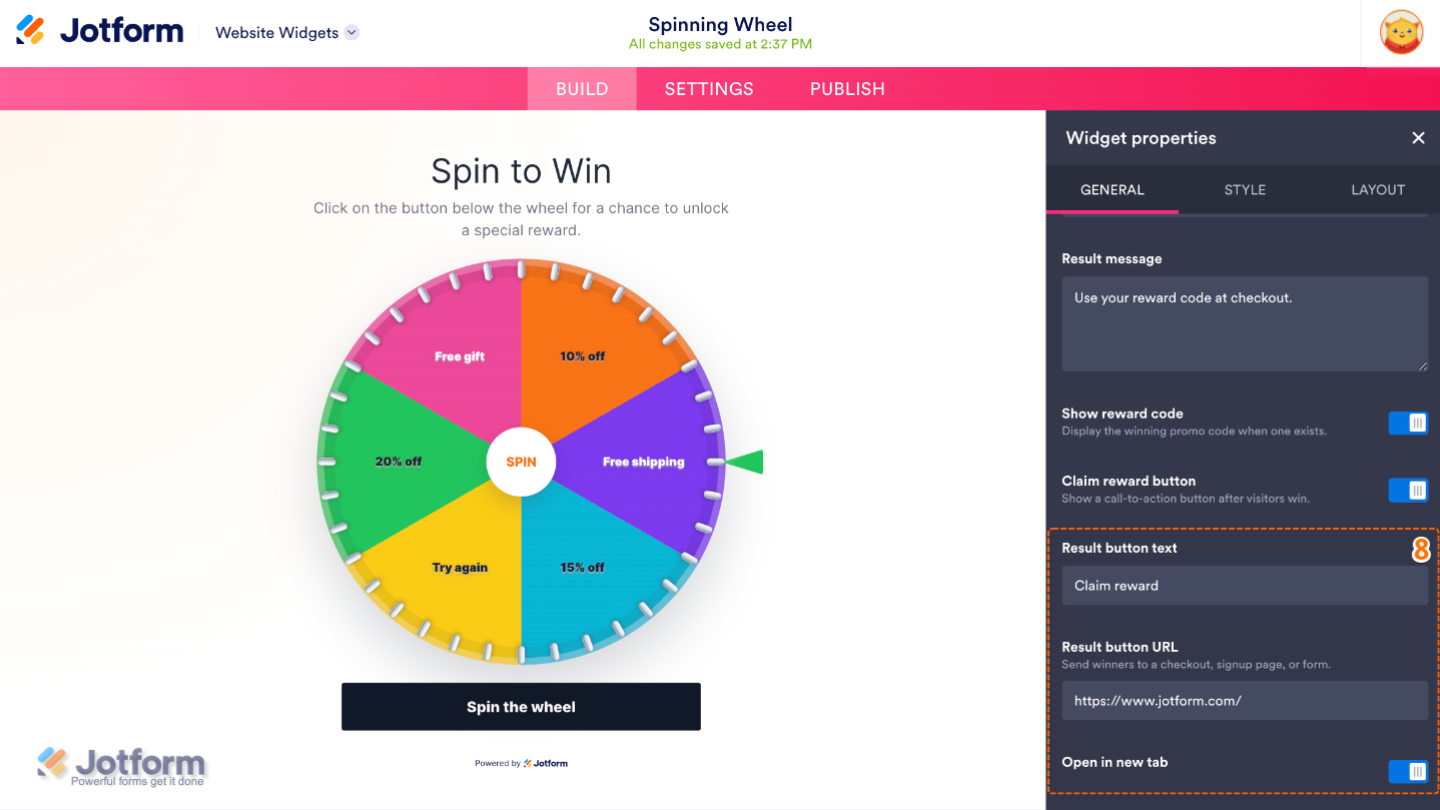
- Now, scroll down again and continue setting up these properties:
- Result Button Text — Customize the text displayed on the reward or Result button.
- Result Button URL — Specify the page visitors are taken to when they click on the Result button, such as a checkout page or a promotional landing page.
- Open in New Tab — Choose whether the Result button opens the linked page in a new browser tab.
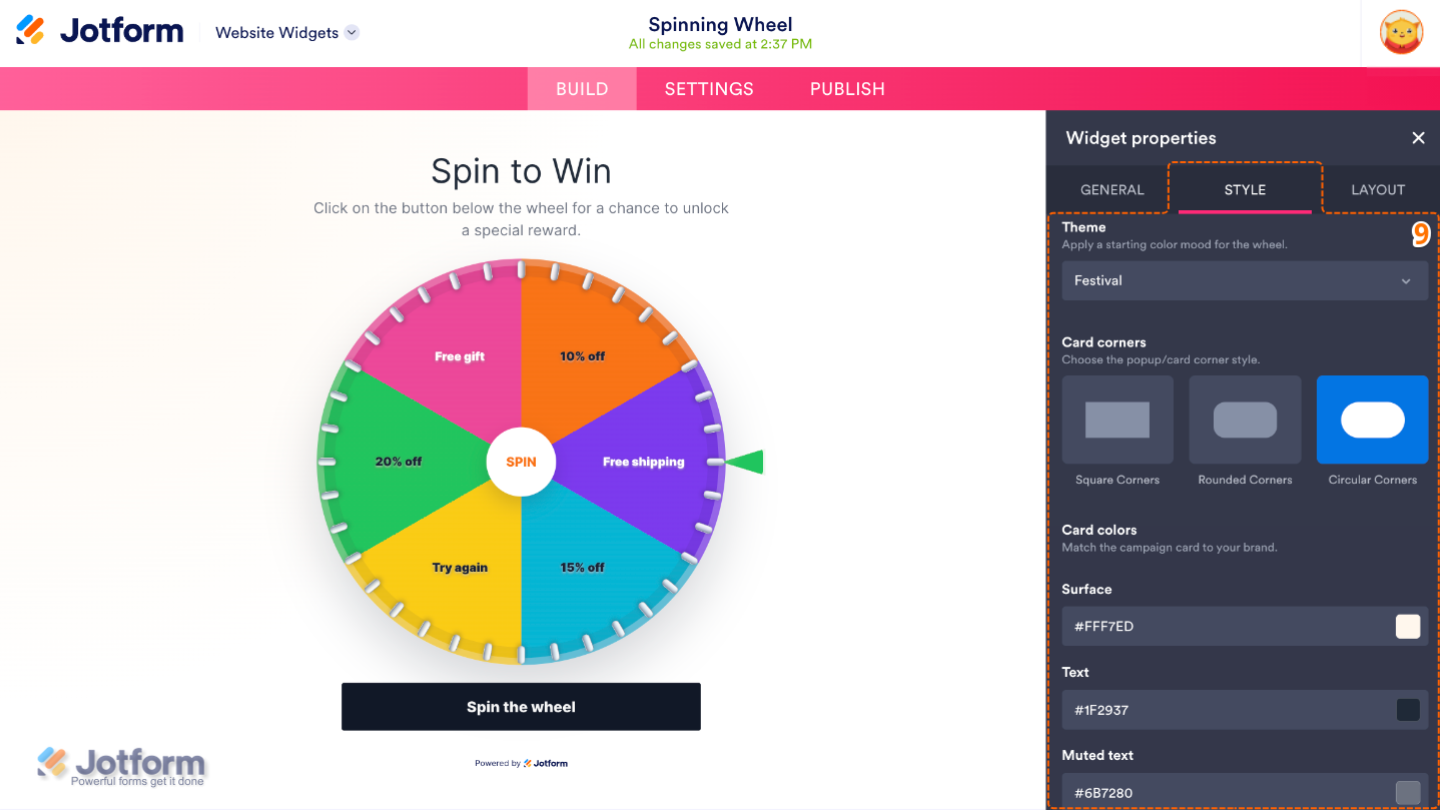
- Next, under the Styles tab, customize these properties:
- Theme — Choose a pre-designed theme to quickly change the overall appearance of the spinning wheel.
- Card Corners — Adjust how rounded the corners of the widget card appear.
- Card Colors
- Surface — Set the color of the card or content area surrounding the spinning wheel.
- Text — Choose the primary color used for text throughout the widget.
- Muted Text — Customize the color of secondary or less prominent text.
- Then, scroll down and continue with these settings:
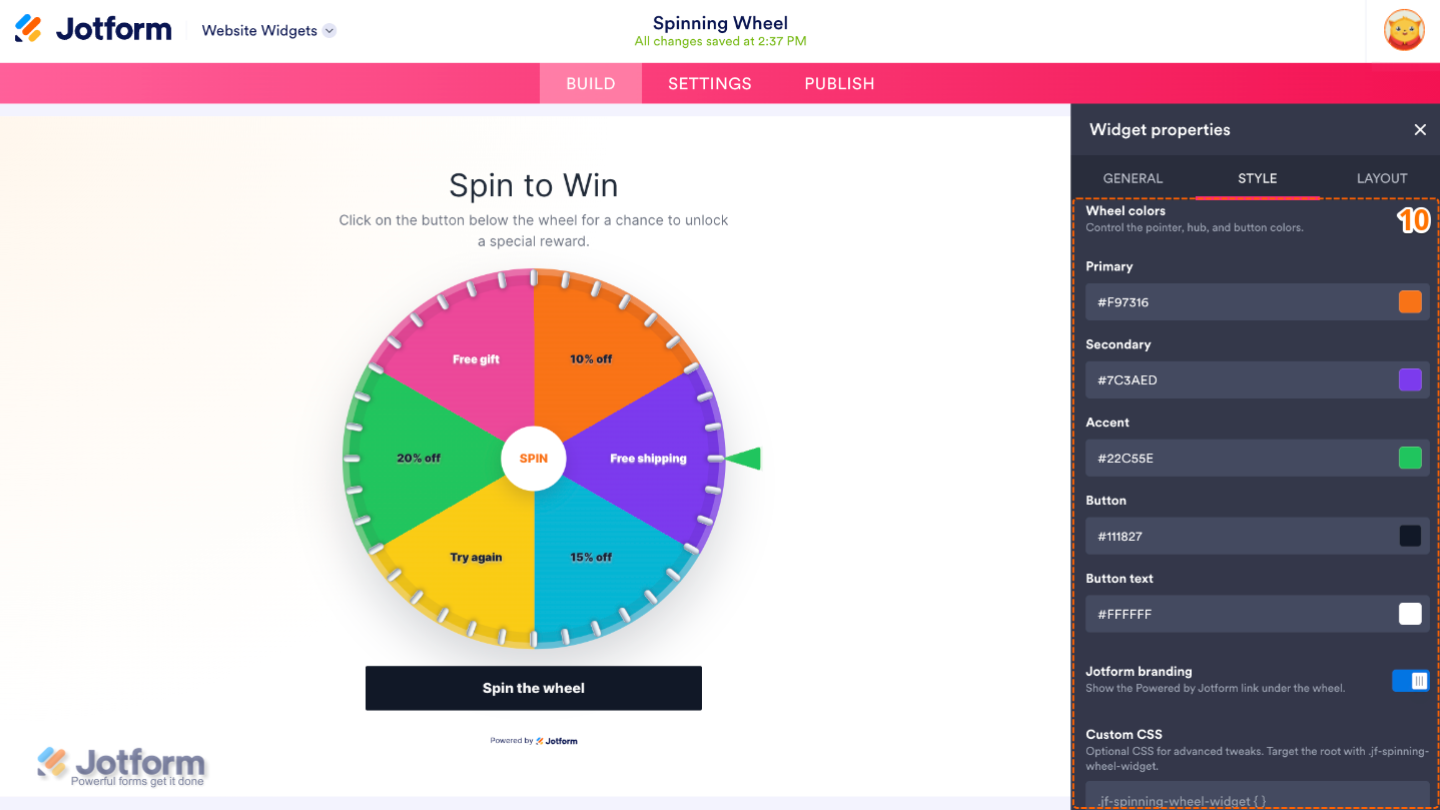
- Wheels Colors
- Primary — Choose the primary color used on the spinning wheel segments.
- Secondary — Choose the secondary color used to alternate wheel segments.
- Accent — Set the accent color used for highlights and decorative elements.
- Button — Choose the background color of the spin button.
- Button Text — Set the color of the text displayed on the spin button.
- Jotform Branding — Show or hide Jotform branding on the widget, depending on your plan and preferences.
- Custom CSS — Apply your own CSS codes for advanced customization beyond the built-in settings.
- Wheels Colors
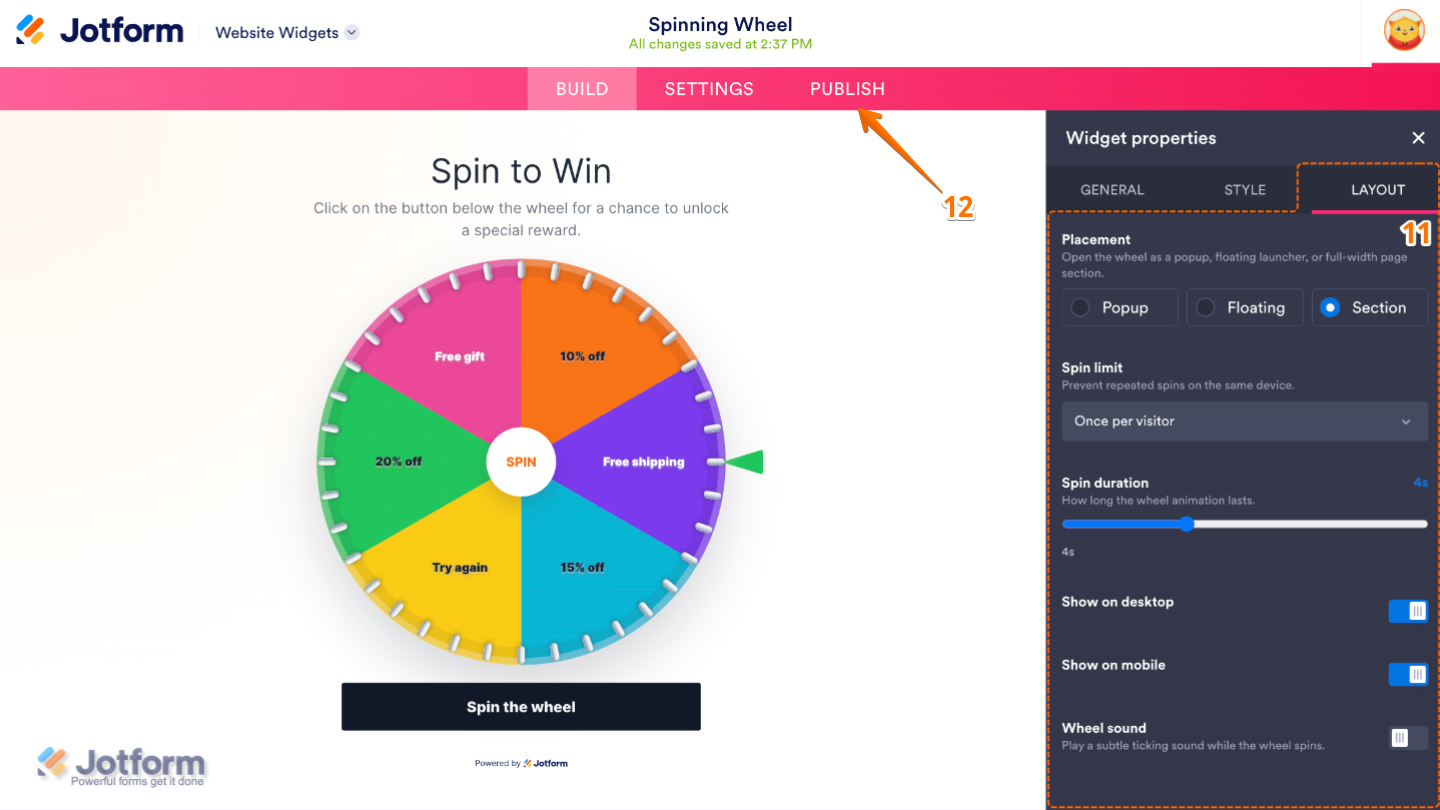
- Now, under the Layout tab, configure these properties:
- Placement — Choose where the Spinning Wheel appears on your website.
- Spin Limit — Control how many times a visitor can spin the wheel.
- Spin Duration — Adjust how long the wheel spins before it lands on a prize. A longer duration creates more excitement, while a shorter one gives quicker results.
- Show on Desktop — Choose whether the widget is displayed on desktop devices.
- Show on Mobile — Choose whether the widget is displayed on mobile devices.
- Wheel Sound — Enable or disable the spinning sound effect to make the experience more interactive.
- Once you’ve finished configuring the widget, in the pink navigation bar at the top of the page, click on Publish.
Note
You’ll be asked to log in to your Jotform account, if you’re not already, or sign up for one. Once you’ve done that, you’ll be able to get the embed code for your widget.
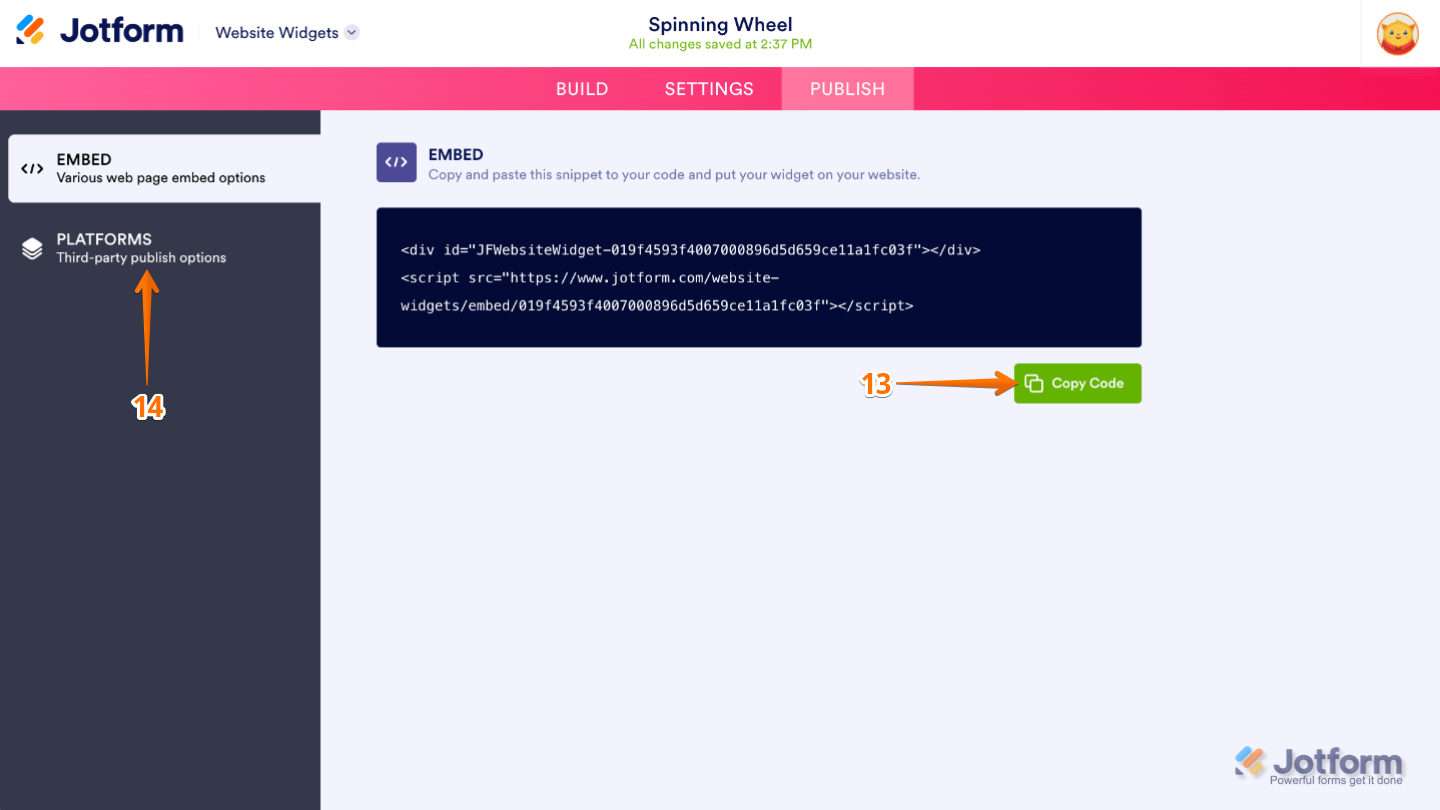
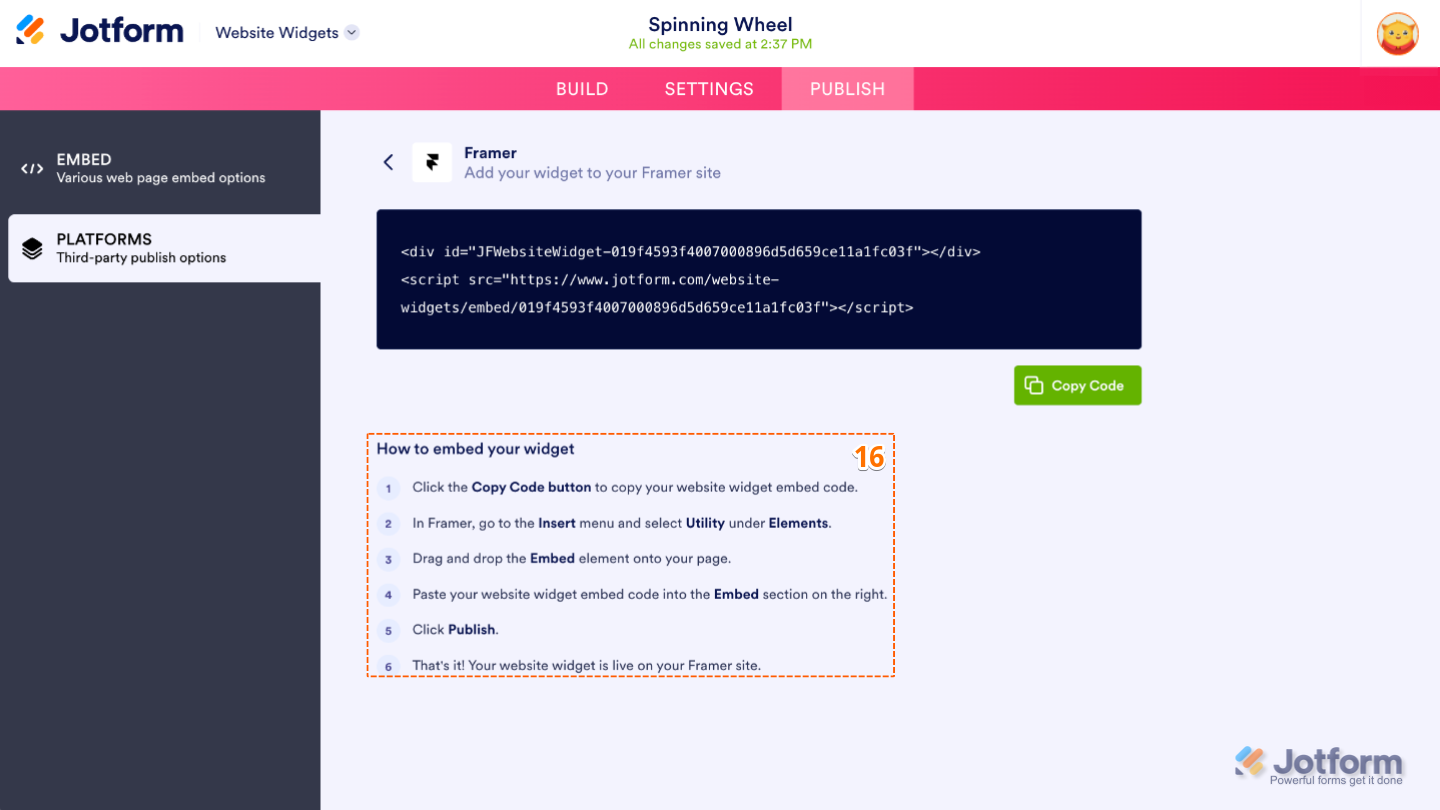
- Then, in the Embed section, click on Copy Code, and, if you already know how, paste that into the Embed section on your platform, and you’re good to go.
- To view embedding instructions for your widget, click on Platforms in the menu on the left side of the page.
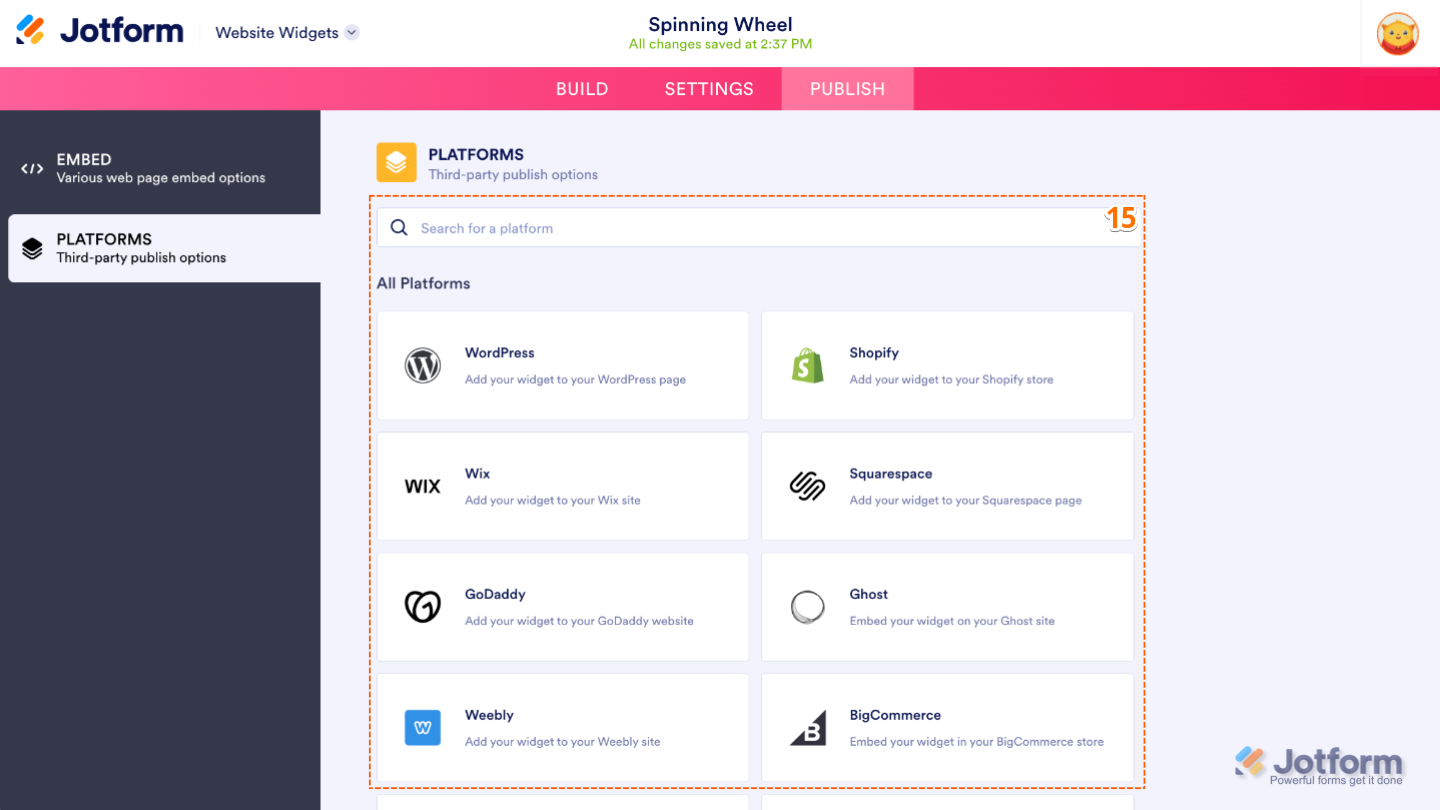
- Next, in the Platforms section on the right, select the platform you want to view embedding instructions for. Or, use the Search bar at the top of the section to find it easily.
- Then, follow the steps in the How to Embed Your Widget section to add it to your website.
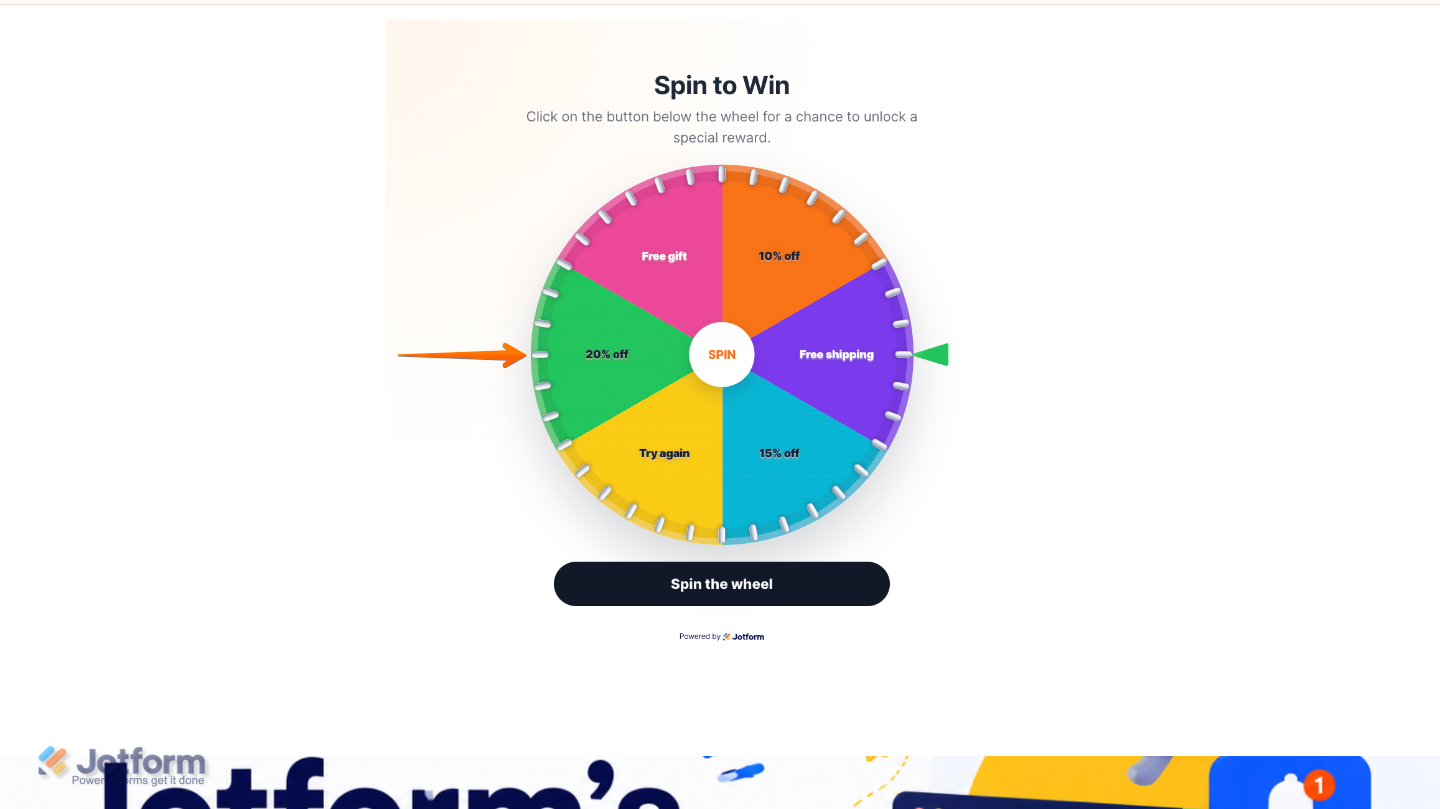
That’s it! Your Spinning Wheel widget will appear on your website with the design and settings you selected for it. See the screenshot below for an example of how it looks:
Note
You can manage the website widgets you’ve created at any time from your account. For a full breakdown of how to do it, head over to our guide on How to Manage Website Widgets.
Pro Tips
- If you’re offering coupon codes or rewards, enable Show Reward Code and add a Claim Reward Button so visitors can easily redeem their prizes.
- Offer prizes that encourage visitors to take the next step, such as discount codes, free shipping, exclusive content, or special offers.
- Preview the widget on both desktop and mobile devices before publishing to make sure the popup, wheel, and buttons display and function as expected across different screen sizes.


Send Comment: