With the RSS Feed widget, you can display content from any public RSS or Atom feed in responsive list, grid, masonry, carousel, or slider layouts, customize which post details appear, and match the widget to your website’s design, all without writing a single line of code.
Whether you want to showcase the latest blog posts, news articles, announcements, podcasts, or updates from another website, the RSS Feed widget automatically keeps your content fresh by displaying new items as soon as they’re published, helping keep visitors informed without requiring manual updates.
Creating and Getting the Embed Code of Your RSS Feed Widget
To embed an RSS or Atom Feed on your website, you’ll first need to configure the RSS Feed widget and copy the embed code for it. Here’s how to get going
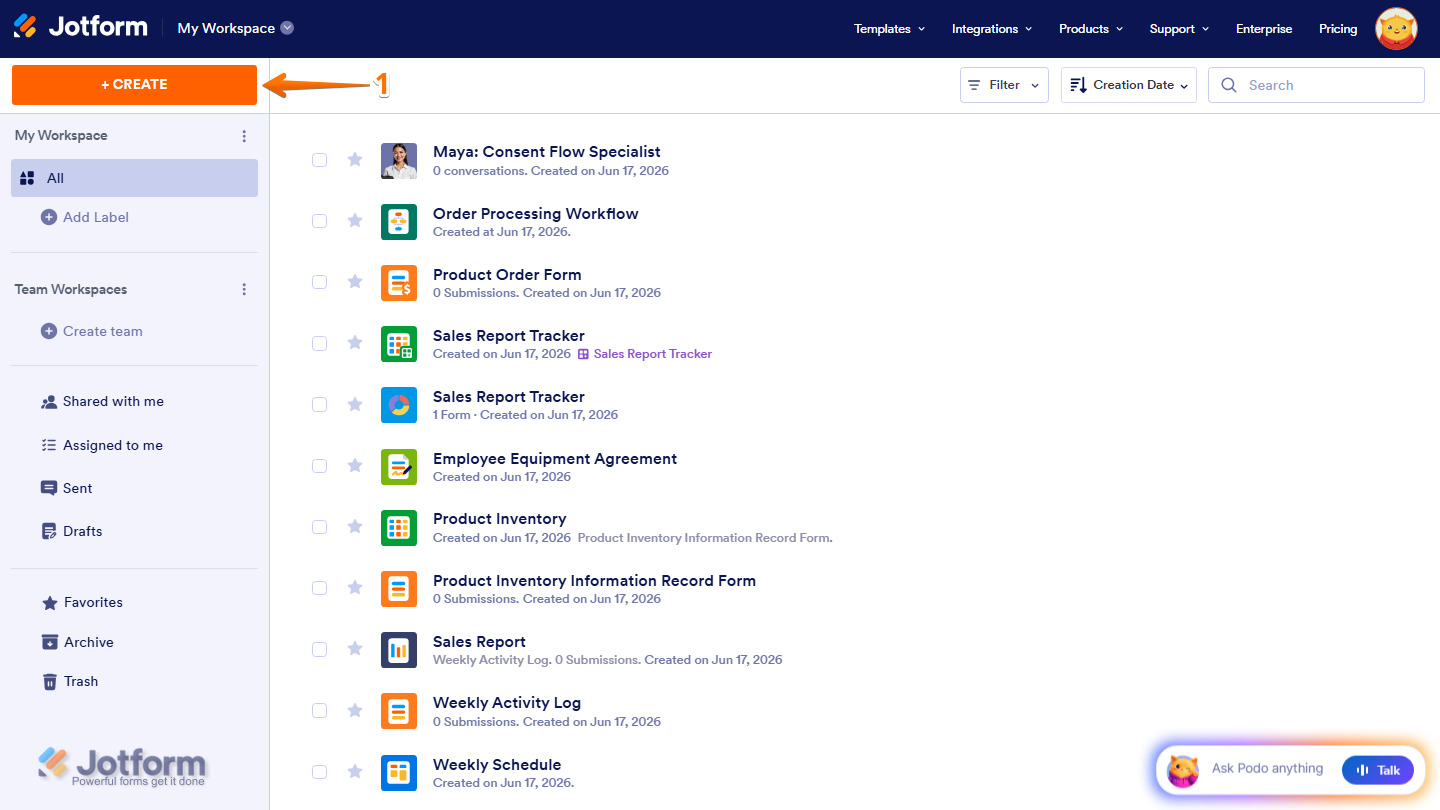
- On the top-left side of your Workspace page, click on Create.
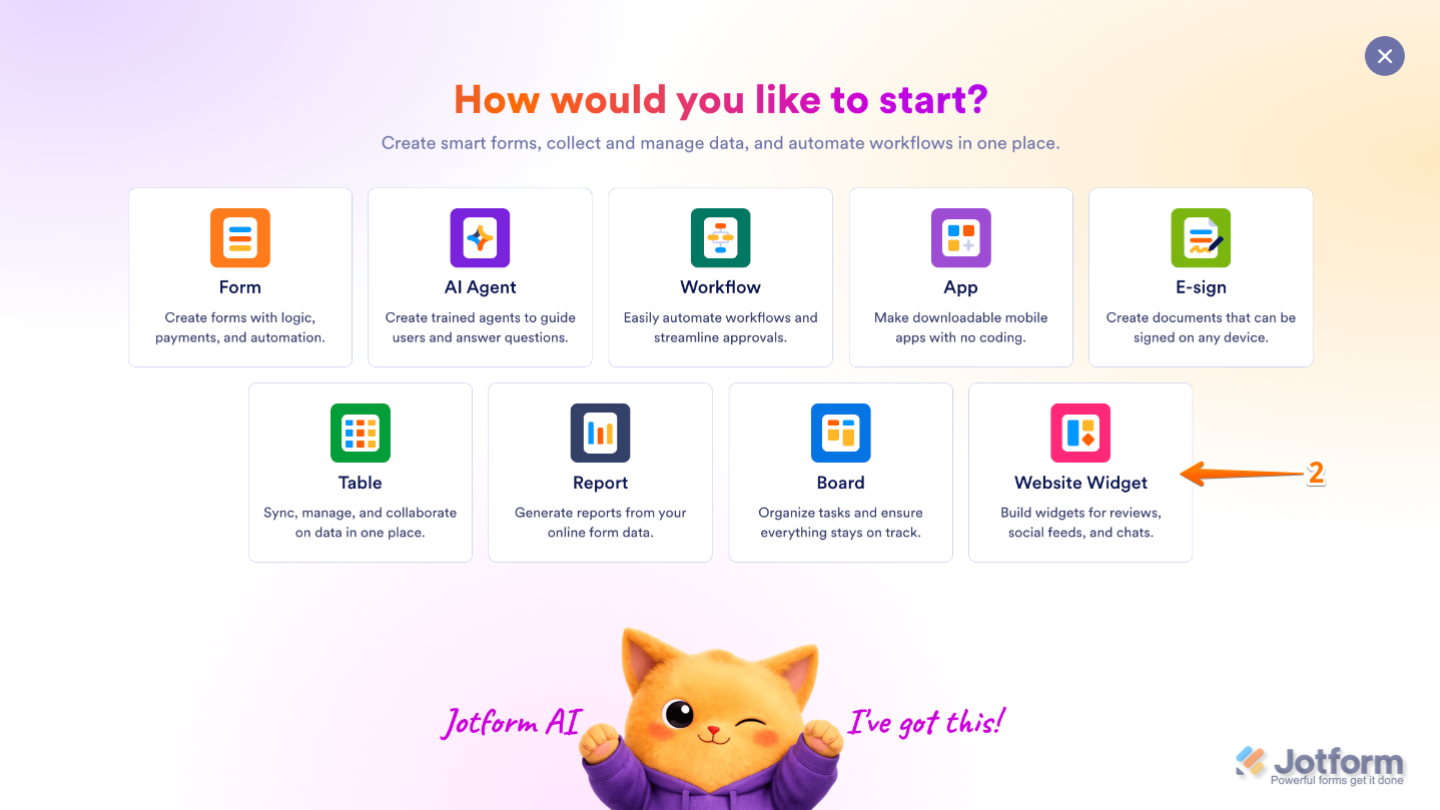
- Then, in the menu that opens up, select Website Widget from the assets.
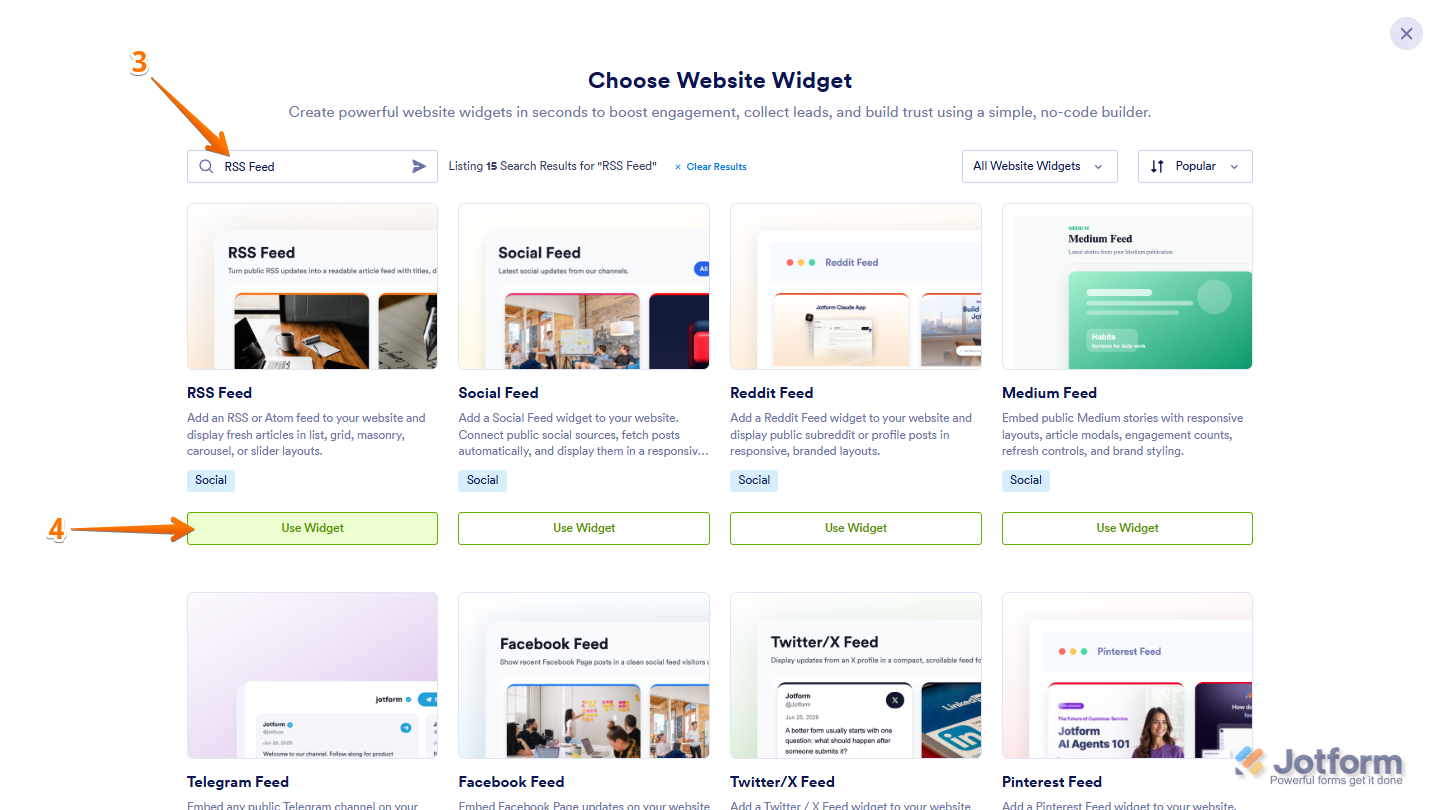
- Next, in the Search bar in the upper-left corner of the Choose Website Widget menu, enter RSS Feed.
- Then, at the bottom of the RSS Feed in the Choose Website Widget menu, click on Use Widget.
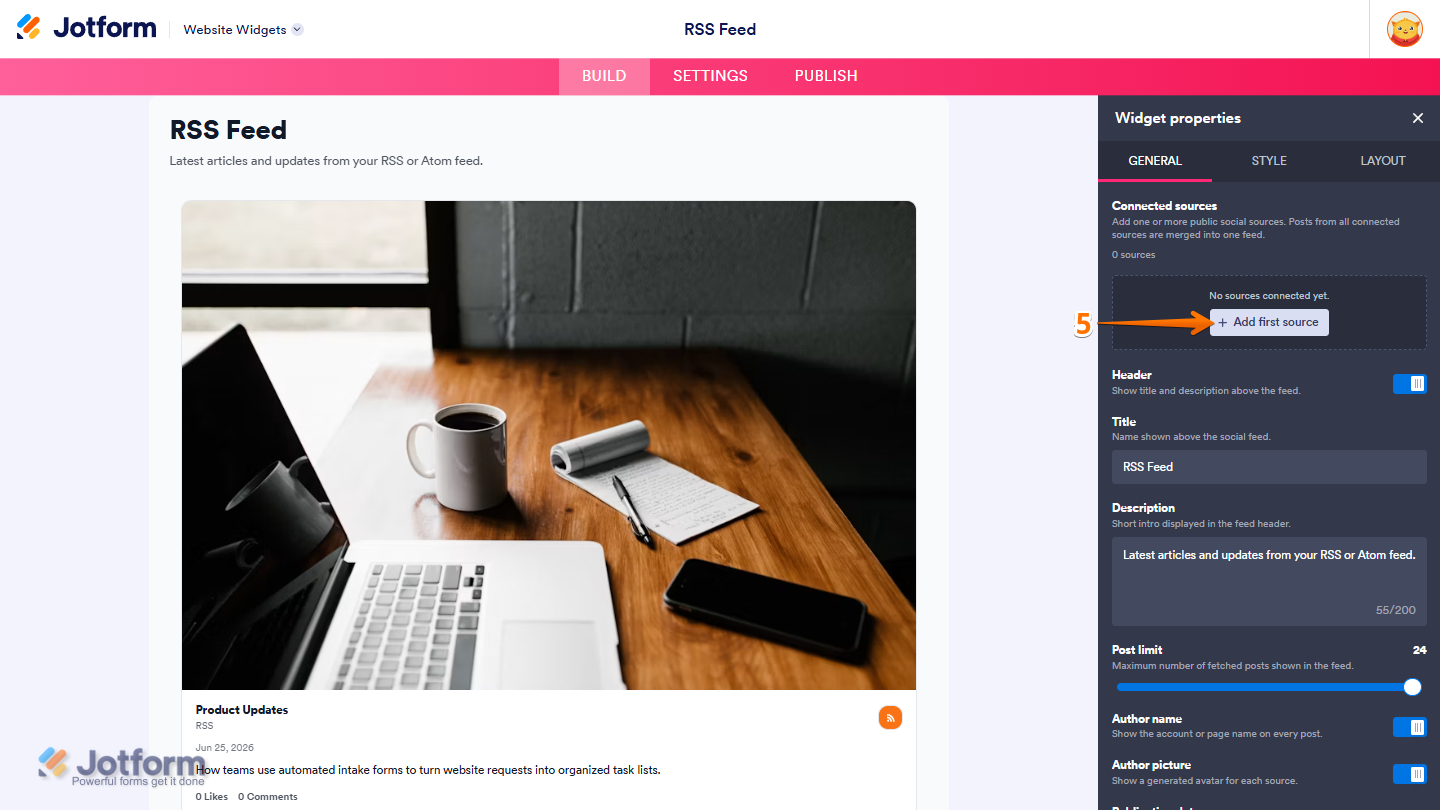
- Now, in the Widget Properties menu that opens on the right side of Website Widgets, under the General tab, click on Add First Source in the Connected Sources section.
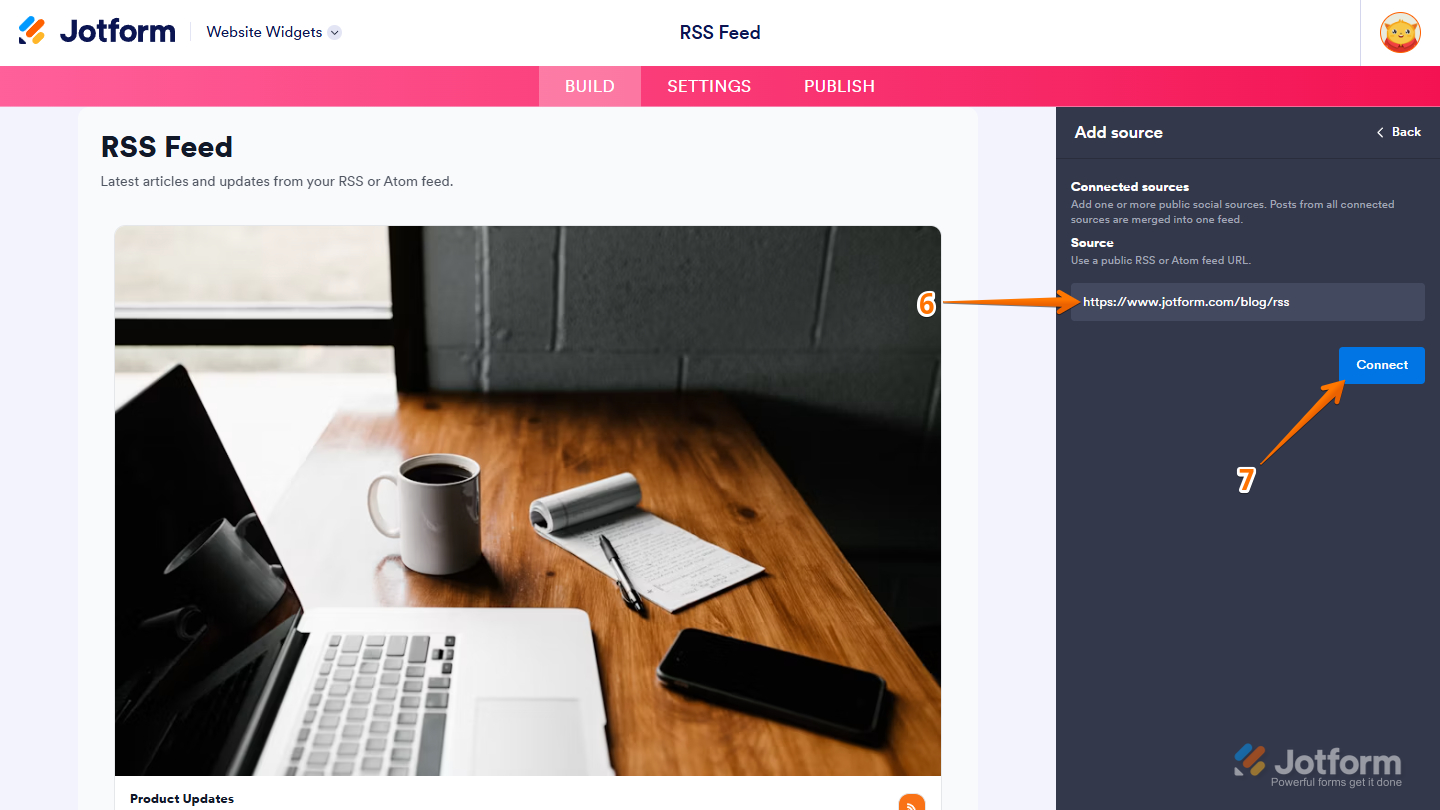
- Next, in the Add Source menu, enter the RSS feed URL in the Source field.
- Then, click on Connect.
Note
A public RSS Feed URL, such as https://www.example.com/rss, or its XML feed URL can be used as the source.
- Now, click on the Back button at the top-right of the Add Source menu to go back to the General tab.
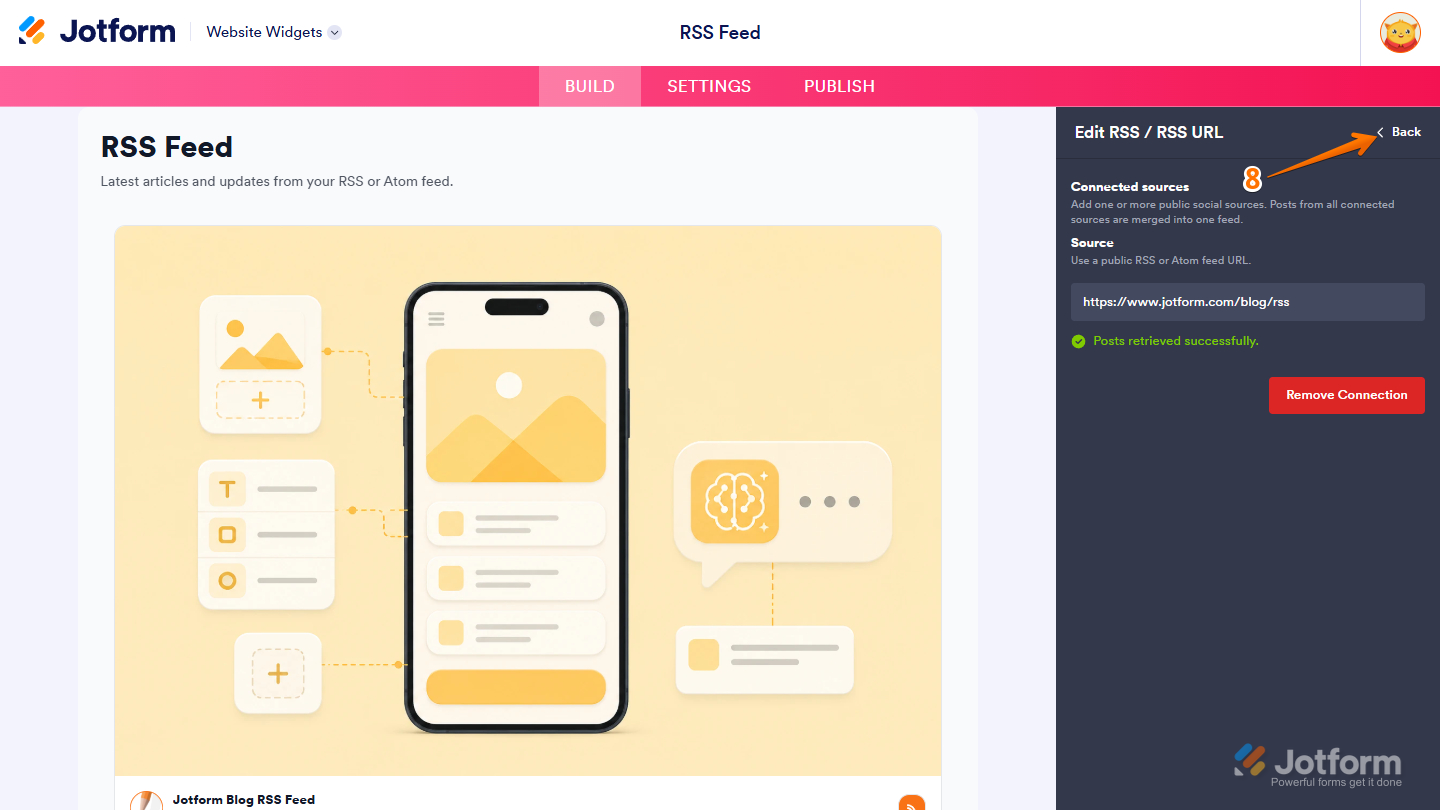
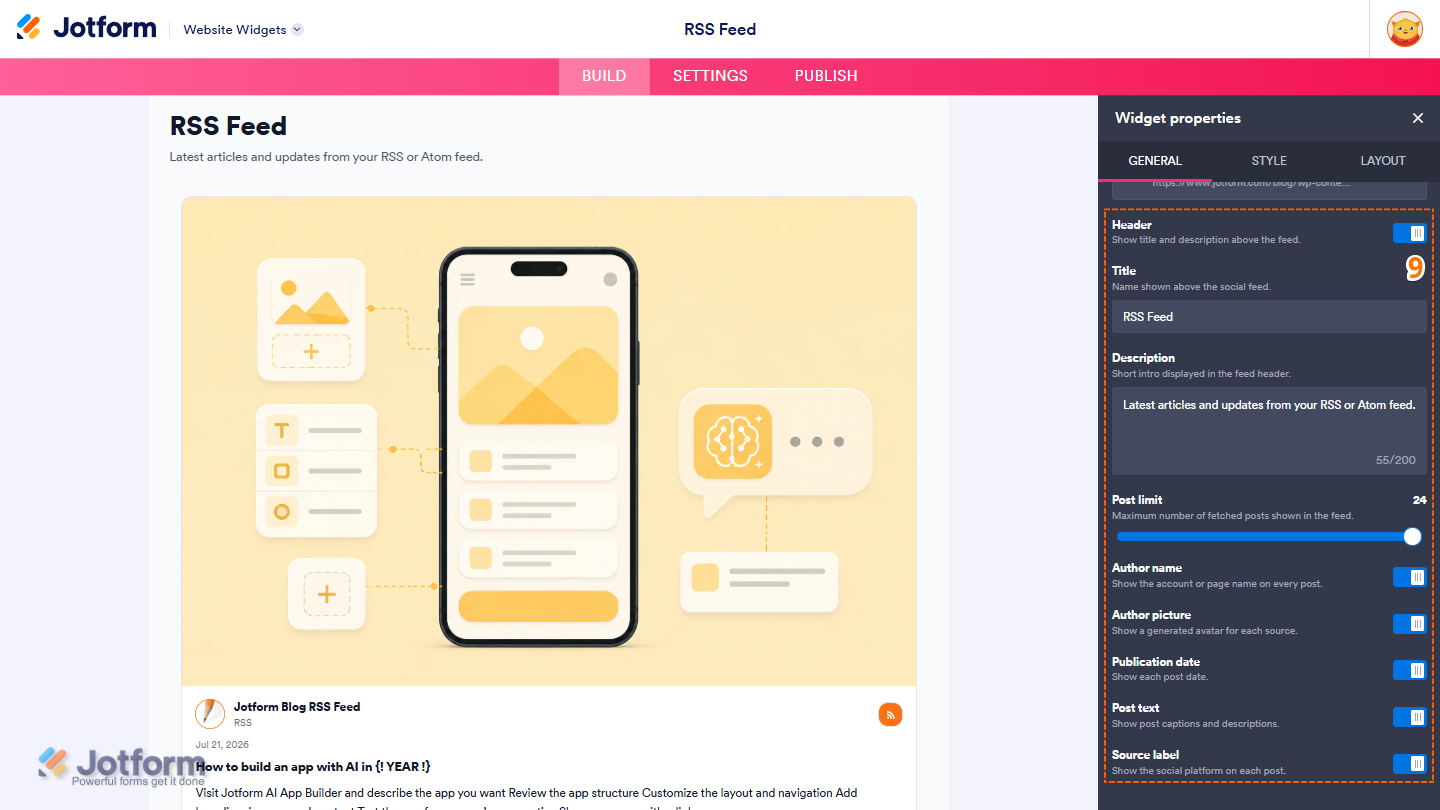
- Next, scroll down in the General tab and set up the properties below:
- Header — Keep this on to display the Title and the Description, or toggle it off to hide both.
- Title — Keep the default title or enter a custom one to display at the top of the feed.
- Description — Enter a short description to display below the feed title.
- Post Limit — Click on and hold the slider handle, then drag it to change the number of posts to be displayed in the feed.
- Author Name — Keep this on to show the account or page name on every post, or toggle it off to hide it.
- Author Picture — This is on by default. Keep this on to show a generated avatar for each source, or toggle it off to remove it.
- Publication Date — Keep this toggled on to show each post date, or toggle it off to hide it.
- Post Text — Leave this enabled to show post captions and descriptions, or toggle it off to hide both.
- Source Label — Keep this on to show the social platform on each post, or toggle it off to hide it.
- Header — Keep this on to display the Title and the Description, or toggle it off to hide both.
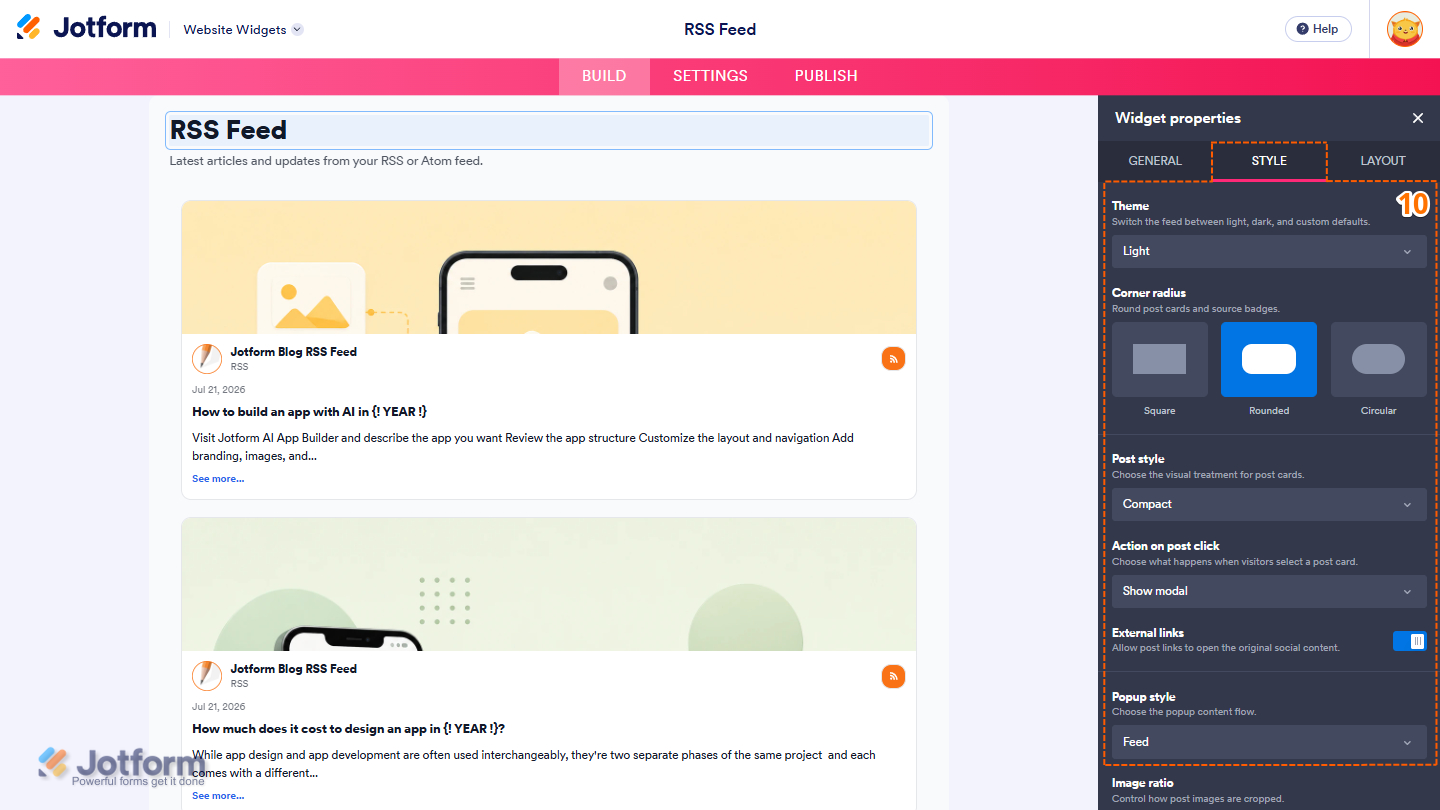
- Then, under the Style tab, customize these properties:
- Theme — Click on the Dropdown menu and select Light, Dark, or Custom to change the overall appearance of your feed.
- Corder Radius — Keep the default Rounded corner or change it to Square or Circular.
- Post Style — Click on the Dropdown menu and select Classic, Compact, or Title option.
- Action on Post Click — Keep the default Show Modal option selected, or click on the Dropdown menu and select Open in a New Tab to open links as a new tab in your browser, or None to have no action at all.
- External Links — Keep this on to allow post links to open the original social content.
- Popup Style — Click on the Dropdown menu and select the Feed or Classic option.
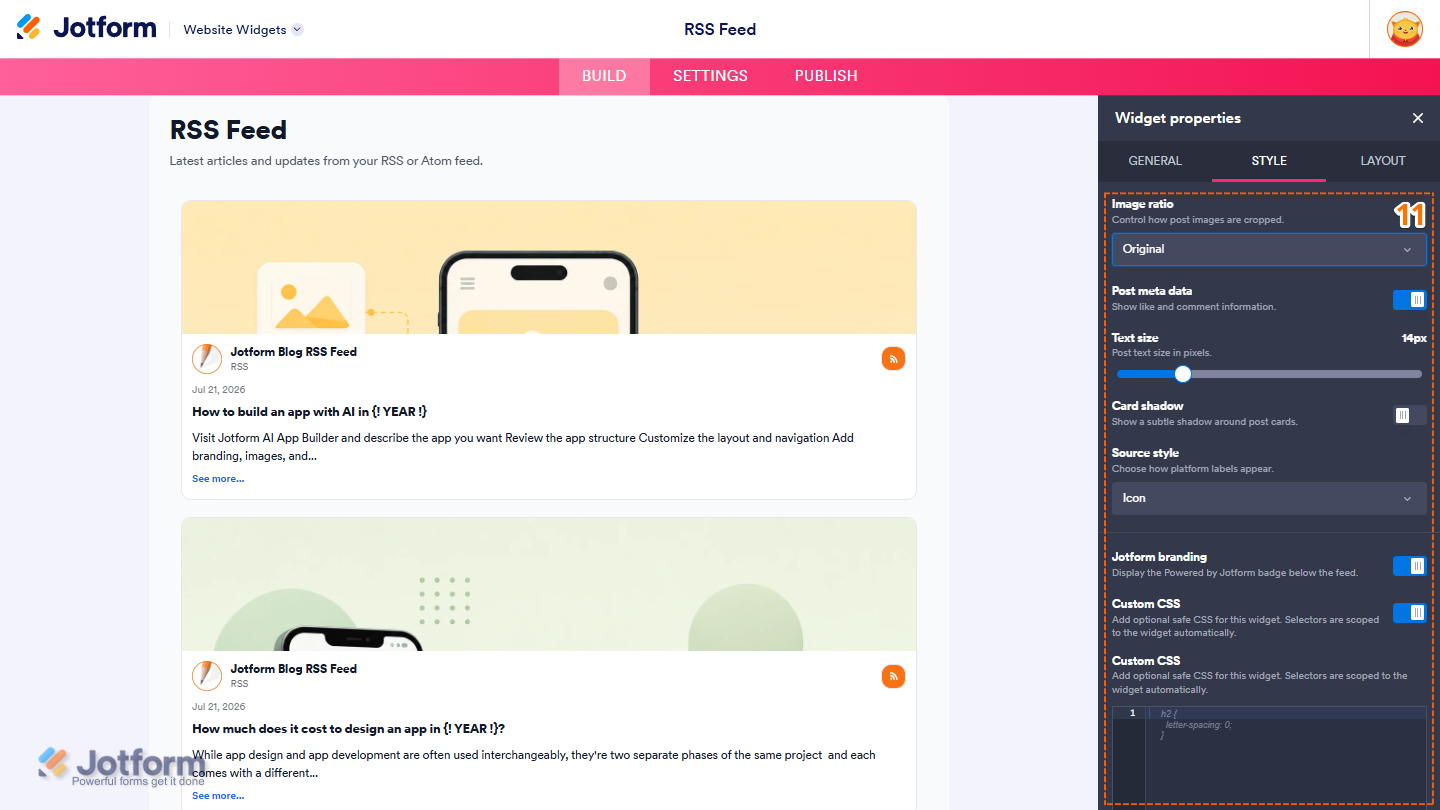
- Now, scroll down and adjust these settings:
- Image Ratio — Click on the Dropdown menu and select Original, Square, Landscape, or Portrait cropping.
- Post Meta Data — Keep this on to show like and comment information, or toggle it off to hide the metadata.
- Text Size — Click on and hold the slider handle, then drag it to change the font size in pixels.
- Card Shadow — Toggle this on to show a subtle shadow around postcards.
- Source Style — Click on the Dropdown menu and select to display the source Icon or Label.
- Jotform Branding — Keep this on to display the Powered by Jotform badge below the feed.
- Custom CSS — Toggle this on, then enter your custom CSS in the Custom CSS box that appears below it.
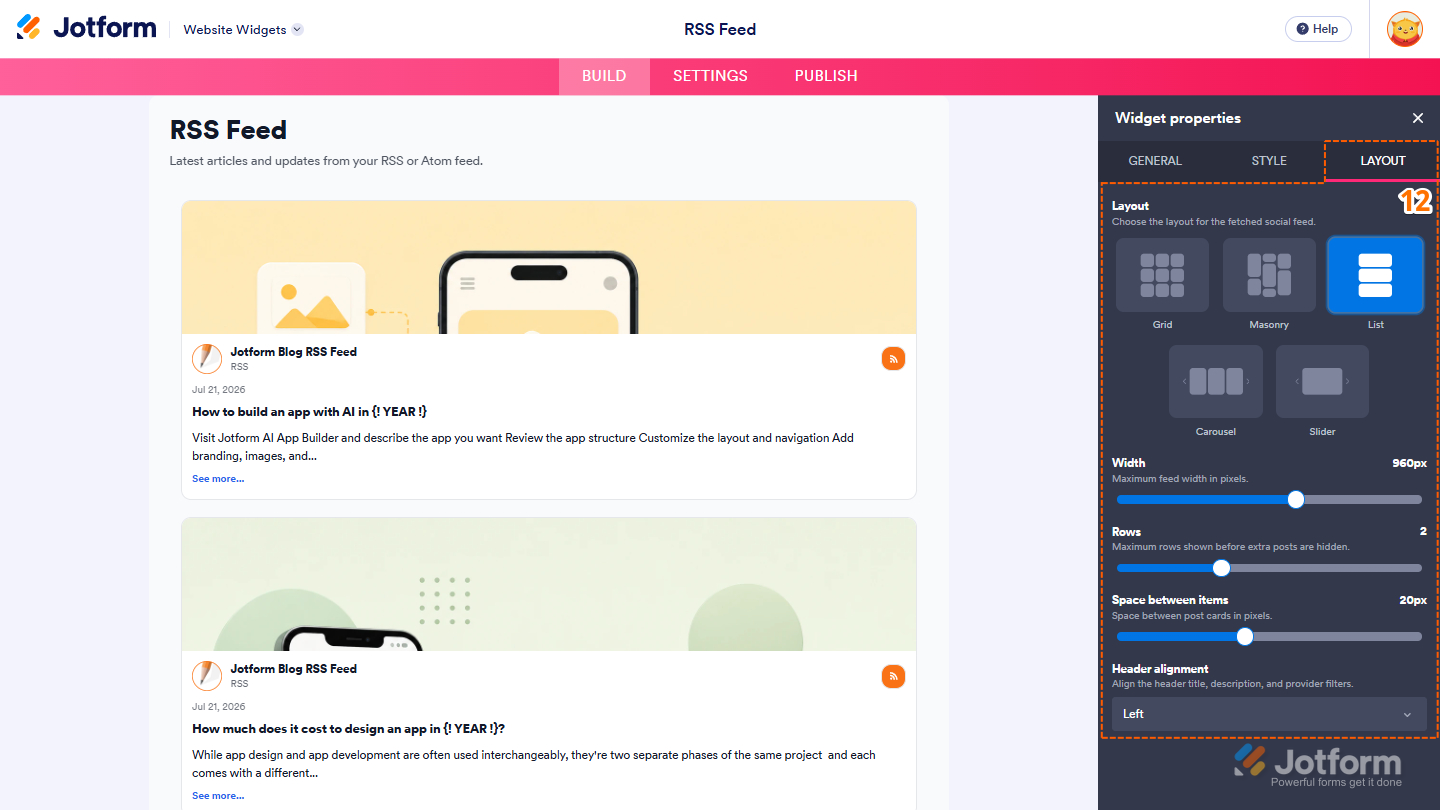
- Next, under the Layout tab, configure these properties:
- Layout — Keep the default List option to display feed items in a vertical list, or select one of the following layouts:
- Grid — Display feed items in a responsive grid of cards.
- Masonry — Arrange feed items in a layout with varying card heights.
- Carousel — Display feed items in a horizontally scrollable carousel.
- Slider — Show one feed item at a time in a slideshow with navigation controls.
- Width — Click on and hold the slider handle, then drag it to change the width of the feed.
- Rows — Keep the default 2, or click on and hold the slider handle, then drag it to adjust the number of feeds displayed by default.
- Space Between Items — Click on and hold the slider handle, then drag it to adjust the space between postcards.
- Header Alignment — Click on the Dropdown menu and select Left, Center, or Right.
- Layout — Keep the default List option to display feed items in a vertical list, or select one of the following layouts:
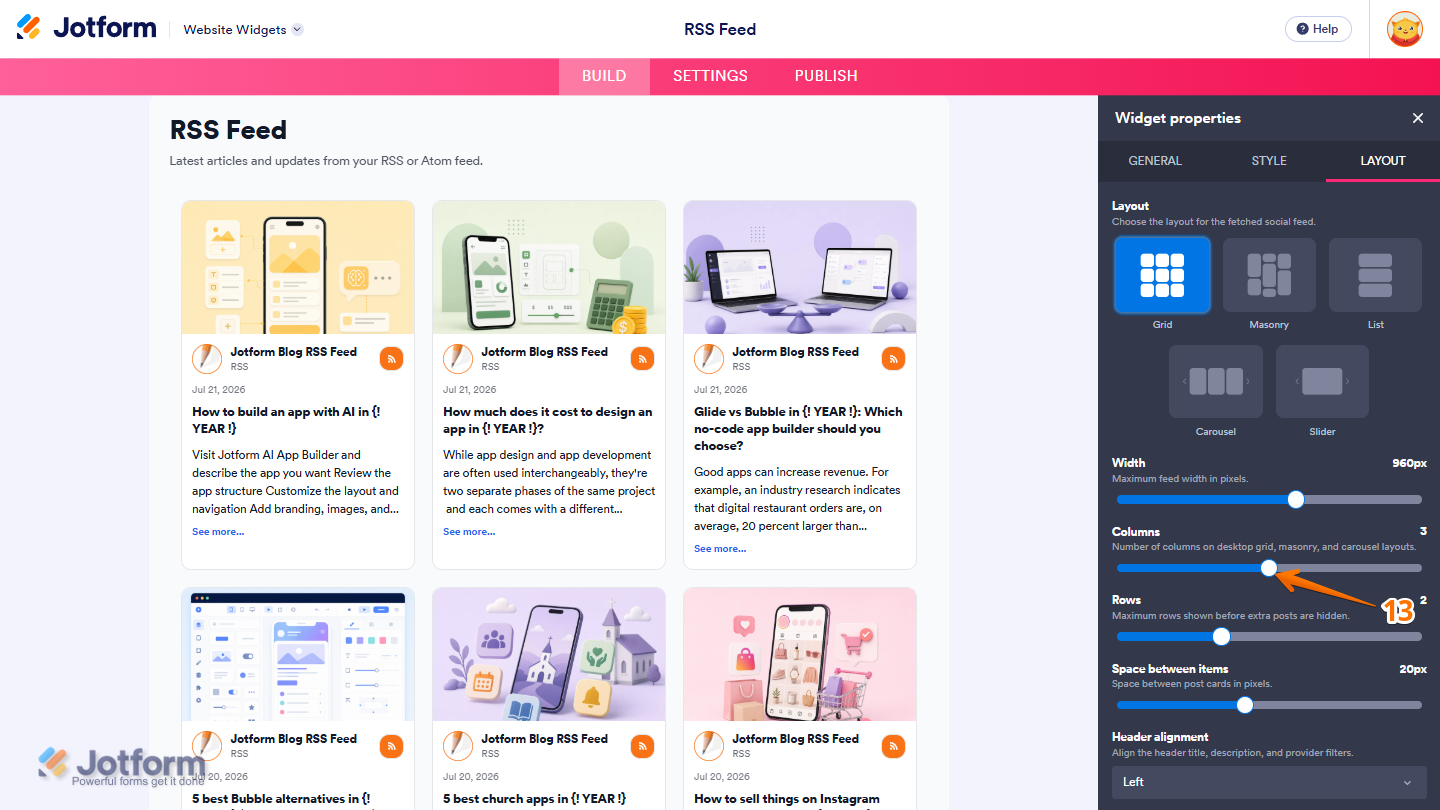
- If you select Grid or Masonry in Layouts, click on and hold the Columns slider handle, then drag it to set the number of columns displayed in each row.
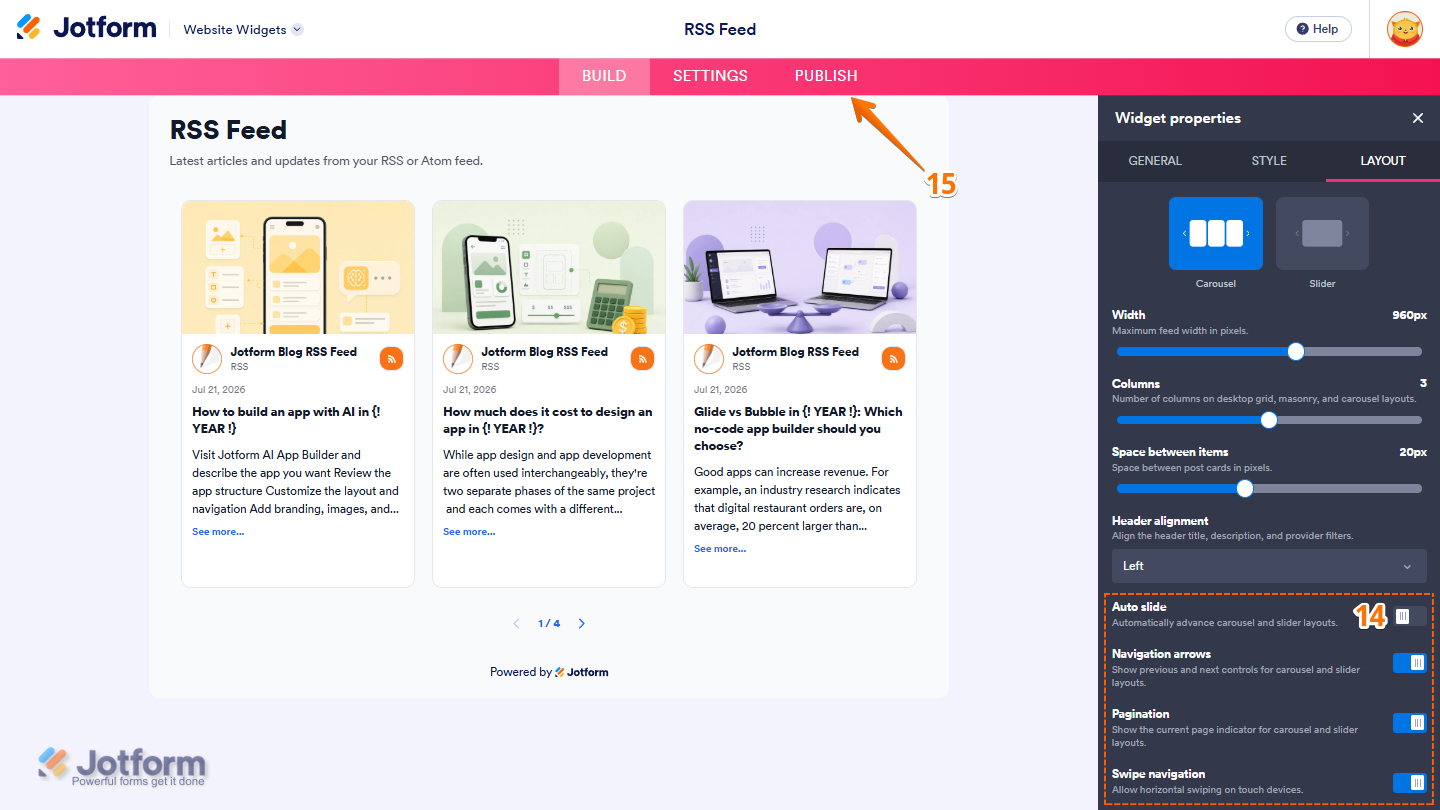
- If you select the Carousel or Slider layout options, set up these additional properties:
- Auto Slide — Toggle this on to automatically
- Navigation Arrows — Keep this on to display navigation, or toggle it off to hide it.
- Pagination — Leave this on to display the current page indicator, or toggle it off to hide the number.
- Swipe Navigation — Keep this on to allow swiping on mobile devices, or toggle it off to keep the control on the navigation arrows or pagination.
- Once everything’s set, in the pink navigation bar at the top of the page, click on Publish.
Note
If you’re not logged in, you’ll be asked to log in to your Jotform account or sign up for one. Once you’ve done that, you’ll be able to get the embed code for your widget.
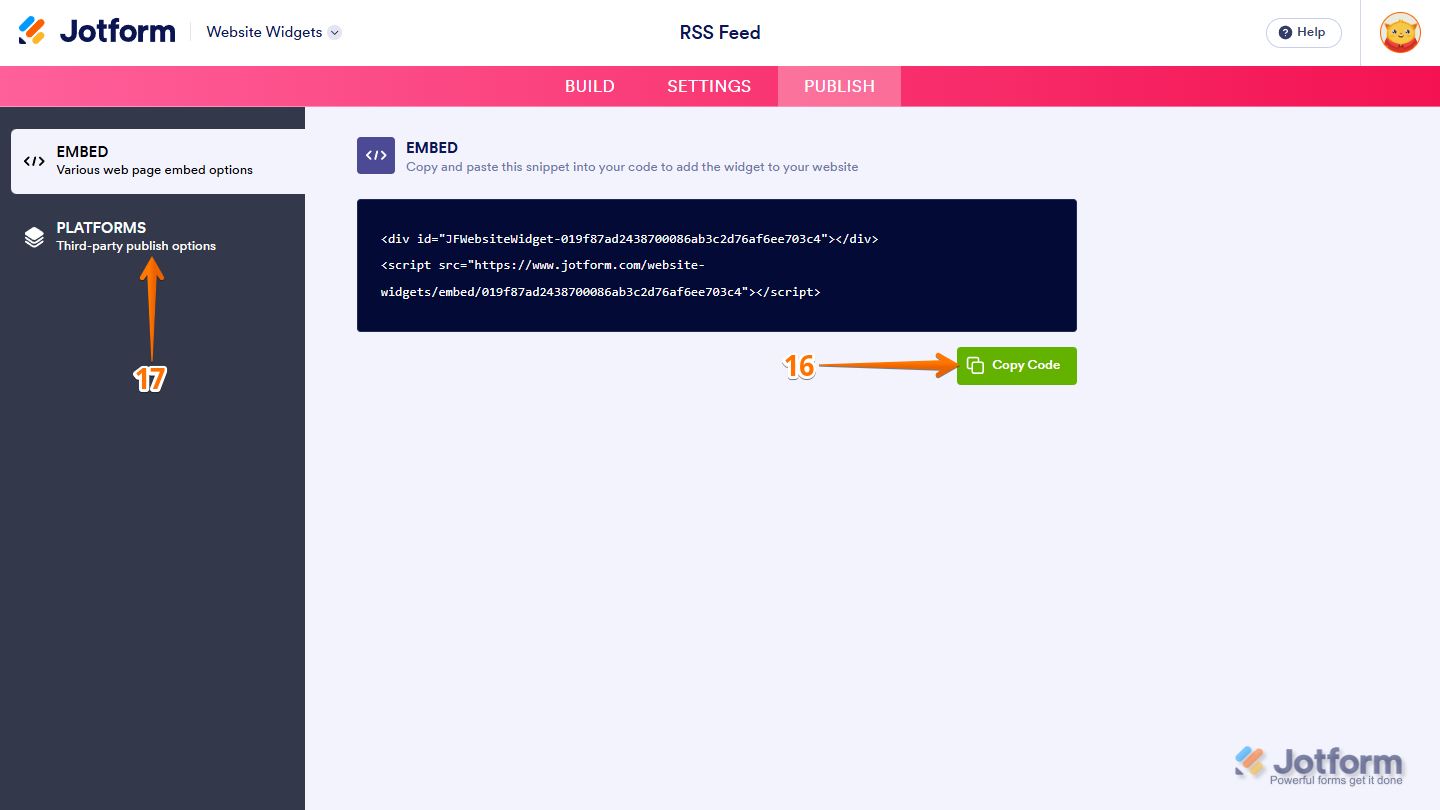
- Then, in the Embed section, click on Copy Code, and, if you already know how, paste that into the Embed section on your platform.
- To view embedding instructions for your widget, click on Platforms in the menu on the left side of the page.
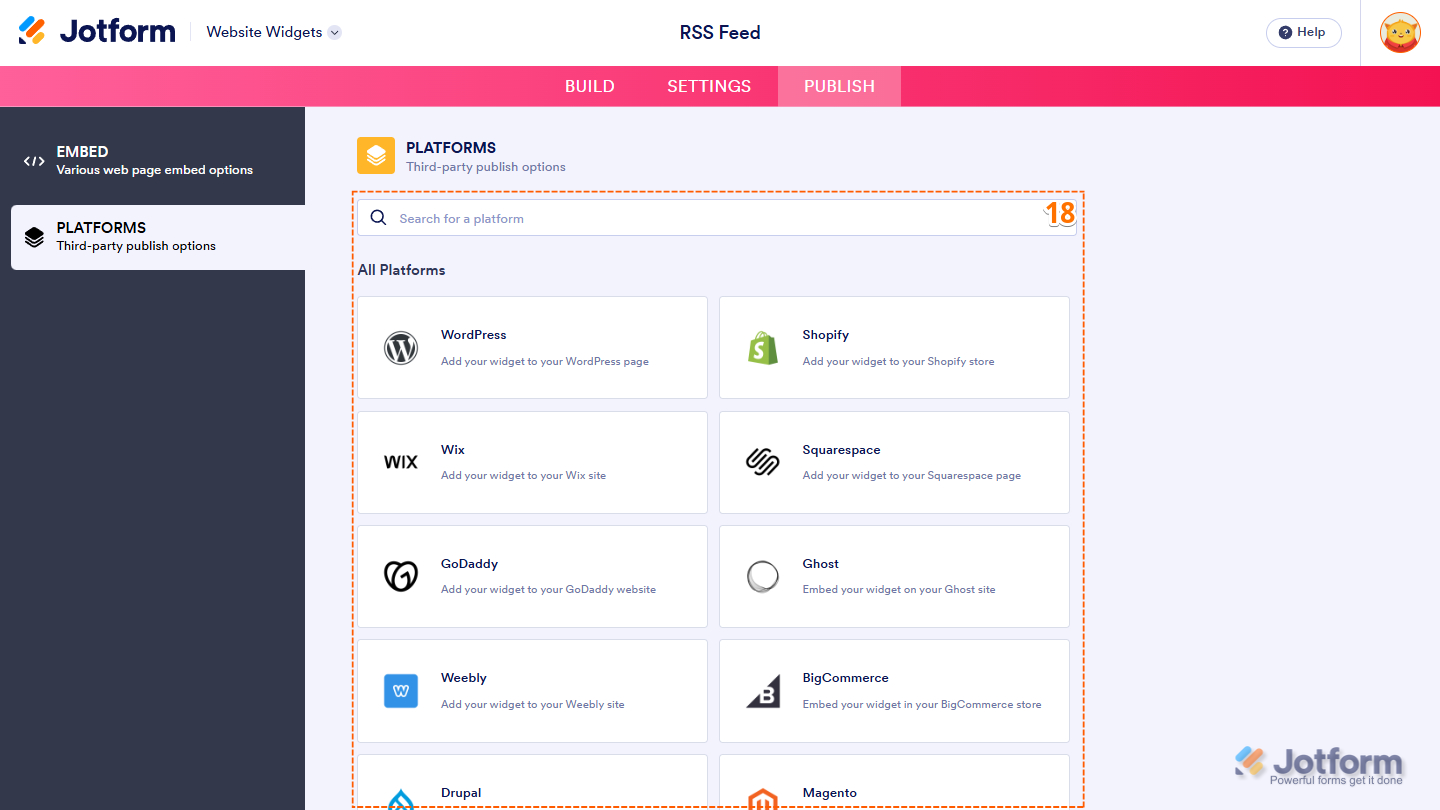
- Next, in the Platforms section on the right, select the platform you want to view embedding instructions for. Or, use the Search bar at the top of the section to find it easily.
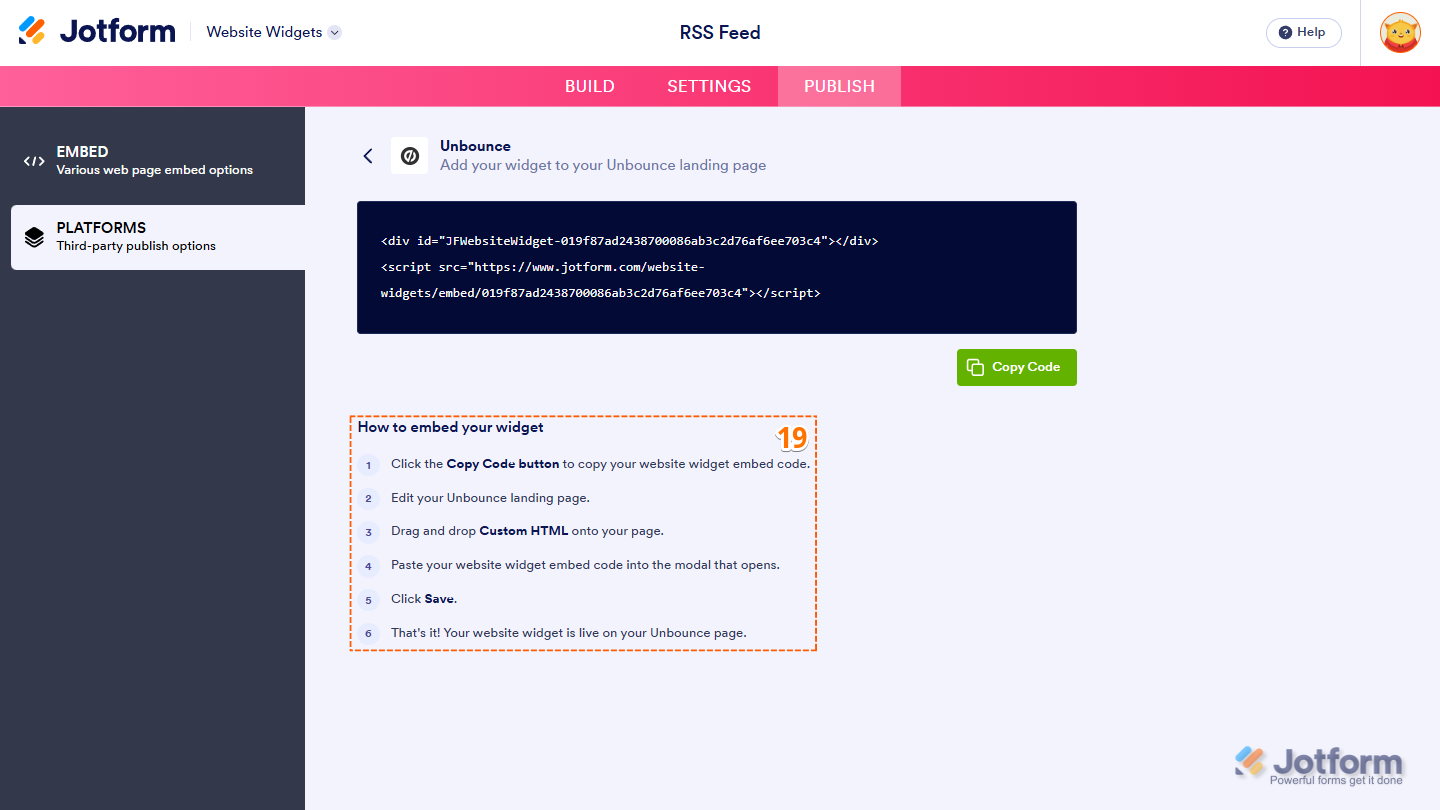
- Then, follow the steps in the How to Embed Your Widget section to add it to your website.
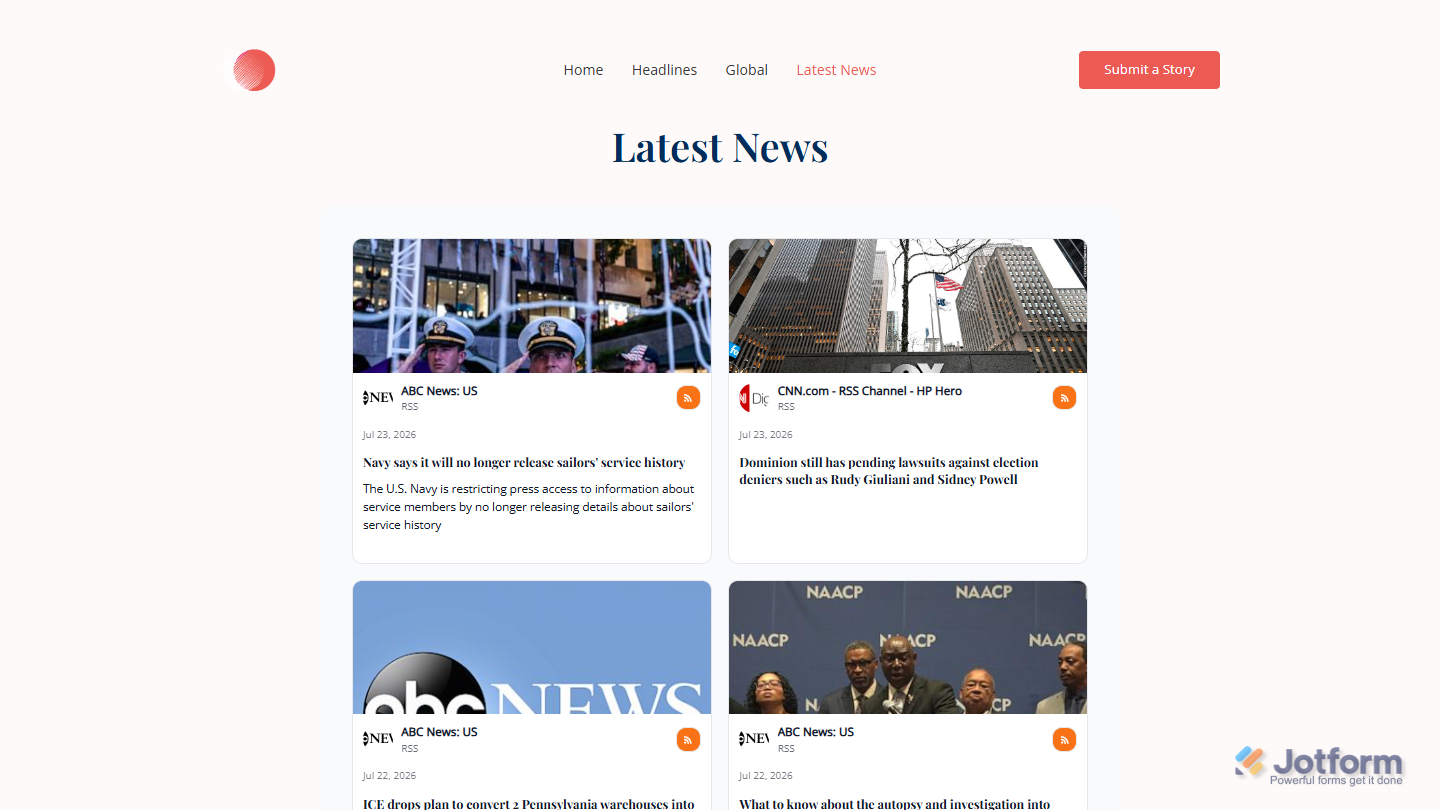
That’s it! Your RSS Feed widget will appear on your website just as you customized it. Take a look at the screenshot below to see how it looks on a website.
Updating Your RSS Feed Widget
You can make changes to the RSS Feed widget at any time to update its content, appearance, or layout. Here’s how:
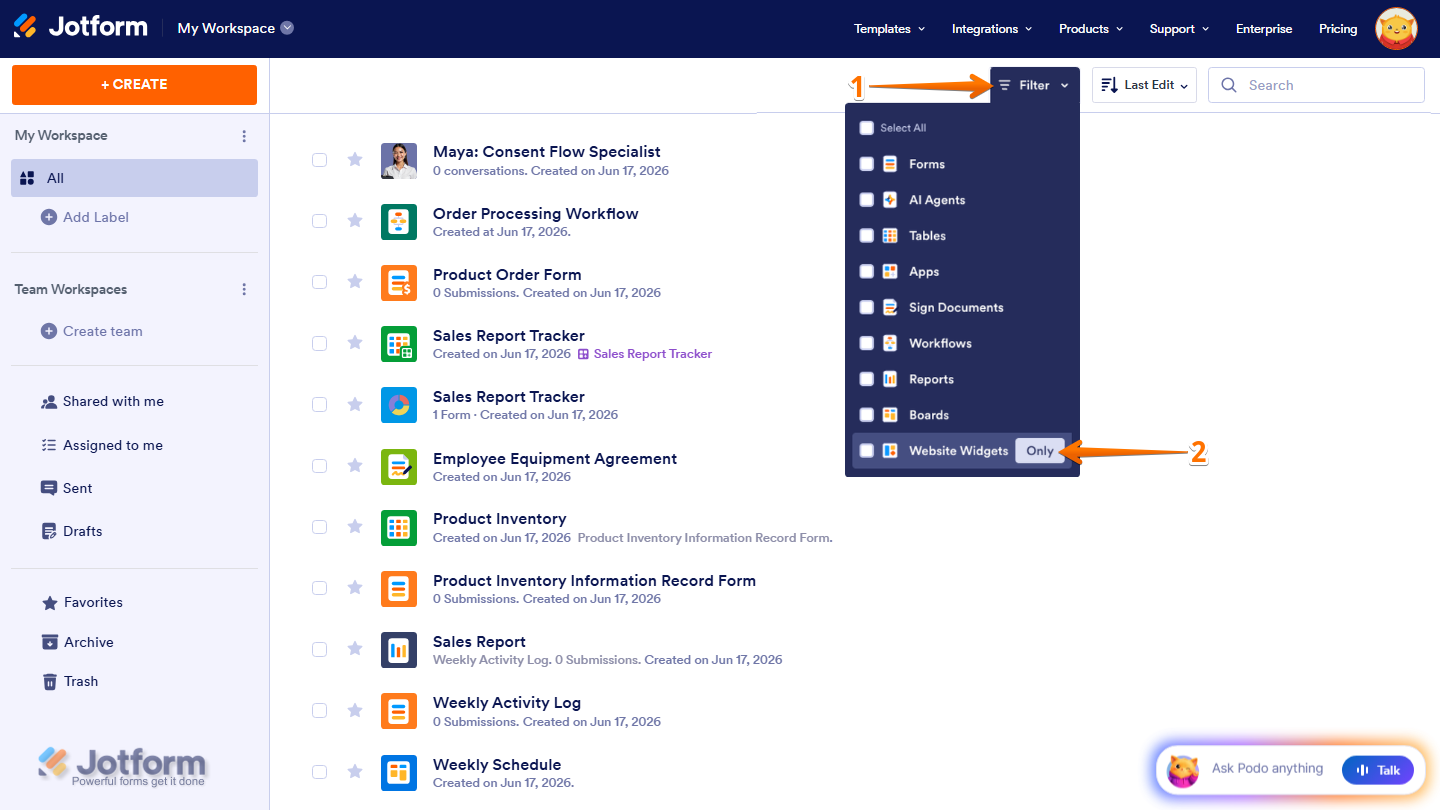
- At the top of your Workspace page, click on Filter.
- Then, in the Dropdown menu that opens, hover your mouse over Website Widgets, and on the right side of it, click on Only.
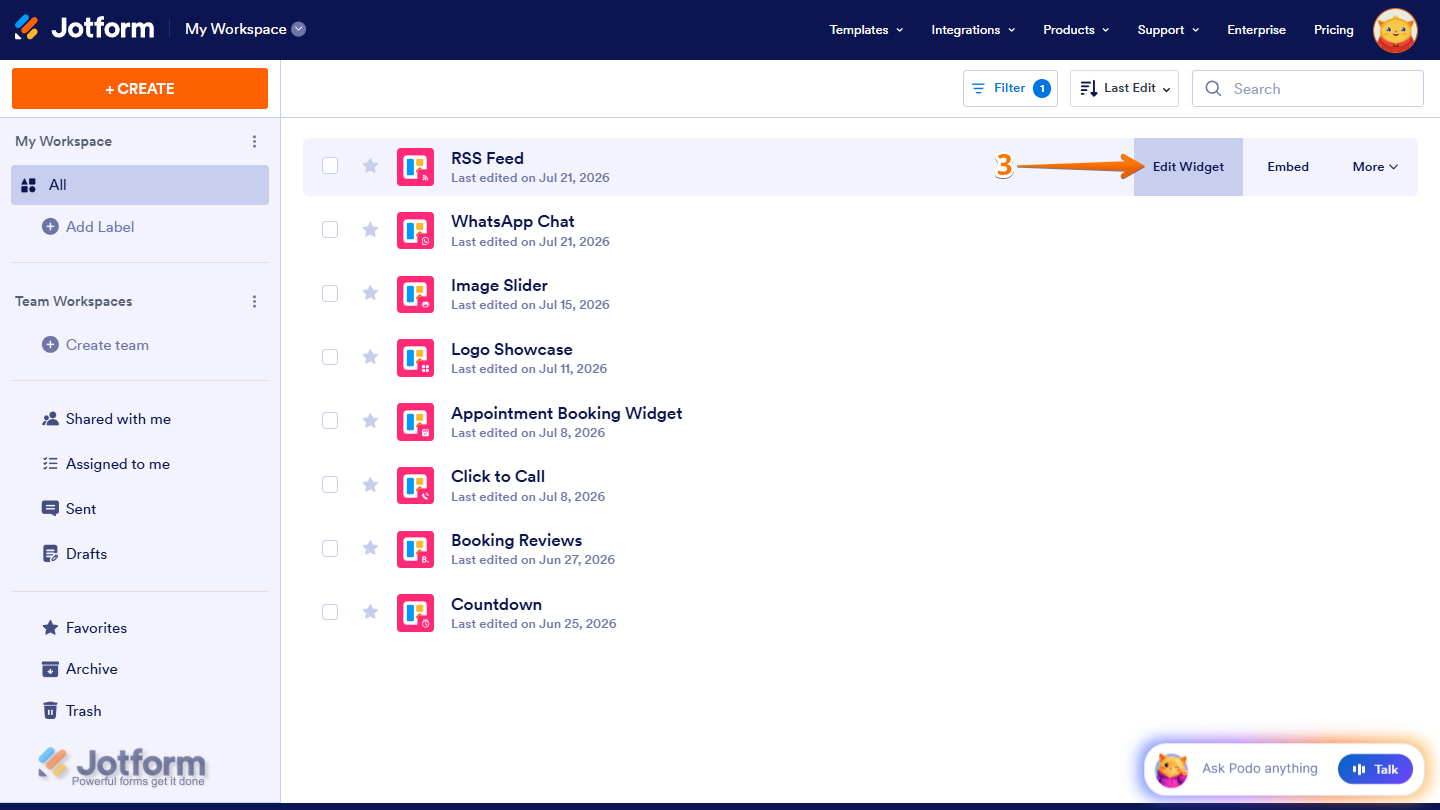
- Next, hover your mouse over the RSS Feed widget you want to update, then click on Edit Widget on the right side of the page.
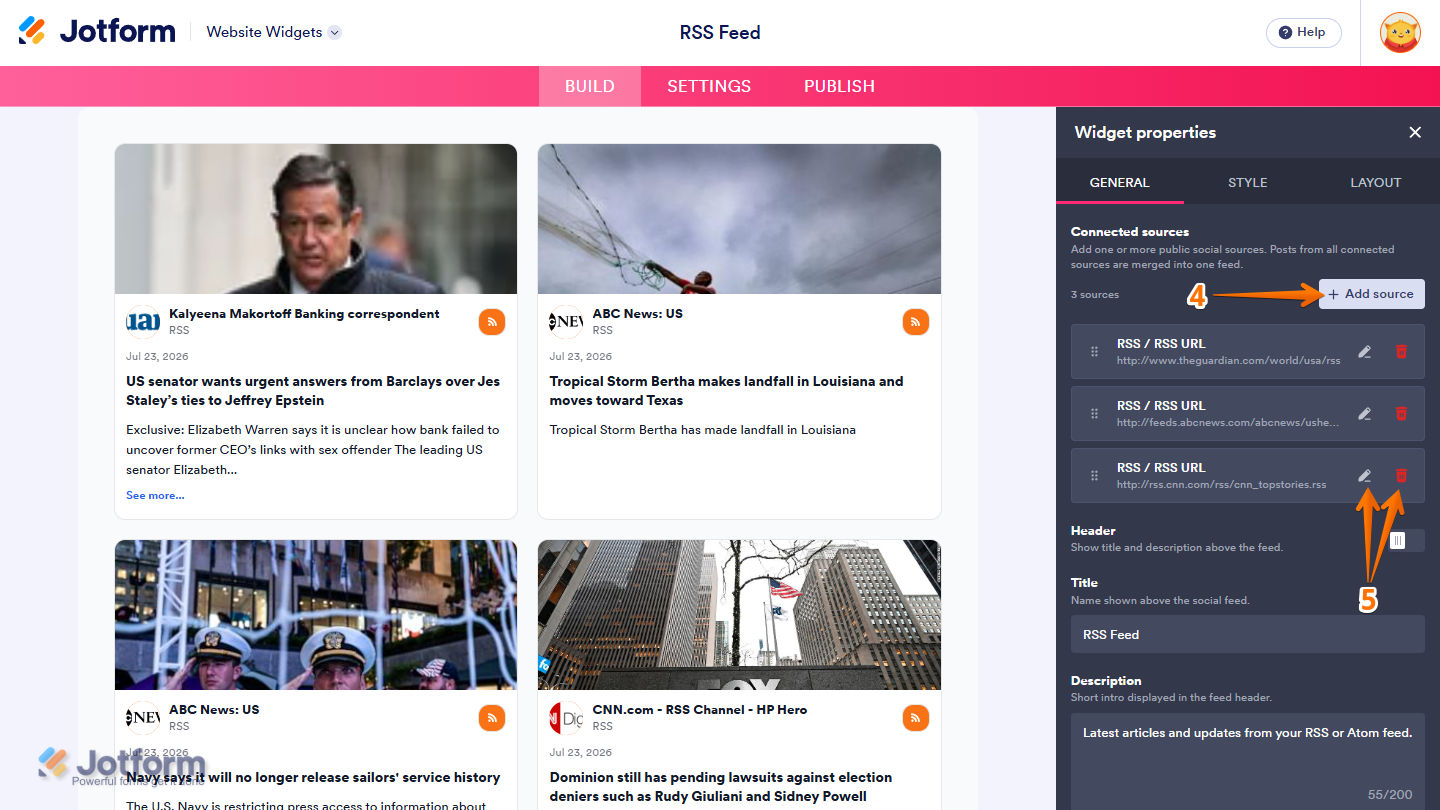
- Now, in the Widget Properties menu that opens on the right side of Website Widgets, under the General tab, click on Add Source to add a new RSS Feed to the widget.
- To manage your RSS Feeds, use the following icons:
- Pencil Icon — Edit the selected RSS source.
- Trash Can Icon — Permanently delete the RSS source.
- To customize how your widget looks and works, go to the Style and Layout tabs.
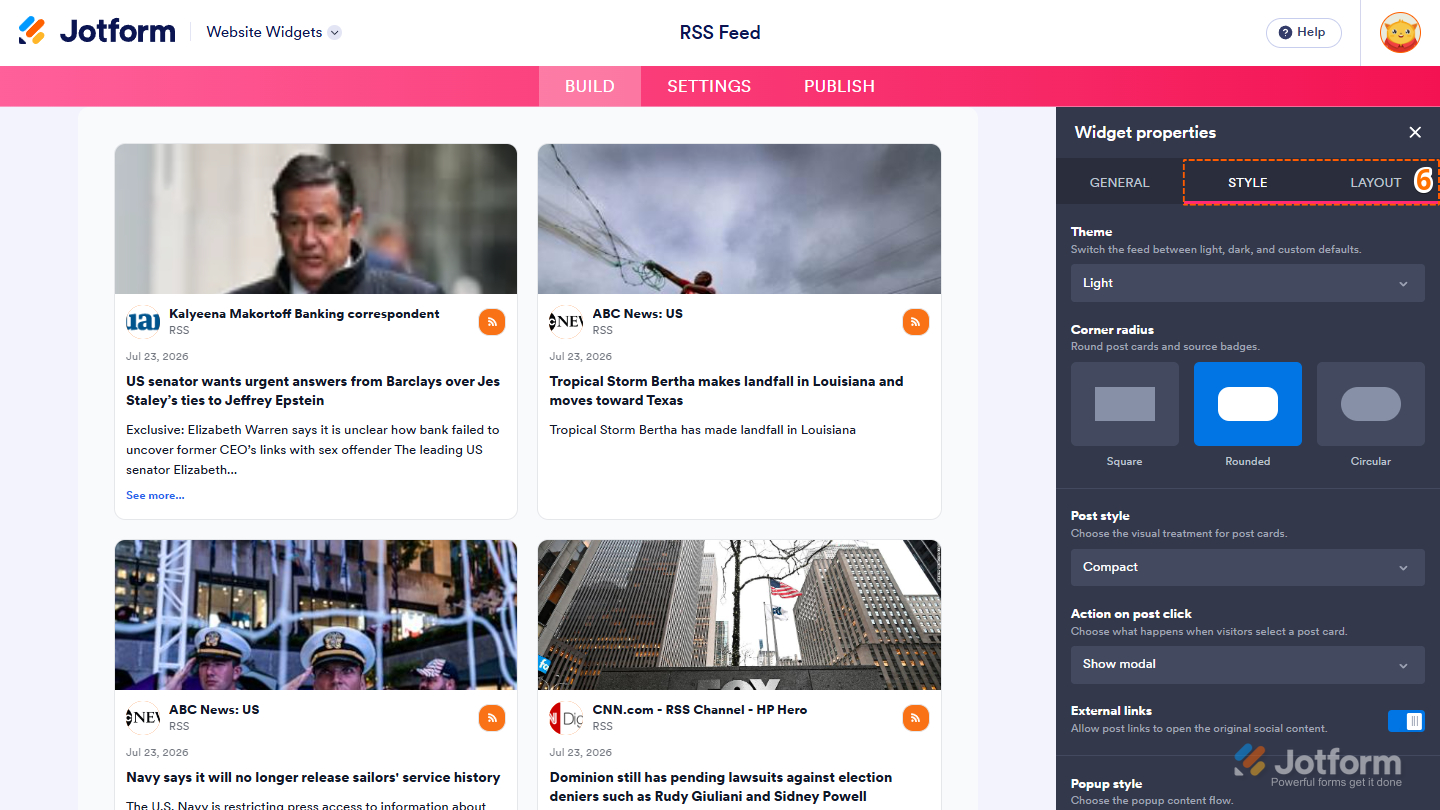
That’s it. You’ve successfully updated your RSS Feed widget.
Note
Any changes you make in the Widget Properties menu are automatically saved and reflected in the RSS Feed widget on your website.


Send Comment: