HubSpot is a leading marketing and CRM platform designed to centralize sales, marketing, and customer service management. With HubSpot Integration, customer information is captured and organized instantly, ensuring your database stays accurate and up to date. Each form submission can automatically create contacts, deals, tickets, or custom records—streamlining lead management, speeding up follow-ups, and helping you focus on building relationships and driving results.
Connecting a HubSpot Account
The first step in setting up the integration is connecting your HubSpot account. Whether you’re creating a new form or updating an existing one, the connection process is quick and simple—here’s how:
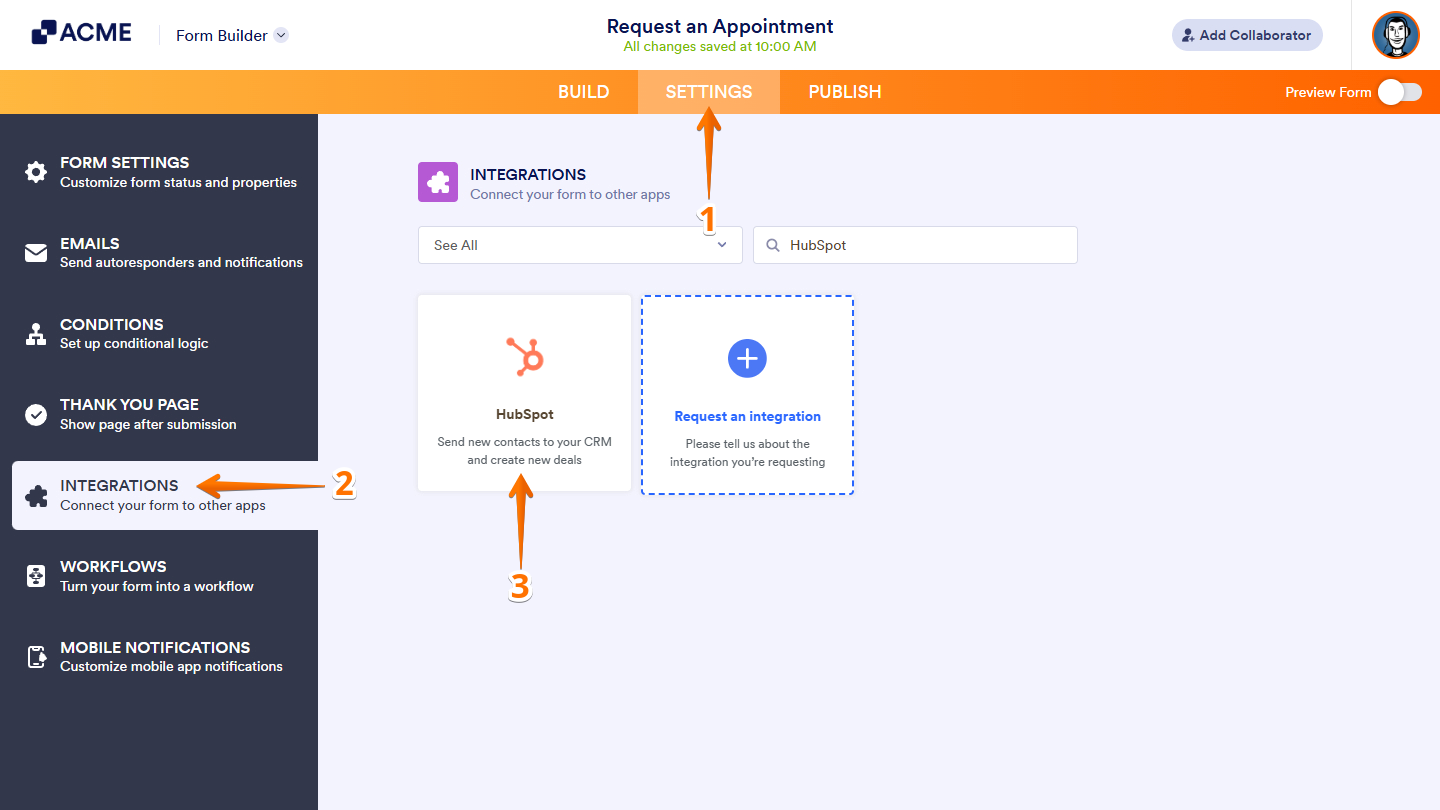
- In Form Builder, in the orange navigation bar at the top of the page, click on Settings.
- In the menu on the left, click on Integrations.
- Then, search for HubSpot and click on it.
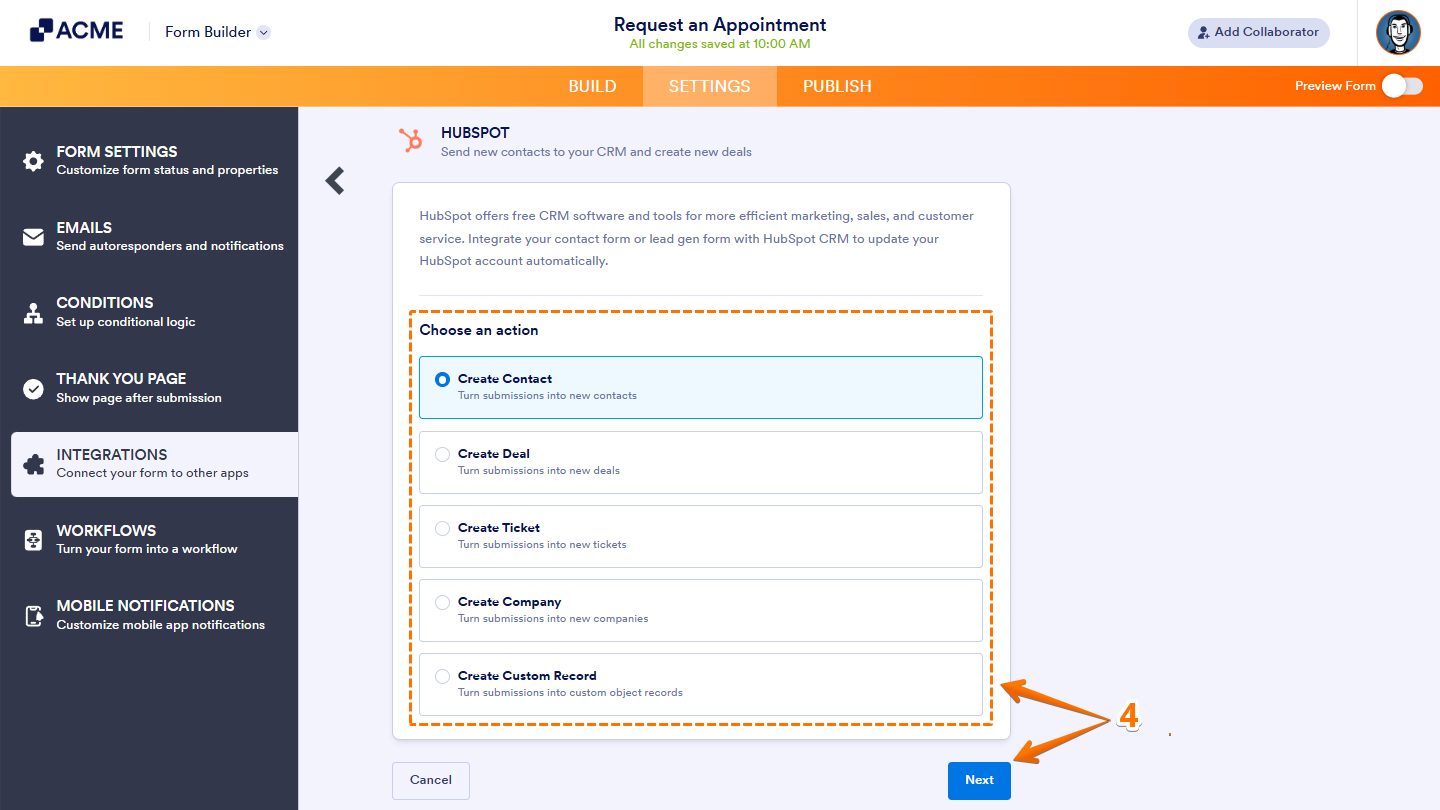
- Now, under the Choose an Action section on the right, select what you want to do, and then click on Next.
- Create Contact — Adds each submission as a new contact record.
- Create Deal — Generates a new deal from each submission.
- Create Ticket — Opens a new support ticket based on the submission.
- Create Company — Creates a new company record from submitted details.
- Create Custom Record — Builds a new custom object record from the submission.
- Next, click on Authenticate and log in with your HubSpot then to grant the necessary permissions required for the integration.
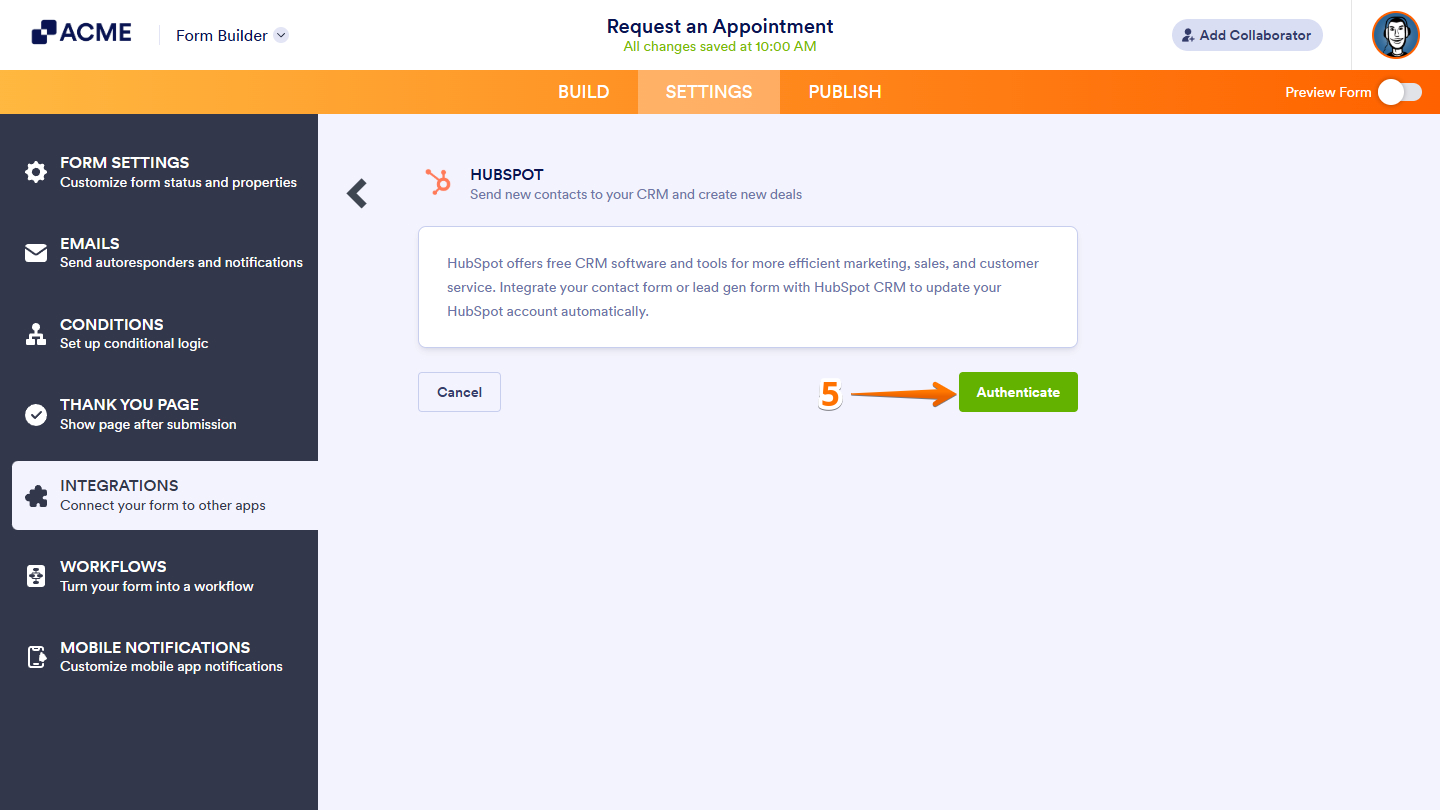
Note: If it’s your first time setting it up for any form in your organization account, you’ll see options to log in to your existing HubSpot account or create a new one if needed.
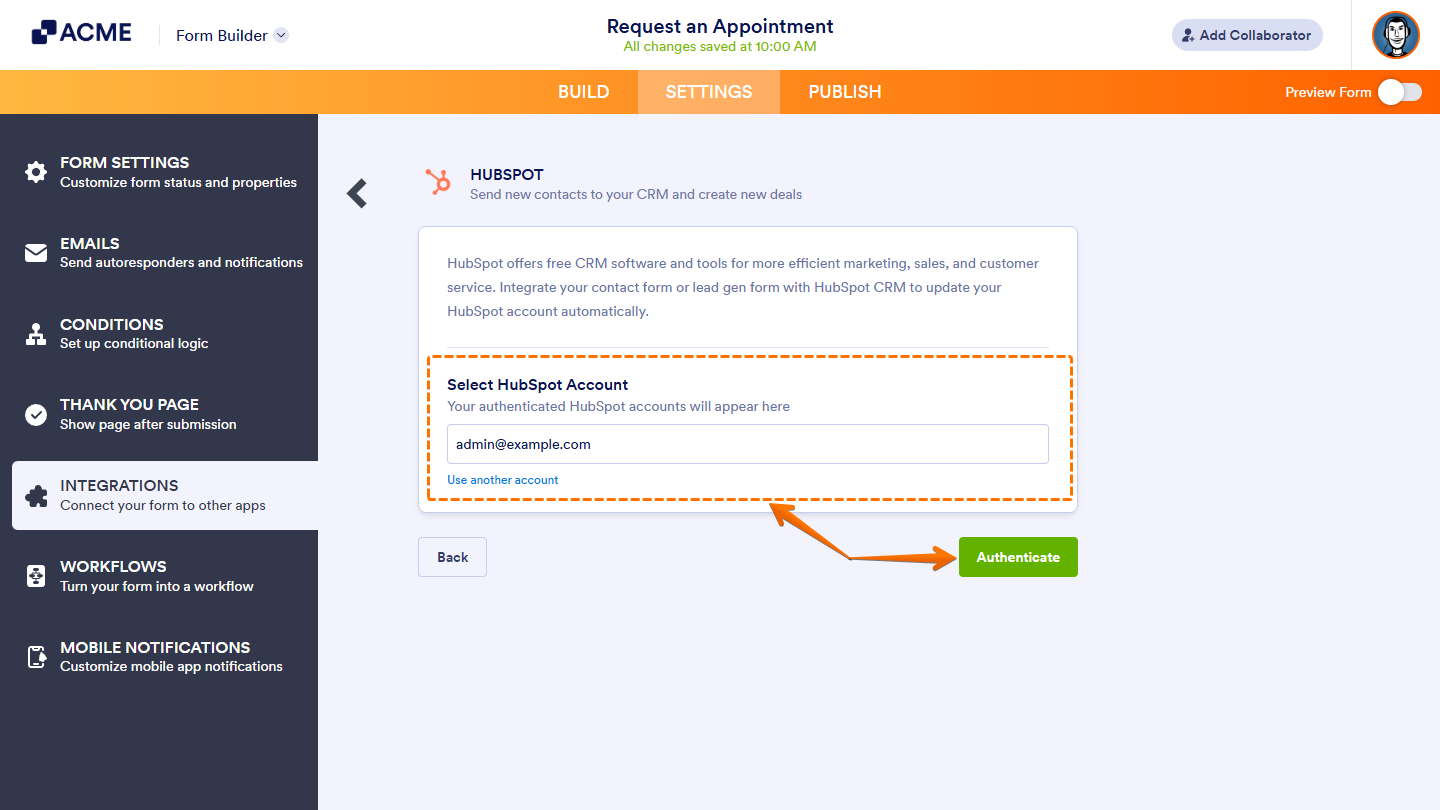
If you’ve logged in before, just pick your HubSpot account from the Dropdown menu and click on Authenticate. To use a different one, click on Use Another Account link.
Setting Up the HubSpot Integration
Once you’ve authenticated or selected your HubSpot account, it will automatically connect to your form, allowing you to complete the setup for your chosen action.
Notes:
- For most actions, you can add more field mappings by clicking + Add Fields, or remove any mapping by clicking the X icon next to it.
- Ensure you click the Save button at the bottom of the HubSpot integration settings to apply any changes or save your new action.
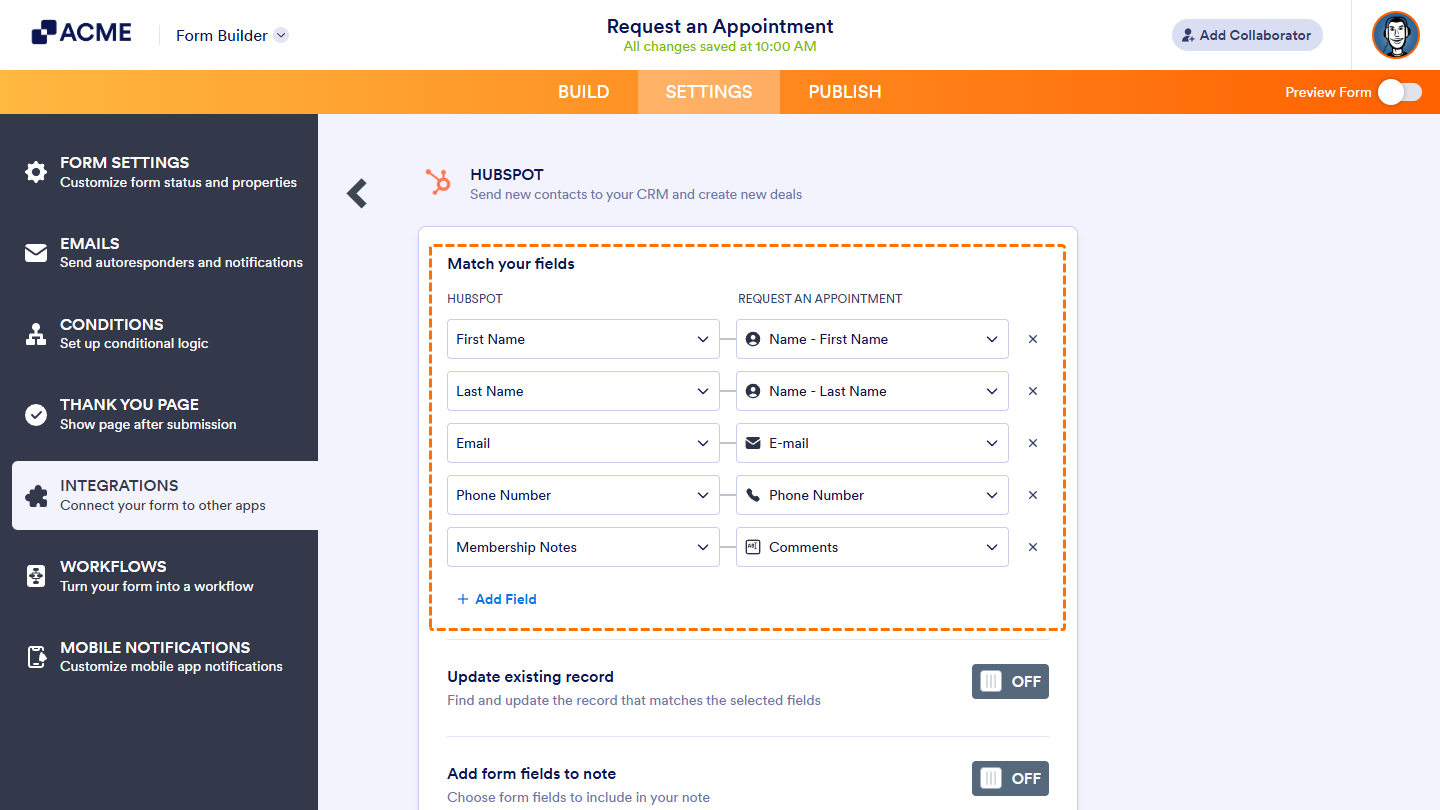
Create Contact
If you selected the Create Contact action, you can map your form fields to the corresponding Contact fields in HubSpot. This ensures that data submitted through your form is automatically captured and converted into new contact records within your CRM.
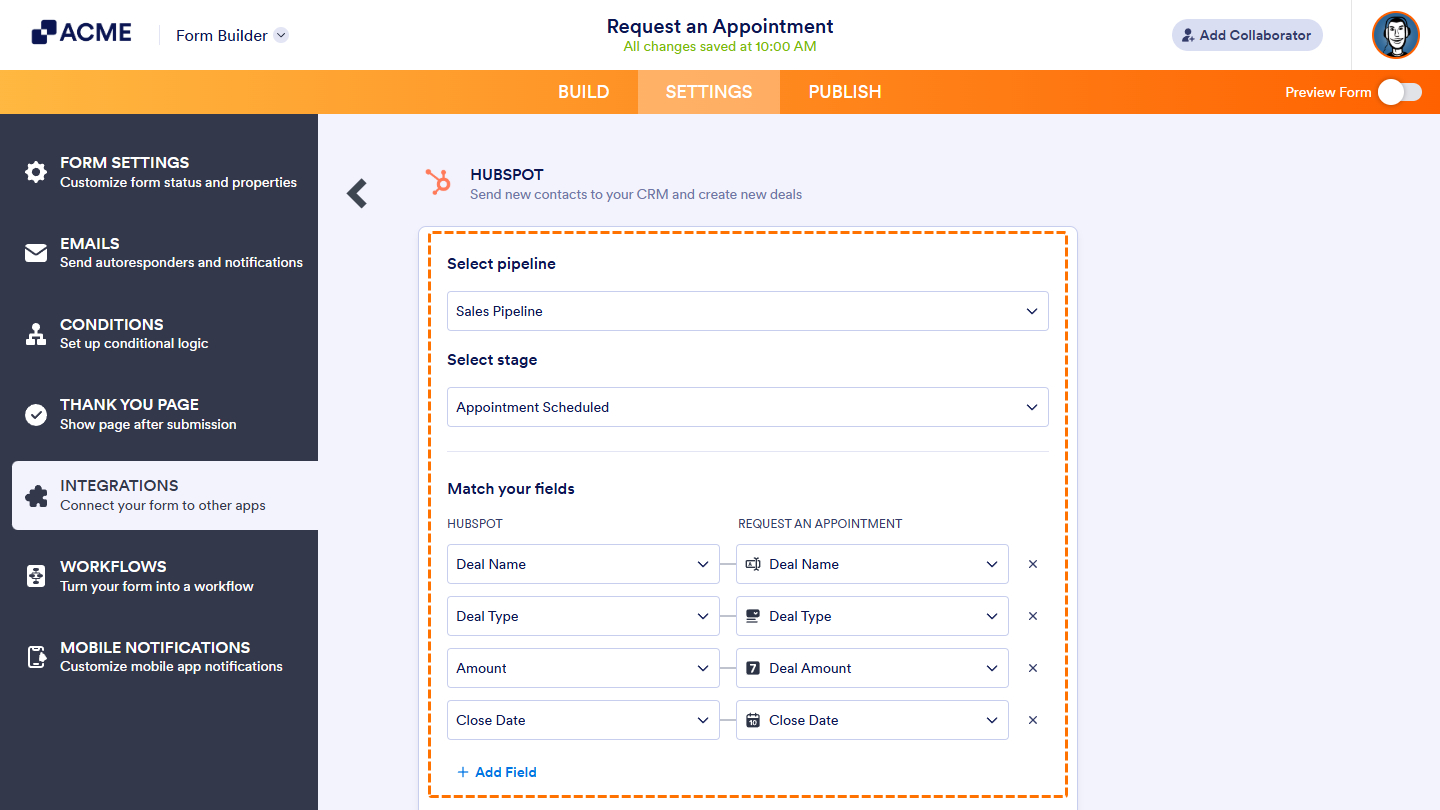
Create Deal
If you select the Create Deal action, you’ll configure the integration to determine which Deal Pipeline in your account new deals from form submissions should be added to. You’ll also choose the starting stage for those deals within the selected pipeline. After that, you can map your form fields to the corresponding Deal fields in HubSpot. This setup automatically generates new deals in your CRM based on the submitted form data.
Create Ticket
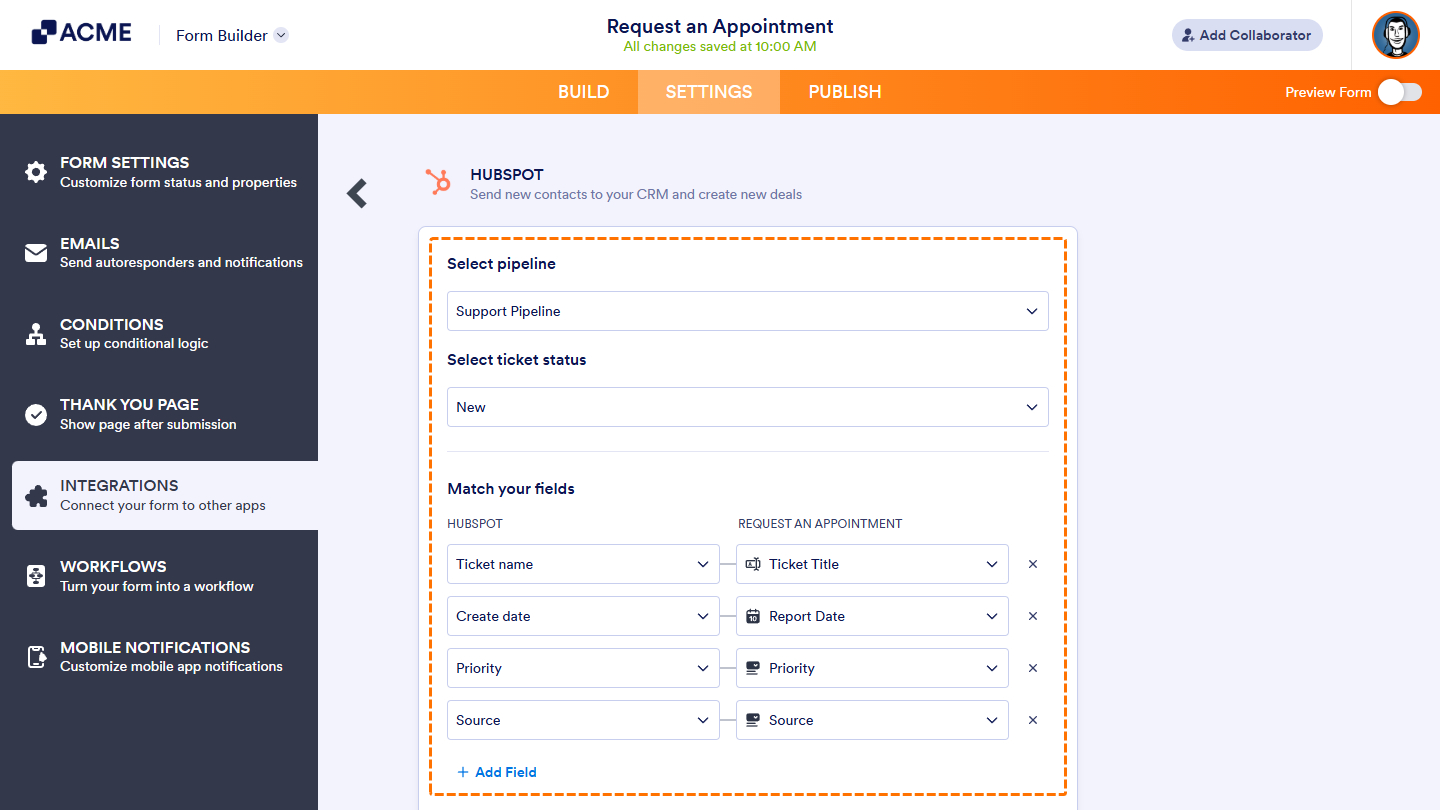
Similar to setting up the Create Deal action, selecting Create Ticket involves configuring the integration to determine which Ticket Pipeline in your account will handle tickets generated from form submissions. You’ll also define the initial status for those tickets within the selected pipeline. Once configured, you can map your form fields to the corresponding Ticket fields in HubSpot, automatically creating new tickets in your CRM based on the submitted form data.
Create Company
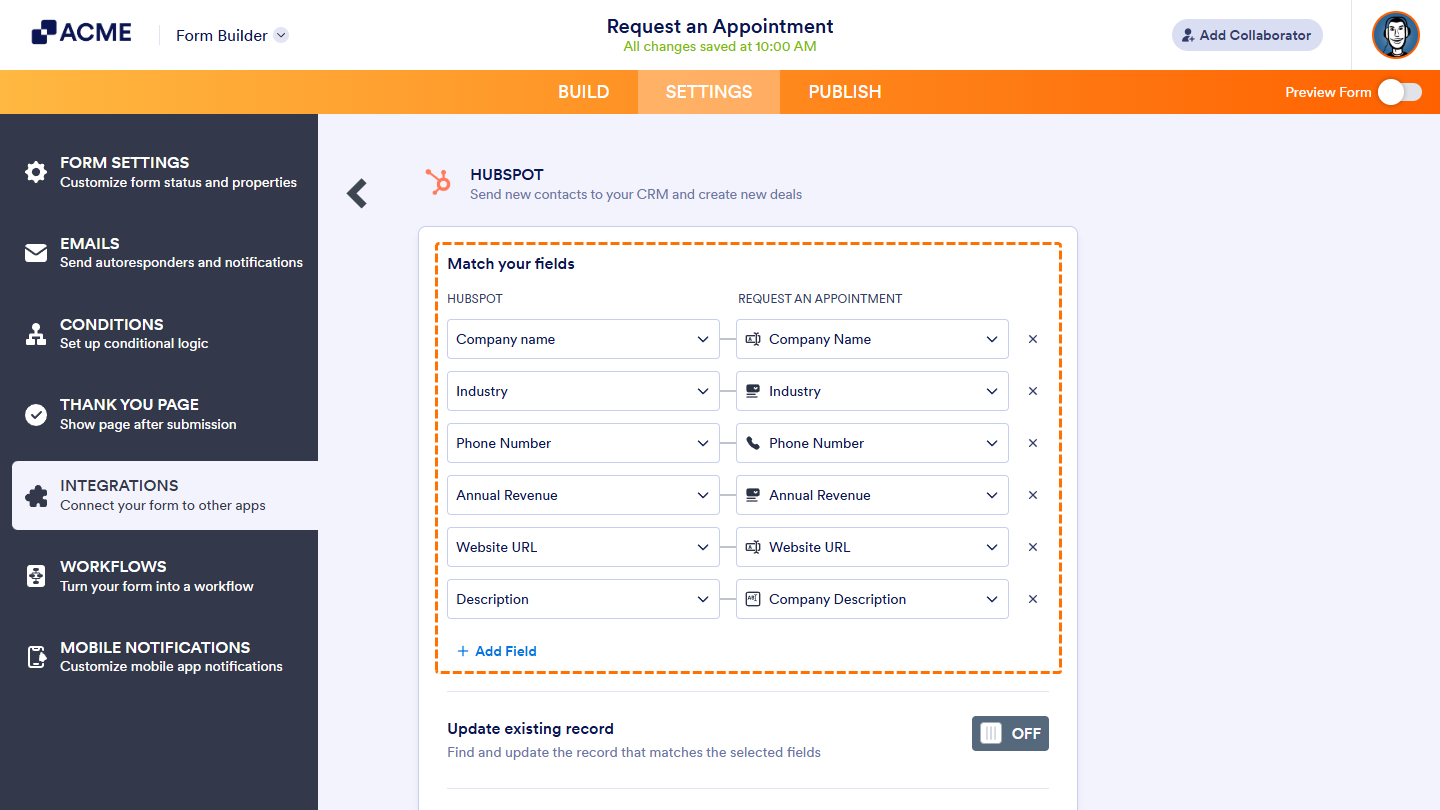
Similar to setting up the Create Contact action, if you select Create Company, you can map your form fields to the corresponding Company fields in HubSpot. This ensures that data submitted through your form is automatically converted into new company records in your CRM.
Create Custom Record
If you select the Create Custom Record action, you can choose from the custom objects you’ve created in HubSpot within the integration settings and map their fields to those in your form. This configuration automatically converts submitted form data into new records under the selected custom object in your CRM.

Configuring Other Integration Settings
You can further customize your integration with options that allow you to update existing records, attach notes, and send files to HubSpot directly from form submissions.
Updating Existing Record
Enable this setting to allow the integration to search your HubSpot CRM for a record that matches the submitted form data. If a match is found, the existing record will be updated; if not, a new record will be created automatically.
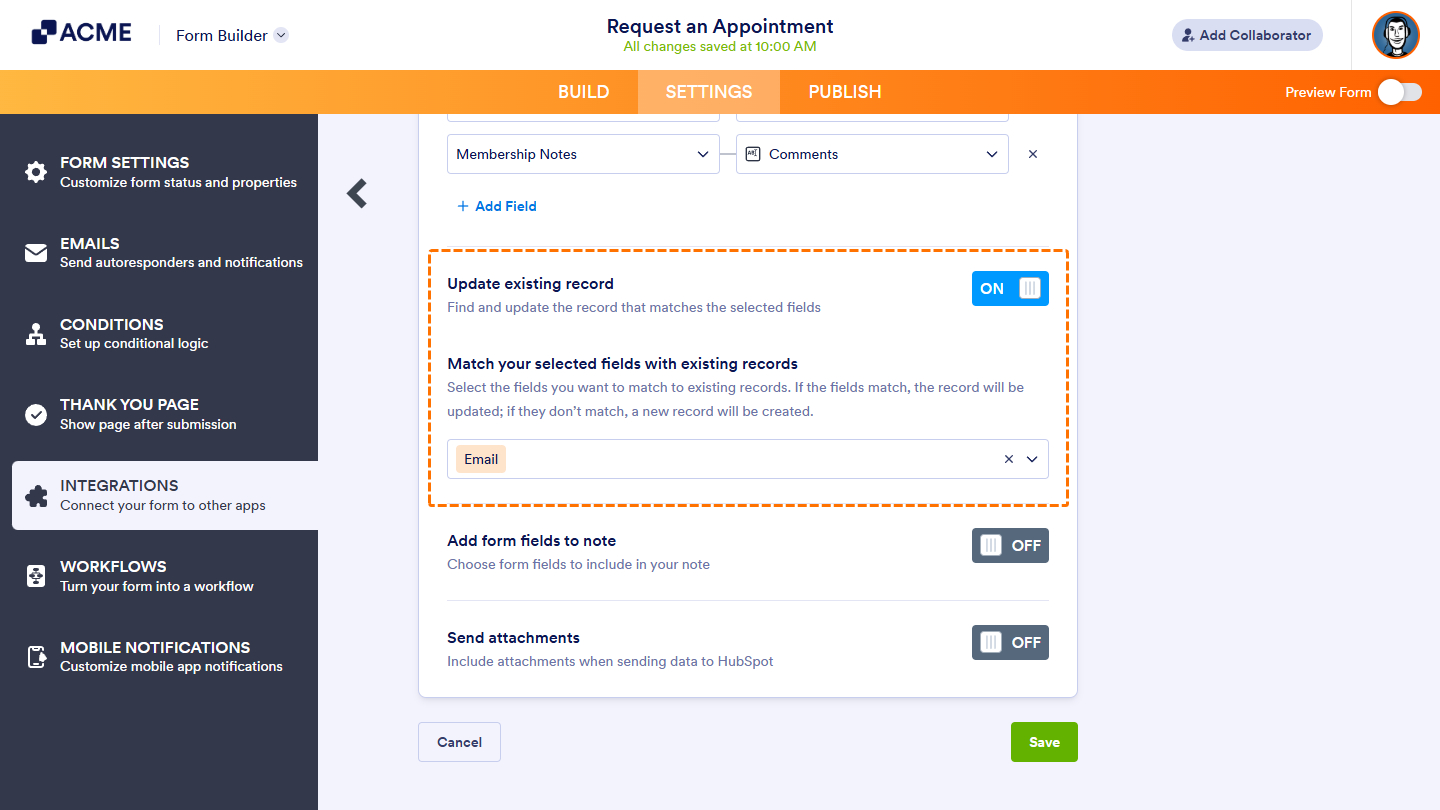
Pro Tip: Set up the Update existing record option in your integration to automatically send updates from edited submissions on your form to your integrated HubSpot CRM account.
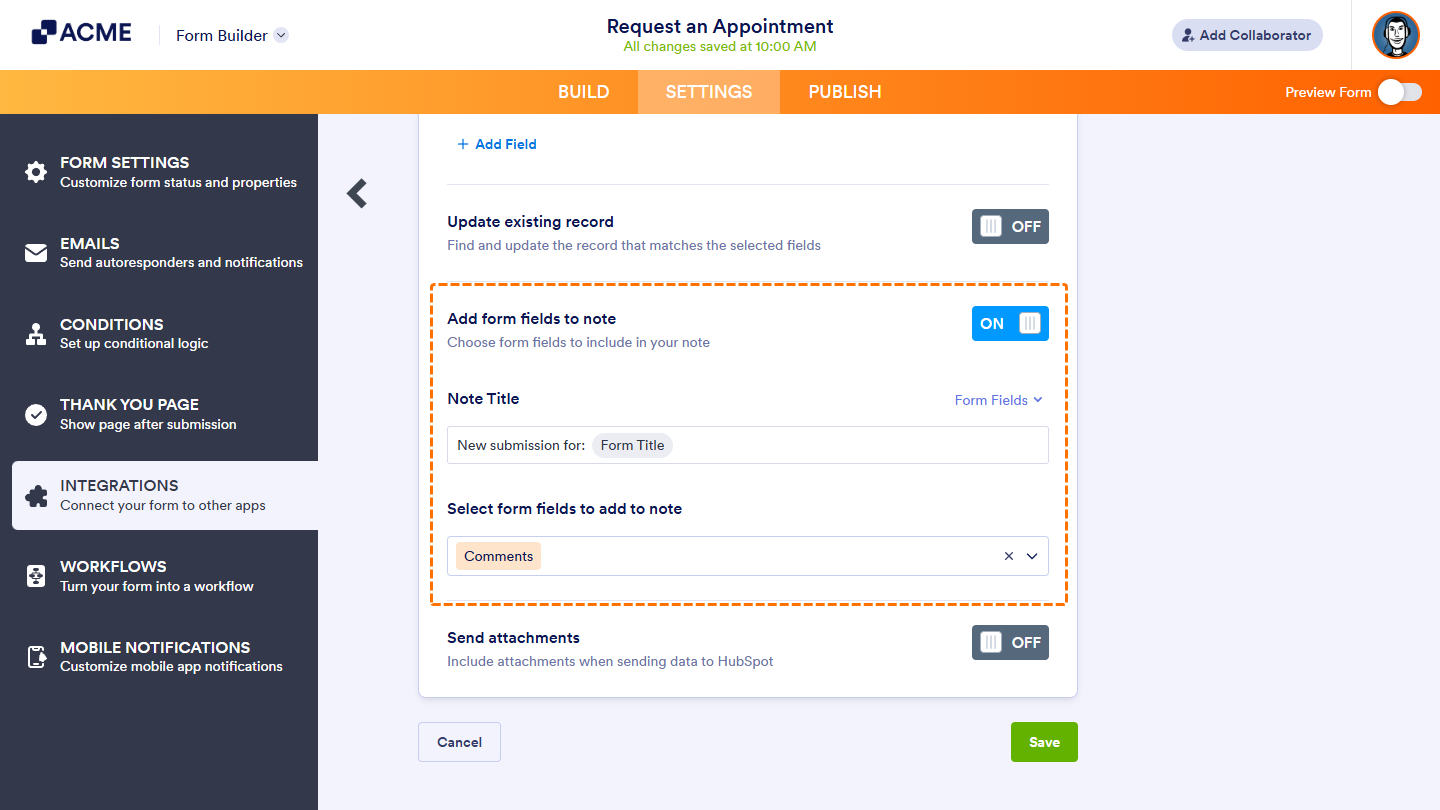
Add Form Fields to Note
Enable this setting to let your integration automatically add notes to records created from form submissions in HubSpot CRM. You can customize the note title using text and form fields, then choose which field will generate the note. The note will be attached to the record in HubSpot when the form is submitted.
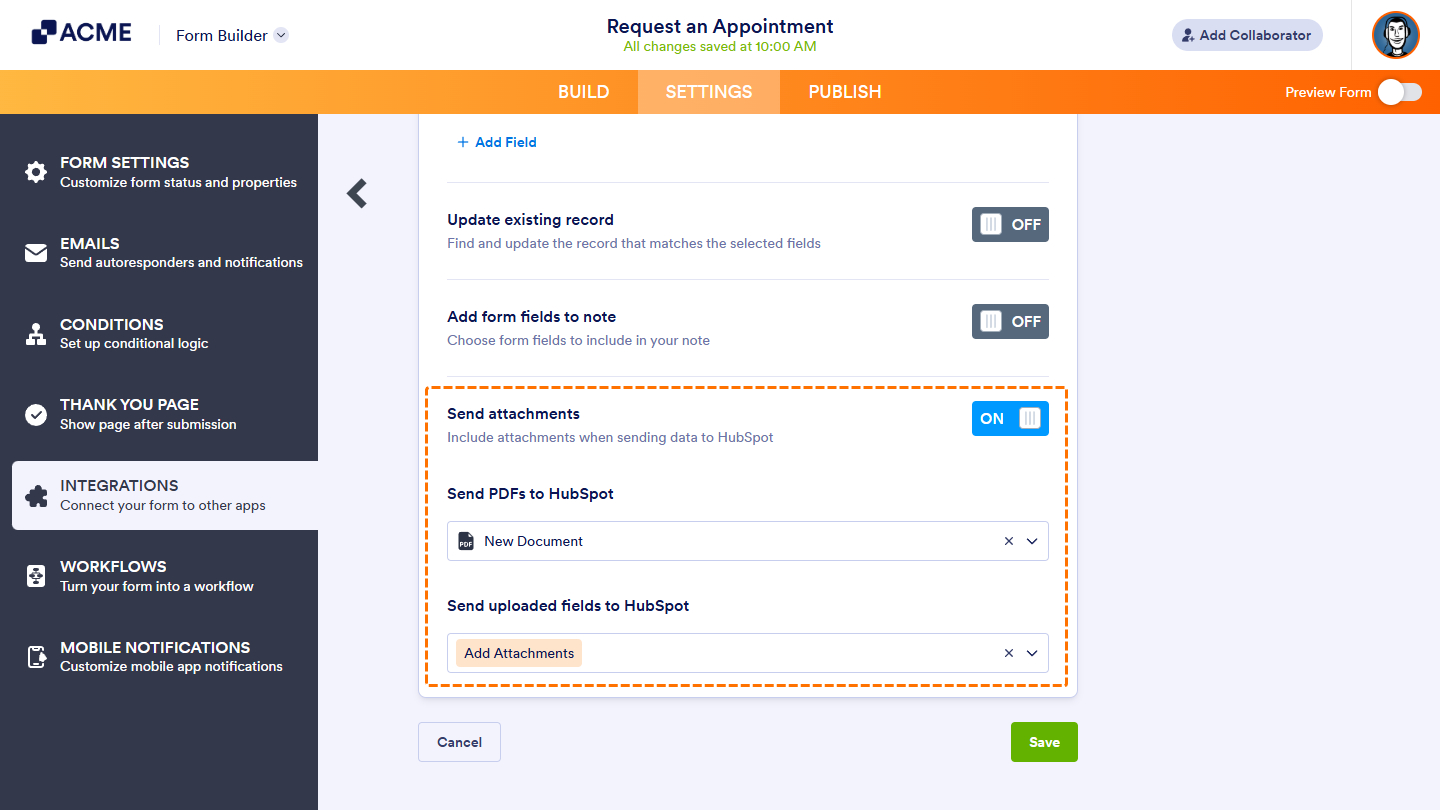
Send Attachments
This setting allows you to attach a PDF copy of the submission, along with any uploaded files, to the associated records in HubSpot. You can select which PDF document and file upload fields to include.
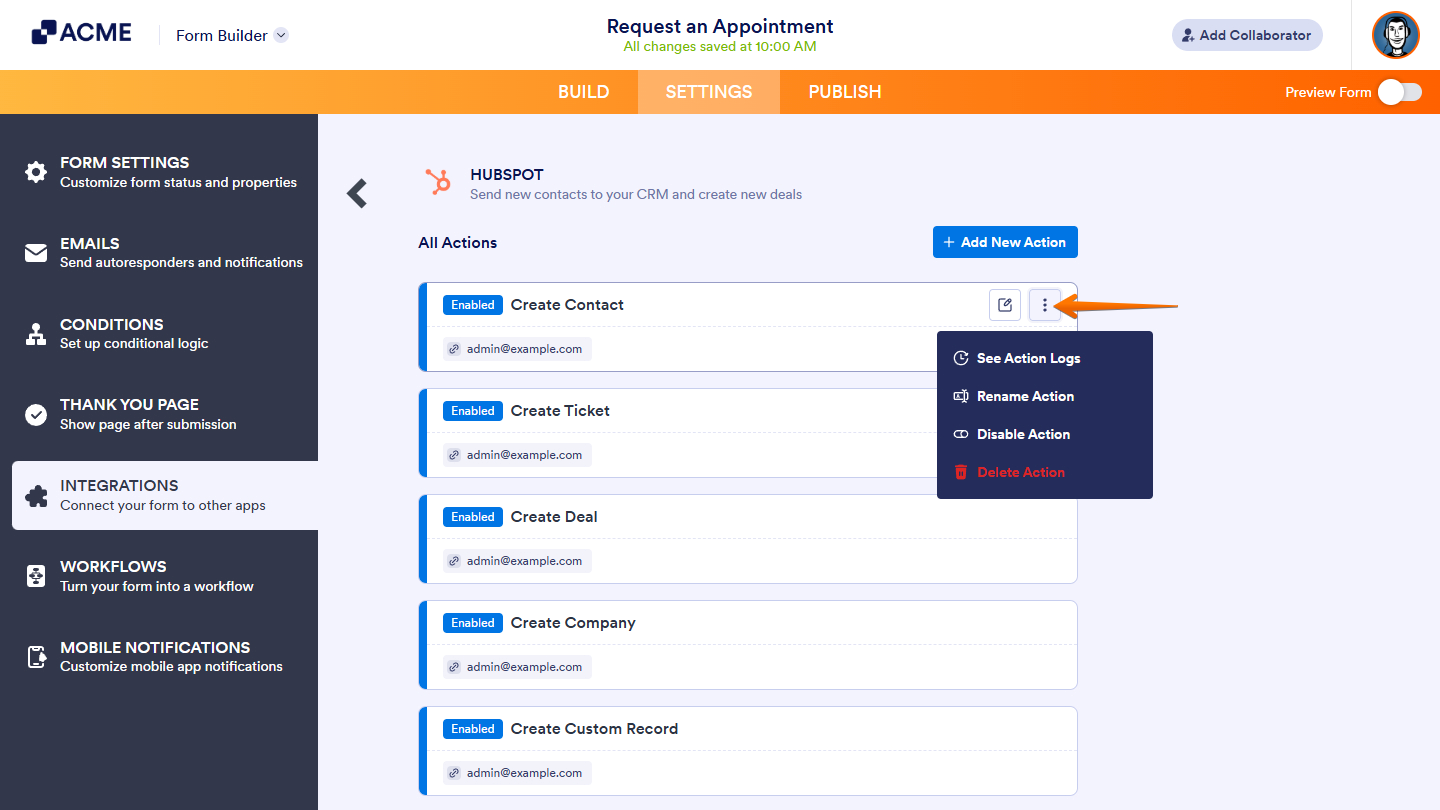
Managing HubSpot Integration Actions
After saving the integration, you’ll see a list of the HubSpot actions you’ve set up and the Add New Action button on the main page. Hover your mouse over an action and click on the Pencil icon to edit it or the Three Dots icon to access these options:
- See Action Logs — View successful and failed runs, helpful for troubleshooting.
- Rename Action — Change the action’s title.
- Disable Action — Temporarily stop the integration from sending data.
- Delete Action — Remove the action from your form.

Send Comment: