Jotform’s Podcast Player widget lets you add a fully functional podcast player to your website, allowing visitors to listen to your episodes without leaving the page. It’s a simple way to showcase your podcast, encourage longer engagement, and make your content easier to access across all devices.
Whether you’re promoting a business podcast, sharing educational content, or growing your audience, the widget creates a smoother listening experience while keeping visitors on your site.
Setting Up Your Podcast Player Widget
Setting up a Podcast Player for your website only takes a few steps. Here’s how to get started:
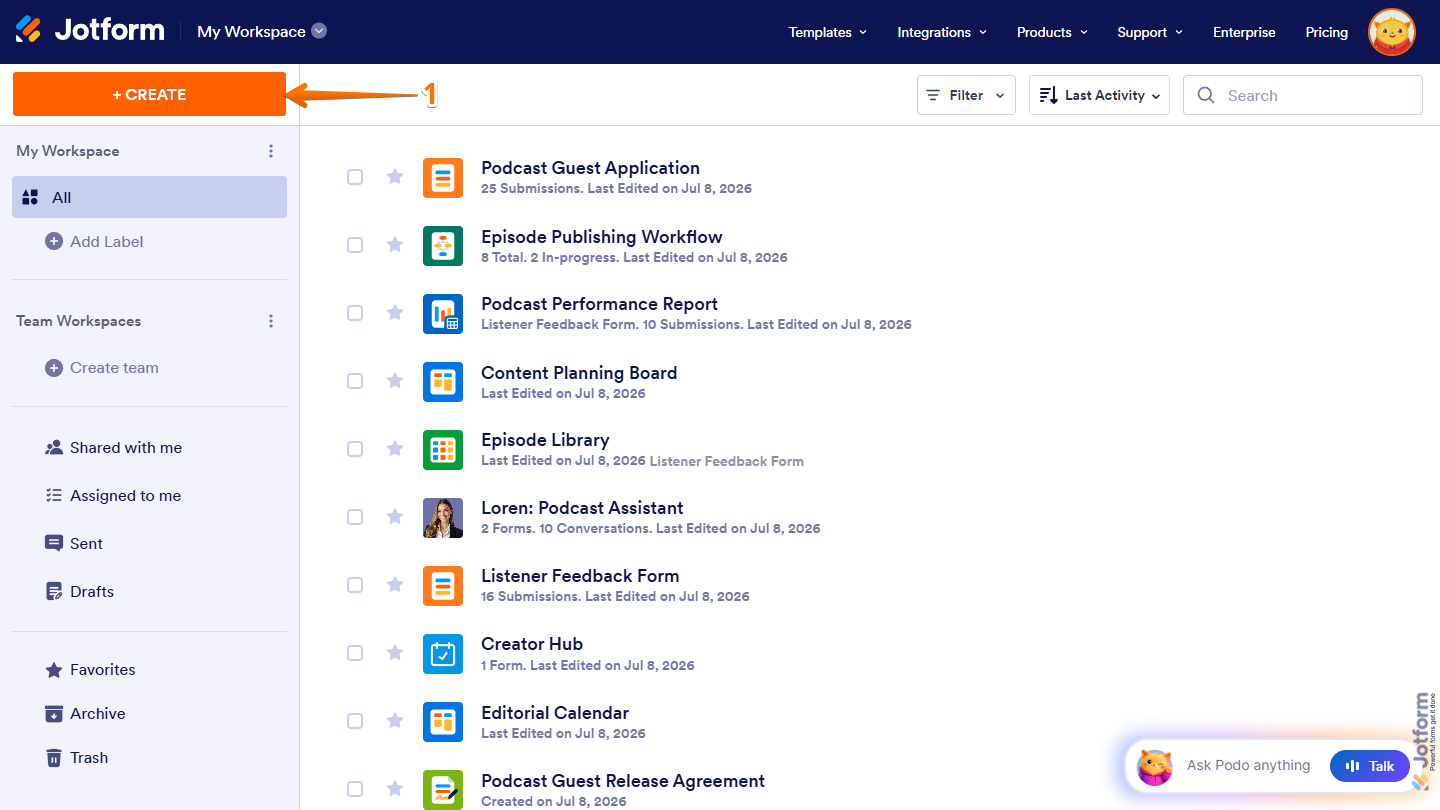
- On the top-left side of your Workspace page, click on Create.
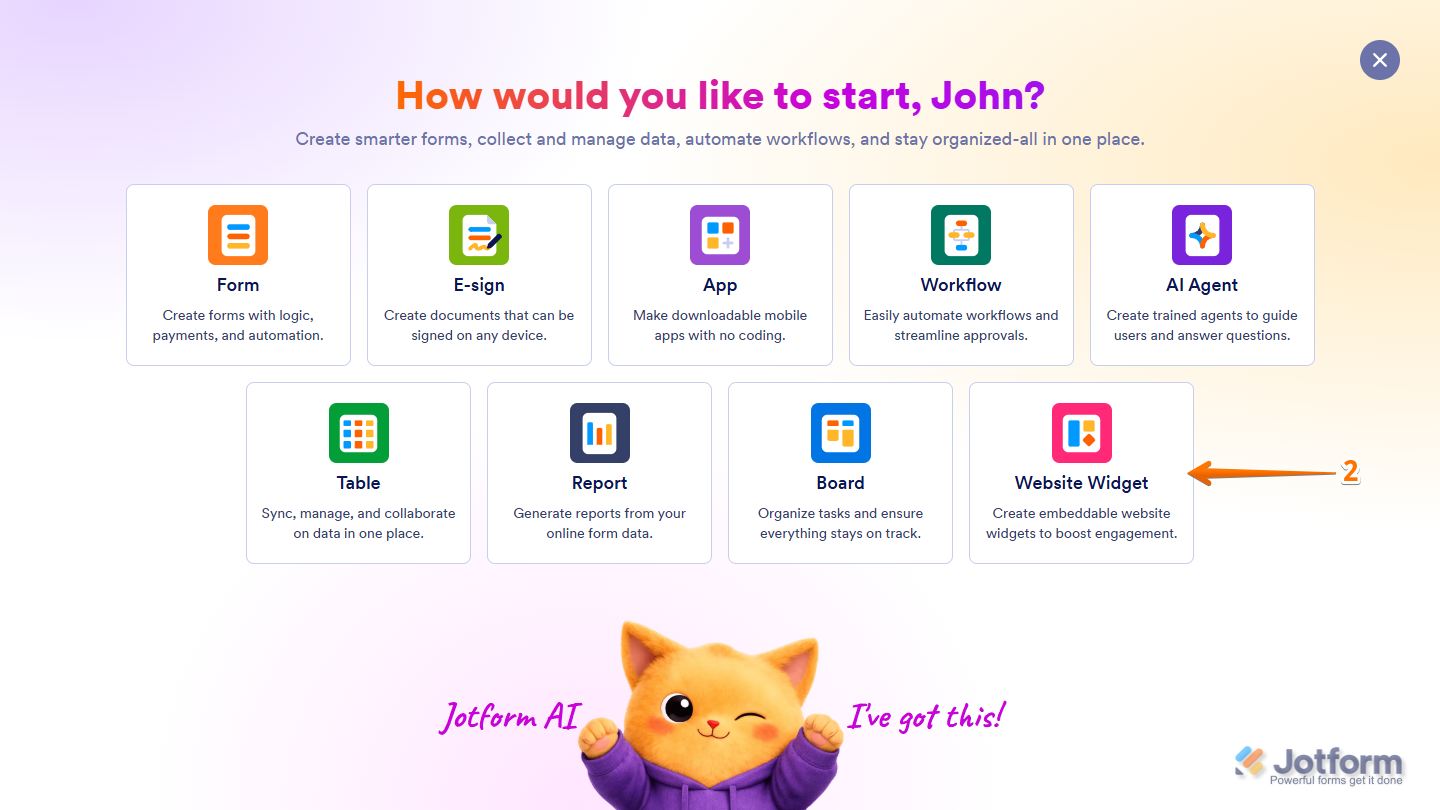
- Then, in the menu that opens up, select Website Widget.
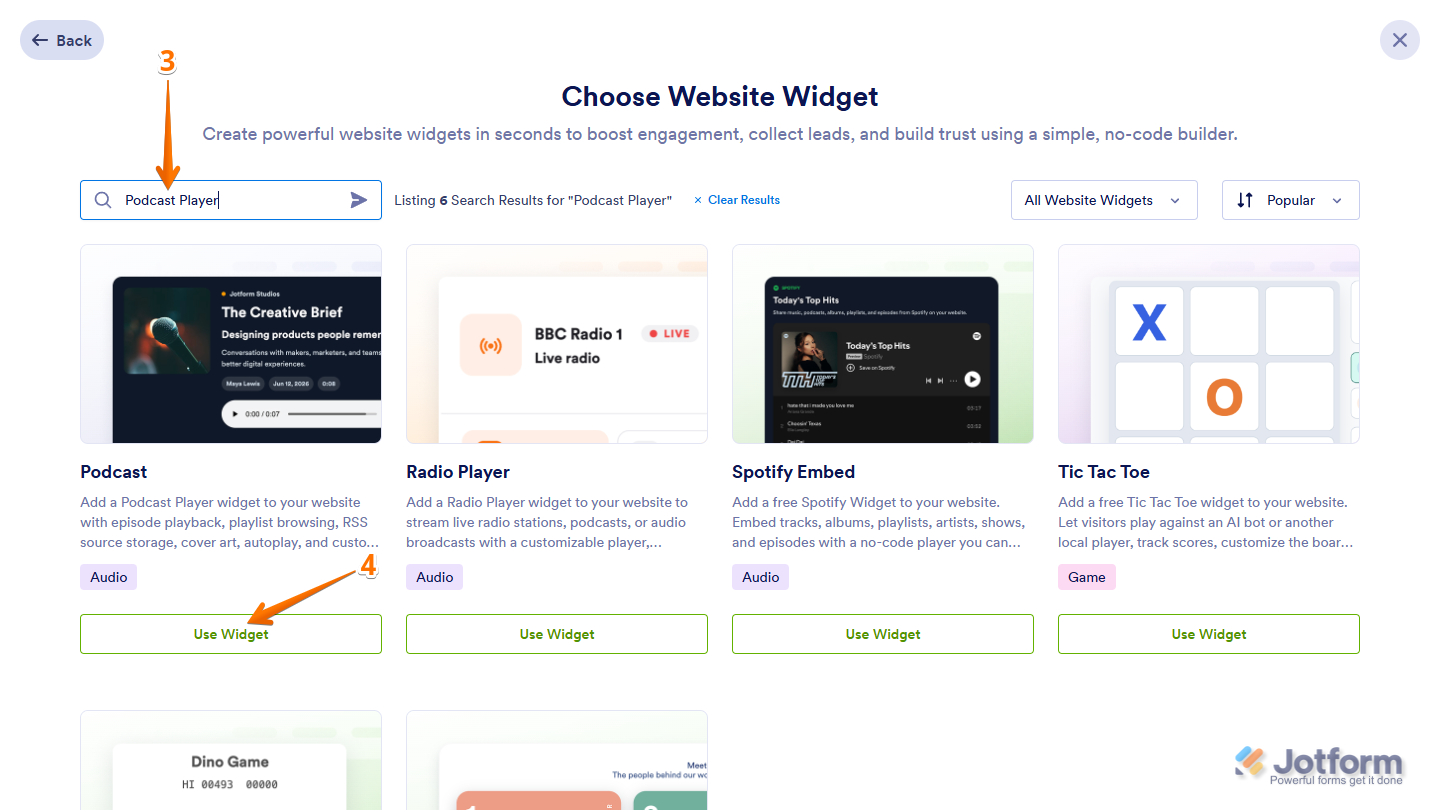
- Next, in the Search bar in the upper-left corner of the Choose Website Widget menu, enter Podcast Player.
- Then, at the bottom of the search results, click on Use Widget.
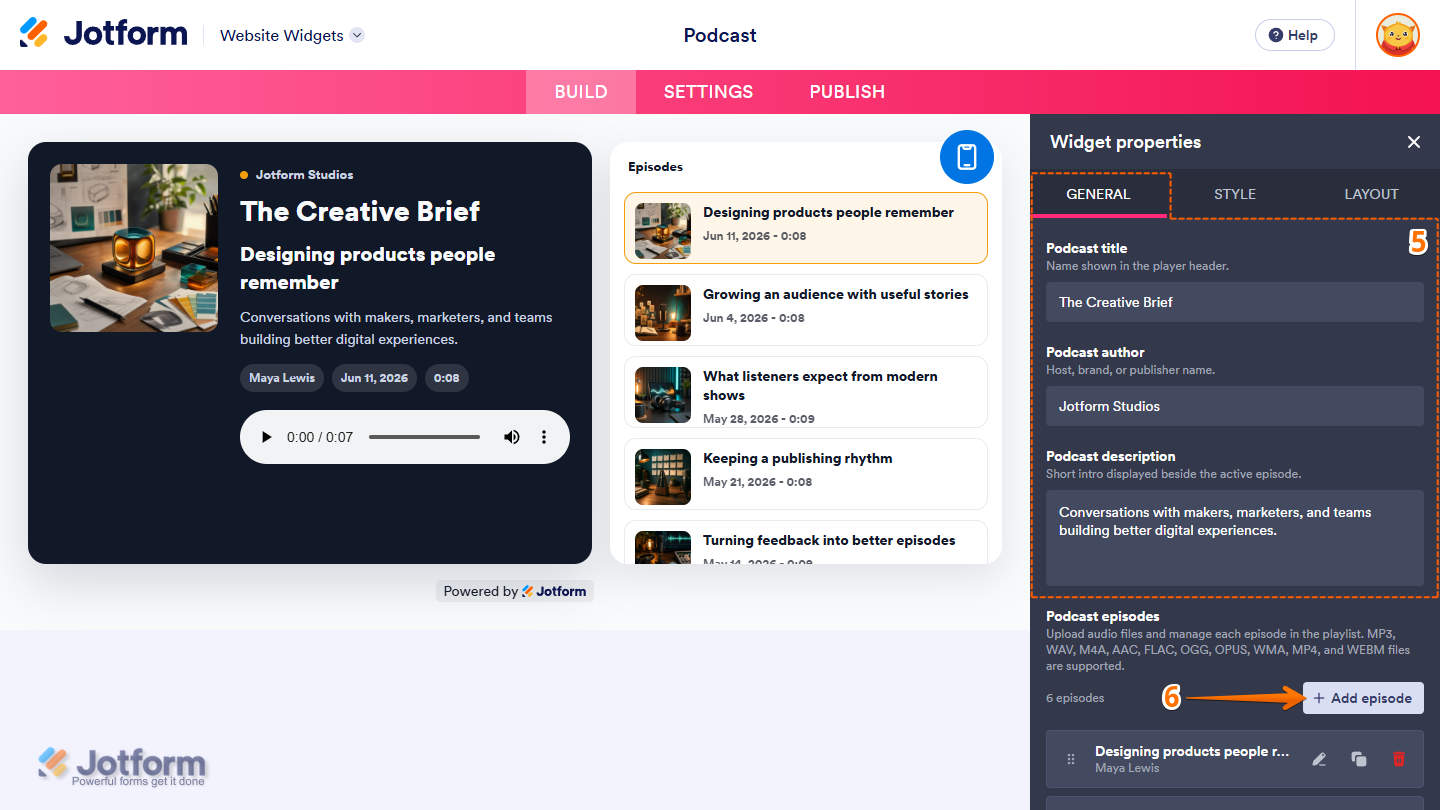
- Now, in the Widget Properties menu that opens on the right side of Website Widgets, under the General tab, set up these properties:
- Podcast Title — Delete the existing title in the input box and enter the name you want to display in the player header.
- Podcast Author — Delete the existing name in the input box and enter the host, brand, or publisher name you want to display in the player.
- Podcast Description — Delete the existing description in the input box and enter a short introduction to display beside the active episode.
- Next, on the right side of Podcast Episodes, click on Add Episode.
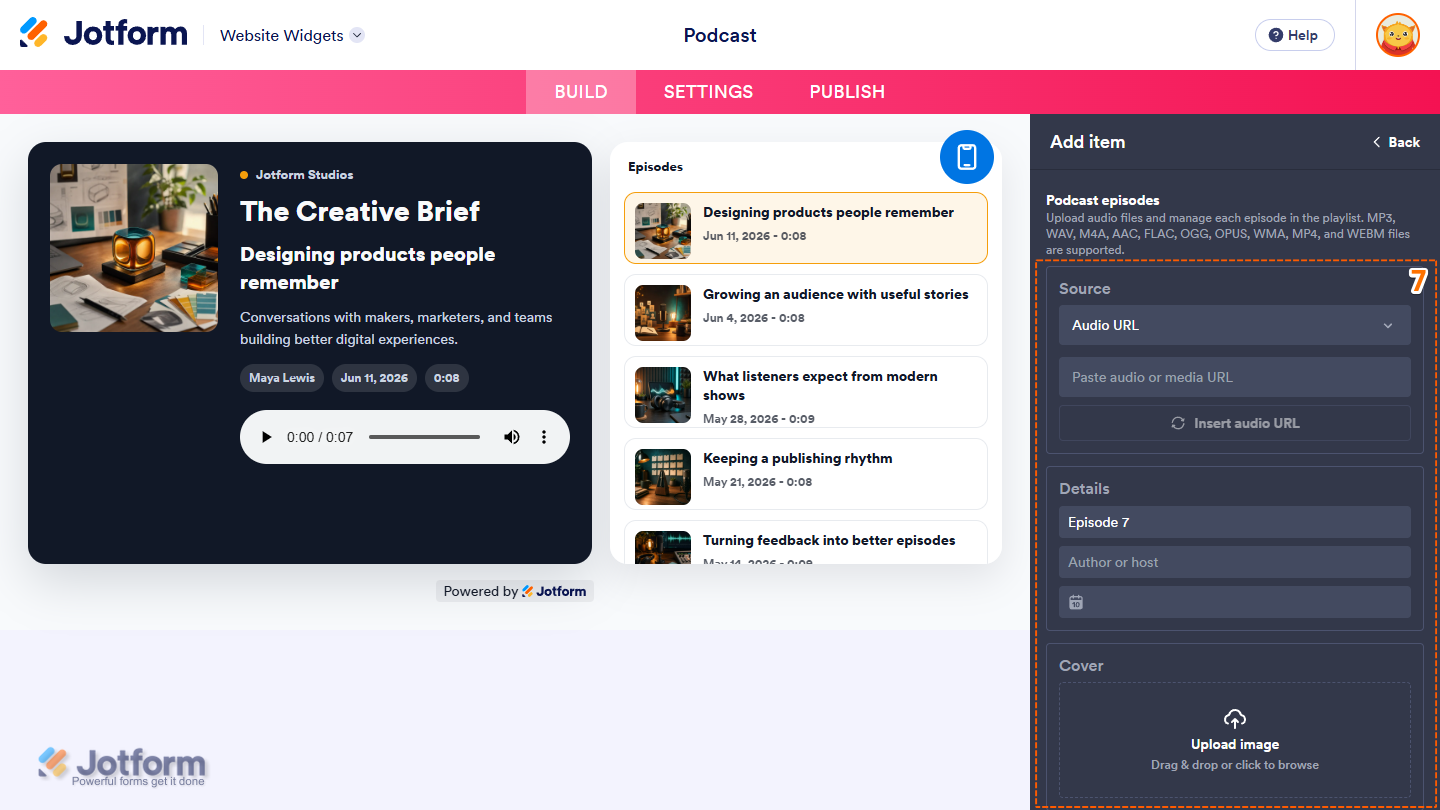
- Then, in the Add Item menu that opens, complete the settings in the following sections:
- Source — Click on the Dropdown menu and select how you want to add the audio for your episode:
- Audio URL — This lets you add an episode using an audio or media URL. Enter the URL in the input box, then click on Insert Audio URL.
- Upload Audio — This lets you add an episode by uploading an audio or media file from your device. Click on Upload Audio, then select a supported file.
- Details — Delete the default title, then enter your episode title, author or host, and publish date in the input boxes.
- Cover — Drag and drop an image into the upload area, or click on Upload Image, then select an image from your device to use as the episode cover art.
- Source — Click on the Dropdown menu and select how you want to add the audio for your episode:
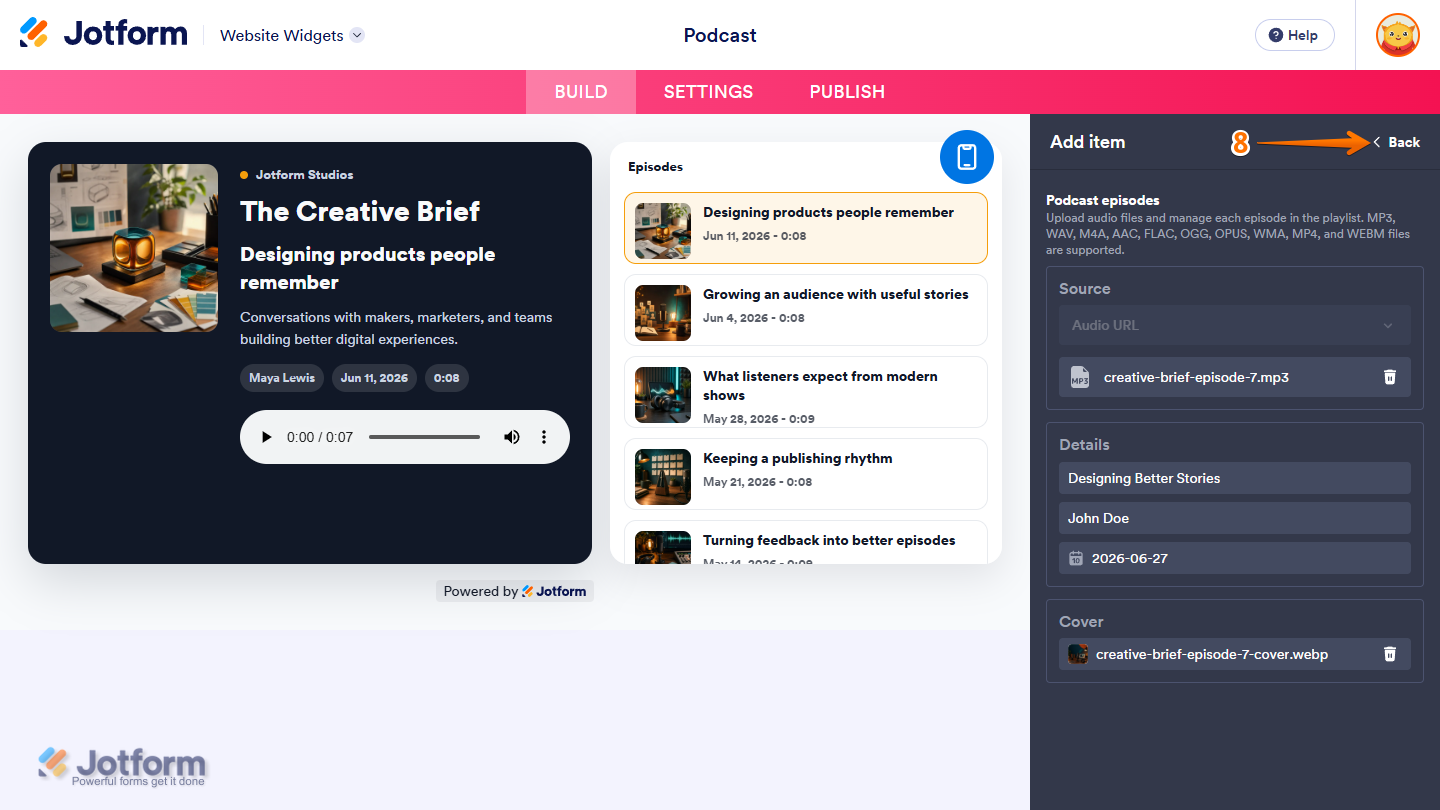
- Next, in the top-right corner of the menu, click on Back to close it.
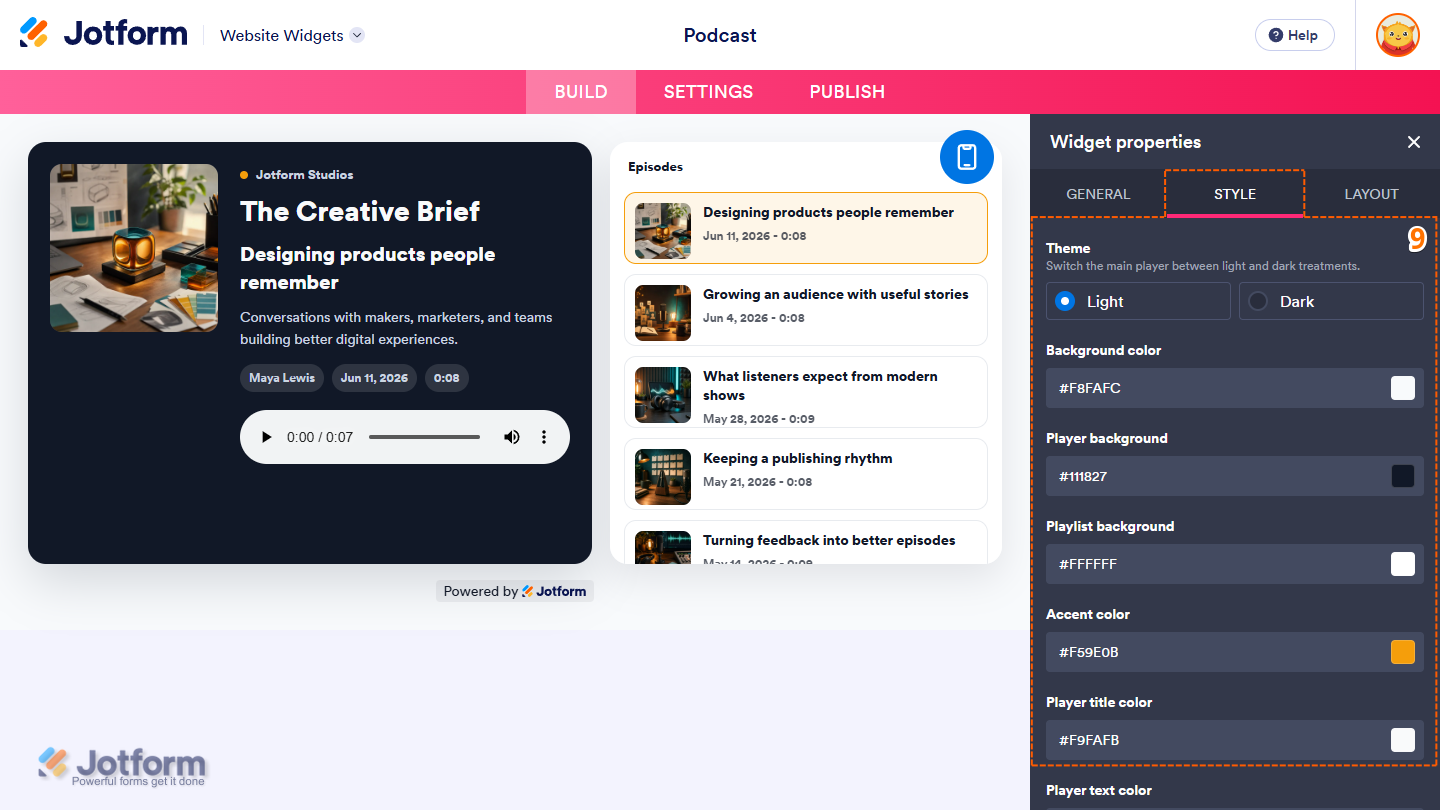
- Now, under the Style tab, customize these properties:
- Theme — Keep the default Light option selected, or select Dark to give the player a darker appearance.
- Background Color — Keep the default color, or enter a new one in the input box to change the widget background color.
- Player Background — Leave the default color as is, or enter a new one in the input box to change the player background color.
- Playlist Background — Enter a new color in the input box to change the playlist background color, or leave the default color as is.
- Accent Color — Keep the default color, or enter a new one in the input box to change the color used for highlighted elements in the player.
- Player Title Color — Leave the default color as is, or enter a new one in the input box to change the player title color.
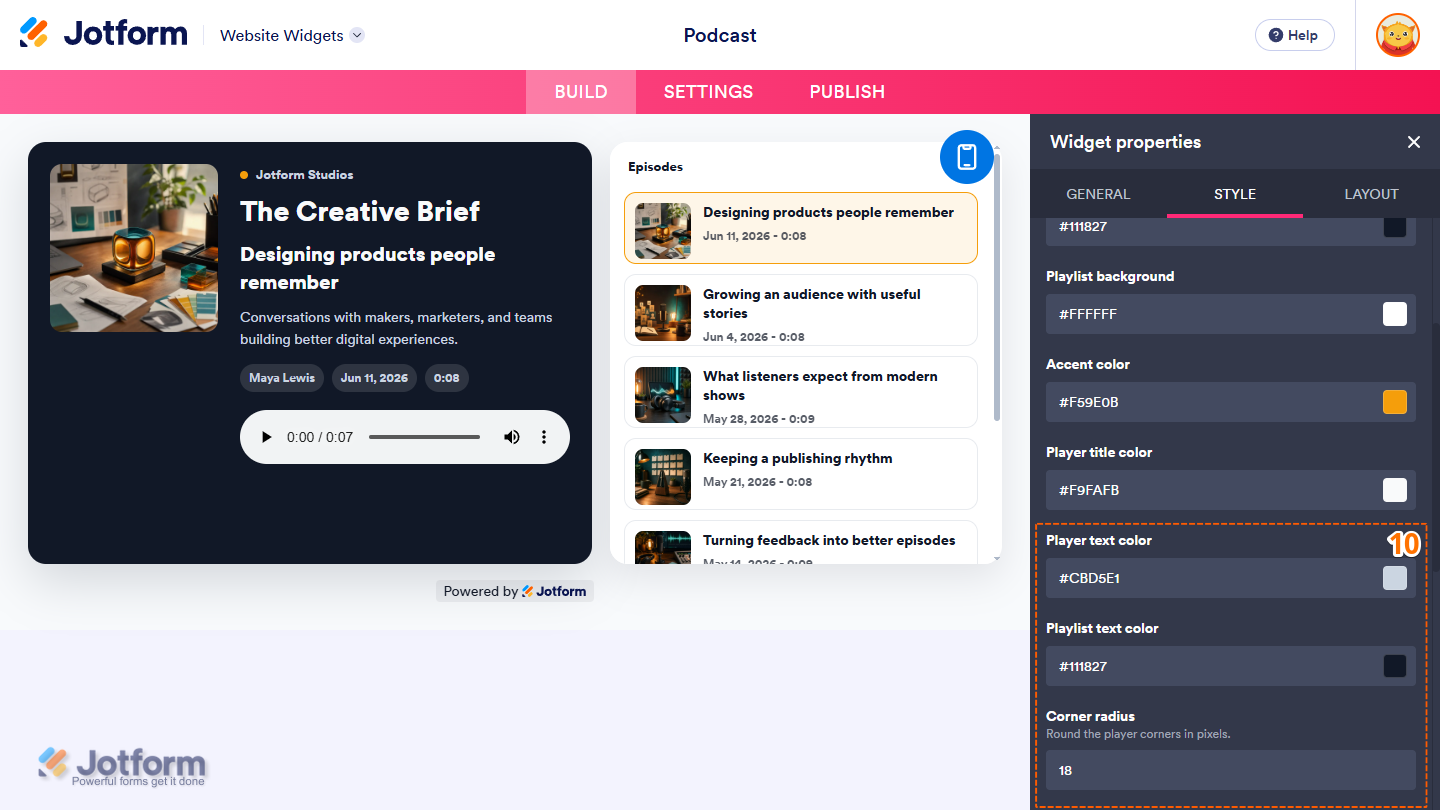
- Then, scroll down and continue with these settings:
- Player Text Color — Keep the default color, or enter a new one in the input box to change the text color in the featured episode player.
- Playlist Text Color — Leave the default color as is, or enter a new one in the input box to change the playlist text color.
- Corner Radius — Enter a new pixel value in the input box to make the corners of your Podcast Player more or less rounded, or leave the default value as is.
Note
Each color input box accepts color names, hex codes, and RGB values. The Color Picker on the right side of each input box lets you select a specific color or one of the predefined options.
- Next, continue scrolling and adjust these options:
- Jotform Branding — Keep this on to display Powered by Jotform in your widget, or toggle it off to hide it.
- Font — Toggle this on, then in the Dropdown menu that appears below it, keep Site Font selected to match the font used on your website, select System to use the font from each visitor’s device, or select another available font. Leave this off to continue using your website’s font.
- Custom CSS — Toggle this on, then in the code editor that appears below it, enter custom CSS to apply advanced styling to your widget.
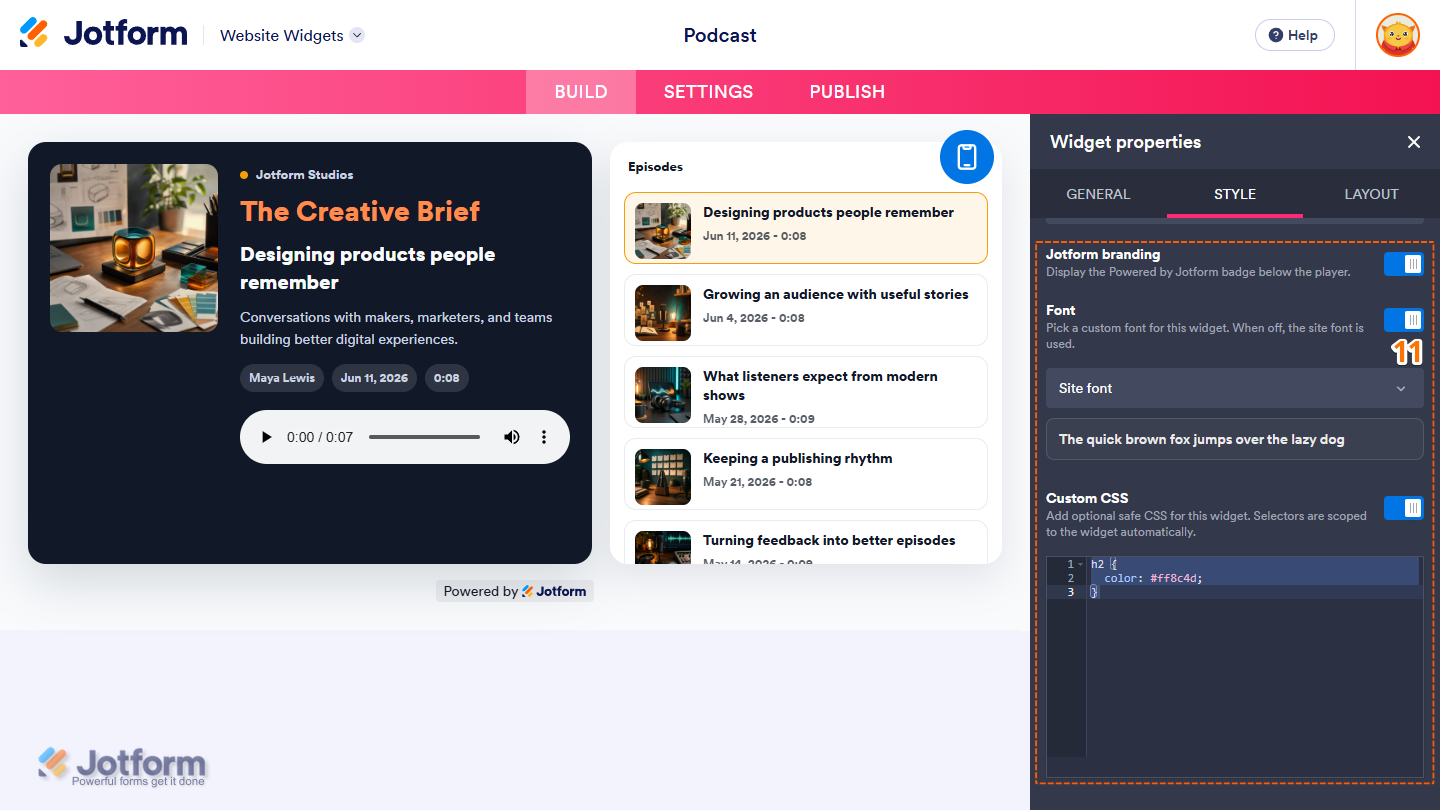
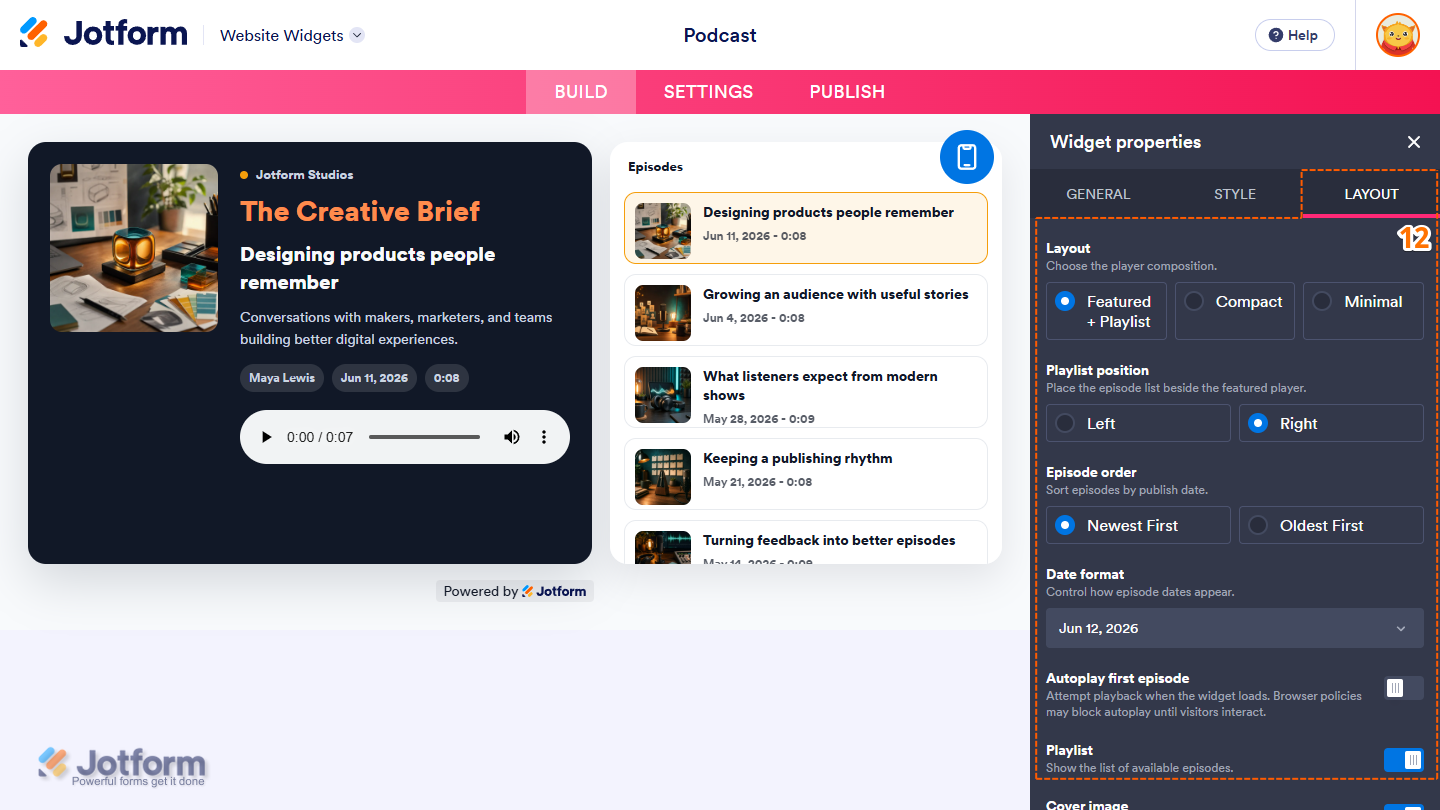
- Now, under the Layout tab, configure these properties:
- Layout — Select one of the following options to choose how the featured episode and playlist are displayed:
- Featured + Playlist — This displays the featured episode and playlist side by side.
- Compact — This displays the featured episode above the playlist.
- Minimal — This hides the playlist and displays only the featured episode player.
- Playlist Position — This is only shown when the Featured + Playlist layout is selected. Select Left or Right to choose which side of the featured episode the playlist appears on.
- Episode Order — Keep the default Newest First option selected to display the newest episodes first, or select Oldest First to display the oldest episodes first.
- Date Format — Keep the default date format, or click on the Dropdown menu and select a different format for your episode publish dates.
- Autoplay First Episode — Toggle this on to start playing the featured episode automatically when the Podcast Player loads. Some browsers may prevent autoplay until visitors click or tap the page.
- Playlist — This is only shown when the Featured + Playlist or Compact layout is selected. Keep this on to display the playlist, or toggle this off to hide it.
- Layout — Select one of the following options to choose how the featured episode and playlist are displayed:
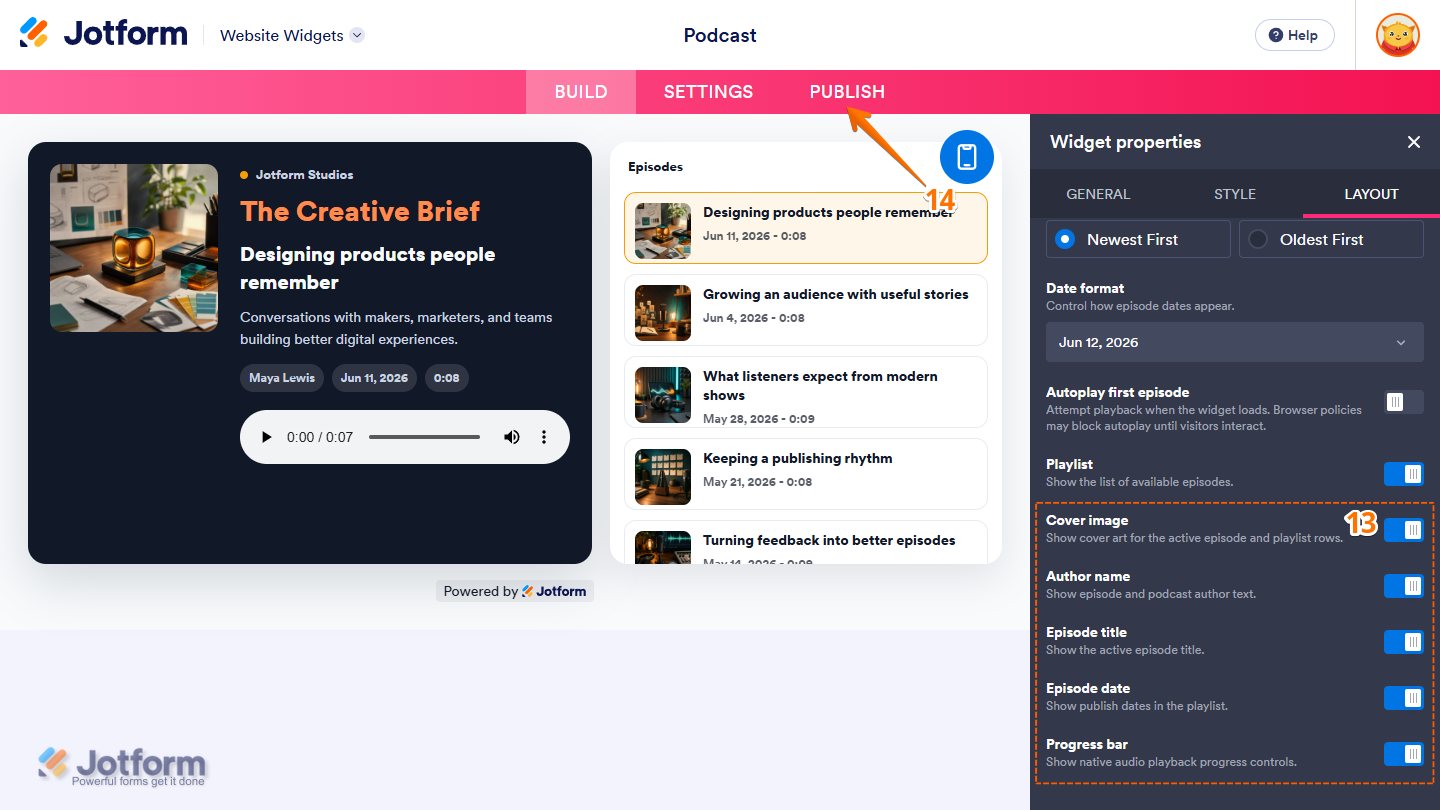
- Then, scroll down and set up these settings:
- Cover Image — This is only shown when the Featured + Playlist or Compact layout is selected. Leave this on to display cover art for the active episode and playlist items, or toggle it off to hide it.
- Author Name — Keep this enabled to display the podcast and episode author names, or toggle it off to hide them.
- Episode Title — This is on by default. Keep it enabled to display the active episode title, or toggle it off to hide it.
- Episode Date — Toggle this off to hide episode publish dates in the playlist, or leave it on to display them.
- Progress Bar — Keep this on to display the audio playback progress controls, or toggle it off to hide them.
- Once everything’s set, in the pink navigation bar at the top of the page, click on Publish.
Note
You’ll be asked to log in to your Jotform account or sign up for one before you can continue using your widgets.
- Then, in the Embed section, click on Copy Code, and, if you already know how, paste that into the Embed section on your platform, and you’re good to go.
- To view embedding instructions for your widget, click on Platforms in the menu on the left side of the page.
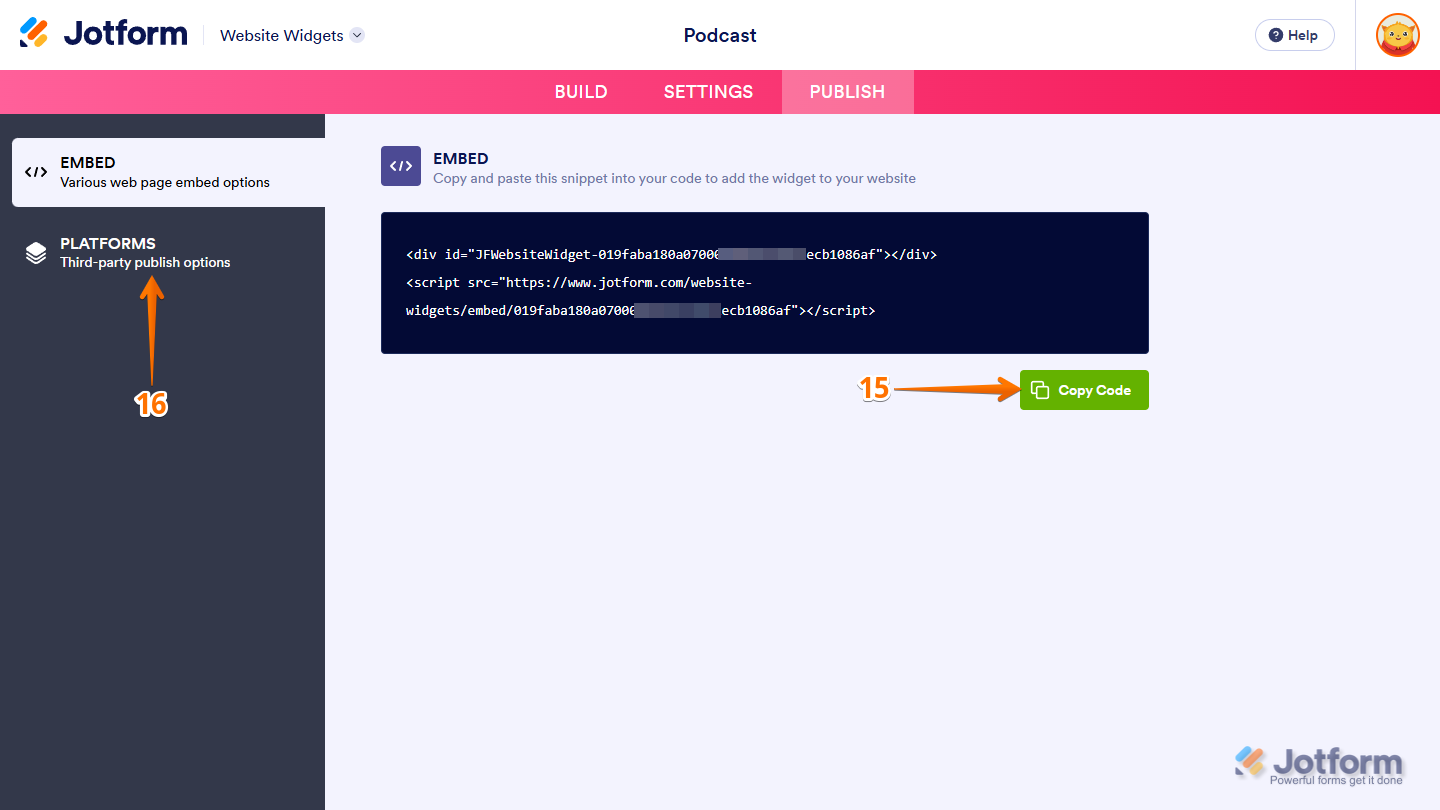
- Next, in the Platforms section on the right, select the platform you want to view embedding instructions for. Or, use the Search bar at the top of the section to find it easily.
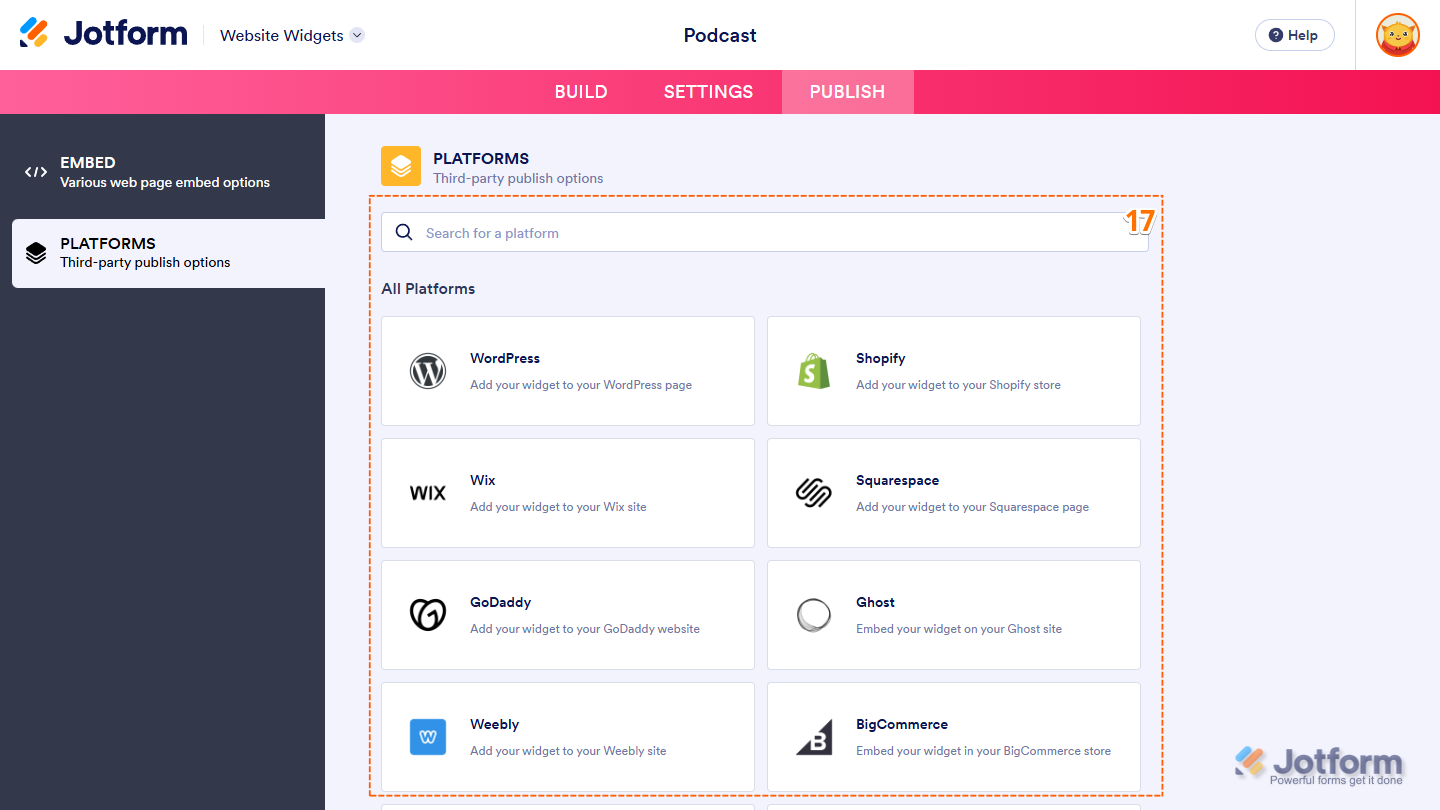
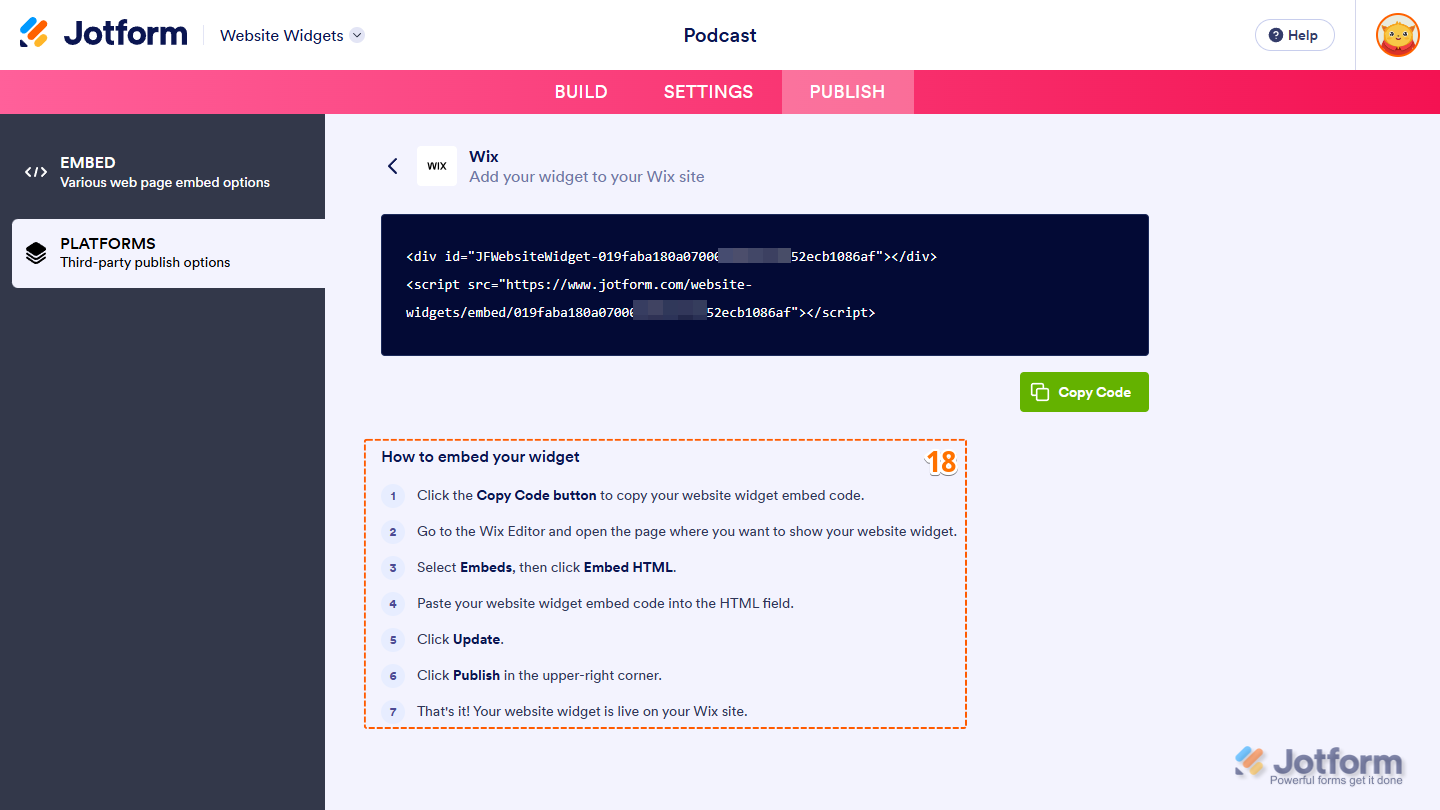
- Then, follow the steps in the How to Embed Your Widget section to add it to your website.
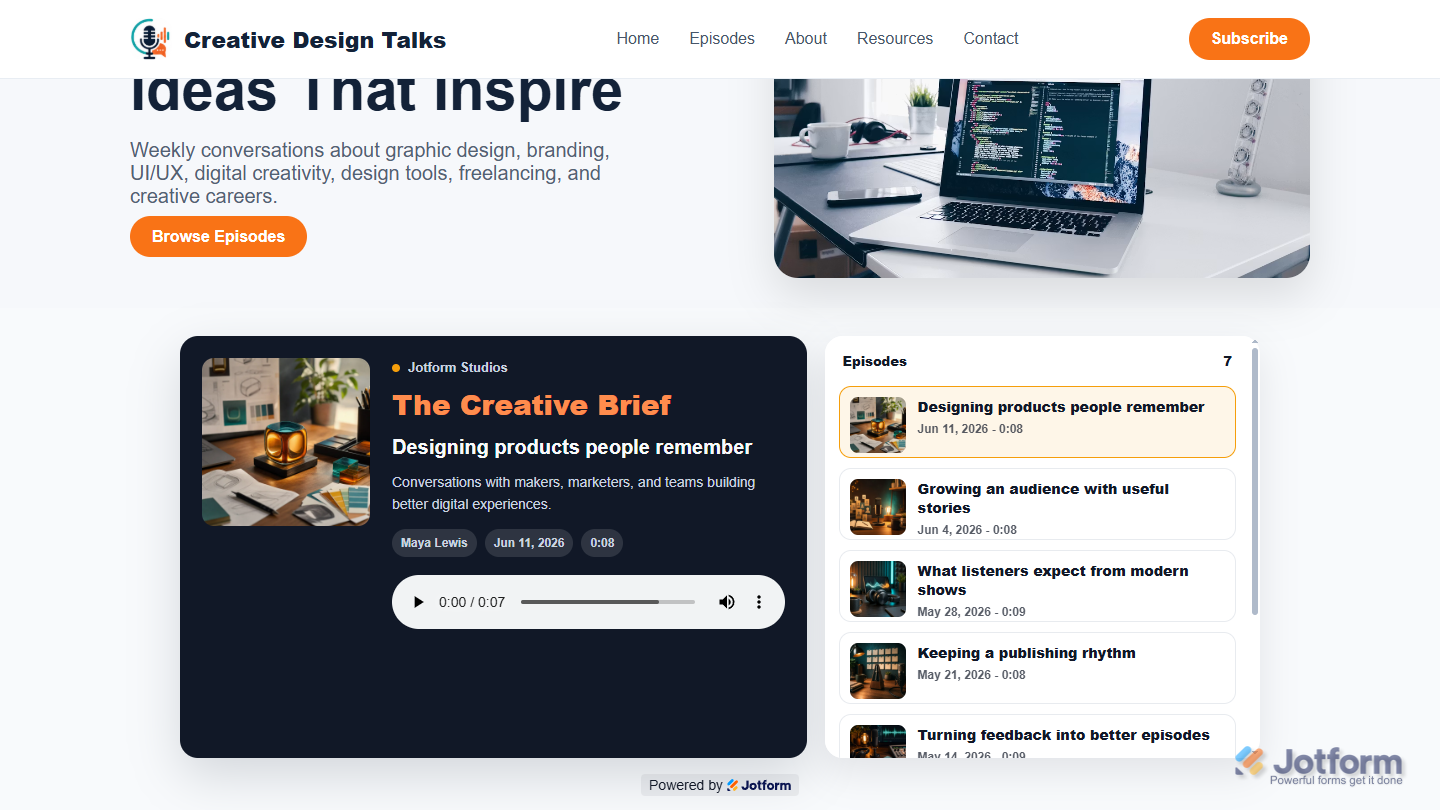
That’s it! Your Podcast Player widget will appear on your website just the way you customized it. Take a look at the screenshot below to see how it looks on a website.
Note
You can manage the website widgets you’ve created at any time from your account. For a full breakdown of how to do it, head over to our guide on How to Manage Website Widgets.
Updating Your Podcast Episodes
You can update a podcast episode in just a few simple steps. Here’s what to do:
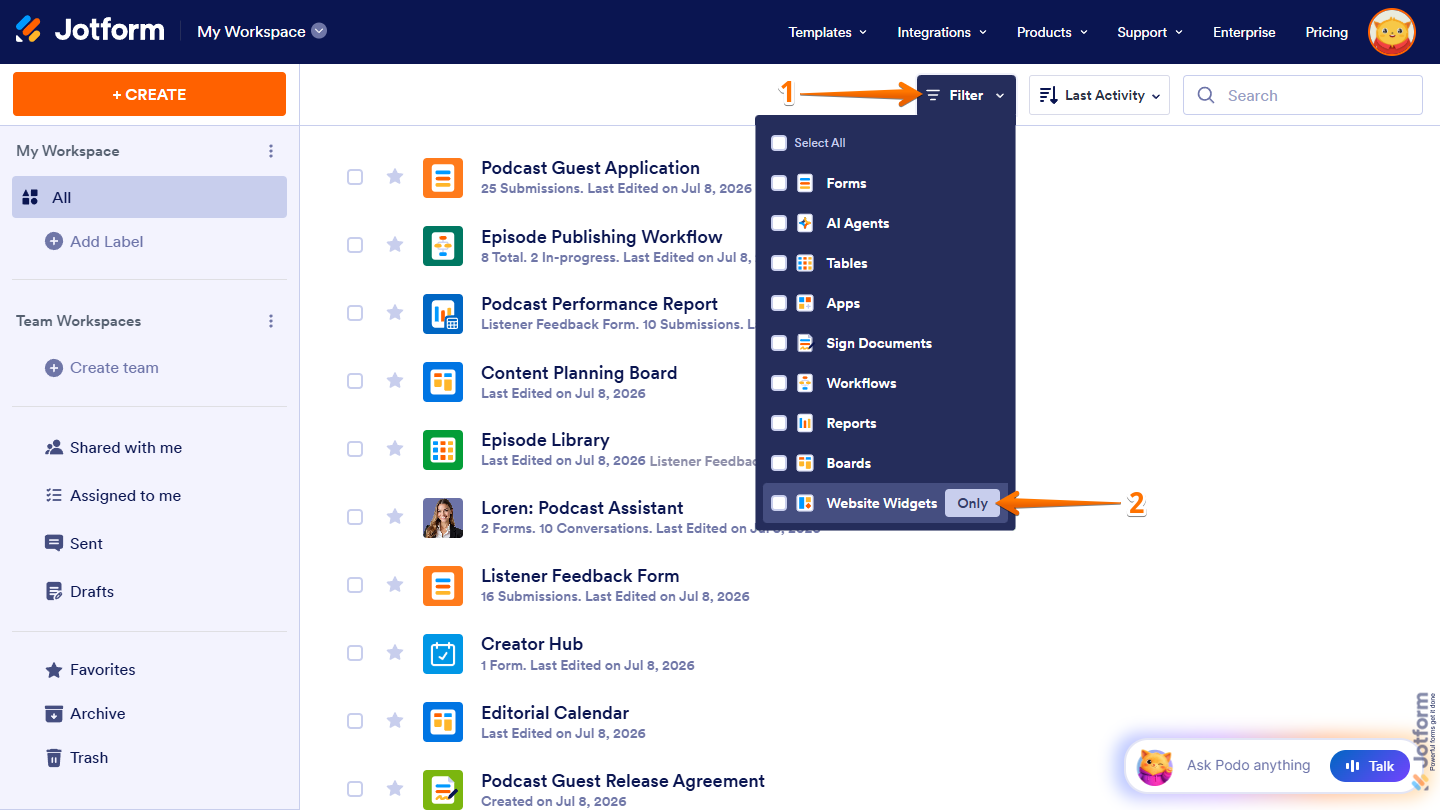
- At the top of your Workspace page, click on Filter.
- Then, in the Dropdown menu that opens, hover your mouse over Website Widgets, and on the right side of it, click on Only.
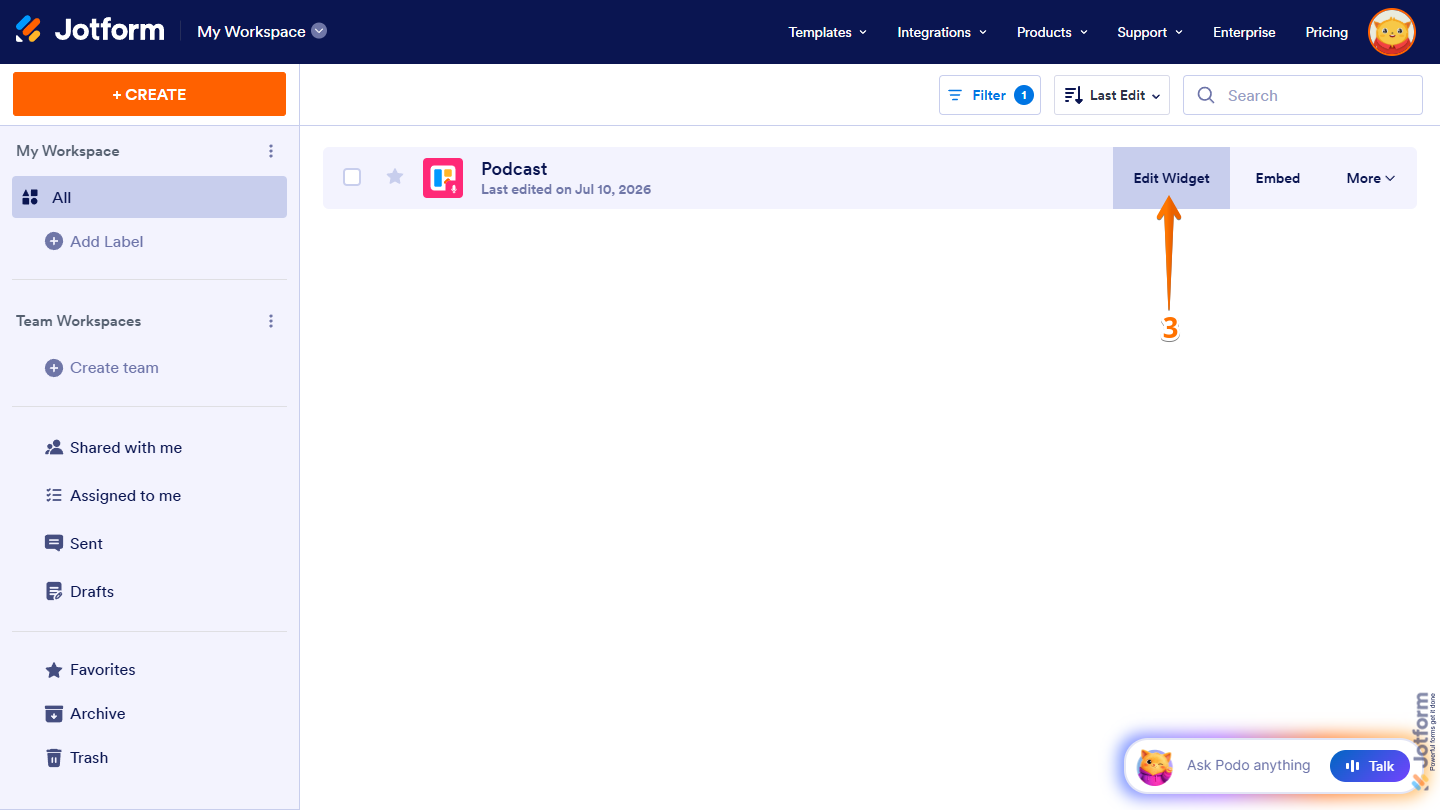
- Next, hover your mouse over the Podcast Player widget you want to update, then click on Edit Widget on the right side of the page.
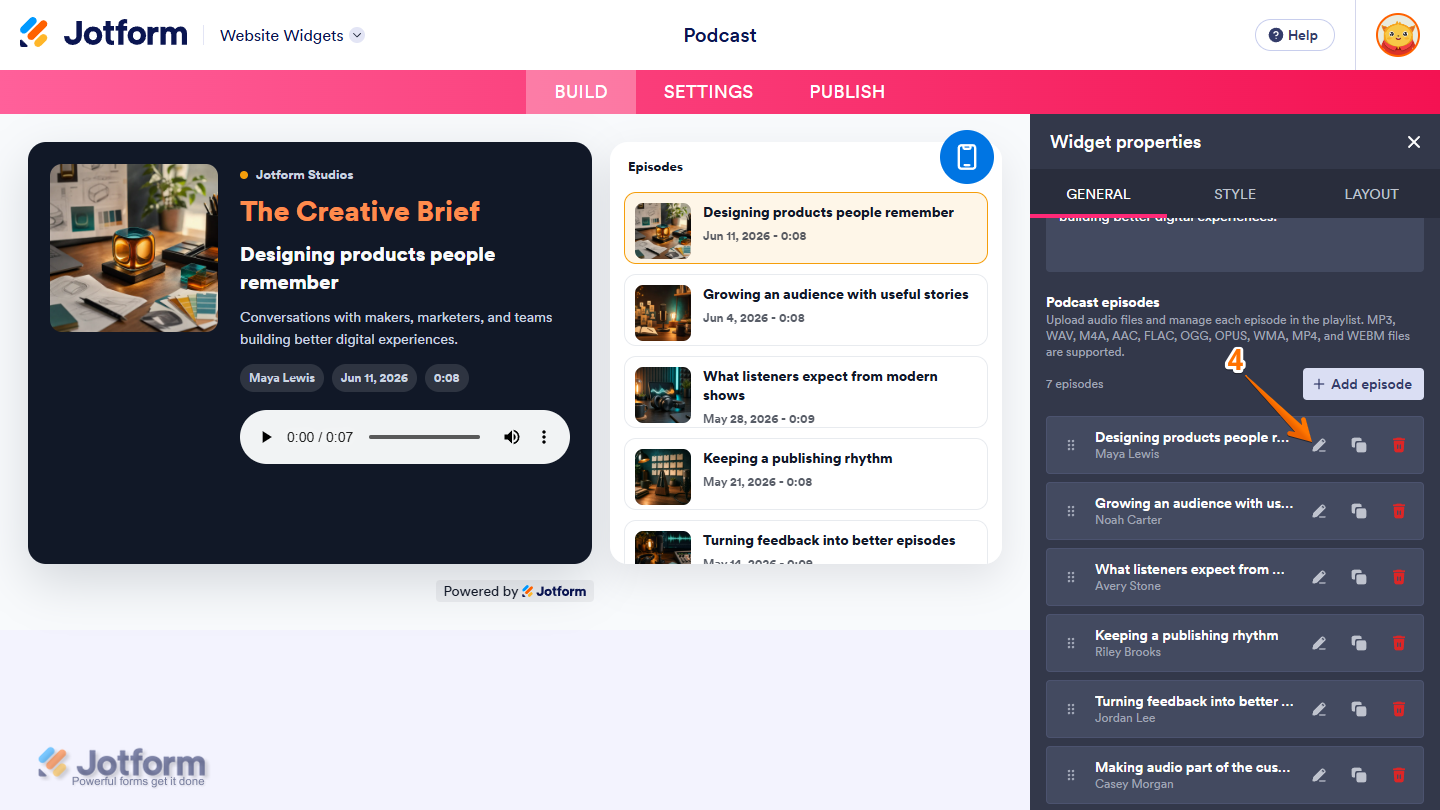
- Now, in the Widget Properties menu on the right side of Website Widgets, under the General tab, scroll down to Podcast Episodes and, on the right side of the episode you want to update, click on the Pencil icon.
Note
Any changes you make in the Widget Properties menu are automatically saved and reflected in the Podcast Player widget on your website.
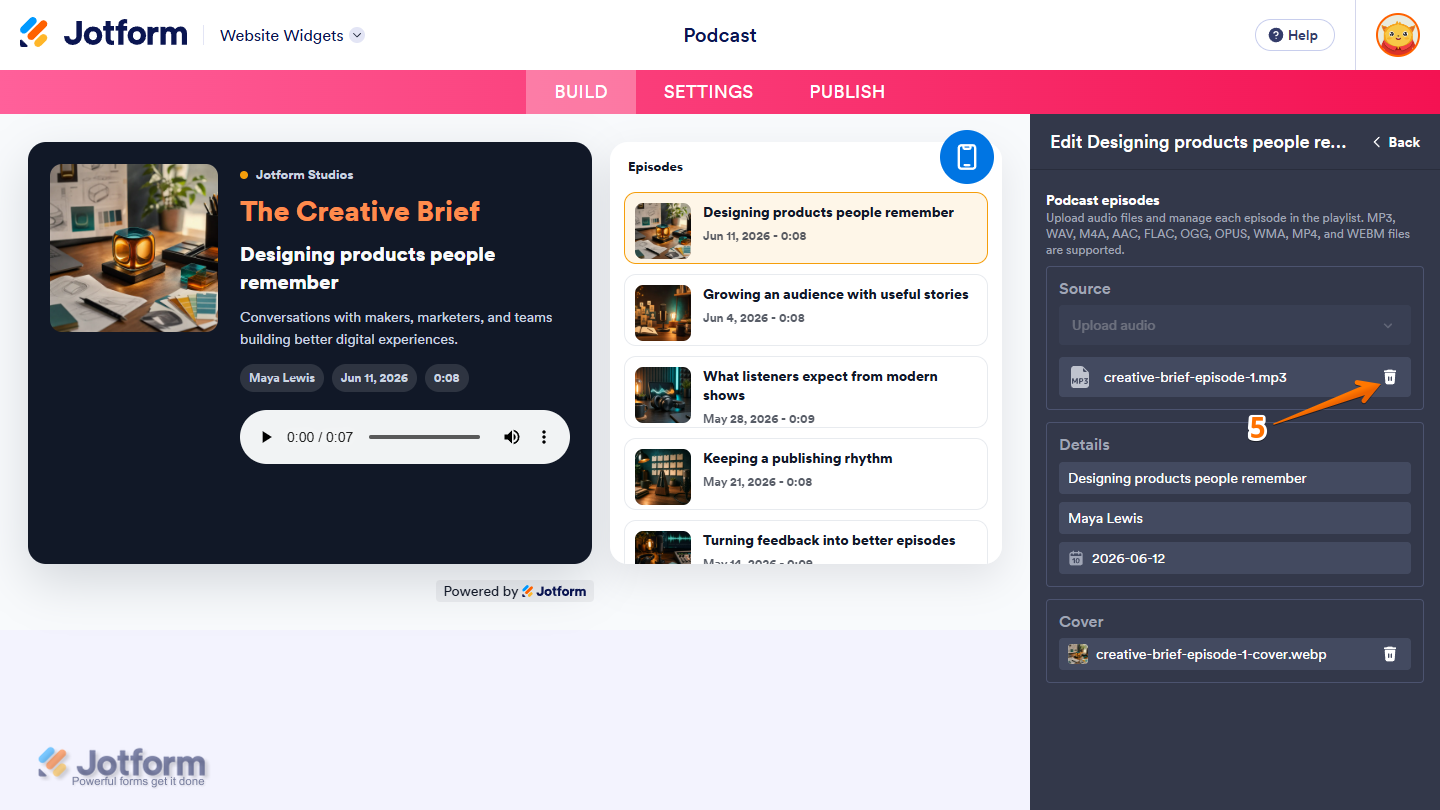
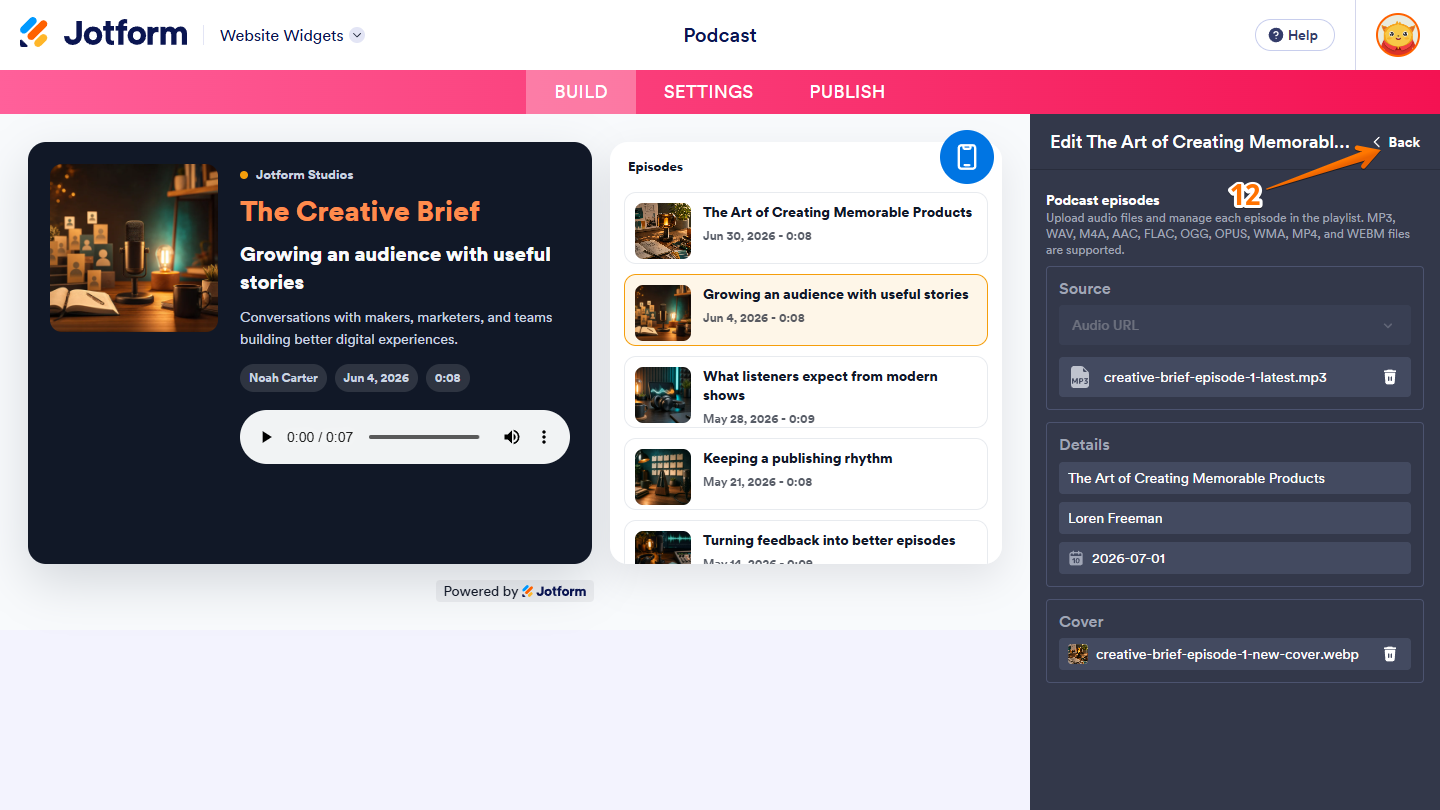
- Then, in the Source section of the Edit Episode menu that opens, click on the Trash Can icon next to the filename to remove the existing audio.
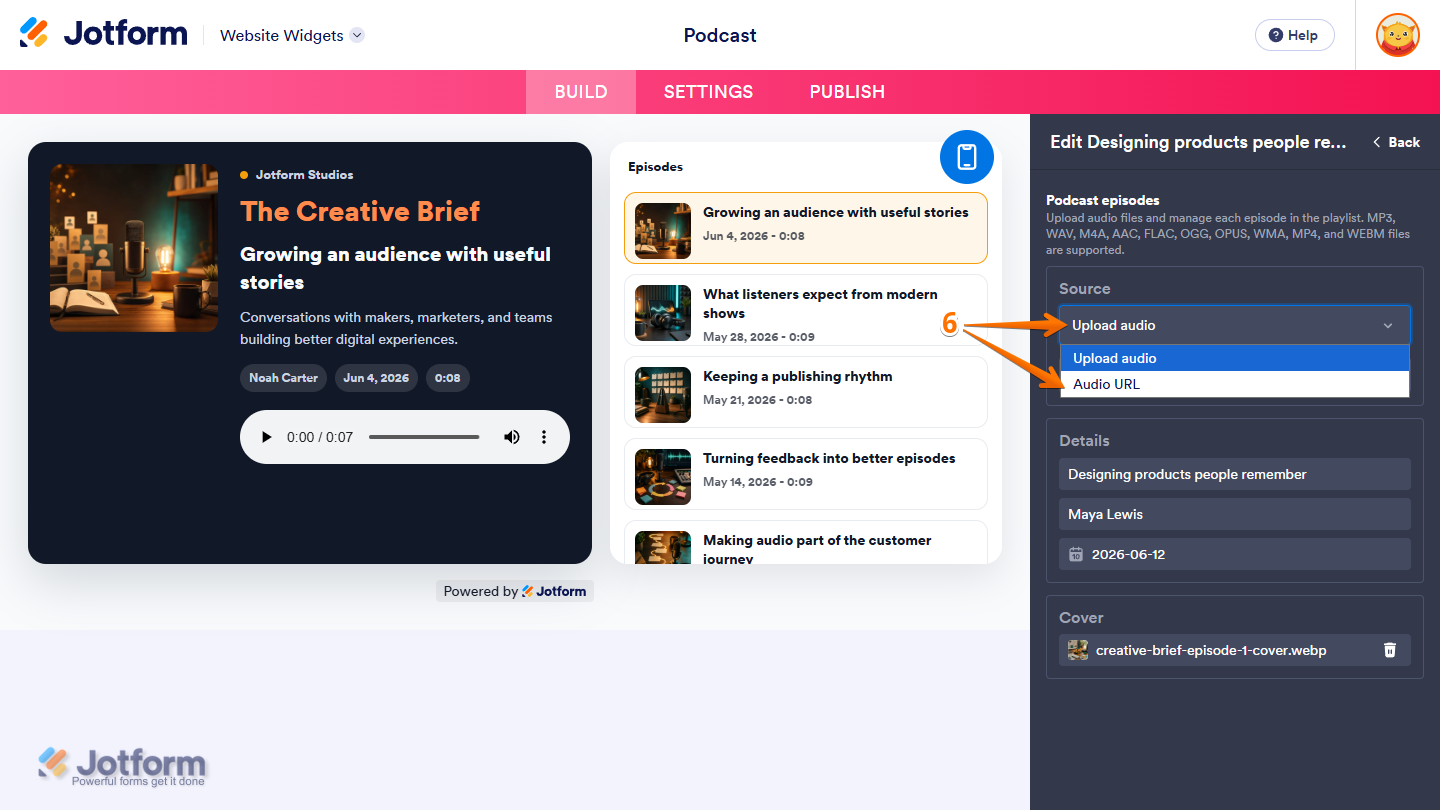
- To change the source of your episode’s audio, click on the Dropdown menu at the top of the Source section, then select the other option.
- If Upload Audio is selected, click on Upload Audio, then select a new supported audio or media file from your device.
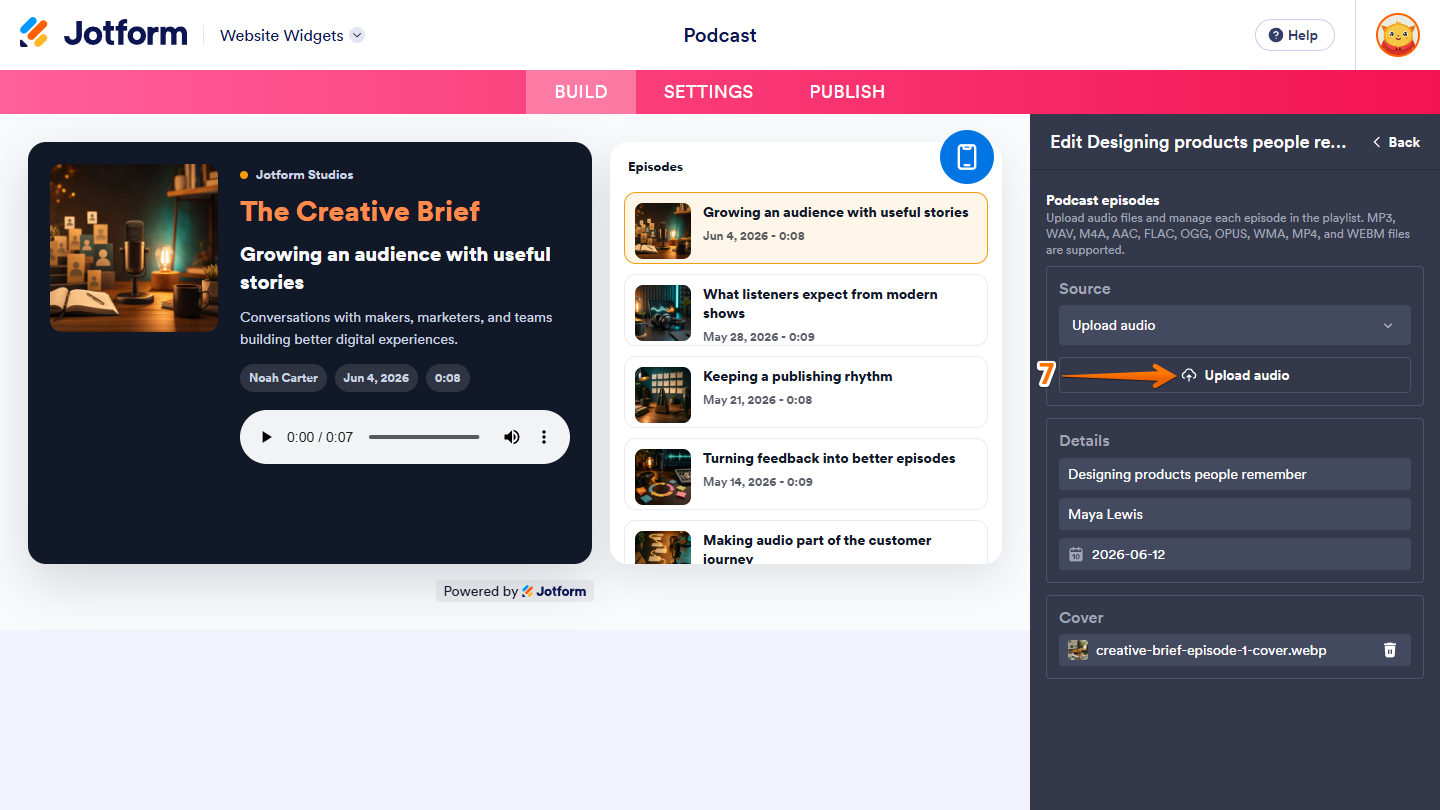
- If Audio URL is selected, enter a new audio or media URL in the input box, then click on Insert Audio URL.
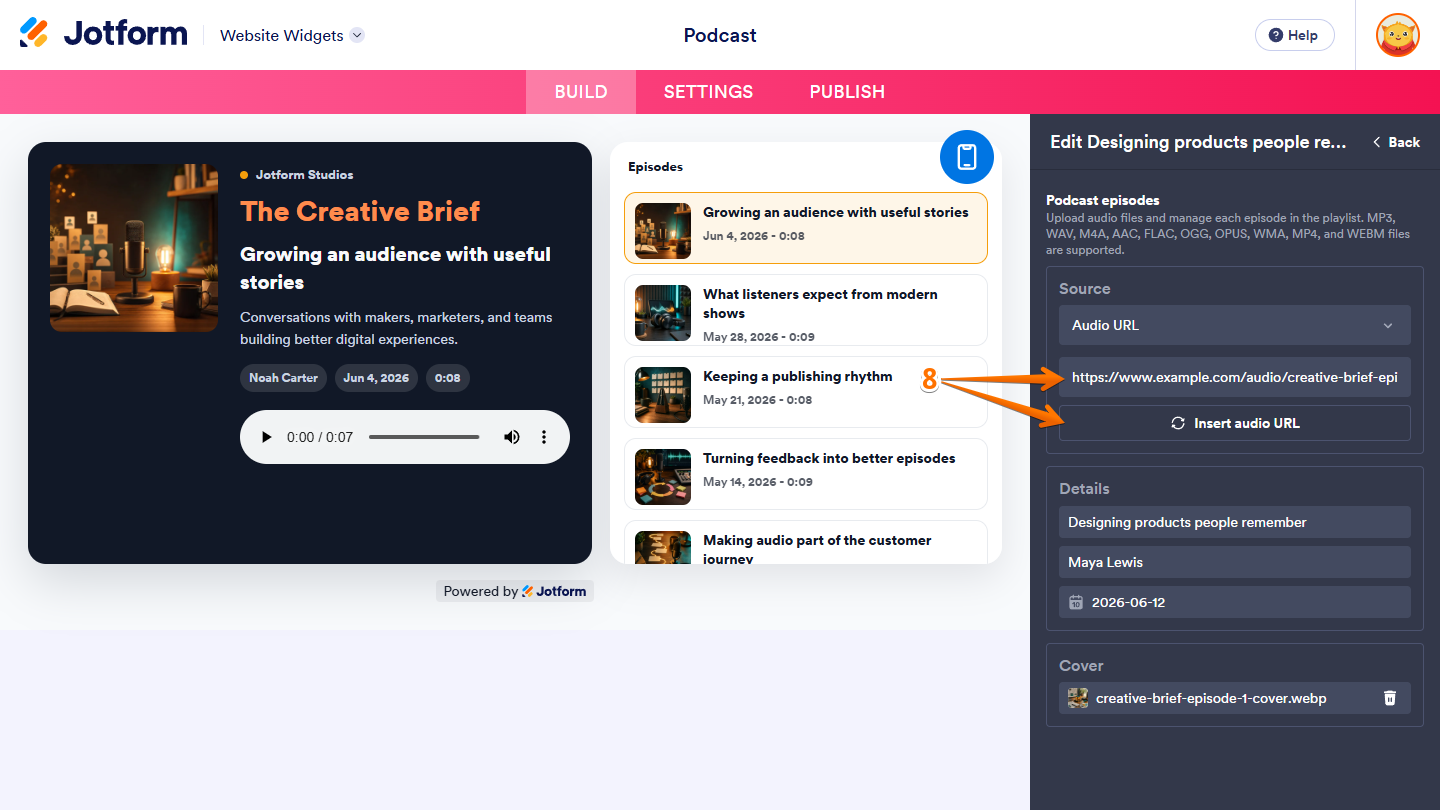
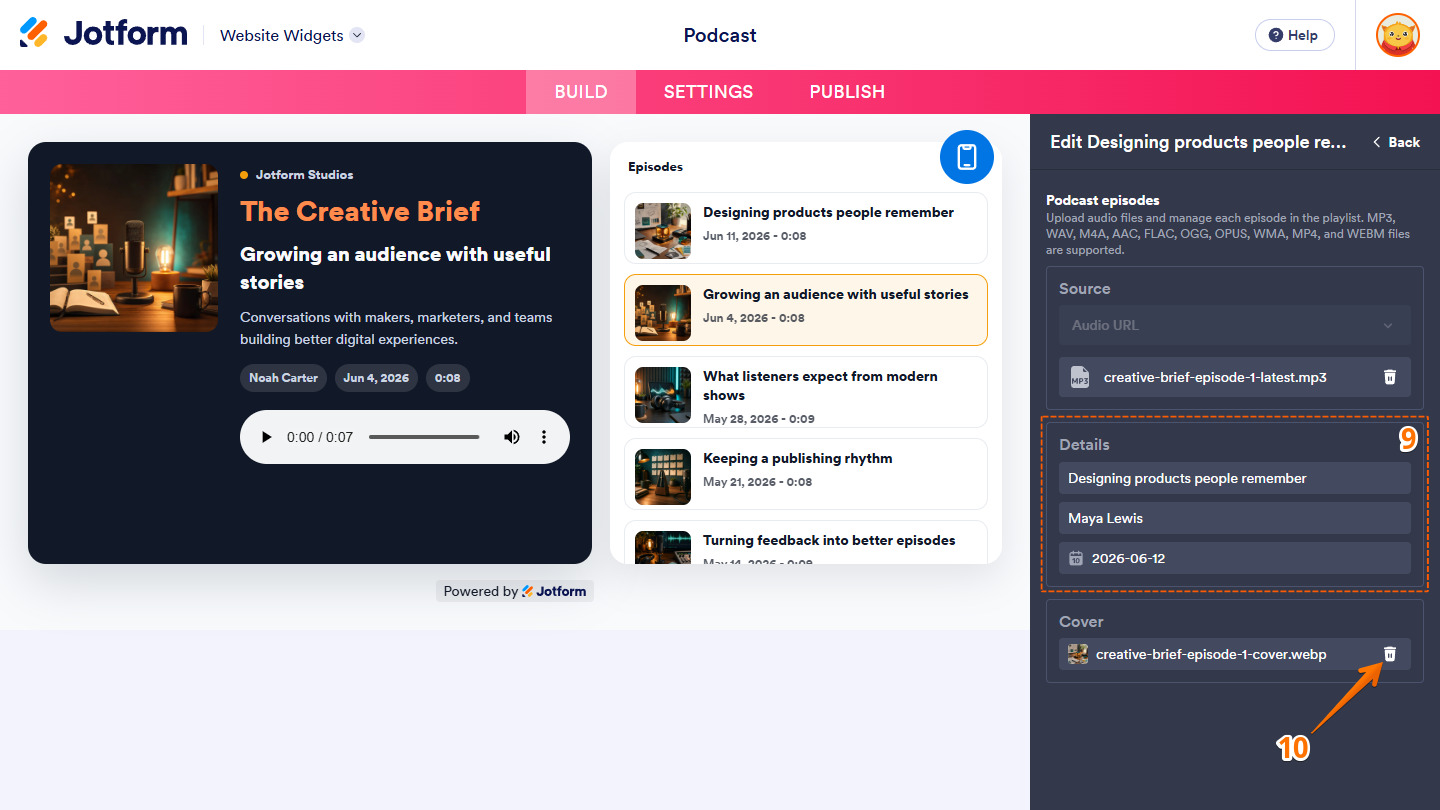
- Now, in the Details section, delete any existing title, author or host, and publish date from the input boxes, then enter the new details for your episode.
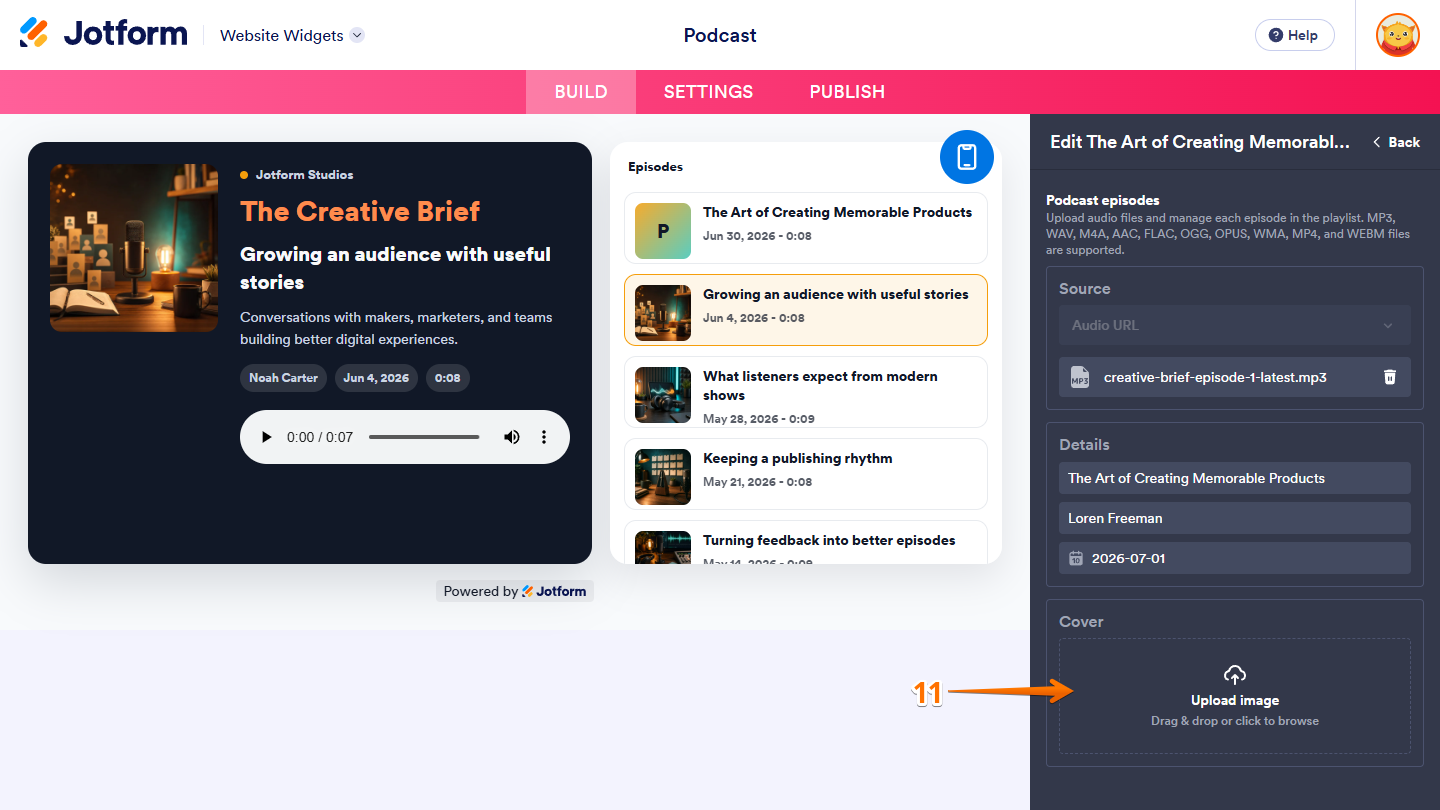
- Next, on the right side of the Cover section, click on the Trash Can icon next to the filename to remove the existing image.
- Then, drag and drop an image into the upload area, or click on Upload Image, then select one from your device to use as the episode cover art.
- Next, in the upper-right corner of the menu, click on Back to close it.
- To change the order of your podcast episodes, click on and hold the Six Dots icon on the left side of an episode to grab it, and then move it to where you want to drop it.
- To remove an episode, click on the Trash Can icon on the right side of it.
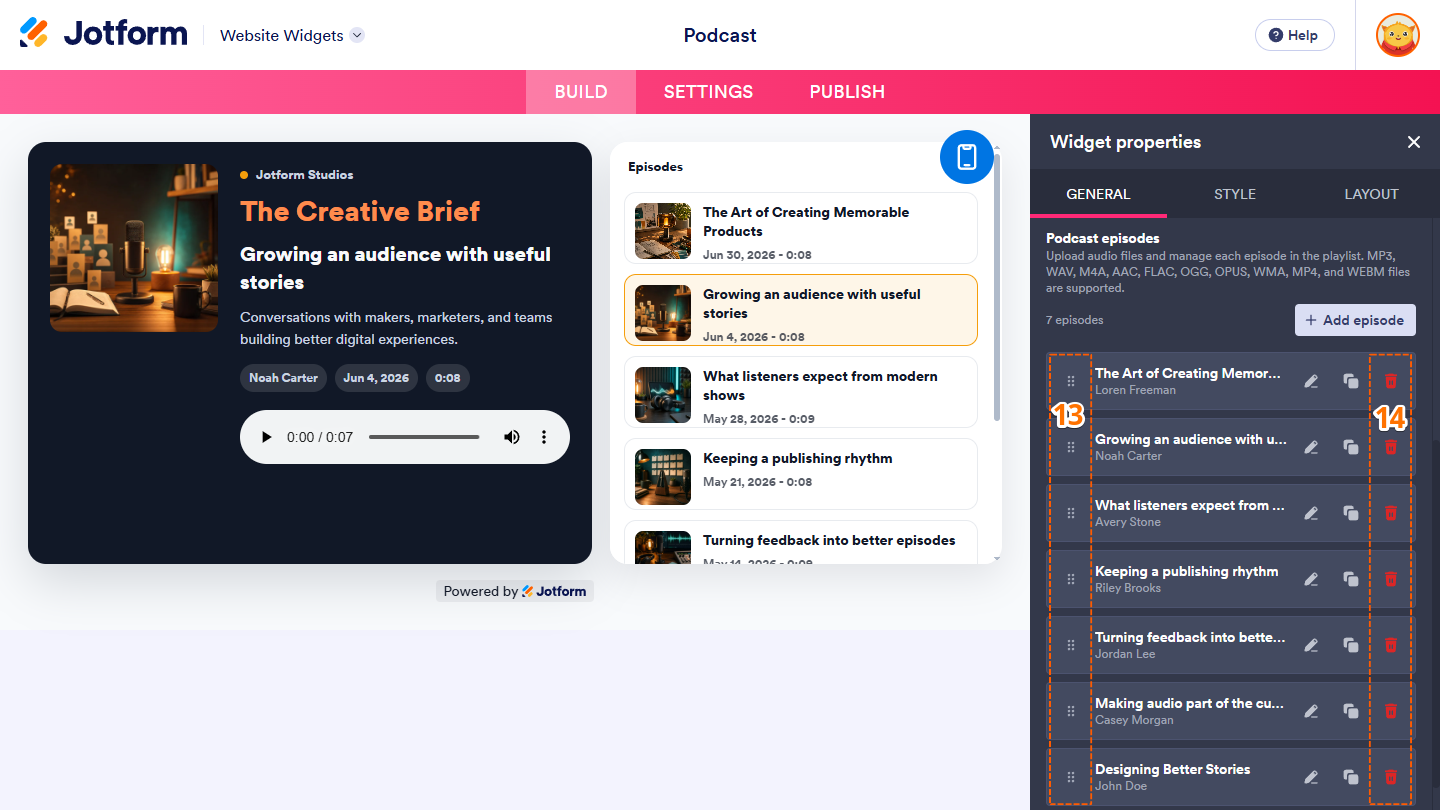
That’s it. You’ve successfully updated your Podcast Player episodes.


Send Comment: