With Jotform’s Medium Feed Widget, you can display articles from your Medium profile or publication directly on your website. Connect your Medium URL, customize the layout to match your site’s design, and embed the widget in just a few steps.
It’s a simple way to showcase your writing, keep your site updated with fresh content, and help visitors discover your work without leaving the page.
Note
Ensure that the Medium URL you use is be publicly accessible. Articles from private or unavailable profiles and publications won’t appear in the widget.
Creating Your Medium Feed Widget and Getting the Embed Code for It
Before you can add the Medium Feed Widget to your website, you’ll first need to connect your Medium profile or publication, customize the widget, and copy the embed code for it. This is how it’s done:
- On the top-left side of your Workspace page, click on Create.
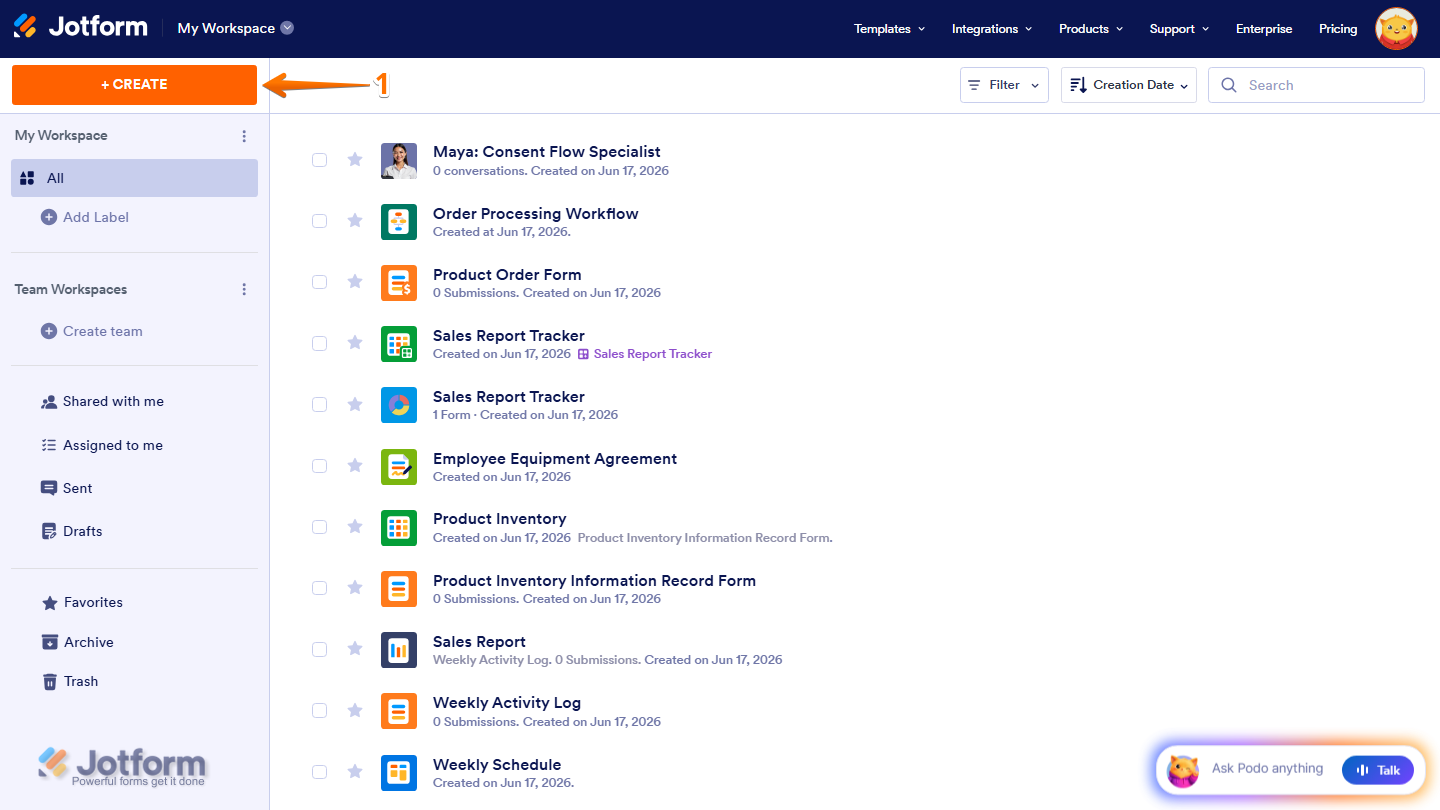
- Then, in the menu that opens up, select Website Widget.
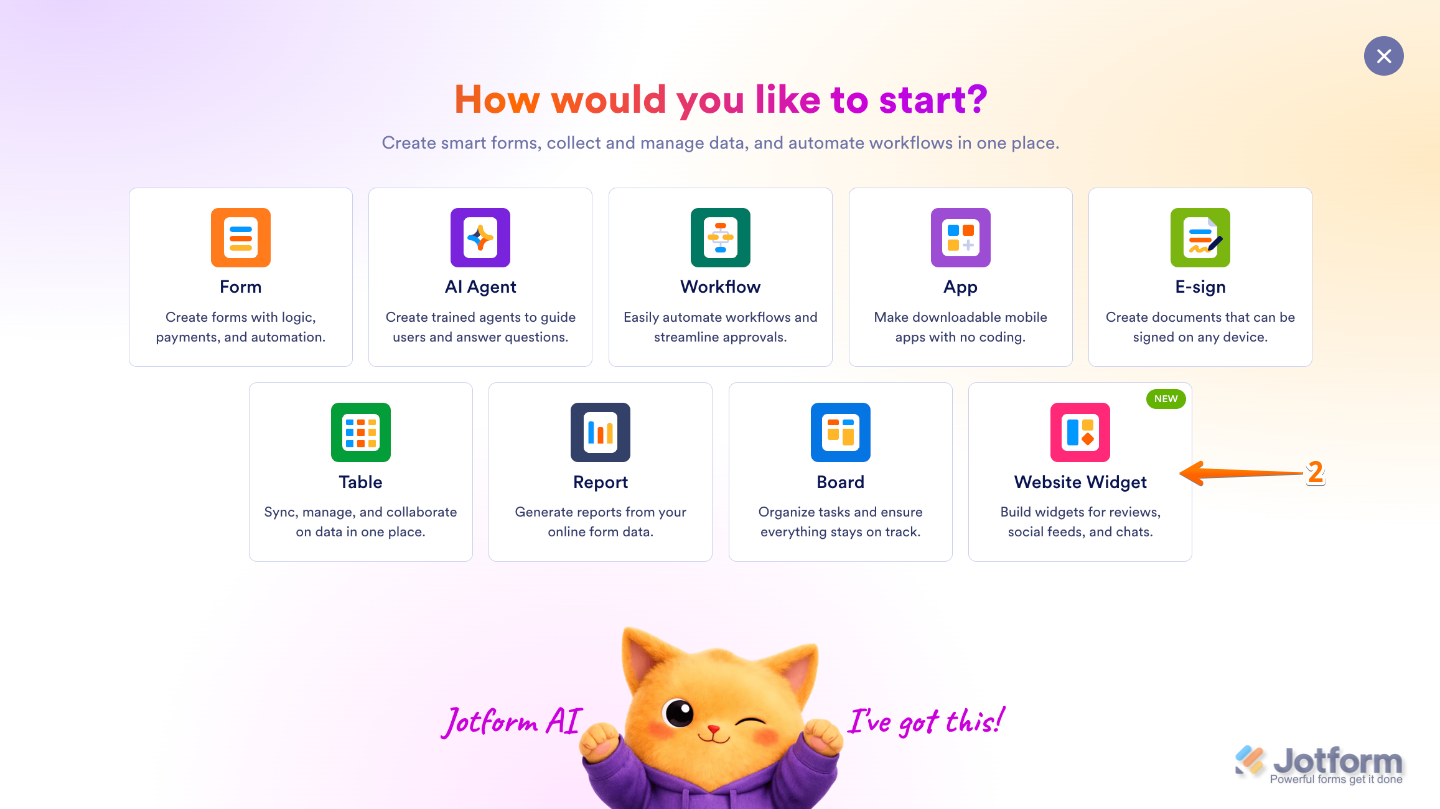
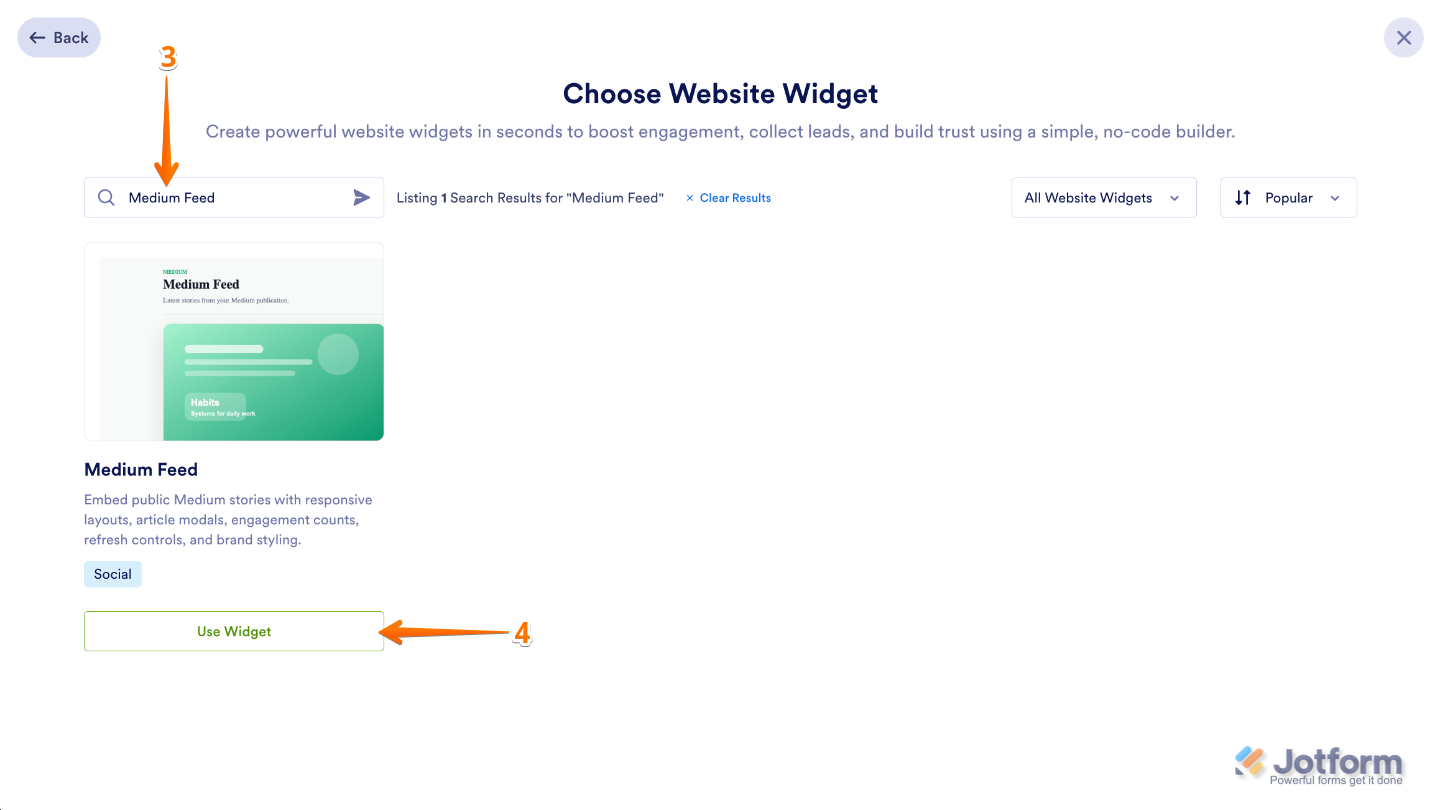
- Next, in the Search bar in the upper-left corner of the Choose Website Widget window, enter Medium Feed.
- Then, at the bottom of the search results, click on Use Widget.
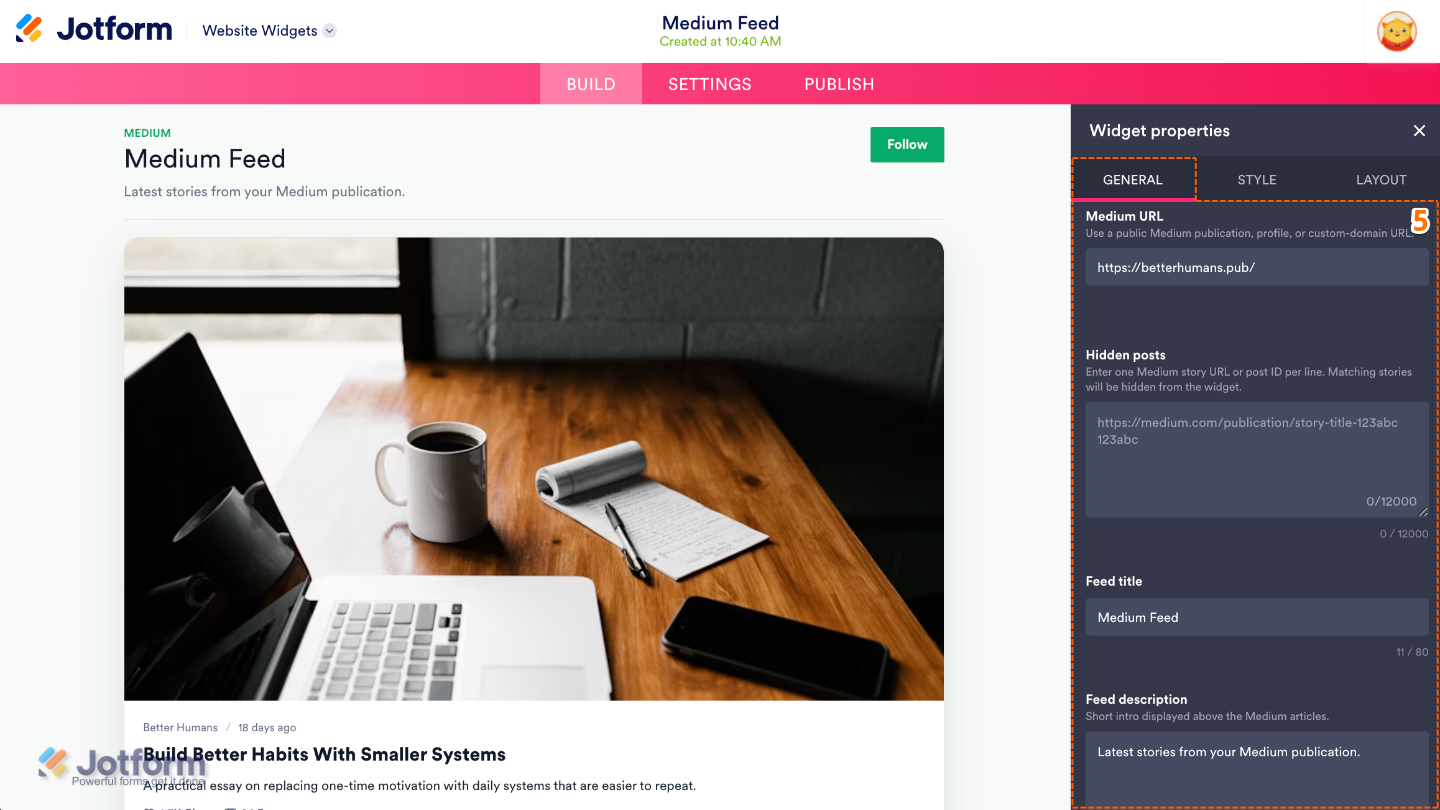
- Now, in the Widget Properties menu that opens on the right side of Website Widgets, set up these properties:
- Medium URL — Enter the URL of your Medium profile or publication to display its latest articles in the widget.
- Hidden Posts — Hide specific Medium posts so they won’t appear in your feed.
- Feed Title — Add a custom title to introduce your Medium feed.
- Feed Description — Include a short description to provide context about your articles or publication.
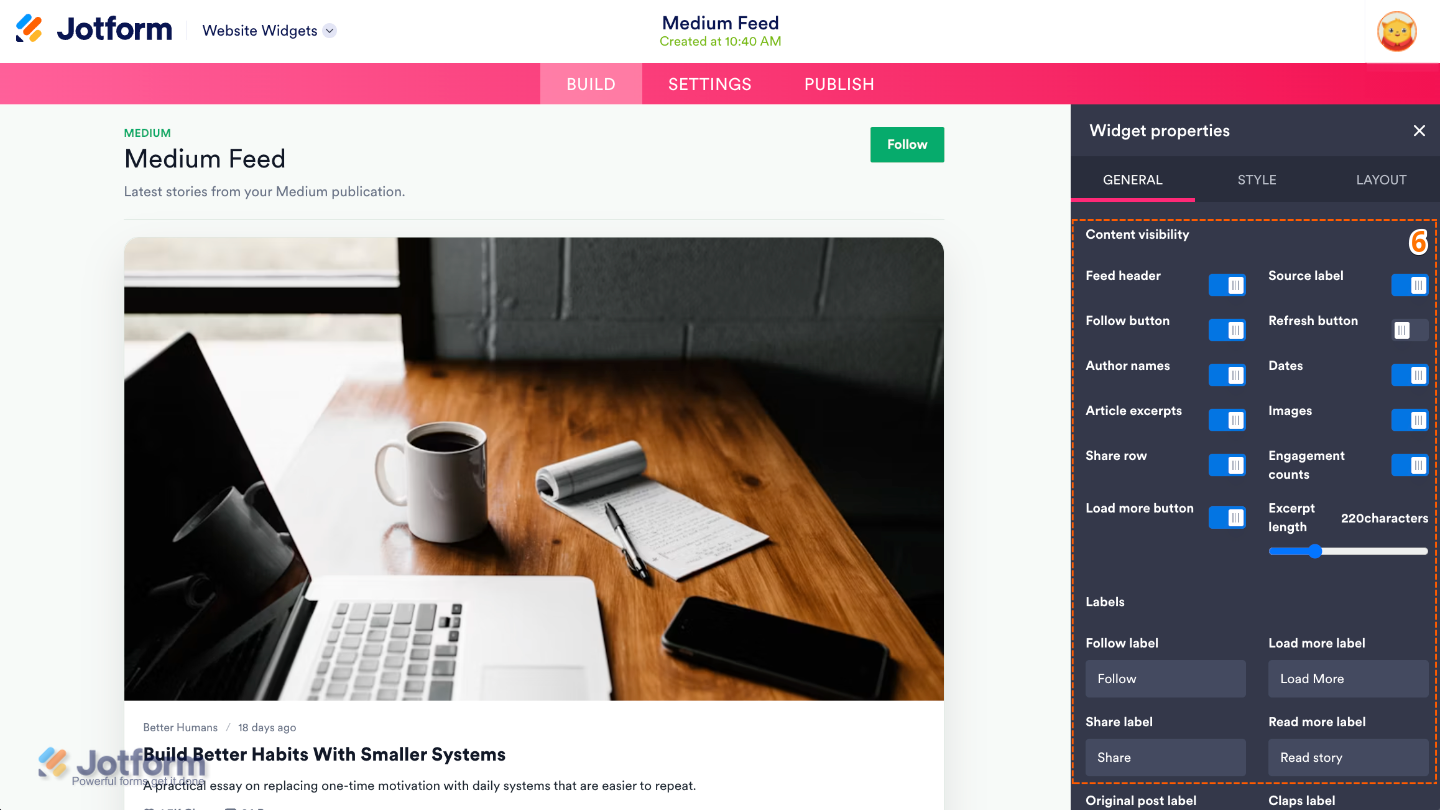
- Then, scroll down and configure the Content Visibility settings:
- Feed Header — Show or hide the feed header at the top of the widget.
- Follow Button — Display a button that lets visitors follow your Medium profile or publication.
- Author Names — Show or hide the author’s name for each article.
- Article Excerpts — Display a preview of each article’s content.
- Share Now — Show or hide the sharing option for each article.
- Load More Button — Display a button that lets visitors load additional articles without leaving the page.
- Source Label — Show the name of the Medium source for each article.
- Refresh Button — Display a button that allows visitors to refresh the feed and view the latest posts.
- Dates — Show or hide the publication date for each article.
- Images — Display or hide featured images from your Medium posts.
- Engagement Counts — Show engagement metrics, such as claps or responses, for each article.
- Excerpt Length — Choose how much of each article excerpt is displayed.
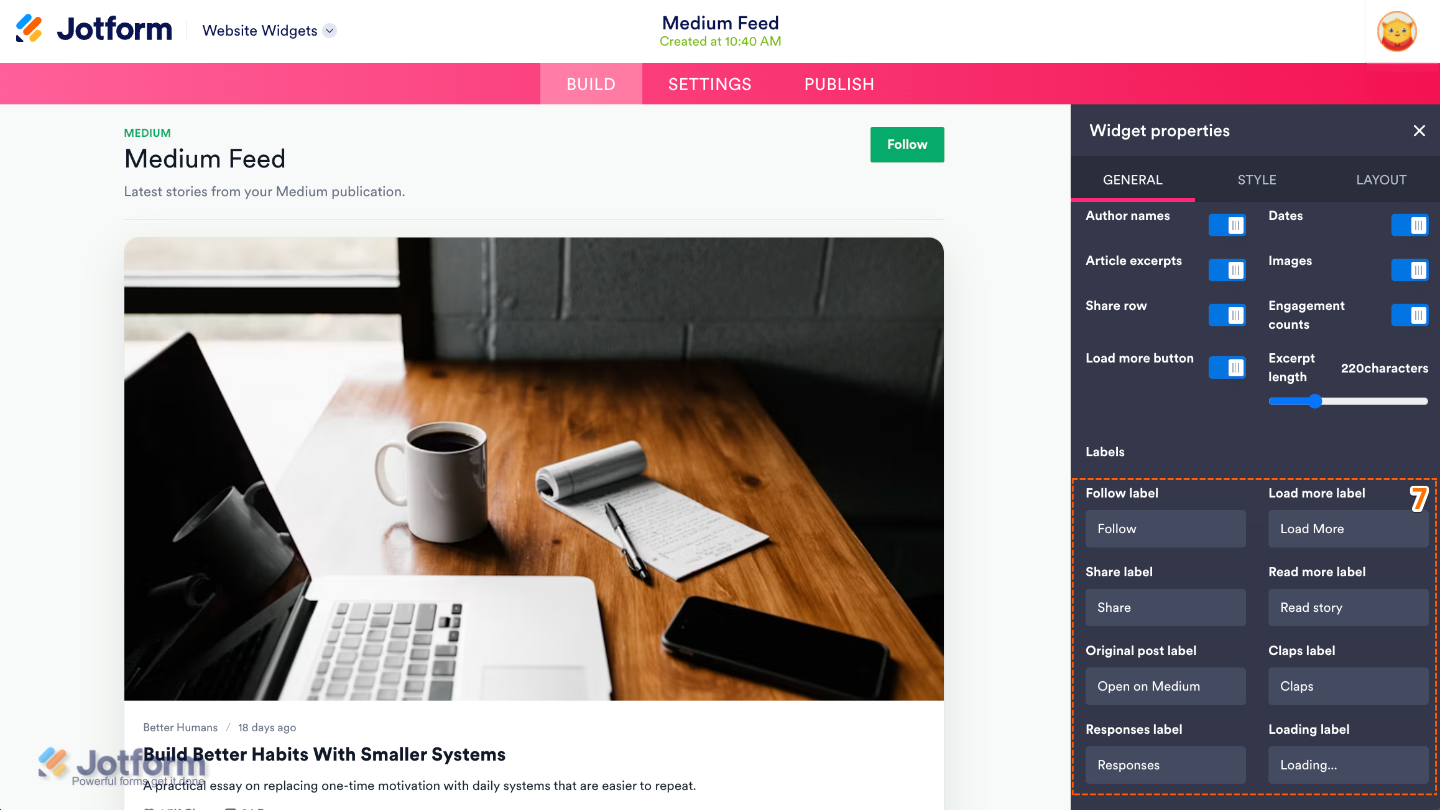
- Next, scroll down again and set up the Labels options:
- Follow Label — Set the text displayed on the Follow button.
- Share Label — Choose the text shown on the sharing button.
- Original Post Label — Add the label that links visitors to the original Medium article.
- Responses Label — Enter the label displayed for article responses.
- Load More Label — Specify the text displayed on the Load More button.
- Read More Label — Set the text shown for the Read More link or button.
- Claps Label — Enter the label displayed alongside the number of claps.
- Loading Label — Customize the message shown while additional content is loading.
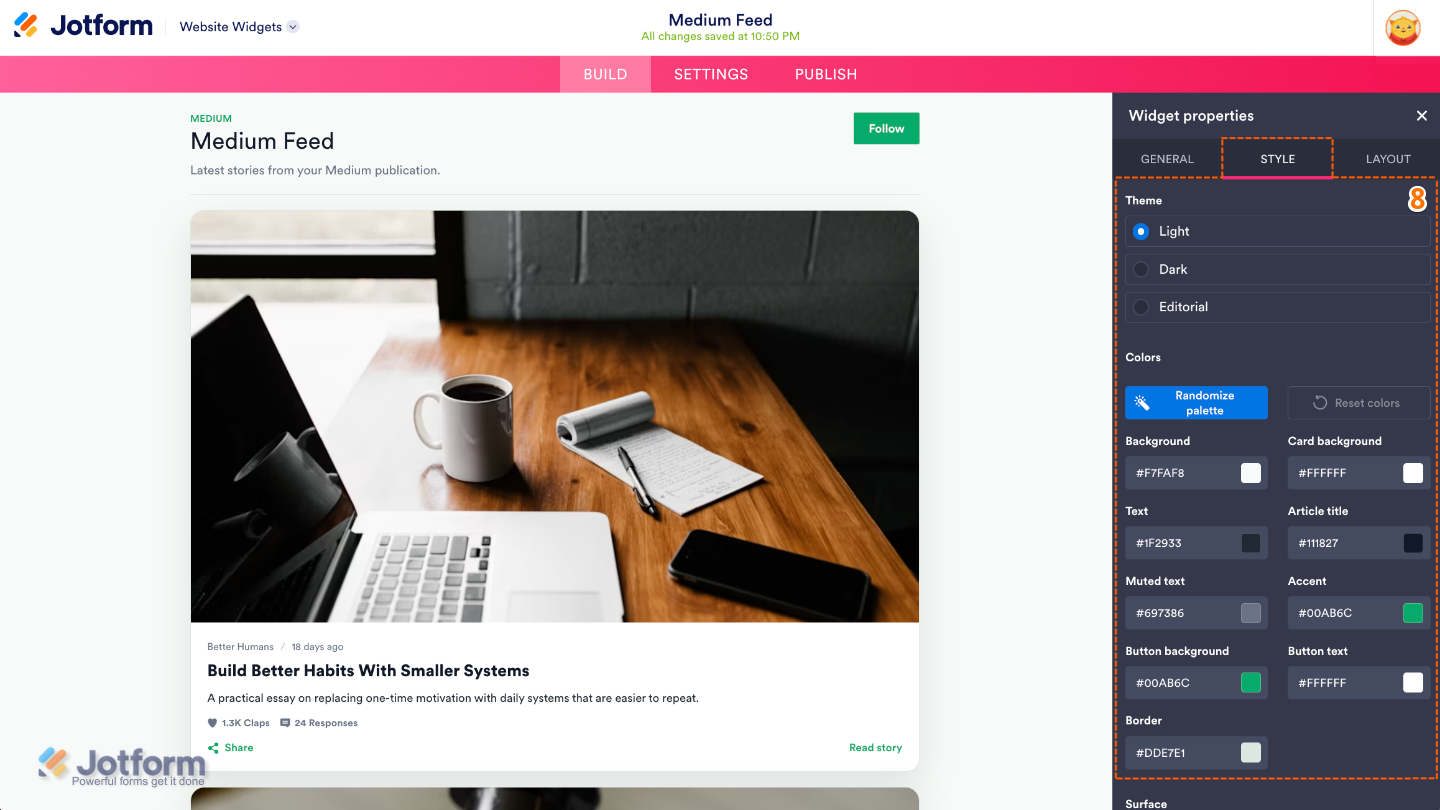
- Now, under the Styles tab, set up these properties:
- Theme — Choose a pre-designed theme to quickly change how your Medium feed looks.
- Colors
- Randomize Palette — Automatically generate a different color palette for the widget.
- Background — Choose the background color of the widget.
- Card Background — Set the background color of each article card.
- Text — Choose the primary text color used throughout the widget.
- Article Title — Set the color of the article titles.
- Muted Text — Choose the color used for secondary text, such as dates or labels.
- Accent — Set the accent color used for highlights, links, and interactive elements.
- Button Background — Choose the background color of the widget buttons.
- Button Text — Set the text color displayed on buttons.
- Border — Choose the color of the borders around cards and other widget elements.
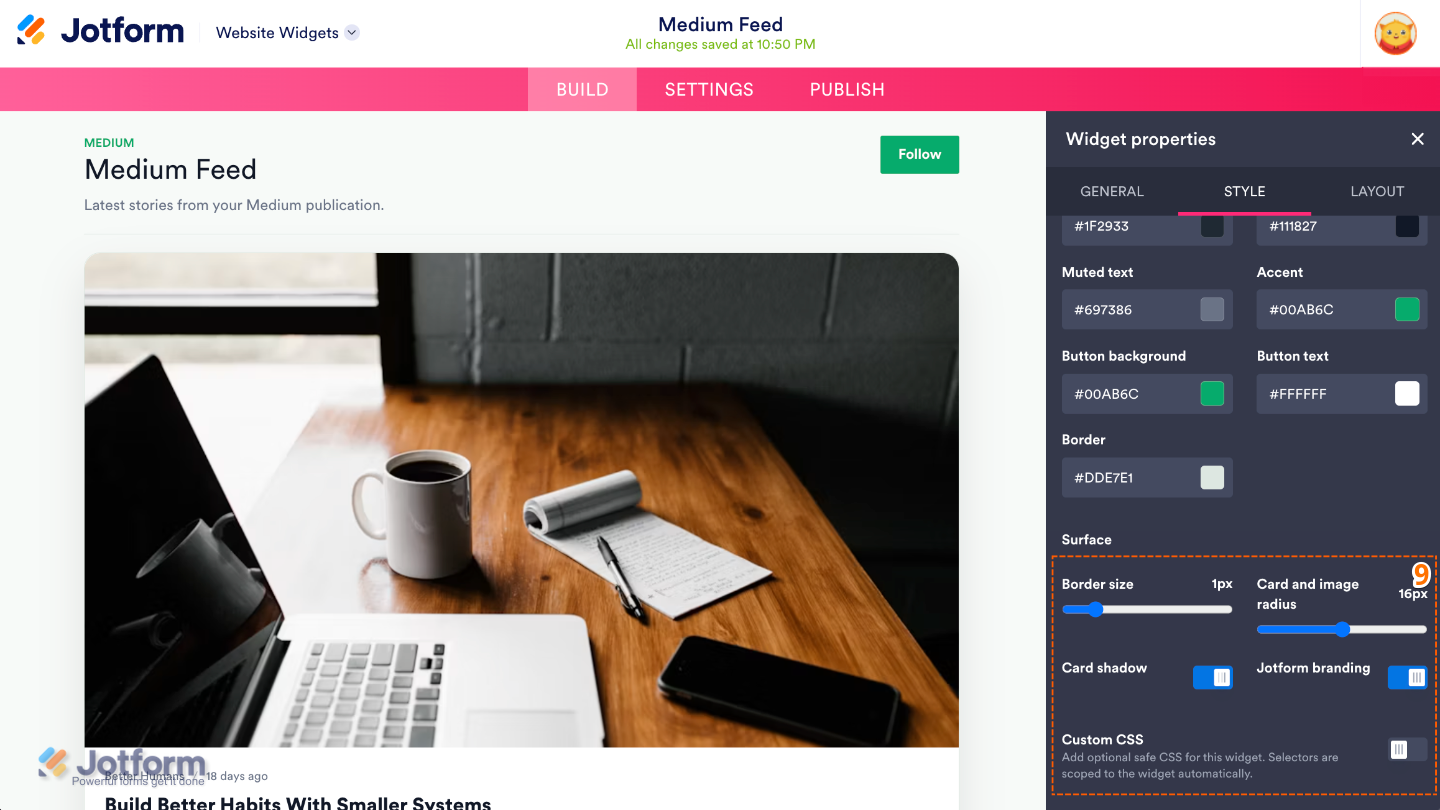
- Then, continue scrolling to customize these properties:
- Surface
- Border Size — Adjust the thickness of the borders around article cards and widget elements.
- Card and Image Radius — Control how rounded the corners of article cards and images are.
- Card Show — Show or hide the borders or card-style boxes around each article.
- Jotform Branding — Show or hide Jotform branding on the widget, depending on your plan.
- Custom CSS — Apply your own CSS code for advanced customization beyond the built-in settings.
- Surface
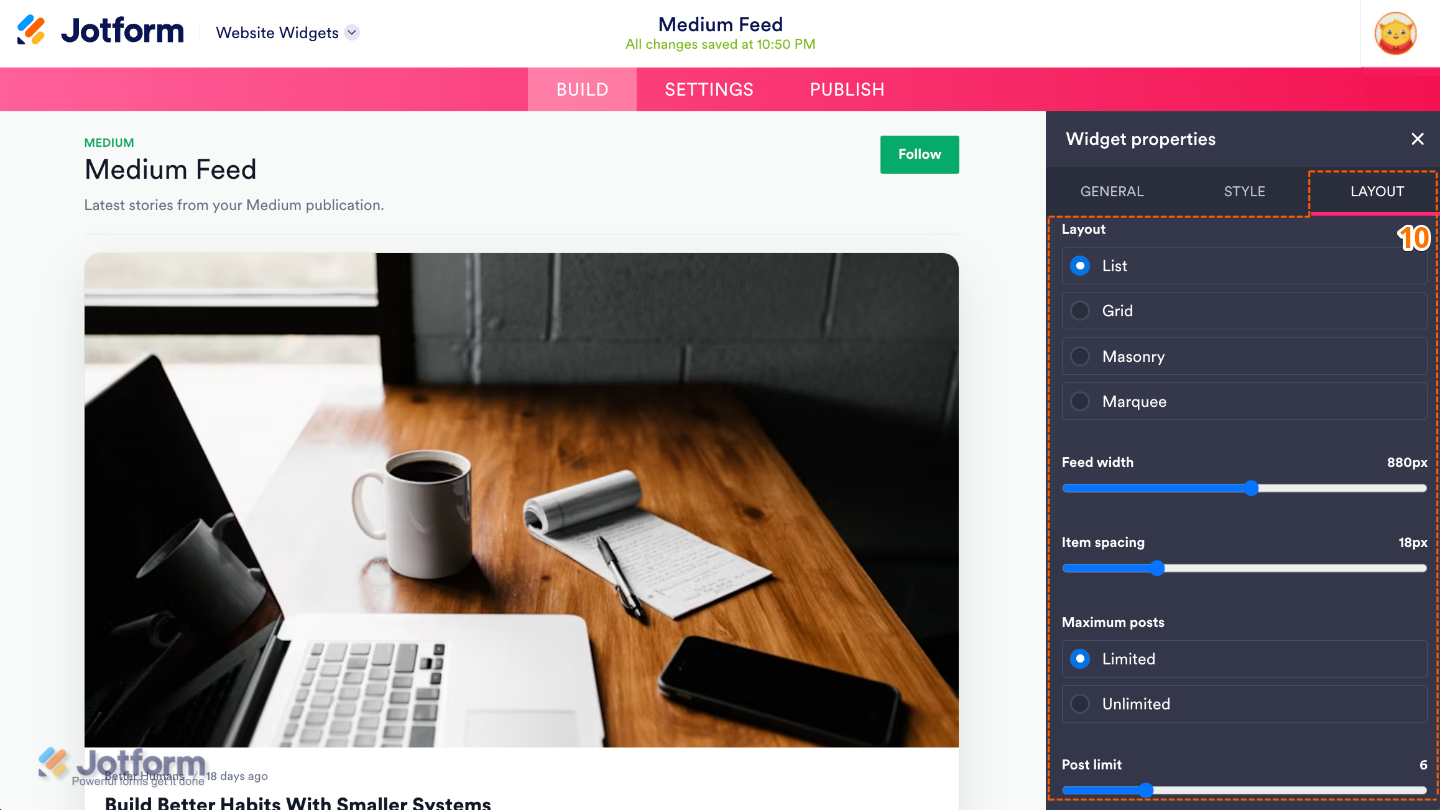
- Next, under the Layout tab, configure these properties:
- Layout — Choose how articles are arranged within the widget.
- Feed Width — Adjust the overall width of the Medium feed to fit your website’s layout.
- Item Spacing — Control the amount of space between individual articles.
- Maximum Posts — Set the maximum number of articles available in the feed.
- Post Limit — Choose how many articles are displayed when the widget first loads.
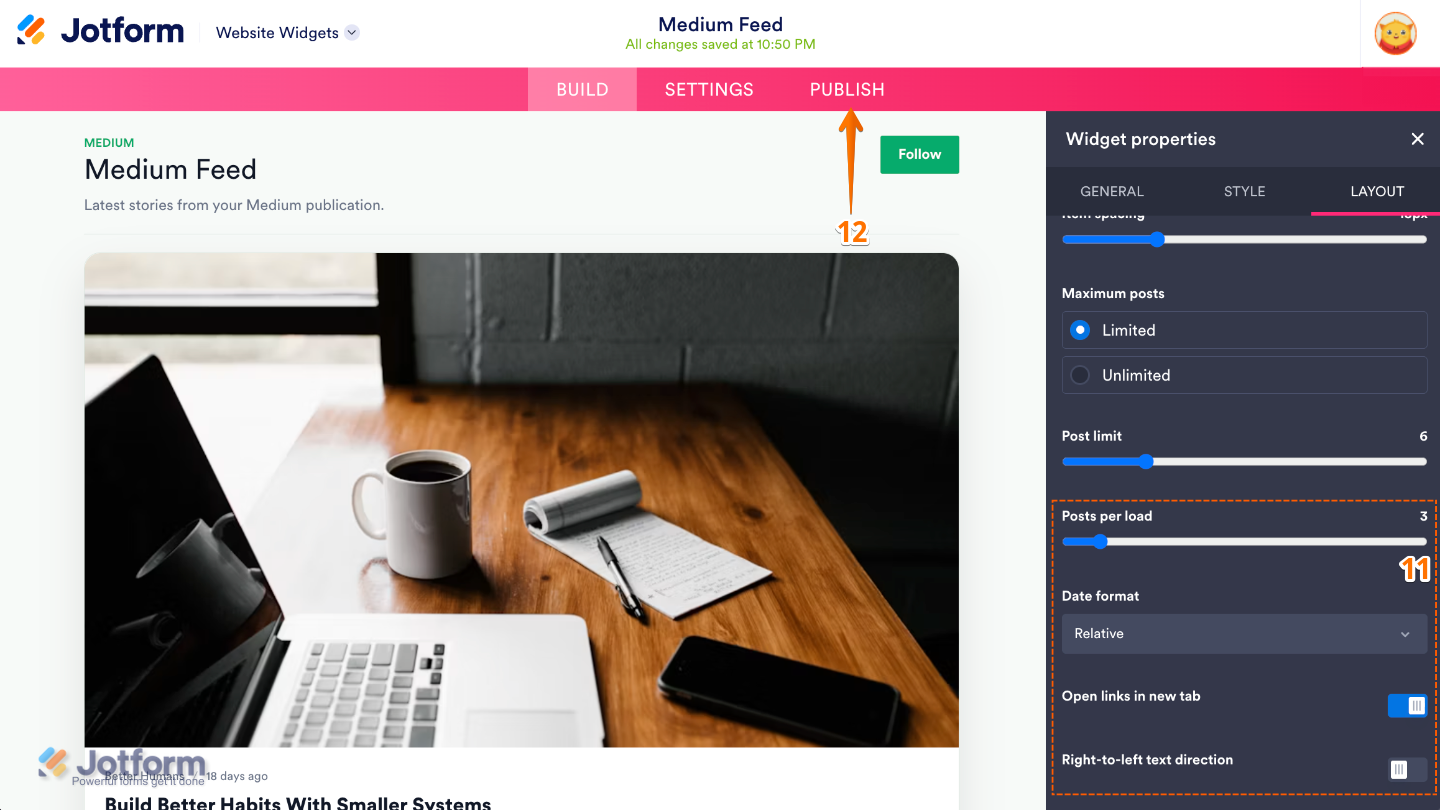
- Then, scroll down and adjust these things:
- Posts Per Load — Specify how many additional articles are displayed each time visitors click Load More.
- Date Format — Choose how publication dates are displayed in the widget.
- Open Links in New Tab — Open Medium articles in a new browser tab when visitors click on them.
- Right-To-Left Text Direction — Enable right-to-left text support for languages such as Arabic or Hebrew.
- Once you’ve finished configuring the widget, in the pink navigation bar at the top of the page, click on Publish.
Note
You’ll be asked to log in to your Jotform account, if you’re not already, or sign up for one. Once you’ve done that, you’ll be able to get the embed code for your widget.
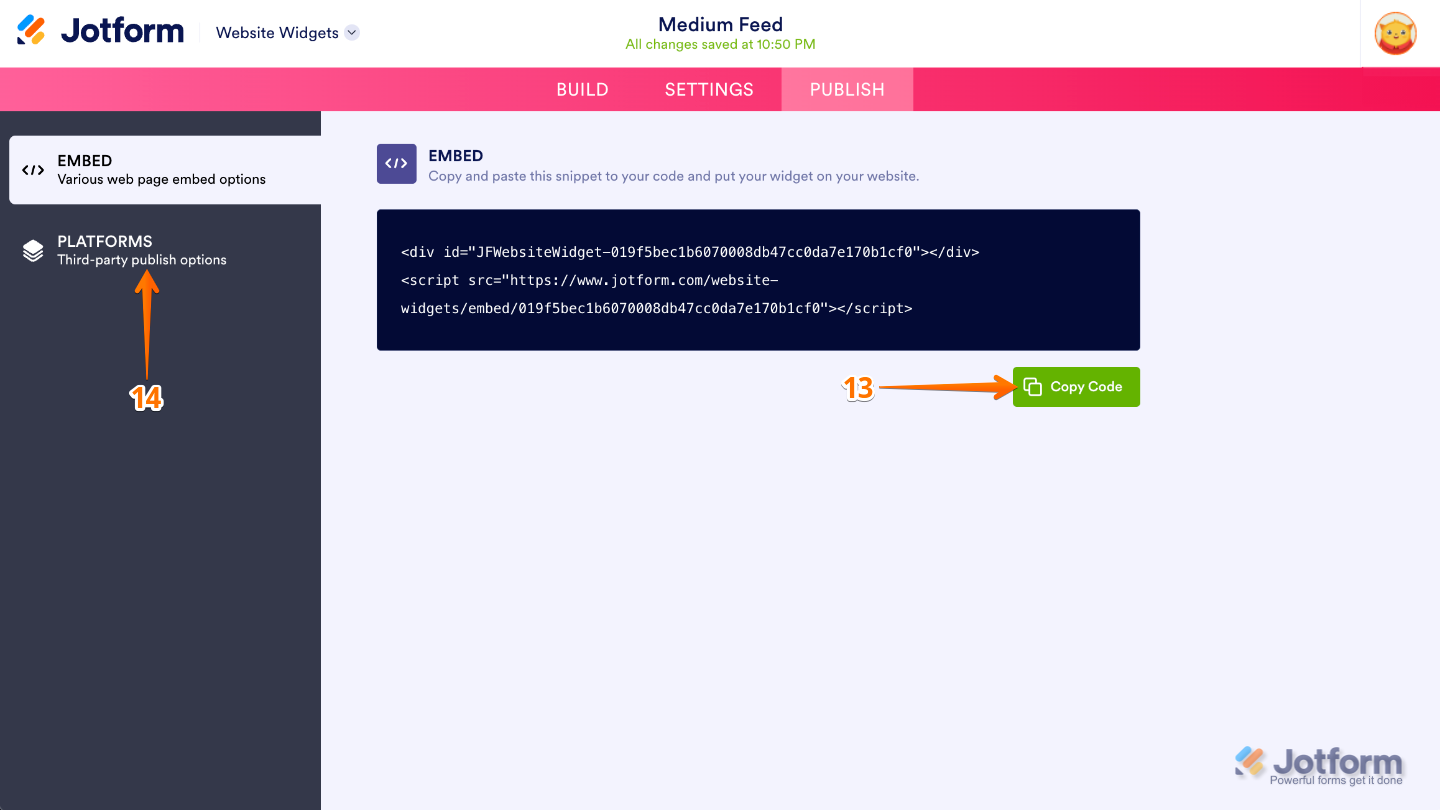
- Then, in the Embed section, click on Copy Code, and, if you already know how, paste that into the Embed section on your platform, and you’re good to go.
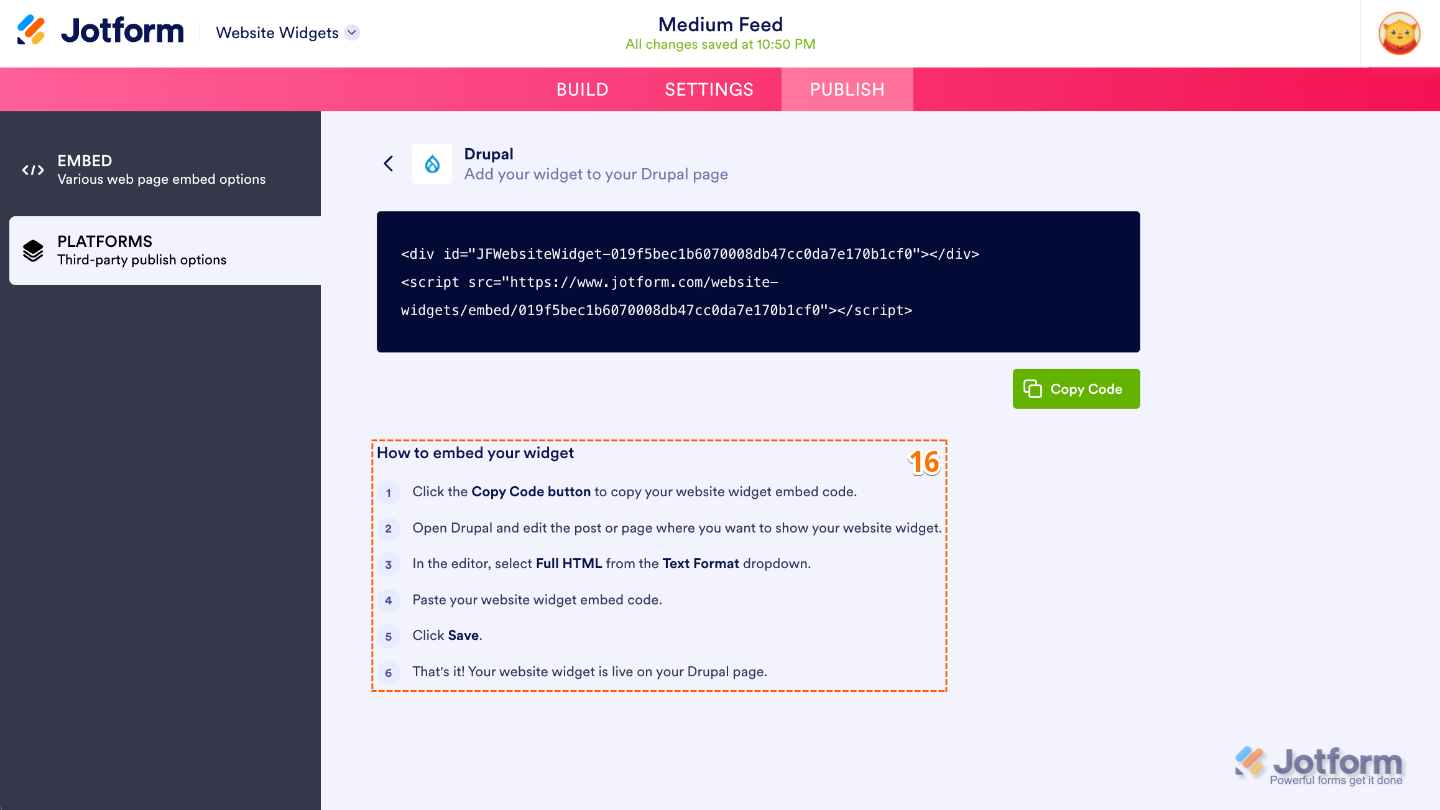
- To view embedding instructions for your widget, click on Platforms in the menu on the left side of the page.
- Next, in the Platforms section on the right, select the platform you want to view embedding instructions for. Or, use the Search bar at the top of the section to find it easily.
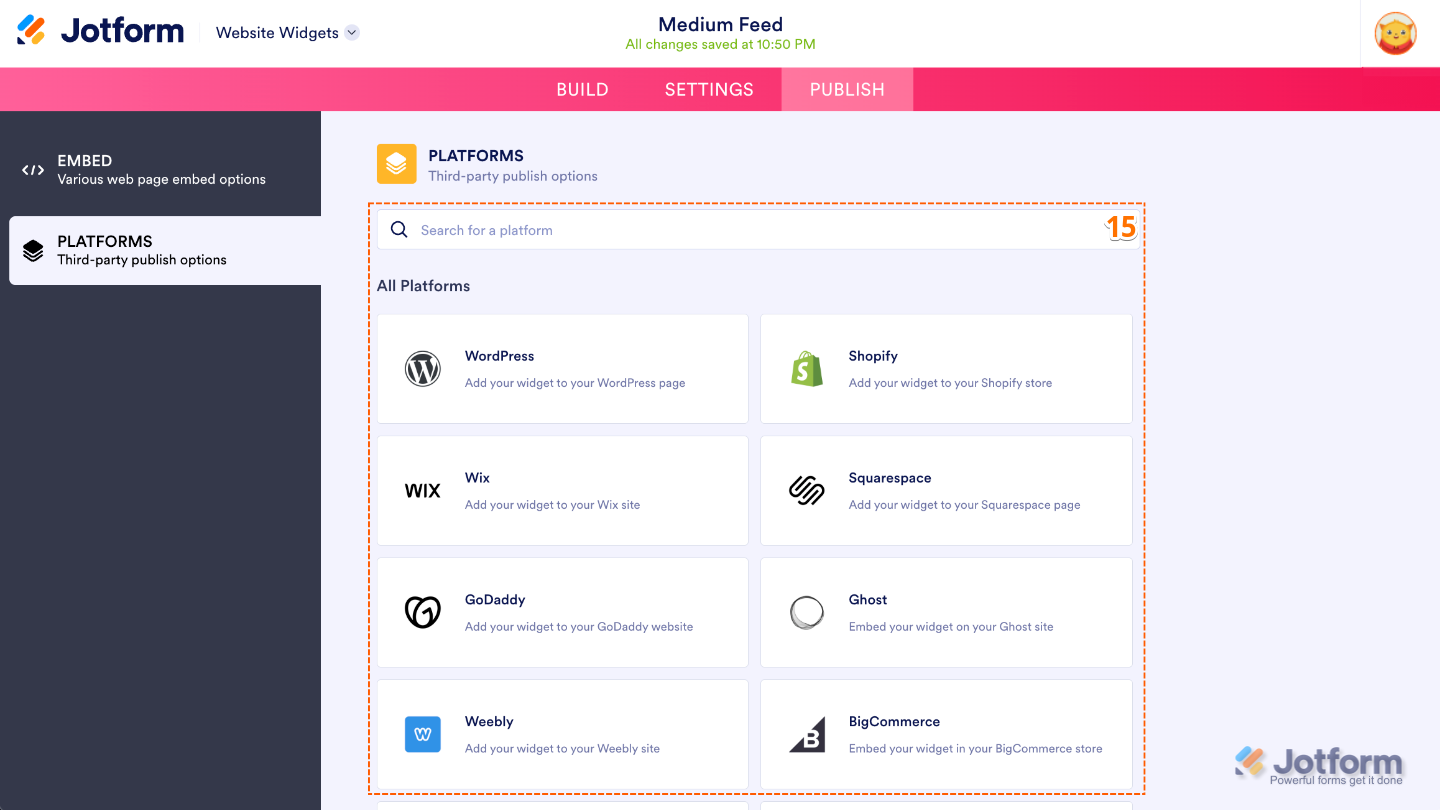
- Then, follow the steps in the How to Embed Your Widget section to add it to your website.
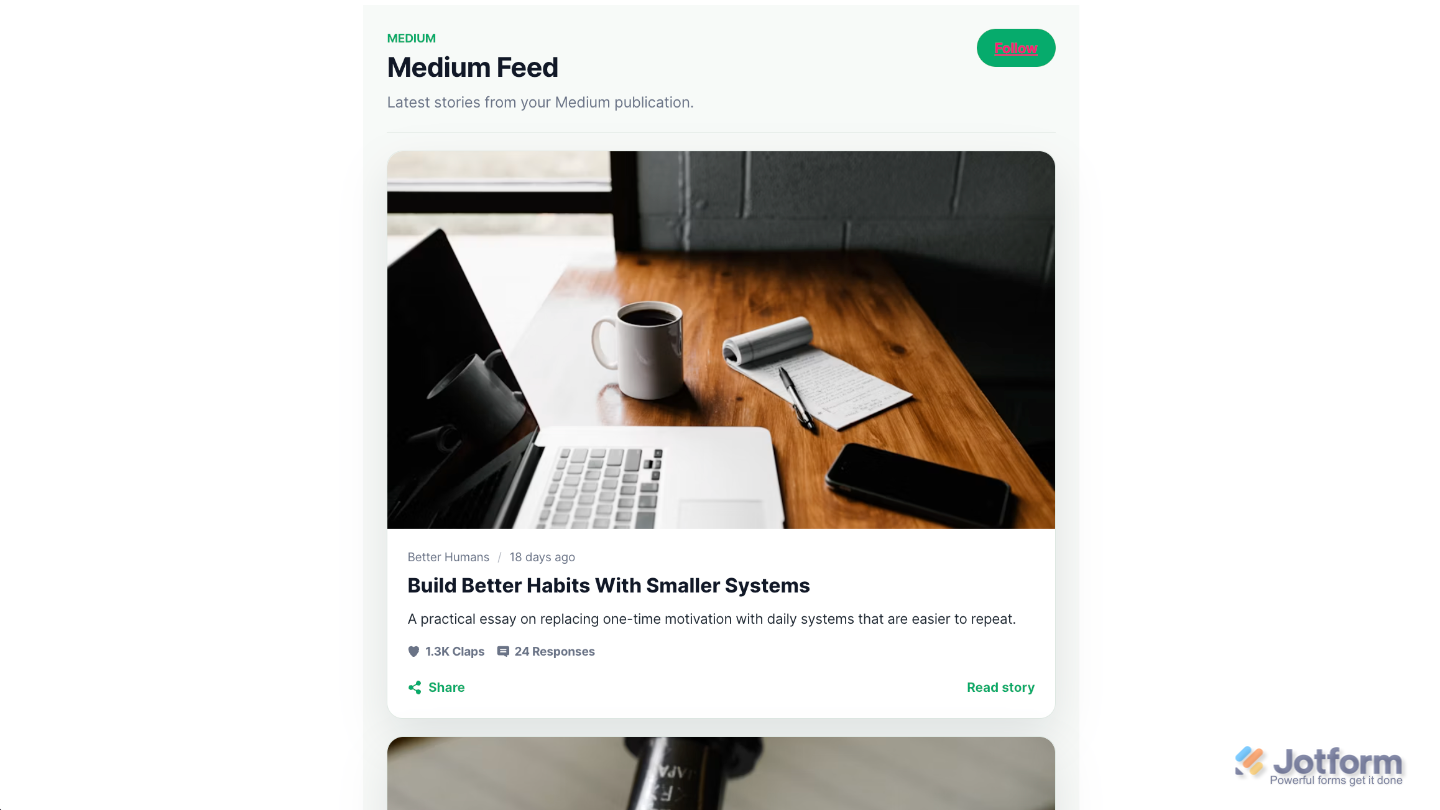
That’s it! Your Medium Feed widget will appear on your website based on how you set it up. Take a look at the screenshot below to see how it’ll look:
Note
You can manage the website widgets you’ve created at any time from your account. For a full breakdown of how to do it, head over to our guide on How to Manage Website Widgets.
Pro Tips
- Display featured images and article excerpts to make your feed more engaging and encourage visitors to explore your content.
- Set a reasonable Post Limit so your page loads quickly while still showcasing enough of your latest content.


Send Comment: