Integrating your form with ClickUp lets you collect task requests and project details through your form and send them straight to your ClickUp account as tasks, subtasks, or comments. It’s helpful for handling requests, assignments, and feedback in one place and keeps everything moving without switching tools. This works well for project managers, team leads, and operations teams that want form responses to feed directly into ClickUp.
Adding and Setting Up Actions
Setting up actions that send form data to ClickUp is quick—here’s what to do:
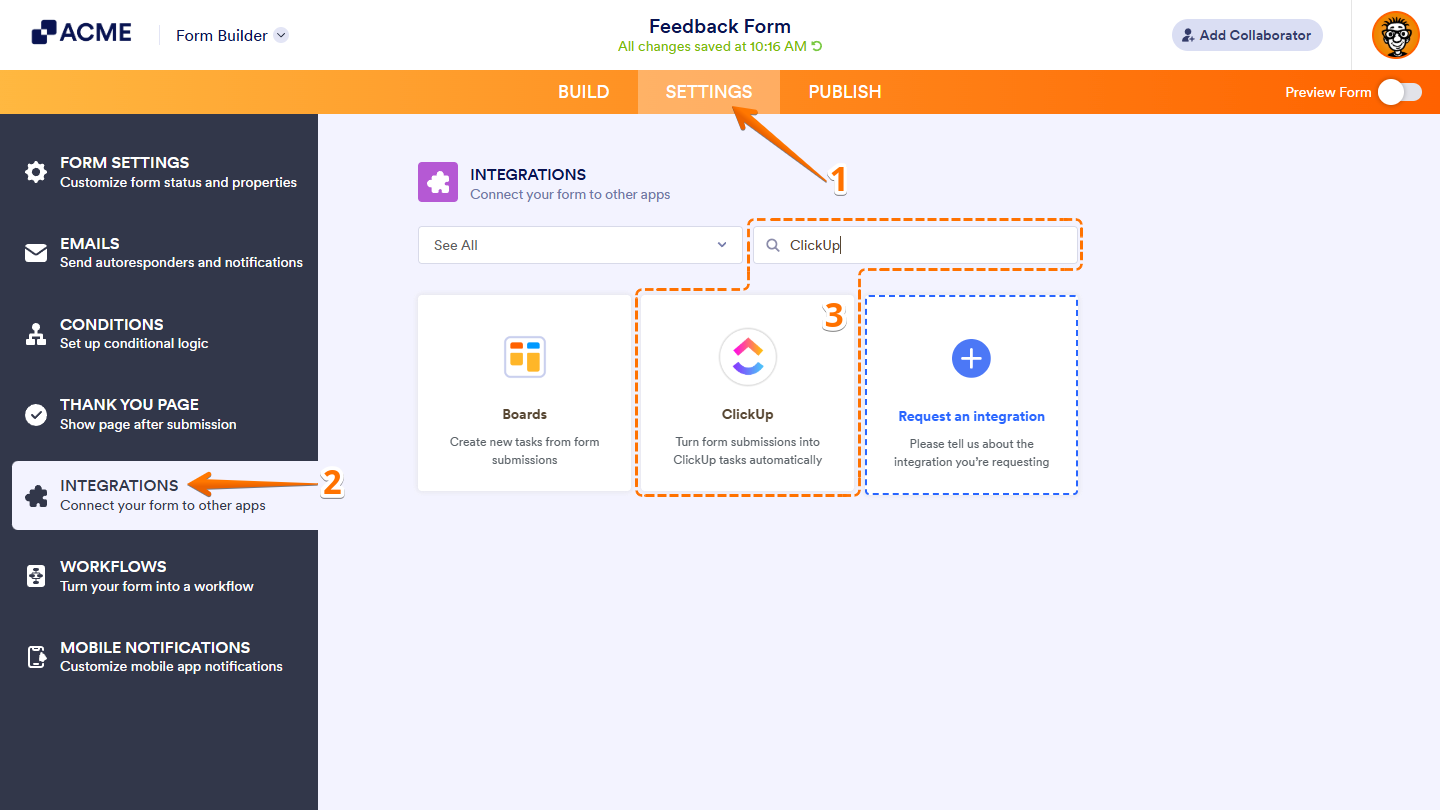
- In Form Builder, in the orange navigation bar at the top of the page, click on Settings.
- Then, in the menu on the left side of the page, click on Integrations.
- Now, in the Integrations section on the right, search for ClickUp and click on it.
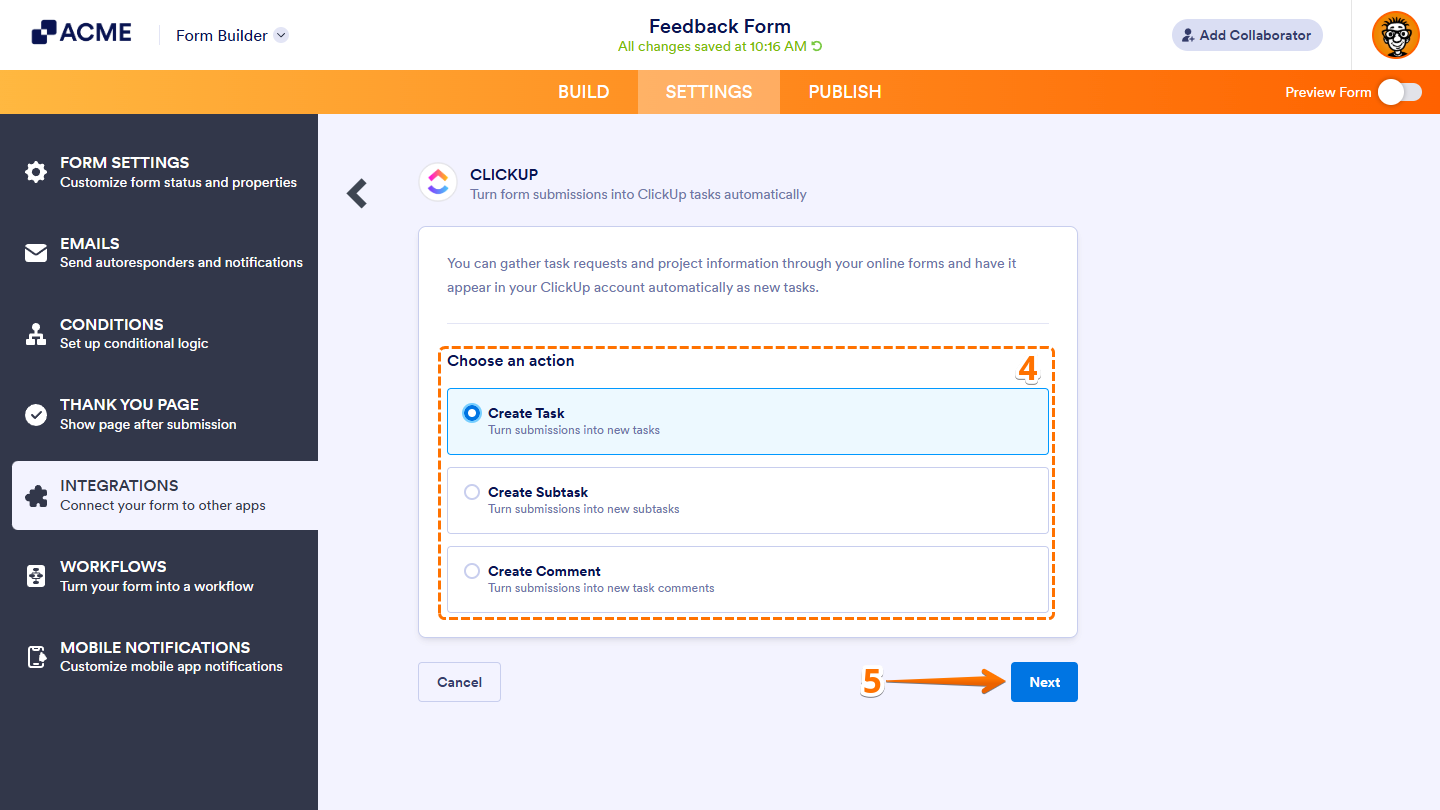
- In the ClickUp section, select one of the following actions:
- Create Task — Turns form submissions into new tasks in ClickUp.
- Create Subtask — Turns form submissions into new subtasks under an existing task in ClickUp.
- Create Comment — Turns form submissions into comments on an existing task in ClickUp.
- Then, click on Next.
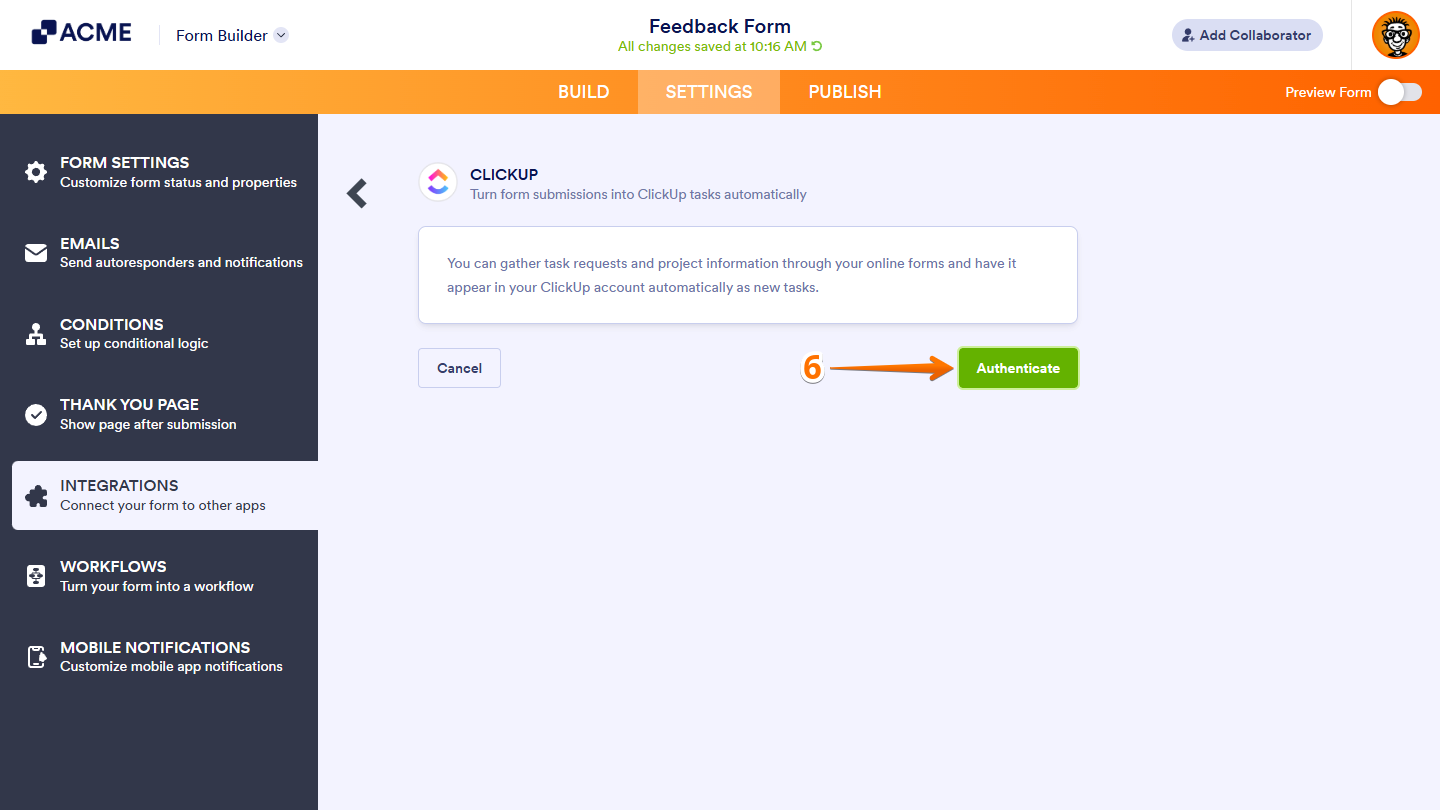
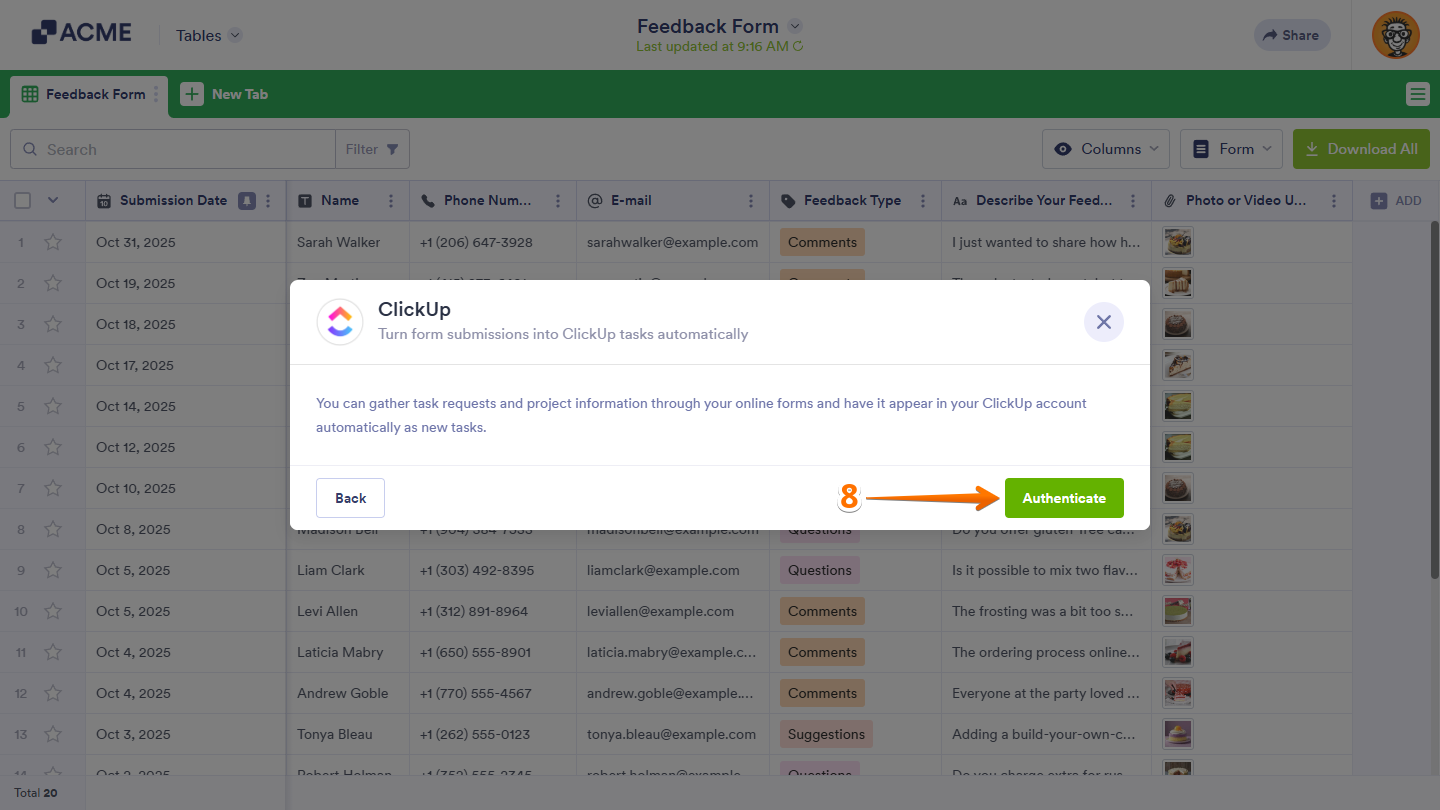
- Now, click on Authenticate. And then, in the pop-up window, log in and authorize access for the integration to your ClickUp account.
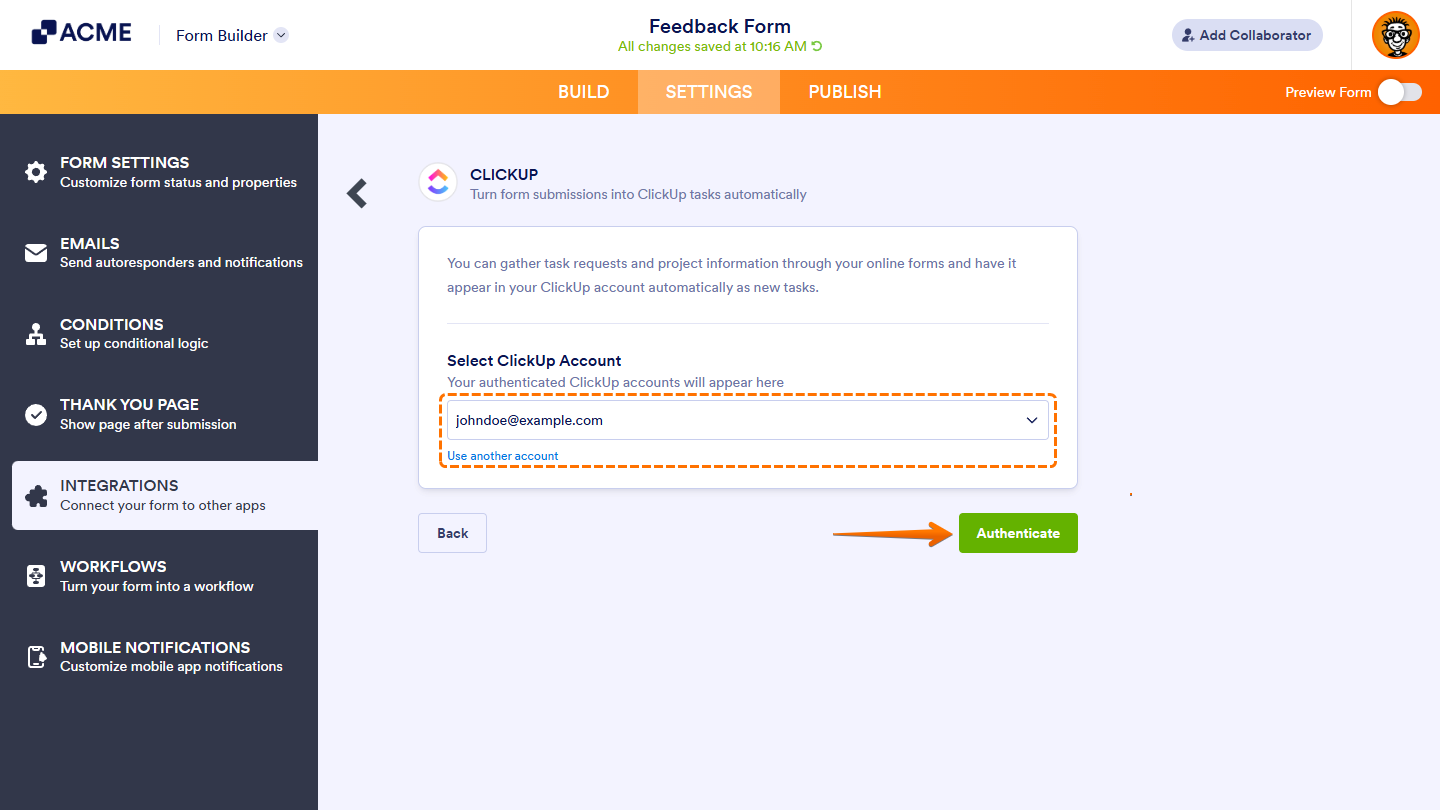
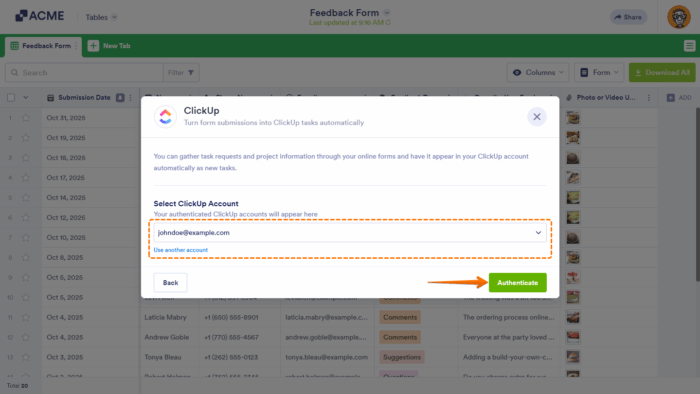
If there is a saved ClickUp account you’ve integrated any of your forms with before, you can choose its email address from the dropdown and click on the Authenticate button on the right to use it. Or, you can also click on Use Another Account below the dropdown to log in and authorize access for the integration to a different ClickUp account.
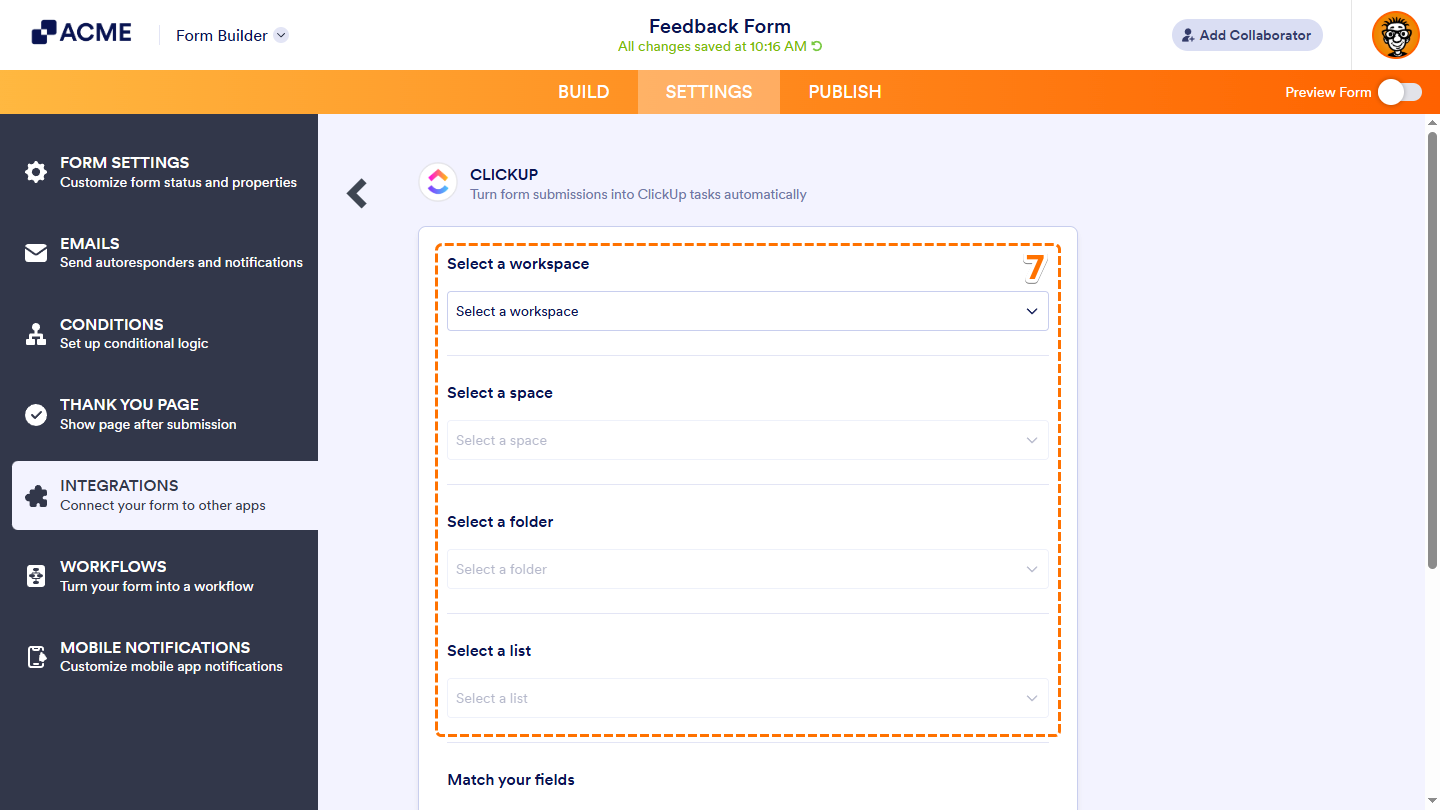
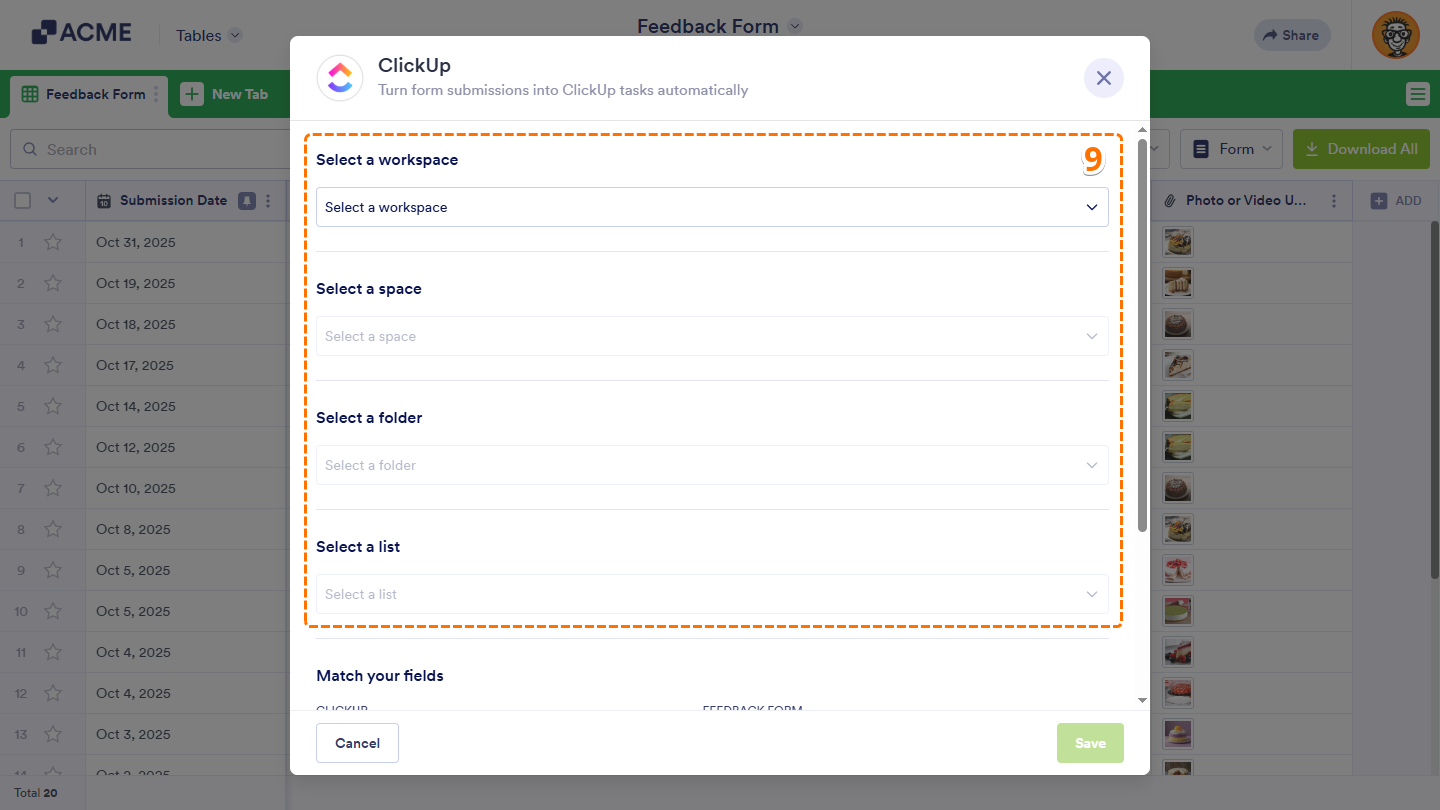
- Then, in Integration Settings, you’ll see this list of settings you can configure:
- Select a Workspace — Choose the ClickUp workspace where the data will go.
- Select a Space — Pick the Space inside your workspace where the item will be created.
- Select a Folder — Choose the Folder that organizes the tasks under your selected Space.
- Select a List — Select the specific List where ClickUp will add the task, subtask, or comment.
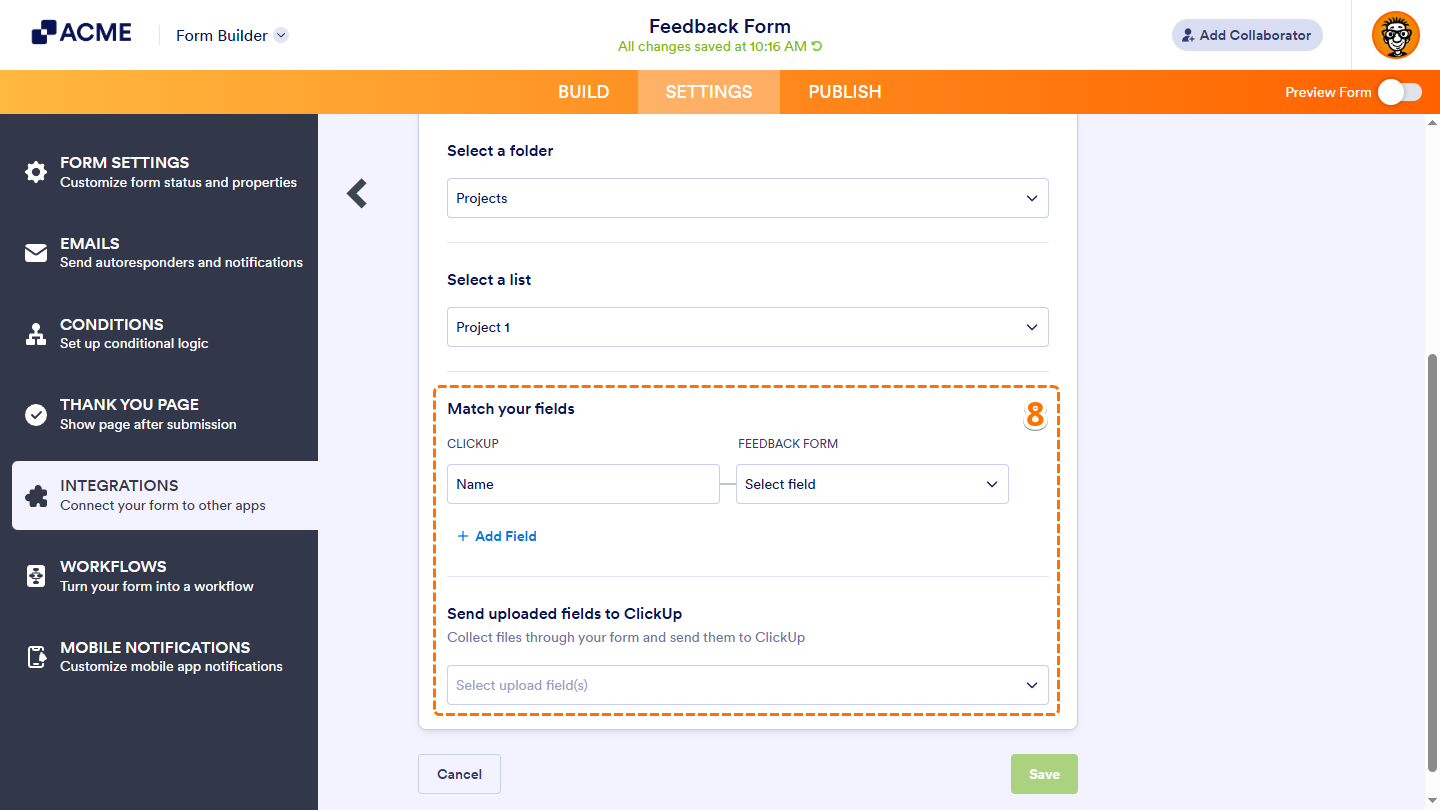
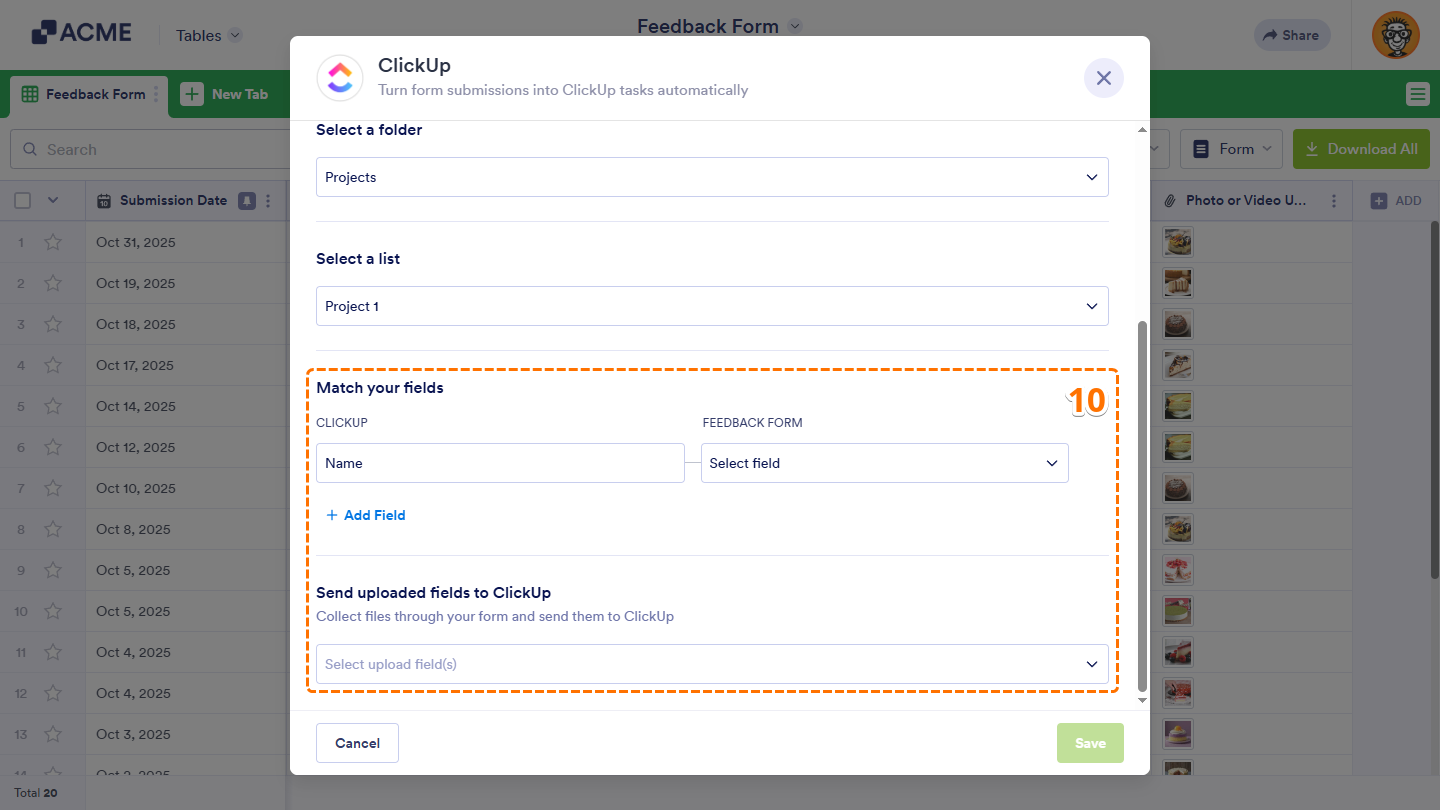
- Next, scroll down to the bottom of the page and, depending on the action you chose, continue to set up these settings:
- Select a Task — This only shows when the Create Subtask or Create Comment action is selected. Choose the specific ClickUp task where the subtask or comment will be added.
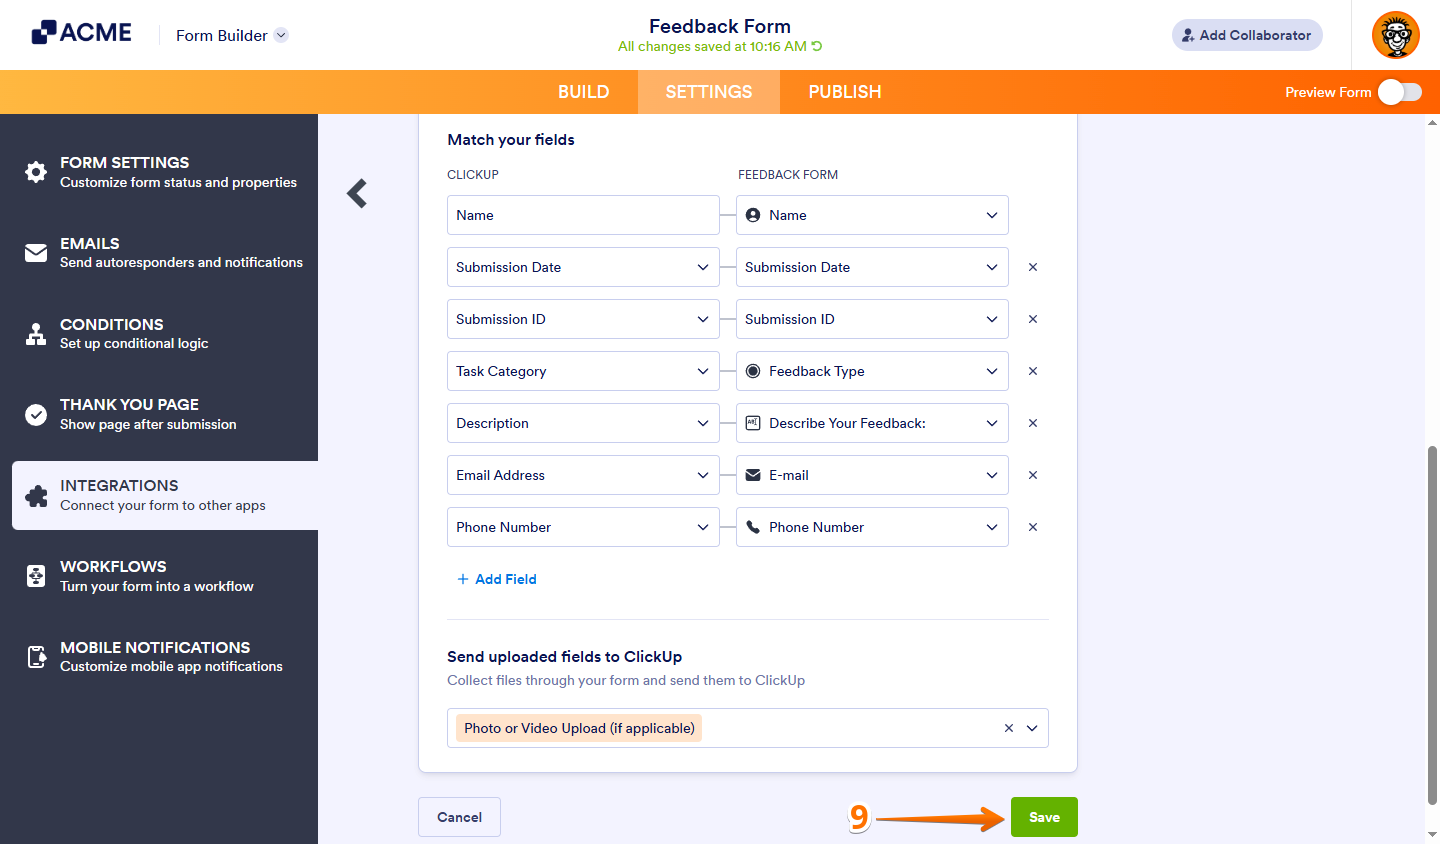
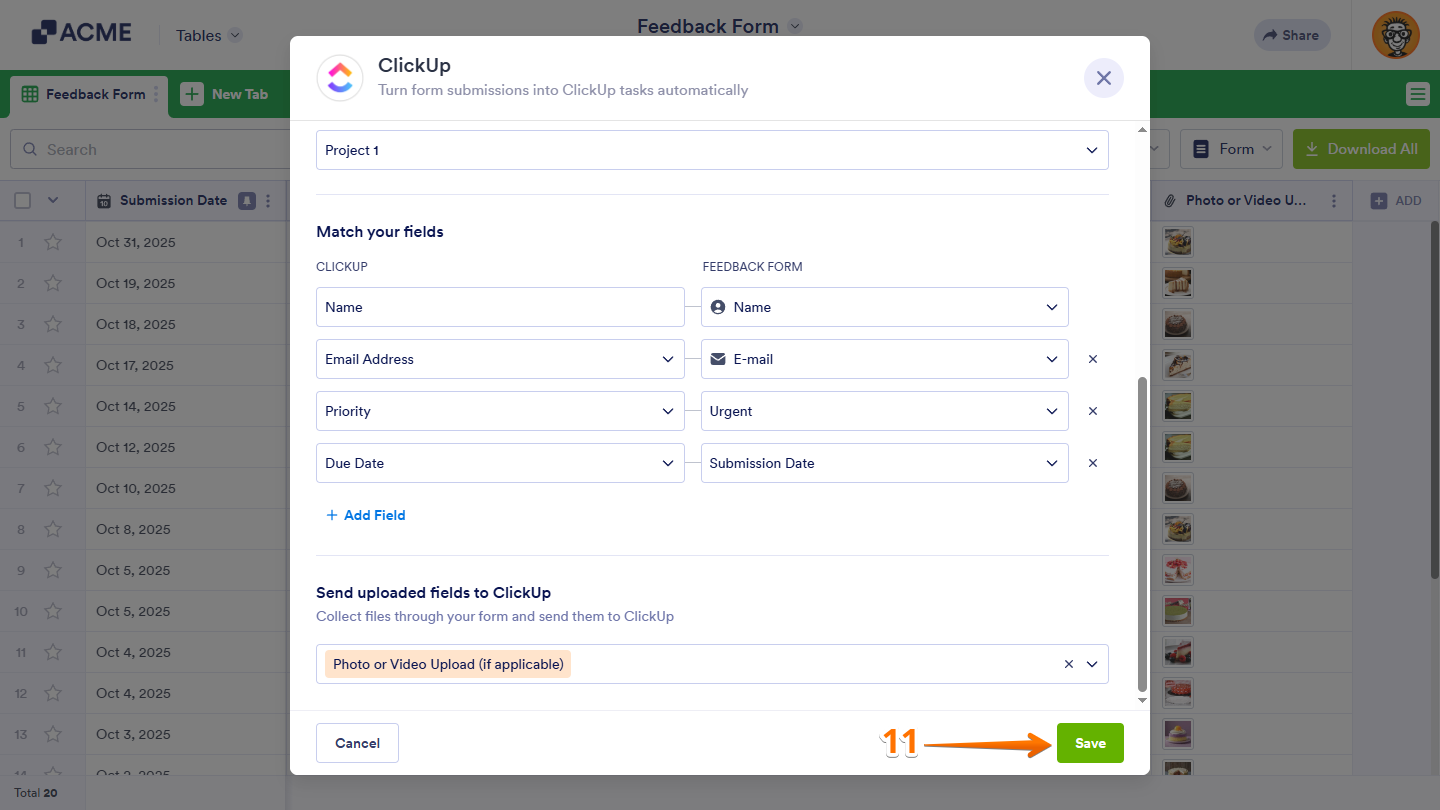
- Match Your Fields — This only shows when the Create Task or Create Subtask action is selected. Map form fields to ClickUp fields so information goes to the right places.
- Send Uploaded Files to ClickUp — This only shows when the Create Task or Create Subtask action is selected. Include uploaded files from the form as attachments in ClickUp.
- Customize Your Comment Title — This only shows when the Create Comment action is selected. Set a title that appears above the comment created in ClickUp.
- Add Form Fields to Comments — This only shows when the Create Comment action is selected. Add form responses directly inside the ClickUp comment.
- Once everything is set, click on Save.
That’s it. You’ve successfully set up an action for your ClickUp integration. Click on the Add New Action button on the top right side of the All Actions section if you want to add another one.
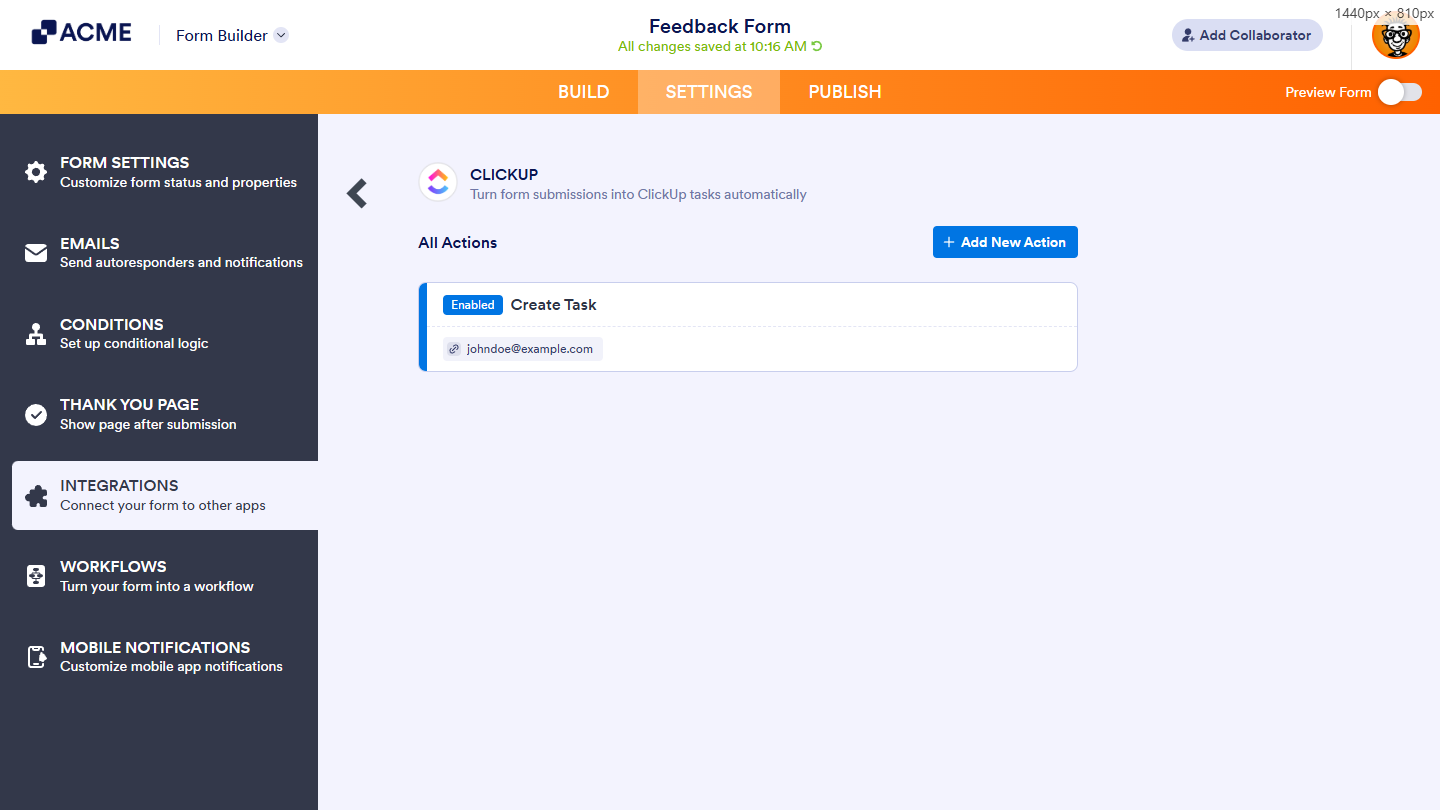
Note: You can use the same ClickUp account to run different actions, or connect your form to multiple ClickUp accounts to run the same or different actions during submissions.
Managing Actions
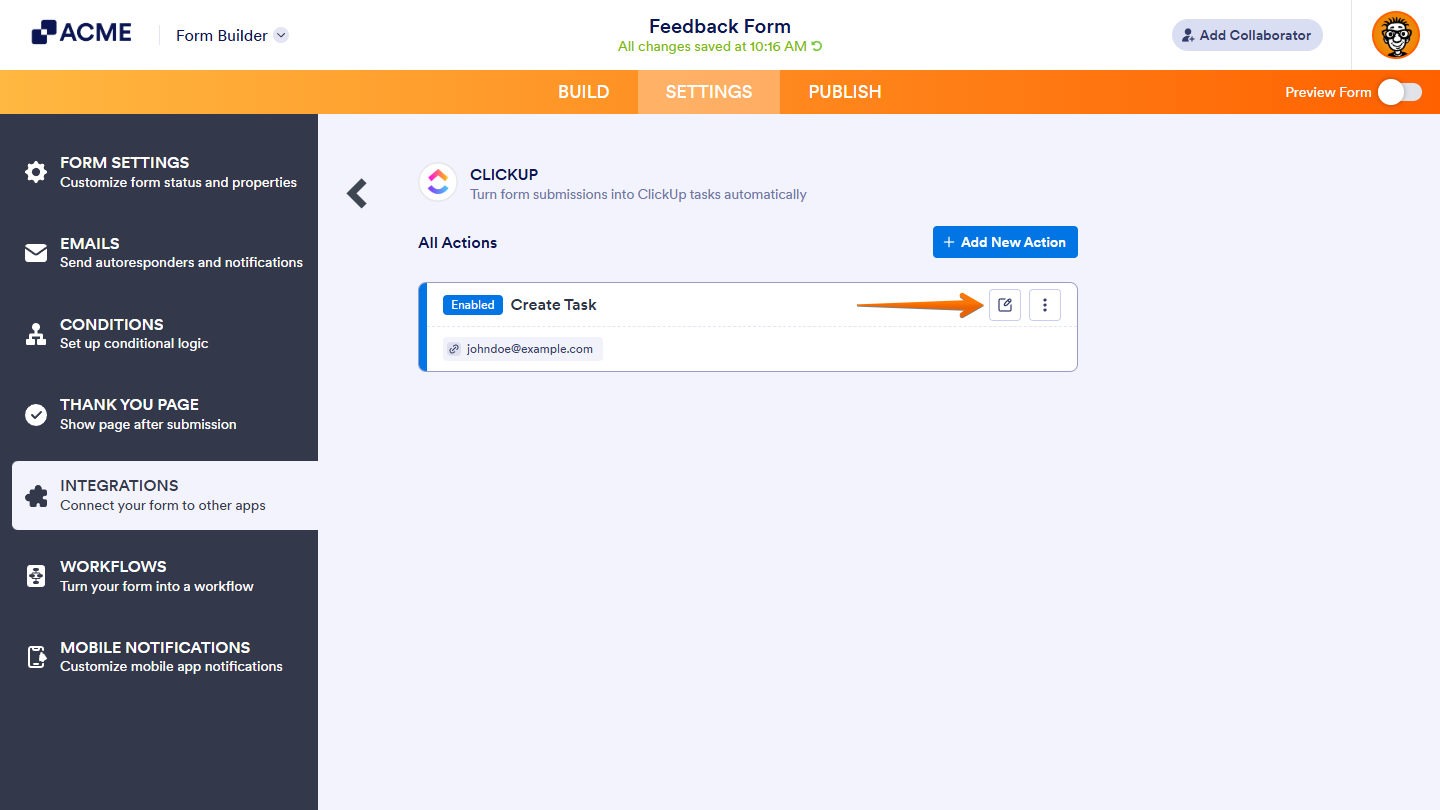
Once you’ve added your actions, you can manage them anytime to keep things organized and running the way you want. You can edit an action, check its logs, rename it, turn it on or off, or delete it if you don’t need it anymore.
Hover your mouse over an action and, on the right side of it, click on the Edit icon to open and update it in the Integration Settings.
Note: Always click the Save button after making changes to make sure they’re applied.
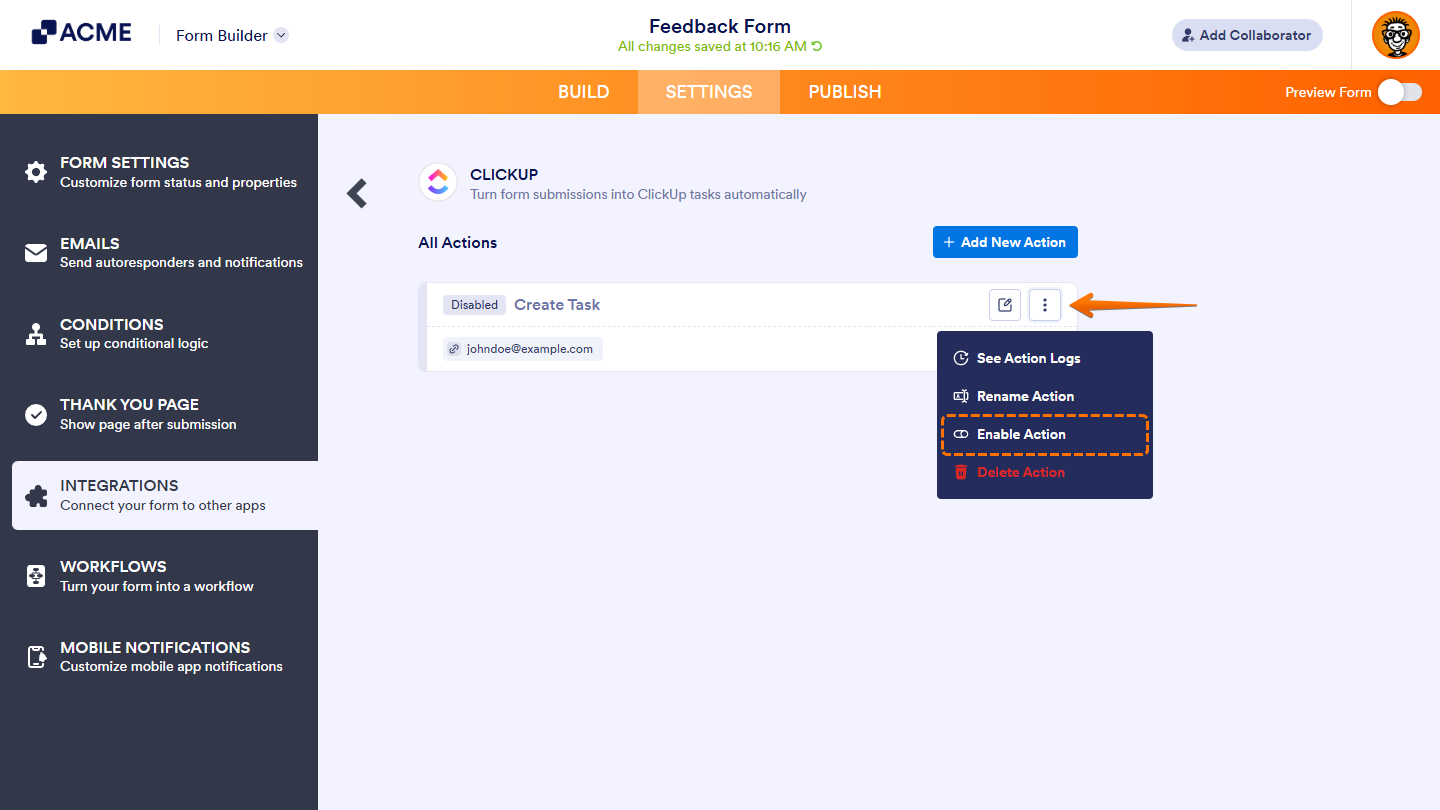
Click on the Three Dots icon next to the Edit icon and, in the menu that comes up, select one of the following options:
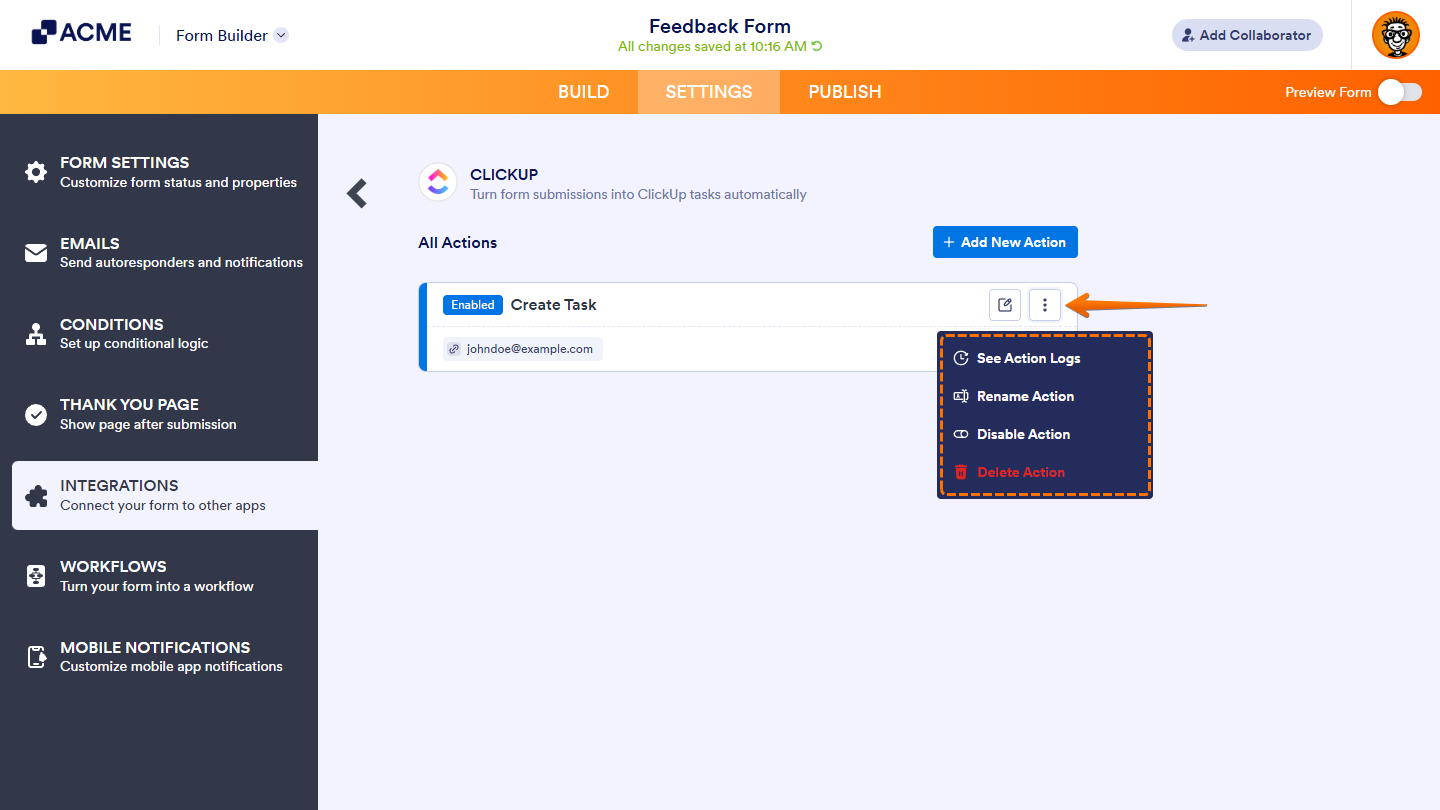
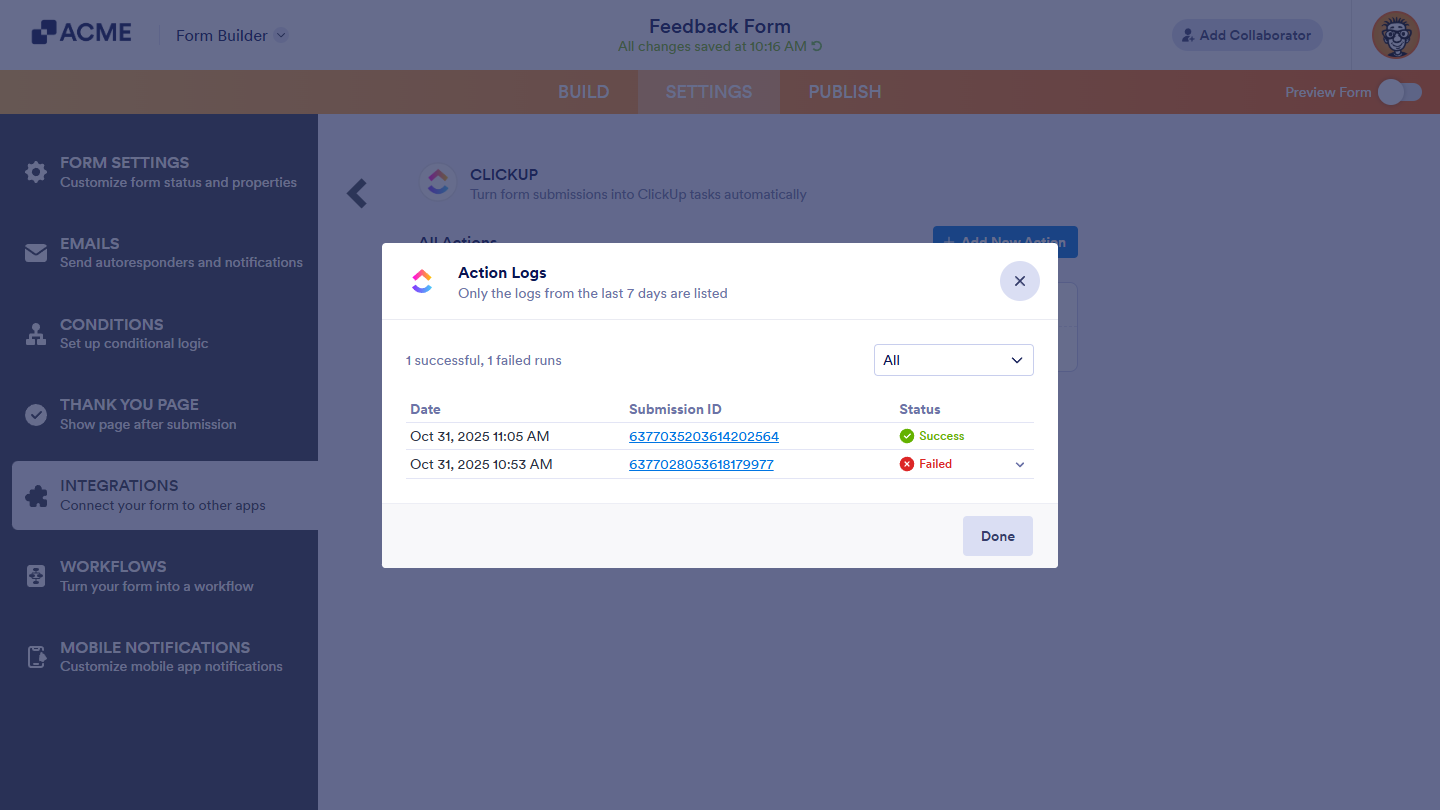
Viewing Action Logs
This opens the Action Logs window, where you’ll see successful and failed run logs of a ClickUp integration action from the last seven days.
Notes:
- Use the dropdown menu on the right side of the Action Logs window to filter logs by All, Successful, or Failed.
- In the Status column, click on the Downward Arrow icon next to Failed to view the error details of a log.
- In the Submission ID column, click on an ID to open and review the details of the submission in another browser tab.
Renaming Actions
This gives a ClickUp integration action a new name. It helps you label actions more clearly, match recent changes in your workflow, and tell similar actions apart in the All Actions section when they serve different purposes in ClickUp.

Disabling Actions
This temporarily stops a ClickUp integration action from running. It’s useful when you need to pause it without deleting it or affecting other actions in the integration. When an action is disabled, the indicator next to its name changes from Enabled to Disabled. Click on the Three Dots icon and then select Enable Action to turn it back on.
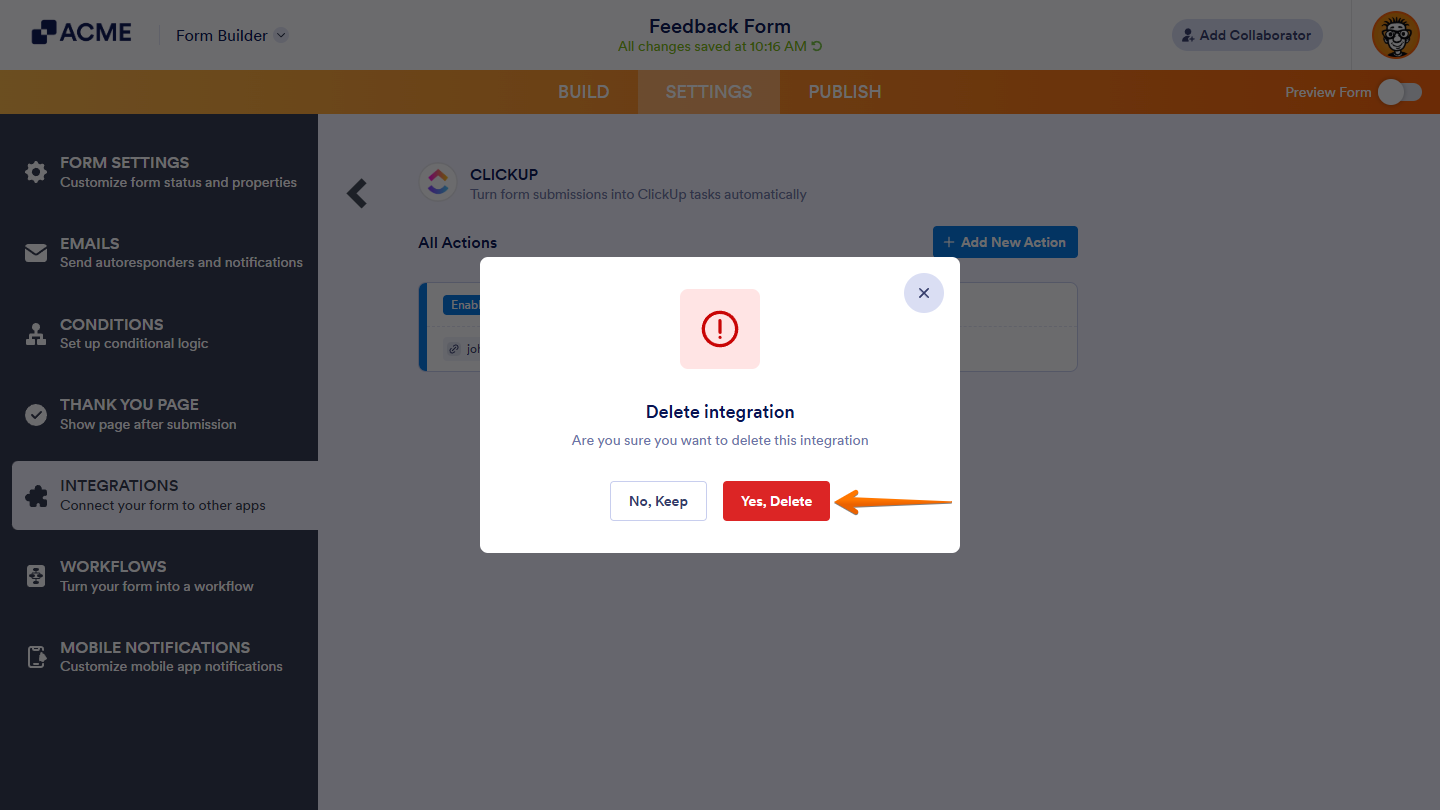
Deleting Actions
This permanently deletes a ClickUp integration action and is helpful when it’s no longer needed and you want to keep your setup organized. After you click on Yes, Delete in the confirmation window, the action is removed forever. If you only need to pause it, consider disabling it instead.
Setting Up Phone Number Field for ClickUp
ClickUp integration works with phone numbers that include country codes. Enabling the Country Code in your form’s Phone Number field prevents errors when integration actions are triggered during form submissions. Here’s what to do:
- In Form Builder, select the Phone Number field and then, on the right side of it, click on the Gear icon.
- Then, in the Phone Properties menu that opens on the right side of the page, under the Options tab, toggle on Country Code and then toggle off Input Mask.
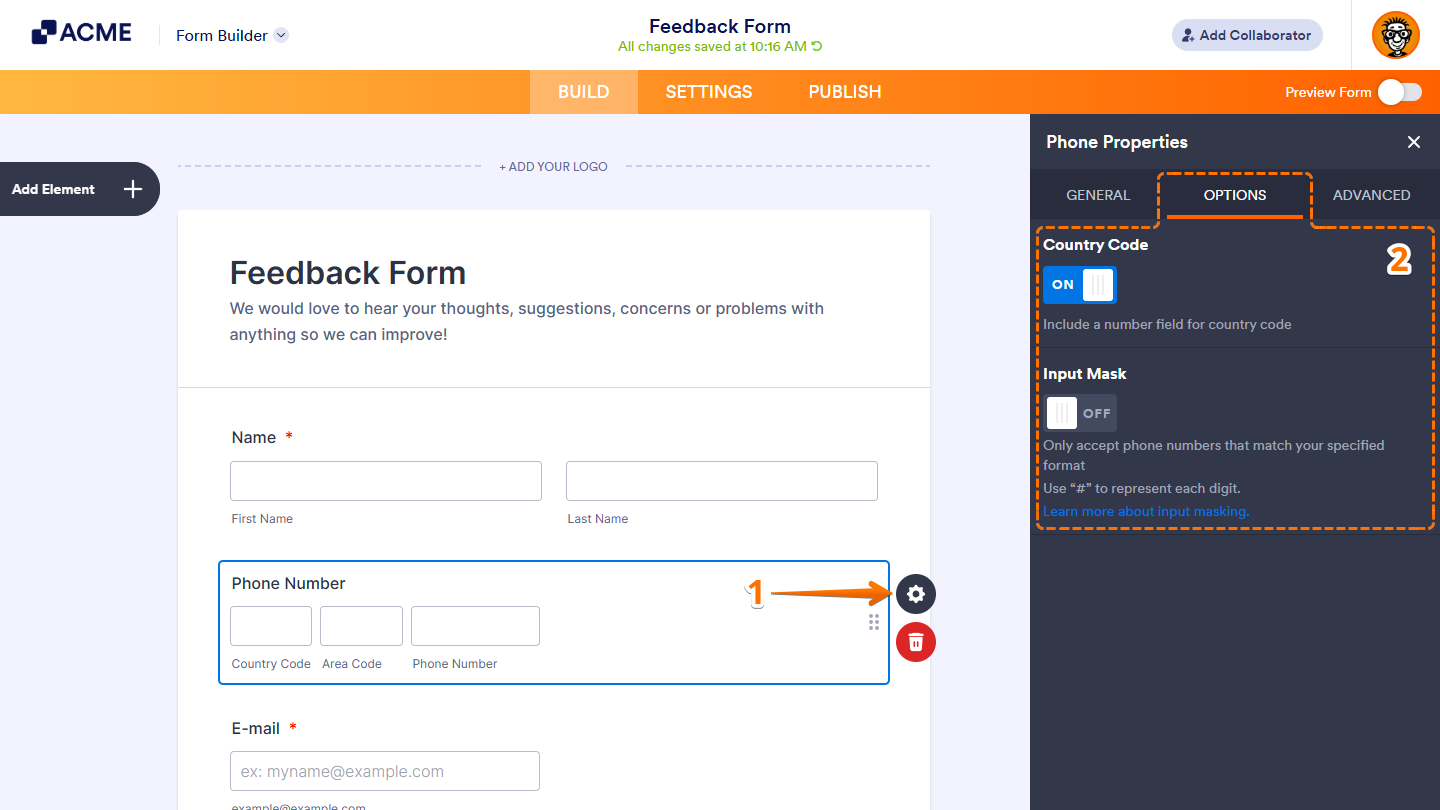
That’s it. The Country Code is now enabled, so phone numbers submitted through your form will work smoothly with your ClickUp integration.
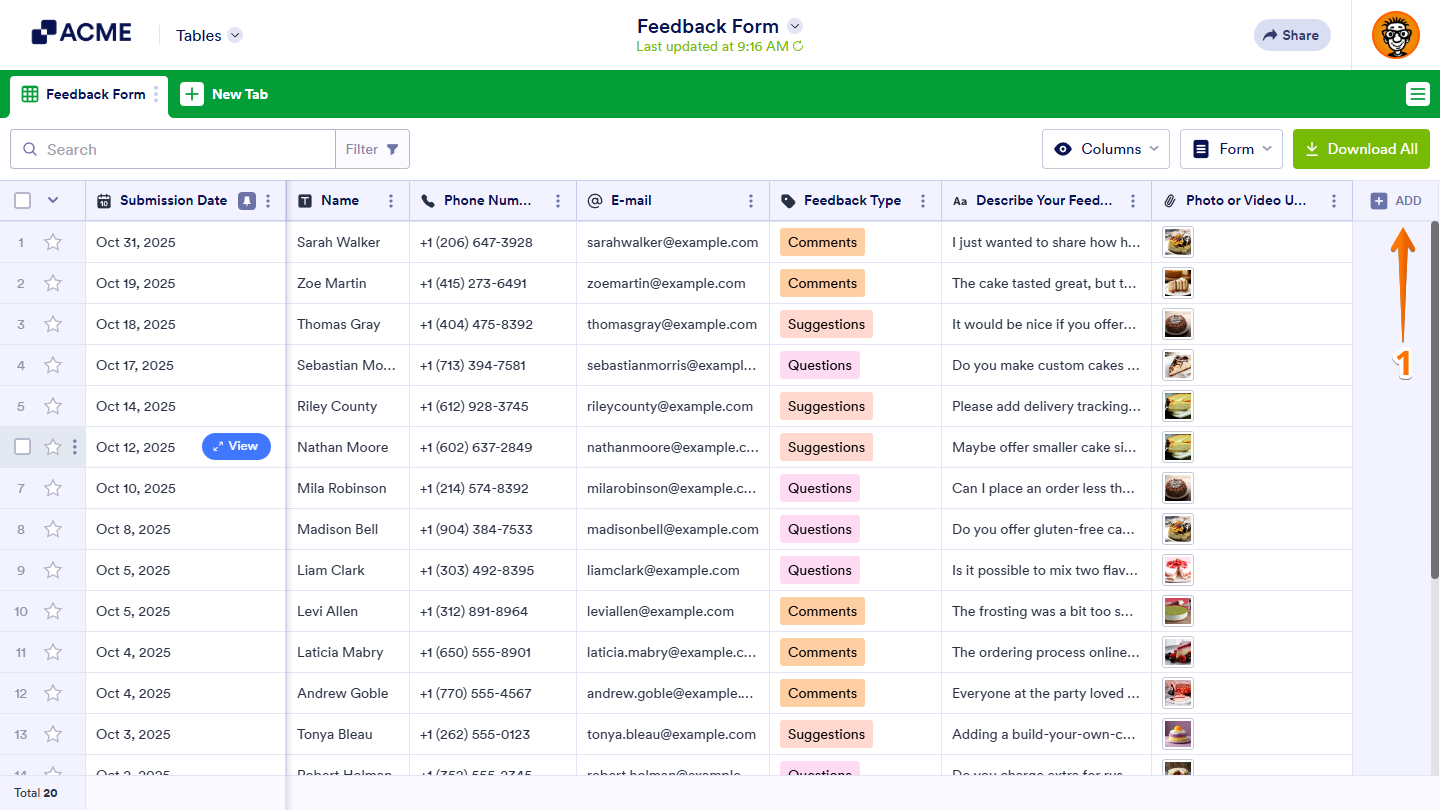
Sending Form Data to ClickUp Through Tables
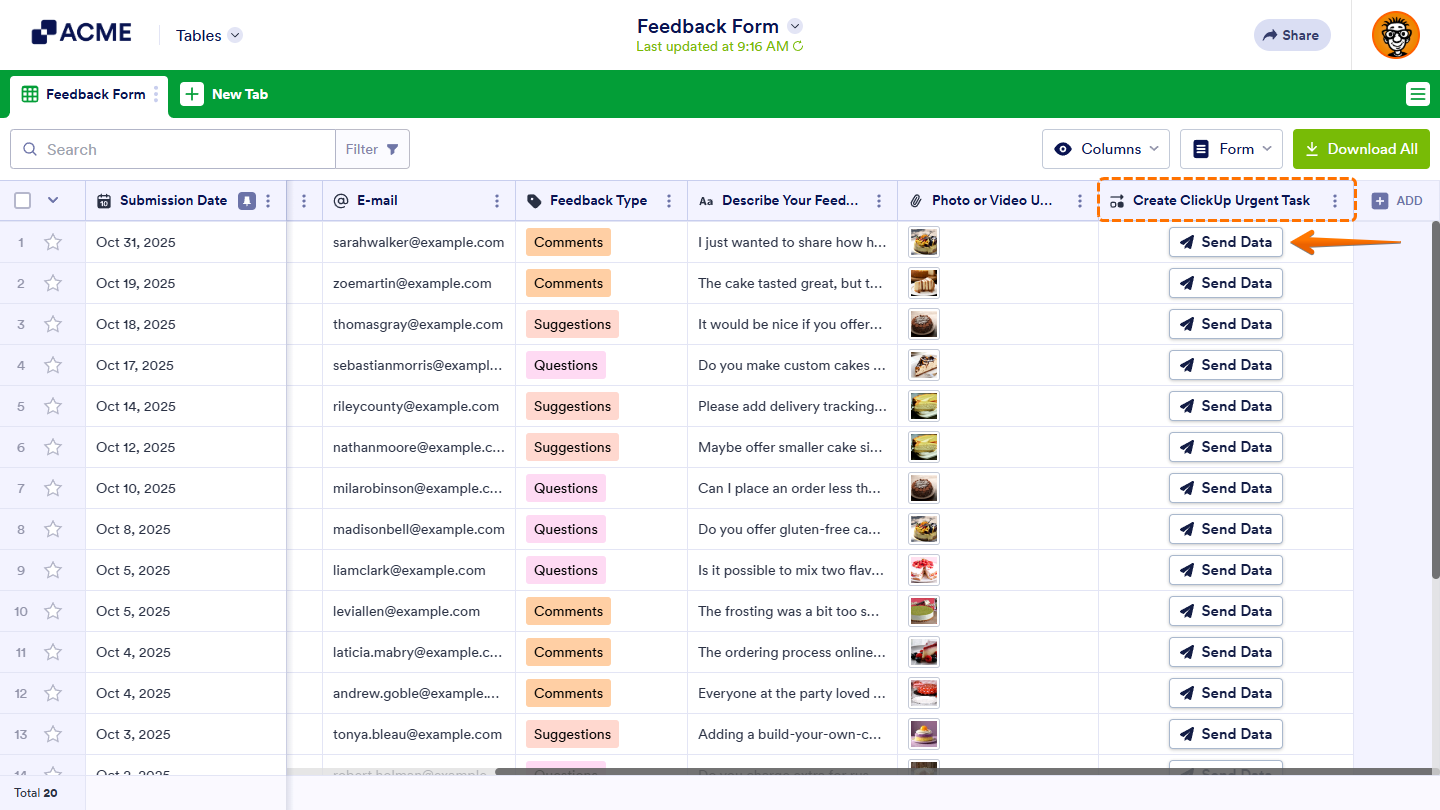
You can send submission data in Tables manually to create tasks, subtasks, and comments in ClickUp using Action Buttons. You can use it to trigger ClickUp integration actions already set up in your form, or create different ones that only run from Tables.
Setting up an Action Button in Tables is easy. It only takes a minute to do—here’s how:
- In Tables, on the right side of the last column header, click on Add.
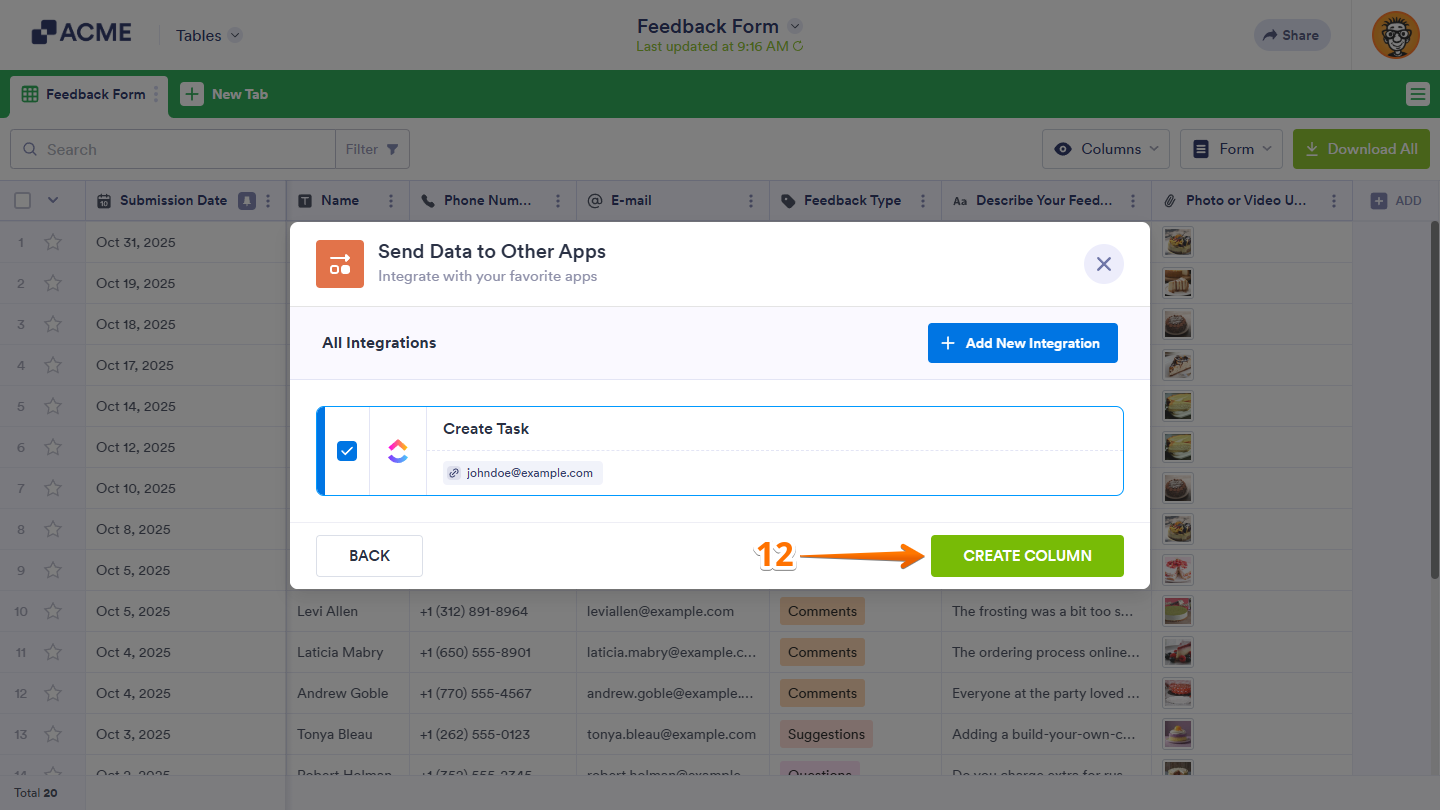
- Now, in the Add New Column window, under the Buttons tab, click on Send Data to Other Apps.
- Then, click on Next.
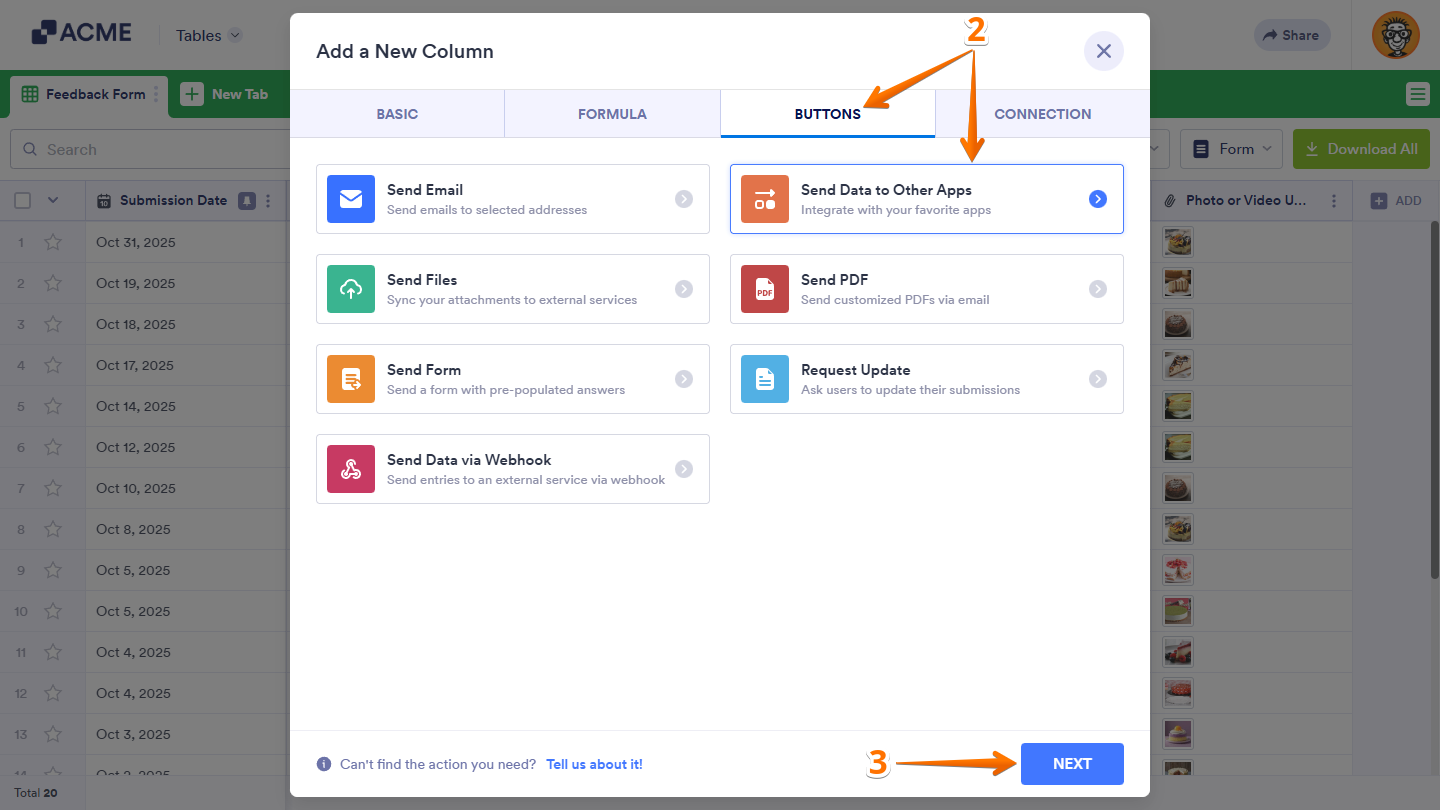
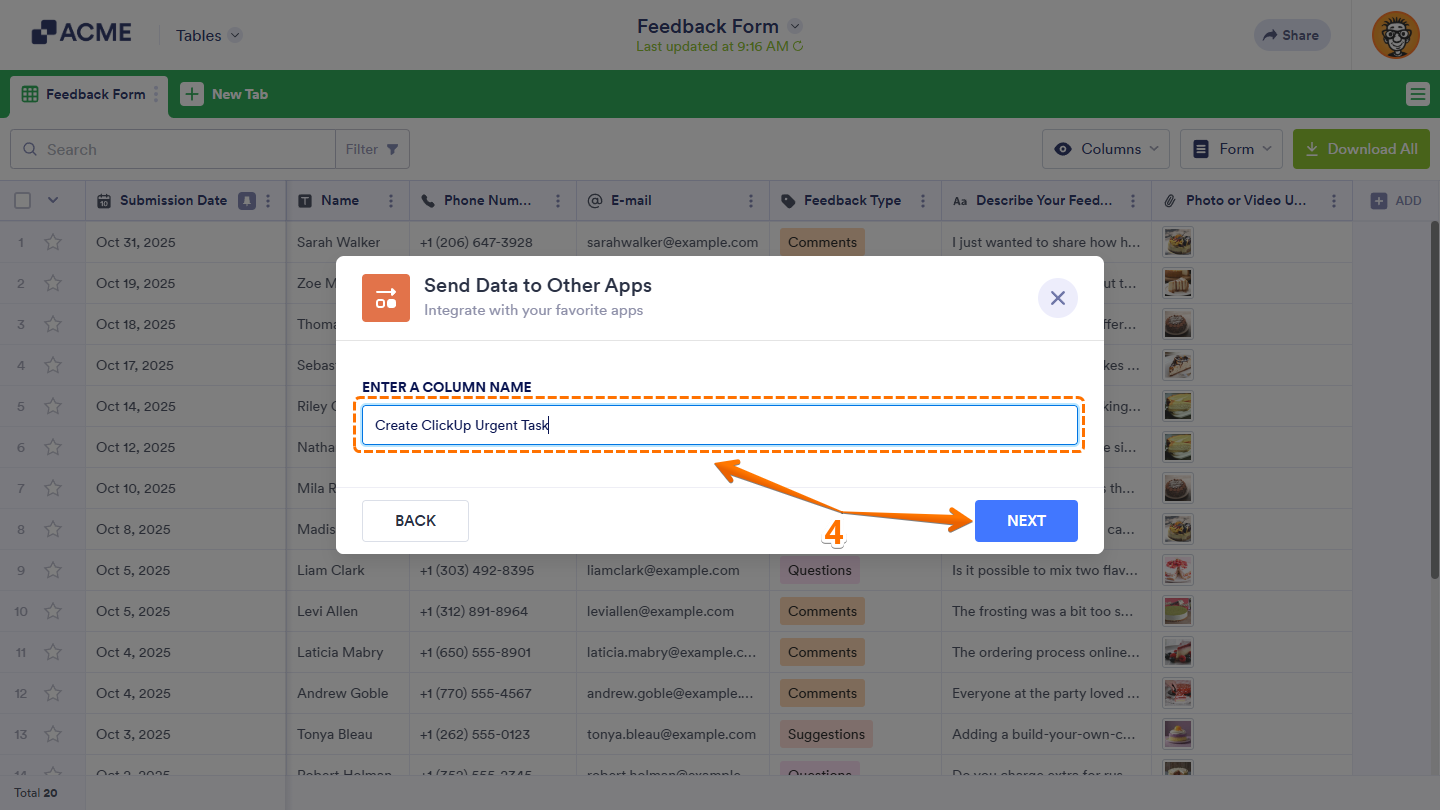
- In the Send Data to Other Apps window, in the Enter a Column Name Input box, enter a name for the new column and then click on Next.
- Then, search for ClickUp and click on it.
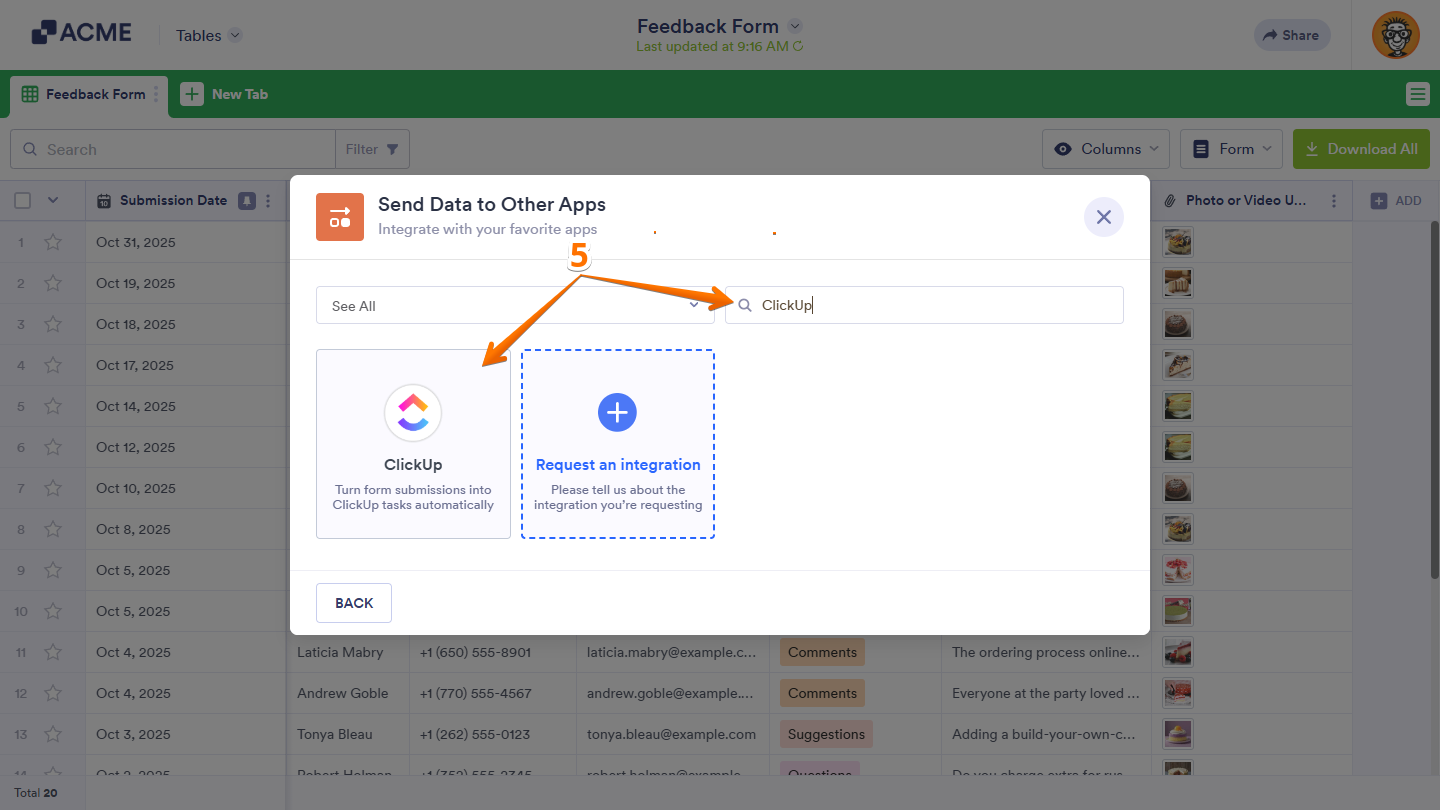
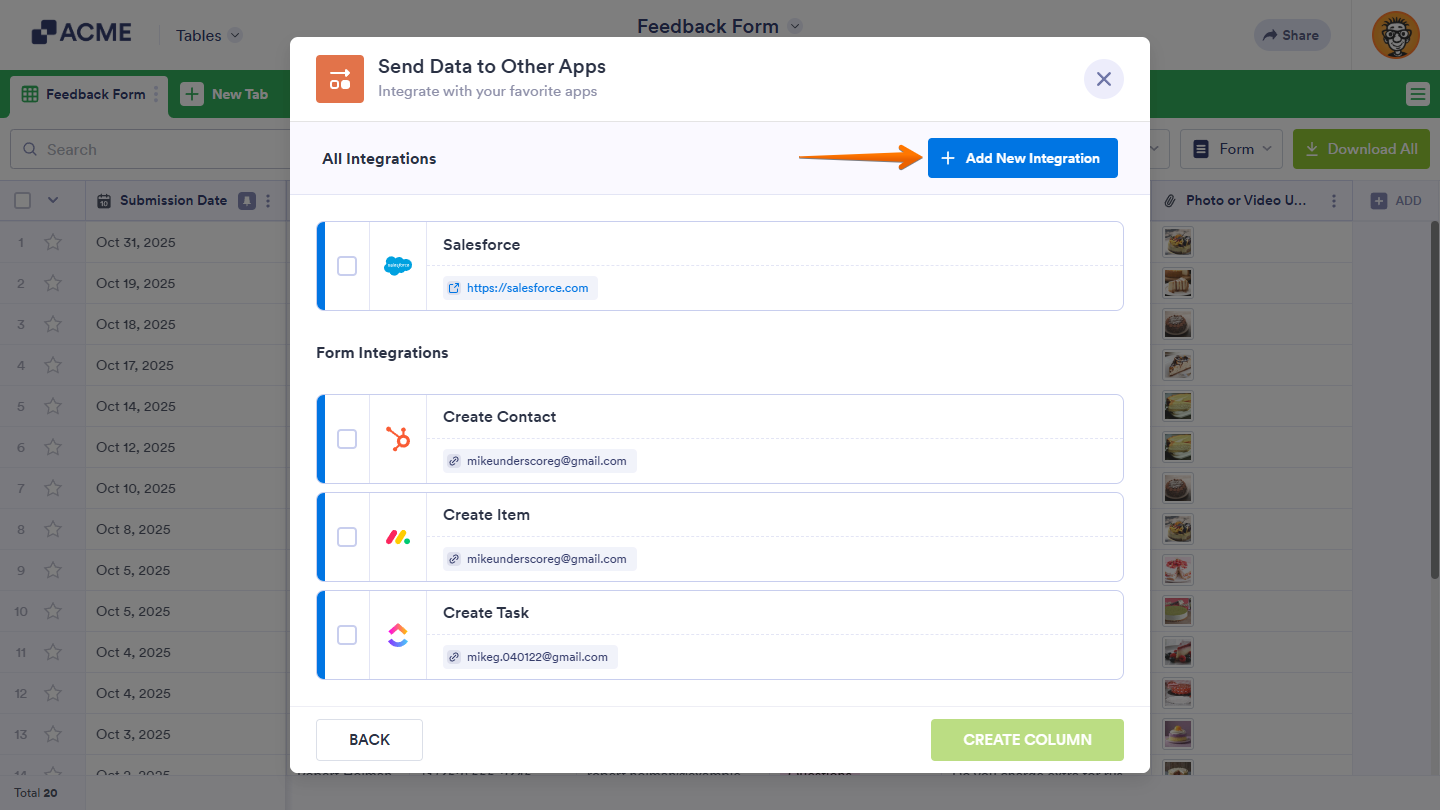
If your form already has other integrations or action buttons that send data to other apps, click Add New Integration first.
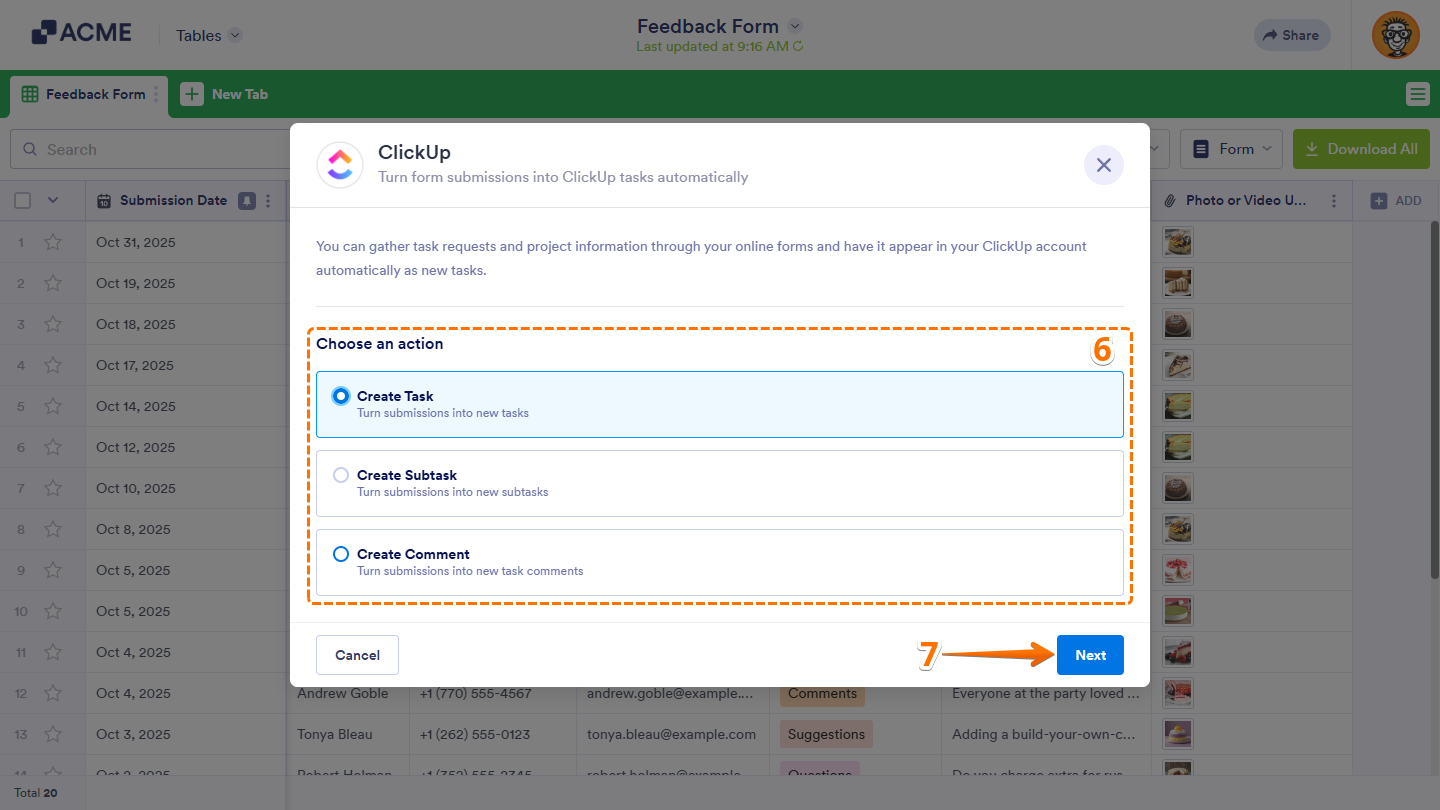
- In the ClickUp window, select one of the following actions:
- Create Task — Turns form submissions into new tasks in ClickUp.
- Create Subtask — Turns form submissions into new subtasks under an existing task in ClickUp.
- Create Comment — Turns form submissions into comments on an existing task in ClickUp.
- Then, click on Next.
- Now, click on Authenticate. And then, in the pop-up window, log in and authorize access for the integration to your ClickUp account.
If there is a saved ClickUp account you’ve integrated any of your forms with before, you can choose its email address from the dropdown and click on the Authenticate button on the right to use it. Or, you can also click on Use Another Account below the dropdown to log in and authorize access for the integration to a different ClickUp account.
- Then, in Integration Settings, you’ll see this list of settings you can configure:
- Select a Workspace — Choose the ClickUp workspace where the data will go.
- Select a Space — Pick the Space inside your workspace where the item will be created.
- Select a Folder — Choose the Folder that organizes the tasks under your selected Space.
- Select a List — Select the specific List where ClickUp will add the task, subtask, or comment.
- Next, scroll down to the bottom of the window and, depending on the action you chose, continue to set up these settings:
- Select a Task — This only shows when the Create Subtask or Create Comment action is selected. Choose the specific ClickUp task where the subtask or comment will be added.
- Match Your Fields — This only shows when the Create Task or Create Subtask action is selected. Map form fields to ClickUp fields so information goes to the right places.
- Send Uploaded Files to ClickUp — This only shows when the Create Task or Create Subtask action is selected. Include uploaded files from the form as attachments in ClickUp.
- Customize Your Comment Title — This only shows when the Create Comment action is selected. Set a title that appears above the comment created in ClickUp.
- Add Form Fields to Comments — This only shows when the Create Comment action is selected. Add form responses directly inside the ClickUp comment.
- After that, click on Save.
- Now, with the box next to the ClickUp integration action you just created checked, click on Create Column.
That’s it. Your action button is ready to send data to ClickUp whenever needed.
Note: In Tables, you can add an Action Button that triggers different actions from the same integration or from multiple integrations and accounts.

Send Comment: