With Jotform’s AI Data Assistant, you can use simple prompts to manage and work with form submissions directly in Jotform Inbox. It can help you organize and analyze submission data, make changes to entries, visualize information with charts, and handle tasks such as adding comments or communicating with respondents. You can also summarize or translate entire submissions, making it easier to review responses, find useful information, and manage your inbox more efficiently.
Getting Started with AI Data Assistant
When you access your form’s Inbox, you can start using AI Data Assistant in just a few steps. Here’s what to do:
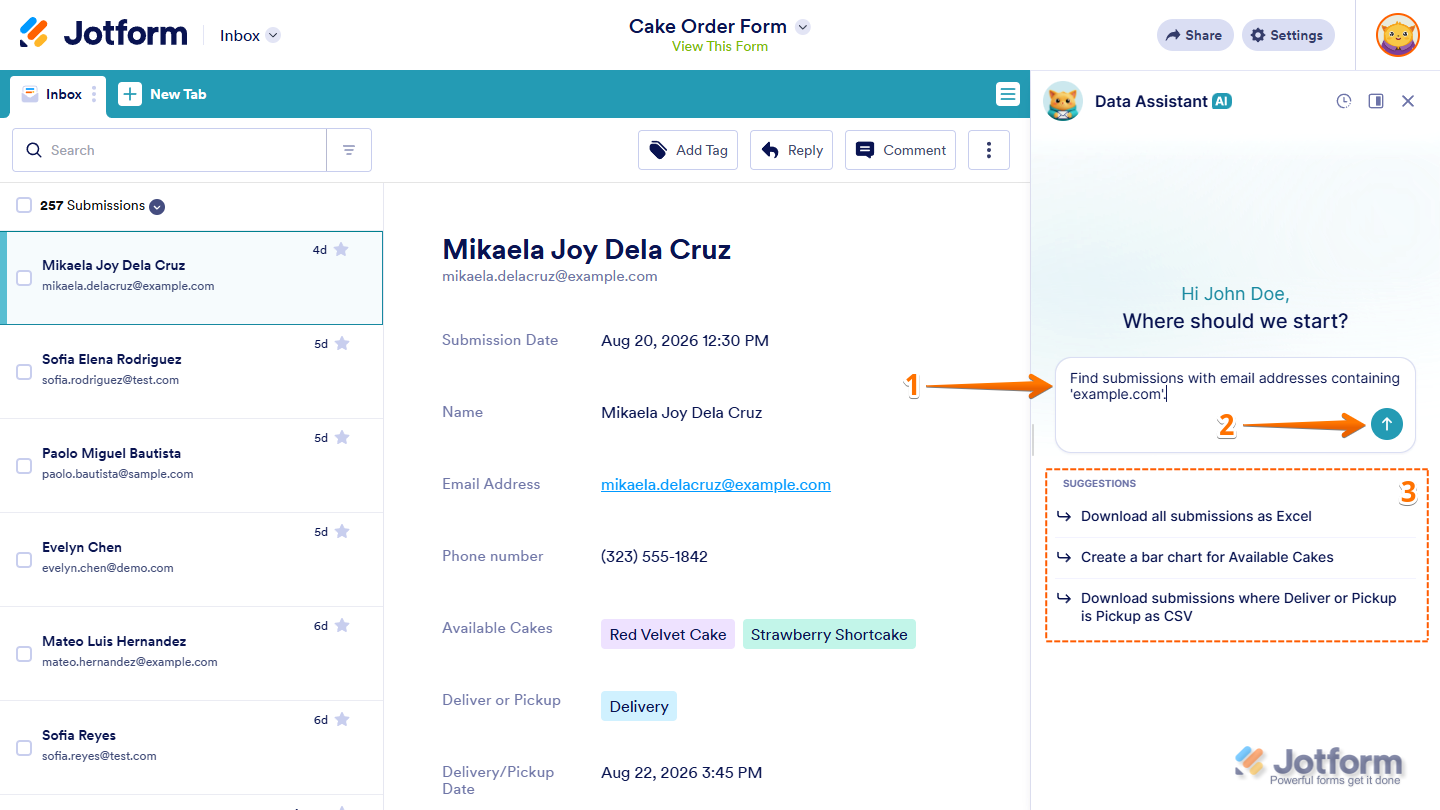
- In Jotform Inbox, in the AI Data Assistant chat window that opens on the right side of the page, describe what you want to do with your submissions in the Prompt box.
- Then, press Enter on your keyboard or click on the Upward Arrow icon to send it.
- Or, under Suggestions, click on a predefined prompt you want to use.
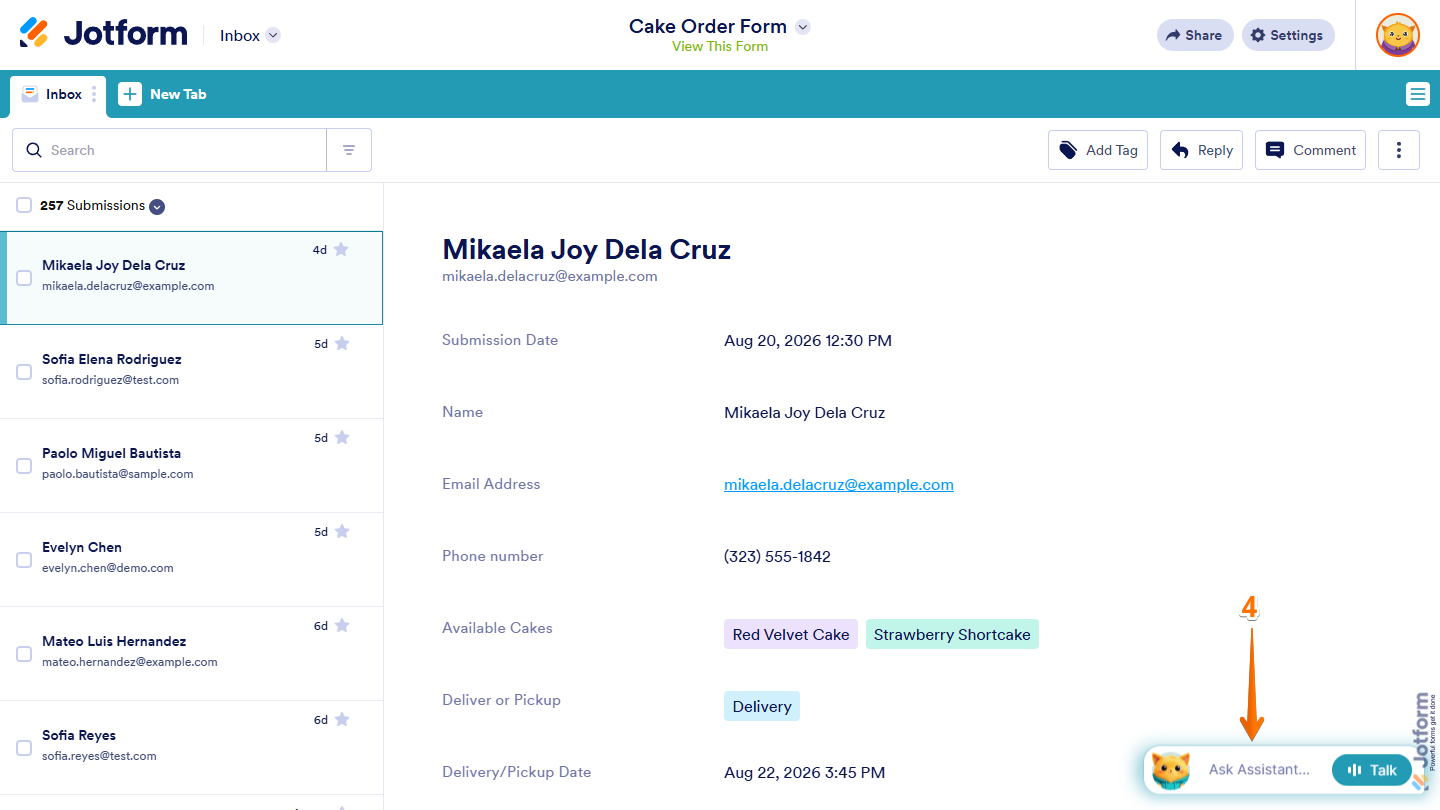
- If the chat window is closed, click on the Ask Assistant Chat box first.
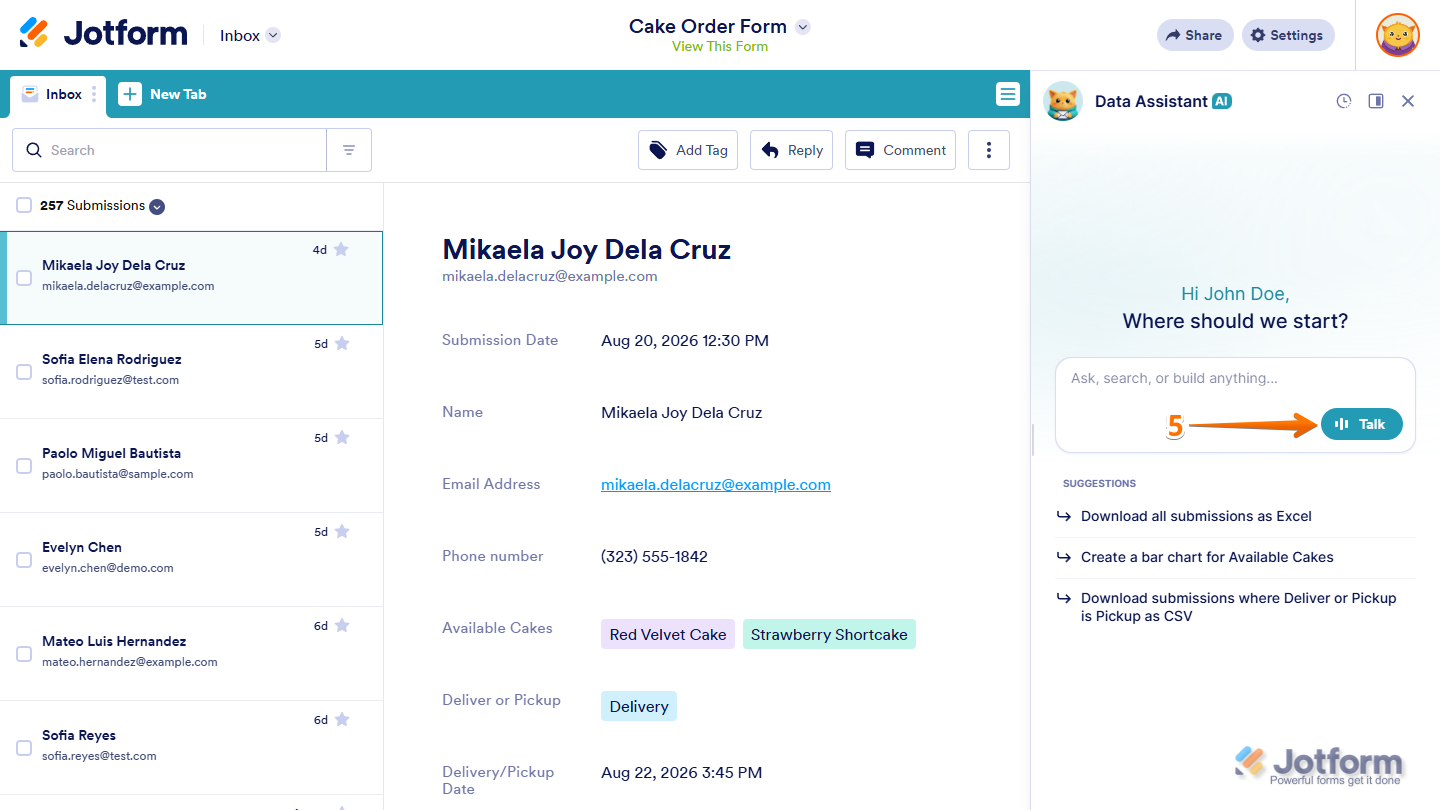
- If you’d rather use voice for your prompts, click on Talk on the right side of the Prompt Box.
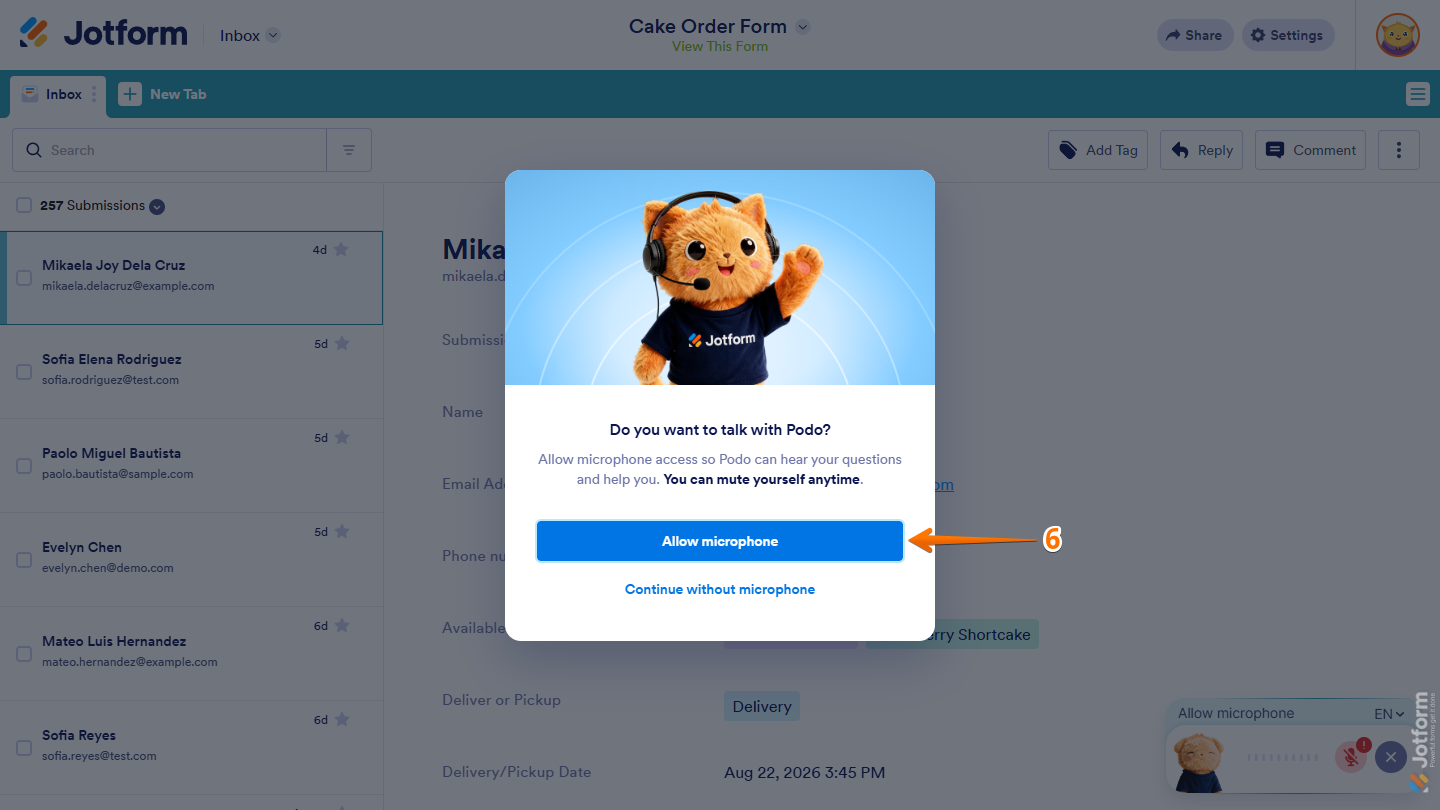
- Then, in the Do You Want to Talk With Podo window that comes up, click on Allow Microphone to open your browser’s microphone permissions and give it access to your device’s microphone.
That’s it. AI Data Assistant will respond to your prompt and perform the action or show the result in the chat window.
Working with Your Submissions Using AI Data Assistant
AI Data Assistant can help you manage and analyze your submissions in Jotform Inbox, make changes to your data, and handle other common tasks using simple prompts.
Filtering Submissions
AI Data Assistant makes it easy to narrow down your submissions based on specific criteria. Here’s what to do:
- While you’re in Jotform Inbox, in the AI Data Assistant chat window, describe how you want to filter your submissions in the Prompt box.
Depending on your form, you can use prompts like:
- Who ordered Red Velvet Cake?
- Show me the submissions for deliveries in Seattle.
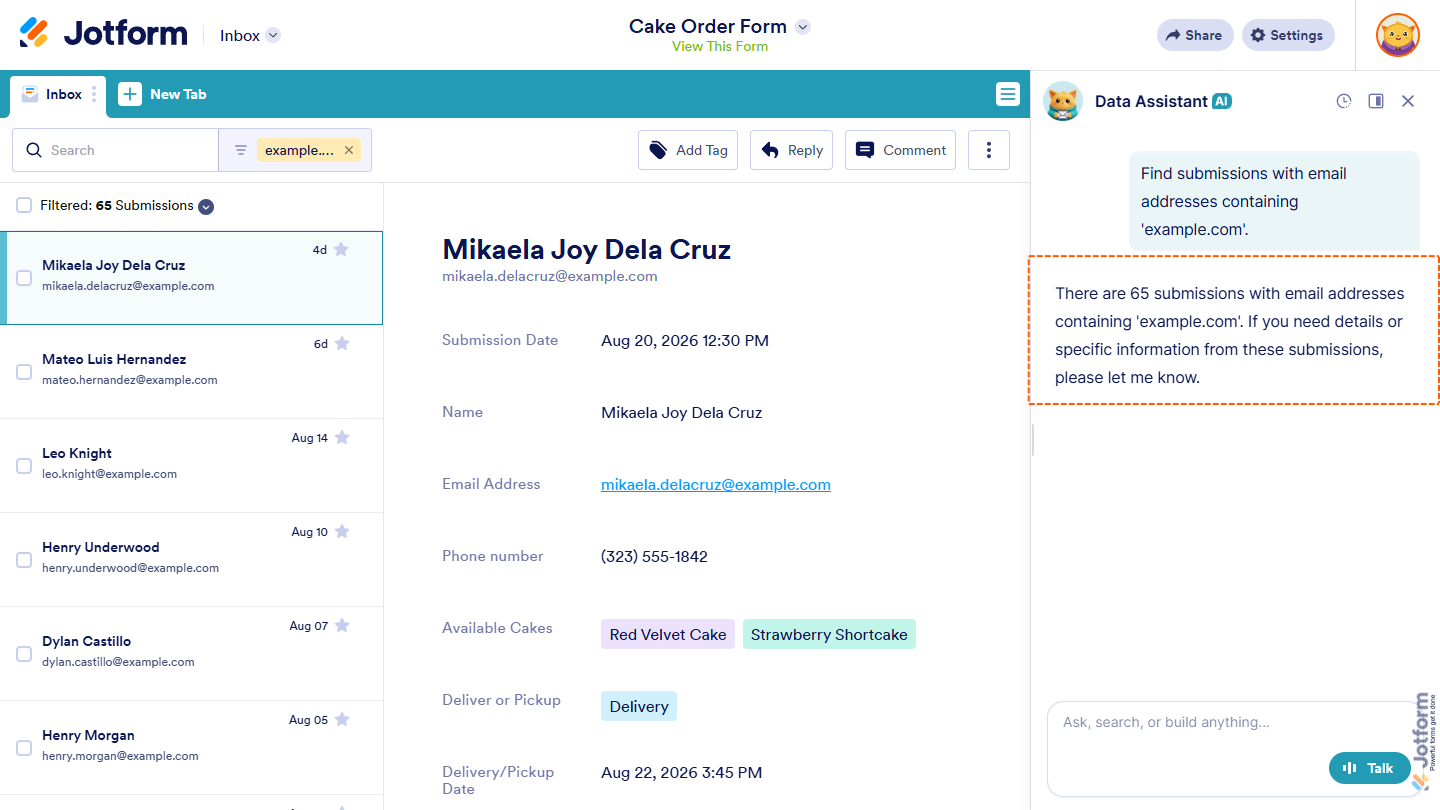
- Find submissions with email addresses containing ‘example.com’.
- Which customers selected Delivery?
- Then, press Enter on your keyboard or click on the Upward Arrow icon to send it.
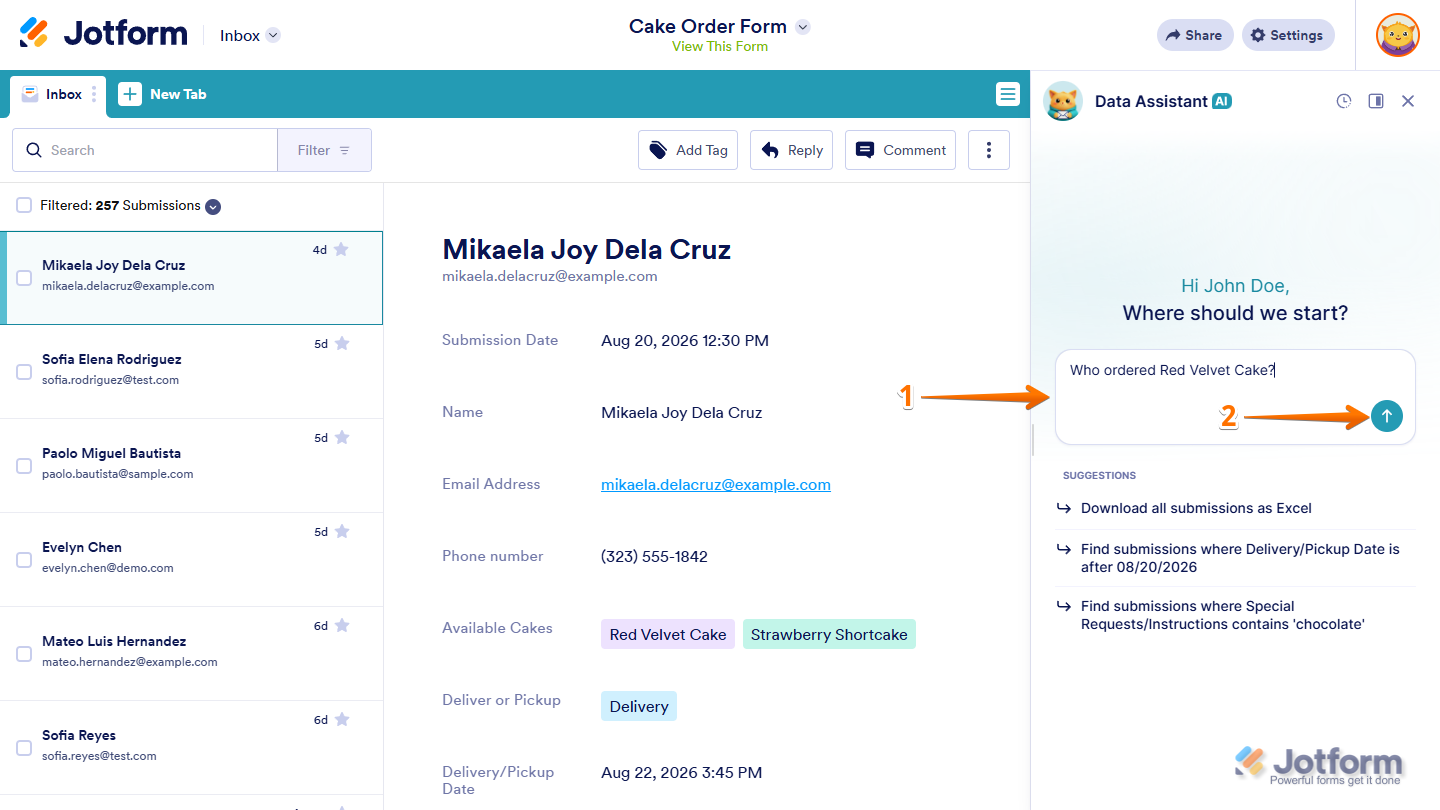
That’s it. AI Data Assistant will show the submissions that match your prompt and provide a response in the chat window.
Analyzing Submission Data
You can use AI Data Assistant to explore your submission data and find useful patterns and insights. Here’s how to get started:
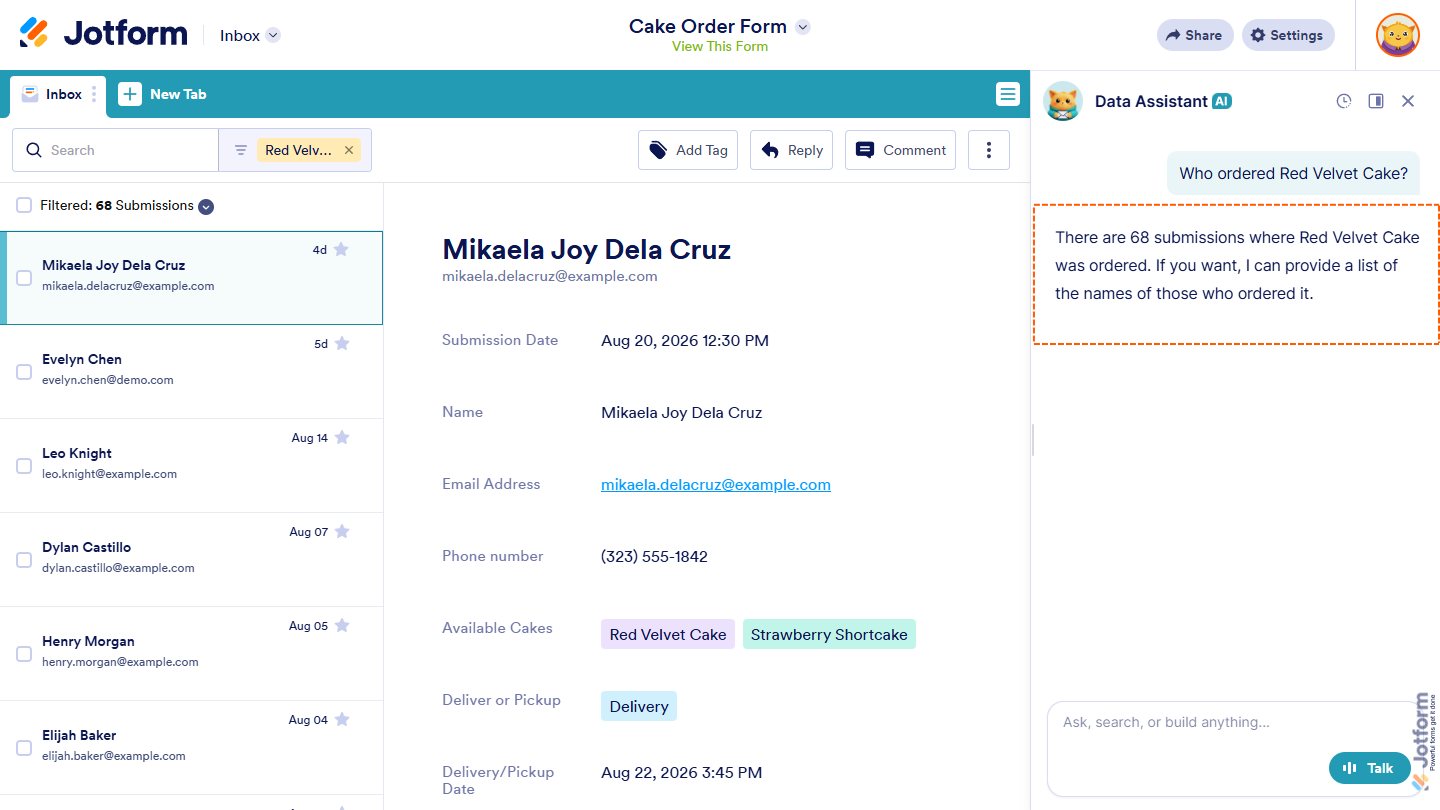
- While you’re in Jotform Inbox, in the AI Data Assistant chat window, describe what you want to analyze in the Prompt box.
Depending on your form, you can use prompts like:
- Which cake is ordered most often?
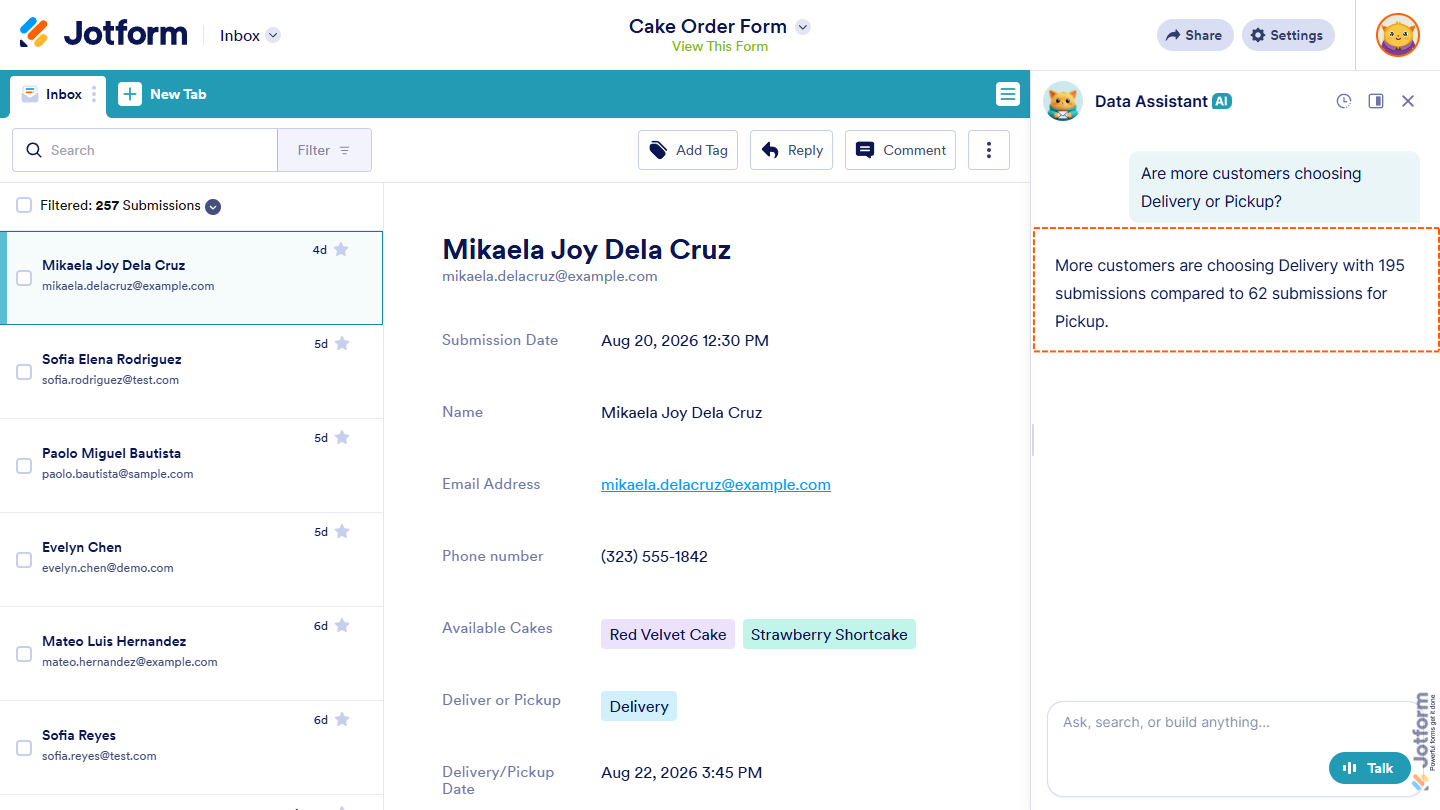
- Are more customers choosing Delivery or Pickup?
- What are the most common special requests?
- Which cities have the most delivery orders?
- Then, press Enter on your keyboard or click on the Upward Arrow icon to send it.
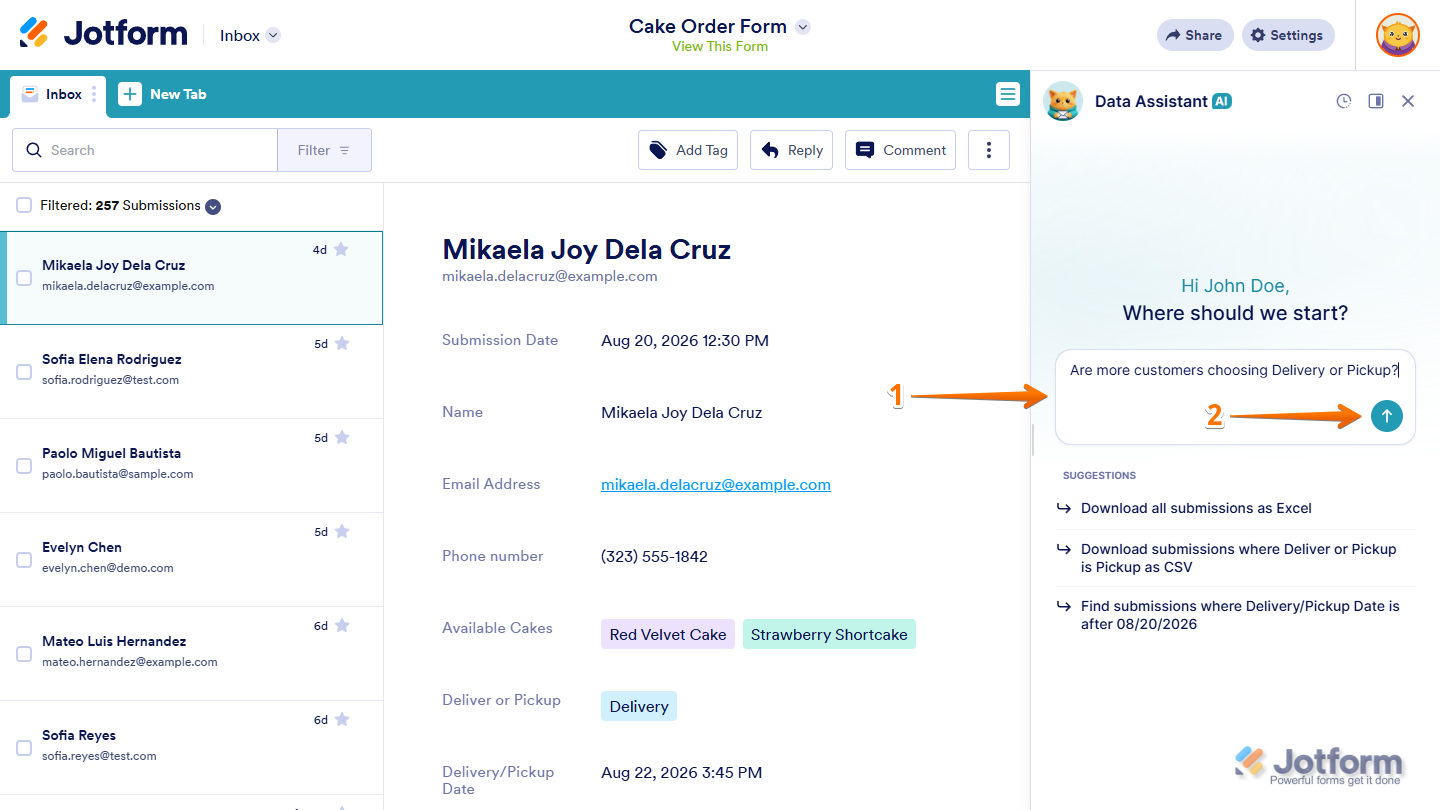
That’s it. AI Data Assistant will analyze your submissions based on your prompt and show the result in the chat window.
Creating Charts from Submission Data
Visualizing your submission data with AI Data Assistant only takes a few steps. You can create bar, pie, or column charts to make comparisons and patterns easier to understand. Here’s how:
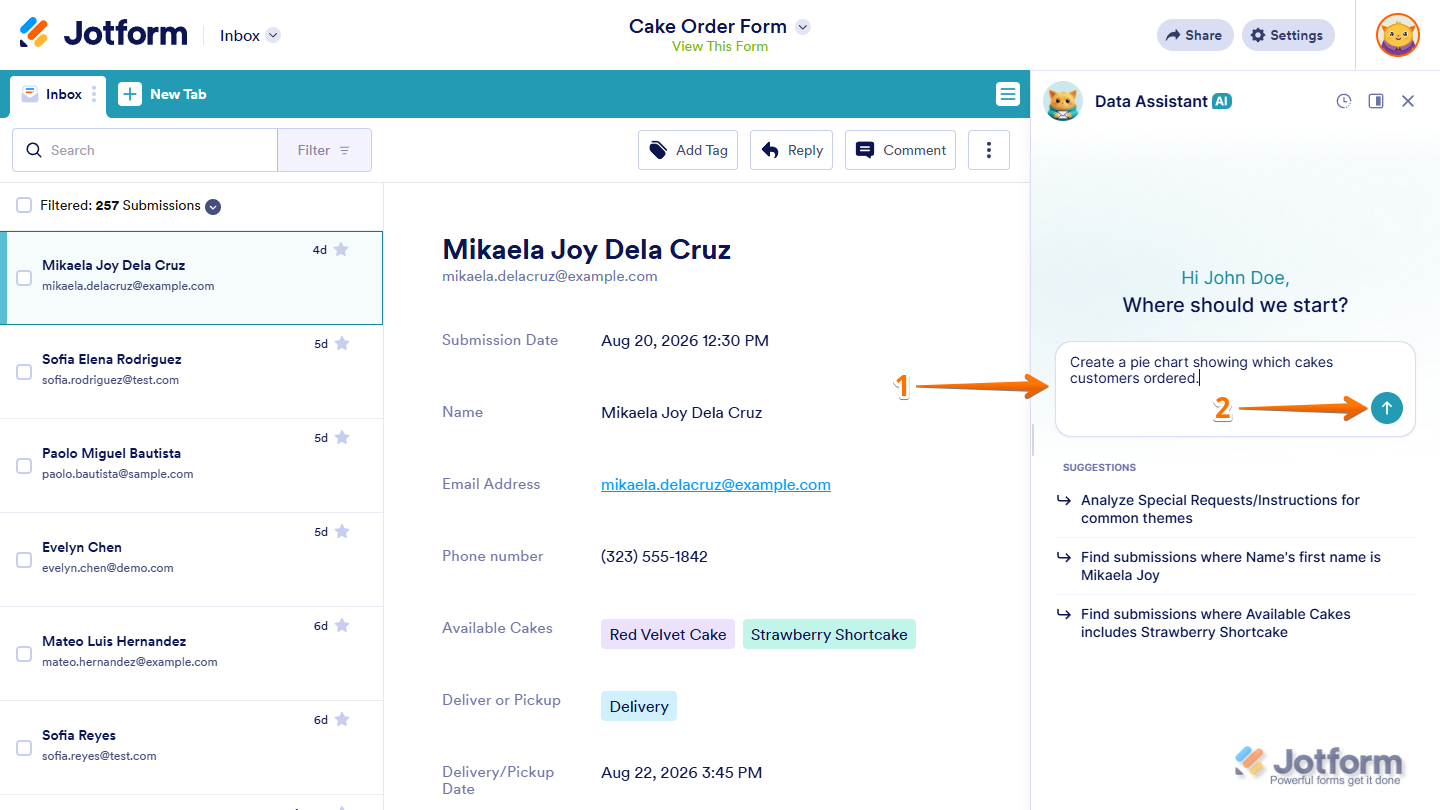
- While you’re in Jotform Inbox, in the AI Data Assistant chat window, describe the chart you want to create in the Prompt box.
Depending on your form, you can use prompts like:
- Create a pie chart showing which cakes customers ordered.
- Compare Delivery and Pickup orders in a bar chart.
- Show the number of orders for each cake in a column chart.
- Then, press Enter on your keyboard or click on the Upward Arrow icon to send it.
- Once the generated chart appears in the chat window, click on the Download icon to save it to your device.
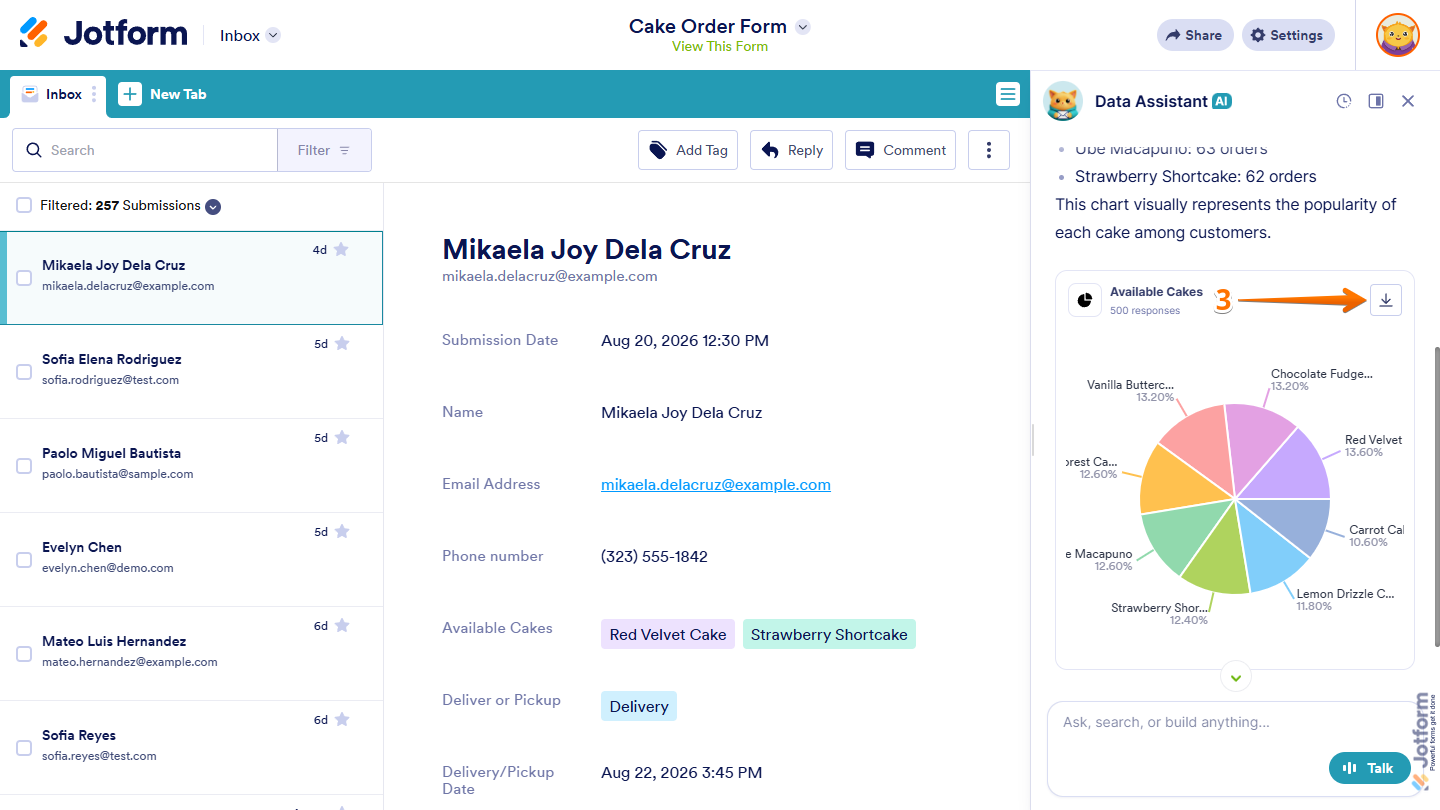
That’s it. You now have a copy of the generated chart in PNG format on your device.
Editing Submissions
When you need to update submission information, AI Data Assistant can help you find the right entry and open it for editing. You can do it in just a few steps:
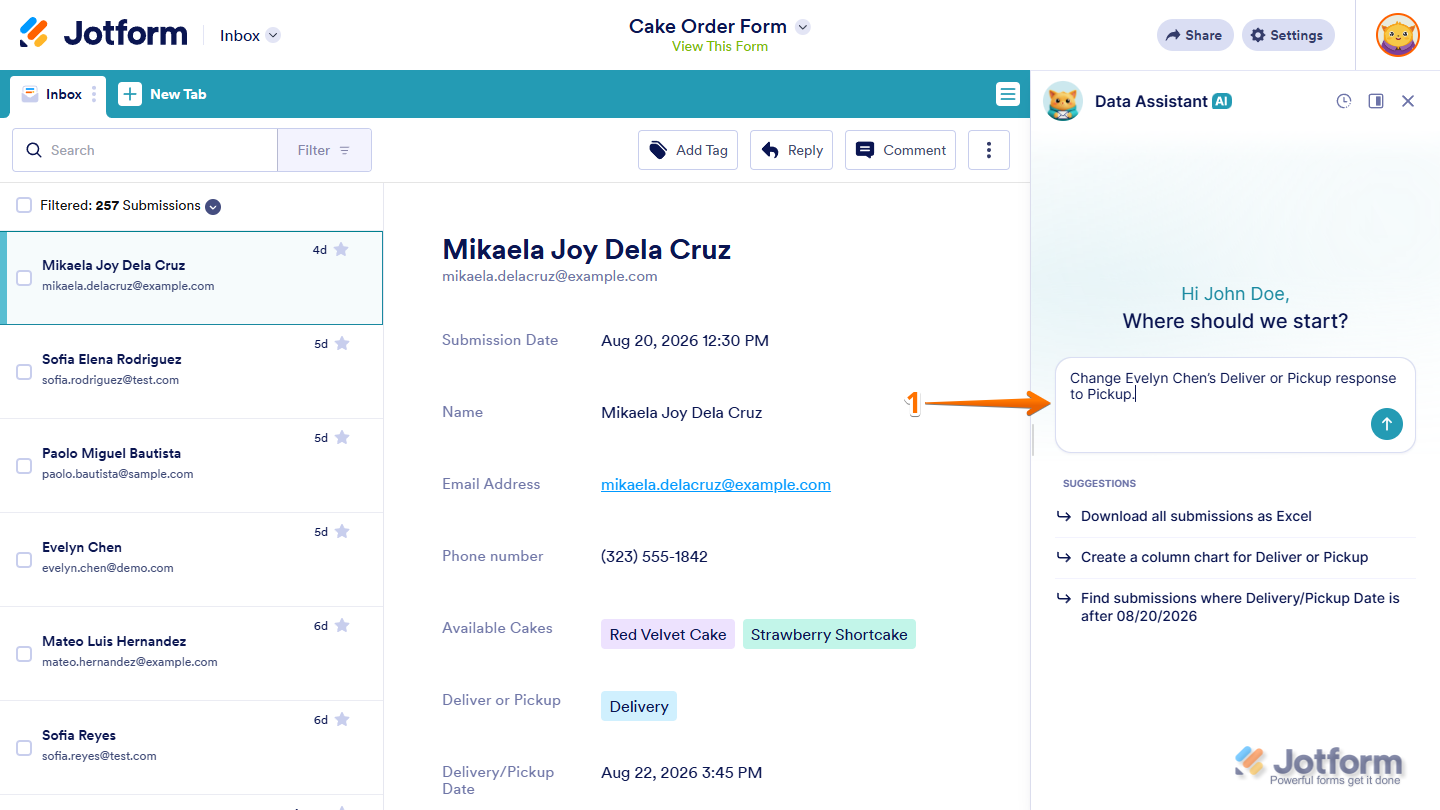
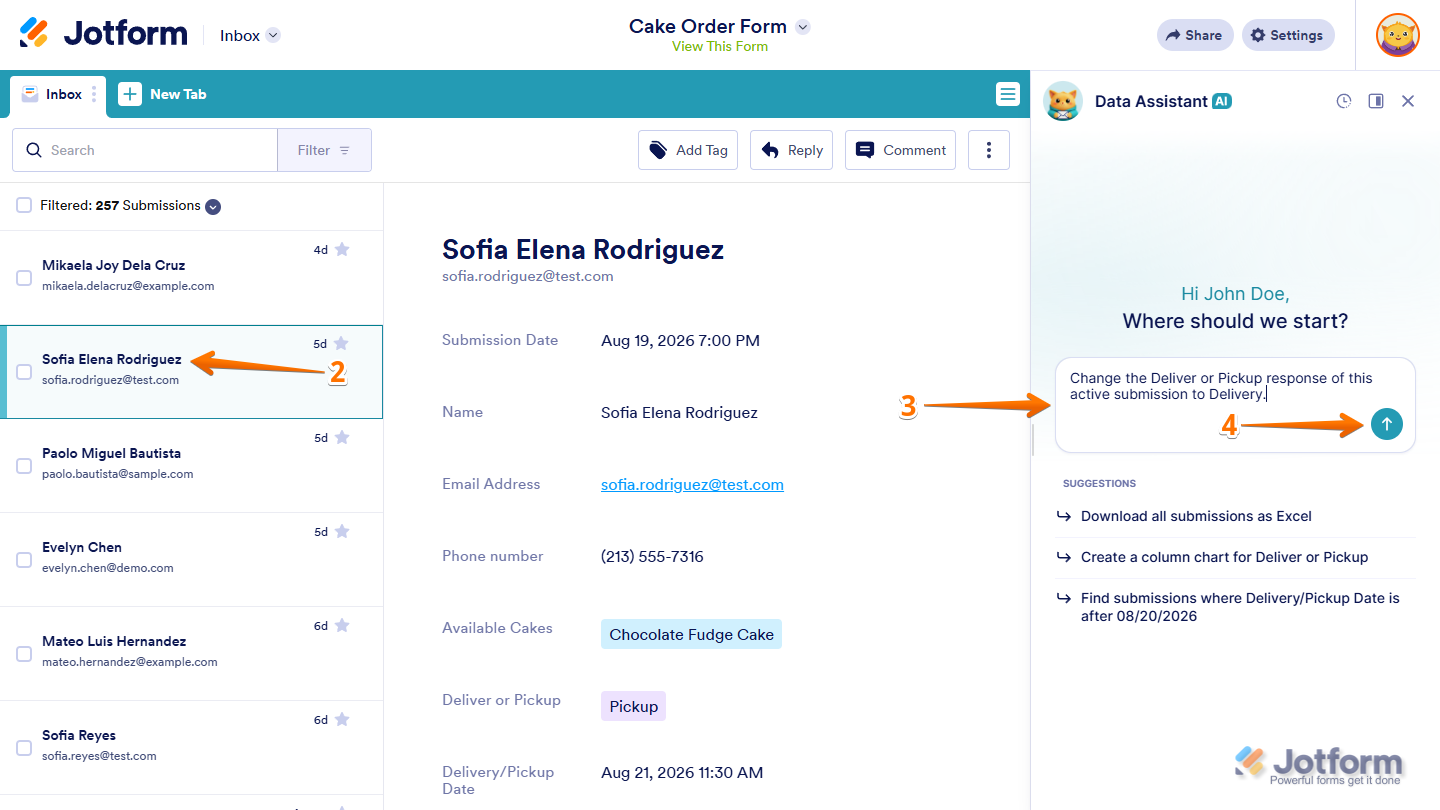
- While you’re in Jotform Inbox, in the AI Data Assistant chat window, describe the submission you want to update and the changes you want to make in the Prompt box.
- Or, on the left side of the page, select the submission you want to update.
- Then, in your prompt, refer to it as the active submission and describe the changes you want to make.
Depending on your form, you can use prompts like:
- Change the Deliver or Pickup response of this active submission to Delivery.
- Change John Doe’s Deliver or Pickup response to Pickup.
- Update the Delivery/Pickup Date of this submission to June 15, 2026.
- Now, press Enter on your keyboard or click on the Upward Arrow icon to send it.
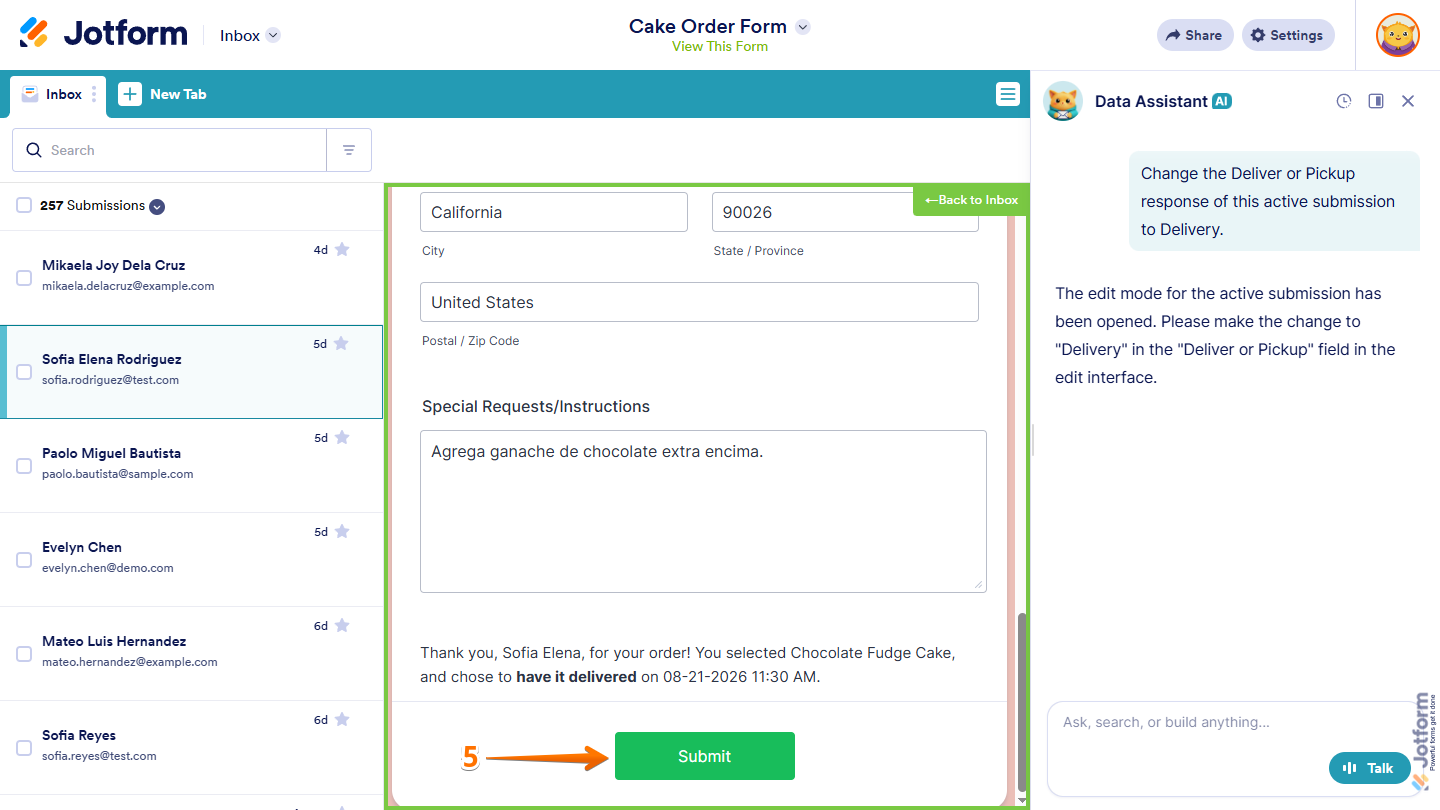
- Once the submission opens in Edit Mode, update the information as needed, and then click on Submit on your form to save your changes.
Note
If your form has after-submission actions set up, such as email alerts, workflows, or integration processes, resubmitting it will trigger them.
That’s it. The updated information will be saved to the submission after you resubmit the form.
Starring or Unstarring Submissions
AI Data Assistant makes it easy to star important submissions or remove stars when you no longer need them. Here’s what to do:
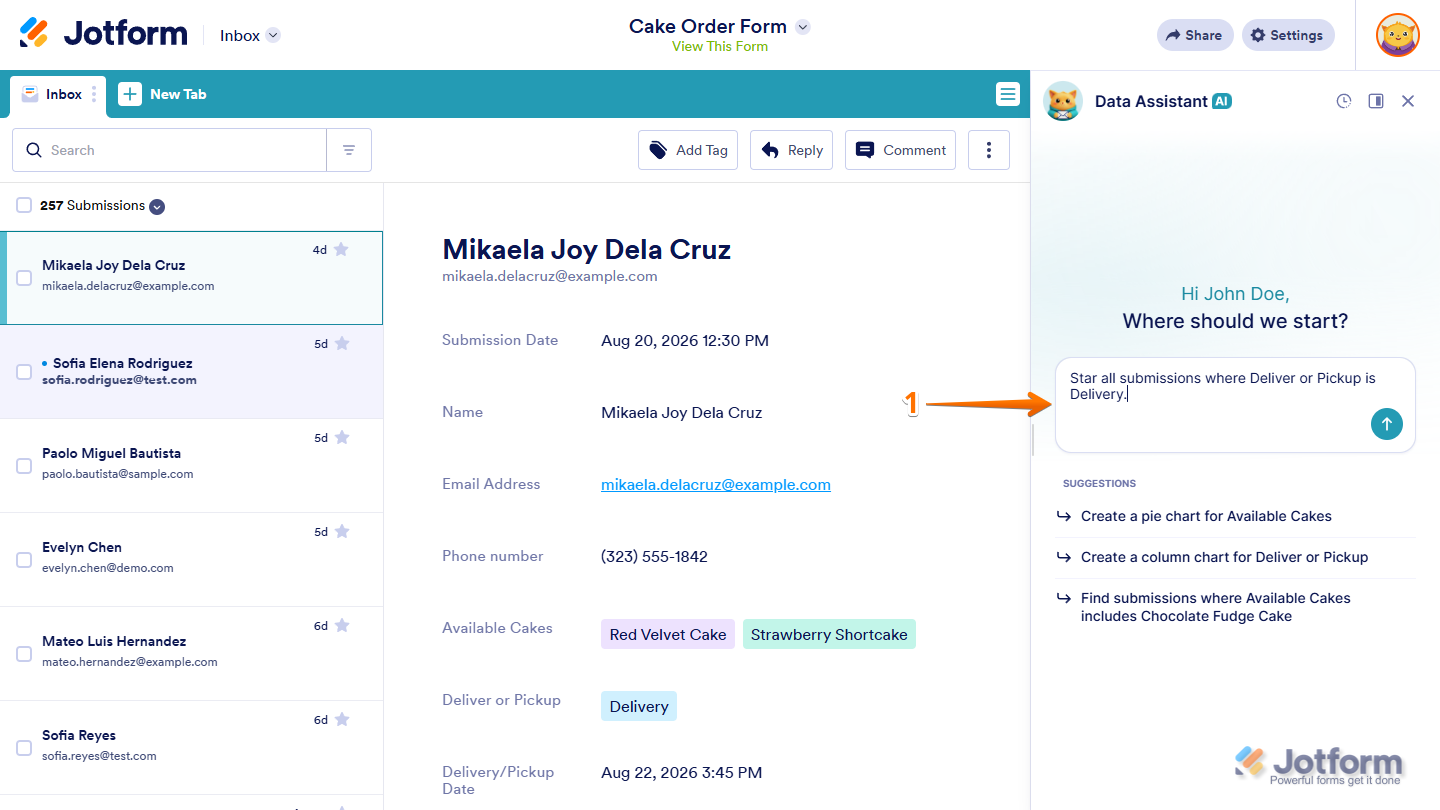
- While you’re in Jotform Inbox, in the AI Data Assistant chat window, describe the submissions you want to star or unstar in the Prompt box.
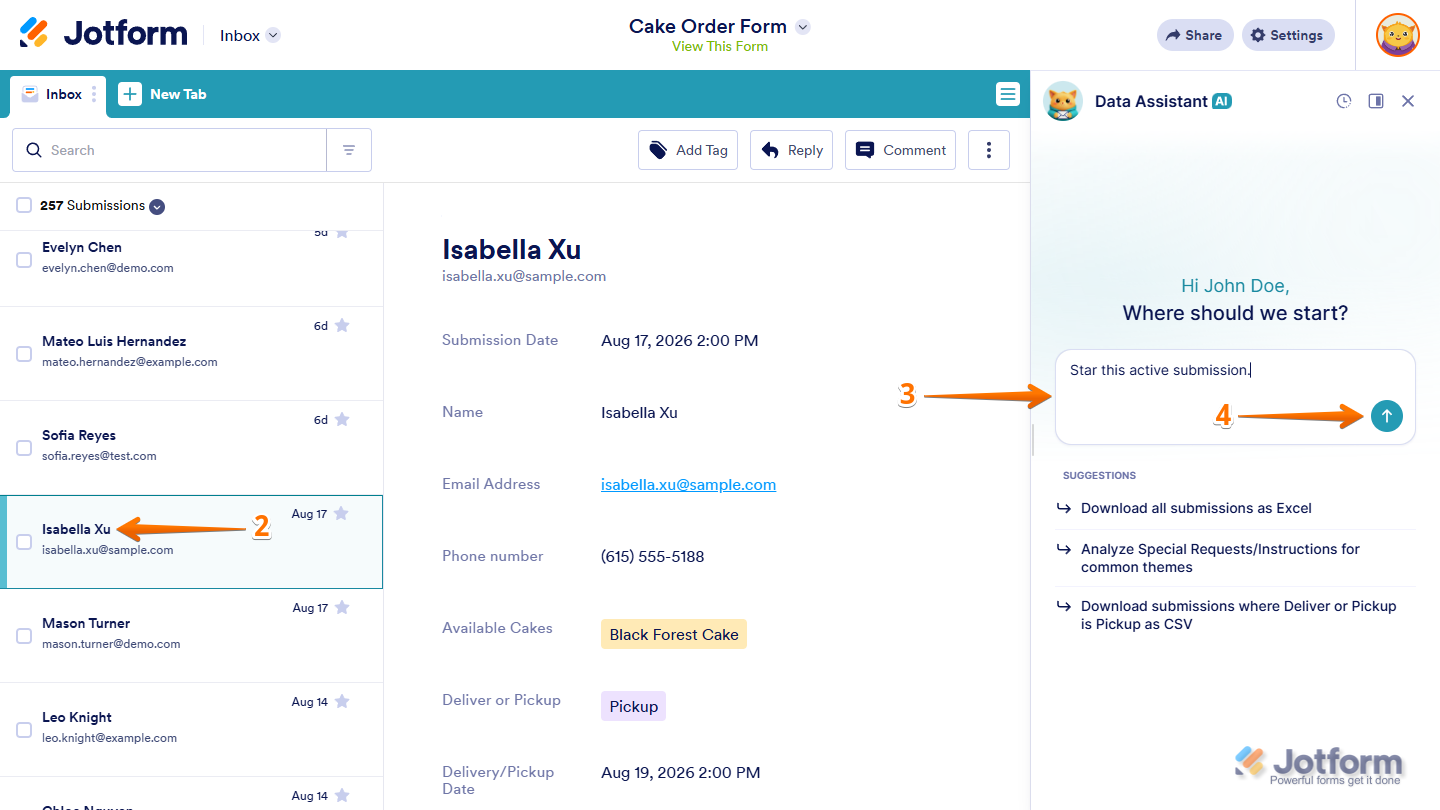
- Or, on the left side of the page, select the submission you want to make changes to.
- Then, in your prompt, refer to it as the active submission and say whether to star or unstar it.
Depending on your form, you can use prompts like:
- Star this active submission.
- Unstar this active submission.
- Star John Doe’s submission.
- Star all submissions where Deliver or Pickup is Delivery.
- Now, press Enter on your keyboard or click on the Upward Arrow icon to send it.
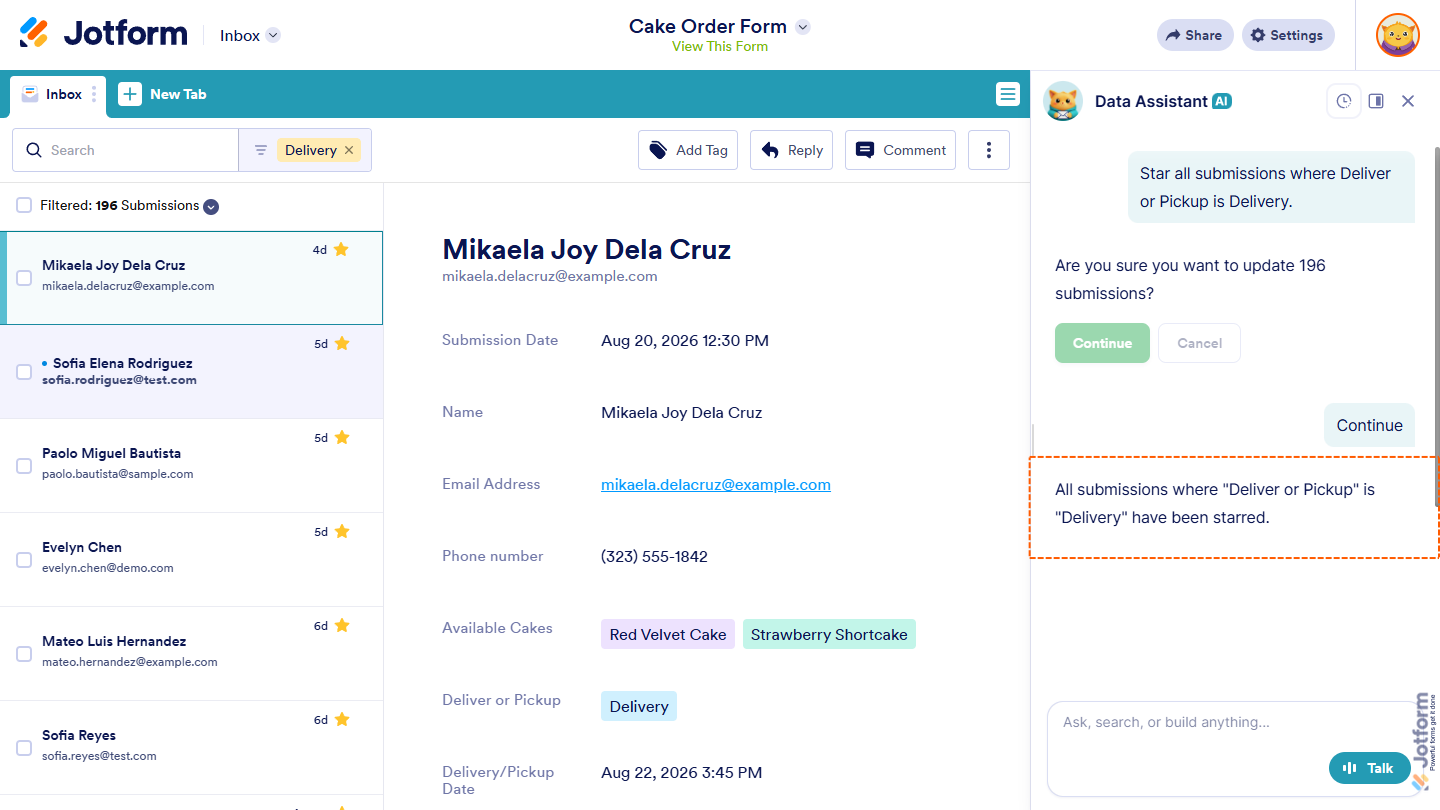
- When asked to confirm changes to multiple submissions in the chat window, click on Continue.
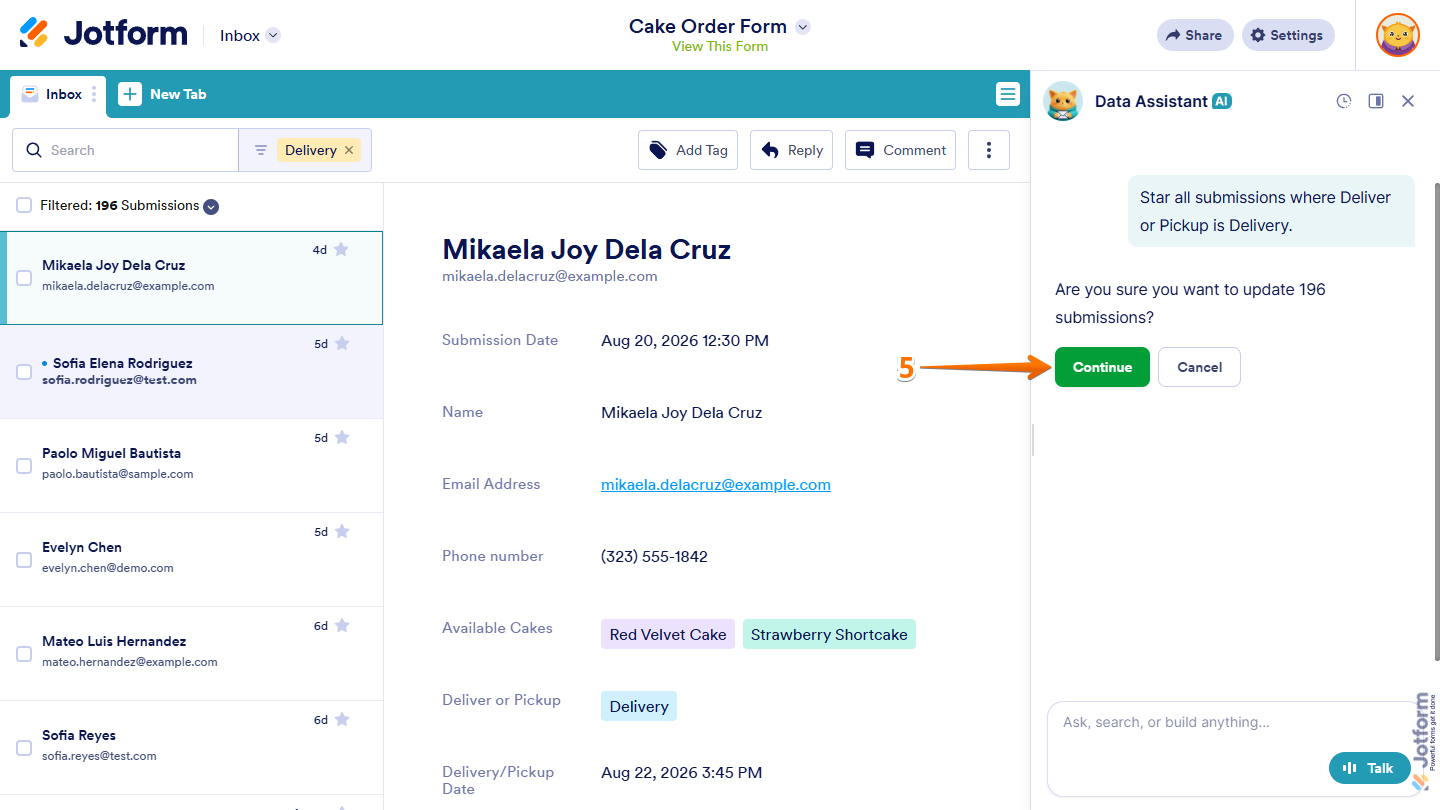
That’s it. AI Data Assistant will star or unstar the submissions based on your prompt and confirm the action in the chat window.
Marking Submissions as Read or Unread
You can use AI Data Assistant to mark submissions as read or unread and keep track of entries that still need your attention. Here’s how:
- While you’re in Jotform Inbox, in the AI Data Assistant chat window, describe the submissions you want to mark as read or unread in the Prompt box.
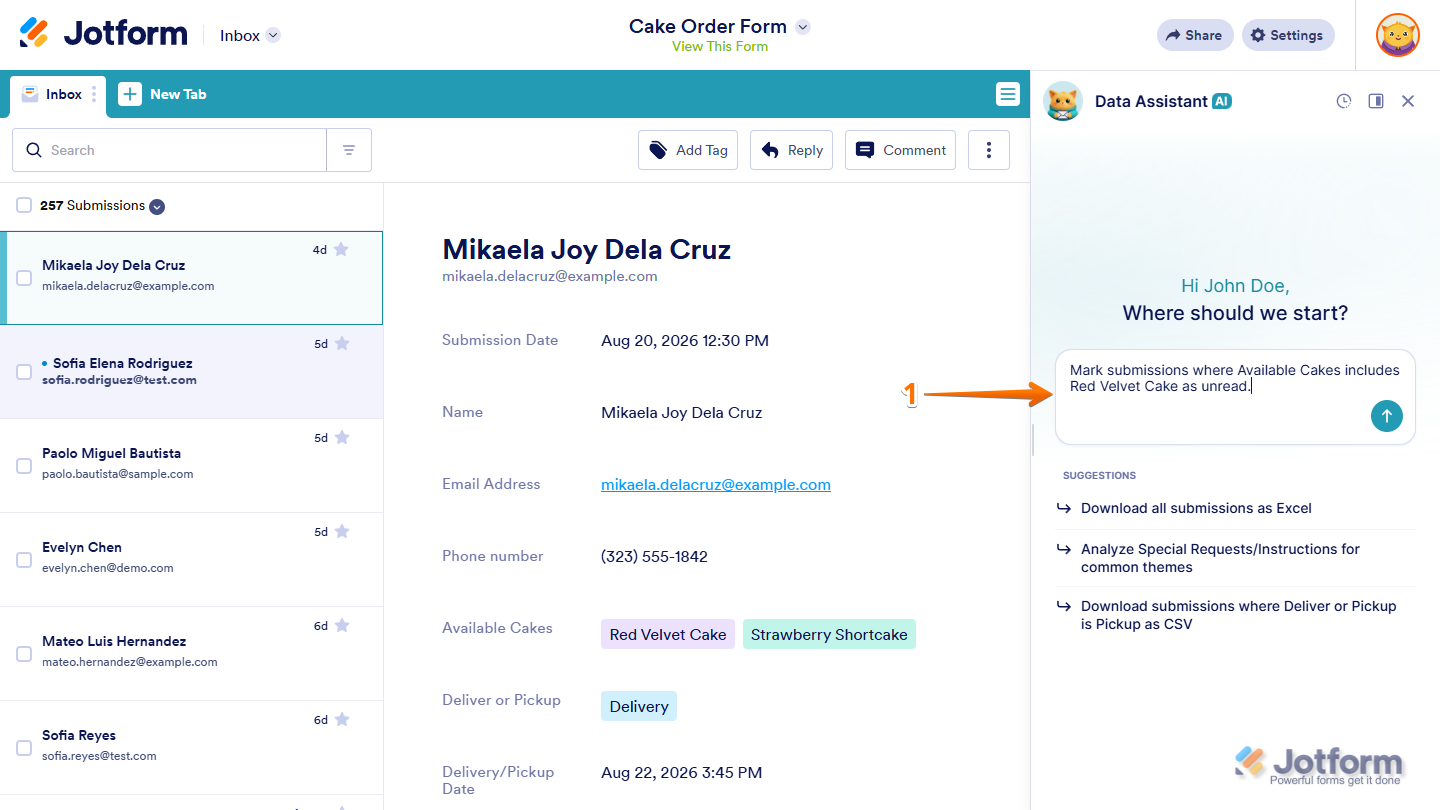
- Or, on the left side of the page, select the submission you want to make changes to.
- Then, in your prompt, refer to it as the active submission and say whether to mark it as read or unread.
Depending on your form, you can use prompts like:
- Mark this active submission as unread.
- Mark all submissions where Deliver or Pickup is Delivery as read.
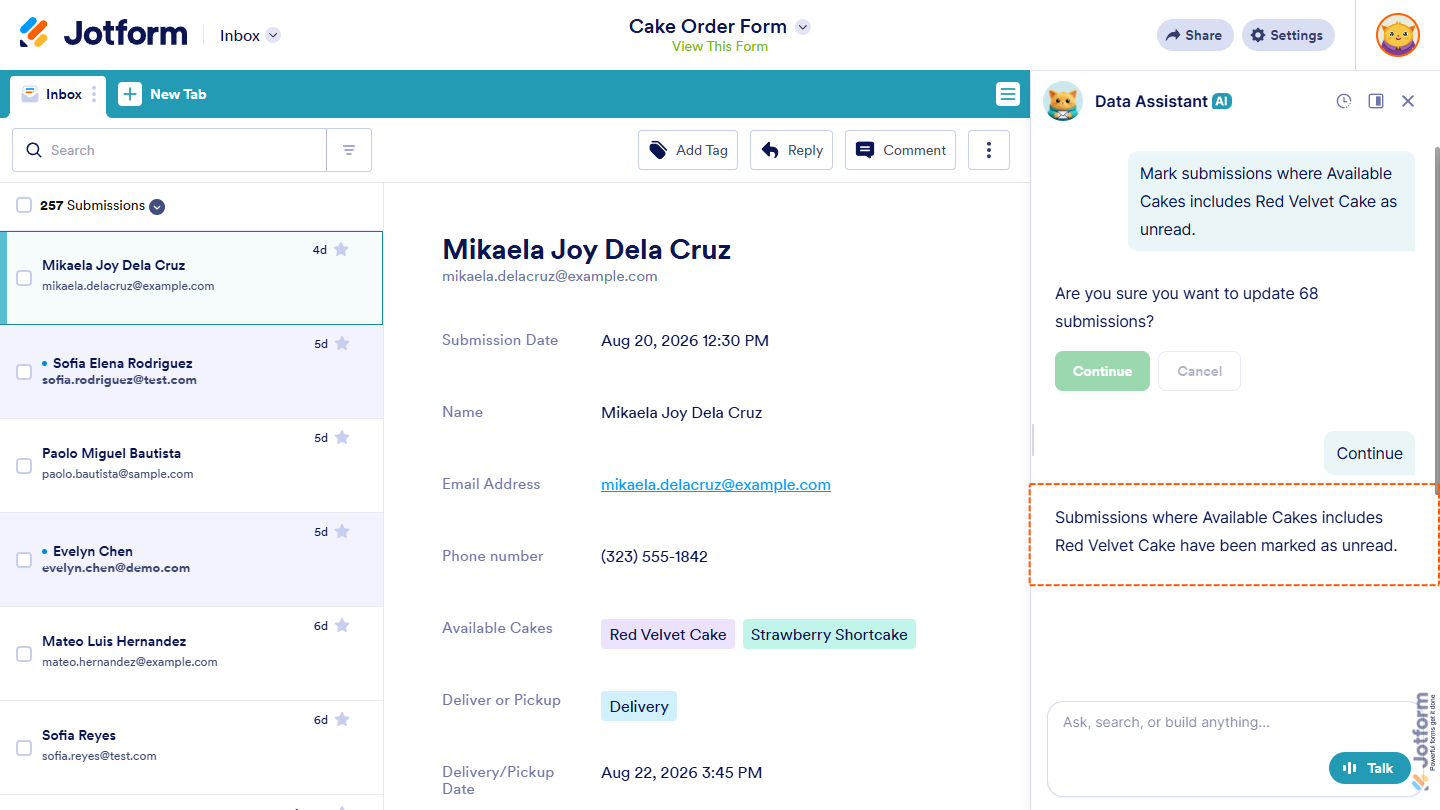
- Mark submissions where Available Cakes includes Red Velvet Cake as unread.
- Now, press Enter on your keyboard or click on the Upward Arrow icon to send it.
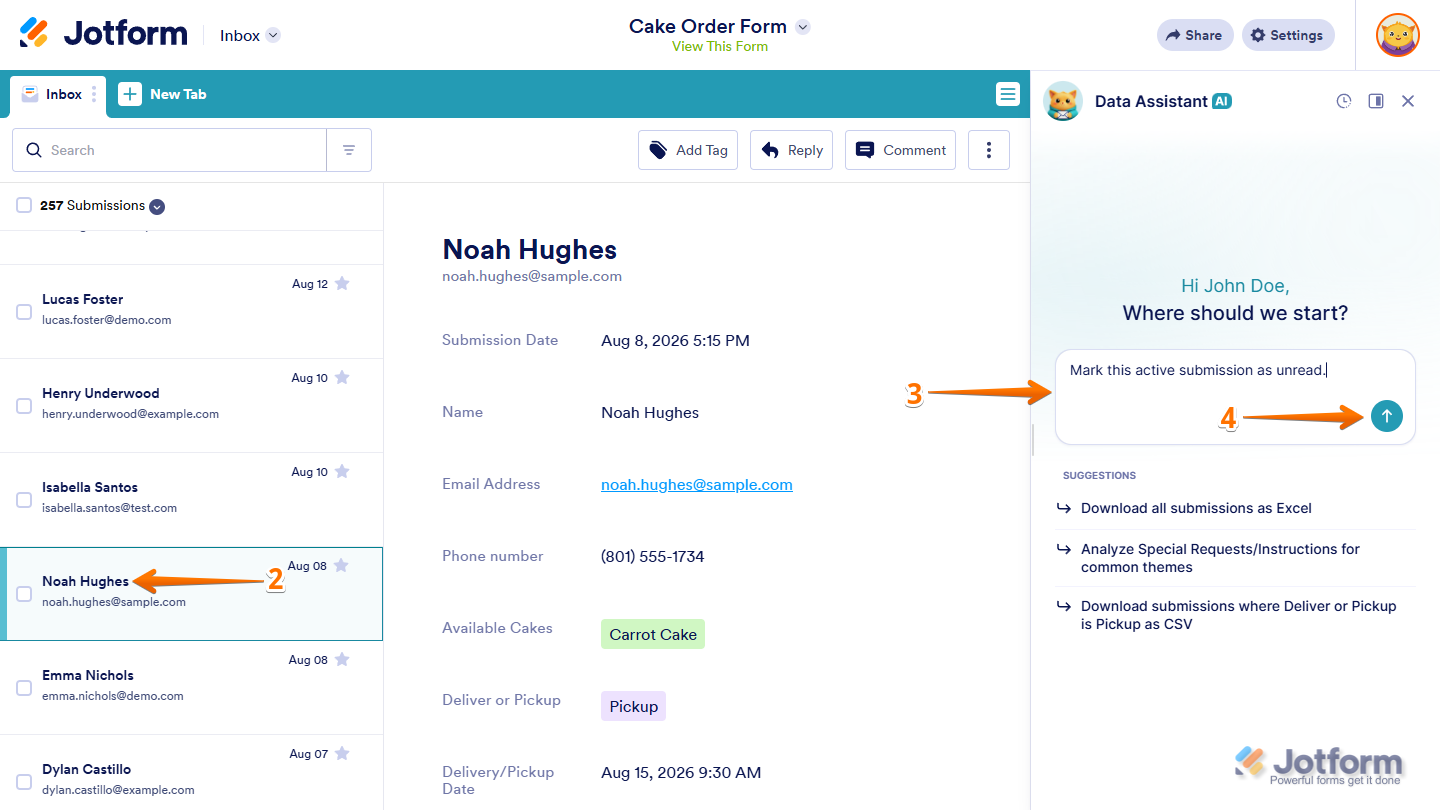
- When asked to confirm changes to multiple submissions in the chat window, click on Continue.
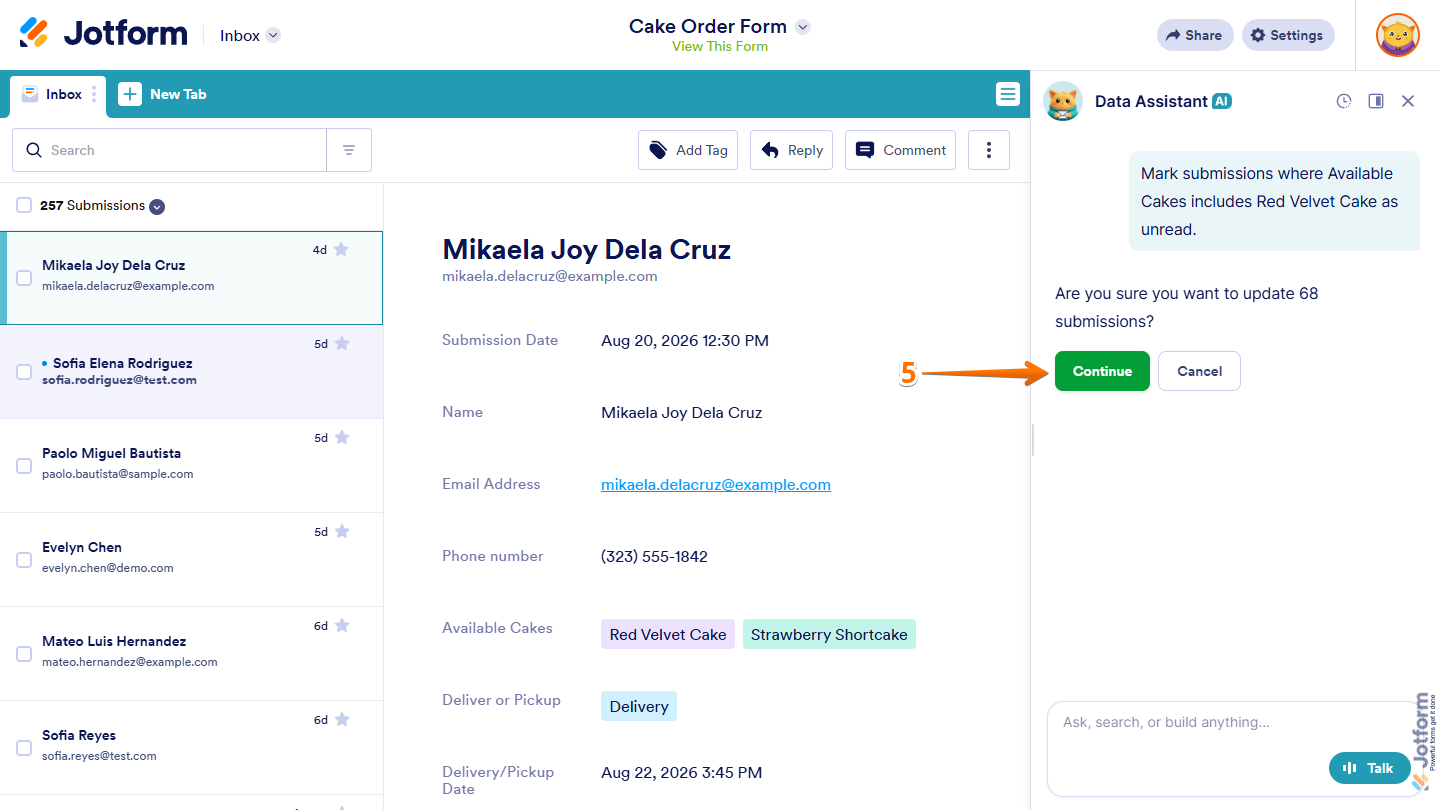
That’s it. AI Data Assistant will mark the submissions as read or unread based on your prompt and confirm the action in the chat window.
Archiving or Unarchiving Submissions
AI Data Assistant can help you archive submissions you want to keep but no longer need in your main view, or bring archived submissions back when needed. Here’s how to get started:
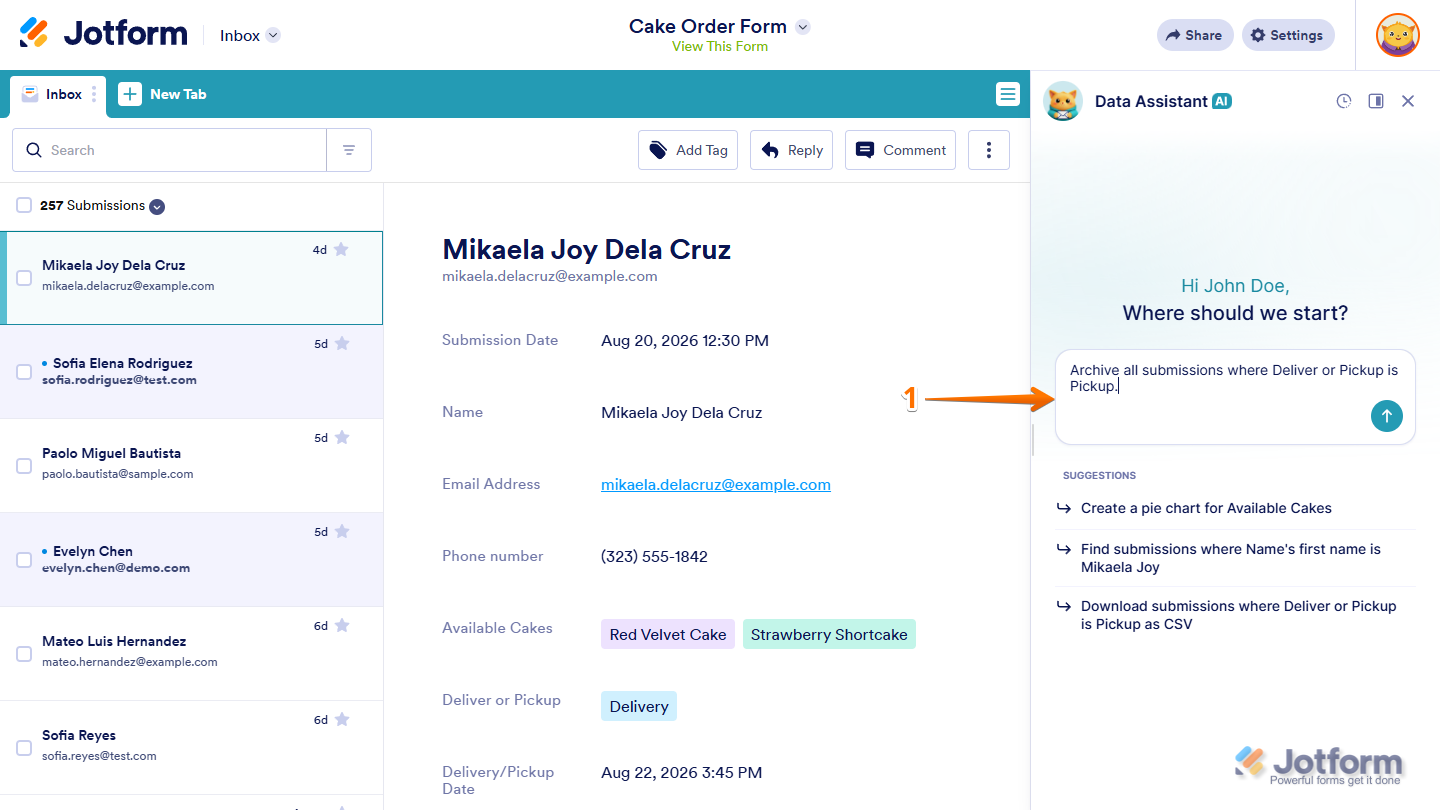
- While you’re in Jotform Inbox, in the AI Data Assistant chat window, describe the submissions you want to archive or unarchive in the Prompt box.
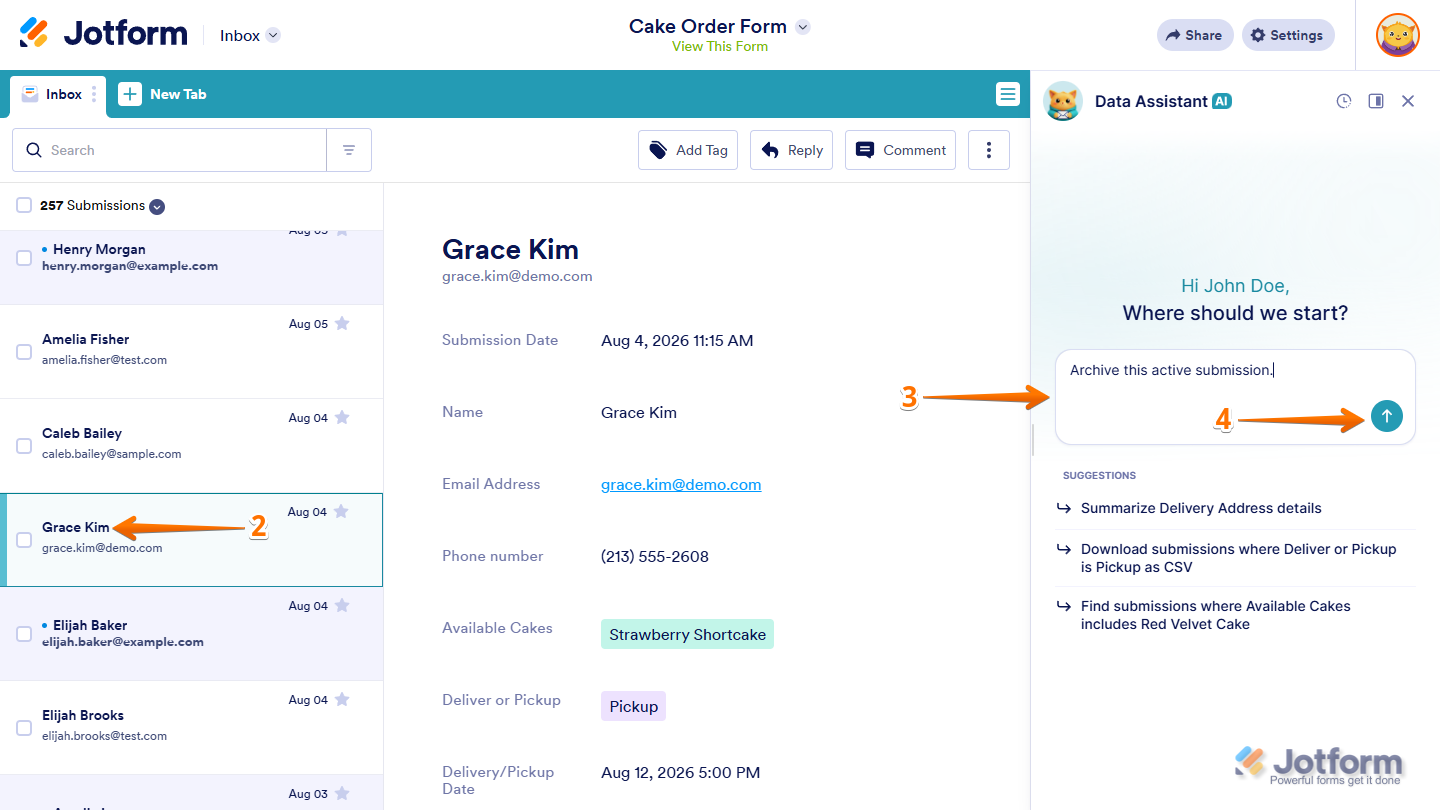
- Or, on the left side of the page, select the submission you want to archive.
- Then, in your prompt, refer to it as the active submission and say that you want to archive it.
Depending on your form, you can use prompts like:
- Archive this active submission.
- Move John Doe’s submission to Archive.
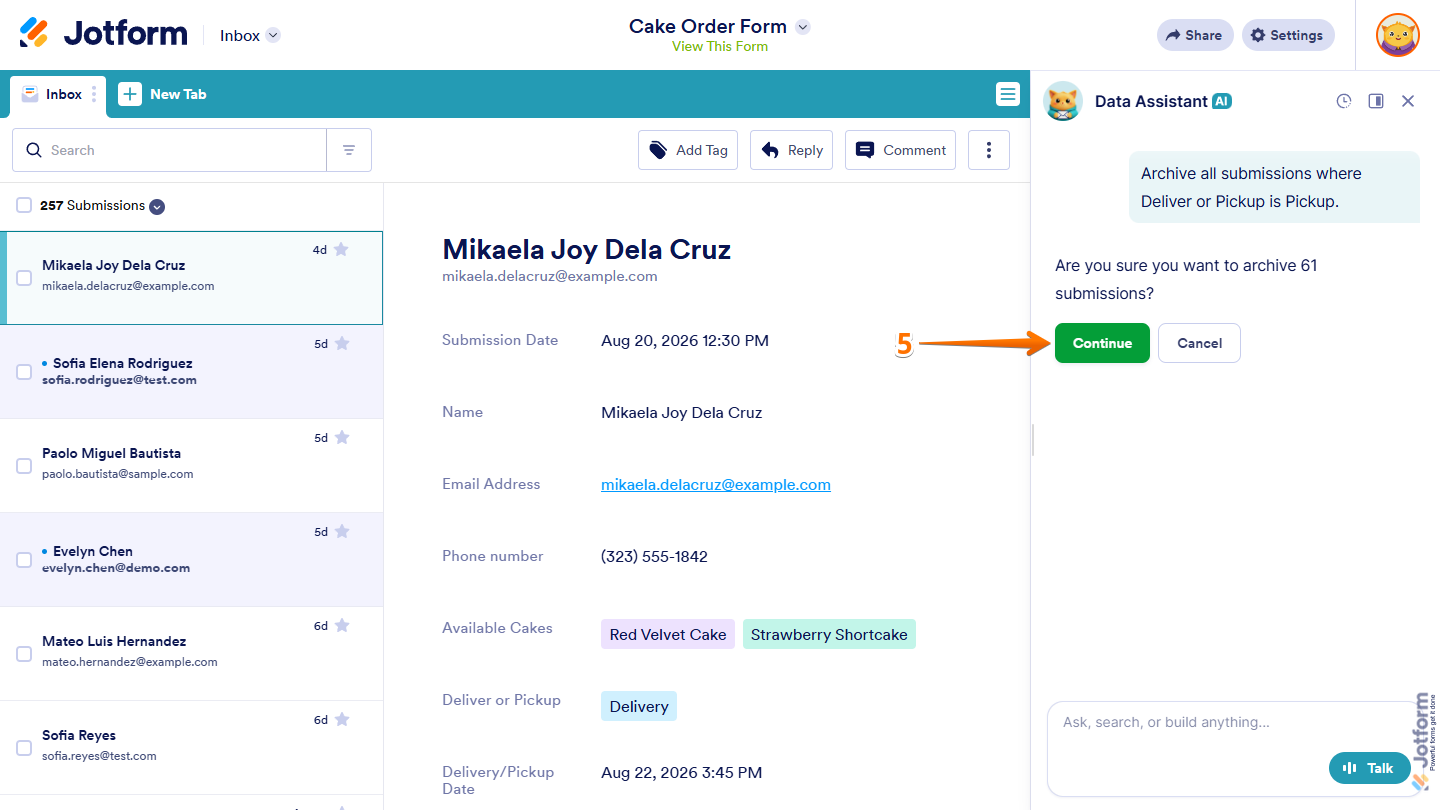
- Unarchive all submissions where Deliver or Pickup is Pickup.
- Archive the latest 5 submissions.
- Now, press Enter on your keyboard or click on the Upward Arrow icon to send it.
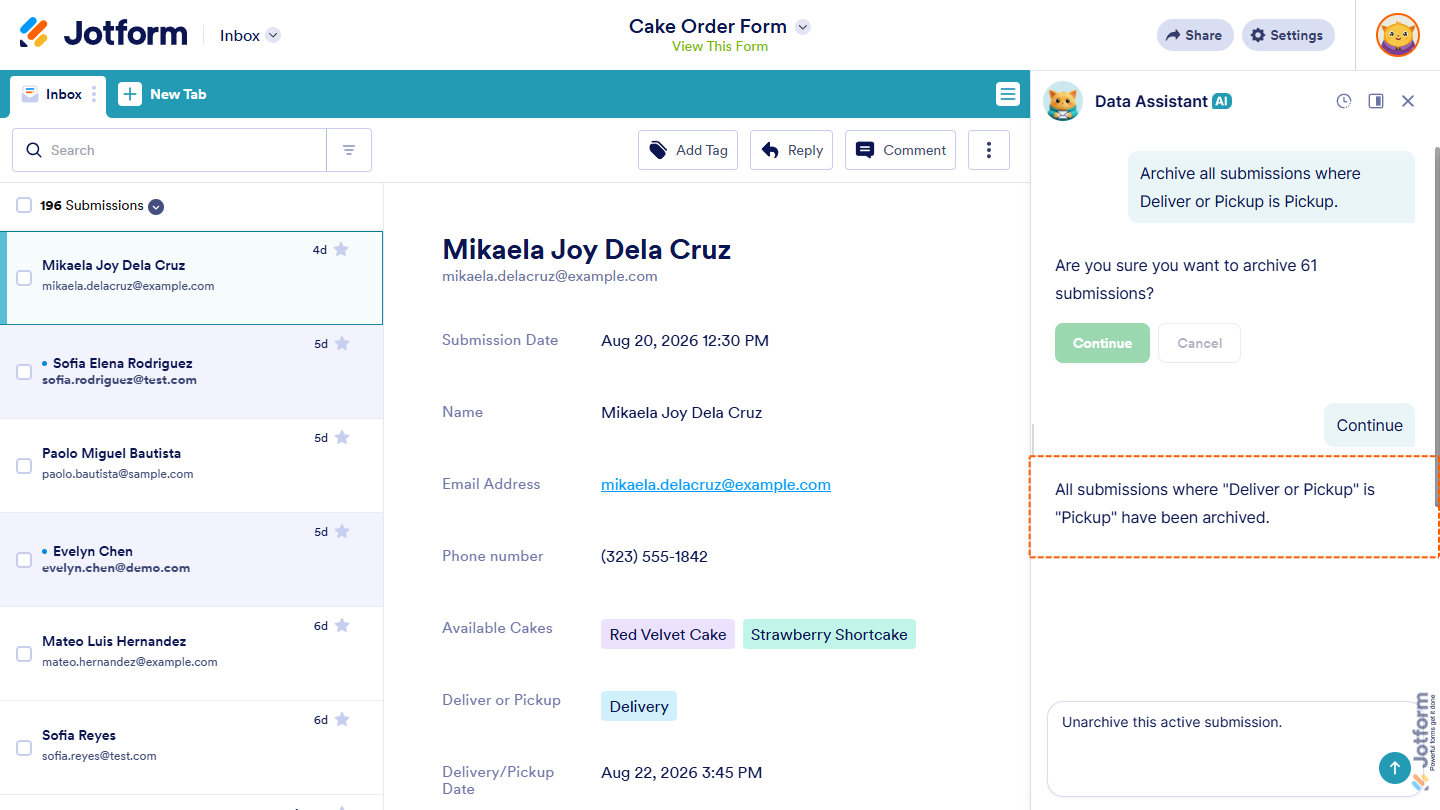
- When asked to confirm changes to multiple submissions in the chat window, click on Continue.
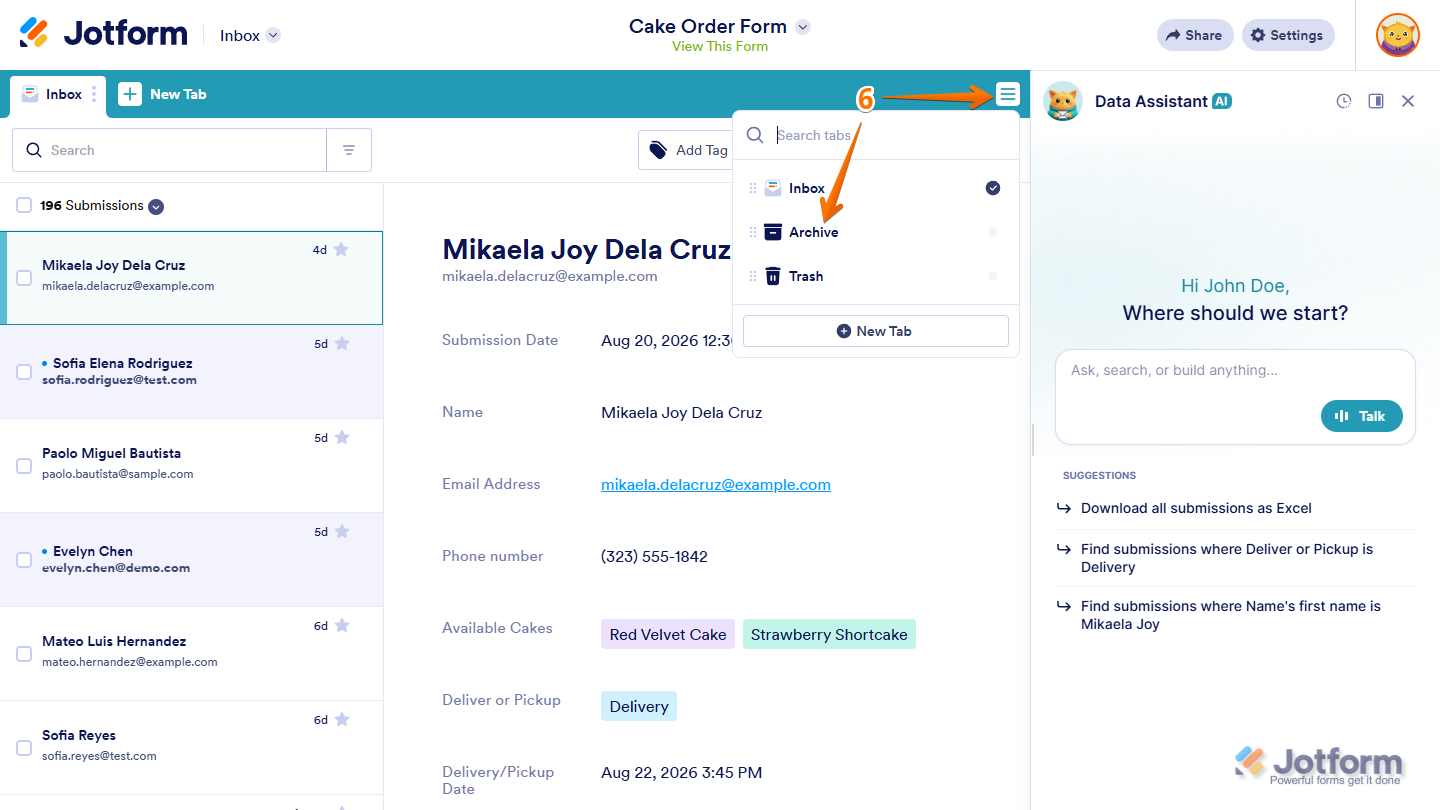
- To select a submission to unarchive, click on the Three Lines icon on the right side of the teal navigation bar at the top of the page, and in the menu that comes up, select Archive.
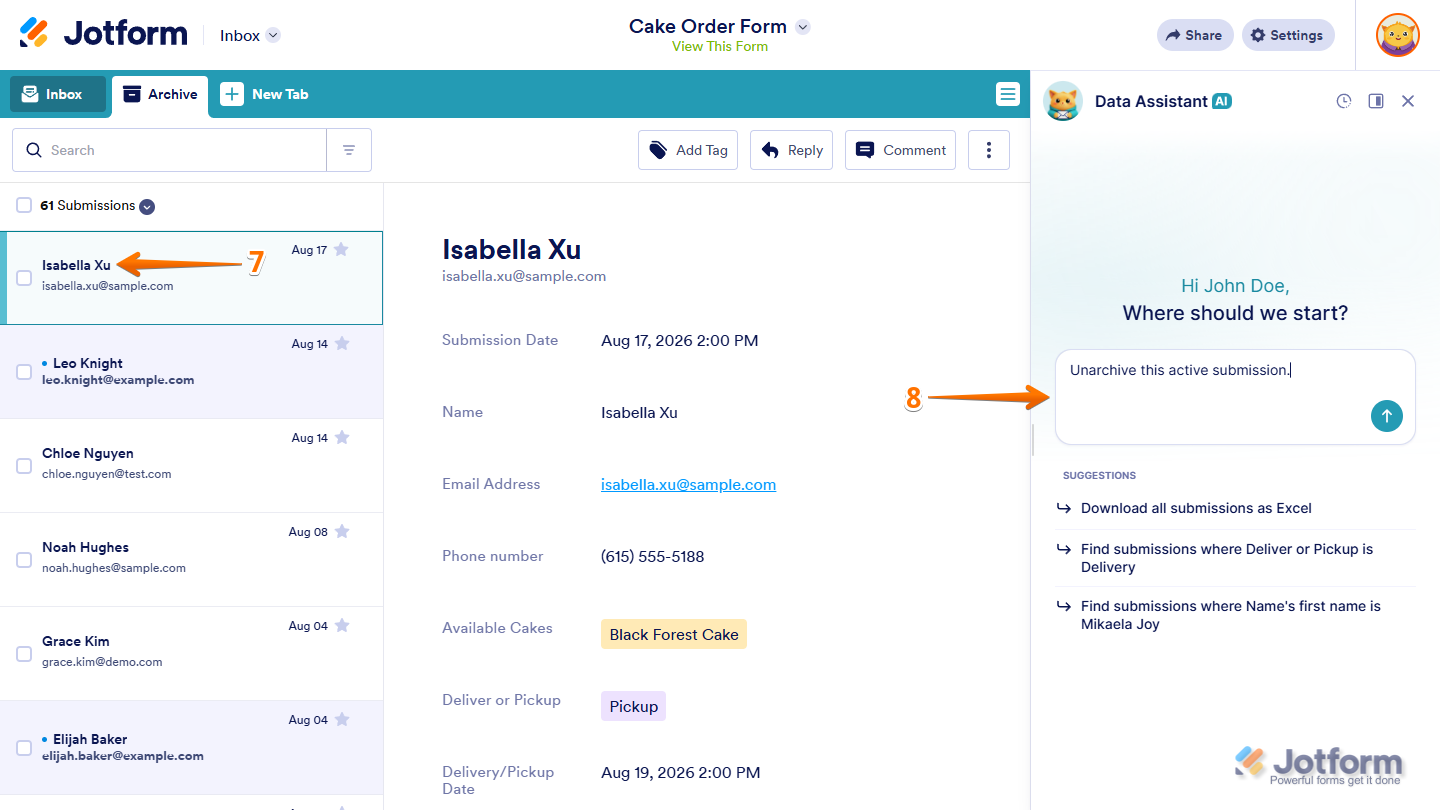
- In the Archive tab, select the submission you want to unarchive on the left side of the page.
- Then, in your prompt, refer to it as the active submission and say that you want to unarchive or move it to the Inbox tab.
Depending on your form, you can use prompts like:
- Unarchive this active submission.
- Move John Doe’s submission to Inbox.
- Move this active submission to Inbox.
That’s it. AI Data Assistant will archive or unarchive the submissions based on your prompt and confirm the action in the chat window.
Deleting and Restoring Submissions
Moving submissions to trash or restoring deleted entries with AI Data Assistant only takes a few steps. Here’s what to do:
- While you’re in Jotform Inbox, in the AI Data Assistant chat window, describe the submissions you want to delete or restore in the Prompt box.
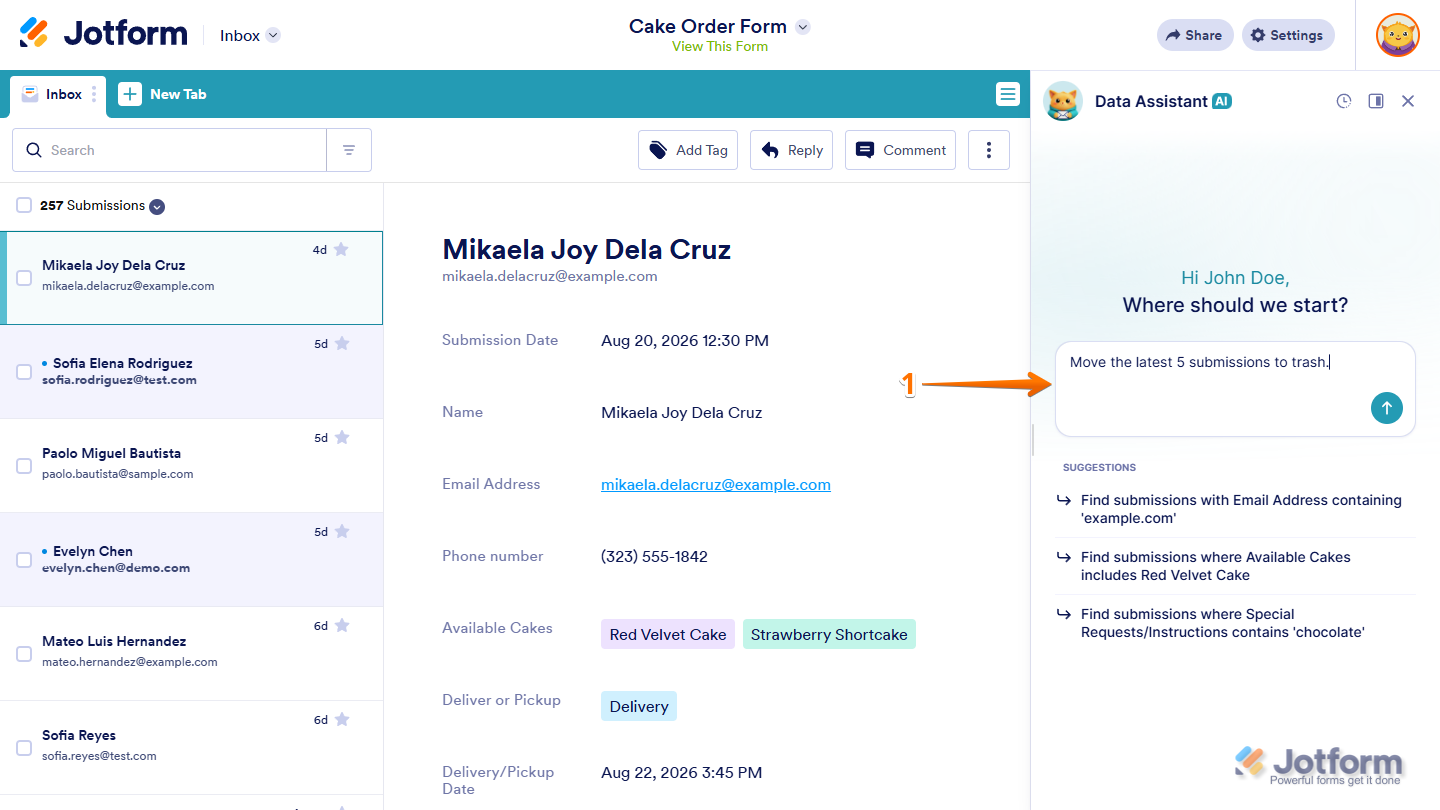
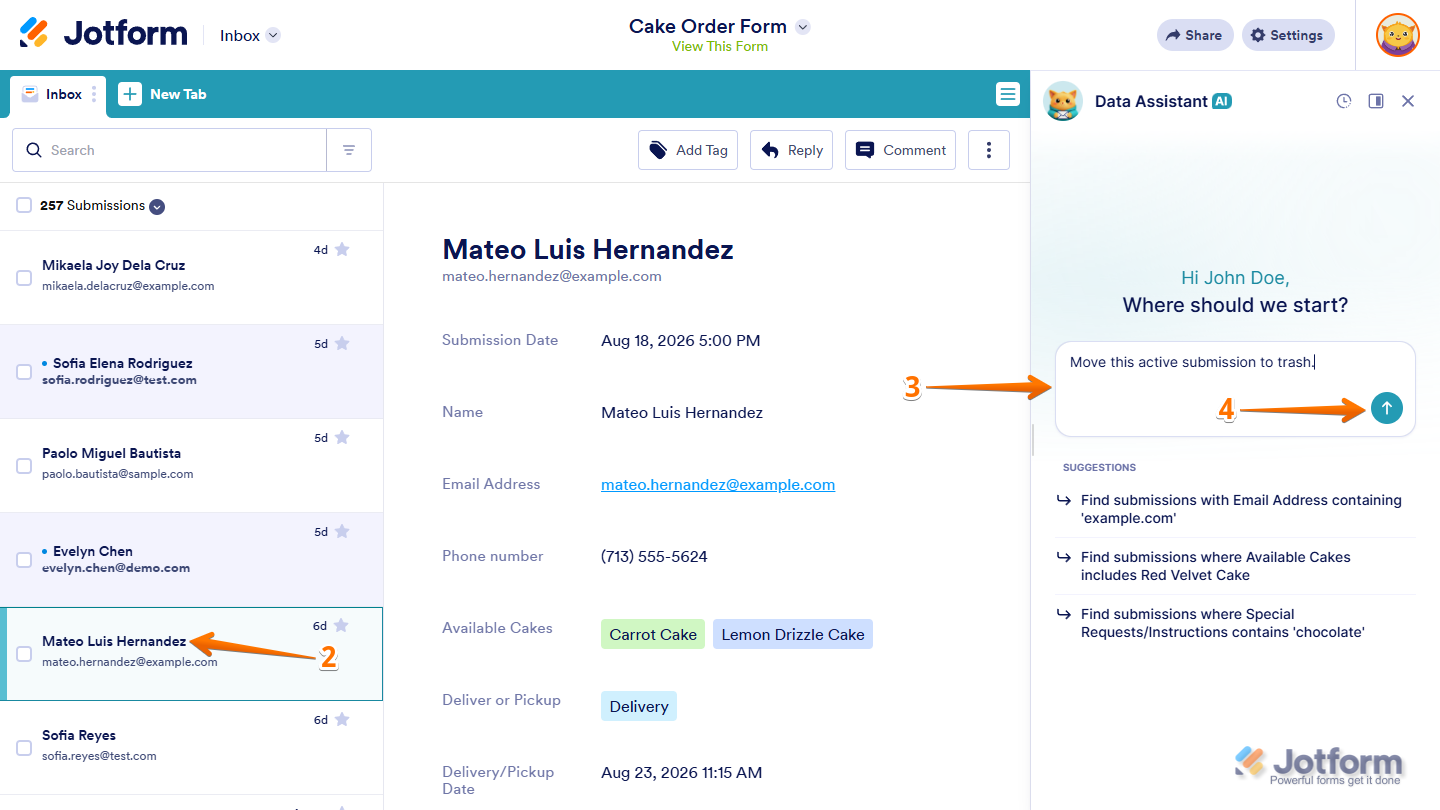
- Or, on the left side of the page, select the submission you want to delete.
- Then, in your prompt, refer to it as the active submission and say that you want to move it to trash.
Depending on your form, you can use prompts like:
- Move this active submission to trash.
- Restore all submissions where Deliver or Pickup is Pickup.
- Move all archived submissions to trash.
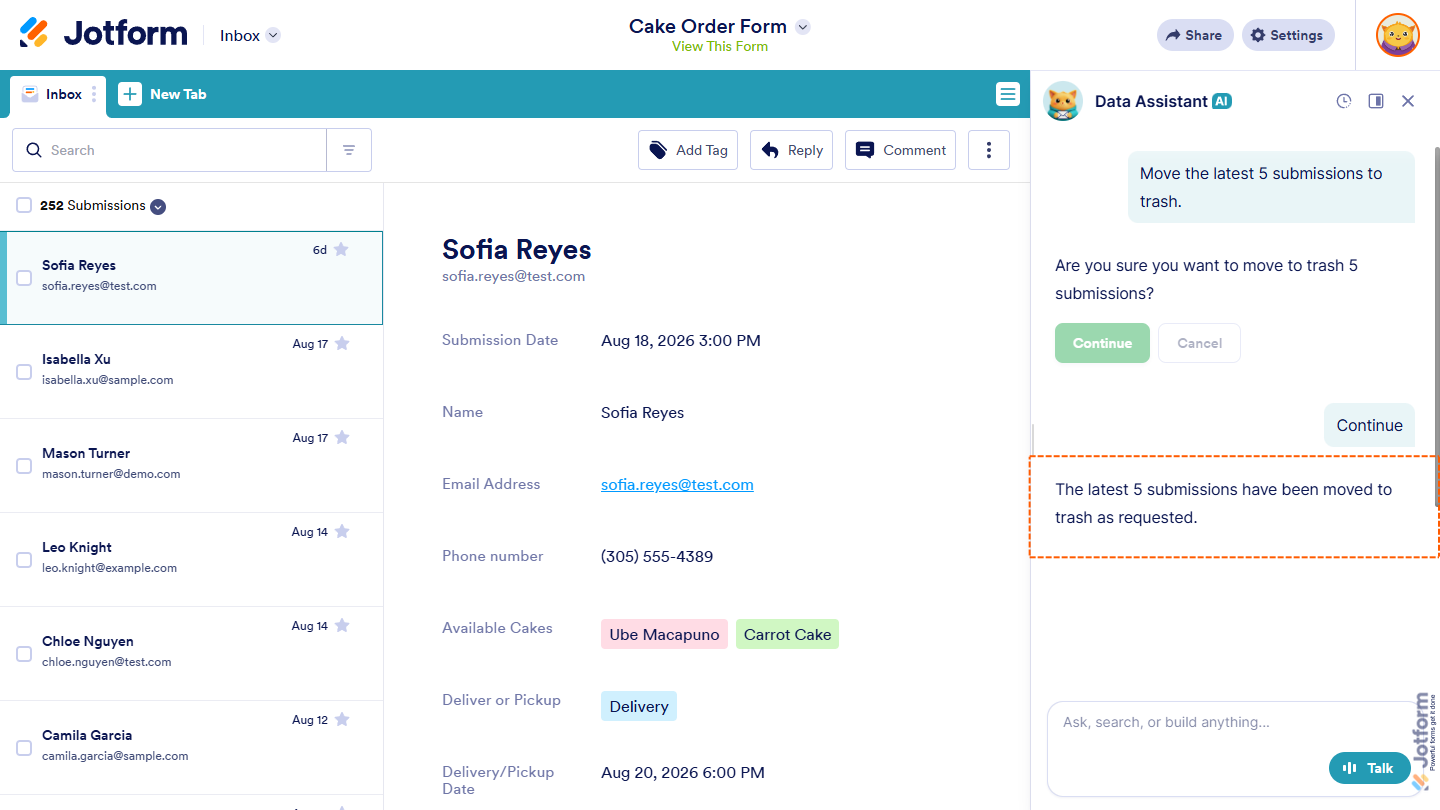
- Move the latest 5 submissions to trash.
- Now, press Enter on your keyboard or click on the Upward Arrow icon to send it.
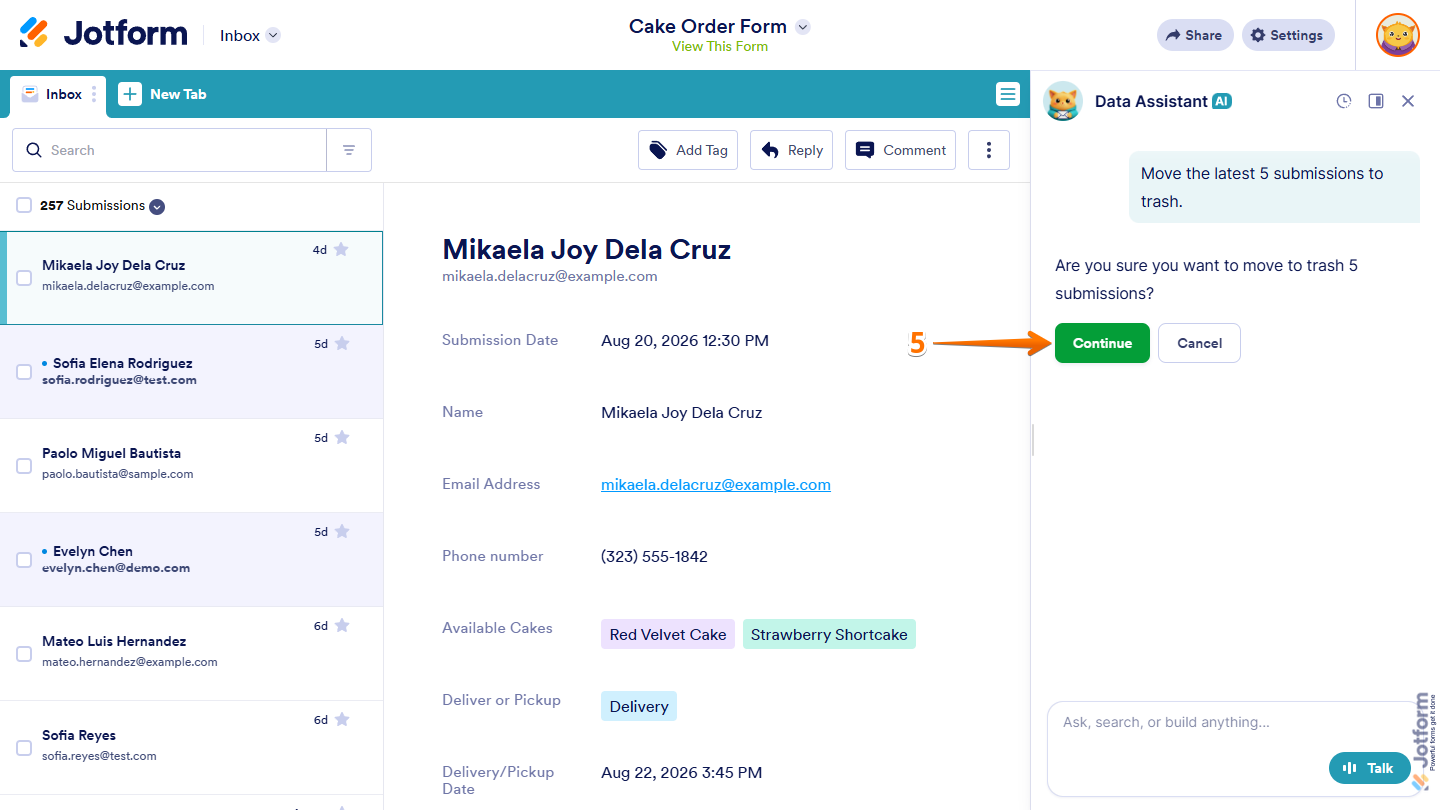
- When asked to confirm changes to multiple submissions in the chat window, click on Continue.
- To select a deleted submission to restore, click on the Three Lines icon on the right side of the teal navigation bar at the top of the page, and in the menu that comes up, select Trash.
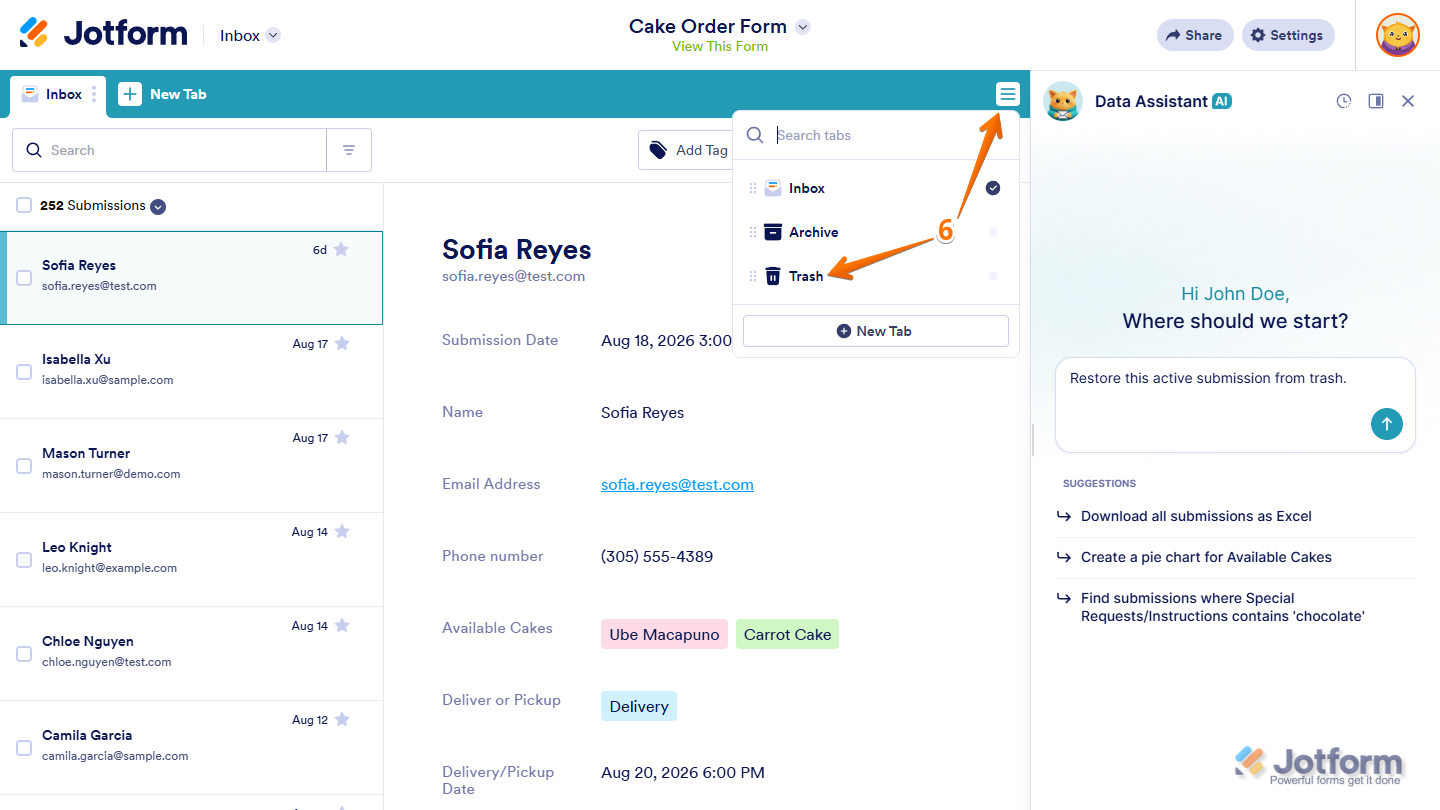
- In the Trash tab, select the submission you want to restore on the left side of the page.
- Then, in your prompt, refer to it as the active submission and say that you want to restore or move it to the Inbox tab.
Depending on your form, you can use prompts like:
- Restore this active submission.
- Move John Doe’s submission to Inbox.
- Restore this active submission from trash.
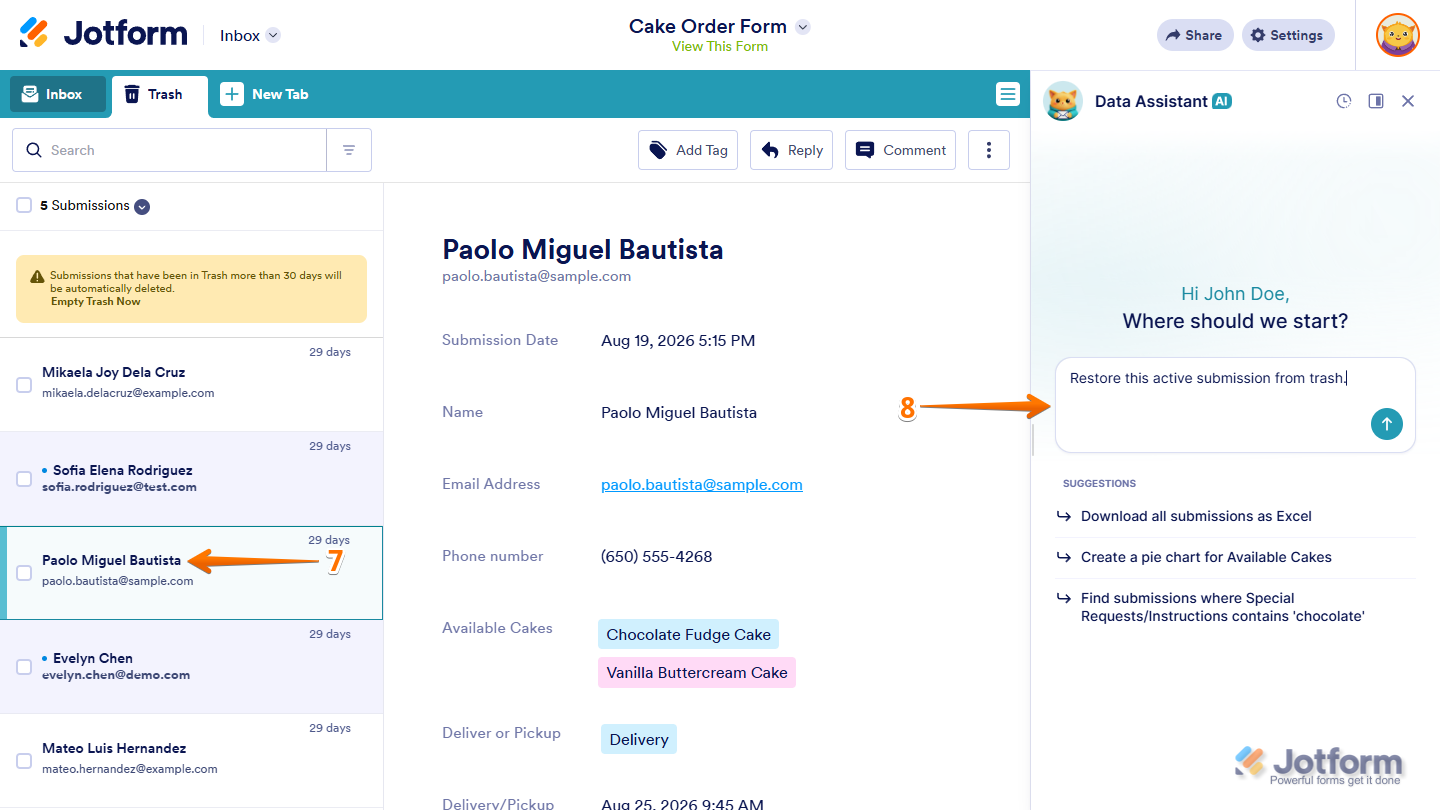
That’s it. AI Data Assistant will delete or restore the submissions based on your prompt and confirm the action in the chat window.
Adding and Updating Comments
You can use AI Data Assistant to add comments to submissions or make changes to existing ones. Here’s how:
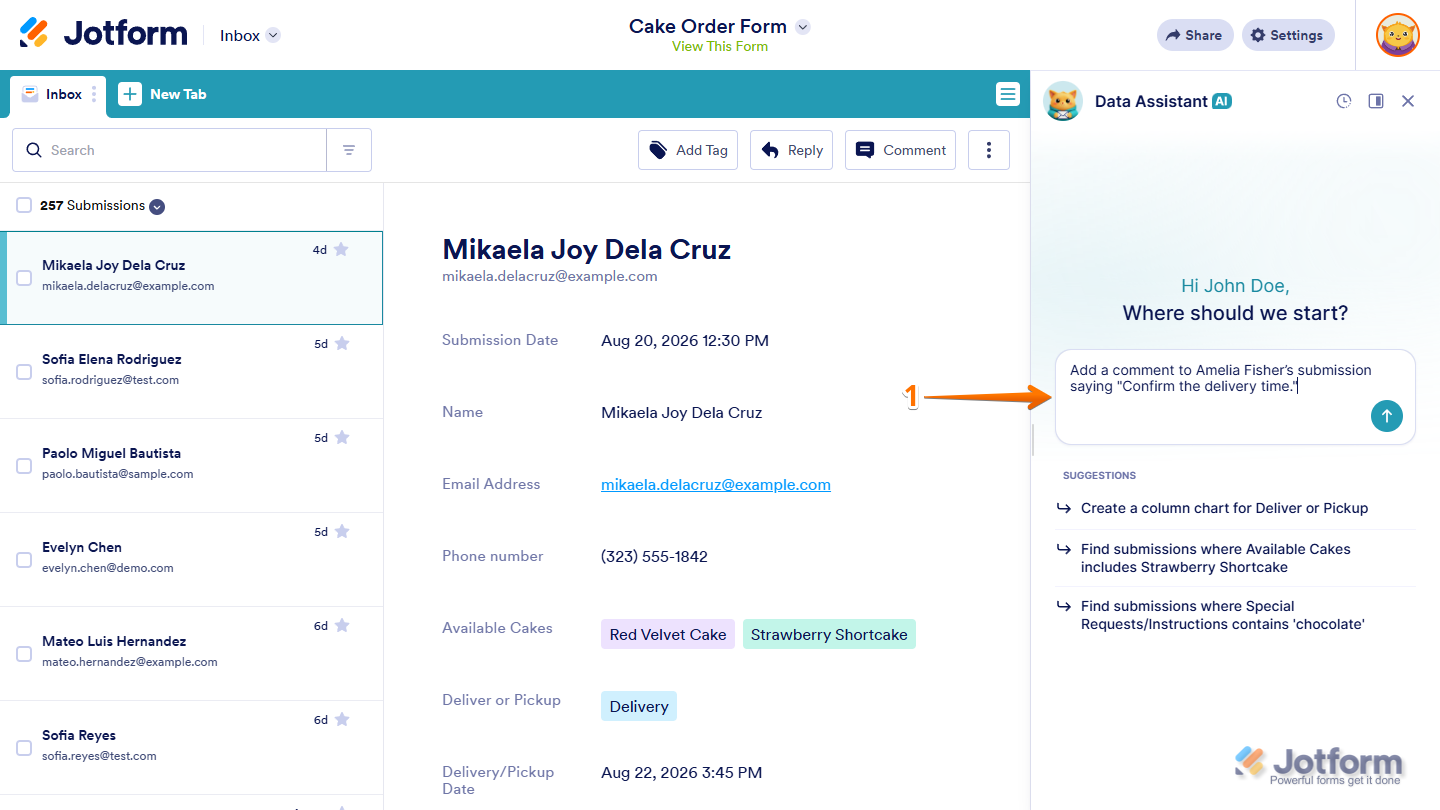
- While you’re in Jotform Inbox, in the AI Data Assistant chat window, describe the submissions you want to add or update comments on and what you want the comments to say in the Prompt box.
- Or, on the left side of the page, select the submission you want to make changes to.
- Then, in your prompt, refer to it as the active submission and describe the comment you want to add or update.
Depending on your form, you can use prompts like:
- Add the comment “Follow up with this customer” to this active submission.
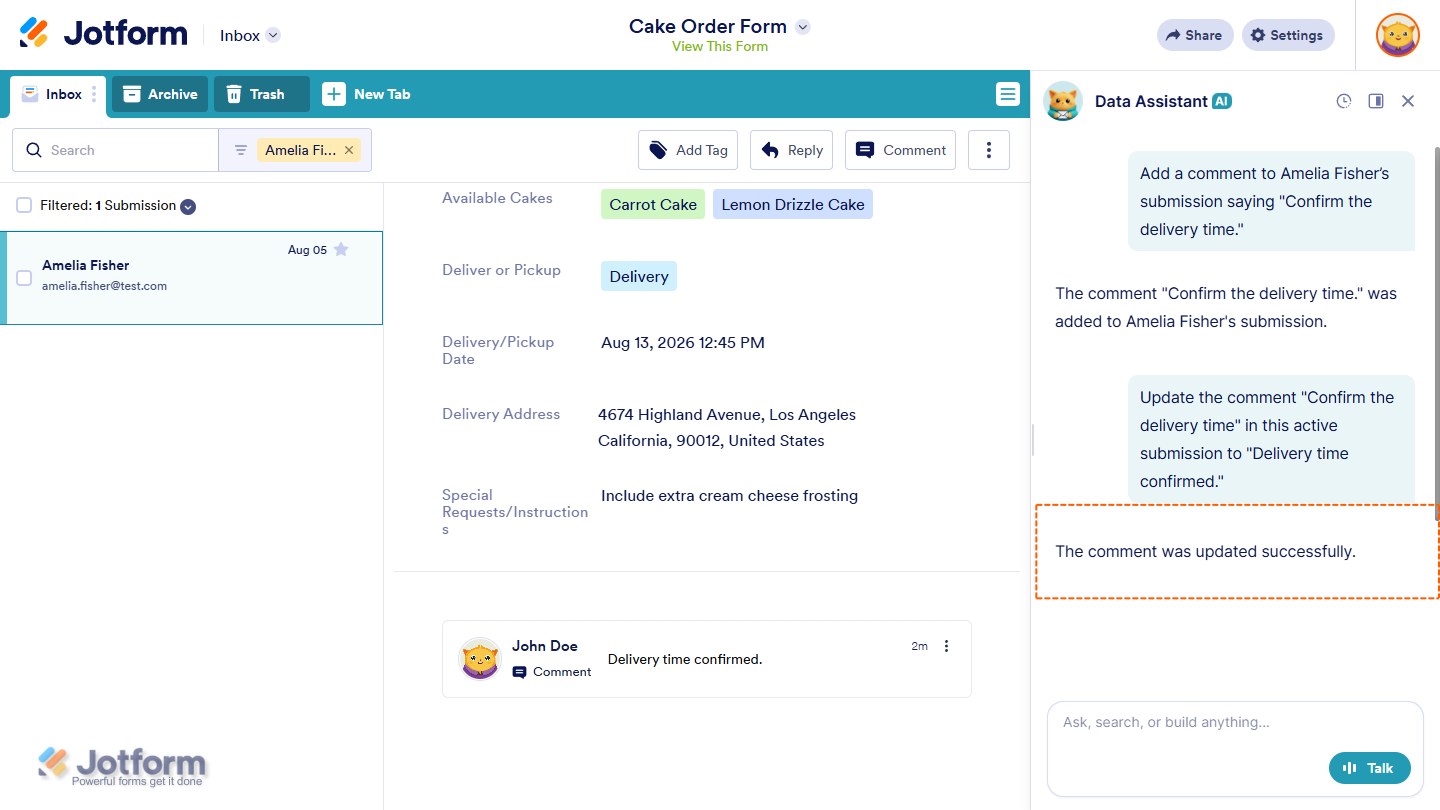
- Add a comment to John Doe’s submission saying “Confirm the delivery time.”
- Update the comment “Confirm the delivery time” in this active submission to “Delivery time confirmed.”
Notes
- You can add comments to one submission at a time.
- To update a comment, identify the specific comment you want to change in your prompt.
- You can only add top-level comments to the entire submission.
- Now, press Enter on your keyboard or click on the Upward Arrow icon to send it.
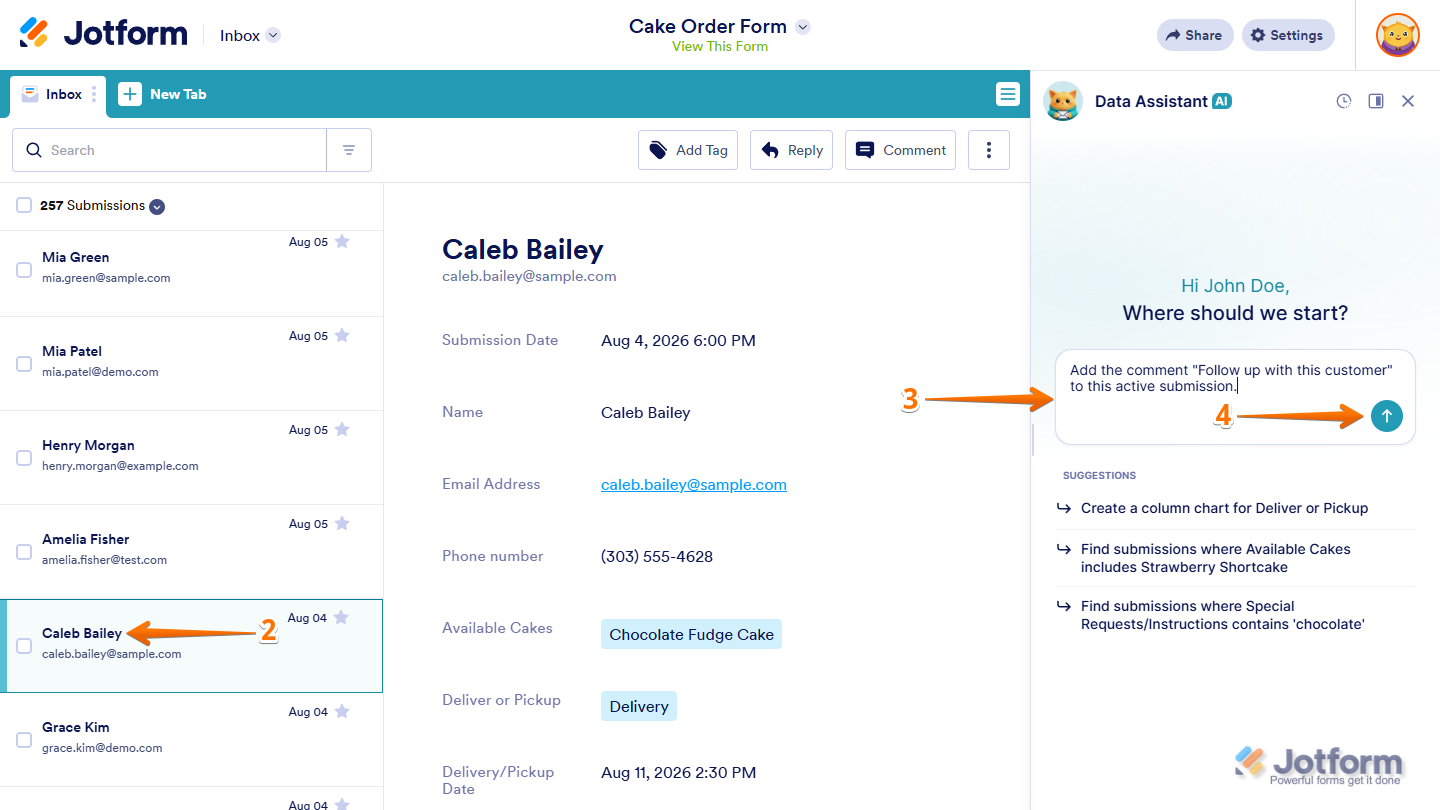
That’s it. AI Data Assistant will add or update the comments based on your prompt and confirm the action in the chat window.
Replying to Submissions
AI Data Assistant can help you prepare replies to respondents directly from Jotform Inbox. Getting started is simple—here’s what to do:
- While you’re in Jotform Inbox, in the AI Data Assistant chat window, describe the submission you want to reply to and what you want the response to say in the Prompt box.
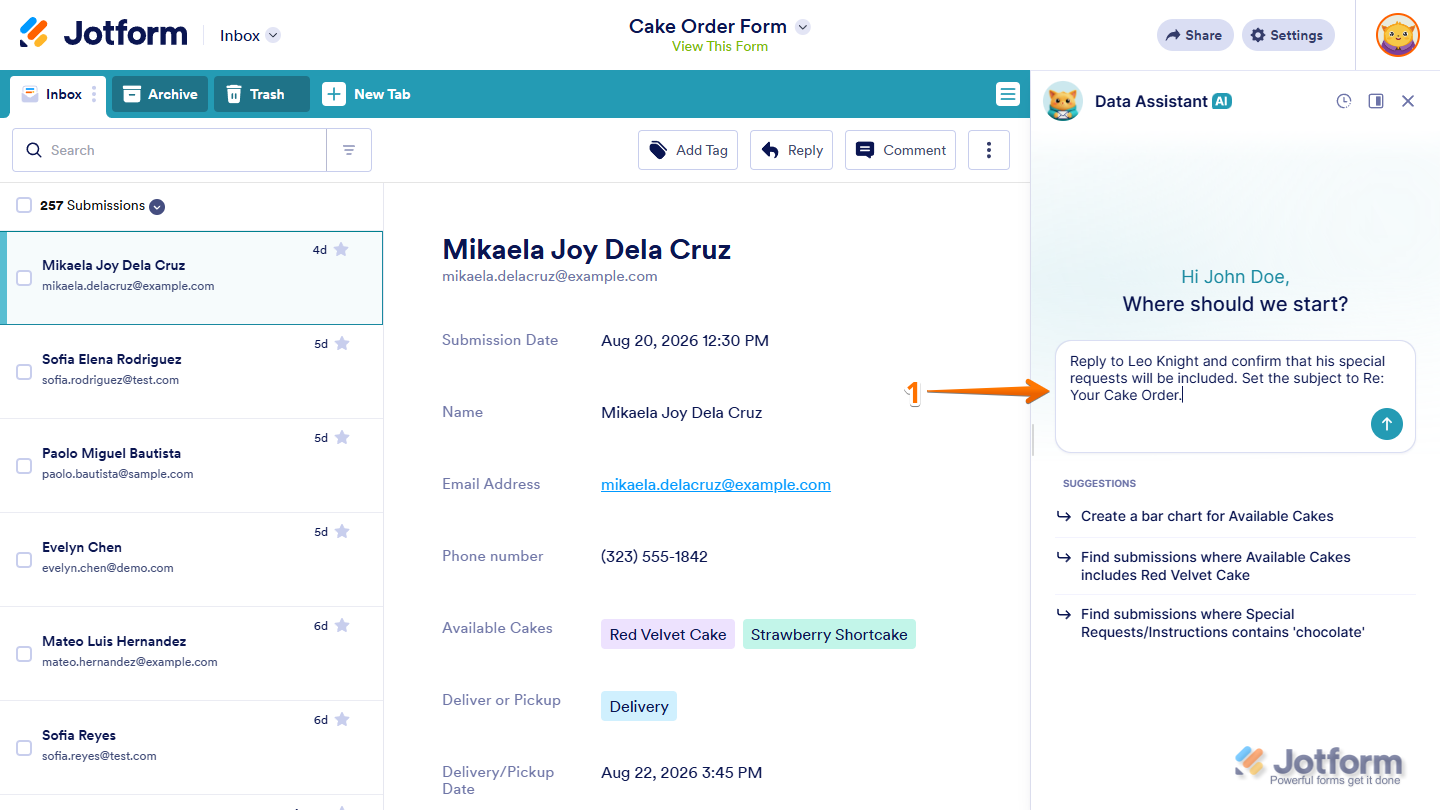
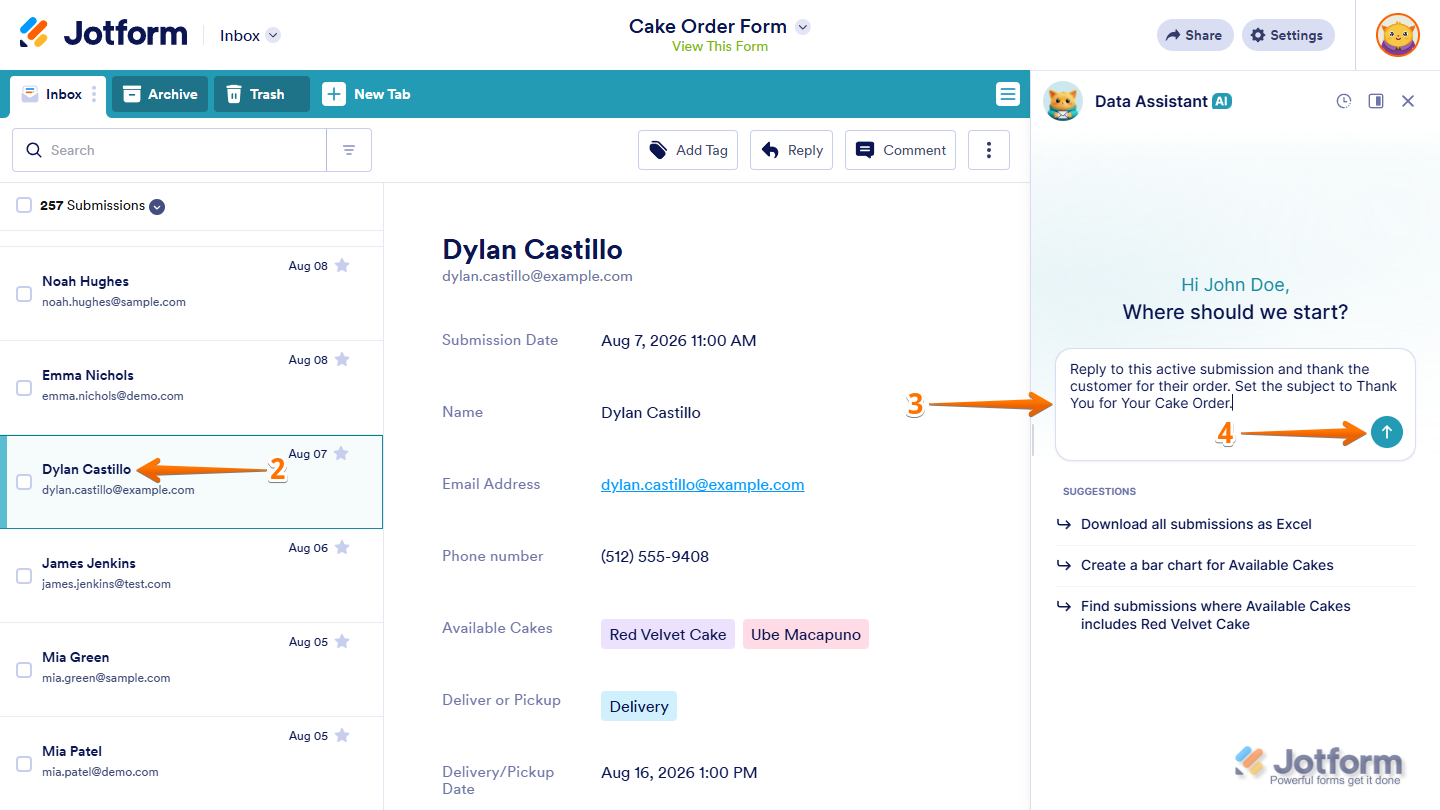
- Or, on the left side of the page, select the submission you want to reply to.
- Then, in your prompt, refer to it as the active submission and describe the response you want to send.
Depending on your form, you can use prompts like:
- Reply to this active submission and thank the customer for their order. Set the subject to Thank You for Your Cake Order.
- Reply to John Doe and confirm that her special requests will be included. Set the subject to Re: Your Cake Order.
- Write a reply telling the customer that their pickup order will be ready on the selected date. Use Your Cake Order Is Ready for Pickup as the subject.
- Now, press Enter on your keyboard or click on the Upward Arrow icon to send it.
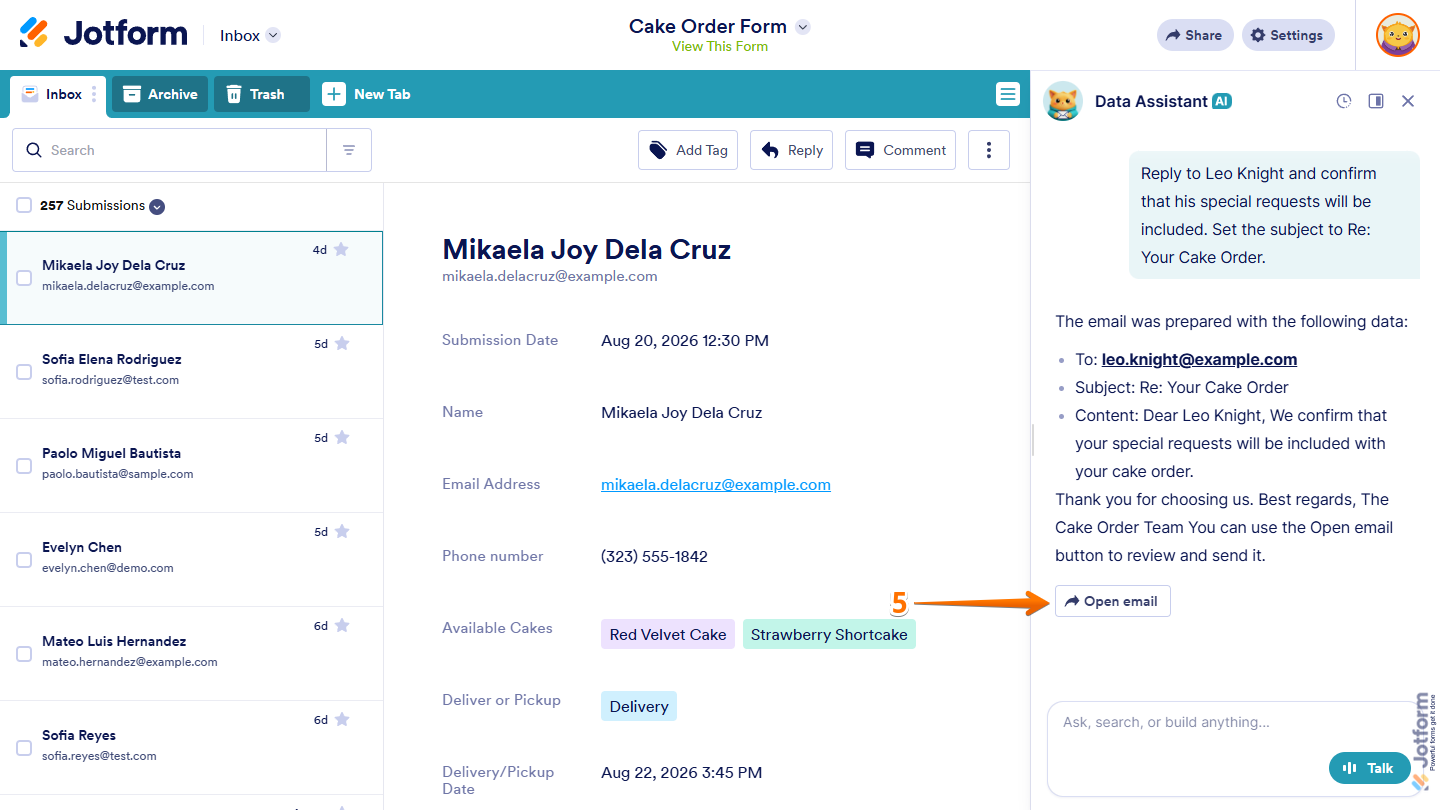
- Once AI Data Assistant prepares the reply, click on Open Email in the chat window.
- Then, in the Send Email window that opens, review or update the recipient, subject, and message as needed, and then click on Send Email.
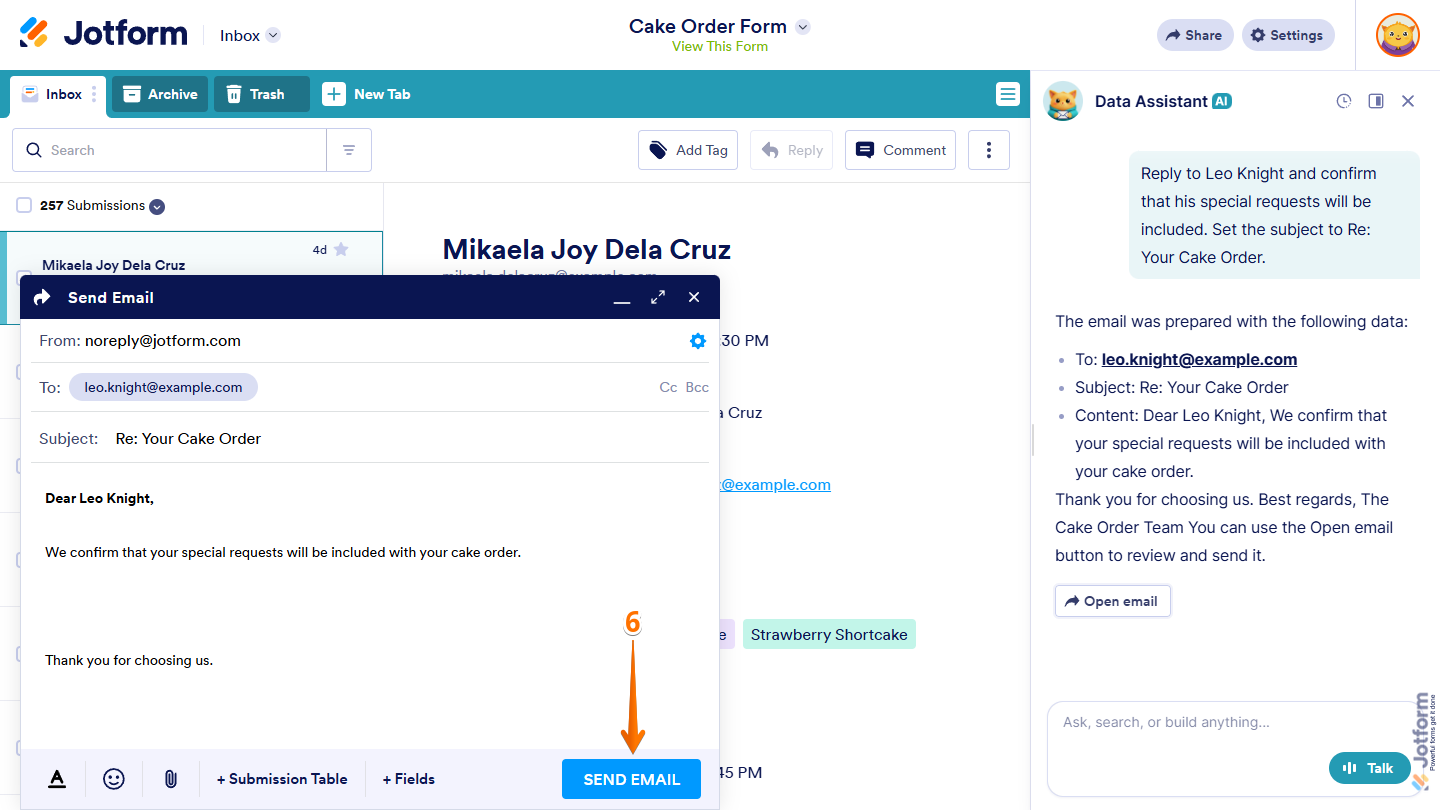
That’s it. Your reply will be sent to the respondent.
Forwarding Submissions
When you need to share submission details with someone else, AI Data Assistant can help you prepare an email to forward them. Here’s how to get started:
- While you’re in Jotform Inbox, in the AI Data Assistant chat window, describe the submission you want to forward and who you want to send it to in the Prompt box.
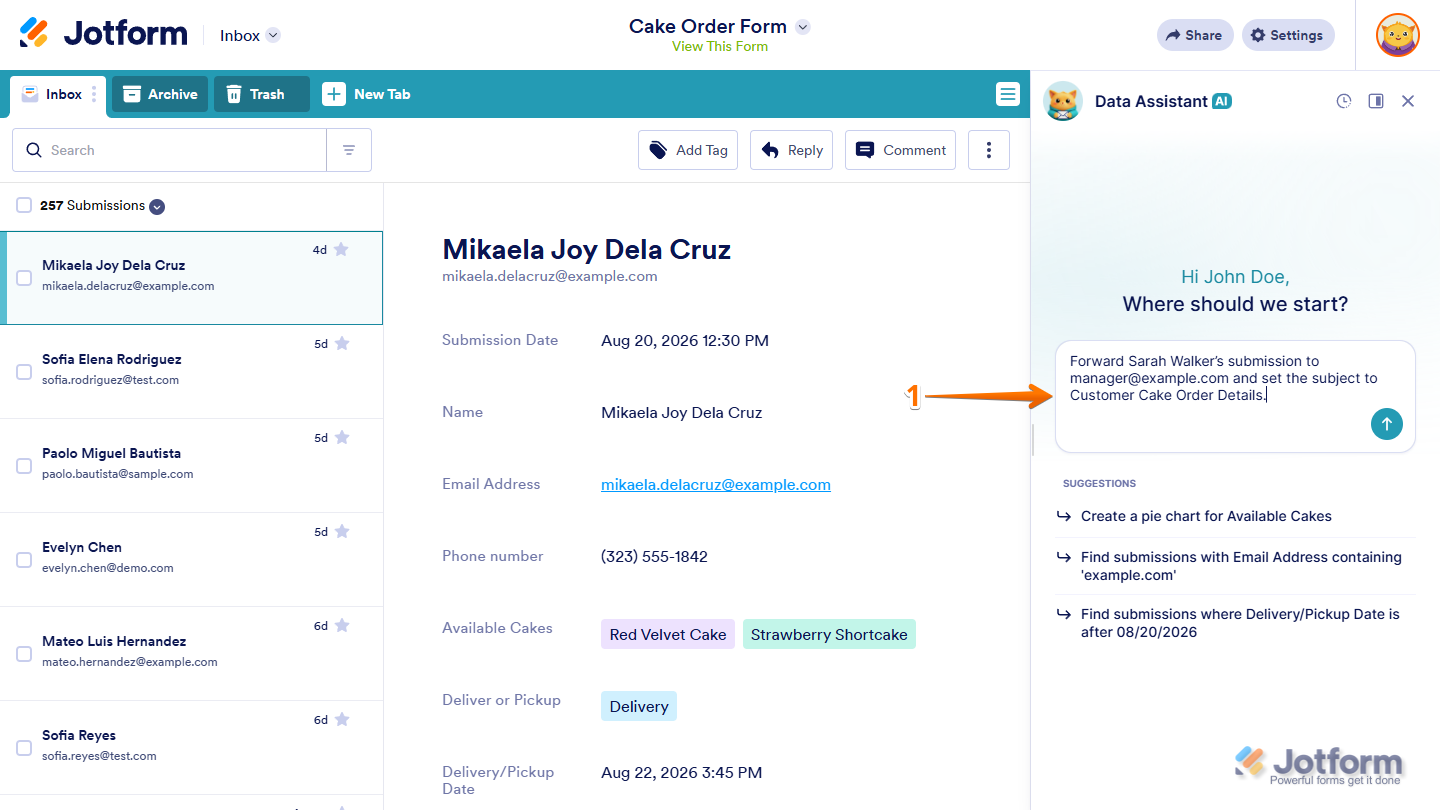
- Or, on the left side of the page, select the submission you want to forward.
- Then, in your prompt, refer to it as the active submission and specify the recipient.
Depending on your form, you can use prompts like:
- Forward this active submission to manager@example.com with the subject Cake Order for Review.
- Forward John Doe’s submission to manager@example.com and set the subject to Customer Cake Order Details.
- Send this active submission to supervisor@example.com with the subject Cake Order Follow-Up and include the customer’s order details.
- Now, press Enter on your keyboard or click on the Upward Arrow icon to send it.
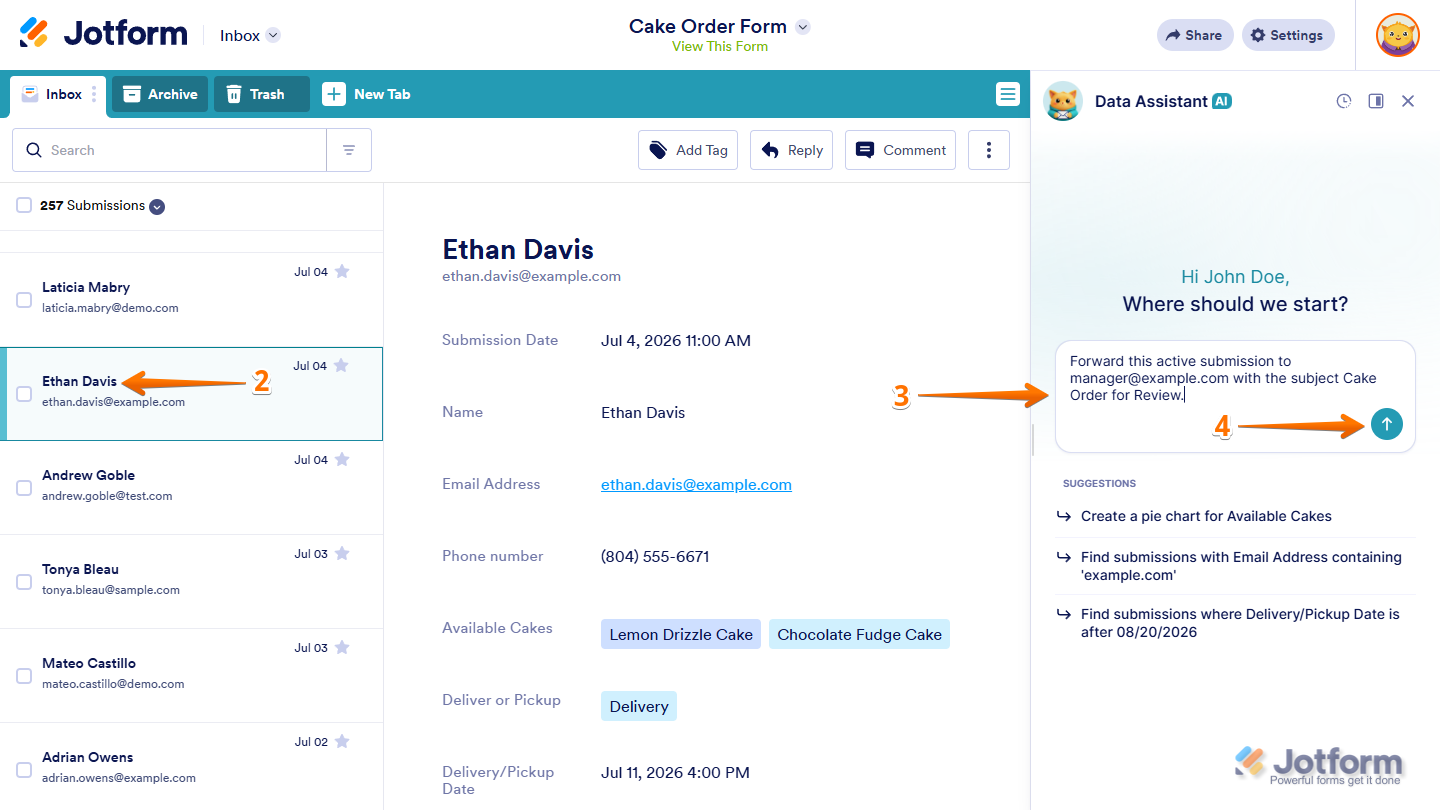
- Once AI Data Assistant prepares the email, click on Open Email in the chat window.
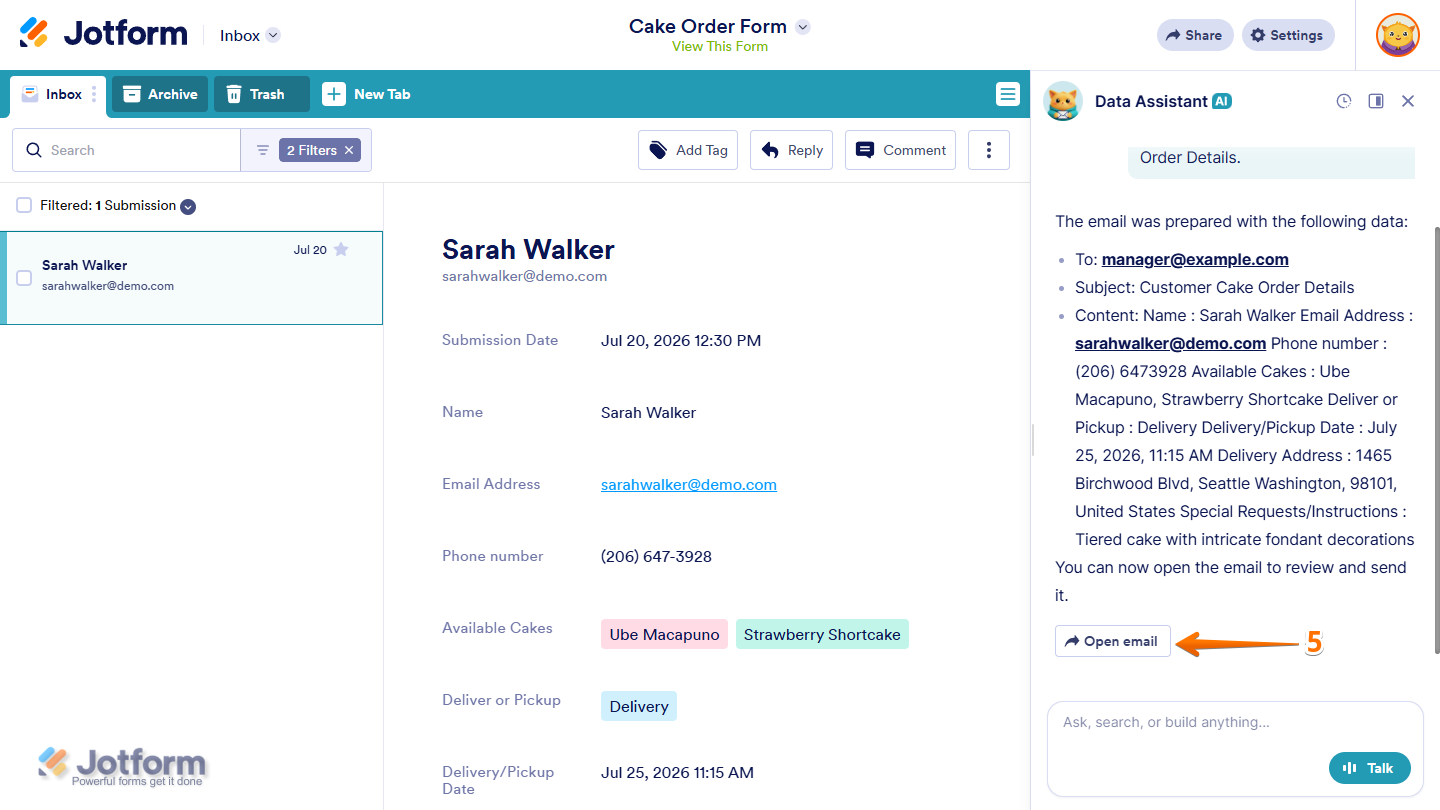
- Then, in the Send Email window that opens, review or update the recipient, subject, and message as needed, and then click on Send Email.
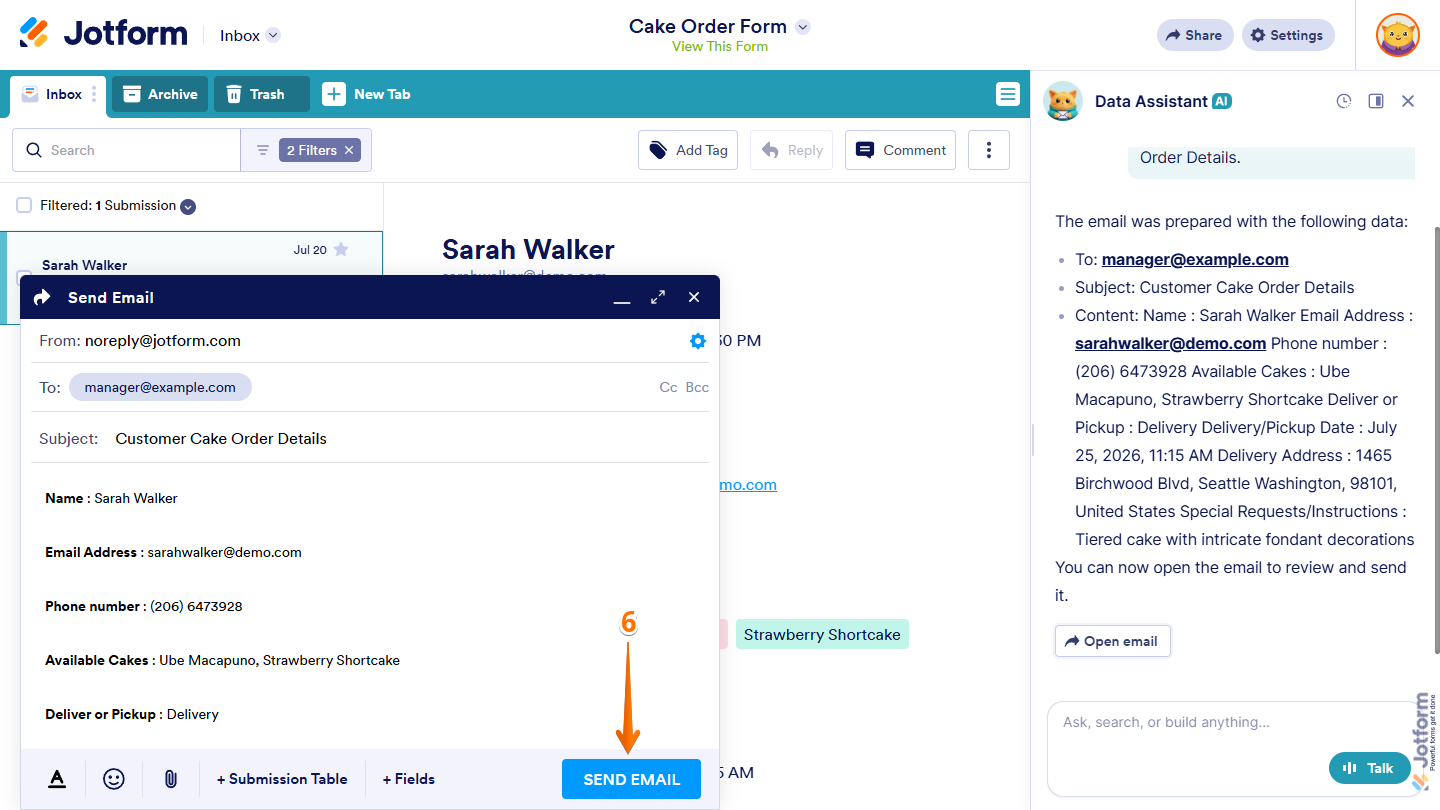
That’s it. The submission details will be forwarded to the recipient.
Exporting Submissions
You can use AI Data Assistant to export your submissions in PDF, CSV, or Excel format. Here’s the quick way to do it:
- While you’re in Jotform Inbox, in the AI Data Assistant chat window, describe the submissions you want to export and the file format you want to use in the Prompt box.
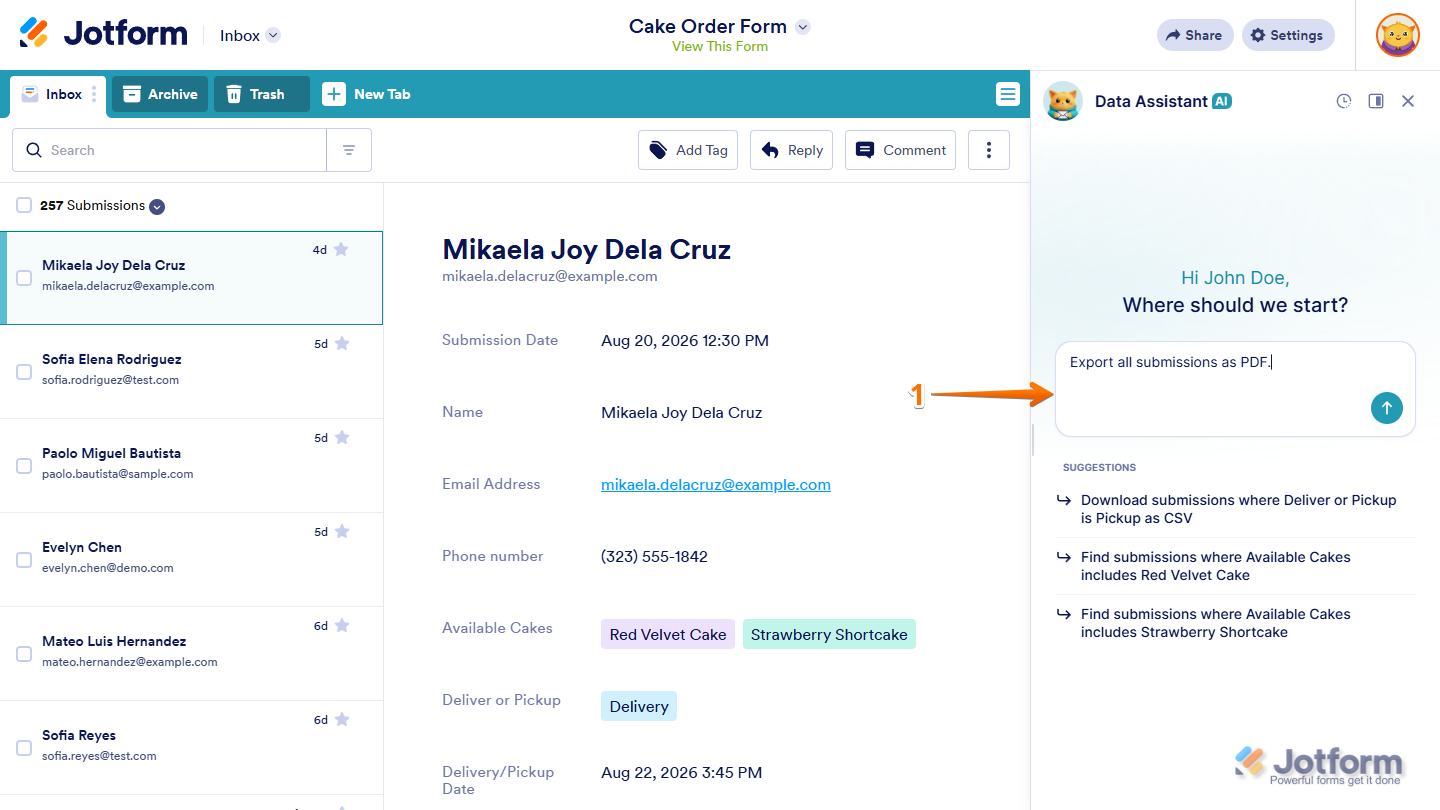
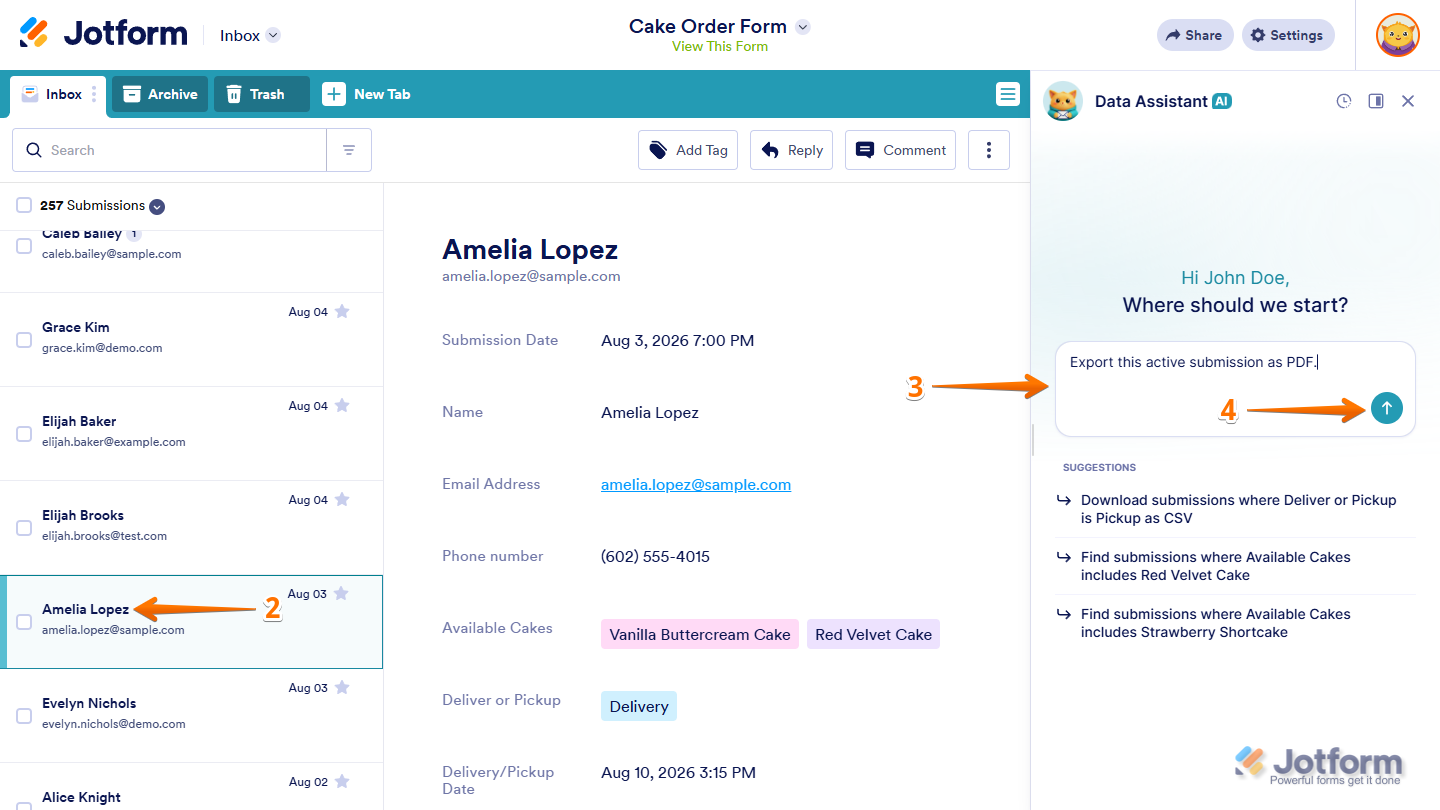
- Or, on the left side of the page, select the submission you want to export.
- Then, in your prompt, refer to it as the active submission and specify the file format you want to use.
Depending on your form, you can use prompts like:
- Export all submissions to Excel.
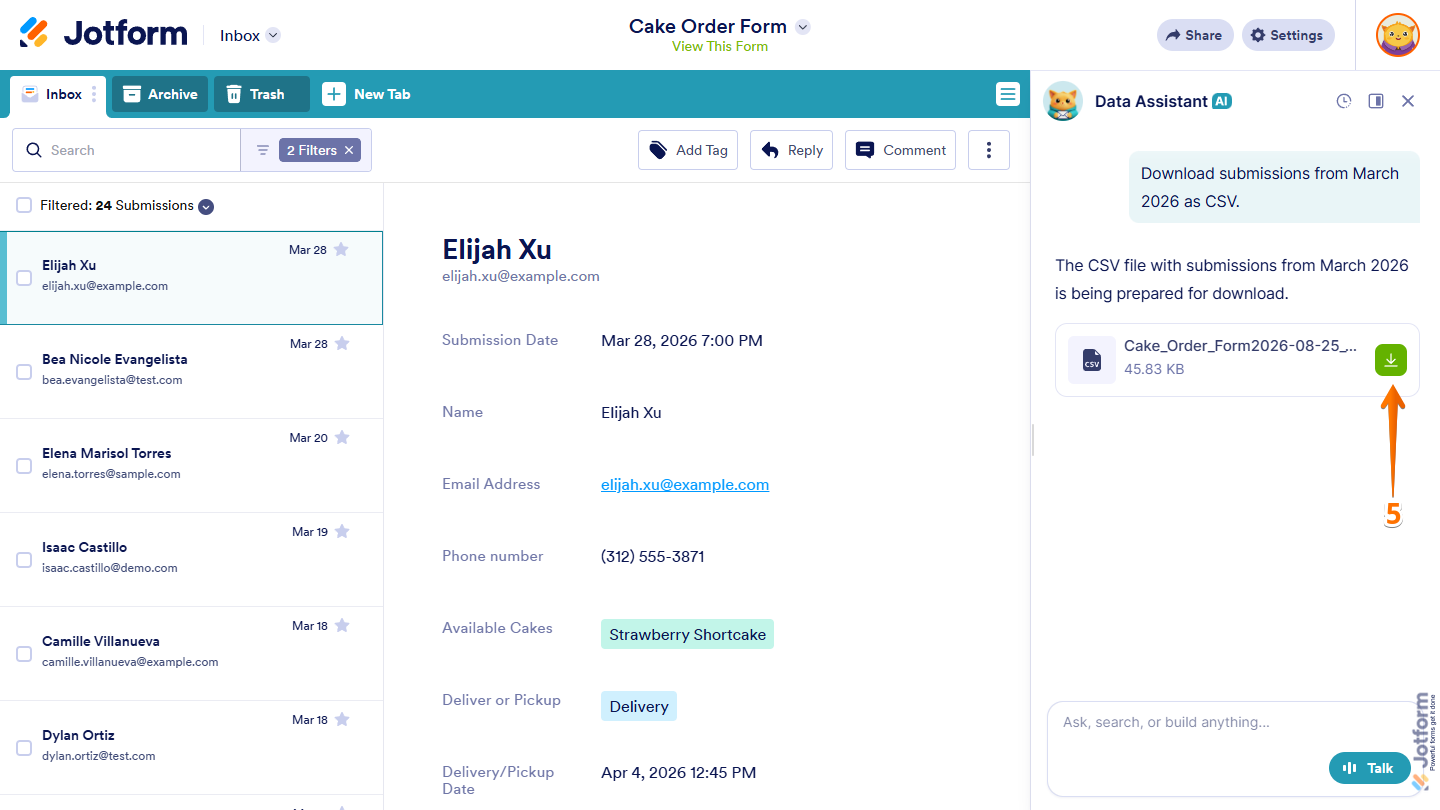
- Download submissions from March 2026 as CSV.
- Download all submissions where Deliver or Pickup is Pickup as CSV.
- Export this active submission as PDF.
- Export John Doe’s submission as PDF.
- Export all submissions as PDF.
- Now, press Enter on your keyboard or click on the Upward Arrow icon to send it.
- For a CSV or Excel file, once the export is ready, click on the Download icon in the chat window to save it to your device.
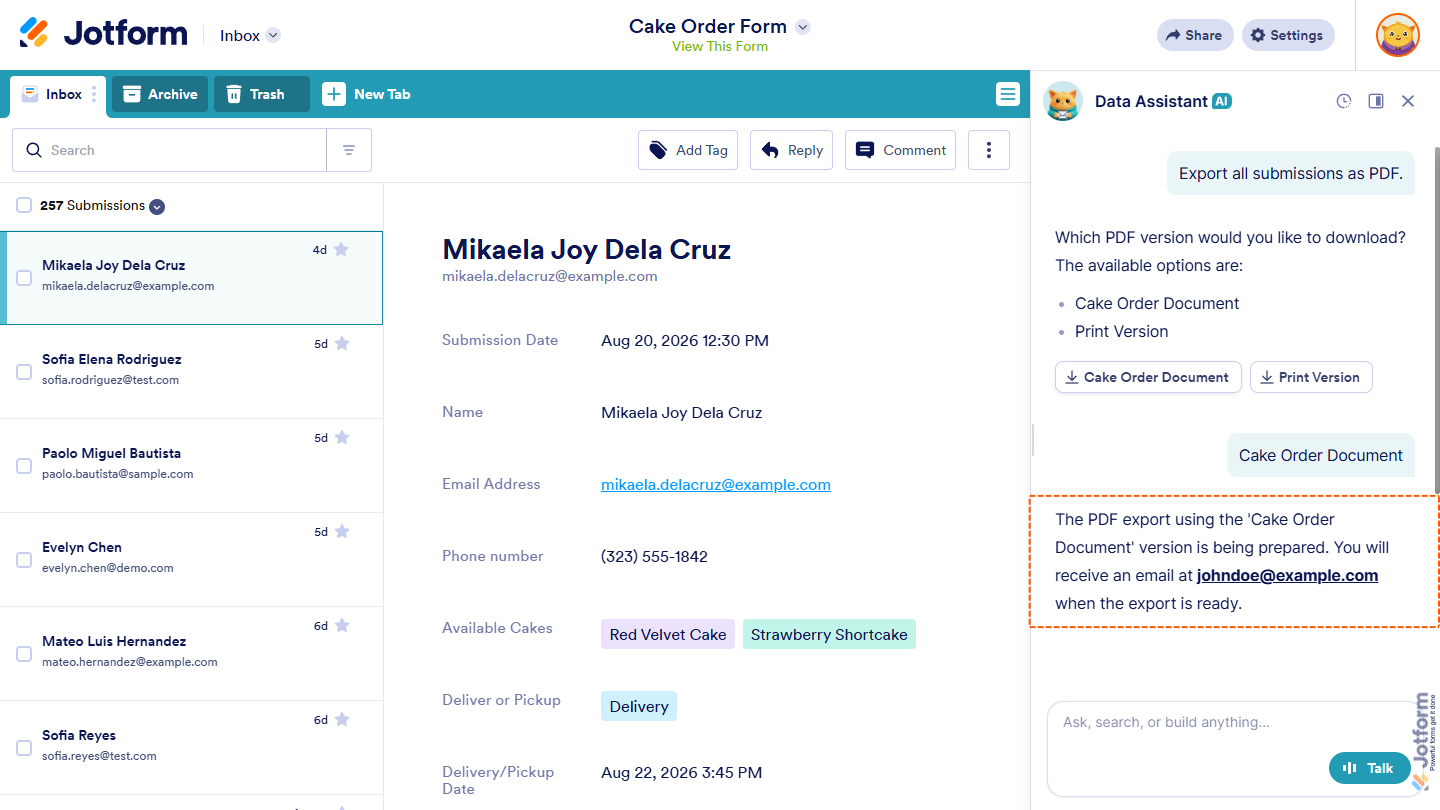
- For a PDF file, if your form has custom PDF documents, select Print Version or the PDF Document you want to use in the chat window.
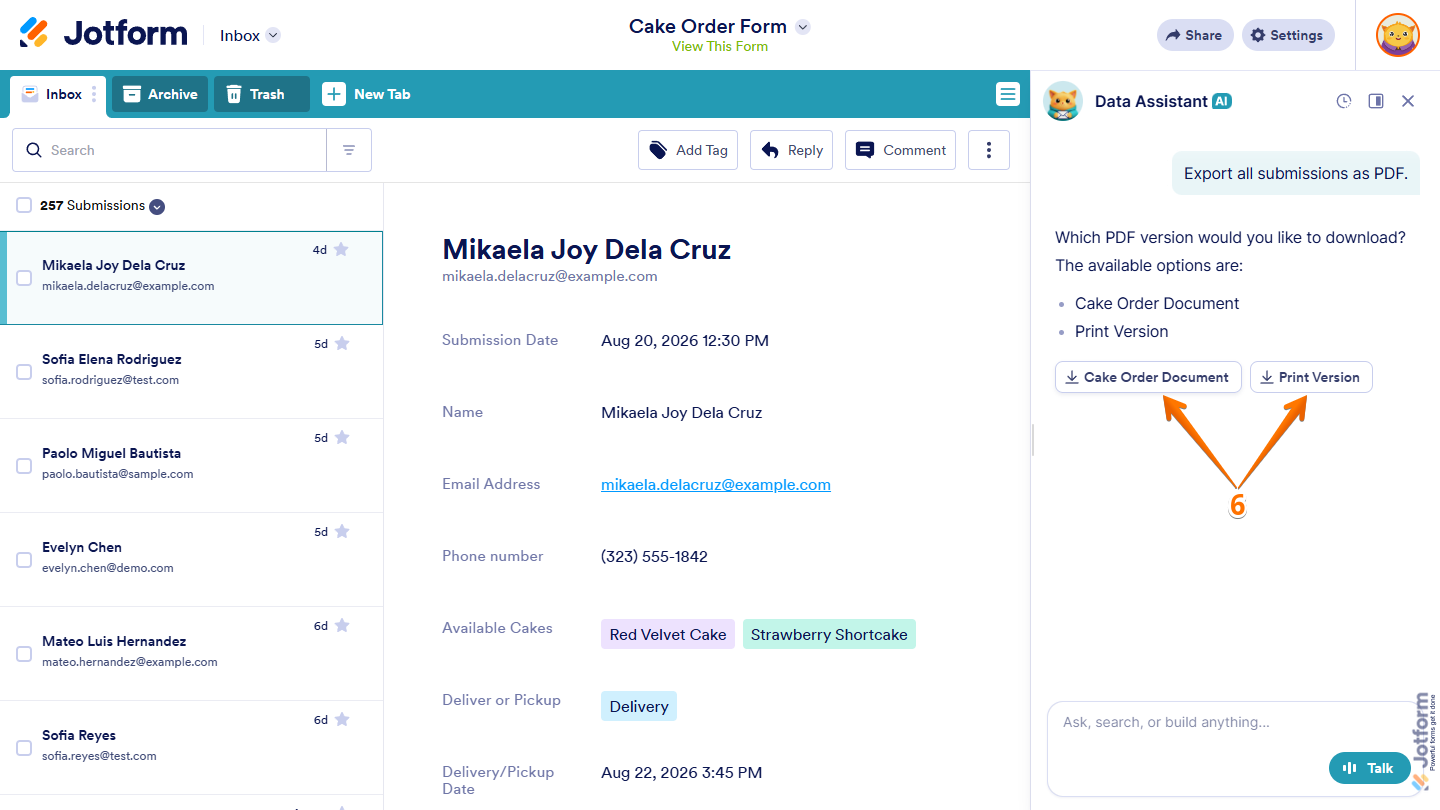
That’s it. AI Data Assistant will prepare the PDF and notify you by email when it’s ready to download.
Using AI Summarize and AI Translate
AI Summarize and AI Translate make it easier to review submission content in Jotform Inbox. You can use them on an entire submission or specific content to quickly understand key details or read responses in another language.
Summarizing Submissions
You can use AI Summarize to quickly review the key information in your submission content. Here’s what to do:
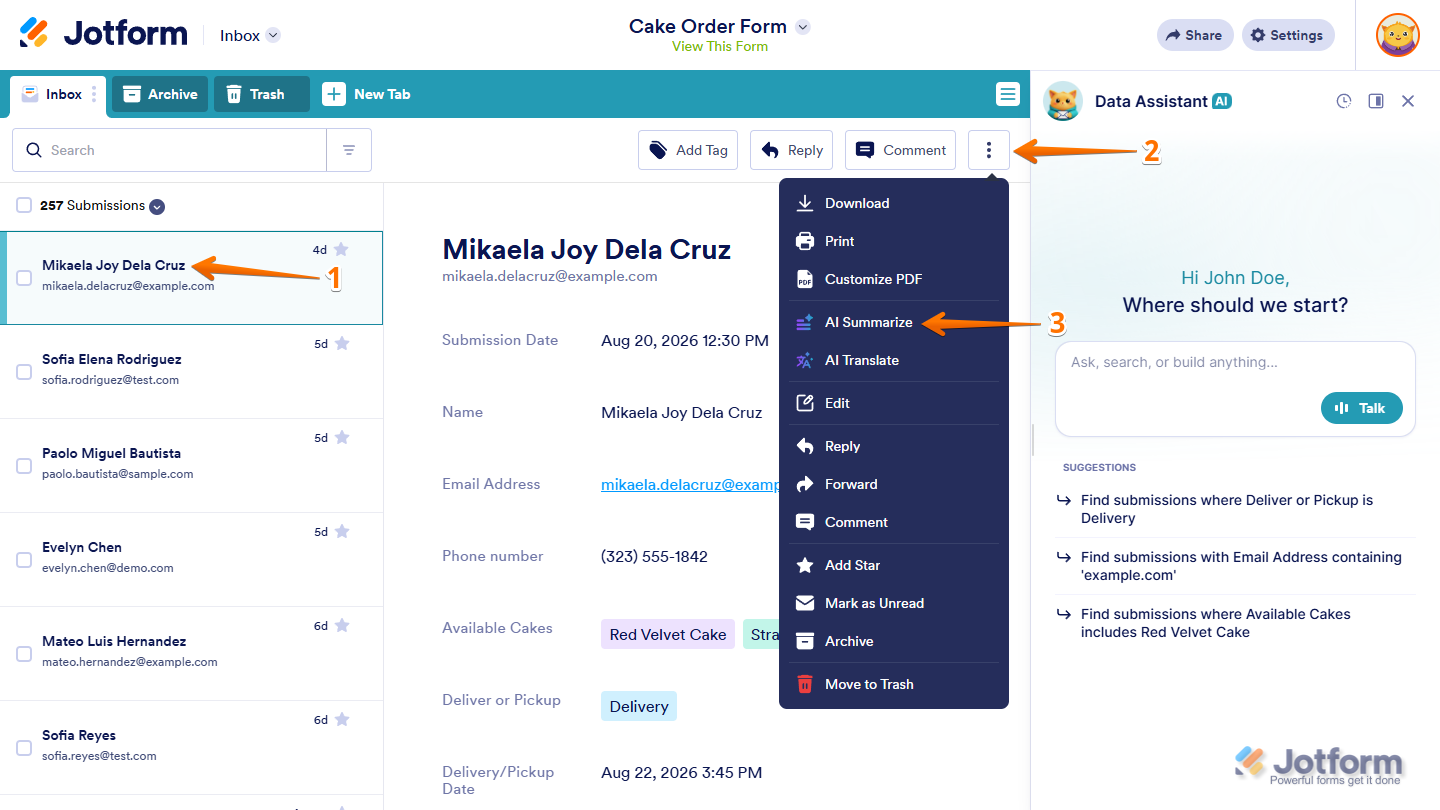
- In Jotform Inbox, select the submission you want to summarize on the left side of the page.
- Then, at the top of the Submission Preview on the right, click on the Three Dots icon.
- Next, in the menu that opens, click on AI Summarize.
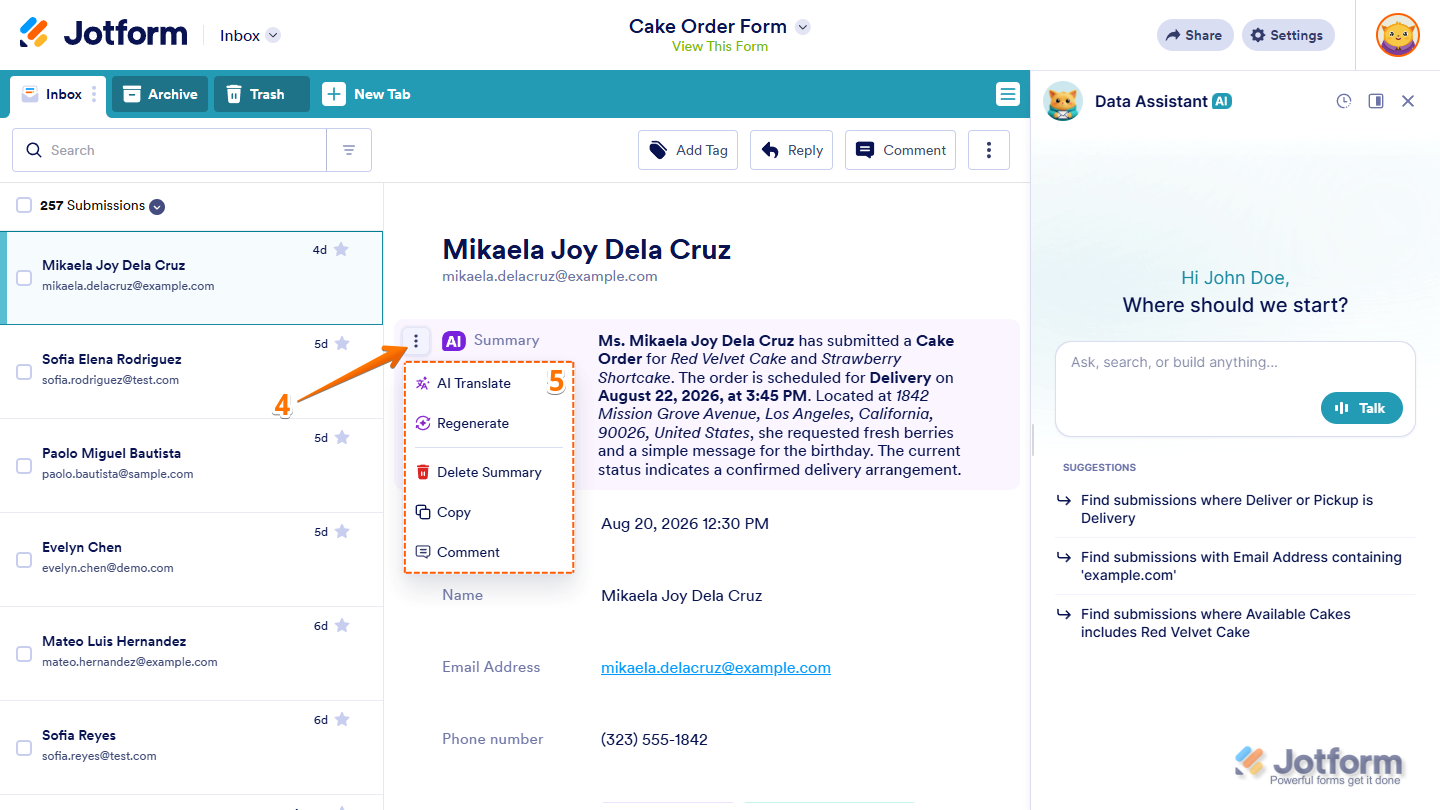
- To manage the generated summary, hover your mouse over the Summary field that is added above the first field in the preview, and then click on the Three Dots icon on its left.
- Then, in the menu that opens, select one of these options as needed:
- AI Translate — Translate the summary into another language.
- Regenerate — Generate a new summary of the submission.
- Delete Summary — Remove the summary from the submission preview.
- Copy — Copy the summary to your clipboard.
- Comment — Add a comment to the summary.
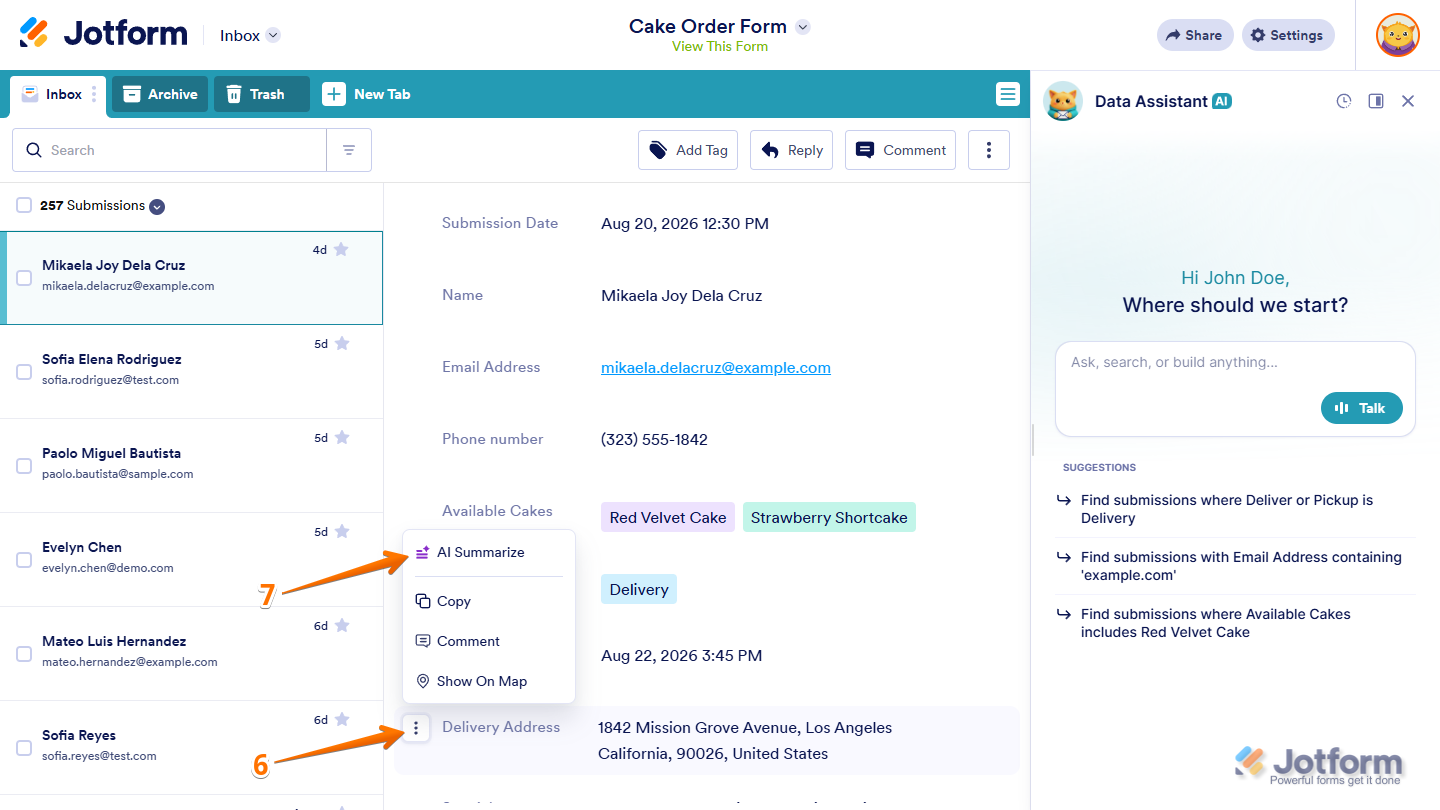
- To summarize a specific answer, hover your mouse over the field, and then click on the Three Dots icon that appears on its left.
- Next, in the menu that opens, select AI Summarize.
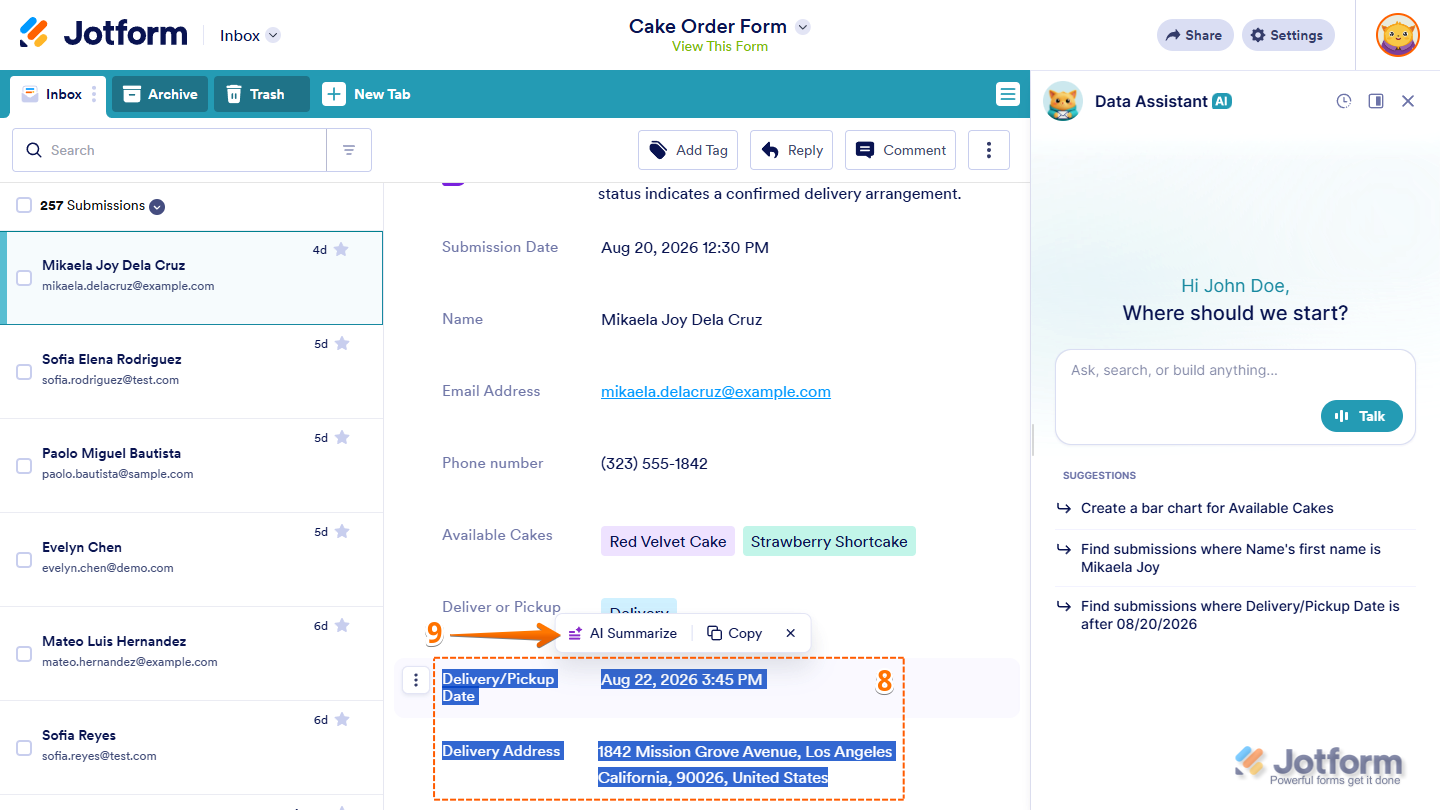
- To summarize answers from different fields, just highlight them with your mouse.
- Then, in the toolbar that appears, click on AI Summarize.
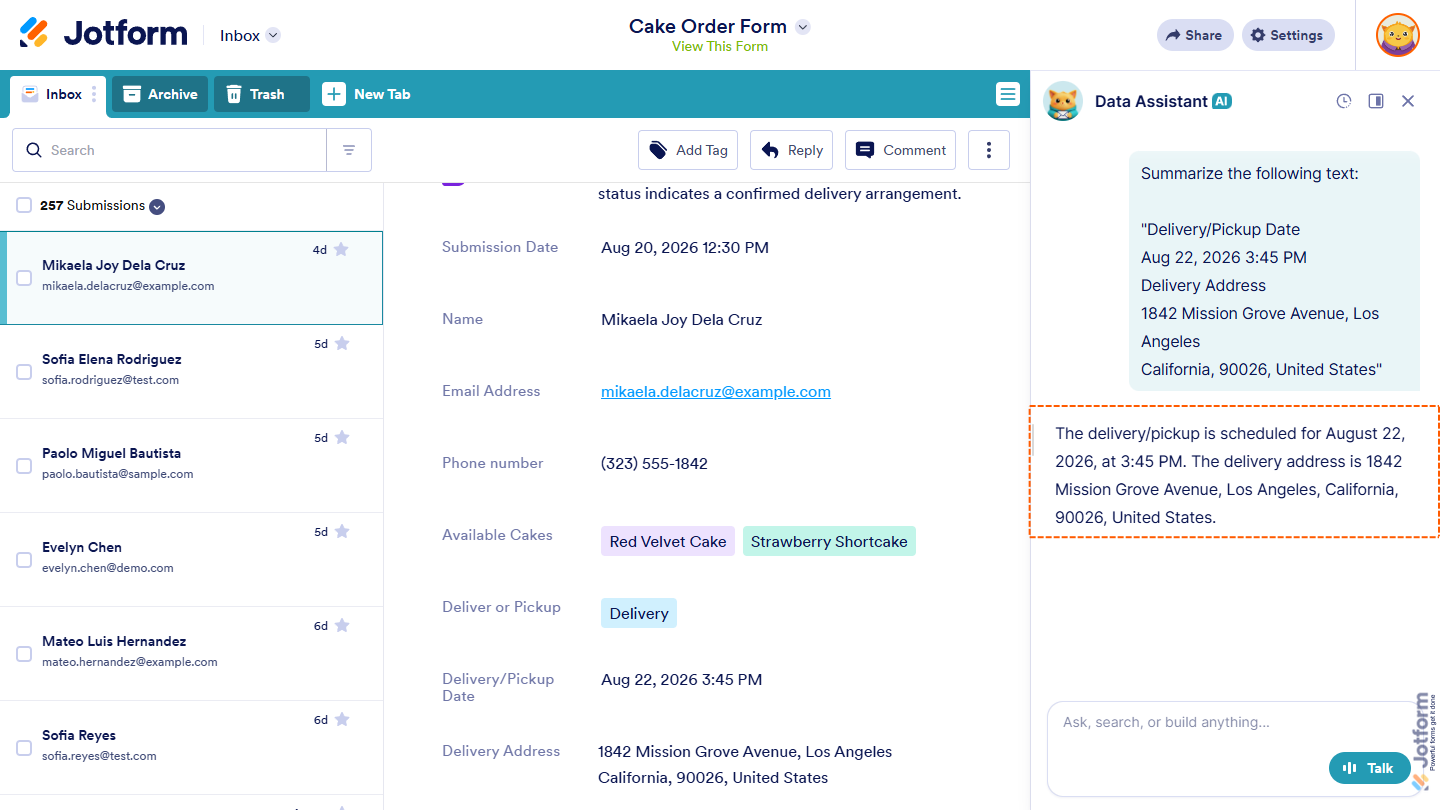
That’s it. A summary of the entire submission will be added to the Summary field in its preview, while summaries of a specific answer or text selected from different fields will appear in the AI Data Assistant chat window.
Translating Submissions
AI Translate makes it easy to understand submission content written in another language. You can do it in just a few steps:
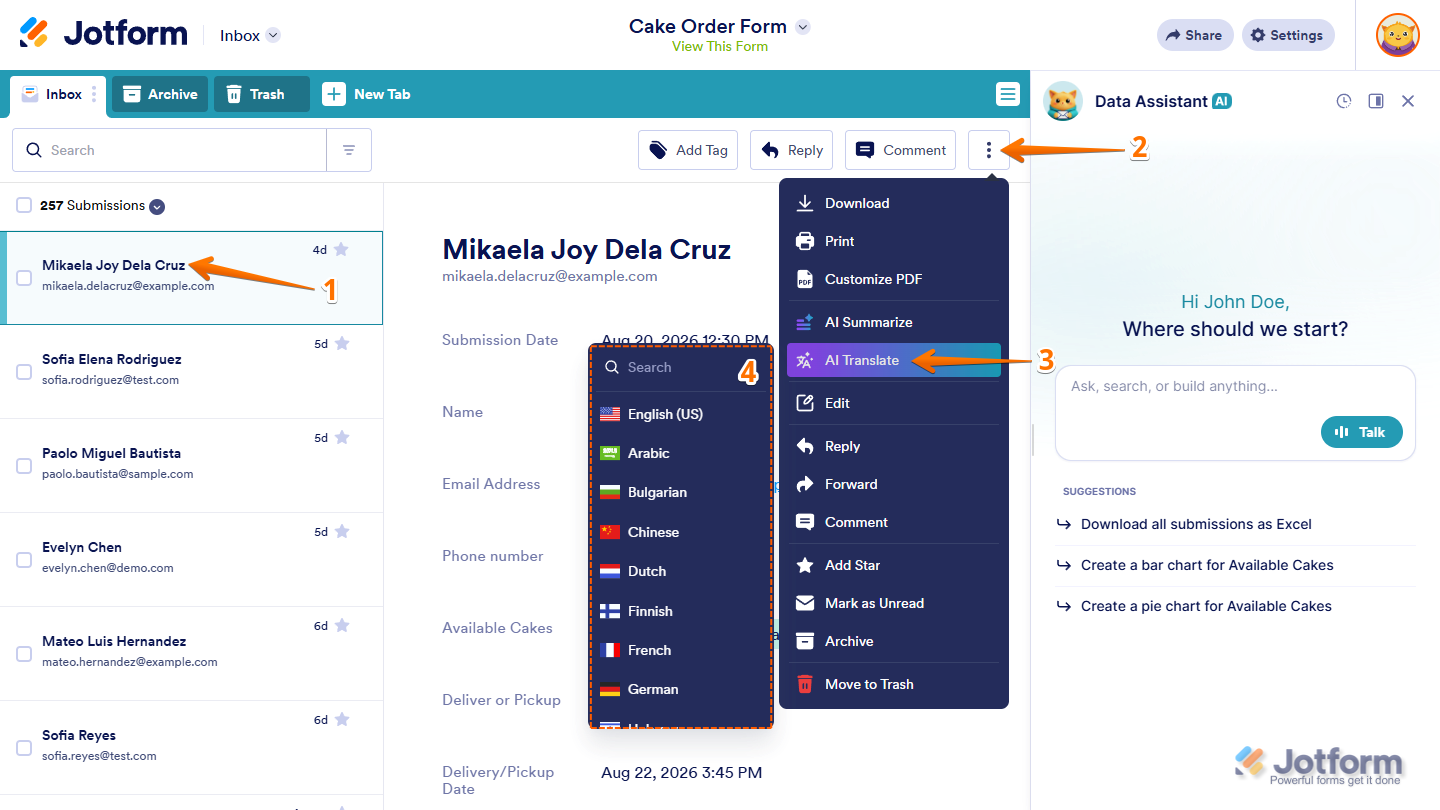
- In Jotform Inbox, select the submission you want to translate on the left side of the page.
- Then, at the top of the Submission Preview on the right, click on the Three Dots icon.
- Next, in the menu that opens, click on AI Translate to translate the entire submission.
- Then, in the submenu that comes up, select the language you want to translate the submission into. You can use the Search bar at the top of the menu to find it easily.
Notes
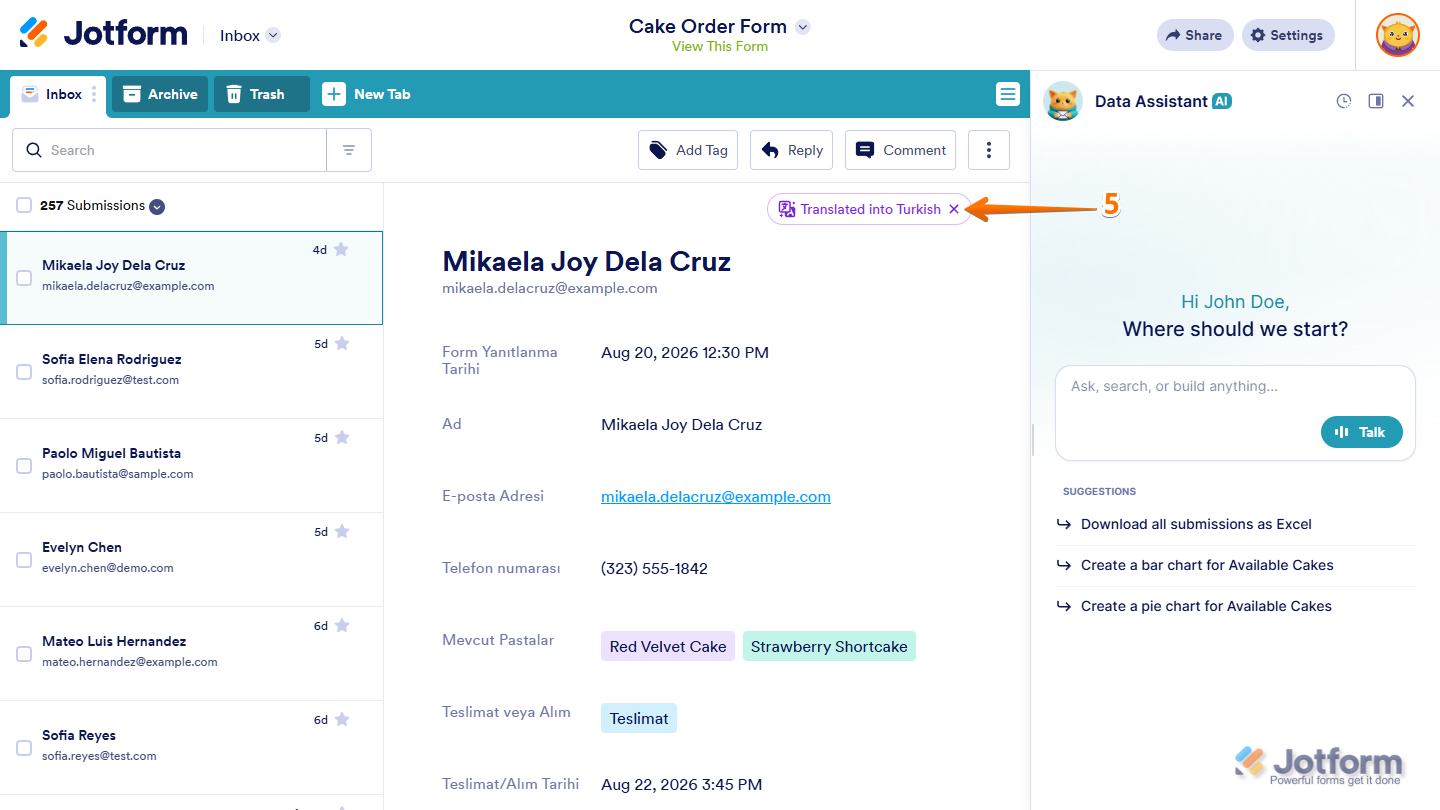
- When you translate the entire submission, both the field labels and answers in the submission preview are translated.
- Any translation resets when you reload the page.
- To reset the translation, click on the X on the right of the Translated tag at the top of the preview.
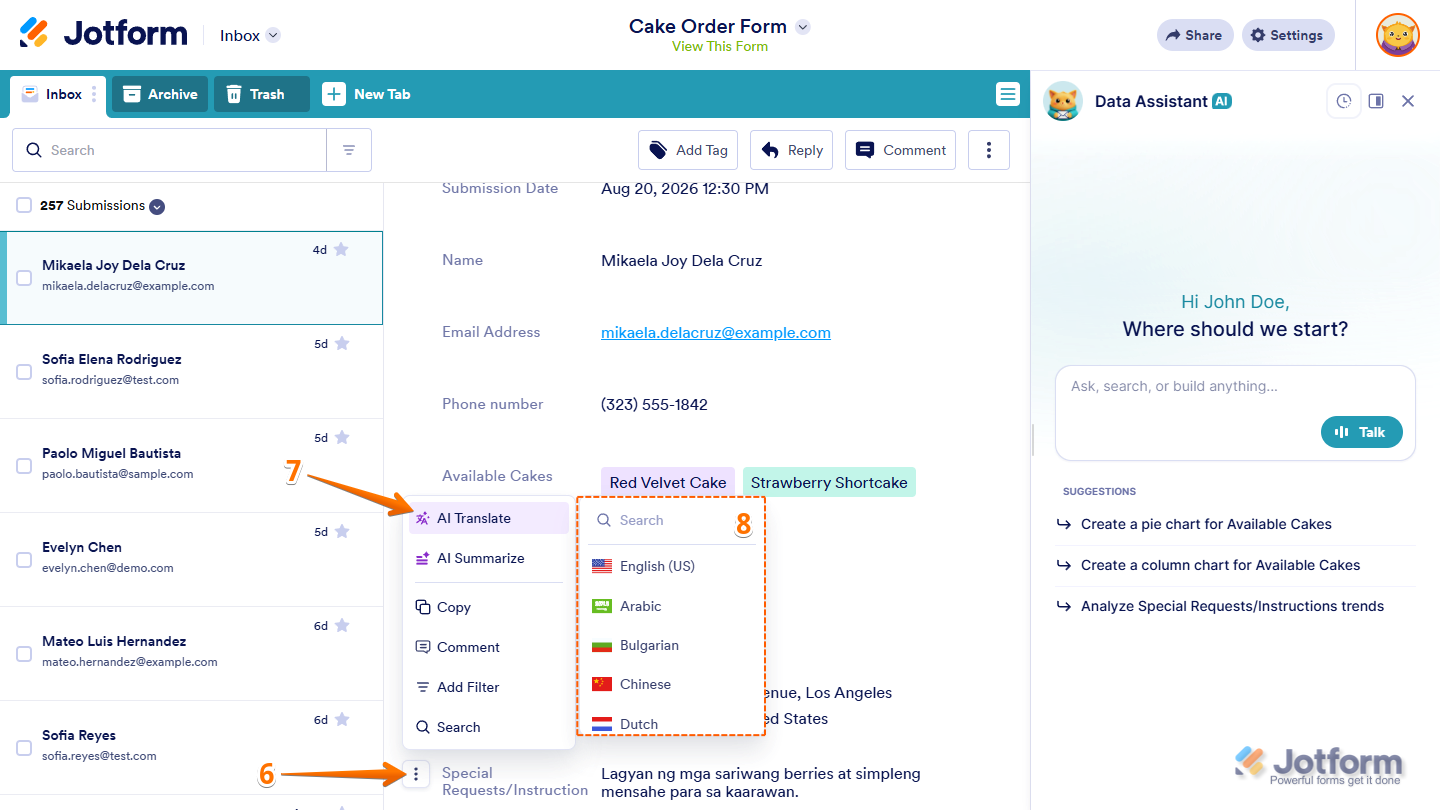
- To translate a specific answer, hover your mouse over the field, and then click on the Three Dots icon that appears on its left.
- Next, in the menu that opens, select AI Translate.
- Then, in the submenu that comes up, select the language you want to translate the answer into.
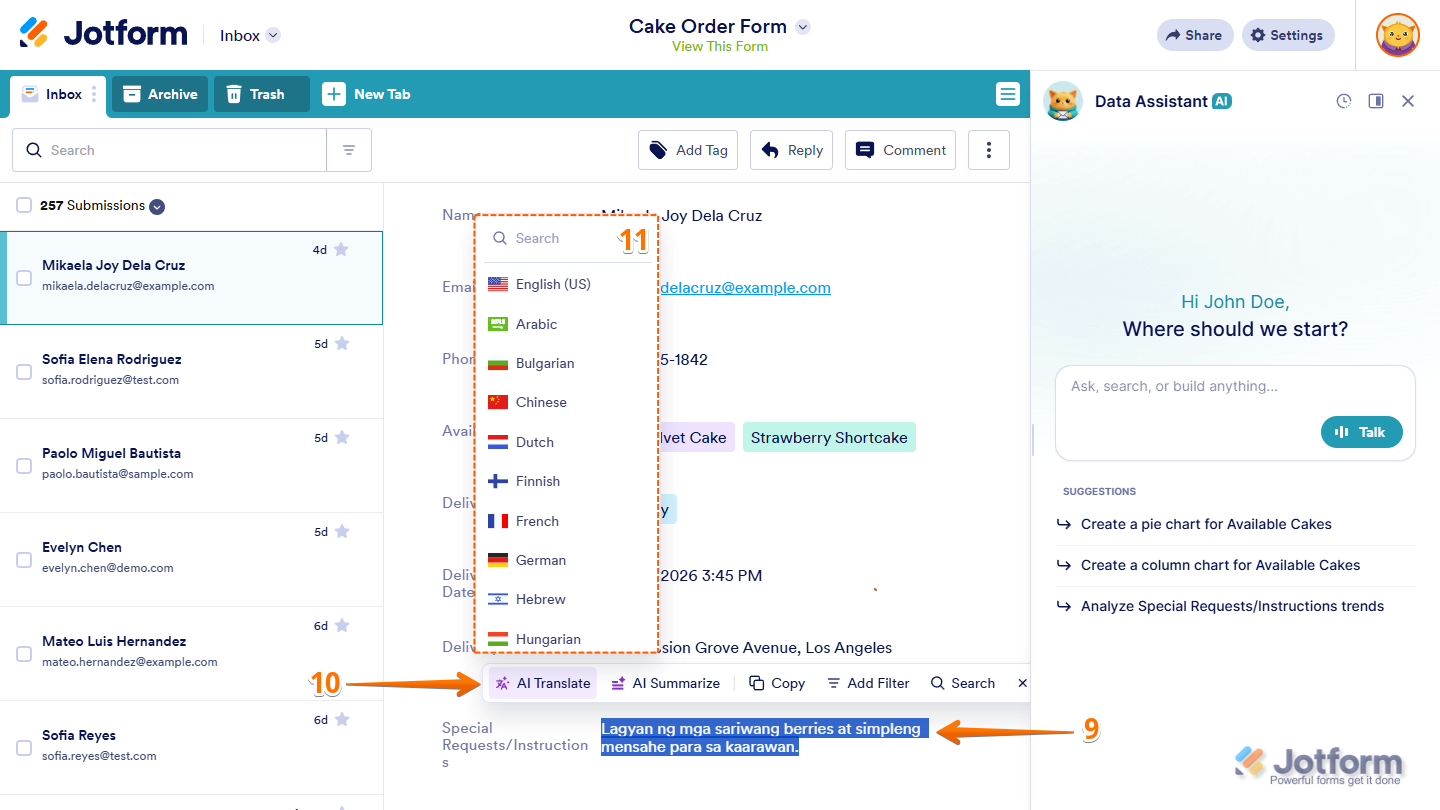
- To translate only part of an answer, just highlight that text with your mouse.
- Next, in the toolbar that appears, click on AI Translate.
- Then, in the submenu that comes up, select the language you want to translate the selected text into.
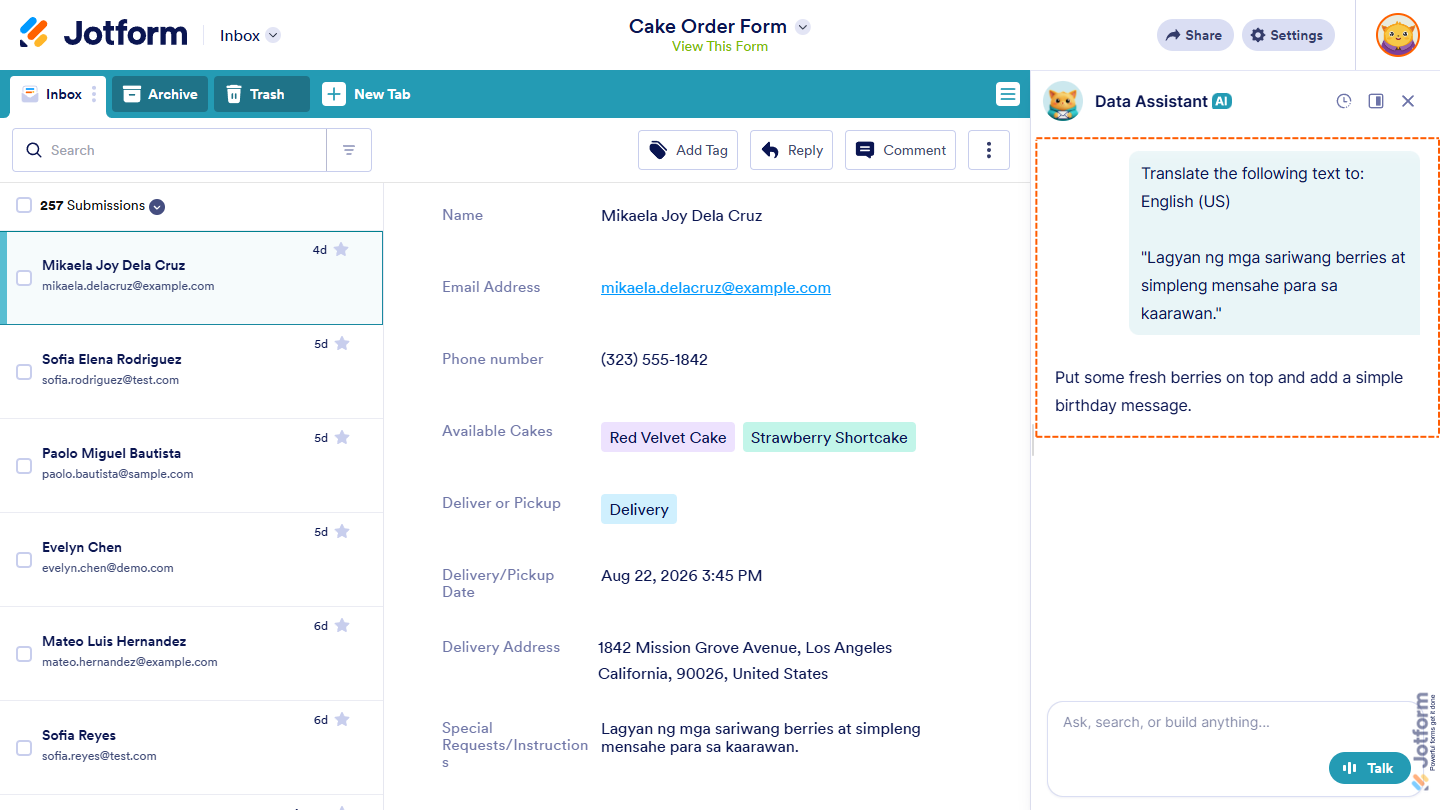
That’s it. The entire submission will be translated directly in its preview, while translations of a specific answer or selected text will appear in the AI Data Assistant chat window.

Send Comment: