Getting things done can feel like a huge struggle, but it’s worth asking yourself how much of that struggle is because you don’t even know what to do.
This is where a to-do list comes in.
These lists create order from chaos, with prioritized, actionable steps. The best part? When you complete something on your to-do list, you feel the endorphin-releasing reward that comes from putting a checkmark next to the task.
A to-do list is one of the most basic forms of project management. It gives people a way to break down large projects into manageable actions. There are psychological benefits as well: A study from Wake Forest University showed that to-do lists can reduce anxiety.
But a to-do list on a napkin or in your notebook won’t serve you or your team well with today’s virtual workflows. You need a platform that allows project stakeholders to share the list, shows updates in real-time, and allows for customization to meet the needs of your organization.
Track Tasks with Jotform Boards Instantly
Enter Airtable, an app that merges the best aspects of spreadsheets and databases into a single platform. It’s also versatile enough for customer relationship management (CRM), scheduling, and, well, to-do lists.
Here’s how to create a to-do list in Airtable.
1. Figure out what you need to do
If you’re moving an existing to-do list to Airtable, you can skip this part. If not, now is the time to do a brain dump of everything you and your team need to complete in the foreseeable future.
This includes tasks for new projects as well as recurring duties. Be as clear and specific as possible with your action items so that as soon as you read them, you know what you need to do. For example, “Organize computer files” works better than “Get organized.”
2. Start with a template
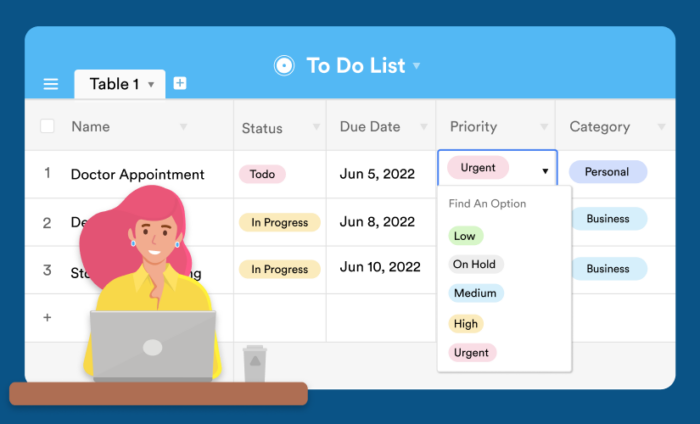
One popular Airtable template is this to-do list.
This template is built with teams in mind. The People table allows you to create personas for coworkers and assign tasks to them. Once you’ve divided the work, you can view all the tasks you’ve assigned the team in one window.
Members of the Airtable community have built a number of other to-do list templates that you can copy to your account.
3. Populate with tasks
Once you’ve selected the template you want to use, set it up to work for your organization.
Here’s a quick step-by-step guide:
- Edit the names in the People table to match your team, if necessary.
- Manually input each task you wrote down in Step 1.
- Assign levels of priority for each task.
- Assign due dates.
- Assign tasks to people.
- Incorporate relevant notes and links in the Comments section.
To see what’s on your plate each day, switch to view by dates. If you’re caught up on immediate work, you can assess which tasks are most important by switching to the priority view.
4. Refine your database for better productivity
Now it’s time for the fun part. One of the reasons Airtable is so popular is its customization capabilities.
Say an emergency project has come up, and you want to determine who you should assign it to. A “due date” field will help you see how much each person has on their plate that day.
To add this:
- Right-click on the Tasks column and select Add lookup fields.
- Select Date, which will create a new column to the right that automatically populates with each task’s due date.
If your company grows — or if you want to track tasks for different teams — you can create another table that breaks down tasks by the department.
Follow the below steps to develop your own table:
- Create a new table and label it “Departments.”
- Name the rows in each column according to department, such as “Sales and Marketing.”
- Expand the record for each and click Add a field to this table.
- Name the field staff and select Link to another record.
- Choose People and press Save. Skip the next window.
- Expand the view of the record again, and click the option to Link to a record from people. Now you can assign the different staff members from the People table to various departments! They will automatically display in a new column called “Staff.”
- To display what’s on the to-do list for each department, right-click on the “Staff” column and select Add lookup fields.
- Select Tasks, and the tasks for every department will display in a new column.
Create a to-do list with Jotform Boards
Jotform Boards provides a powerful way to create, manage, and track to-do lists with ease. Designed for teams and individuals, Jotform Boards offers a visual, customizable workspace where tasks can be categorized, prioritized, and assigned effortlessly.
With its intuitive kanban-style layout, Jotform Boards allows users to move tasks between stages, set due dates, and collaborate in real time. Unlike static spreadsheets, tasks can be added dynamically through form submissions, AI Agent interactions, or automated workflows, ensuring seamless task management without manual data entry.
Whether organizing personal tasks or managing a large-scale project, Jotform Boards keeps everything structured and accessible in one place. Get started today and streamline your workflow with Jotform Boards!


Send Comment: