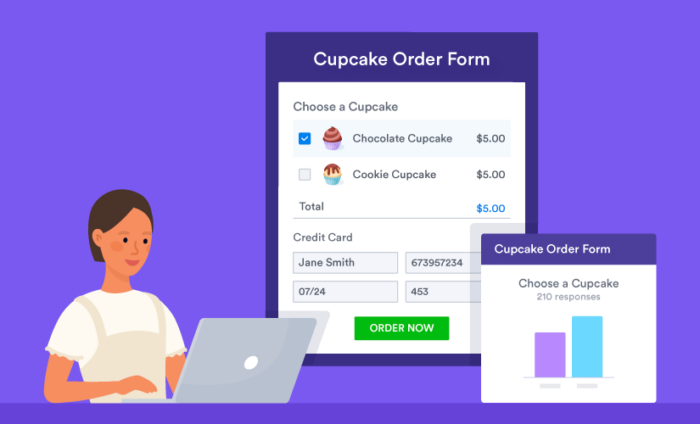
It’s 2021, and the maker economy is booming. Tools like Jotform are democratizing software development, making it easier than ever to get your business up and running. From contract generation to e-commerce, our no-code drag-and-drop tool helps millions of users every day.
In our free webinar, “Launching a no-code business with Jotform,” we highlight various tools, templates, and workflows to help you start an online business. From e-commerce and payments to CRMs and integrations, we’ve got you covered. Jotform is flexible and adaptable, so it’s easy to customize for your business. A few items we cover include
- Configuring your form to collect payments (digital, physical, and subscriptions)
- Managing customers and organizing data
- Generating reports and dashboards
See how Jotform can be your partner in business.


Agenda
[00:09]
Morgan Ziontz: Hi everyone. Welcome to today’s webinar, launching a no-code business with JotForm. I’m Morgan Ziontz, our Webinar Manager and I will be moderating today’s session. We have Denis Calin from our support team on the line, our Enterprise Support Engineer. He will be chiming in during our Q&A. Our presenter today is Art West, Jotform’s Senior Social Media Manager and an expert in the no-code space.
[00:34]
For many years, Art has been using no-code tools both personally and professionally to build applications, manage projects and solve problems. He has a ton of experience with automation marketing tech and a wide variety of no-code tools. He leads a no-code community that provides educational content and tutorials on many topics, including small business automation and marketing which is a lot of what he will be talking about today. I know Art has a ton of valuable tips to share about using Jotform to start and build a business from scratch. So without further ado, I will turn things over to Art to get started.
[01:15]
Art West: Thank you so much, Morgan. As Morgan said my name is Art and I am the senior Social Media Manager here at JotForm. Today, I am very excited to be presenting on the topic, launching a no-code business with JotForm. So today, we’ll be talking a lot about no-code, about how Jotform fits into no-code space, and some of the visual tools that Jotform provides that can help you start your business.
Agenda
[01:41]
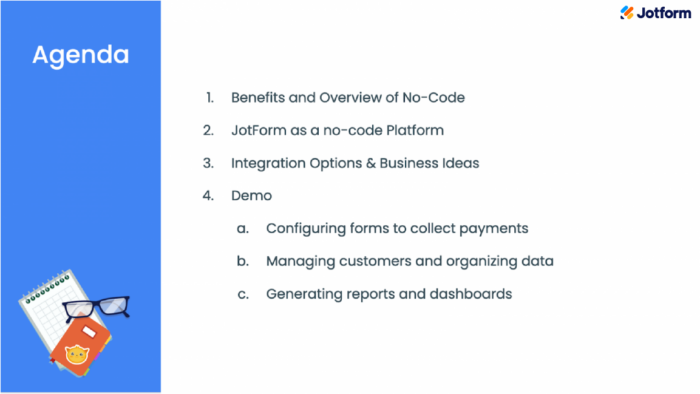
So, what is our agenda today? First and foremost, we’re going to be talking about some of the benefits and an overview of no-code. So what is no-code? When did it start? And how can it help you save time and money in launching your no-code business? We’re going to talk about Jotform as a no-code platform in general, and its roots in no-code space. Finally, I don’t think we can talk about no-code without talking about integration options and business ideas.
[02:07]
So, everything from document management, email marketing, and payments will be discussed in this webinar. And we’ll even touch on some business ideas to get the wheel spinning. I promise we won’t spend the whole day inside. So, we’ll also do a live demo, where we’ll actually build a coaching subscription business. In this demo, we’ll configure forms to collect payments, and we’ll even add some conditional logic to the forms. Next, we’ll sort of pivot from the front of the office to the back of the office. And we’ll do a little bit about many customers and organizing data and build a little CRM using Jotform Tables. Finally, we’ll get into generating reports and dashboards. And we’ll even talk about how you can use Jotform outside of Jotform and extend the functionality into other tools.
Benefits of No-Code
[02:52]
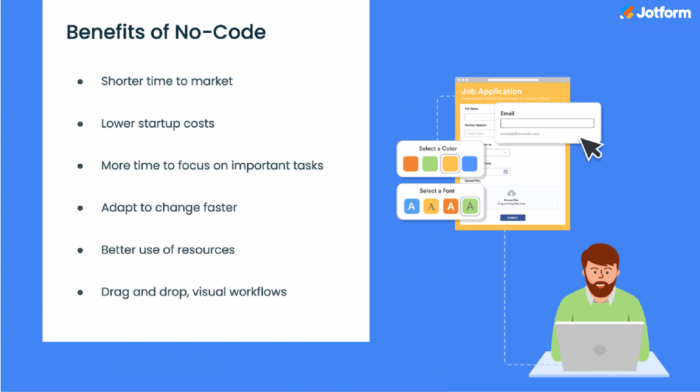
So, let’s back up a little bit and talk about some of the benefits and history of no-code. The no-code tool is really just a drag and drop visual builder. No-code has a lot of tangible benefits that can be realized for business owners and companies alike. First of all, it’s a better use of resources, lower startup costs, and a shorter time to market. All of these really free up a lot of time for the business or the startup. So, they can focus on important things like customer service, marketing, and sales. These are really things that allow the business to grow. So if you’re not bogged down in the development of things, you can really focus on what matters, which is one of the real benefits of no-code.
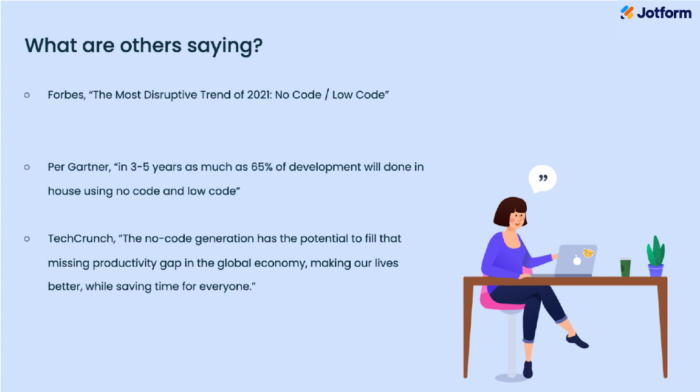
[03:33]
So, it’s not just Jotform nets talking about no-code, some of the biggest publishing houses in the world have mentioned no-code. For instance, Forbes has called No-code: The most disruptive trend of 2021. So I think that’s really powerful and it really shows that Forbes is dialed into what’s happening in the no-code space and how it’s really changing the game for productivity in the startup and business space alike. Gartner research did a study that said in three to five years as much as 65% of all development will be done in-house using no-code and low code. So again, I think this really shows how the tide is shifting and organizations are able to utilize these tools that are available like Jotform to build applications and iterate faster. Some other companies like TechCrunch have mentioned no-code repeatedly over the years, and it’s just becoming more and more frequent.
Integration options
[06:20]
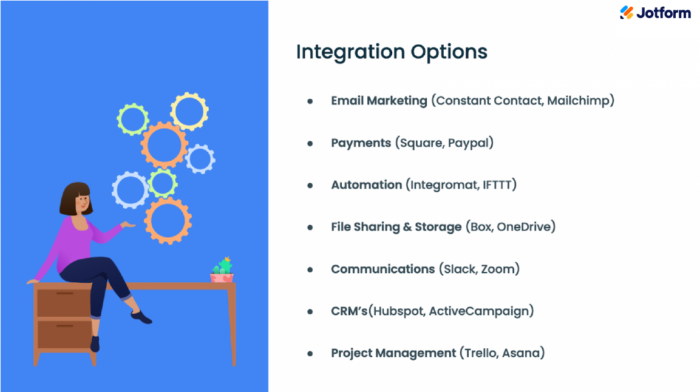
So, these are some of our integration options. Today, we’re going to be building a coaching business and we’re going to be taking in client information via a form. So when we get our client information, one of the things that will be captured is an email address. As you can imagine, at some point in the future, we might want to market to this customer for some sort of promotion or discount, or holiday event or something like that. So what you can do with Jotform is you can connect the form to an email marketing tool like Constant Contact or MailChimp. So that way you can do an email campaign in the future.
[06:56]
Payments are another big one and we’ll be showing that in demonstrating how payments work today. We integrate with Square, PayPal, and a number of other payment integrations. One thing that we just announced, which is pretty exciting, is that we actually integrate with stripe checkout. You can accept Apple and Google Pay right in your forms. This is great because it increases conversions and just makes it easier for your customers to check out and you to get paid.
[07:23]
Another exciting thing about Jotform payments is that we don’t charge any additional fees on top of the payment gateway. So that’s a really unique thing about JotForm. And it just breaks down barriers for you to be able to get into your business. I’m not going to touch on all of these, because there’s quite a lot here. And this is just a sample of all of our integrations, but ones that would be most applicable to the demonstration today. But I think we do have to touch on automation. Although Jotform does have 100 pre-built integrations, if you cannot find an integration that Jotform has, we also integrate with some automation tools like Integromat and IFTTT. These would allow you to connect to other applications that may be Jotform doesn’t have an integration with.
[08:06]
So really, it’s pretty unlimited. As far as how you can extend Jotform, you can integrate it with 100 tools built-in. Plus, you can use some of our automation tools. Just skipping down here communications, I think that’s really big, especially since I’m in the Communications Department at JotForm. But you know, I’m a heavy Slack user. Although Jotform does provide a notification. When you get a form submitted, I also might want to know that I just got a new customer. And I wouldn’t get a Slack message when that came through. So that can be really useful. We’re also going to be building an appointment booking business. So it would be really nice to have the Zoom information be attached right to the forms. So you don’t have to create a Zoom meeting for each booking. So again, it just reduces the amount of manual work that you have to do, which I think is exactly what a no-code integration is trying to accomplish.
Finally, I’ll just group together CRM and project management. At some point, although you can emulate some sort of CRM activity within JotForm. You might need a more robust platform as your business grows like HubSpot or Active Campaign or in the project management space like Trello and Asana. So you can always integrate to those platforms as your business grows with JotForm.
No-code with Jotform
[04:28]
So how about Jotform as a no-code platform? I think we need to back up a little bit and go all the way back to 2006. When Jotform was founded. Jotform has really always been a no-code platform long before no-code was a buzzword or a keyword that people were using. From its inception, visual tools were utilized to help people make forms and build visual workflows. As the product evolved to things like Tables and Approvals. More and more functionality became available within the Jotform ecosystem.
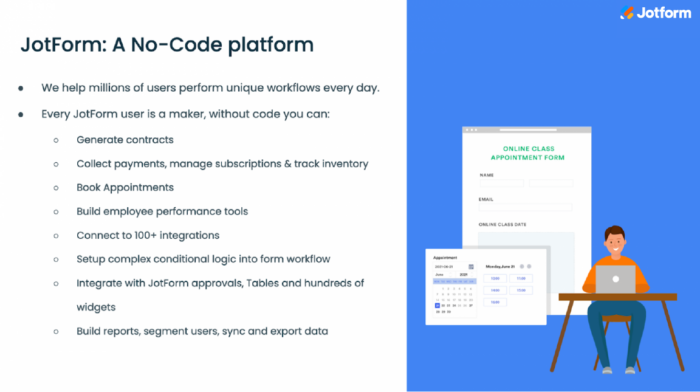
[05:00]
Today, we have 9 million active users. And we consider every Jotform user to be a major every day, they are building unique workflows that are truly agnostic in terms of what they want to be. For instance, you can start with a blank slate and build any sort of tool that you want with Jotform, and then integrate it with other platforms as well. So some of the things that you can do with Jotform, you can generate contracts, you can book appointments, you can build reports, segment users. You need some sync and export your data in and out of JotForm. You can also set up complex conditional logic into your form workflow and into the Tables and Approvals product.
[05:38]
So there’s really a lot you can do. But most importantly, I think when we’re talking about no-code, we also want to talk about integration. So based right on the Jotform product, there are 100+ integrations. So what does that mean, you can integrate with payment tools, docu management tools, or anything like that right into Jotform without having to use a third-party automation tool. There is no cost to use our integrations, there may be some products that you need to subscribe to on the other side, but we do not charge for integration. So the integrations are definitely plentiful at Jotform, and we’ll talk a little bit more in detail about the integrations that we could utilize with our example product that we’ll be building today.
Types of businesses
[09:20]

Types of businesses that you would be able to build with Jotform, I’m going to leave this pretty open, but I’ll just touch on a few e-commerce, whether it’s merchandise, subscription boxes, t-shirts, coffee mugs. You can sell any sort of physical product or digital product with a Jotform form. If you’re an agency or consultant, whether it’s HR, social media, PR, or SEO, you could certainly build a business within our product. I’m going to not go into too many other ideas, but I think you get the idea there. You could do real estate, you could integrate Jotform into your existing brick and mortar business, data management, or something.
[10:00]
So there’s really a ton of different things that you could do with JotForm. And one of the things that I would recommend is just going out to our templates section. We have over 20,000 form templates and are organized by category. So this would give you a really good mechanism to start generating ideas for your business since there are so many different form templates and so many different ideas that are out there already. So with that being said, what I want to do now is pivot to the demonstration part of this webinar and show you what it would look like to actually build this coaching business within JotForm.
Live Demo
[10:37]
Okay, so what I have here is a simple form. We’re going to be adding content to this form but I wanted to have a starting point for this webinar. So I have Art’s online coaching business and this is a new era of online learning. I’ve actually added one coaching service here, and we’ll go ahead and build out more on that a little bit later in the presentation.
Product listing features
[11:01]
The other thing that I thought would be absolutely necessary to capture was our customers’ email addresses when they’re submitting the form. So I’ve included that as well. This form was just from our templates section, in the Jotform templates catalog. There are plenty of e-commerce templates available to you. So you can start from scratch or begin with one of our e-commerce templates. So, one thing that we might want to do is we want to add other coaching services that we have available. So as a business that’s offering coaching services, I’m gonna offer public speaking, and also some math and some writing coaching services. So the way that we add a product to our form store is we go ahead and click this payment settings button right here. When we click that, it brings up this payment settings module that shows our existing product and allows us to create a new subscription.
[11:58]
One thing that I want to point out before we add additional products is just sort of the level of depth that this tool has. You can actually create coupons here, which we’re not going to do. But you could create a discount-based coupon or a fixed price coupon or something like that. You could also add tax, which again, isn’t really relevant for this example. But if you need to add the tax to your products, you could certainly do so there. So what I’m going to go ahead and do is I’m going to create a new subscription. And we’re gonna call this math coaching.
[12:30]
For the sake of consistency, we’ll keep this at 2999 per month, and we’ll say get better at math. This is a nice feature that I want to point out. So it allows you to choose the subscription period of this product, you can do anything from daily to yearly. We’re gonna stick with monthly again to be consistent. But it really allows you to be diverse if you have a wide range of products and different subscription levels. Another thing that you can do is you can define a set number of payments. I’m going to choose no limit because I want this to be a professional subscription. But if you wanted to sell like a package of 10 public speaking classes, you’d be able to go ahead and just define that there, you could even make it user selected.
[13:16]
The next thing is images. We’re going to actually go ahead and upload an image for our math coaching product. One thing to point out is you can upload multiple images. But for this example, we’re just going to use one. You can imagine if you had a physical product, it might be really useful to have different images from different angles. Some other settings here that we’re not going to adjust, but you can scale the images automatically if you would like. You can choose a variable price or allow the customer to define the price if you would want. You can also set a trial period. So you may offer a seven-day trial and then the customer will be built after that seven-day trial you can also set up a first payment cost. So if you were building a website building service or something like that, you could add something like an initial setup fee. You could add that fee here. We’re not going to do any of that, but I just wanted to show that it was available.
[14:11]
So when I go ahead and click “Save” here, just like that, it adds the product to our store. So I’m going to go ahead and add one more product by creating a new subscription and we’re just going to make this a reading coaching. 2999 again, just to be consistent, we’re going to say get better at writing. Keep all the settings the same and just upload a new image for the writing. And we’ll keep all these things the same. Great. It looks good. So one of the things that I want to point out here is in this product block by default, just as an FYI, we are using Square here.
[15:00]
To set up these products, but we do have a ton of different payment integrations. But one of the default blocks here, of course, is the credit card information that we need to collect from the customer. However, there are some additional settings that we can configure here, such as the layout of the product list, so we can actually choose from a single column to a column or a three-column layout. So it’s really nice, we have some optionality there and what we can choose, I think I’ll stick with the three-column layout, because I have three products. And it just looks really nice like that.
[15:27]
Another thing that you can do is, you can enable a search bar which is not necessary in this case. But you can imagine if we had a ton of different products, you might want to allow your customers to search through the products rather than scrolling through all of them. Another feature here is enabling a minimum order amount. That’s another thing that you could turn on if you would like just to give additional options to your customers. We won’t change any of that. But I did want to show you again that there are a ton of options that can be customized within this product module.
[16:00]
Okay, so now that we have this form, it’s looking pretty good. But I think that there’s probably some additional information that we’d like to collect from our customers. For instance, we might want our customer’s name. For example, a parent can be booking a coaching session for a child, and the parents’ name could be completely different from the child’s name. So what we’re going to do is to add some additional information to this form. So to do that, we’re going to click on the form element button up here on the left, and we’re going to go ahead and start with a name, everything is visual and drag and drop. So I’m going to drag that right in above the coaching packages. Right here, I’m going to say the “client’s name”.
Appointment features
[16:43]
Another thing that might be really useful to collect from our customers is to have them put in an employment field to give us an idea of their availability when they want to be coached. So we can just go ahead and drag that down here. And it actually brings up this really nice appointment booking block, we’re going to change this to tell us your availability, “your preferred coaching time”.
[17:12]
Okay. And the final thing that we want to do is maybe we want to make this more contractual. So we want to capture a signature from our customers when they fill out this form. So we’re going to go ahead and drag in a signature block right here into our form. One thing I want to point out without going into too much detail is that all of these different form elements have a ton of different options. As you can see, with just this appointment picker alone, you can customize all kinds of different slot duration times. You can block out lunchtimes, you can put limits on what days can be booked. You can completely customize the schedule. So there’s really a ton that you can do. You can even set up email reminders for this form in this booking. So there’s just a ton, you can change the date format whatever works best for your customers that are booking. So just a ton of optionality here, again, of things that you could do.
[18:07]
While we’re in the settings, I did mention that we are using Square just to demo this. But really, we have no preference on what payment provider you use. If you click the payment tabs, you’ll see all these different payment options that are available with JotForm. It makes sense that none of them are selected, as you can only use one payment integration per form. So that’s why the rest of these are grayed out. But if you did not have a payment integration already enabled, then these would be available to be selected.
[18:37]
Another thing I want to point out is all the widgets that we have available. This can add a ton of functionality to your form. If you were in a traditional development environment and you’re trying to build something into your forms like inventory or a form calculation, it would take a lot of work. But with all of these widgets, you can even search you can find your hopefully the perfect tool to help improve the workflow for your users.
Conditions
[19:03]
Okay, so we’ve built out this form. It’s starting to look pretty good. But the thing that I want to fix here is that the form is a little bit longer. If you come to this form, you kind of has to scroll through it. And it might be a little bit daunting to fill out all this information on the form. So in order to increase conversions, we’d like to shorten up this form and make it as user-friendly as possible for our customers. So the way that we’re going to do that is with something called conditions. So you can turn on and off elements in the form based on certain conditions. So the first thing that we’re going to do is we’re going to say if the coaching package is filled, then we want to show that tell us your preferred coaching time. So what we’re trying to accomplish here is that they don’t really need to see the appointment time until they’ve actually selected a package. So let’s go ahead and save this.
[19:58]
One of the nice things about Jotform is that you can always preview your form in real-time. Up here on the right-hand corner, if you go ahead and click Preview form. Once it loads up, you will actually get a real preview of your form. Another nice feature is you can actually preview it and phone and tablet mode and Jotform forms are responsive and mobile-ready by design. So here we go. Here’s our form. As we can see, our conditional logic seems to be working. Because we cannot see the appointment calendar, if we were to go ahead and select a package like math coaching, just like that, the calendar then pops up, and you’re able to choose an appointment time. So that is working as expected. So this is great. But also the signature probably doesn’t make sense unless a customer selects a package. So let’s go ahead and duplicate this sort of logic, but for the signature field. So again, if the coaching package is filled, then we want to show the signature block, let’s go ahead and save that and preview our form.
[21:05]
Okay, great. So now our form is much shorter, it looks a lot better. If we go ahead and select the package, then we get both the appointment picker and the signature block showing in our form. So that’s working as expected. And just like that, we build some conditional logic in our form, which again, would take a ton of time, if you’re doing this with a traditional development environment, or even any other builder.
Integration options
[21:31]
Another thing that I want to show here is just all the integrations we’re not going to integrate with anything else for this demo. But this is where you find it in the Settings tab. There are a ton of integrations over 100. Like I said, the payment integrations that are sort of grayed out here are grayed out because we’ve already connected a payment integration to this tool. But as you can see, you could quickly integrate with Slack, which is a communication tool, or Google Drive, which is a document management storage tool, or anything else in between. We really have a lot of integrations from project management, to other table things like Airtable and Google Sheets.
[22:06]
So everything is looking good on our form. So the next thing that we’re going to do is we’re going to publish our form. I do want to point out that you can embed this form in various different ways, we have a lot of embed options. I’m not going to go into too much detail there. But you can embed the code into another website. So I’m going to go ahead and open this form. And we’ll go ahead and actually submit a product. Keep in mind, this is a test environment. So we’re going to use some test information to make this work. But I want to show you how it submits through.
[22:35]
So I’m going to go ahead and choose math coaching because I think I could be better at math. We have to use a dummy card number here to make this form Submit. Then we’ll pick an appointment for some time in the future. We’ll go ahead and sign and put it in our email. When we submit the form this hopefully should go through. Okay, great. One thing I want to point out here, too, is that this page can be completely customized. Right now it’s just set as default but you could set it up to be unique for your business. You also would be able to redirect to some other page or some other website if you would like.
Managing customers and organizing data
[23:28]
So at this point, what I want to do is pivot from sort of the front, the front side of the business to the backside of the business and view how we will build out a small CRM for this coaching business. So one of the things that Jotform does automatically is it connects to our payables product. Our payables product is just a spreadsheet view of your form data.
[23:51]
As this loads up, there are some example entries here. But this entry at the top is the entry that just got submitted here today on July 28th for math coaching. As you can see, it has all my information, which I would be the client, and it has the preferred coaching time and the signature. So really, we’re getting a lot of information right into our table automatically through the form. And this happens again, automatically whenever a form is submitted with any form on JotForm.
[24:21]
So this is great, but as you can imagine, at some point, we might want to gather some additional information about our customers as our business grows. So the way that we can add additional columns to sort of append to this existing table is by this add button here. When you click the Add button, it gives you a bunch of pre-built options, but you can also make it a formula field or connect it to another form or another table. And just to point out, this doesn’t even have to be the same form. This would be a totally different form. So you can connect multiple forms to one table which is pretty nice. As you can imagine, there’s just a ton of options you can do to build this out.
[25:01]
So the first thing that I might want to add here is a star rating to keep track of my best customers. Maybe at some point in the future, I want to have some of my customers write testimonials. It would be really good to know from my point of view, which customers make their payments on time, and have been customers for a long time. So I can add a star rating and I’ll just call this “rating”. When I create this column, it actually gives a star rating to every single one of our customers. I’m just going to go through quickly to show you how easy it is, it’s just point and click, you can assign different star ratings to different customers. Okay, so now that I’ve assigned some star ratings, there are some other things that I might want to keep track of, as my business grows.
[25:49]
The next one, I think it would be useful if we kept track of our active versus inactive customers. So we’re going to use a checkbox to keep track of this. And we’ll say this “Active?” So as you can see, it’s a point and clicks workflow, we can mark some of these customers as active and as they become active or inactive, we can simply point and click and deactivate them.
[26:15]
Next, it might be really useful also to have a lesson plan for each one of our customers and upload it into this table. So we’re going to use the attachment field for this. And we will call this “lesson plan”. We created this lesson plan column. This is an attachment column. As you can see, it’s really easy just to click into the cell, you can click “Add attachment” and then here’s an example of a lesson plan. You can upload the lesson plan right into this column.
[26:48]
We’re going to just add something else here, we’re going to use this “single selection” field. I think that as my business grows, it’d be really useful to categorize my customers into different levels, maybe beginner and intermediate or advanced. So this “single selection” field will be perfect for that. We’ll say “level” for this. So we can type in our options here. You can say beginner, intermediate or advanced. You can actually even bring in these options from another form or a table. So again, there’s just a lot of different ways that you can customize this or tie in different forms together or tables together. We’re keeping it pretty simple for this demo. But as you get the idea, you can really build this out. It gives you the option to select a default value. We are going to do that because we want all of our customers to sort of come in as beginners. And then as we want to move them to an intermediate or advanced customer, we will be able to do so. I’m using the drop-down picker as you will see. So now, we have this level. And we have everybody as a beginner because that’s the behavior that we told it to do. But we can go ahead and move some of these customers to different levels.
[28:13]
So pretty quickly here, of course, on a visual workflow, we’ve been able to build out a really nice-looking CRM for our small and growing business. I’m gonna add one more field. And this is just a “long text” field for customer notes because it’s always good to keep track of notes of your customers.
[28:35]
Okay, this is great. But as our customer base gets bigger and bigger, it might be really useful to sort of drill down into some of our data and filter out some of the results. So we can have more succinct reports on what we’re doing. So the way that you can actually do that, within this table product is to use this filter button, we’re gonna start with the rating field. We’re going to choose a rating, and let’s just say we want to only see our customers that have a three-star rating or greater. So we’re gonna say greater than three. If we apply this filter, now we’re only seeing customers that have a star rating of three or greater. So this is great, but it’s also just in this default view. What if we wanted to always have a view that would show our best customers essentially, we could just always tab to that as our business group. So all they have to do to make this happen is create a new tab. We can call these “best customers”.
[29:33]
And there it goes, it creates a tab that already has this filter applied. If we go back to the main form, that filter has still stayed, but we can just simply remove that and we can see all of our customers. Just to do that again, maybe we want to create a tab that only shows our active customers. So the way that you would go ahead and do that is you go ahead and apply a filter. We would go to active and we would say checked when we apply the filter. Now we’re only seeing our active customers. Again, in the same step, we’ve created a new tab. And we say this “active process” tab. Now we just have this tab of active customers, we can go back to the main form, and uncheck the filter. These are always dynamically updated from our main form. So if we uncheck someone from active here, or we change someone’s reading, it would dynamically update in these other tabs.
[30:29]
The last thing I want to show with this is how, because this is a booking business, we have all of our appointments that would be showing, here again, there’s only one in here because we just processed that one form. But if you had hundreds of appointments, it might be really hard to see where they all fall on a calendar. So we would want to build a view that you can actually see all your appointments and the calendar. If you just go ahead and click the “add new” tab, you’re given all these different options. We’re not going to go into all the details here. But as you can see, there are all kinds of different views that you can create on a new tab, including reports. Reports are really powerful. If you had hundreds of entries here and the same drag and drop fashion. You could build a really robust report that gives you a snapshot of the health of your business. And then you can export that report down to your computer where you can share the link or sync it to some other place. So in the same visual way, you can build robust reports. However, we’re going to choose a calendar view for this demonstration. And you can either choose blank, or you can connect it to a form, we’re going to choose to connect the form and we’re going to connect it to Art’s online coaching form.
[31:38]
So you have to map the fields here, again, this is all visual, we’re going to actually map this to the field that tells us your preferred coaching time. So this was when we asked our customers when their coaching time wanted to be, we’re going to map it to this field. We’re going to go ahead and click “Create”. As you can see, it creates a really nice calendar view here. There’s really nothing in here because we only have one customer, but here’s this appointment down here on the 30th, you can actually double click into that appointment and you get a really nice detailed view where you can actually edit all the information. You can adjust the star rating, you can just if they’re active, or whatever your custom fields would be, you can even change their level from beginner, intermediate and advanced on this view. When you click out, it will save it back to the rest of the database in the original form.
[32:25]
So I think the overarching theme here is that this is really a database and you can work with this as a database and connect all the data points together. Another thing I just want to point out is that you can export this data not only to some of our integrations like if you wanted to build the same type of report in Google Sheets, you certainly could. But you can also download this data to your computer, you can download it as a CSV in Excel, PDF, or you can even download all the attachments. So if you just wanted to come here and you had 100 different lesson plans, you might be able to download all the attachments right from this dropdown. So there’s really a ton that you can do in here, including hiding and showing columns and just creating all kinds of different views. So without going into too much detail, that would be how I would envision you would build out a small CRM to manage your customers here into Jotform with our coaching business. At this point, that concludes the demonstration part of this, I’m going to hand it back to Morgan for some Q&A.
Question and Answers
[33:31]
Morgan: Awesome, thank you Art so much. I always love attending other people’s webinars because I learned a lot too. So that was really great. We have a few questions here. And then we’ve also gotten some questions in advance from registration. So I’m going to go through a couple of those. And I did get if we have a number of questions about whether or not the recording would be available. So just briefly touch on that before I go into other questions. Yes, you should be able to find this recording on our Jotform YouTube channel by Friday, and probably on https://www.jotform.com/webinars/ around the same time. And then we will also send an email with the link about a week from now. So if you need it sooner, you can have it by Friday. But otherwise, we will send the link out next week. So one of the questions that we got advanced was about embedding a form onto a website which Art I know you touched upon briefly. Denis, would you mind talking a little bit more about how the process of embedding a form into a website and how you would go about doing that?
[34:41]
Denis: Sure, absolutely. So embedding a form into a website or an app is really easy. We do have a lot of tools that allow for seamless form embedding. One of them being the quick JavaScript method or an iframe or even the full source code. There are also various other embedding tools for embedding the form as a modal or a pop-up window. But if you do embed the form using the quick JavaScript or the iframe method, then the embedding will be seamless and dynamic. Meaning that any changes that you make to the actual form in the Form Builder will get reflected on the form that’s embedded in the website, and or the app. If you embed the form using the full source code, then you would have to reinvent the form again, after making an update to the form.
[35:29]
Morgan: Great, thank you. We also have a bunch of questions about integration. So, how’s it going to ask a few of them that are more specific, how does the integration with MailChimp work? Can you send forms directly through MailChimp?
[35:47]
Denis: So that’s a great question. Basically, you’re able to collect emails on your form, and then those emails create a list in MailChimp, I believe that’s one of the use cases for using that. And then after that, you’re able to use that email base to send out an email blast for marketing campaigns, and things like that.
[36:14]
Also just read on the second part of that question, you’re able to absolutely send an email directly from MailChimp or through any other form of communication, as long as you just include the direct form URL. So that way, if you include the direct form URL, you can reach millions of customers or any of your customers with that link. After they receive the link, they’ll be simply able to click on the link on their device, whether that’s a desktop or a mobile, and then the form will load in their browser of choice.
[36:41]
Morgan: Great, thank you. There were also a couple of questions about integrating with CRMs. Would you mind talking a little bit more about some of the options that we have for CRM integration and how that works?
[36:56]
Denis: Sure, absolutely. So, there are a number of various CRMs that we integrate with some of them being Salesforce, and HubSpot, but I’ll just briefly touch on the Salesforce integration because that’s integration used by a lot of our customers. One use case that you can use with this integration is the ability to define records in Salesforce or create and or update records in Salesforce. Let’s say you have a form that’s collecting leads or contact information from your customers and that form is embedded on your website, basically it’s the landing page. After the customers fill out the form and click submit that automatically either searches for the existing record or finds that record and updates it or creates a completely new one in your Salesforce CRM. Another use case for Salesforce integration is the help desk. You can basically create a form to collect information about a certain service request that your customers may be having after they fill out their information and the issue that they’re having with your product, click Submit, which automatically sends that information to the Salesforce Service Cloud and creates a case which is basically using the form in a web to the case scenario. So these are just some of the use cases. We also have just recently unveiled a new feature that is the Jotform Prefill. You can pre-fill information from your CRM such as Salesforce, and HubSpot directly into the form before you send it to your customers. You can look up this specific information and have it automatically populate fields in your form, and then you will be able to send that information to your customers.
[38:44]
Morgan: Awesome. Thank you so much, Denis. That was a very thorough answer about all the integration options that we have available and how it works. If you have additional questions about that, you can reach out to support.
[38:58]
Denis: Of course.
[38:59]
Morgan: There is one recommendation. I guess I’ll throw this out to both of you. Art with your no-code experience, Denis with your Jotform experience, which integration would you recommend getting a list of what’s purchased as a card or task or project in a separate app other than getting notifications Jotform?
[39:22]
Denis: From my support perspective, I can say that a lot of our customers use Google Sheets as one of the basic primary integrations with JotForm. That way you’re able to monitor the submissions as they’re coming in.
You’ll be able to kind of easily identify information. You can also, of course, use Google Drive, you can use Airtable, you can use Trello to create various cases cards, and the Kanban view. That it’s also possible to use our native, I believe Kanban view, that’s a feature that’s coming out in JotForm. So Art was showing that you’re able to transform that table view to a calendar view, and then also a new feature that’s coming up, you would be able to transport it to a Kanban view for project management stages of view.
[40:14]
Art: Yeah, my answer would have been the Kanban view or something like Trello to make a list that you can then just check off, as you read your payments come through. If you don’t mind Morgan, I saw just one quick question that came up for me, I think a couple of times, just in prior to the webinar, but the question that I see a lot is when you add columns on the back end, does it show on the consumer side, the form side? And the answer’s no. So those columns that I was adding, like the star rating, and the file upload, and all that kind of stuff? That’s only on the back end side and the table view, but it does not show in the form view.
[40:57]
Morgan: Right, thanks for don’t forget that one. The rest assured your customers aren’t going to see any of that internal stuff that you might want to keep track of that might not stuff you want to share with the customers. I have a few more that we got in advance. So, one was about ways to design a form to match company branding. And I know we have a couple of options there. So Denis, would you mind talking about that a little bit?
[41:23]
Denis: Yeah, absolutely. A lot of our customers, especially our enterprise customers, like to customize everything there is about the form so that they’re seamlessly embedded in their website or product. And the options that are available for customers to customize the forms are usually as follows. That would be the ability to inject CSS codes, the ability to upload images and logos for the form as well as select custom color schemes, embed or import custom fonts using CSS code, or use our native font selector. I do believe we offer close to 60 different fonts that can be selected to display questions on the form. And they’re just there’s just so much customization that can happen on the form, you can virtually transform the form to something completely unrecognizable if you know, a few lines of CSS code.
[42:17]
Morgan: Great. I know one question that we get a lot that’s maybe not unique to this webinar, but just also pretty general JotForm. Is there a way for the form to be used when there’s no internet and then sync when you are around an internet connection? So if you wouldn’t mind talking about that a little bit, Denis, that would be helpful as well.
[42:41]
Denis: Of course, that’s a great question. We do have our mobile forms app that allows turning to enable the offline mode for forms, which makes the forms offline accessible. Basically, once you download the app, which of course is free, and save the form with your phone, you would be able to fill out that form in offline mode, and that includes uploaded files. When you’re making a submission, you can make as many submissions in the offline mode as you would like. And then as soon as you get near the access point, and reconnect to the internet, then all of those submissions, including any uploaded files will be automatically synced and sent to the Jotform database.
[43:24]
Morgan: Great. We have a couple more questions and I think we have a little bit more time. So one more question. Can user accounts be defined? So in other words, only users with an account could place an order form, for example?
[43:45]
Denis: That’s another good question. There are several ways of enabling that in JotForm. First of all, you’re able to password-protect the search form so that only people with the password to the form would be able to access it. You’re also able to change the loading or access permissions to a form. By default, any form that’s greater than Jotform is a publicly accessible form meaning that anybody with the direct form URL will be able to open the form and fill it out. But you’re also able to make forms into private forms, meaning that the form will only be accessible to people who have actually been invited to fill out the form via email. And that’s all managed from the Form Builder, as Art was showing when he was building the form that’s available in the Publish tab of the Form Builder.
[44:31]
So that would be the one way in Jotform to limit access to a form. On the other hand, if you’d like to give the form public, but then be able to pull up specific data that are related to a certain account, then you would be able to use the spreadsheet to form widget on the form, which allows to the form creator to upload a static database, which means that you can upload your list of existing accounts. And then you can select this specific column to be the COVID column, which will be used to look up a specific record in the database, virtually allowing the respondent who is filling out the form to look up their information via that access code. And that access code can be either the account number, their email, their last four of social, or any other unique lookup code that you would like.
[45:32]
Morgan: Great. I think we’ve gone through most of the questions. One more, how can I update in your example like the lesson plan. So how can I update like an employee course with dates, and make sure that it updates the employees’ training schedule? So in your example, if it were less than planned, how could you update that?
[46:03]
Denis: Let’s see, is that the question from Bill?
[45:06]
Morgan: Yeah.
[45:07]
Denis: Okay. Let’s see. I will just have to reread the question. So Morgan, if you understand it better, or Art, maybe you can help me tackle this?
[46:21]
Art: I think I’ll try to answer here. I’m not sure if I fully understand the question. But I think that the best way to do that would be to actually update it in the table itself. There’s a way within the table to send an email. So you could maybe send an email from the table to the customer to show the updated date or there might be another way to update the customer. But that’s the way that I would do it. I just update it right on the table.
[46:53]
Denis: Okay. Thank you. All right. I think I am also starting to understand the question. Now, basically, if you would like to change the schedule or the selected time slot, then you would be able to do so from as hard as mentioned, either the table or by actually opening the existing submissions by going into the Edit entry mode from the table, and then selecting a new selection from the form itself. So you would be able to just like to make a new selection for a date and time or a different time slot and then click Submit. And that would actually make the update in the tables page.
[47:30]
Morgan: Awesome. Thank you both for covering that. Yeah, teamwork on answering that question. So I’m going to end the Q&A there. We’re about out of time. I know there are a few questions we didn’t get through. You are welcome to email me morgan@jotform.com. And I’ll do my best to help you out or direct you to somebody who can with any questions we didn’t get to today. And just to reiterate, we will have this recording available on our YouTube channel by Friday, and likely on https://www.jotform.com/webinars/ by Friday. And we will be sending a recording out to everybody through email every registering through email within the next week.
Thank you Art for the great presentation. So much good information. And Dennis, of course, thank you for your help with the Q&A here as well. And thank you all for attending today, and we’ll see you at the next webinar.
[48:35]
Art: Thank you.
[48:35]
Denis: Take care.


Send Comment: