When using the Form and Task elements in Jotform Workflows, keeping assigned users on track is essential to maintaining a smooth process. Instead of manually reminding team members about pending tasks, you can automatically send reminder emails to encourage timely completion. This helps reduce delays, improve collaboration, and keep your workflows moving from one step to the next without unnecessary follow-ups.
Enabling the Reminder Emails for Form Element
The Form element in Jotform Workflows lets you add a form to your workflow and assign it to specific users to complete. You can also set reminder emails to automatically notify assignees about pending forms, helping reduce delays and keep your workflow moving smoothly. Here’s how to set it up:
- In Workflow Builder, click on the Form element from your current workflow.
- Then, click on the Gear icon to open the Form menu.
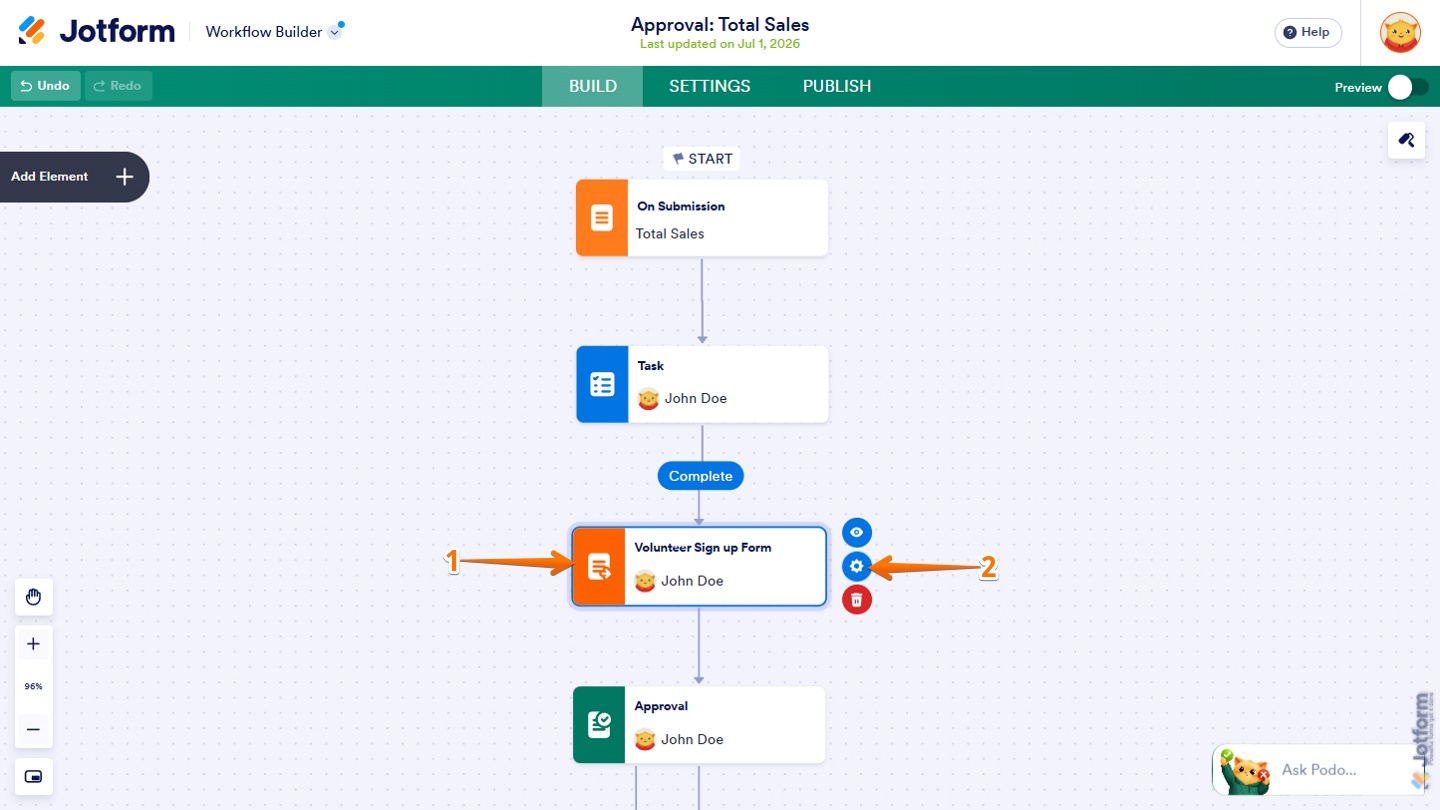
- Next, in the Form menu that opens, click on Advanced.
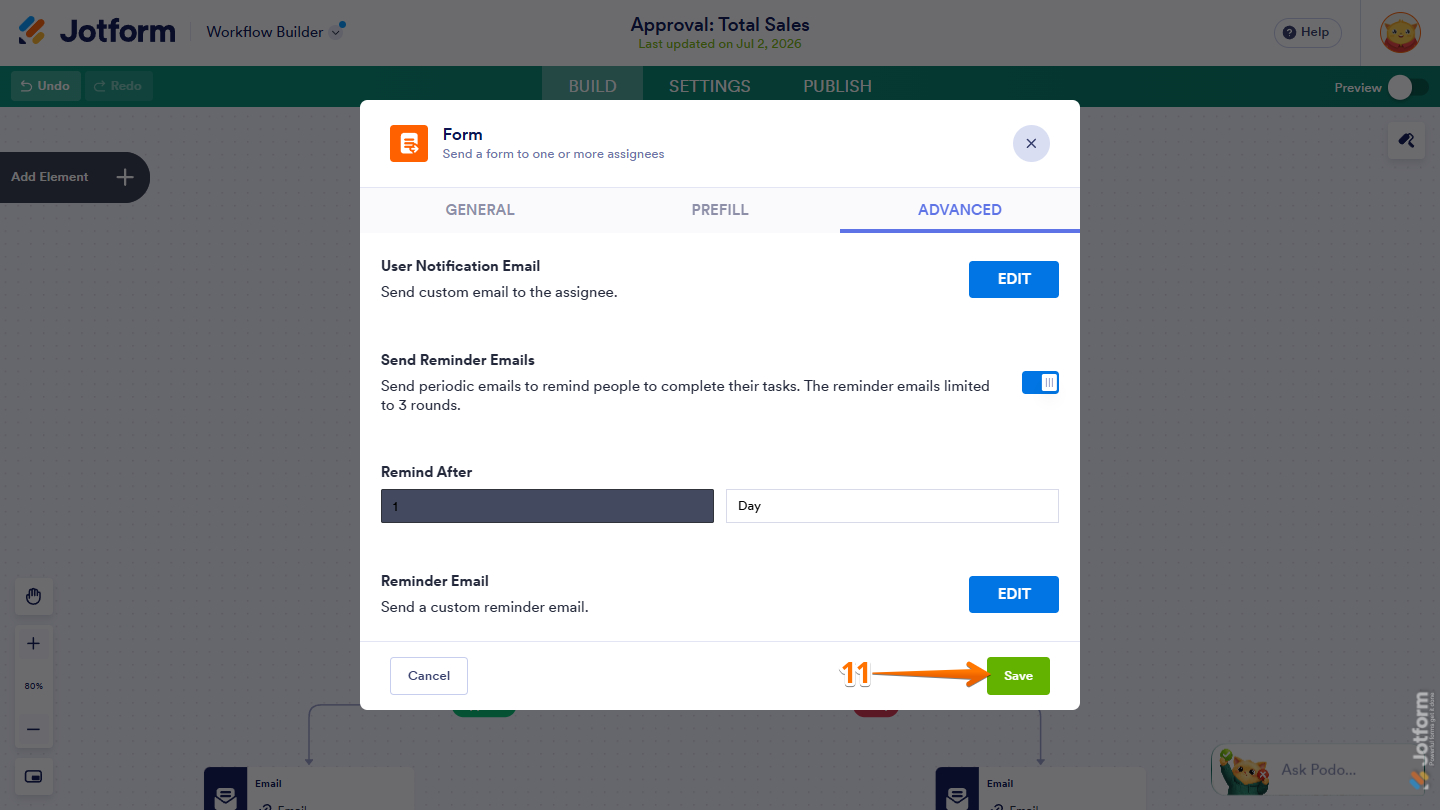
- Now, toggle on Send Reminder Emails.
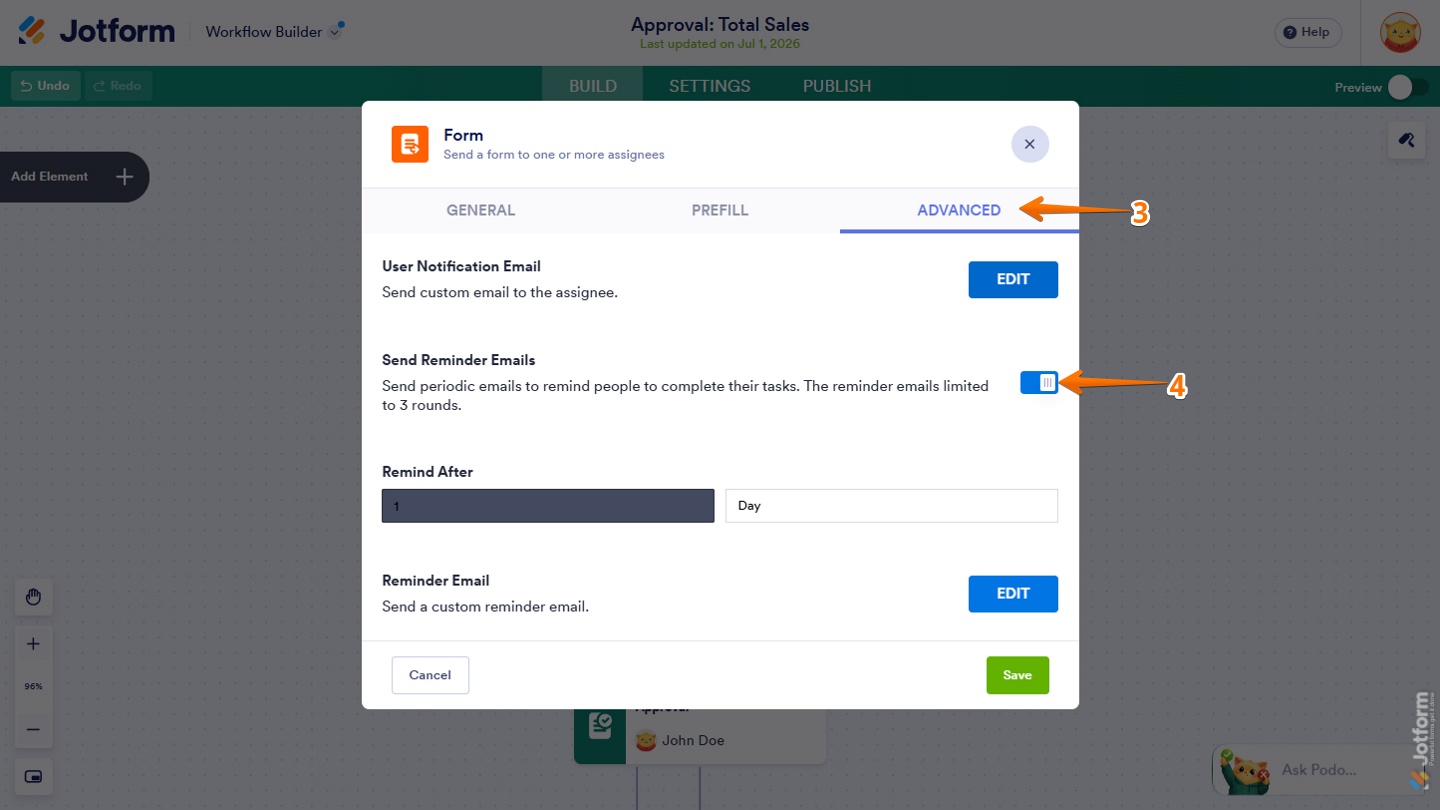
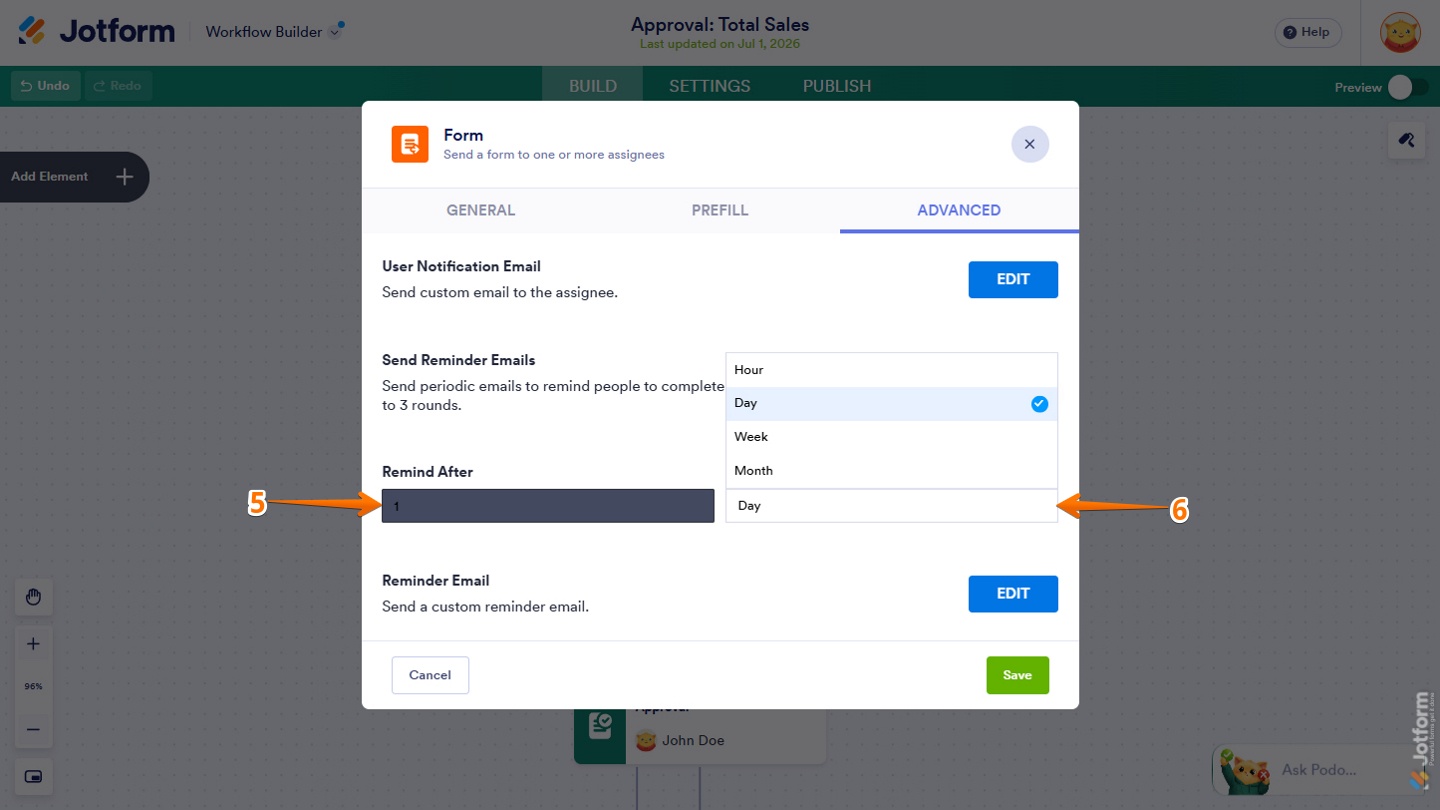
- In the Remind After section, enter the frequency of the reminder email in the Number box on the left.
- Now, select how to send the reminder email: Hours, Days, Weeks, or Months in the Dropdown menu on the right.
Customizing the Reminder Email of the Form Element
While the default reminder email template works well for most workflows, you can also customize it with your own content to create a more personalized reminder for your assignees. Here’s what to do next:
- In the Advanced tab, click on Edit on the right side of the Reminder Email section.
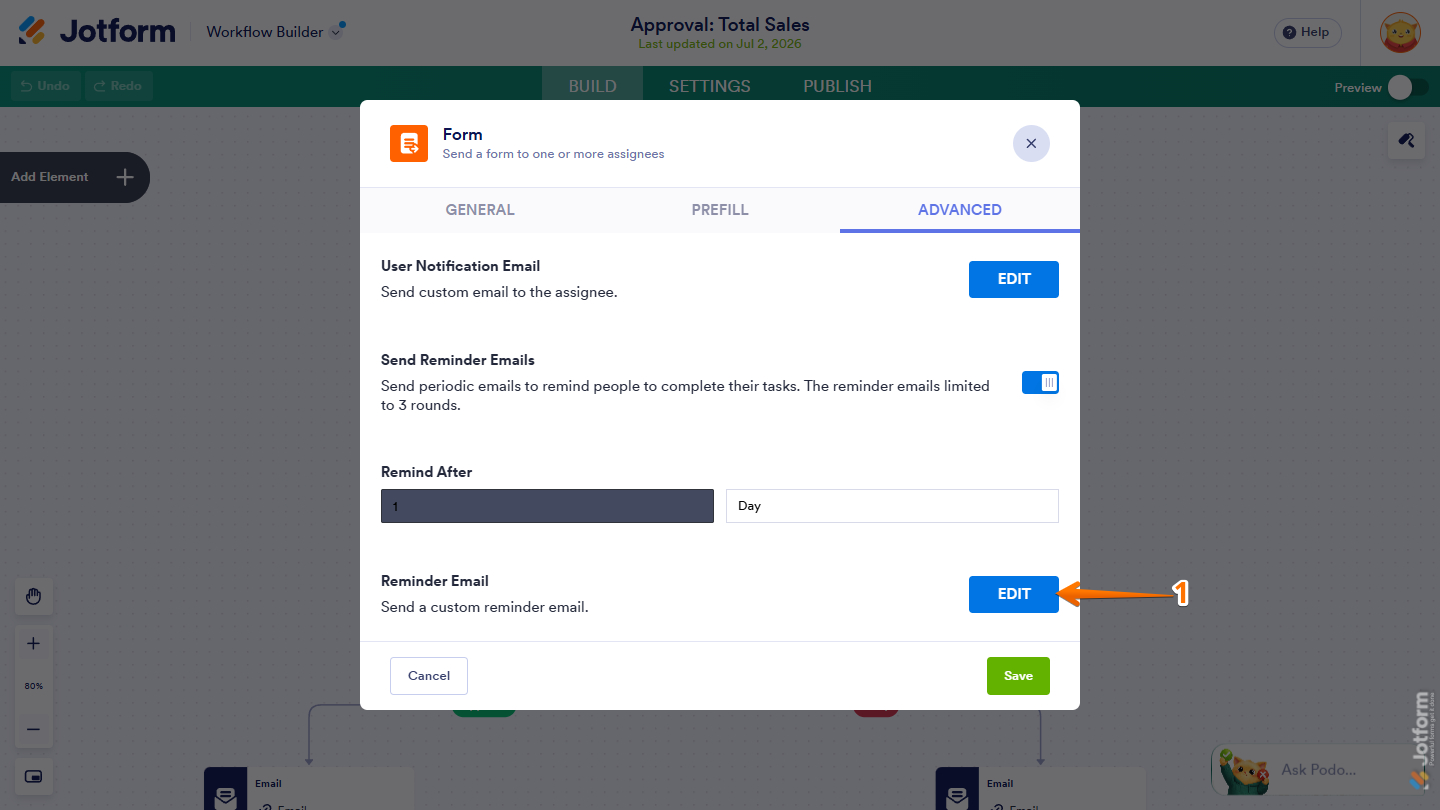
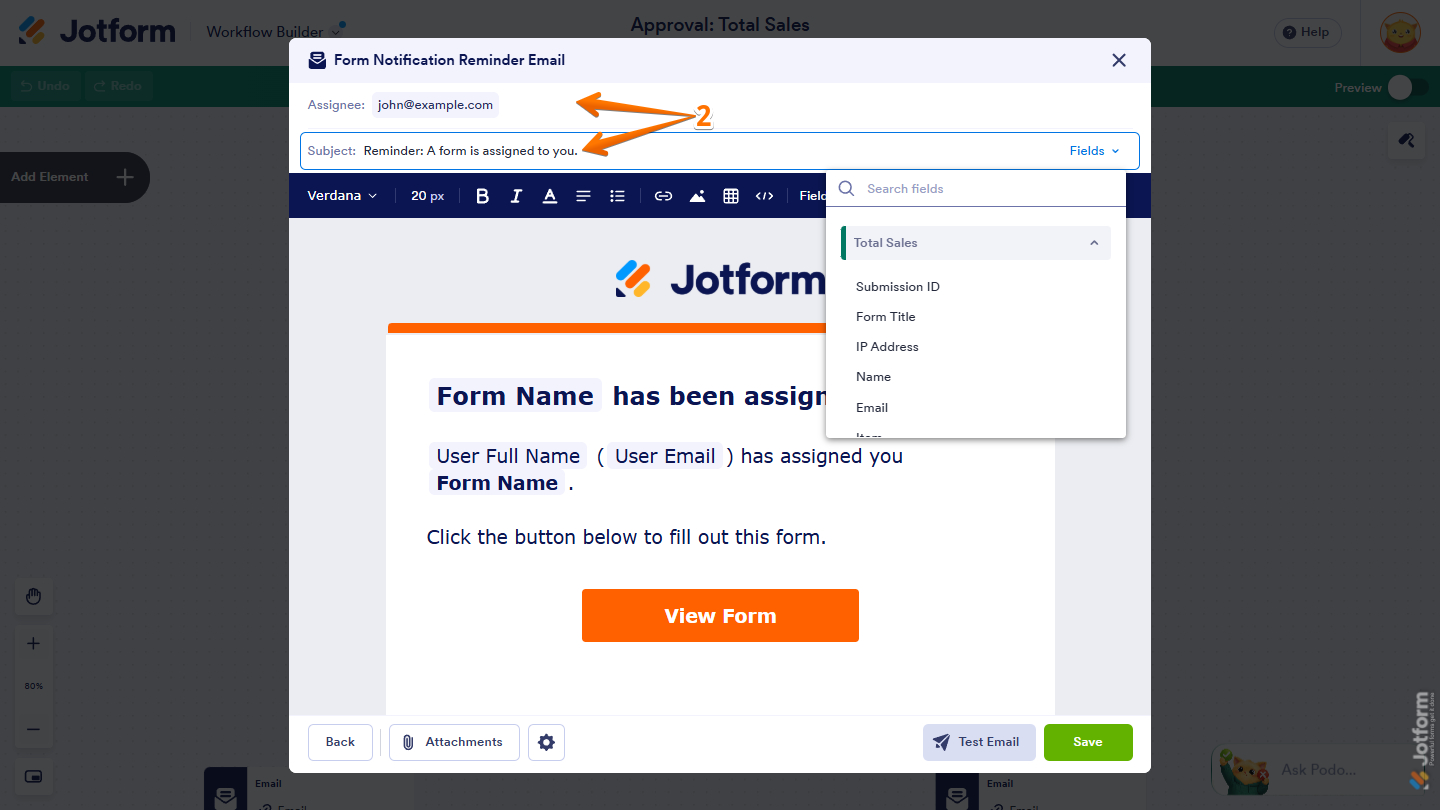
- Then, in the Form Notification Reminder Email window that opens, set up these things first:
- Assignee — Enter the assignee’s email address or select an email field from your form.
- Subject — Enter the subject line for the reminder email. You can also personalize it by inserting fields from your form.
Pro Tip
You can insert form fields by clicking the Fields dropdown menu on the right side of the Assignee or Subject field, then selecting the field you want to use.
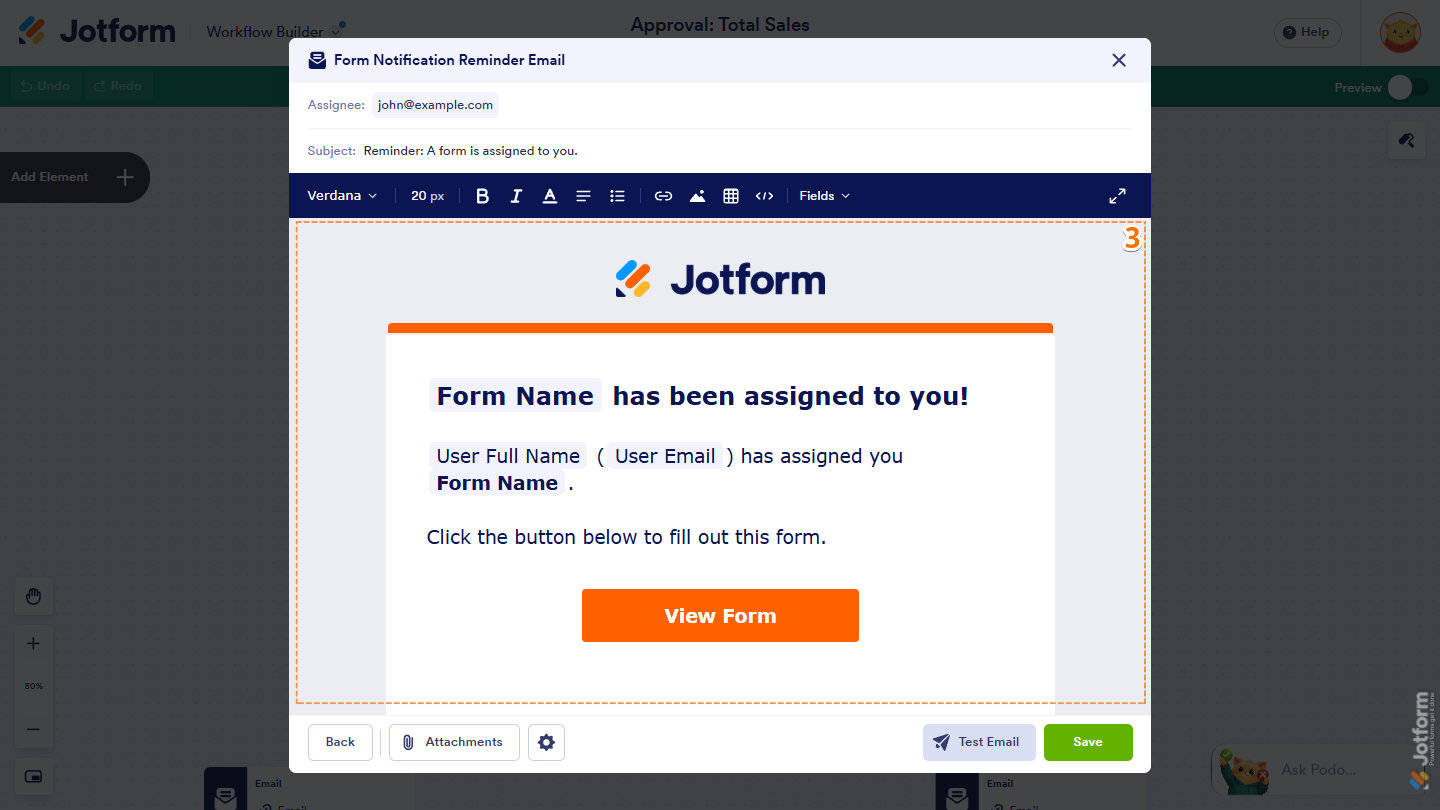
- Next, in the body of the email template, customize the message to your liking.
Notes
- To personalize the email, click Fields in the top toolbar and insert values from your form.
- You can also use the top toolbar to format the text and add images, links, and tables to your reminder email.
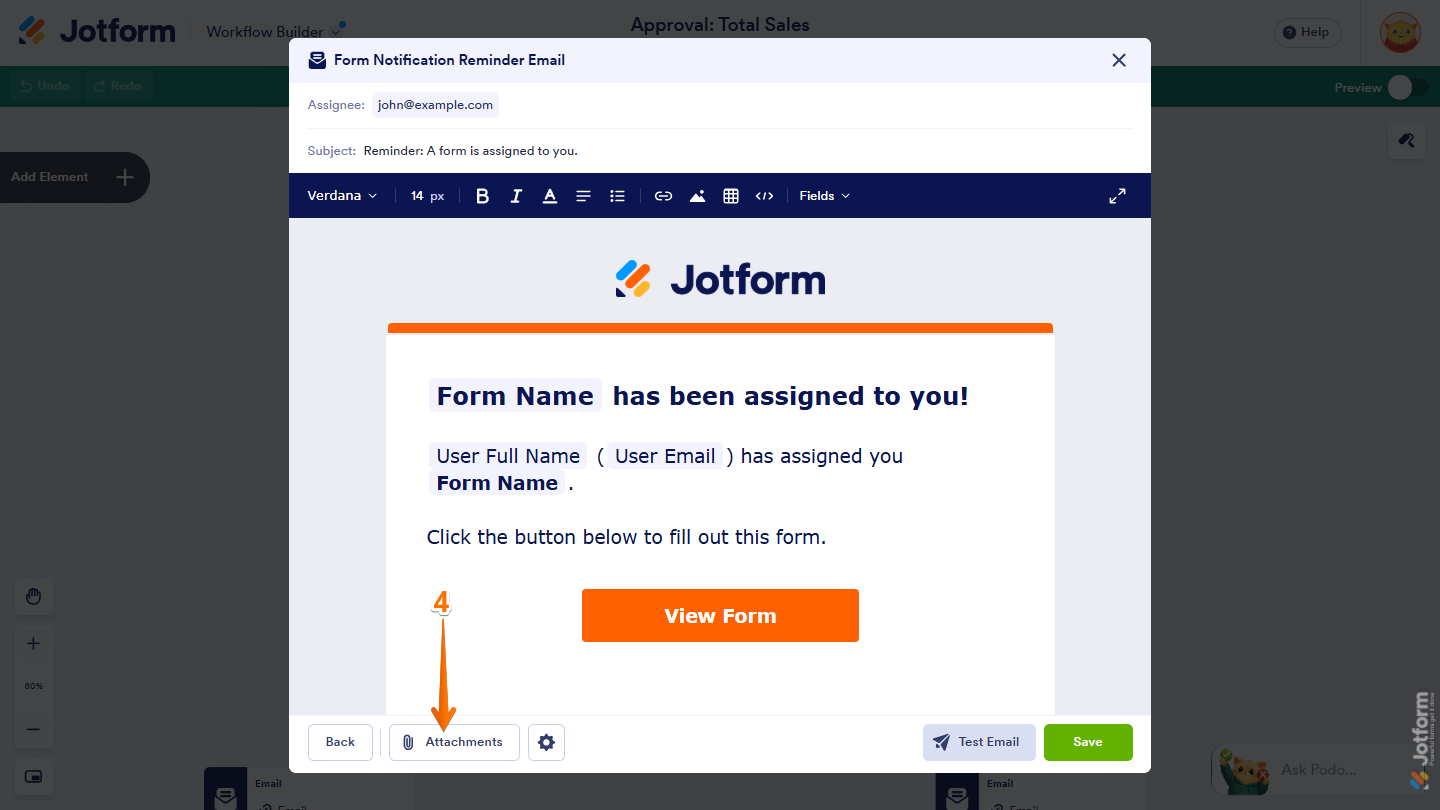
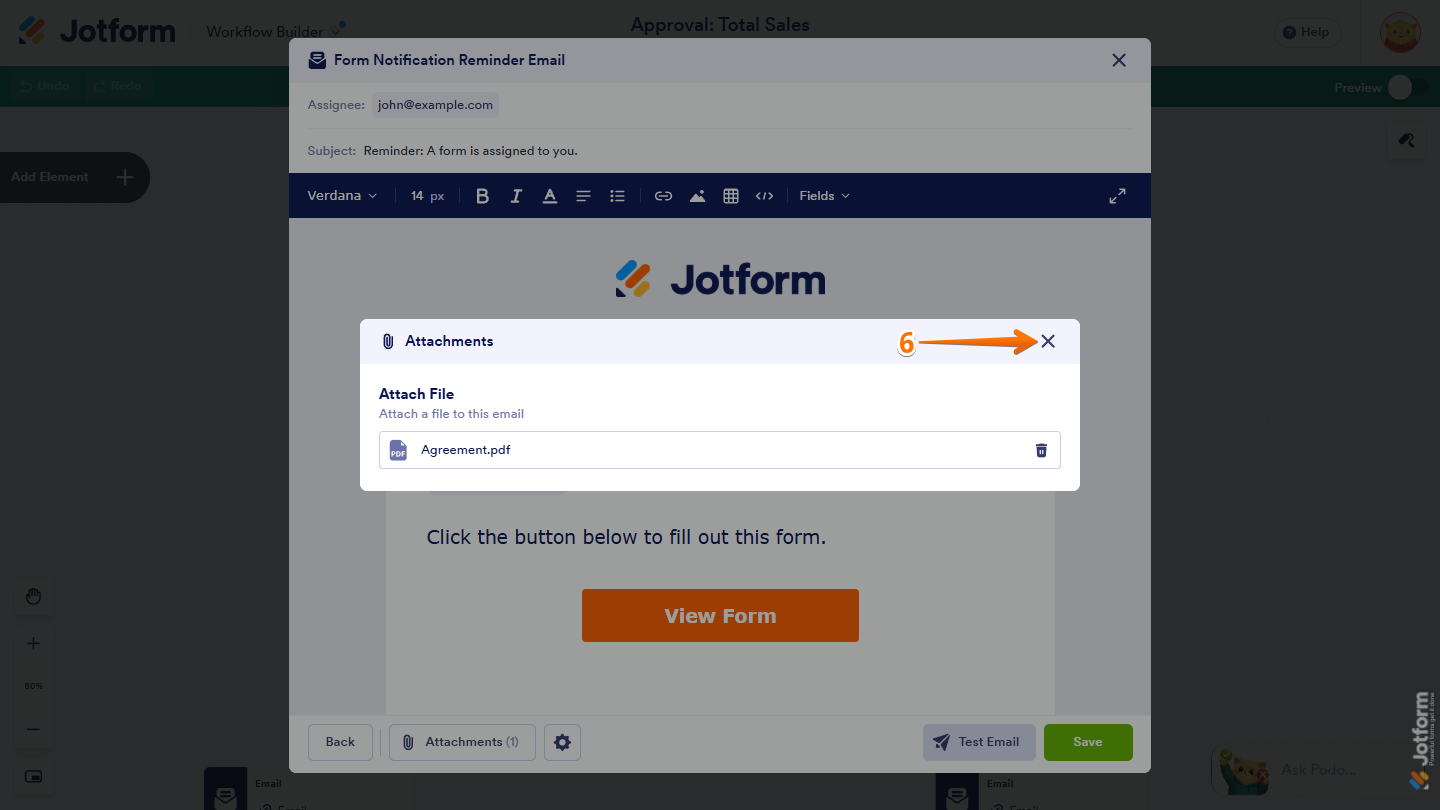
- Then, click on Attachments to add files to the reminder email.
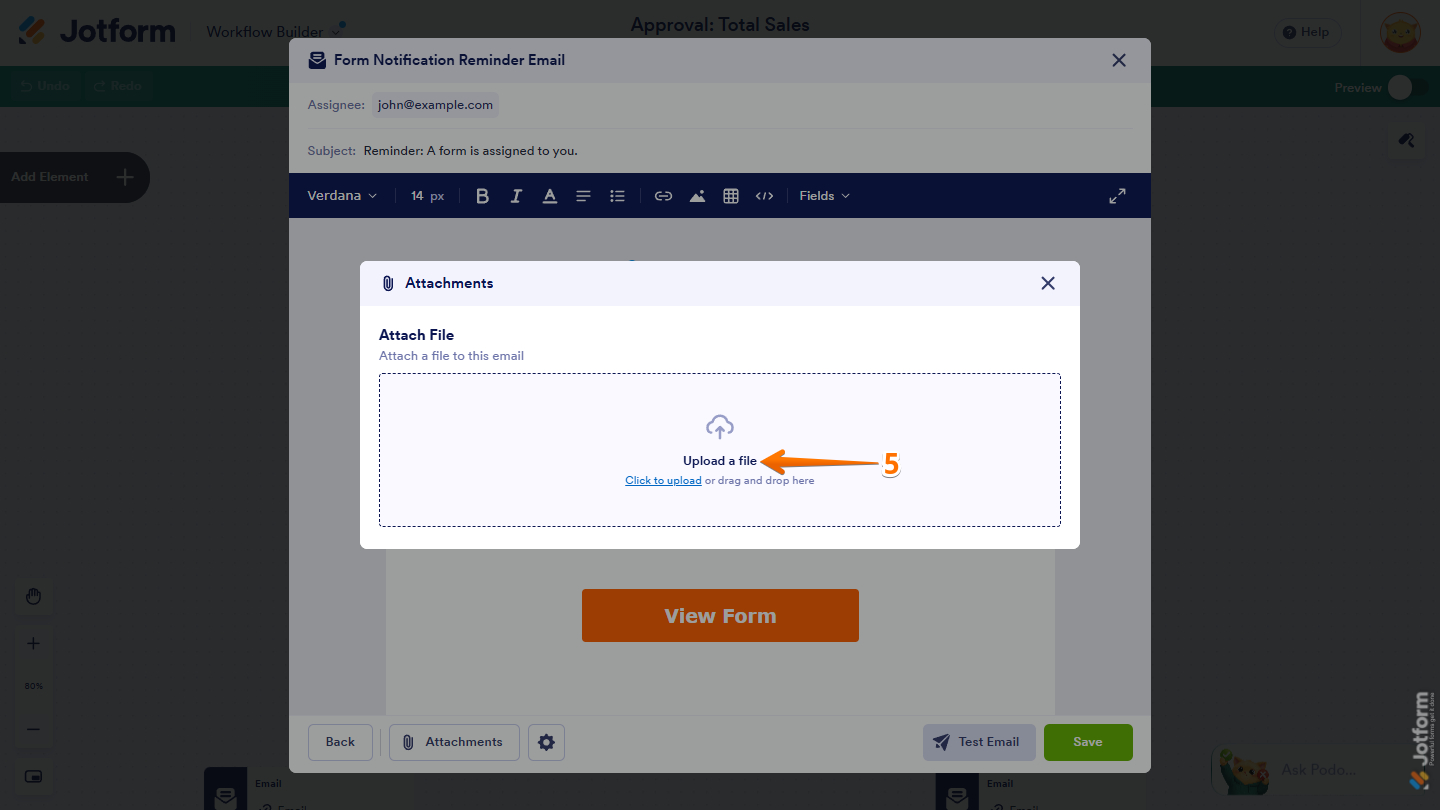
- Now, in the Attachments menu that opens, click on the Upload a File box to select your file. You can also drag and drop the file into it.
- Once the file is uploaded, click on X to close the menu.
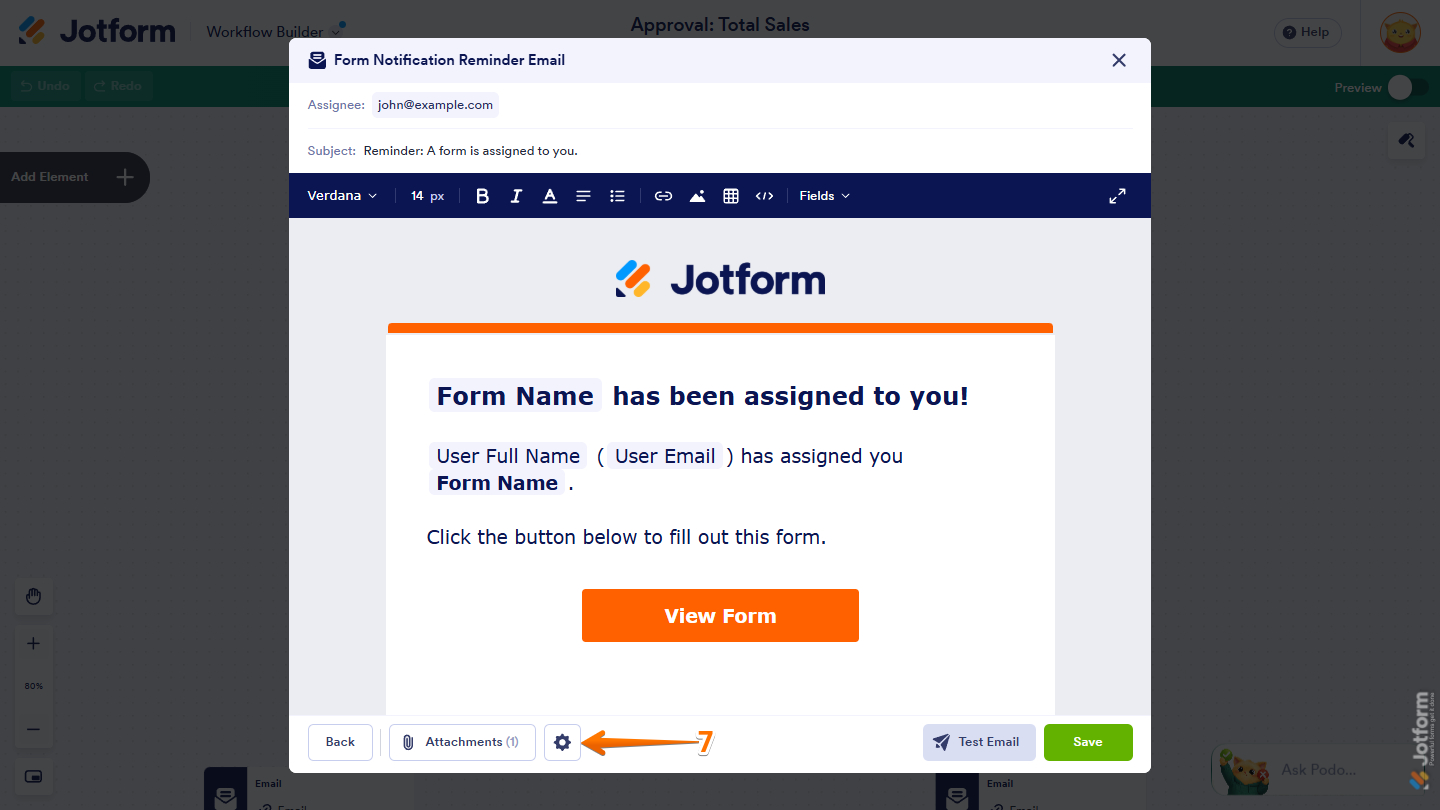
- Next, click on the Gear icon to update your Sender Settings.
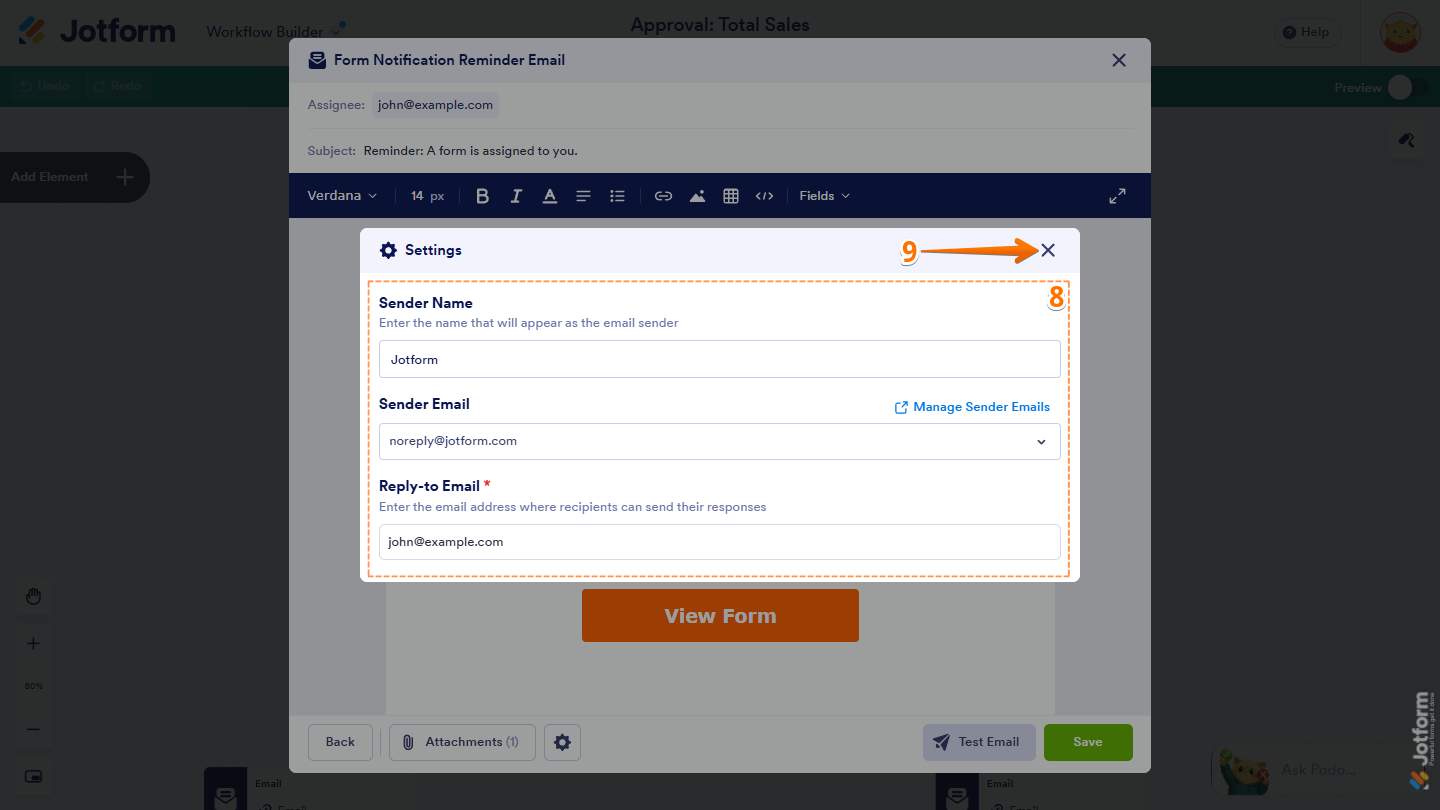
- Then, in the Settings menu that opens, configure these things:
- Sender Name — Enter the name that appears as the sender of the reminder email.
- Sender Email — Enter the email address that appears as the sender of the reminder email.
- Reply-to Email — Enter the email address where recipients’ replies to the reminder email will be sent.
Pro Tip
You can use a custom sender email address for reminder emails by configuring an SMTP server. Check out our guide on How to Set Up a Custom Sender Email with SMTP to learn more.
- Now, click on X at the top-right side of the menu to close it.
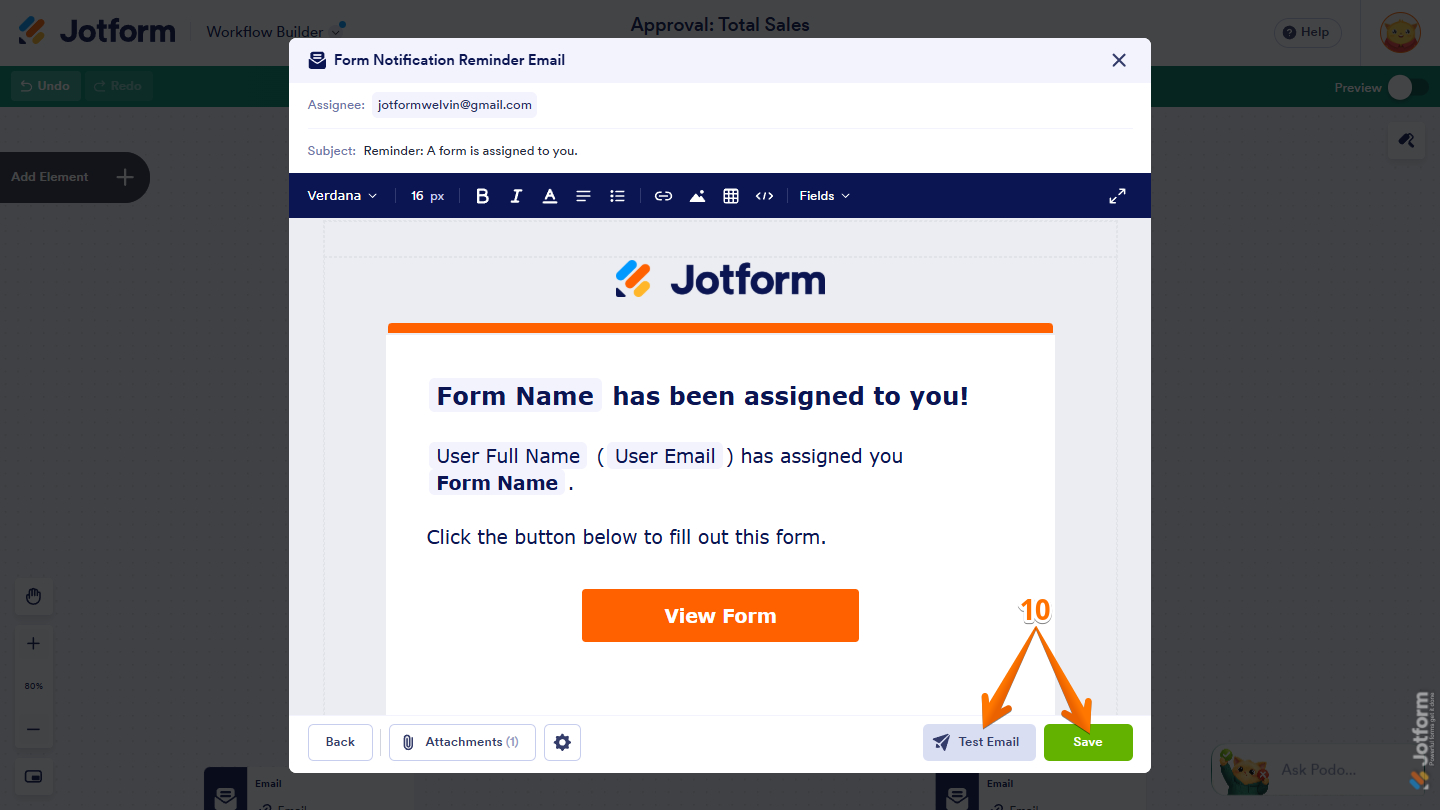
- Once everything’s set, click on Test Email to confirm your settings are working or Save to complete the custom reminder email template.
- Finally, click on Save to save your Form element settings.
Enabling the Reminder Emails for the Task Element
The Task element in Jotform Workflows lets you assign tasks to specific users within your workflow. You can also configure automatic reminder emails to notify assignees about pending tasks, helping reduce delays, improve accountability, and keep your workflow progressing on schedule. Just set it up like this:
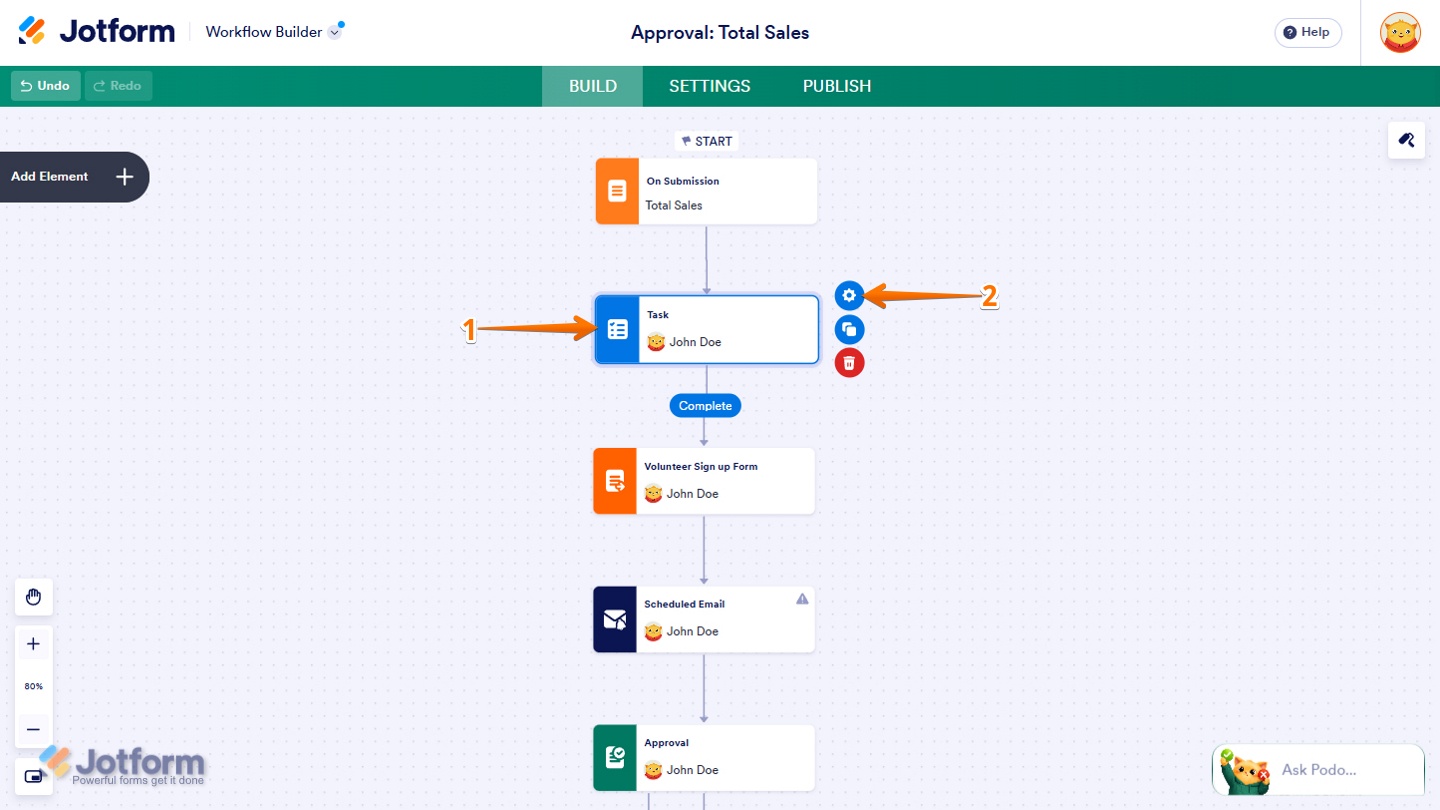
- In Workflow Builder, click on the Task element from your current workflow.
- Then, click on the Gear icon to open the Task menu.
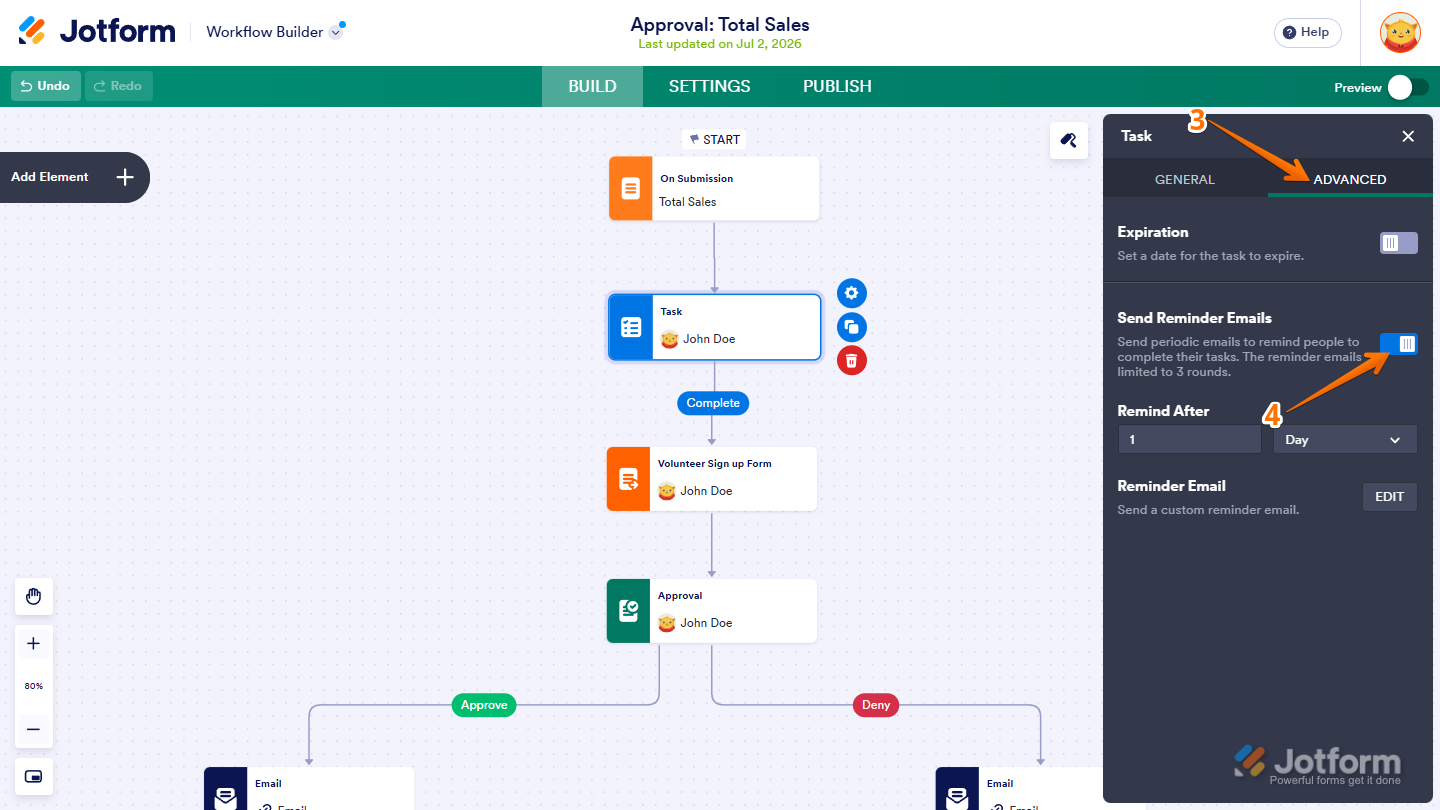
- Next, in the Task menu that opens on the right side of the page, go to the Advanced tab.
- Now, toggle on Send Reminder Emails.
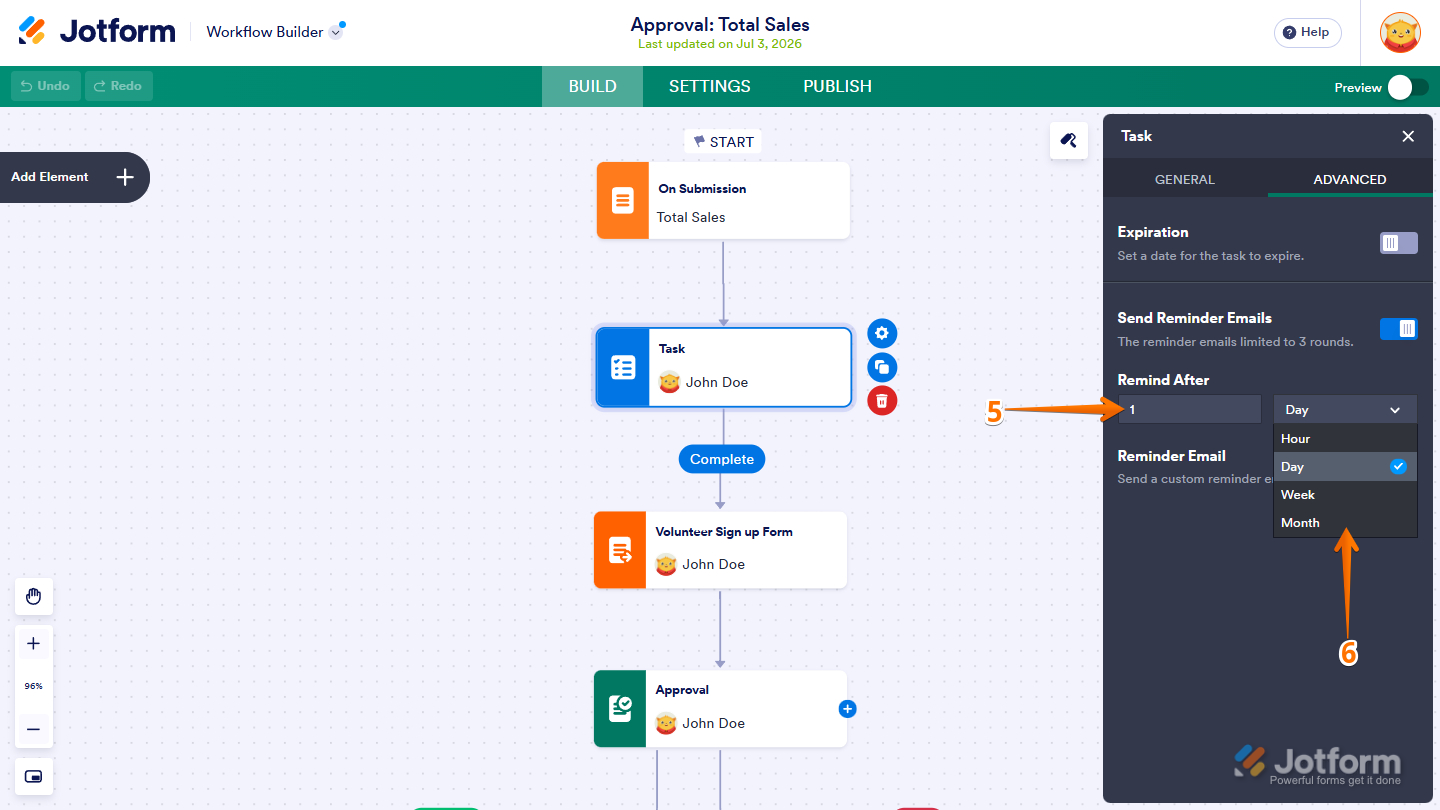
- In the Remind After section, enter the frequency of the reminder email in the Number box on the left.
- Now, select how to send the reminder email: Hours, Days, Weeks, or Months in the Dropdown menu on the right.
Customizing the Reminder Email of the Task Element
You can customize the reminder email template to better match your workflow and provide additional context for your assignees. Personalizing the message helps ensure recipients receive clear and relevant reminders. Here’s how to get going:
- In the Advanced tab, click on Edit on the right side of the Reminder Email section.
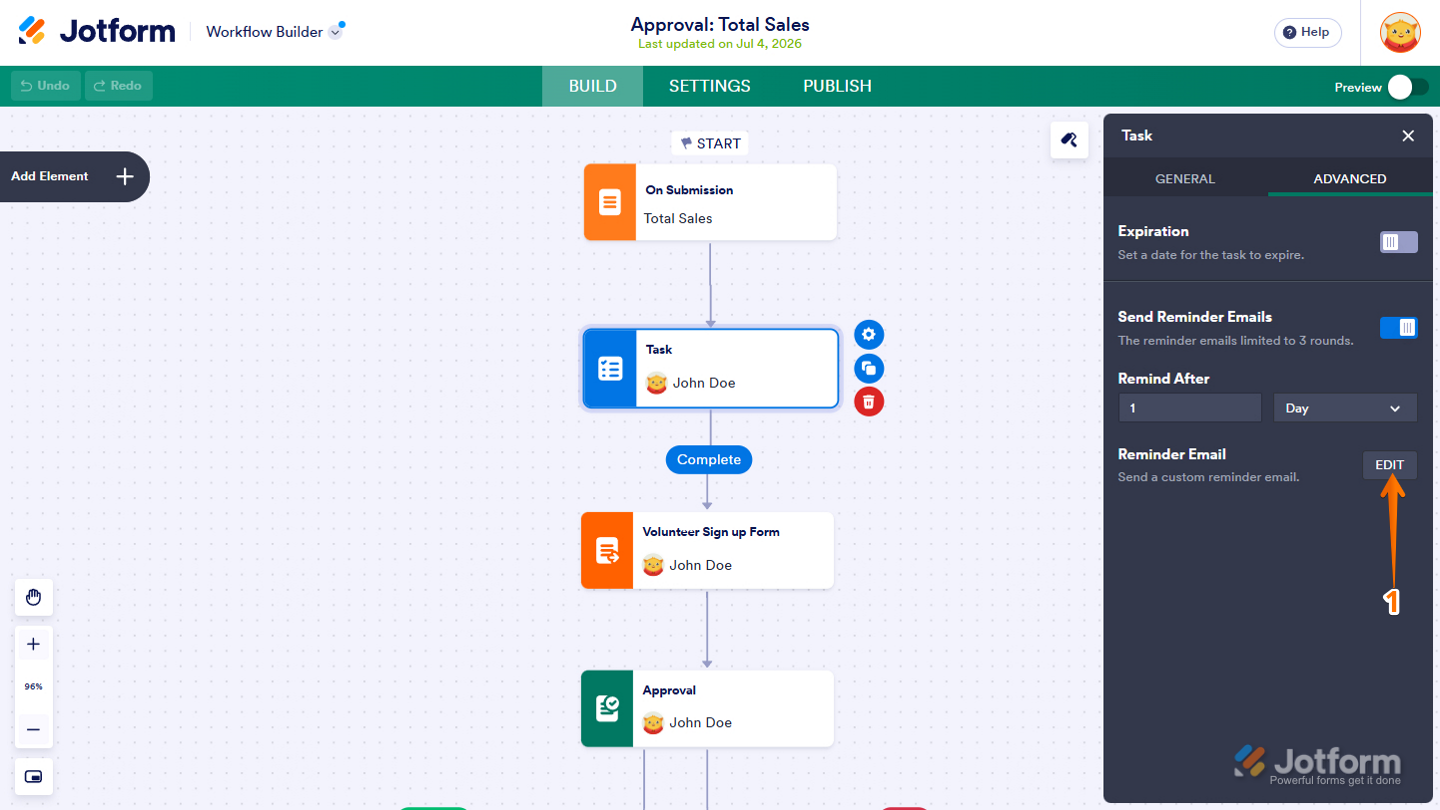
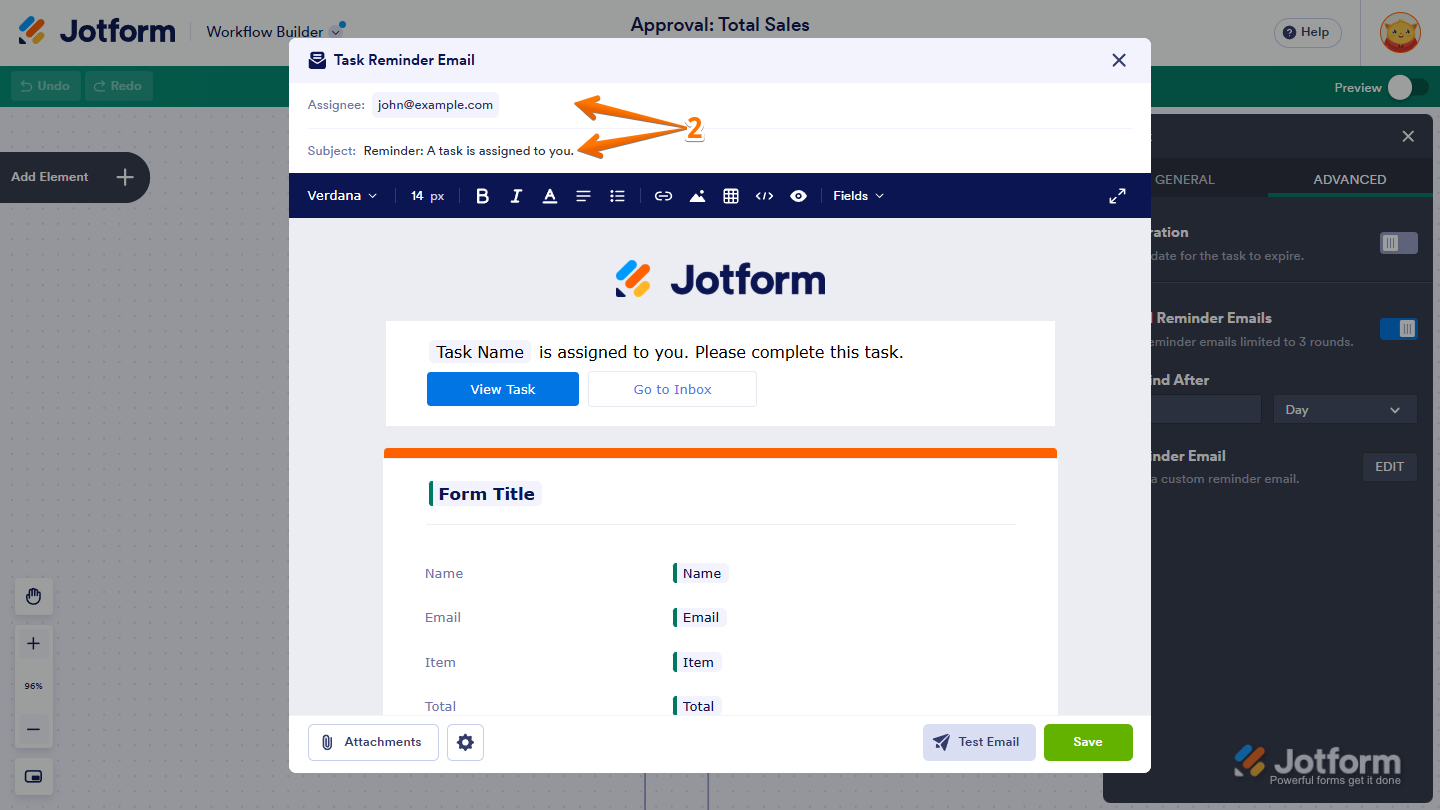
- Then, in the Task Reminder Email window that opens, set up these things first:
- Assignee — Specify who will receive the reminder by entering an email address or selecting an email field from your form.
- Subject — Add a subject line for the reminder email. You can make it dynamic by inserting form fields to include submission-specific information.
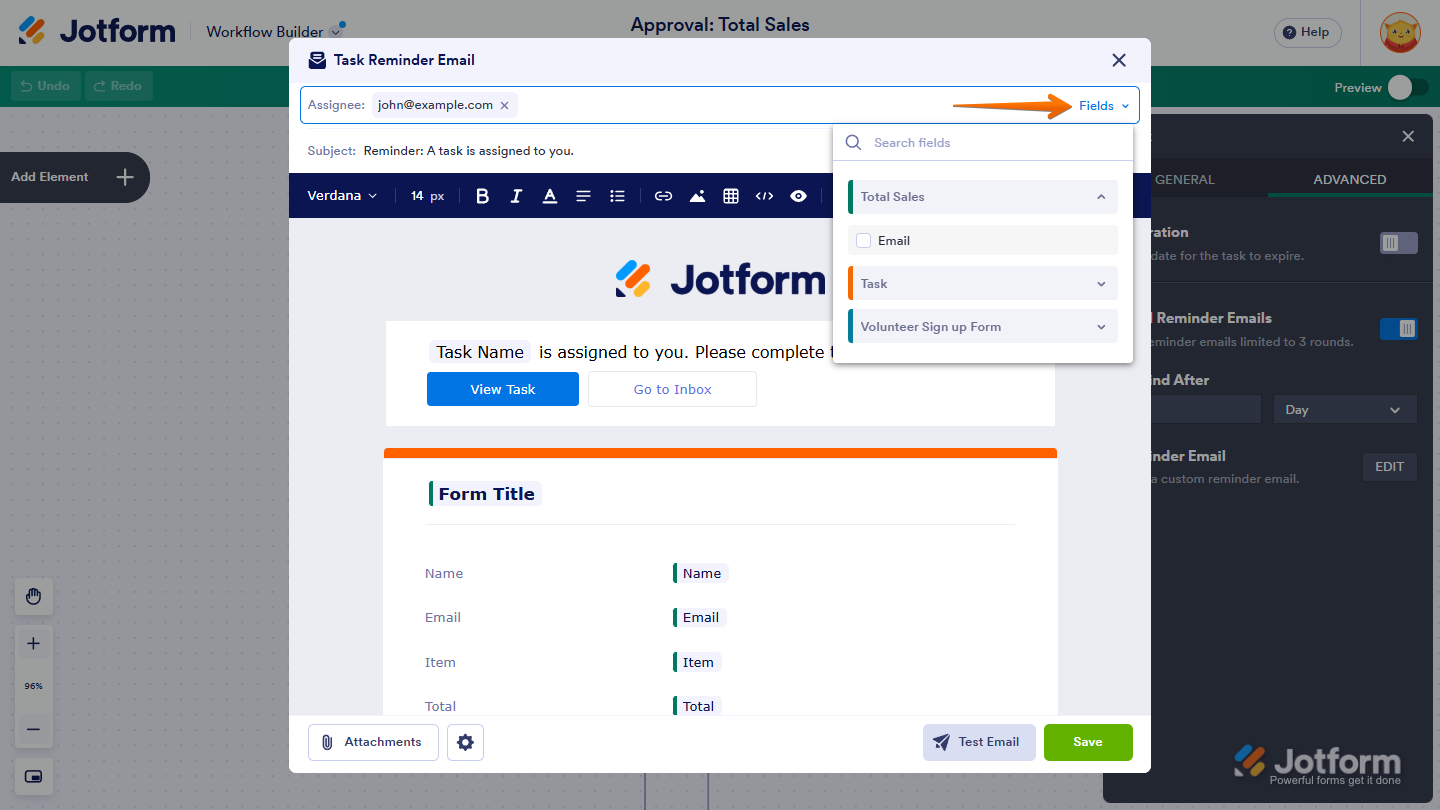
Pro Tip
You can insert form fields by clicking the Fields dropdown menu on the right side of the Assignee or Subject field, then selecting the field you want to use.
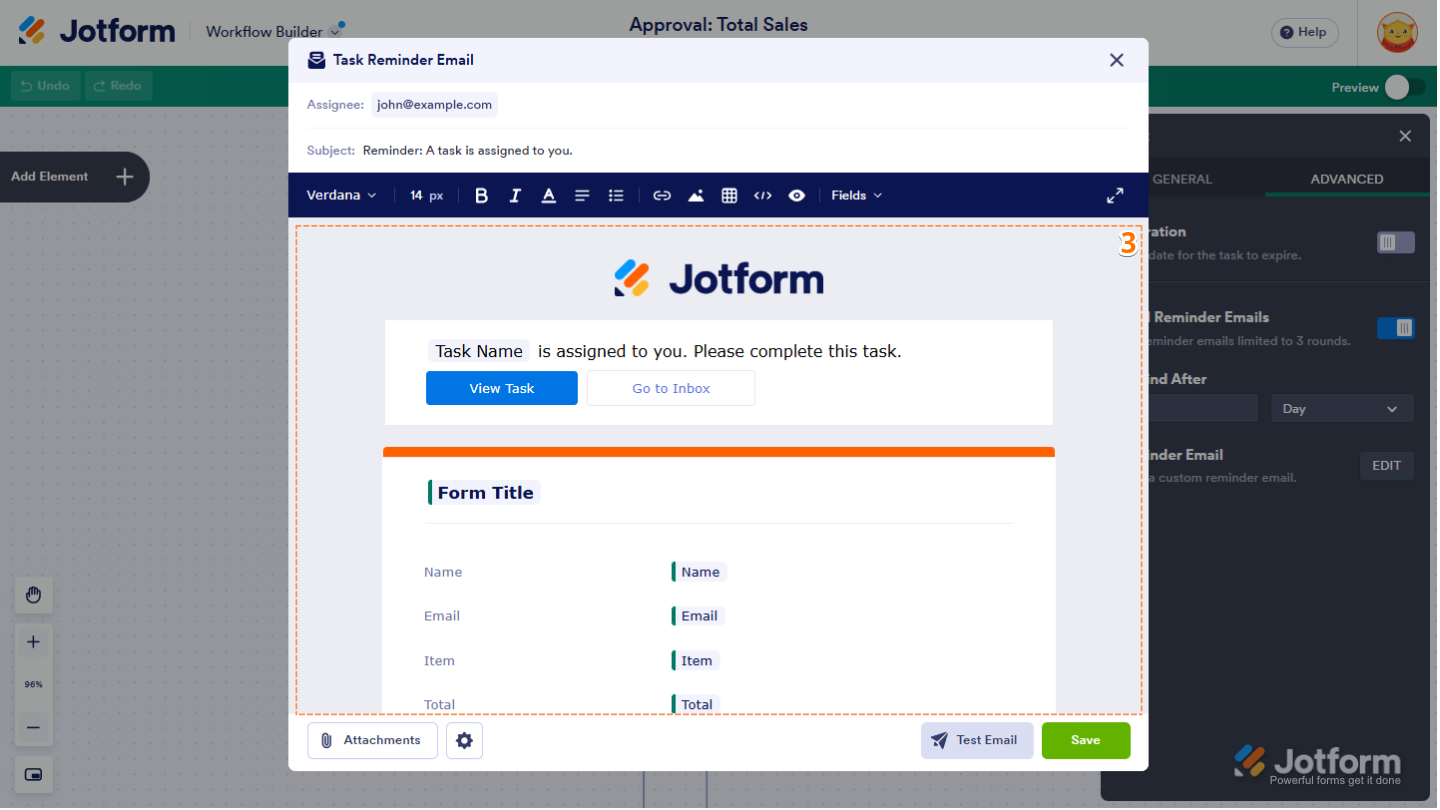
- Next, in the body of the email template, customize the message to your liking.
Notes
- To personalize the email, click Fields in the top toolbar and insert values from your form.
- You can also use the top toolbar to format the text and add images, links, and tables to your reminder email.
- Now, click on Attachments to add files to the reminder email.
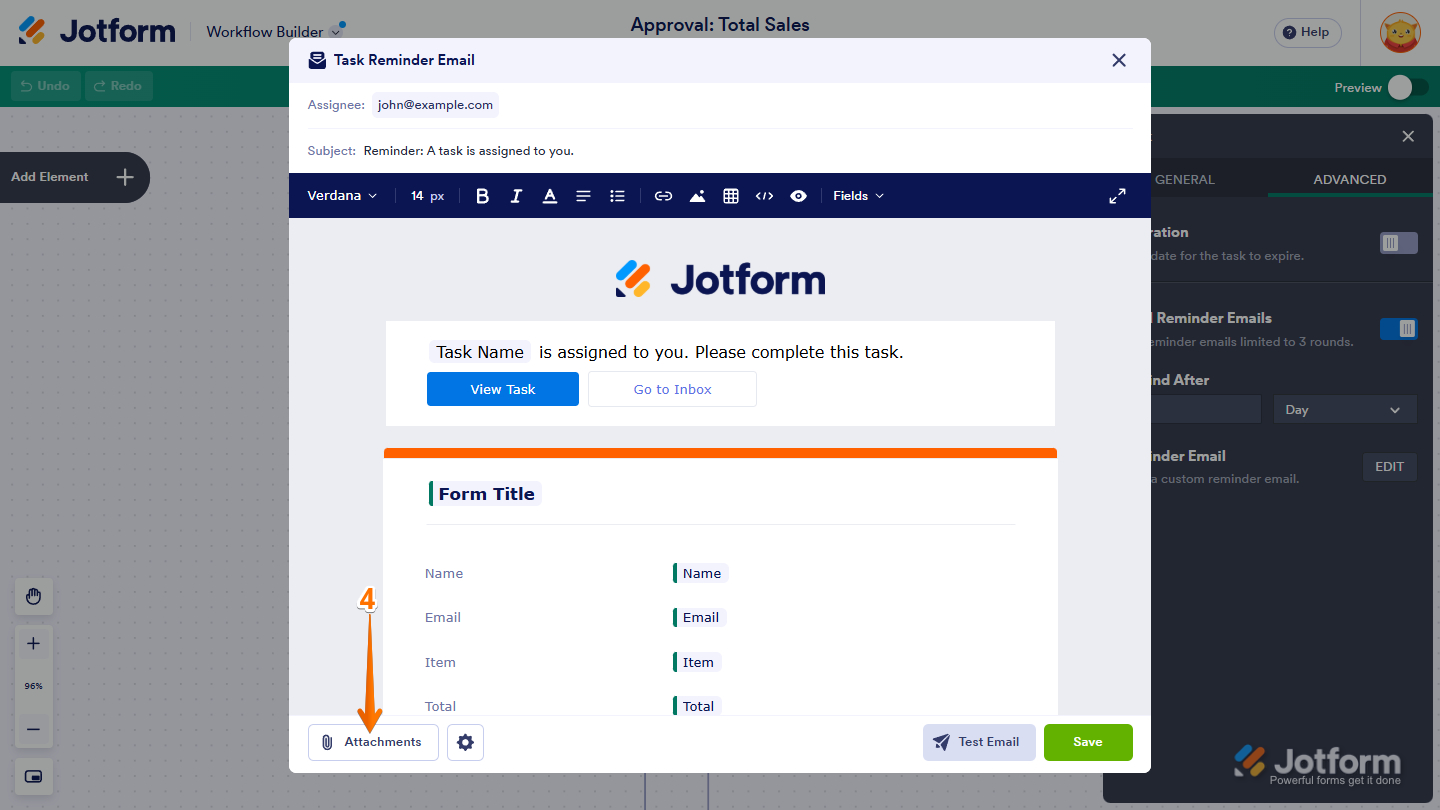
- In the Attachments menu that opens, under the Attach File section, click on the Upload a File box to select your file. You can also drag and drop the file into it.
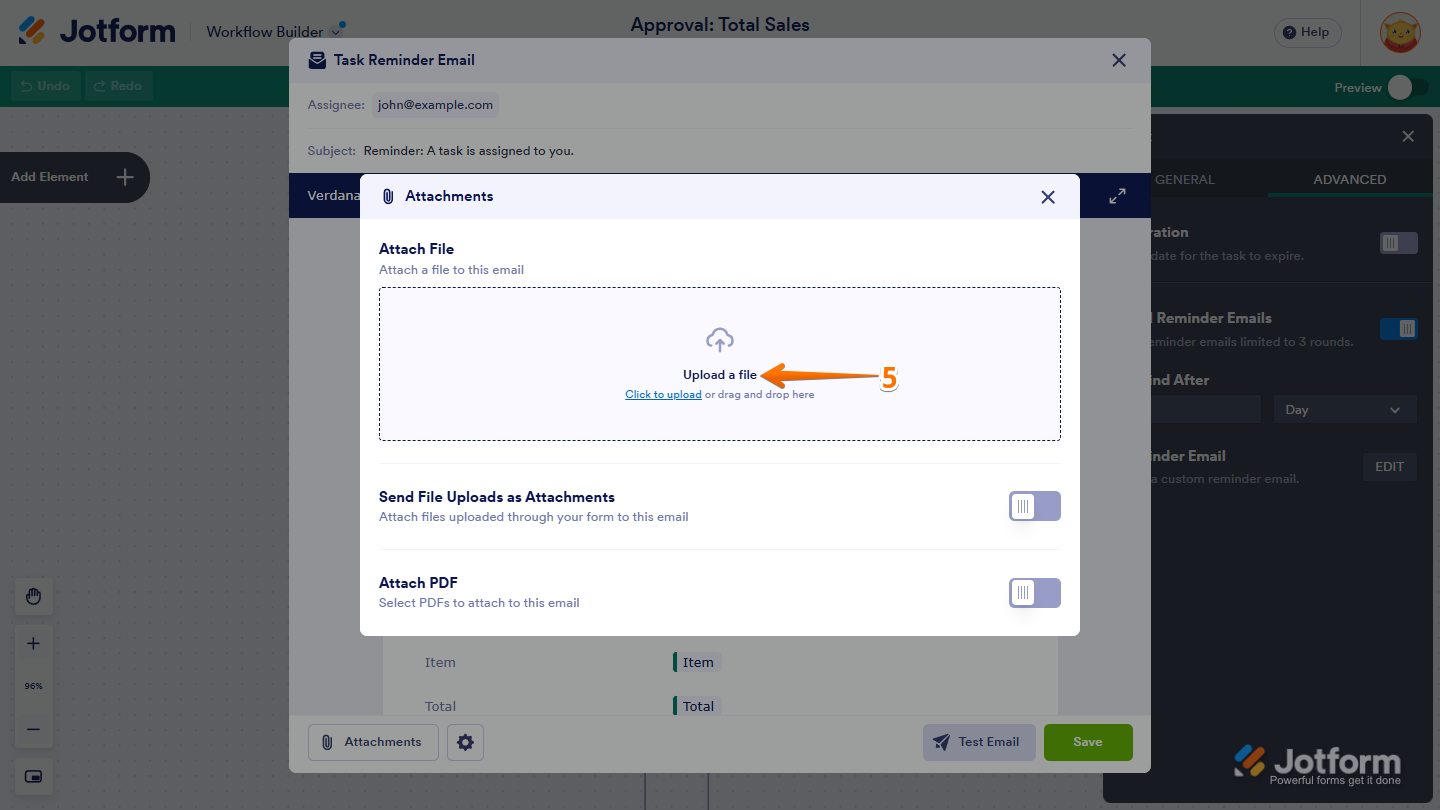
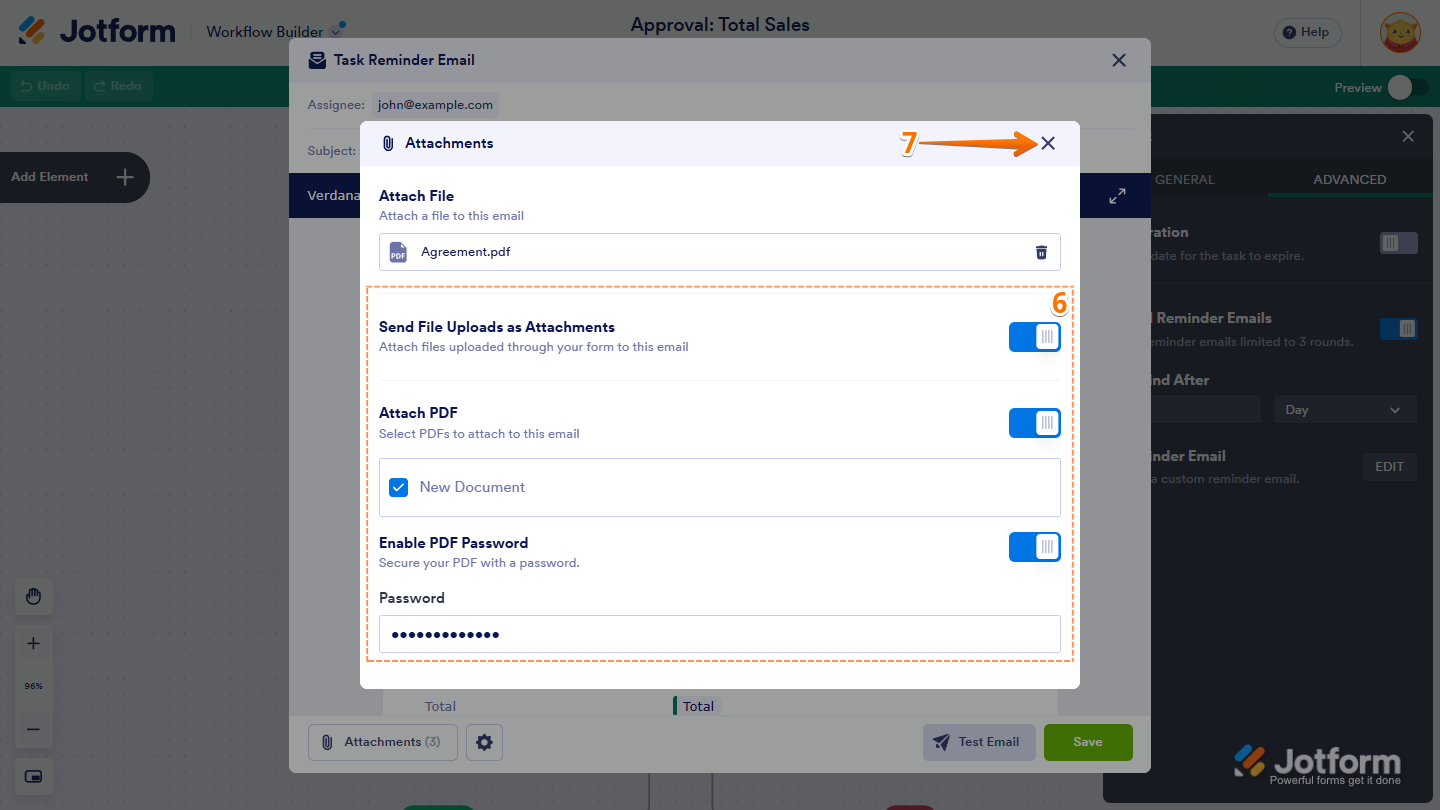
- Next, optionally configure these things:
- Send File Uploads as Attachments — Toggle this on to include files uploaded through your form as attachments in the reminder email.
- Attach PDF — Toggle this on to attach one or more PDFs generated from your form to the reminder email.
- Enable PDF Password — When Attach PDF is enabled, toggle this on to password-protect the attached PDF(s).
- Password — Enter the password recipients will need to open the attached PDF(s).
- Now, click on X at the top-right side of the menu to close it.
- Then, click on the Gear icon to update your Sender Settings.
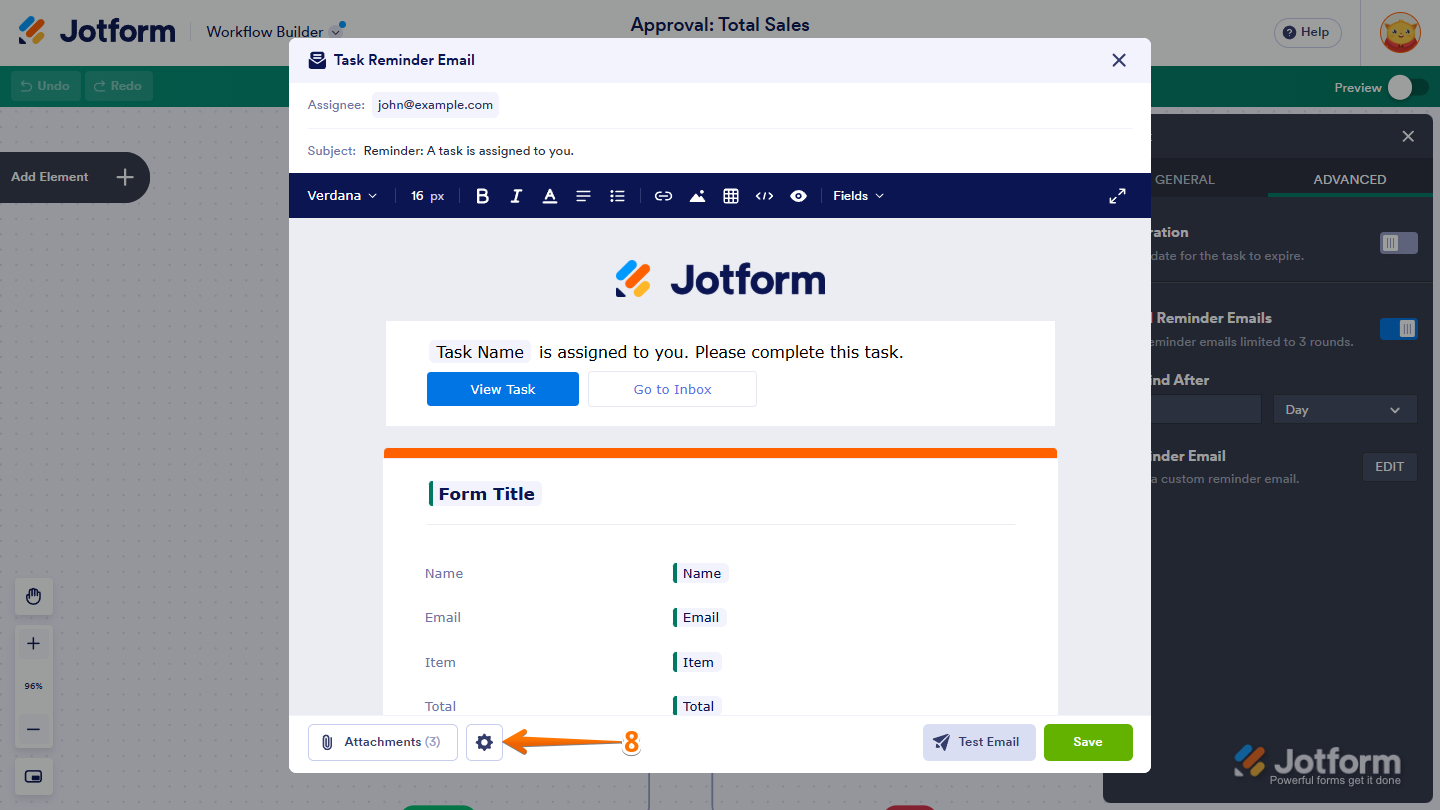
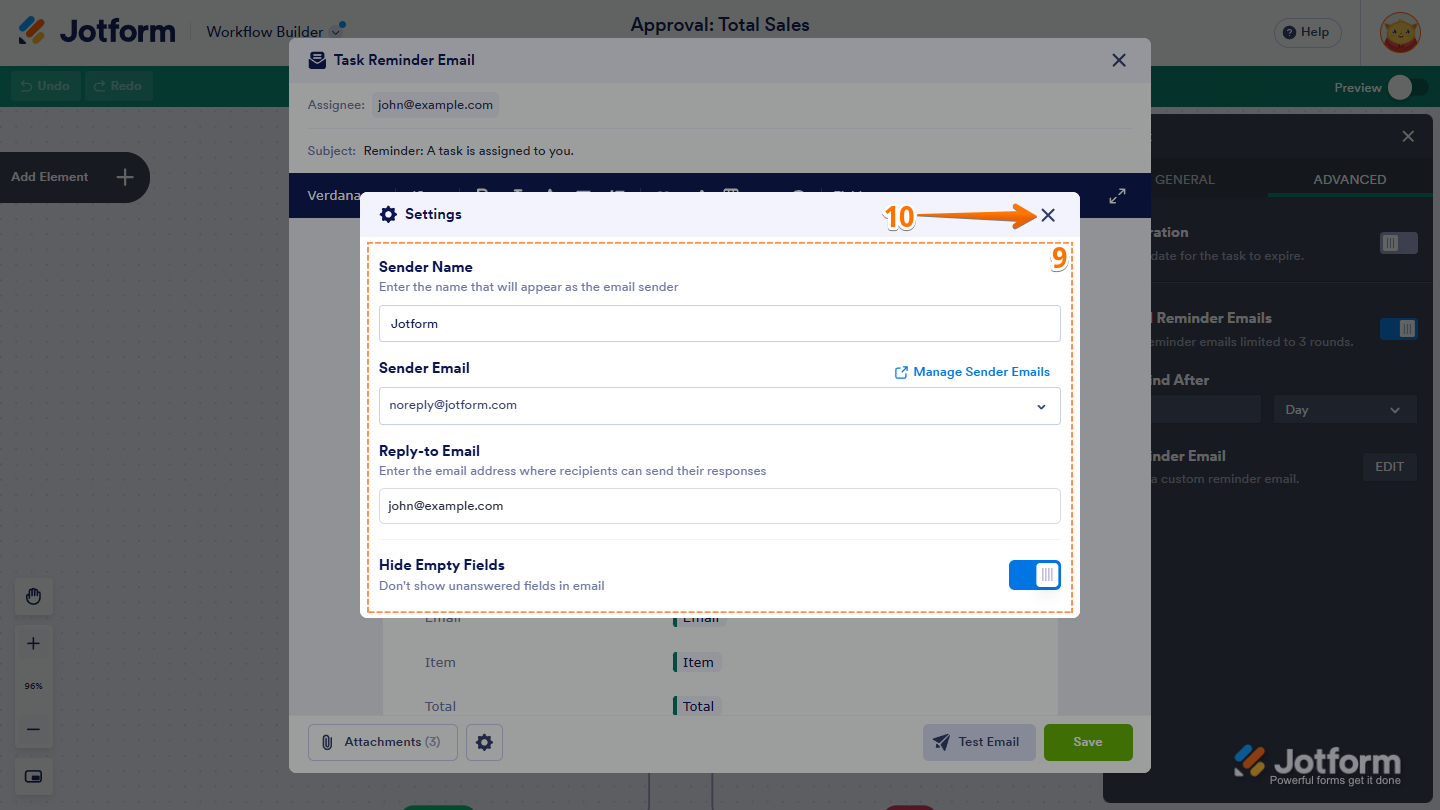
- Next, in the Settings menu that opens, configure these things:
- Sender Name — Enter the name that will appear as the sender of the reminder email.
- Sender Email — Enter the email address that will appear as the sender of the reminder email.
- Reply-to Email — Enter the email address where recipients’ replies to the reminder email will be directed.
- Hide Empty Fields — Toggle this on to automatically hide unanswered form fields in the reminder email.
Pro Tip
You can use a custom sender email address for reminder emails by configuring an SMTP server. Check out our guide on How to Set Up a Custom Sender Email with SMTP to learn more.
- Now, click on X at the top-right side of the menu to close it.
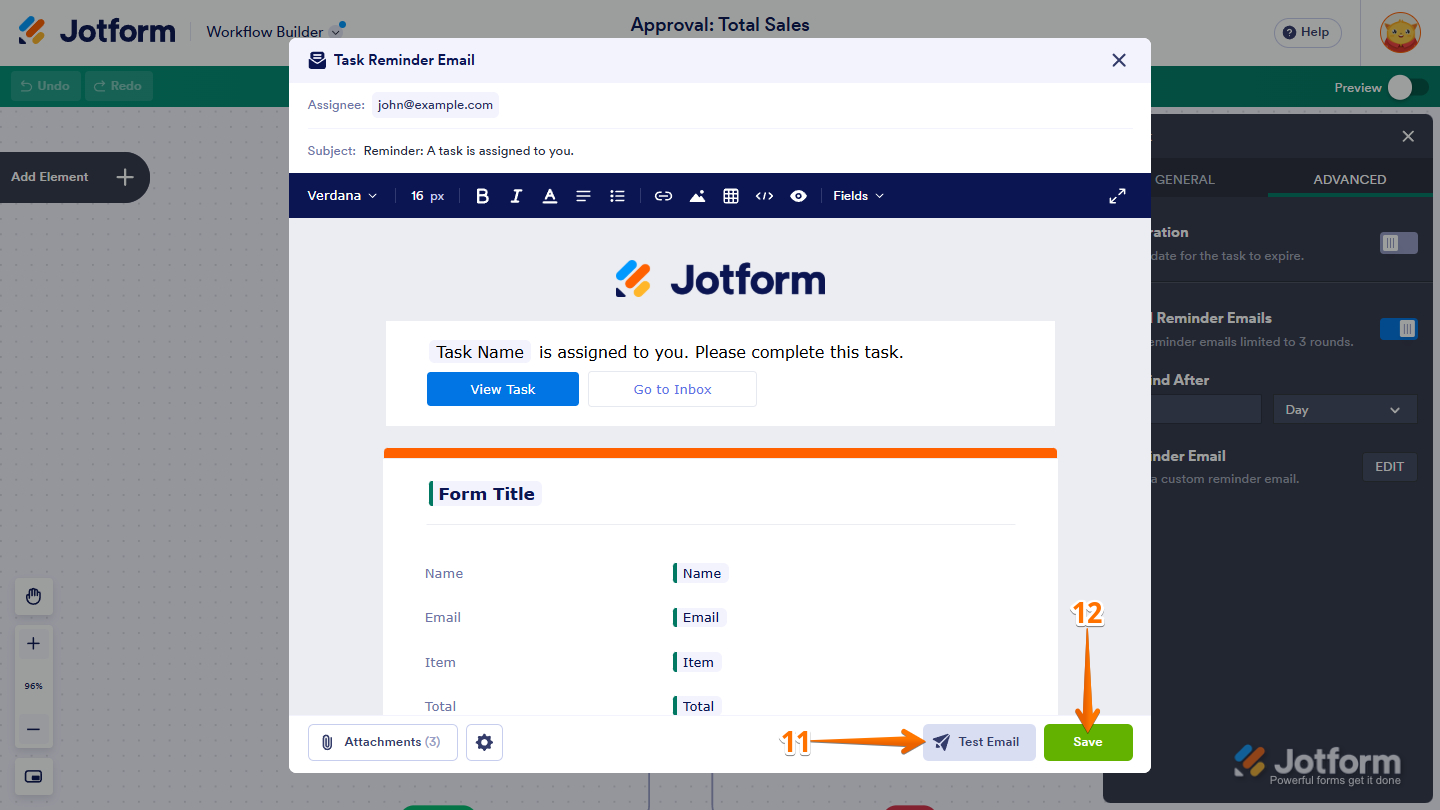
- Once everything’s set, click on Test Email to confirm your settings are working.
- Finally, click on Save to save your Task element settings.
That’s it! You’ve successfully set up reminder emails for your Form and Task elements in Jotform Workflows. Your assignees will now receive automatic reminders, helping them stay on track and ensuring your workflow continues without unnecessary delays.

Send Comment: