With the LinkedIn integration in Jotform Workflows, you can start a workflow automatically whenever someone submits one of your LinkedIn Lead Gen Forms. Since the lead is submitted on LinkedIn, no Jotform form submission is needed. Your workflow then decides what happens next, like saving the lead to Jotform Tables, notifying your team, or sending it to your CRM.
You can choose from four triggers. Sponsored triggers collect leads from your LinkedIn ads, while Organic triggers collect leads from your Company Page, Event, or Organization Product. Each one comes in a Polling or Instant version, depending on how quickly you want the workflow to start.
Note
- Before you start, make sure you have a LinkedIn Company Page and a Lead Gen Form. If you’re setting up sponsored lead triggers, you’ll also need a LinkedIn Campaign Manager ad account linked to that Page.
- Connect a LinkedIn account with at least Viewer access to the ad account and either a Lead Gen Forms Manager or Super Admin role on the Page.
Setting the Start Point to LinkedIn
To start a workflow with a LinkedIn lead, you’ll first need to create a workflow and choose LinkedIn as its Start Point. Here’s how to do it:
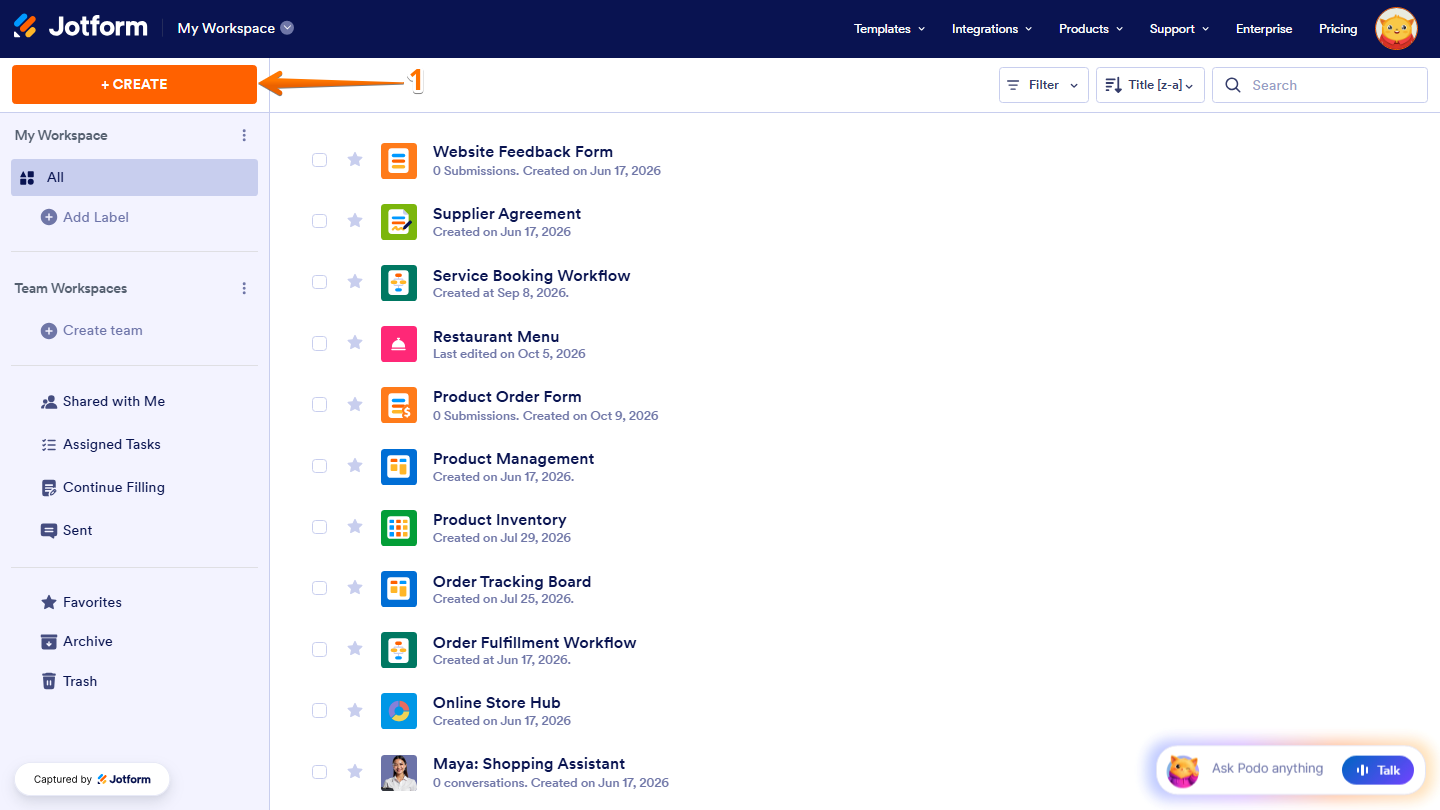
- On the top-left side of your Workspace page, click on Create.
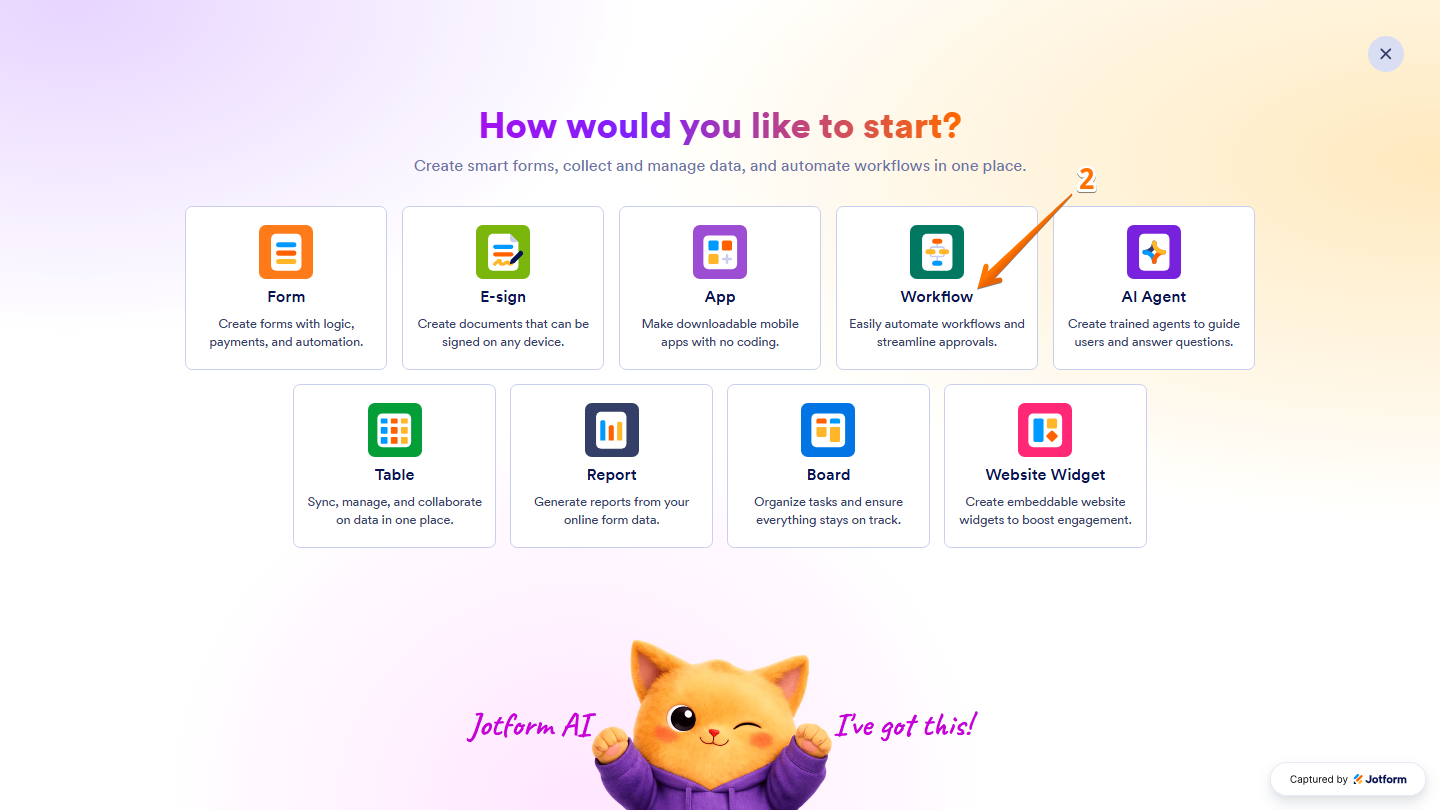
- Then, in the menu that opens up, select Workflow.
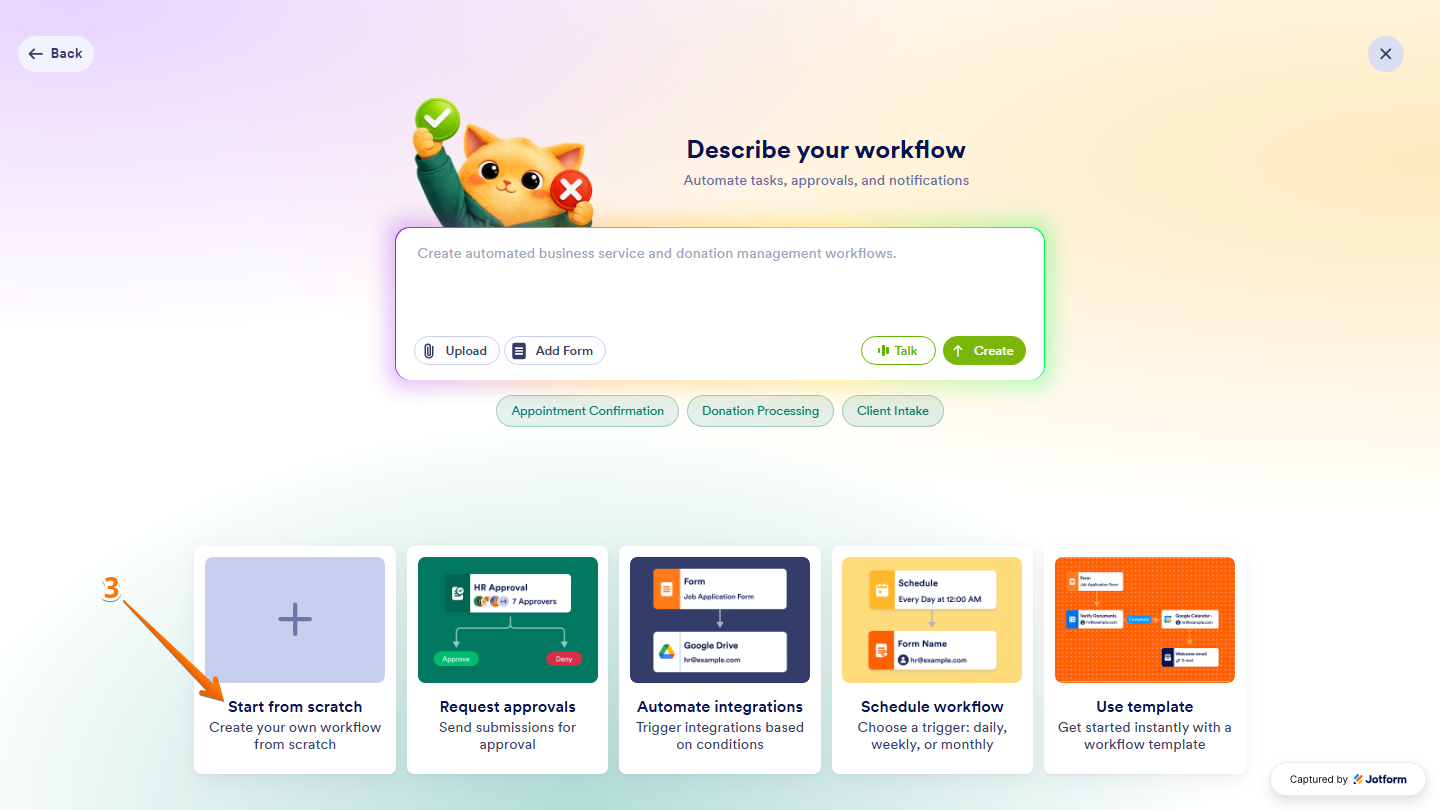
- Next, click on Start from Scratch.
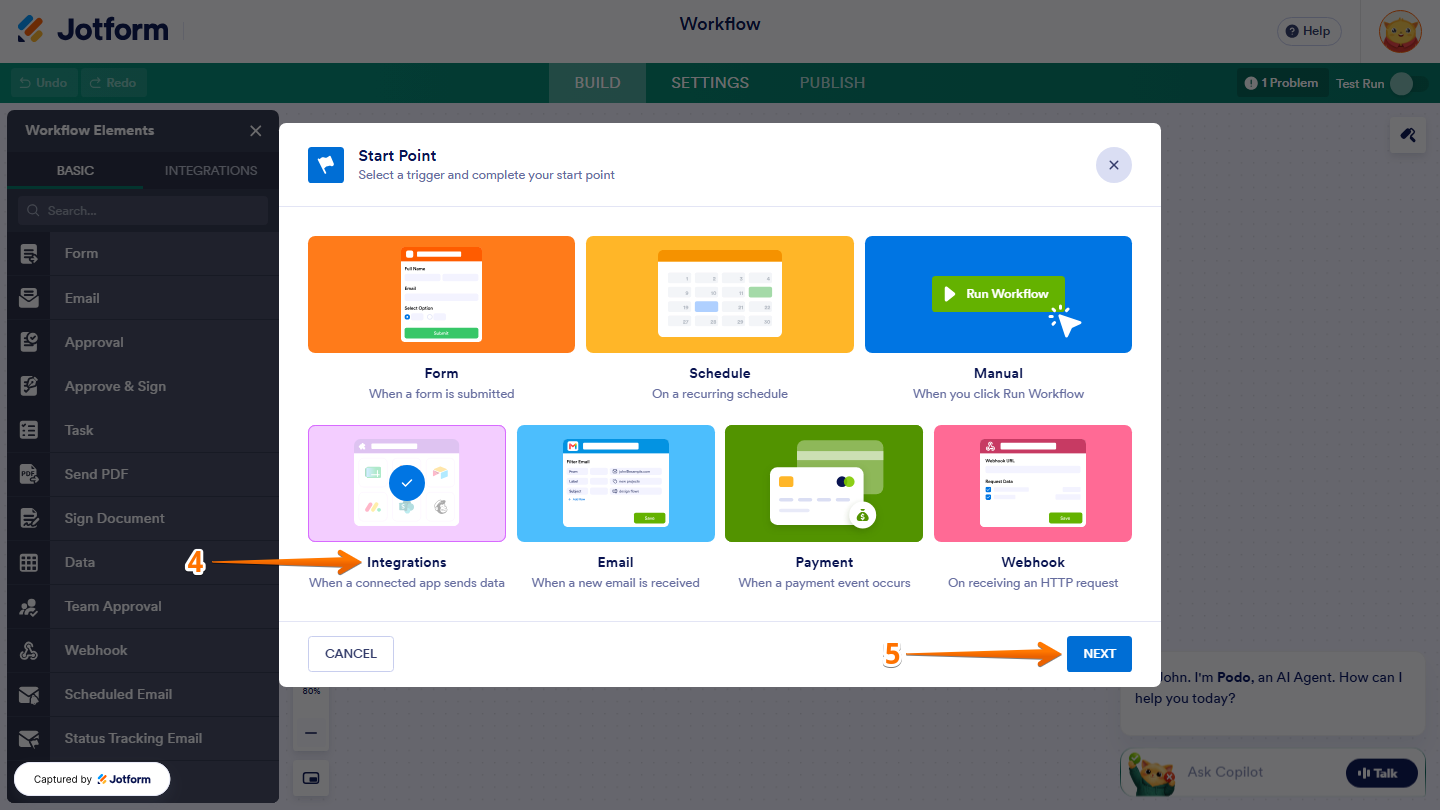
- Now, in the Start Point window that opens, select Integrations.
- Then, click on Next at the bottom of the window.
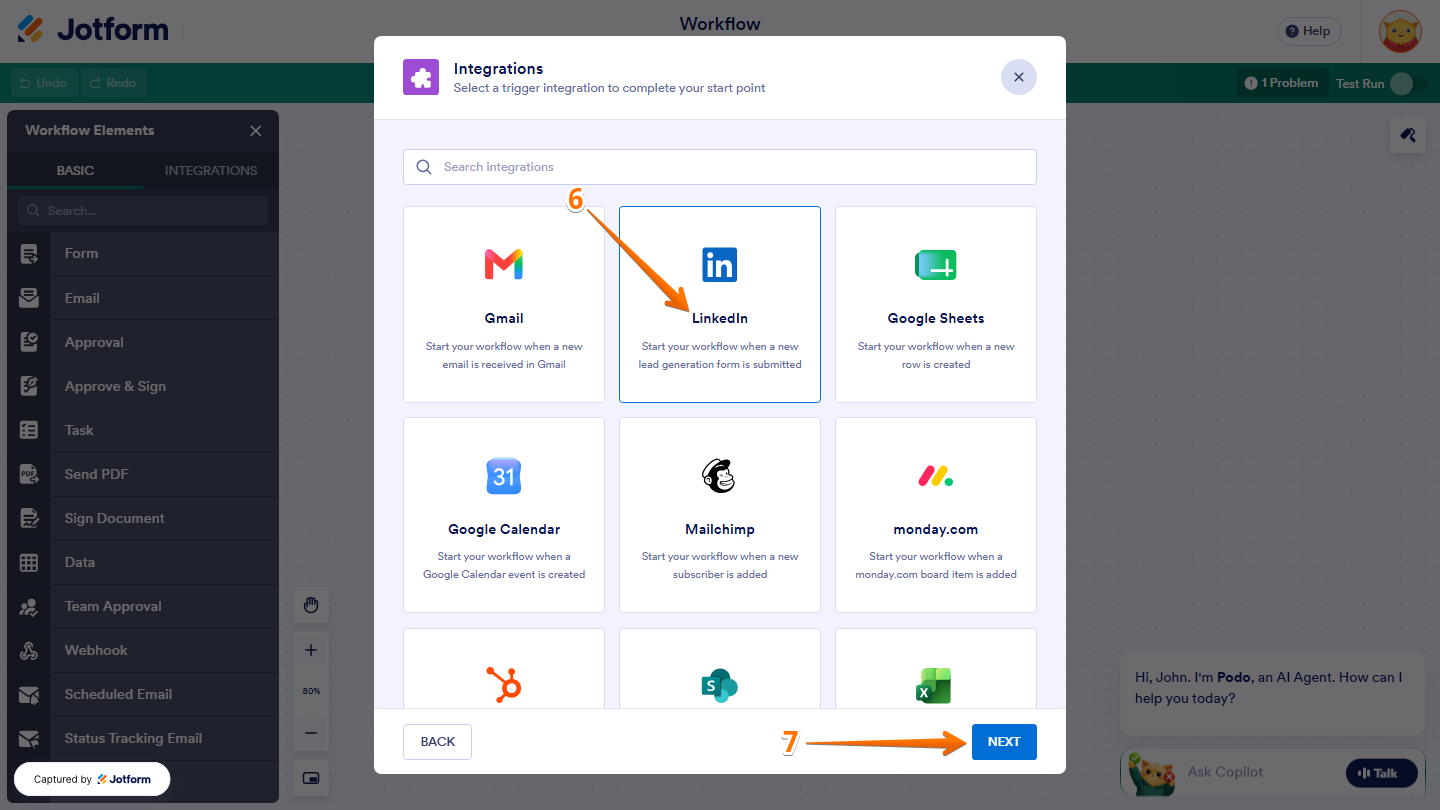
- Next, in the Integrations window, select LinkedIn.
- Then, click on Next to continue.
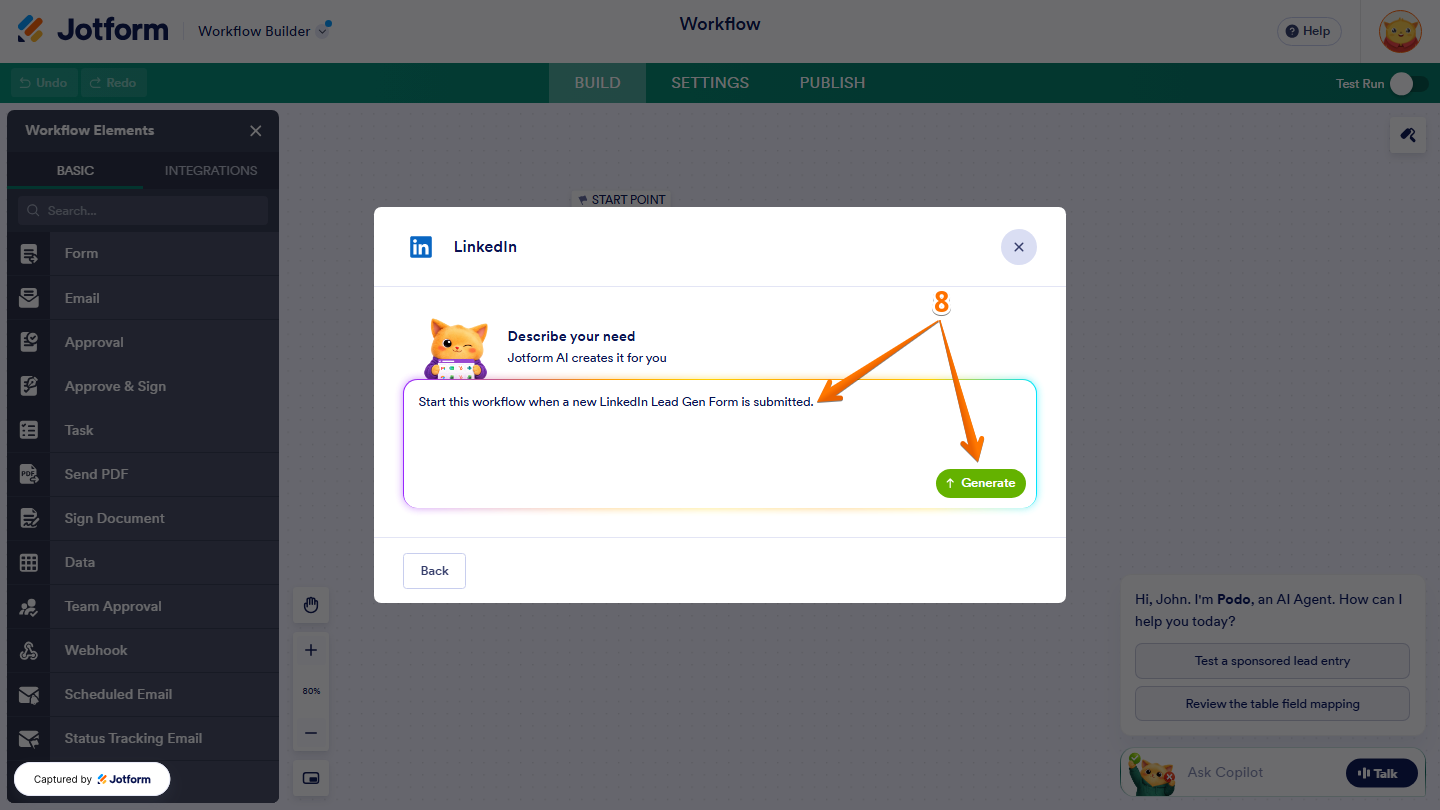
- Next, in the Describe Your Need window that opens, enter what you want the workflow to do. For example, “Start this workflow when a new LinkedIn Lead Gen Form is submitted”, and click on Generate.
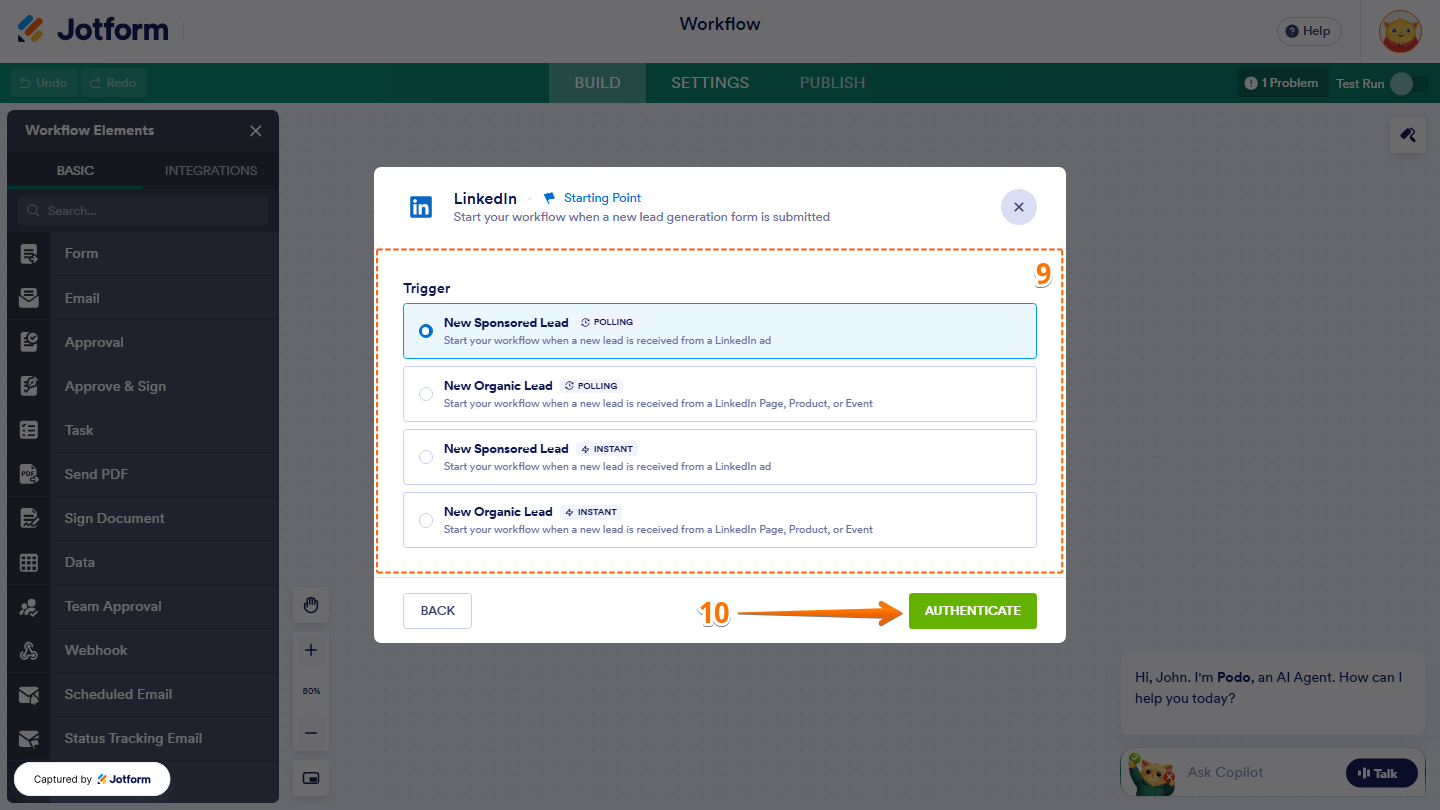
- Then, in the LinkedIn Starting Point window, select one of the following triggers. Check both the lead source and the Polling or Instantbadge before you continue:
- New Sponsored Lead (Polling) — Check for new leads from your LinkedIn ads every 10 minutes.
- New Sponsored Lead (Instant) — Start your workflow as soon as LinkedIn sends a new lead from your ads.
- New Organic Lead (Polling) — Check for new Company Page, Event, or Organization Product leads every 10 minutes.
- New Organic Lead (Instant) — Start your workflow as soon as LinkedIn sends a new Company Page, Event, or Organization Product lead.
- Now, click on Authenticate and log in to your LinkedIn account.
Next, set up the lead source by following the section below that matches your trigger.
Setting Up a Sponsored Lead Trigger
Both New Sponsored Lead triggers use the same settings, whether you choose Polling or Instant. Here’s how to set them up:
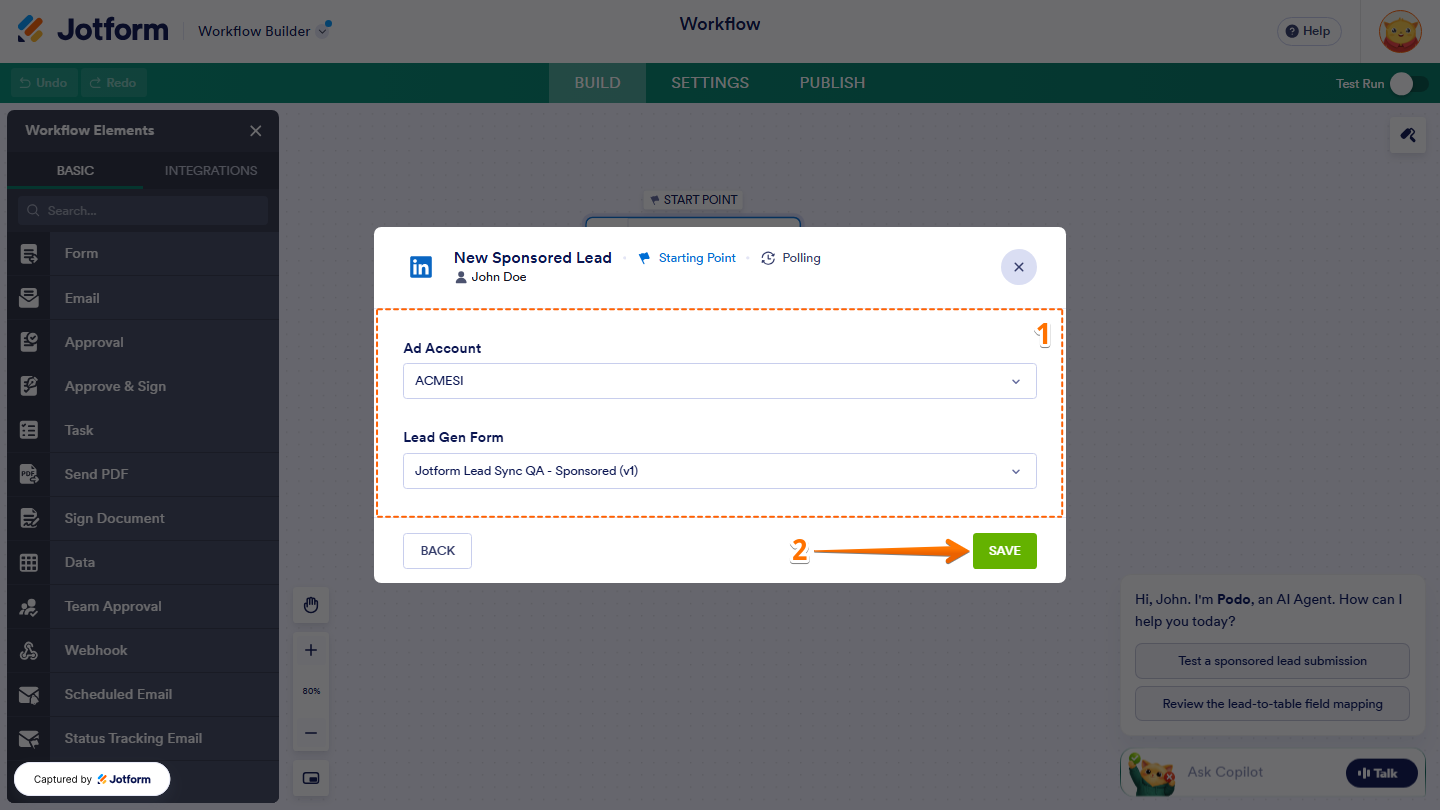
- After authenticating your account, in the New Sponsored Lead window, set up these things:
- Ad Account — Click on the Downward Arrow icon and select the ad account that owns your Lead Gen Form.
- Lead Gen Form — Click on the Downward Arrow icon and select your form. Make sure to choose the right version, such as (v1).
- Once you’re done, click on Save.
That’s it! Your workflow will now start whenever a new lead comes in through the selected sponsored Lead Gen Form.
Note
Each sponsored trigger connects to one ad account and one form. If you want another lead source to start its own workflow, create a separate workflow for it.
Setting Up an Organic Lead Trigger
Both New Organic Lead triggers also use the same settings for Polling and Instant. Let’s set it up:
- After authenticating your account, in the New Organic Lead window, set up these things:
- Lead Type — Click on the Downward Arrow icon and select Company Page, Event, or Organization Product.
- Company Page — Click on the Downward Arrow icon and select the organization that owns the form. This field keeps the Company Page label even if you select Event or Organization Product.
- Lead Gen Form — Click on the Downward Arrow icon and select your form. Make sure to choose the right version, such as (v1).
- Once everything’s set, click on Save.
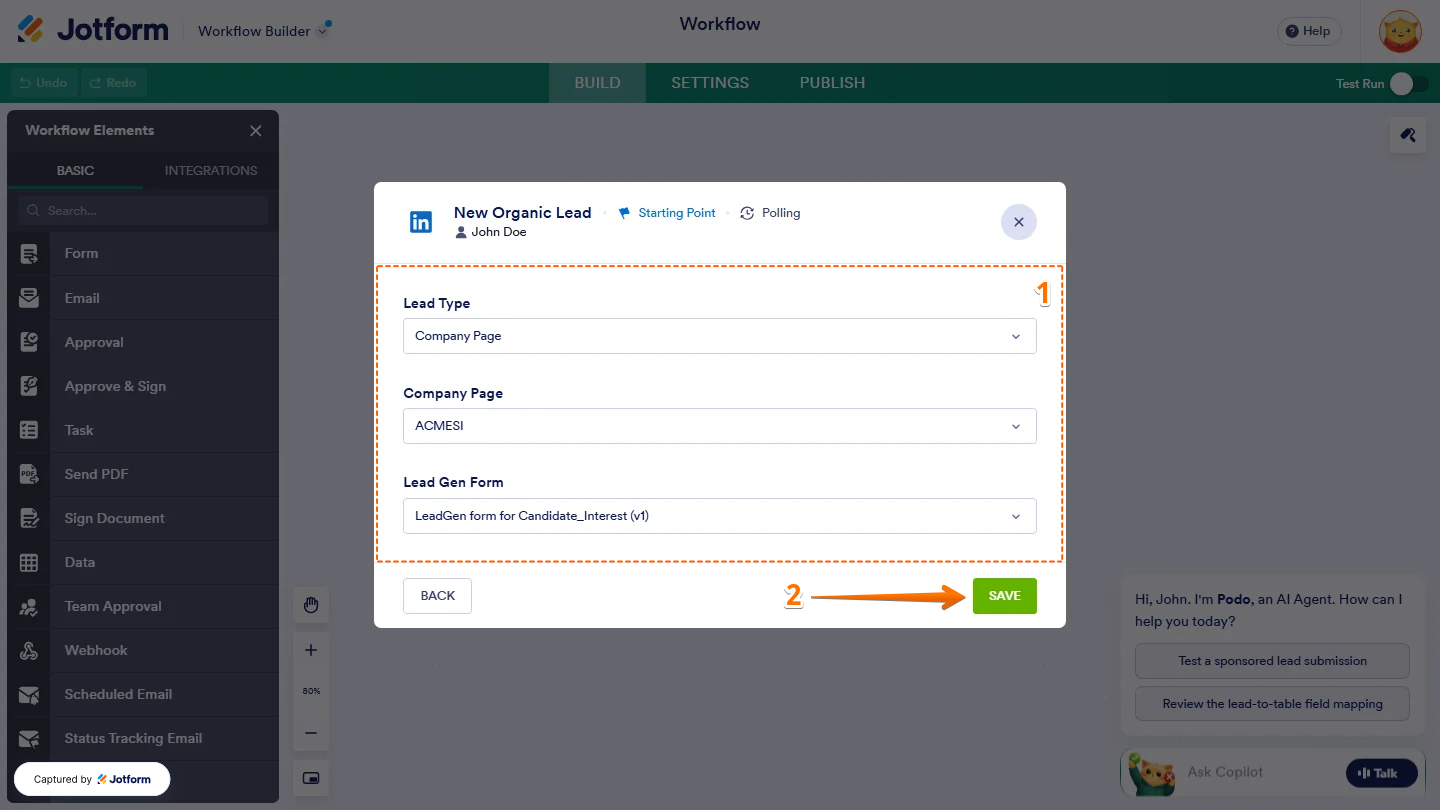
You’re all set! Your workflow will now start whenever a new lead is submitted through the selected organic Lead Gen Form.
Saving LinkedIn Leads to Jotform Tables
Each LinkedIn lead brings details like the Lead ID, submission details, and form answers into your workflow, so you can use them in the steps that follow. For example, you can save every new lead to a new table in Jotform Tables. Here’s how to do it:
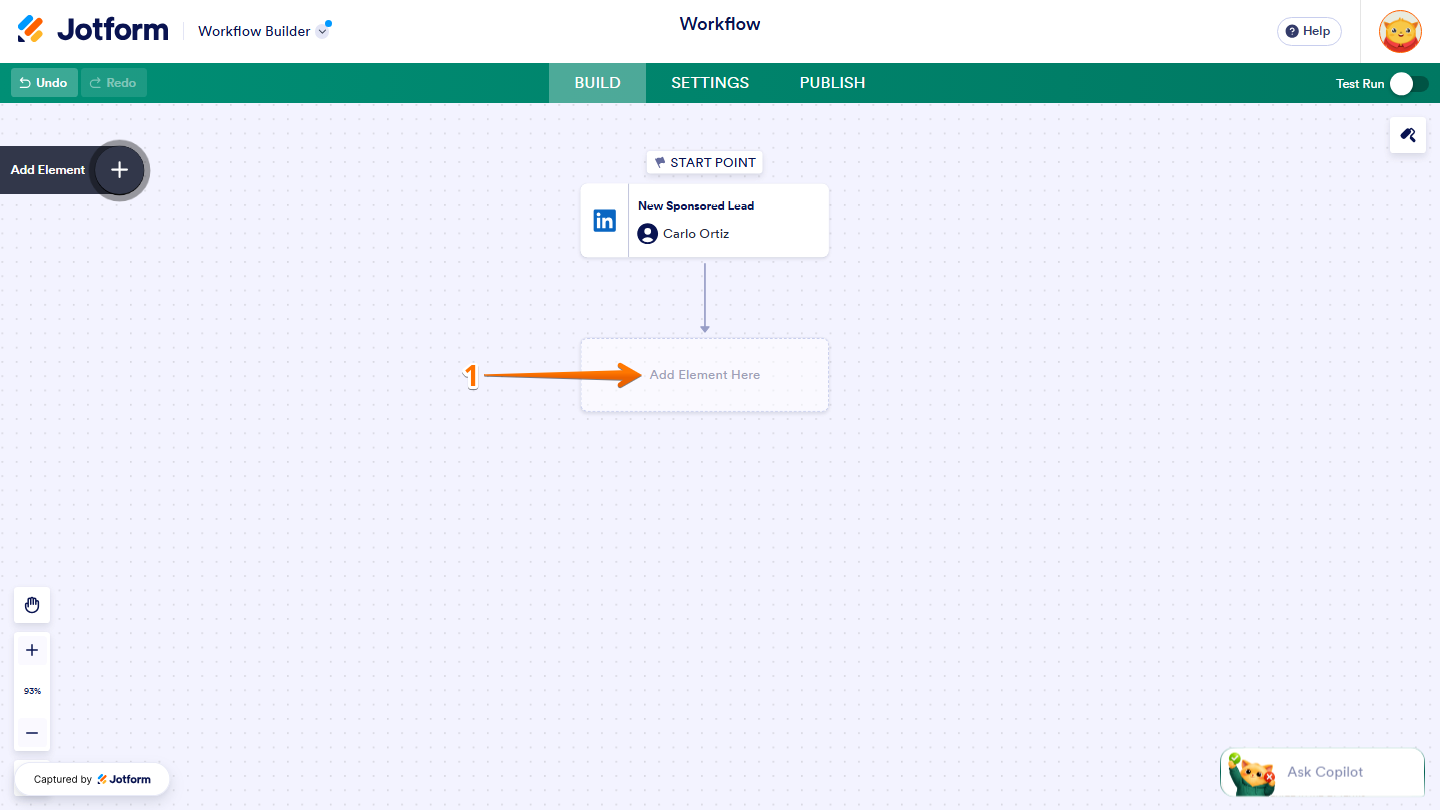
- In Workflow Builder, click on Add Element Here below the LinkedIn Start Point.
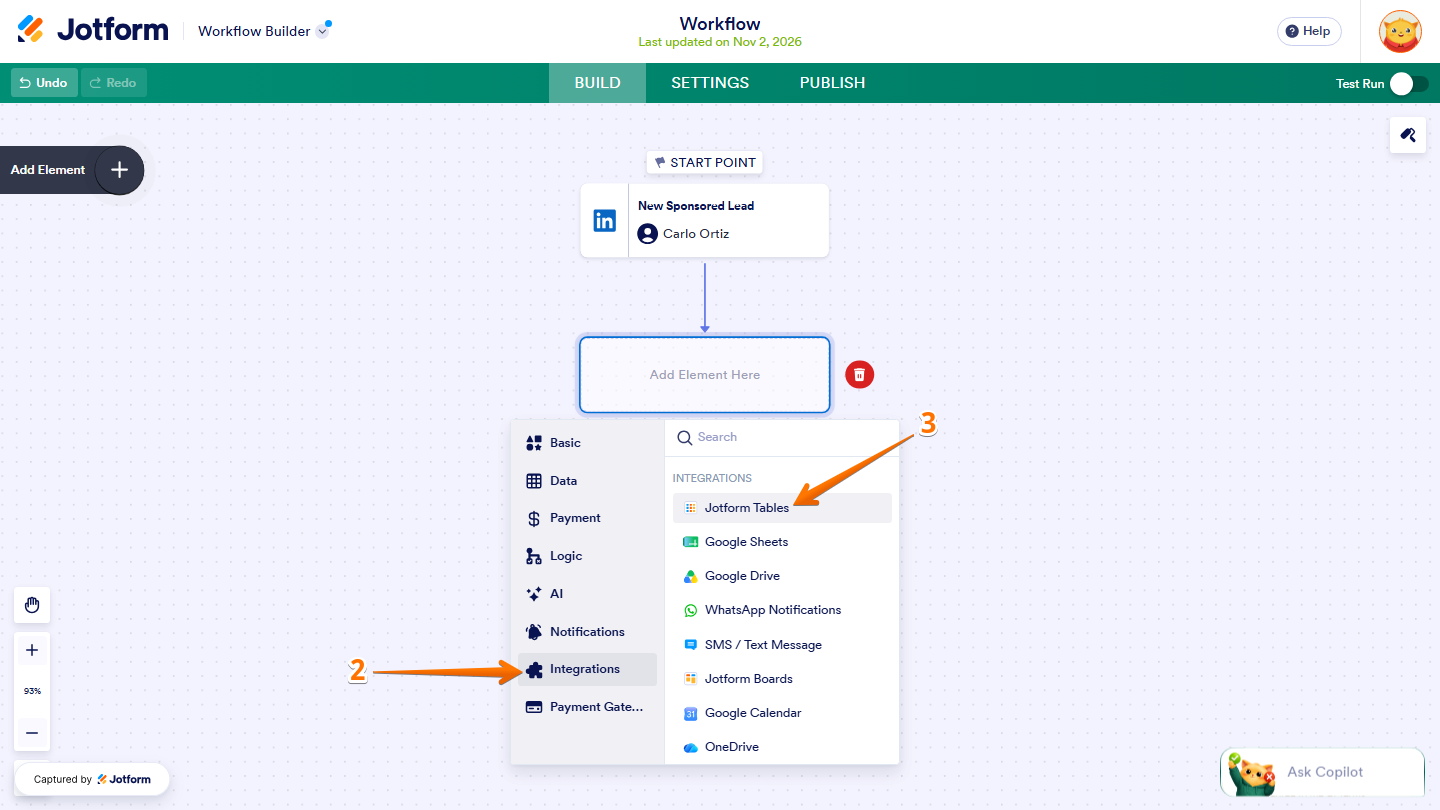
- Now, in the menu that opens, hover your mouse over the left side of the menu and click on Integrations.
- Then, select Jotform Tables from the list.
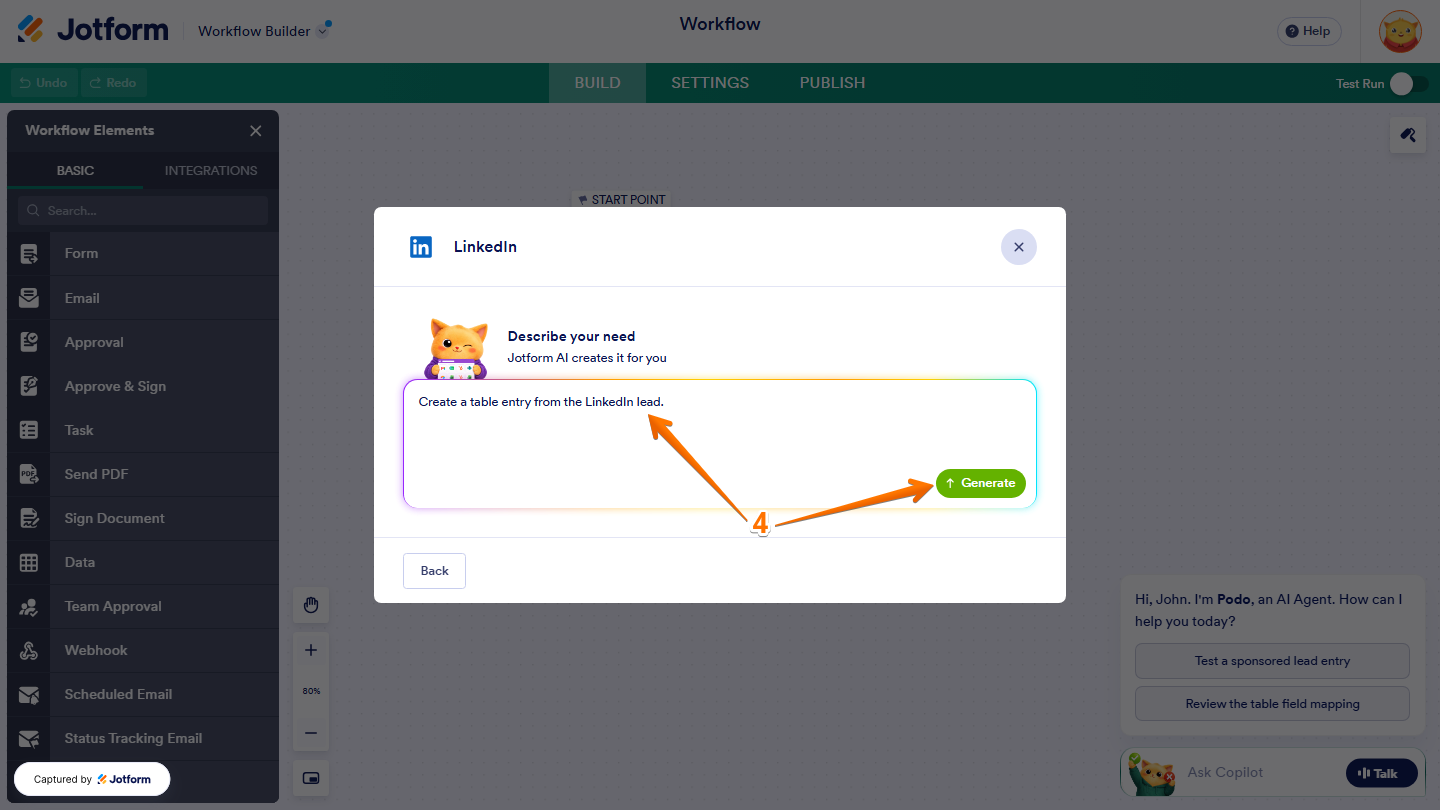
- Next, in the Jotform Tables window that opens, describe what the step should do. For example: “Create a table entry from the LinkedIn lead”, and click on Generate.
- Then, under Action, select Create Entry, and then click on Next.
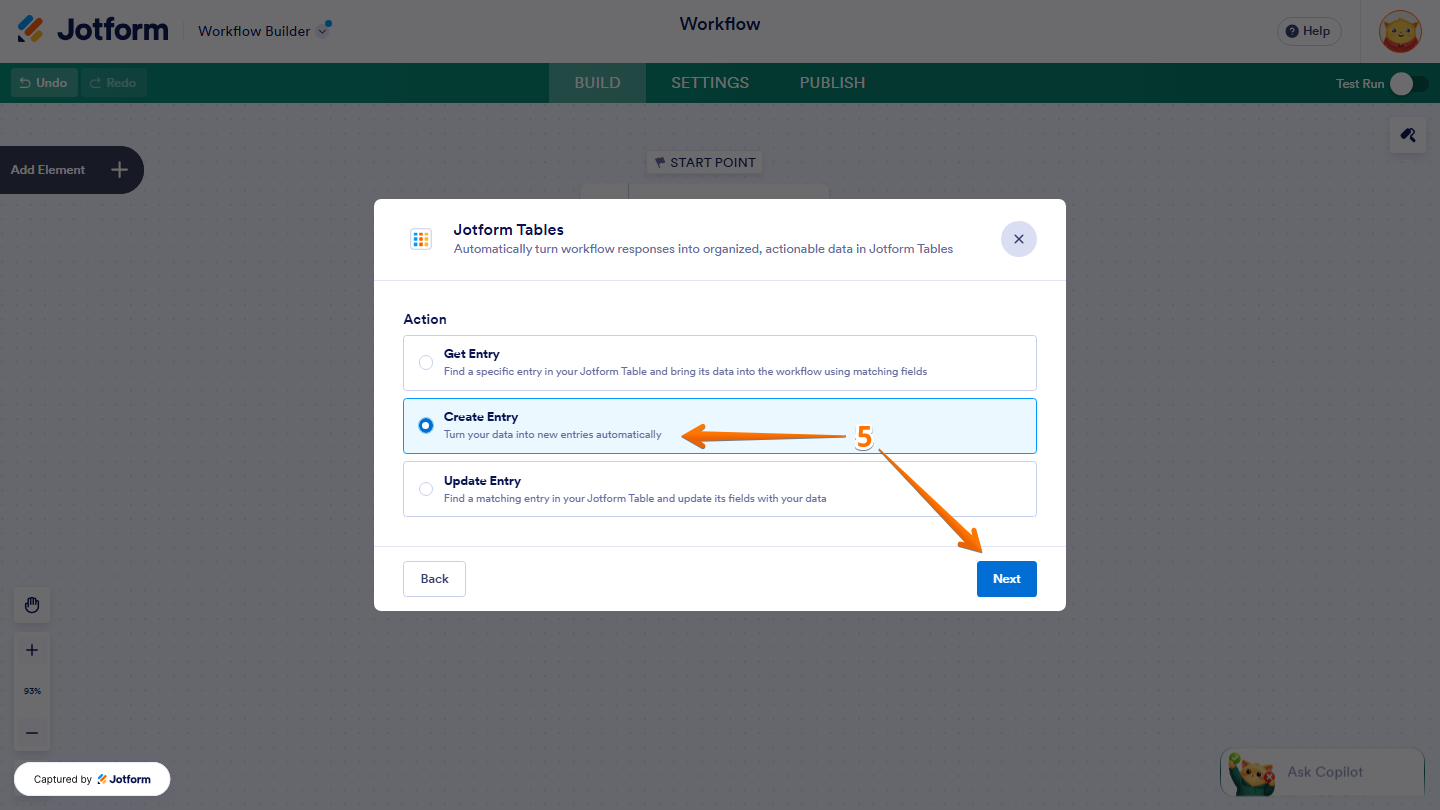
- Now, under the Table section, click on Select a Table.
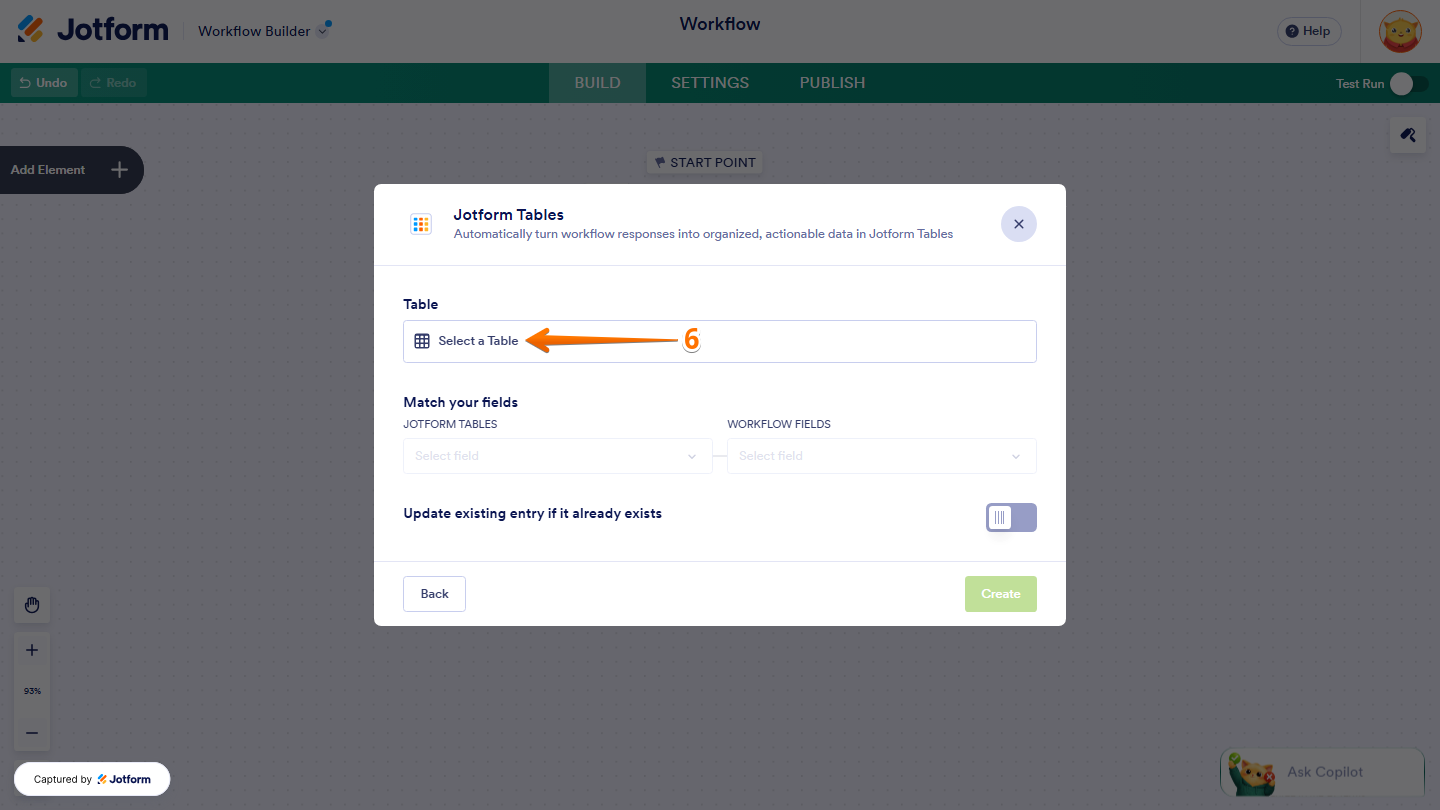
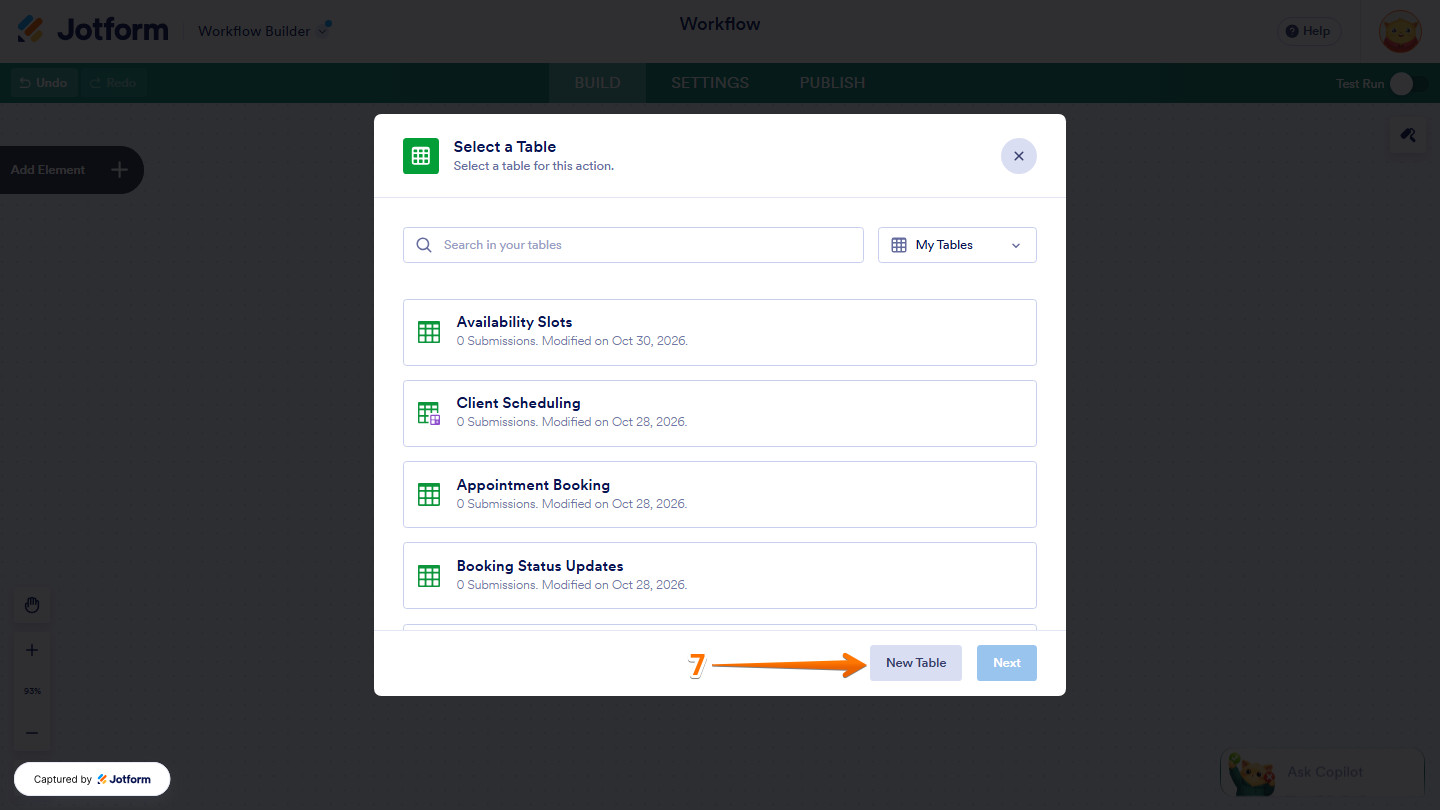
- Then, in the Select a Table window that opens, click on New Table at the bottom.
Pro Tip
If you’d rather use an existing table, select it from the list and click on Next instead.
- Next, in the Columns section, click on the Downward Arrow icon on the right side of your trigger’s name, such as New Sponsored Lead. All fields are selected by default, so untick any fields you don’t want to include in your table.
- Once you’re done, click on Create.
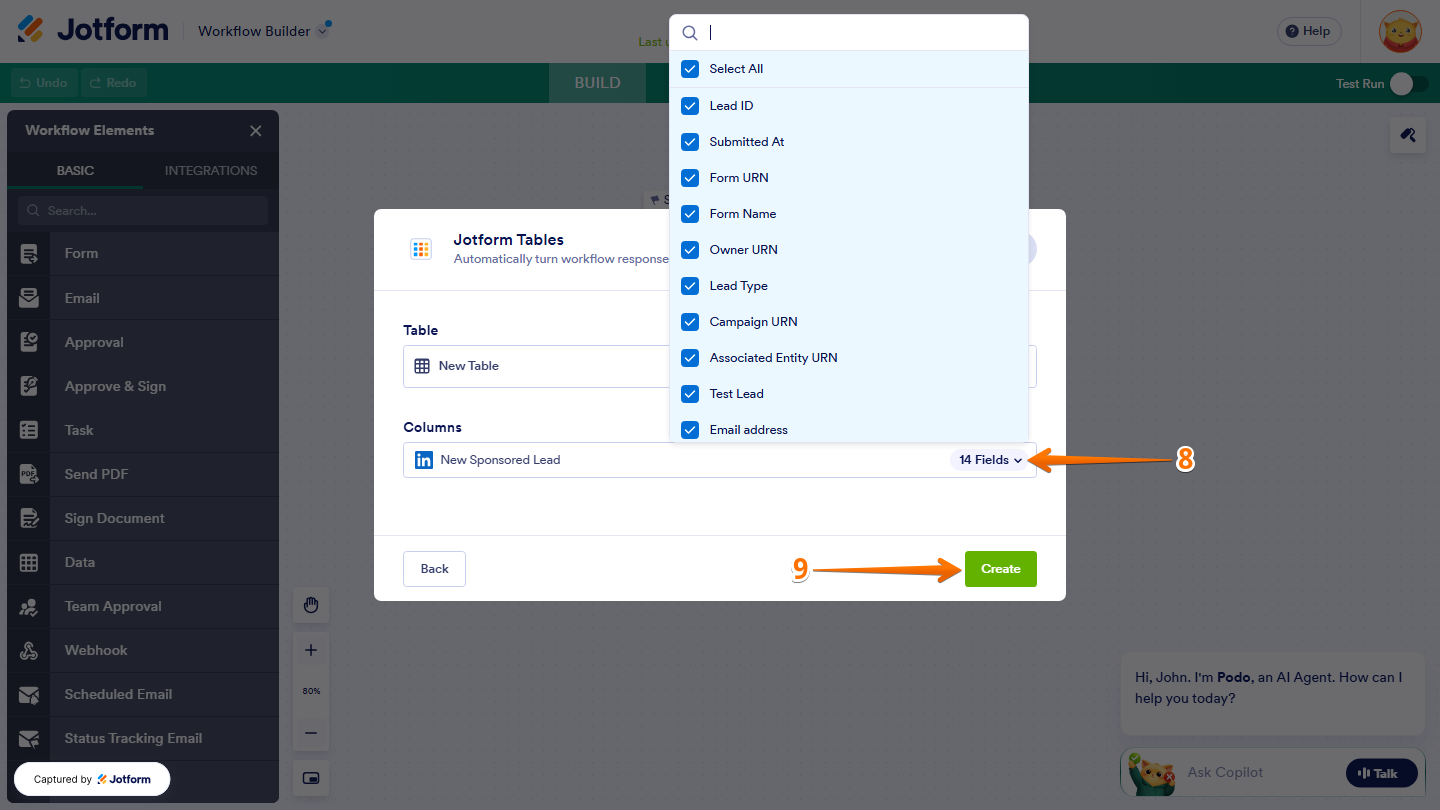
Your table is ready to go! Every new LinkedIn lead will now be saved as a new entry in your Jotform Table.
Note
The fields you can use depend on your lead form, and a field may be empty if the lead didn’t fill it in. If you plan to set up a Polling fallback, keep this table handy, since the fallback workflow uses it to check for leads that are already saved.
Testing Your Workflow
Before using your workflow to follow up with real leads, it’s a good idea to test it. Here’s a quick how-to:
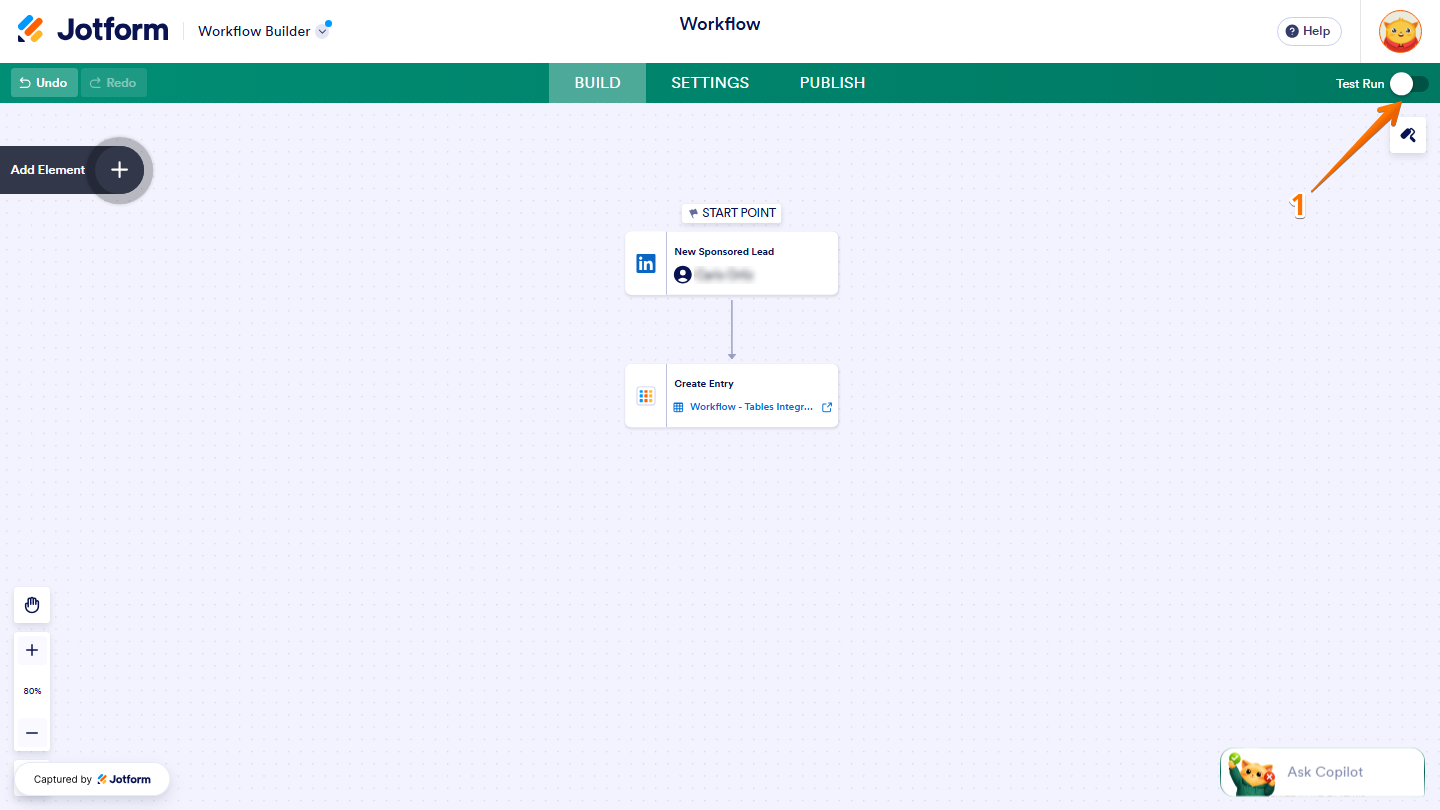
- In Workflow Builder, make sure your LinkedIn trigger settings are complete, and fix any issues that are shown, then in the top-right corner toggle on Test Run.
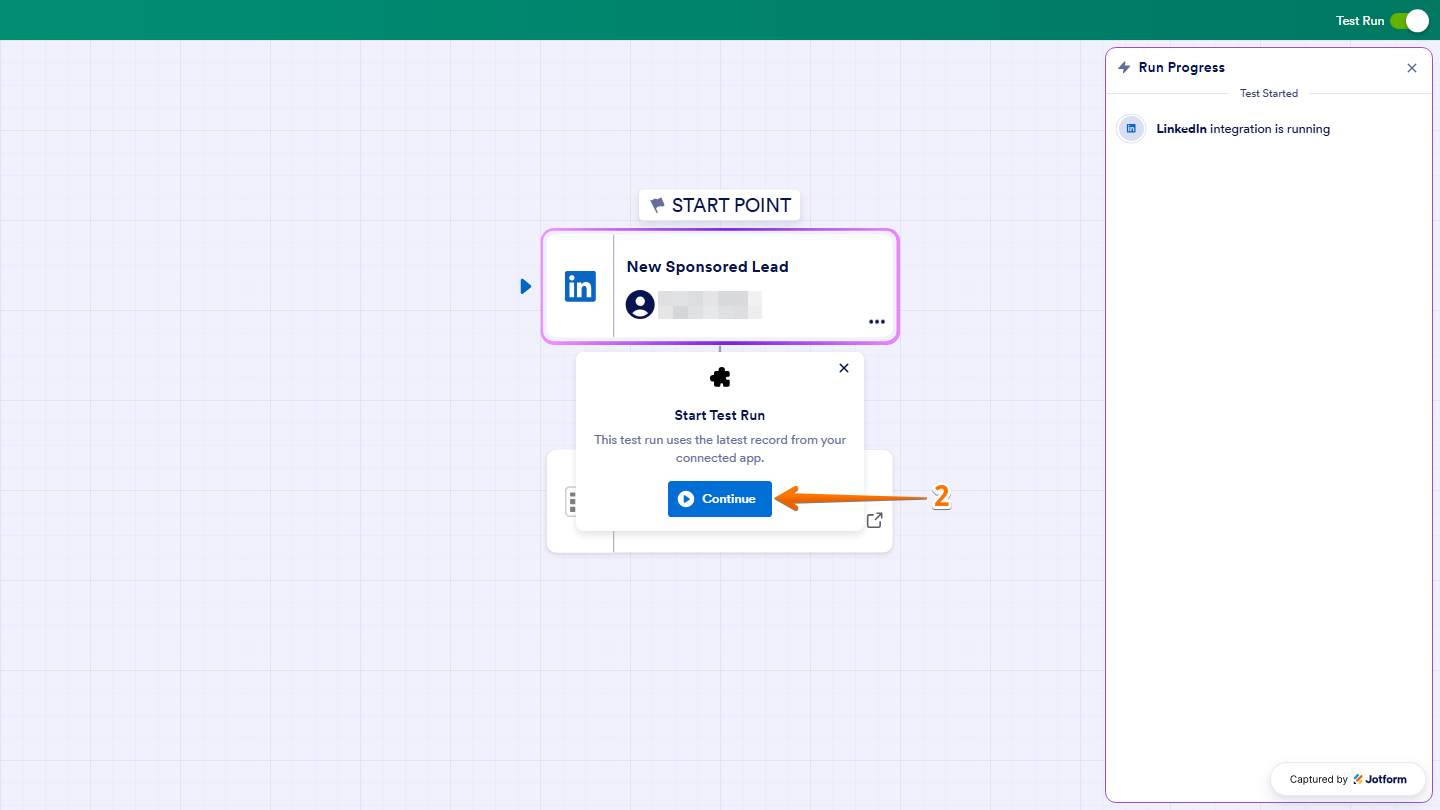
- Next, in the Start Test Run window that opens, click on Continue to run the test with the latest record from your connected LinkedIn account.
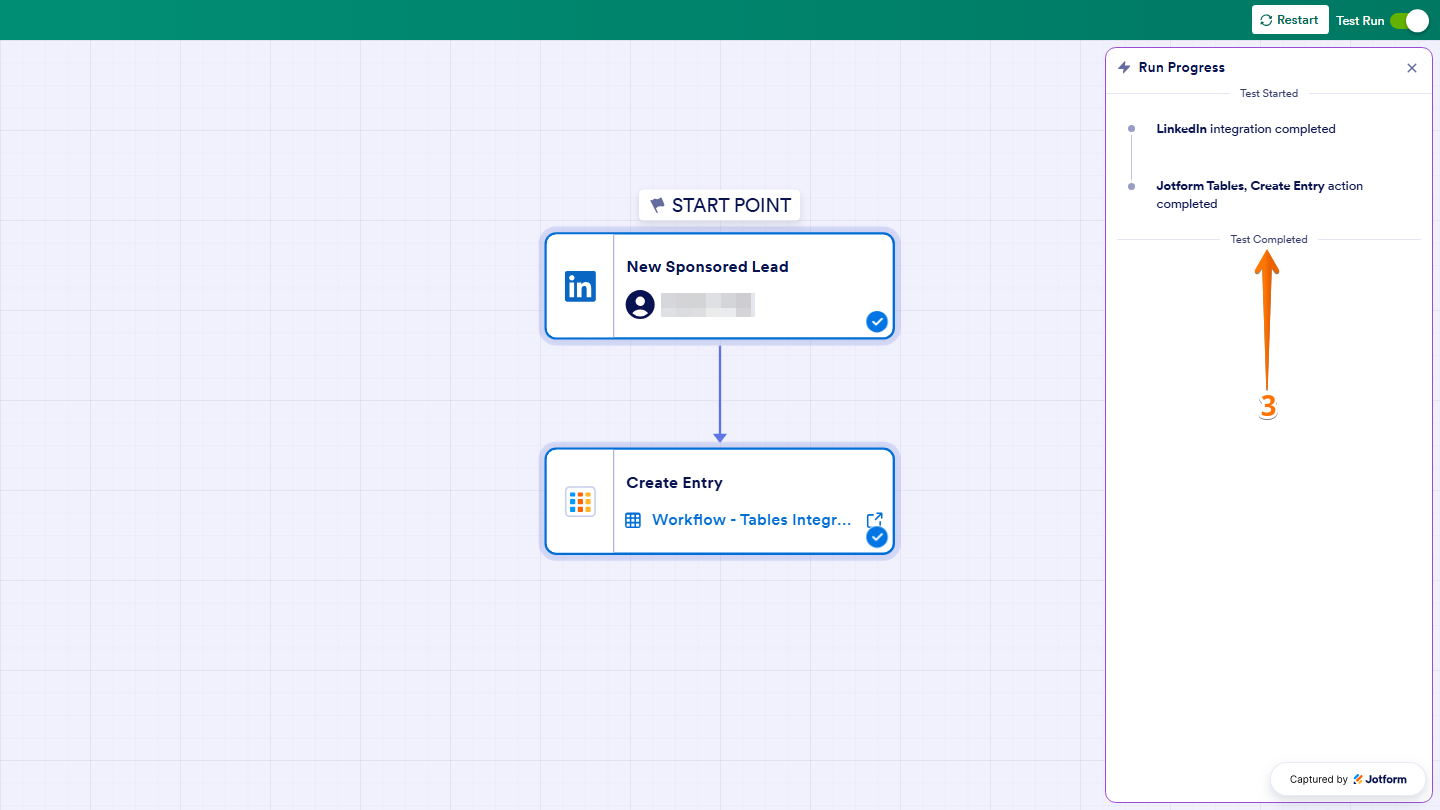
- Now, in the Run Progress window on the right, check for the LinkedIn integration result and the Test Completed status.
Note
Test Run may use a lead you already received. To make sure new leads start your workflow, send a new test lead from LinkedIn. Check out the Sending a Test Lead from the LinkedIn section below to learn how.
Sending a Test Lead from LinkedIn
For sponsored Lead Gen Forms, you can send a test lead from LinkedIn Campaign Manager without launching an ad. Let’s do it:
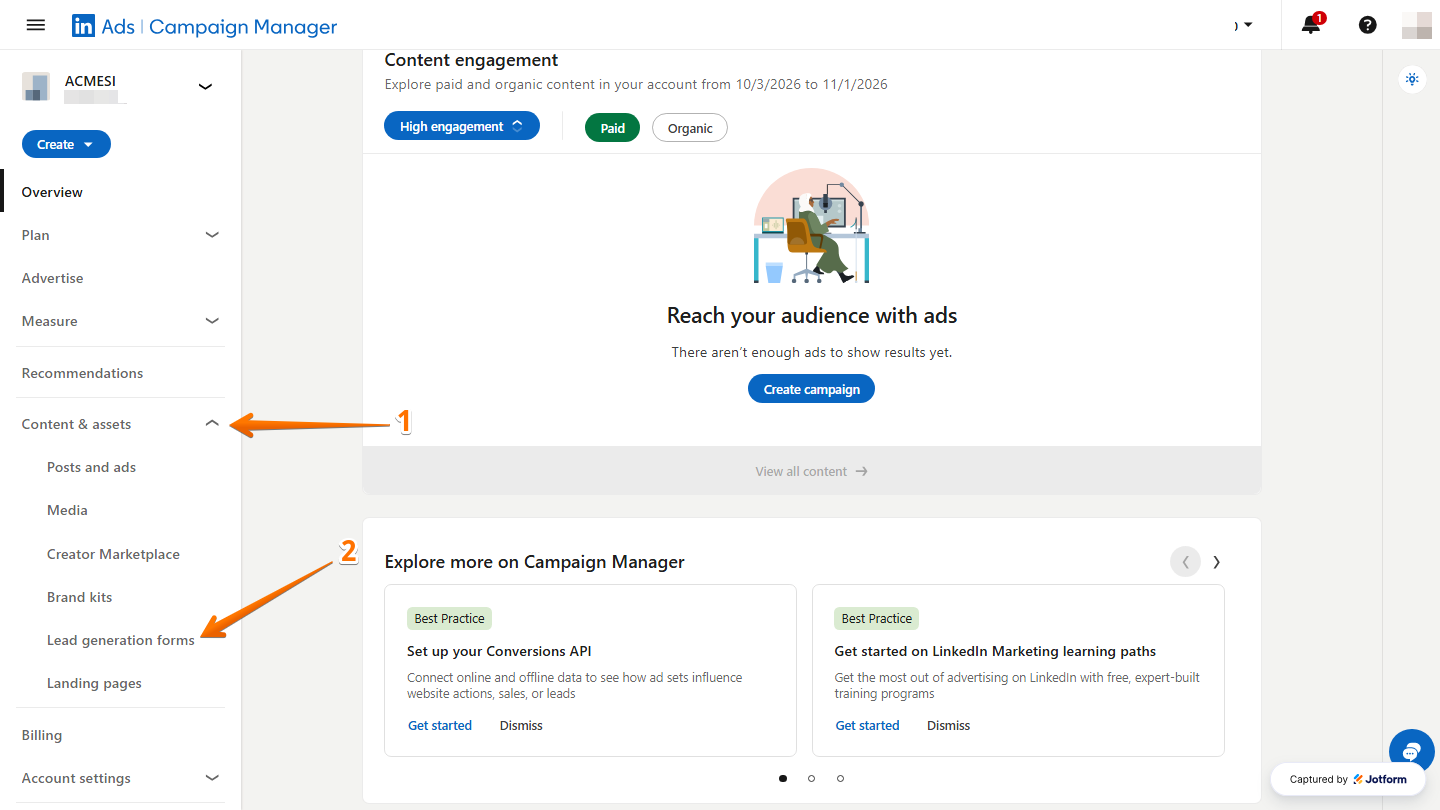
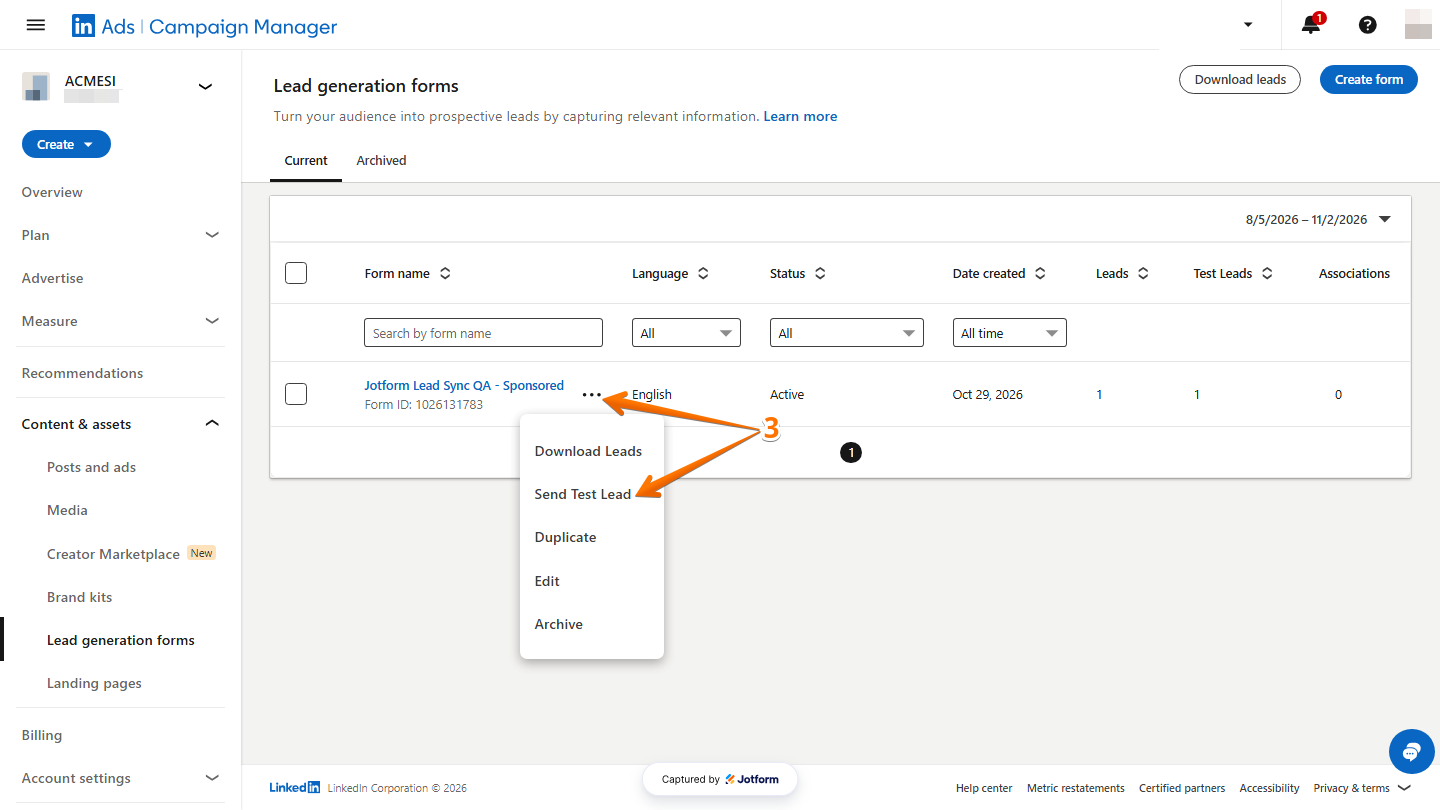
- In LinkedIn Campaign Manager, click on the Downward Arrow icon next to Content & Assets in the menu on the left.
- Then, select Lead Generation Forms.
- Next, click on the Three Dots icon next to your form and select Send Test Lead.
- Now, in the Send Test Lead window that opens, fill in the required fields and click on Send.
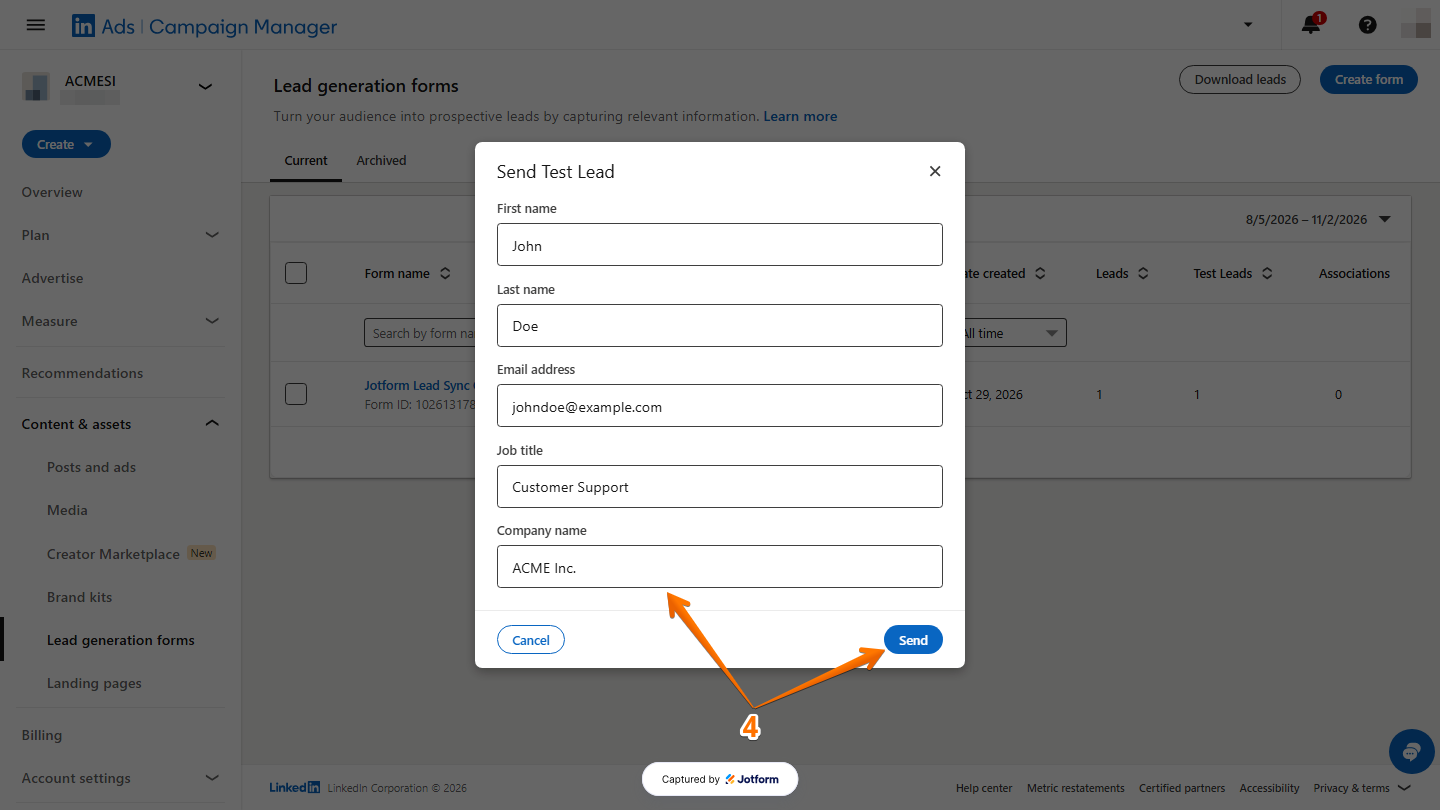
Once the test lead is sent, your workflow should start once, and the lead will be marked with Test Lead = TRUE in LinkedIn’s lead report.

Send Comment: