Jotform’s AI Data Assistant makes it easier to work with your table data using natural-language prompts. You can ask it to sort, filter, analyze, edit, or delete submissions without having to perform these actions manually. It can also create charts and tables, add sample submissions, export results, and work with data generated by AI Columns.
Whether you want to quickly organize your submissions, find useful insights, update your data, or turn your table data into charts and reports, AI Data Assistant can help you work with your data more efficiently.
In this guide, we’ll cover:
- Accessing AI Data Assistant
- Changing the AI Data Assistant Position
- Managing AI Data Assistant Chat Tabs
- Managing Your Table Data With AI Data Assistant
- Creating Charts With AI Data Assistant
- Creating Tables With AI Data Assistant
- Using Voice Prompts
- Exporting Results With AI Data Assistant
- Using AI Columns With AI Data Assistant
Accessing AI Data Assistant
There are two ways to access AI Data Assistant: by creating a new table or opening the Tables view of an existing form. Choose the option that works best for you and follow the steps below.
Creating a New Table
To create a new table and access AI Data Assistant, follow these quick steps to get started:
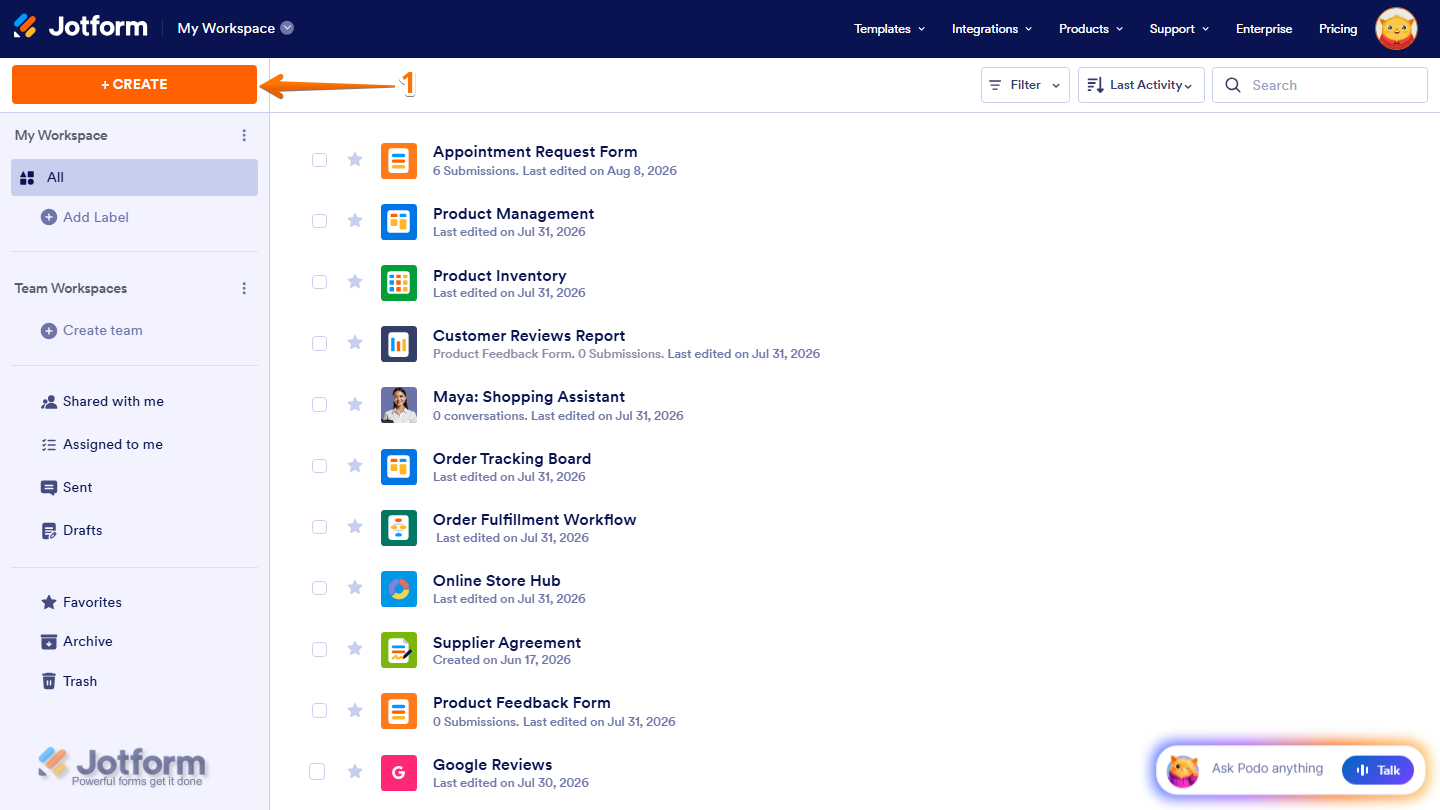
- On the top-left side of your Workspace page, click on Create.
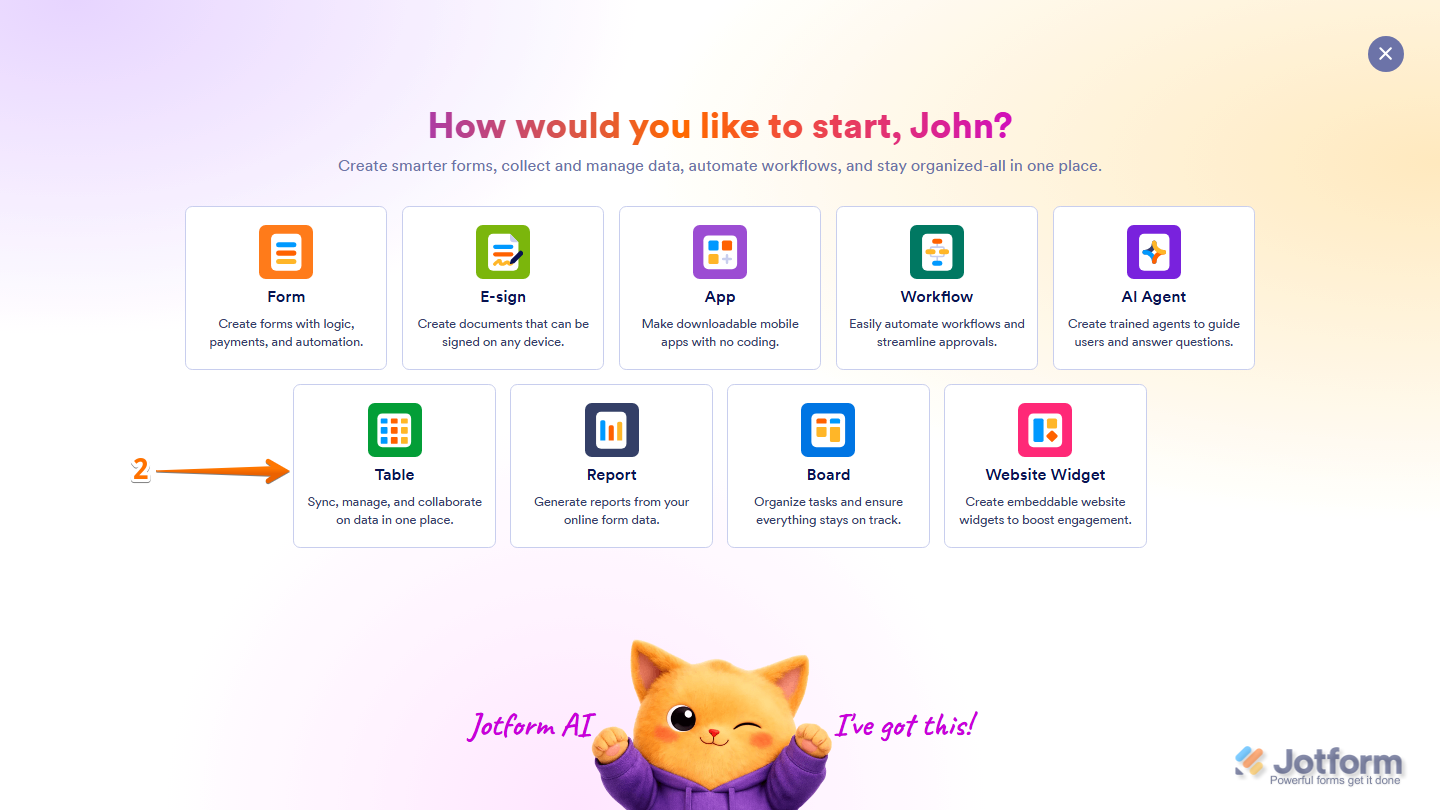
- Then, in the menu that opens up, select Table.
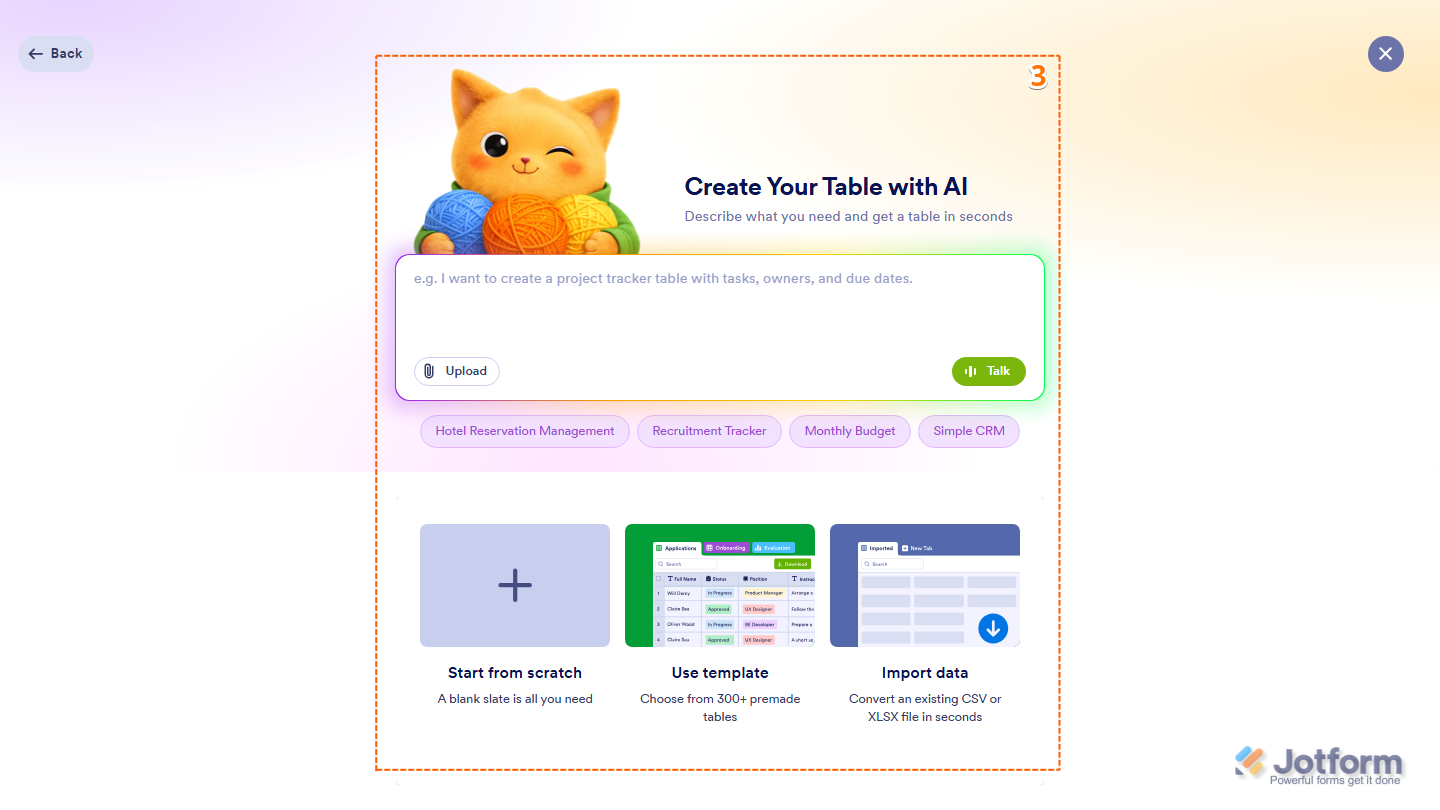
- Now, choose how you want to create your Table:
- Create your Table with AI — Generate a Table based on your prompt.
- Start from scratch — Create a blank Table.
- Use template — Choose from available pre-made Tables.
- Import data — Create a Table from an existing CSV or XLSX file.
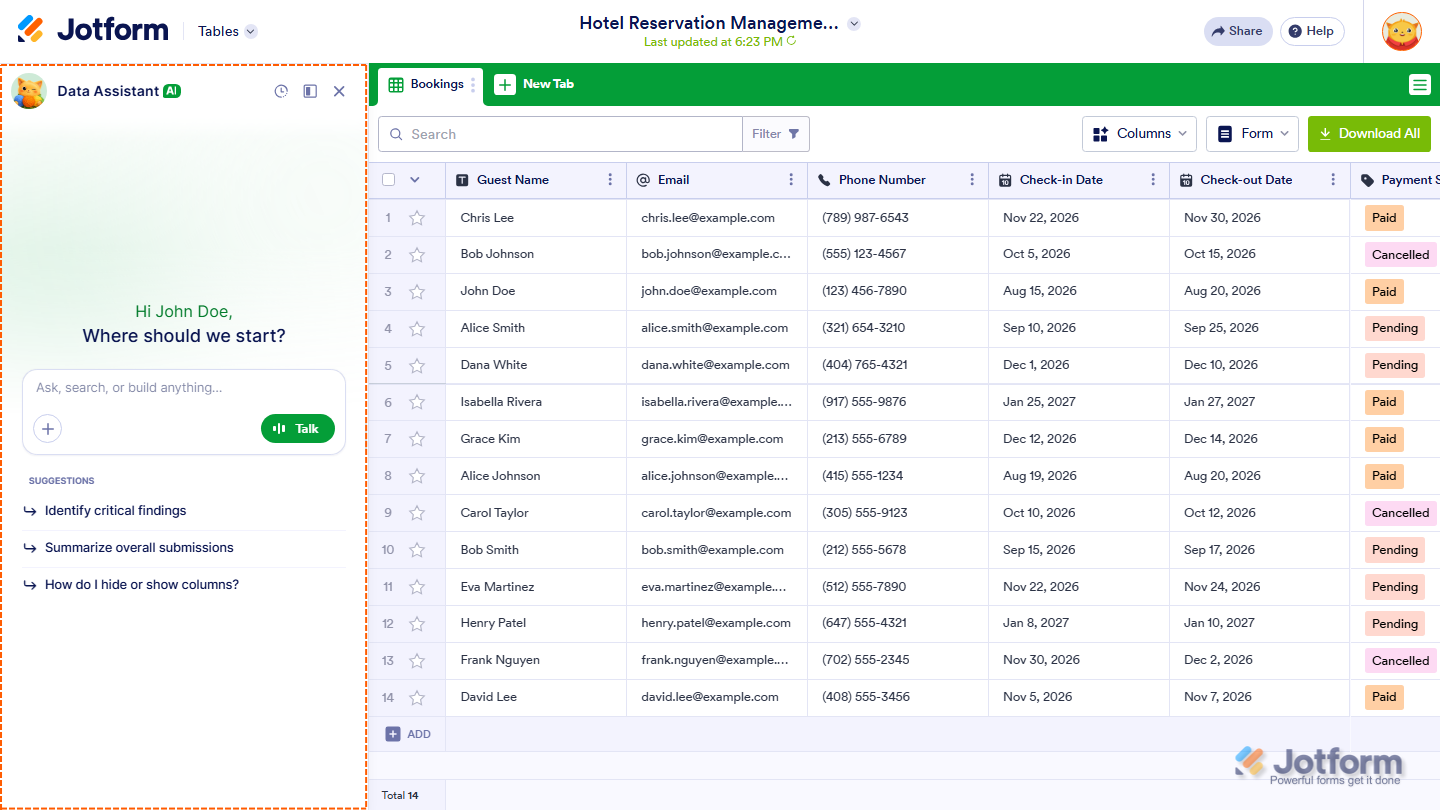
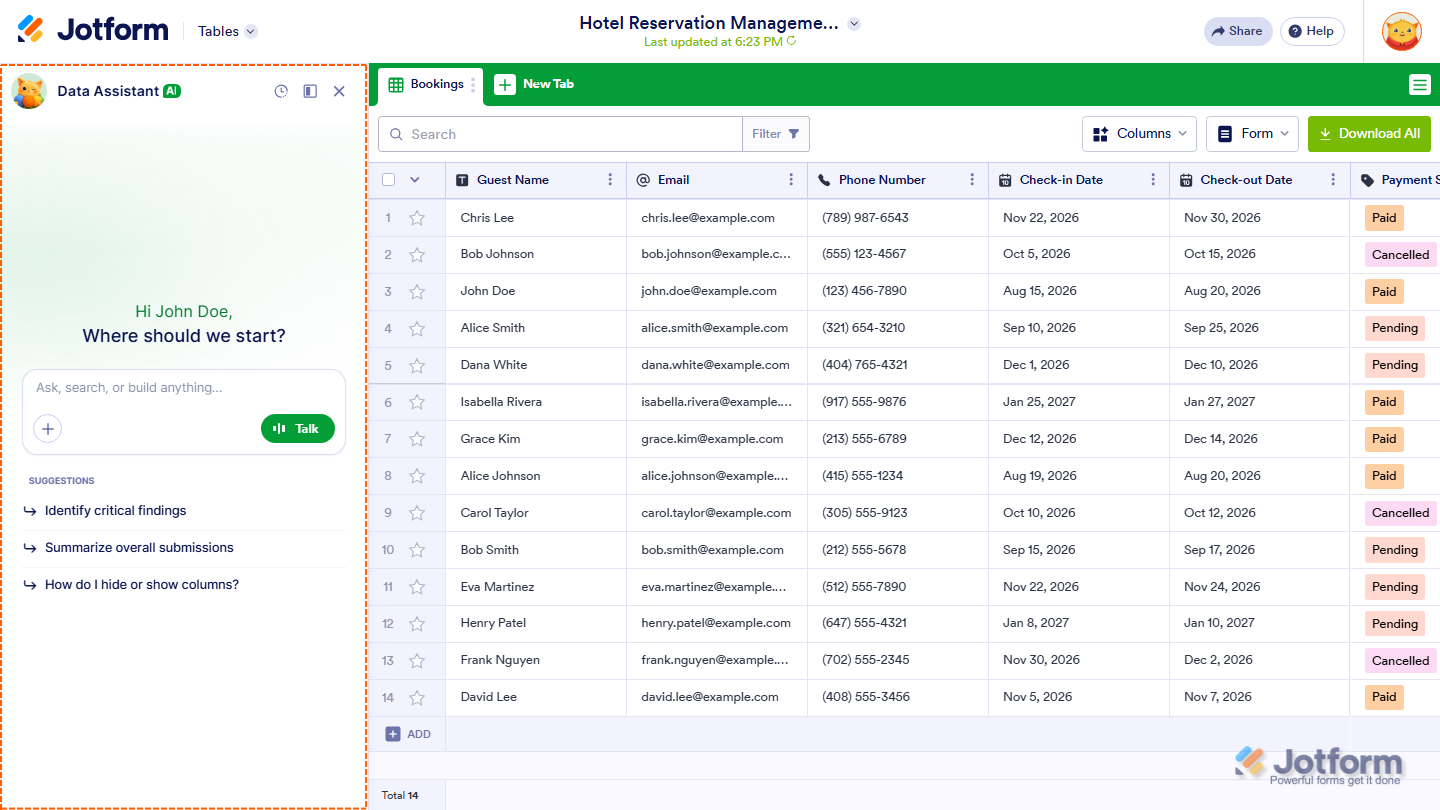
Once your Table is created, AI Data Assistant will automatically open on the left side of the page.
Opening Tables From an Existing Form
You can also access the AI Data Assistant from an existing form. Here’s what to do next:
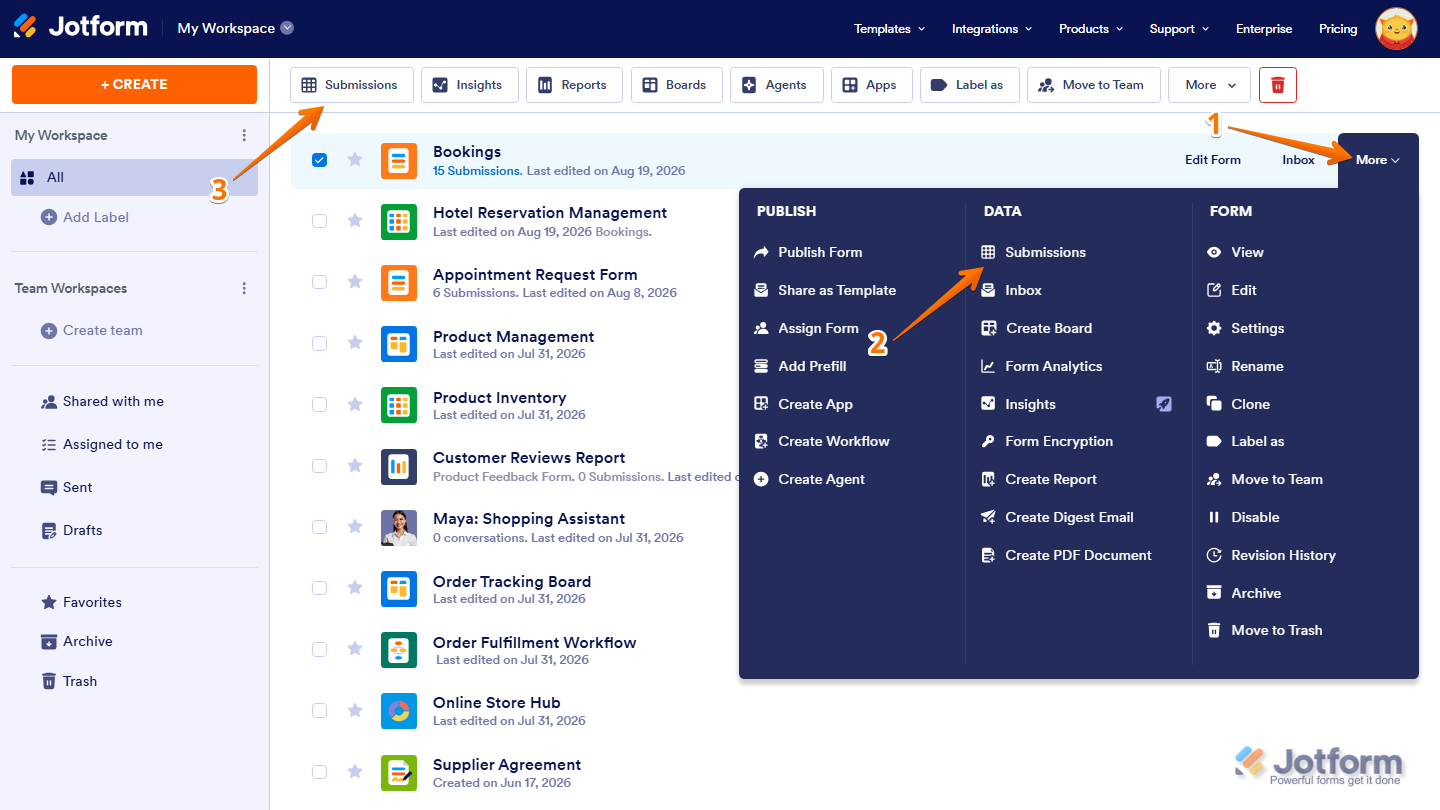
- On your Workspace page, hover your mouse over the Form whose submissions you want to access, and then click on More on the right side of the page.
- Then, in the Dropdown menu that opens up, under the Data section, click on Submissions.
- Or, you can also click on the Submissions in the menu at the top of the page.
Once the Table opens, AI Data Assistant automatically appears on the left side of the page.
Pro Tip
AI Data Assistant works with the data in your table, so make sure there are several submissions available before trying the examples in this guide.
Changing the AI Data Assistant Position
You can change where the AI Data Assistant appears on the page to make it more convenient while working with your table. Here’s what to do:
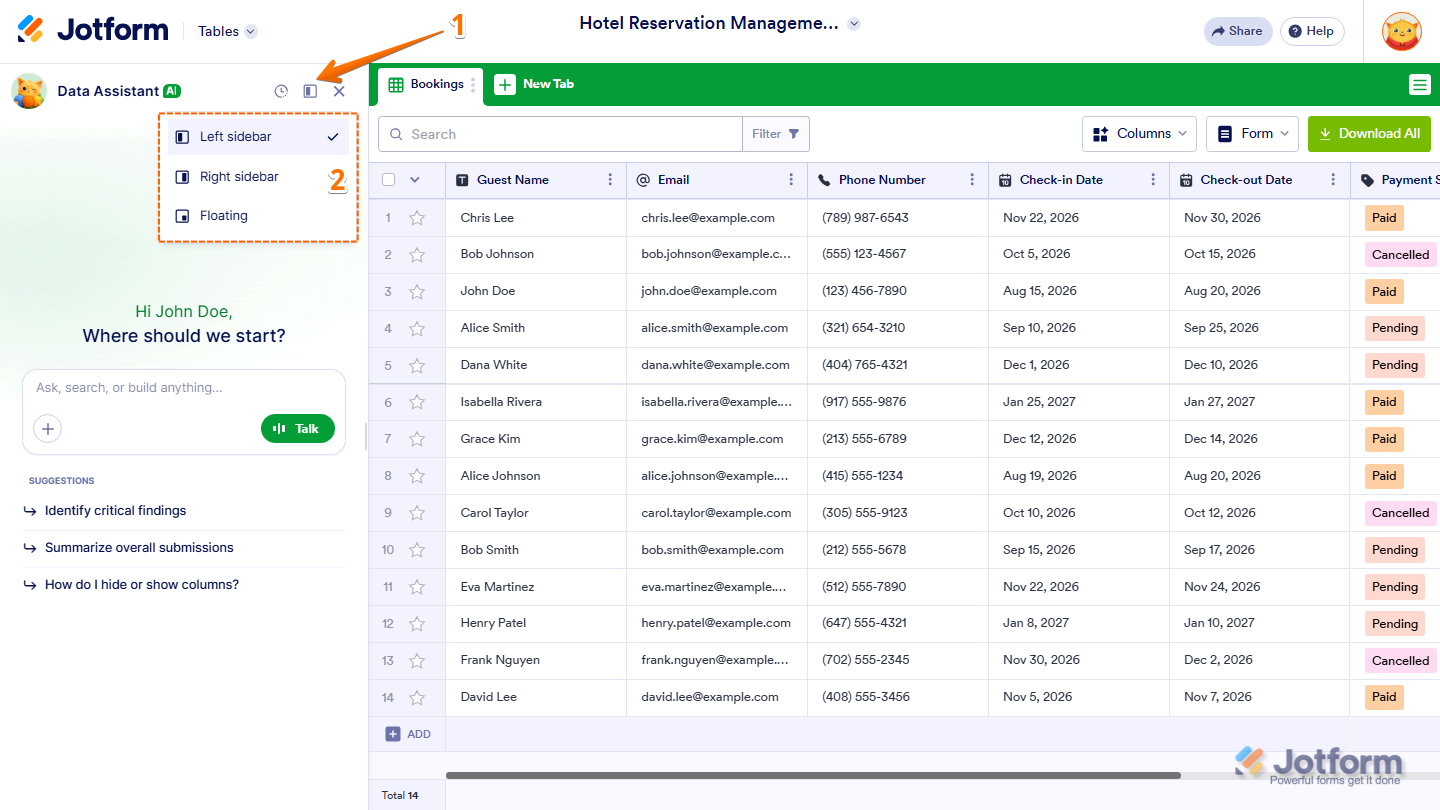
- In Jotform Tables, at the top of the AI Data Assistant chatbox, click on the Sidebar icon.
- Then, in the menu that opens, select where you want the assistant to appear:
- Left sidebar — Displays the assistant on the left side of the page.
- Right sidebar — Displays the assistant on the right side of the page.
- Floating — Displays the assistant as a floating panel.
Managing AI Data Assistant Chat Tabs
AI Data Assistant lets you keep your conversations organized by viewing your previous chats, renaming chat tabs, or deleting chats you no longer need. Here’s what to do next:
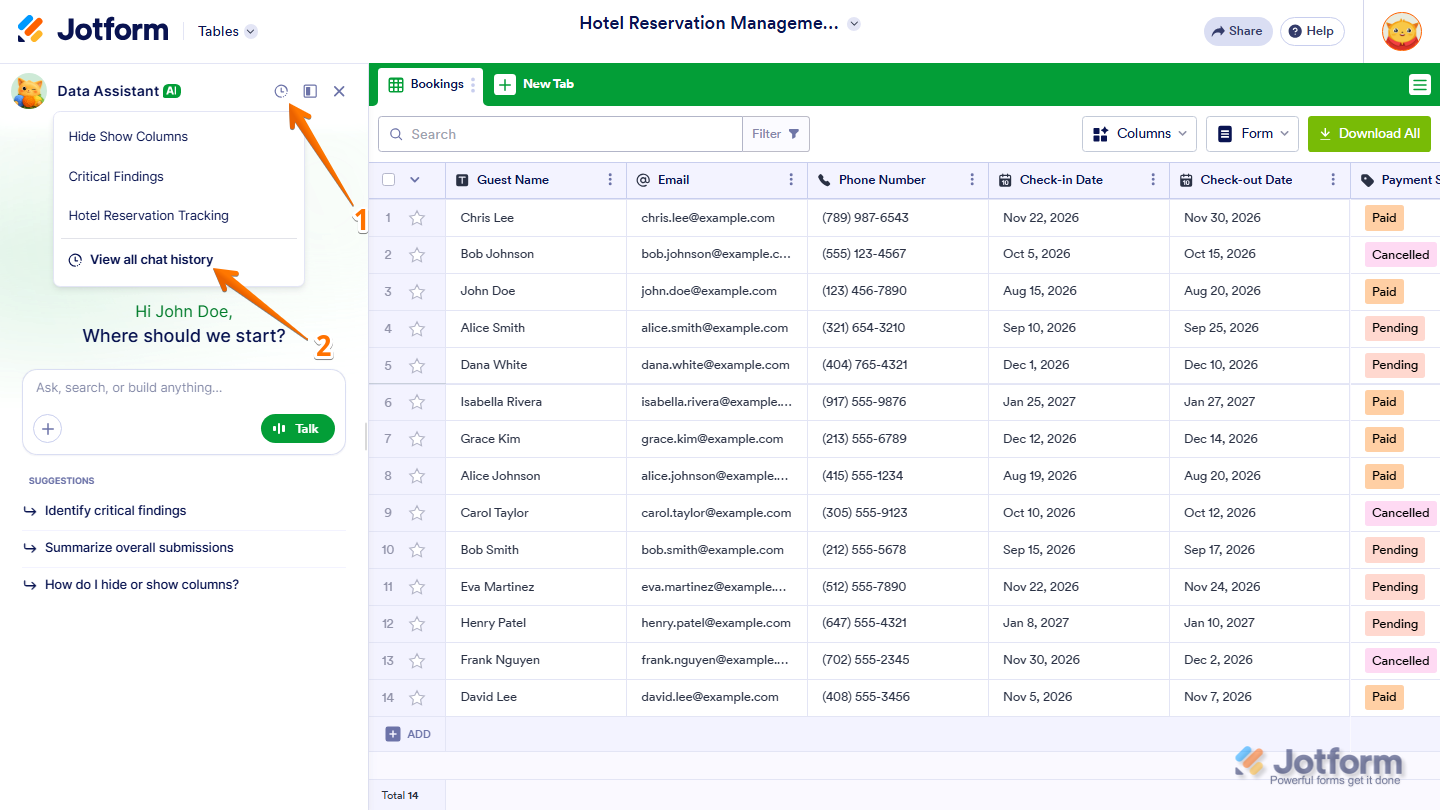
- In Jotform Tables, at the top of the AI Data Assistant chatbox, click on the Circular Arrow icon.
- Then, in the menu that opens, click on View All Chat History.
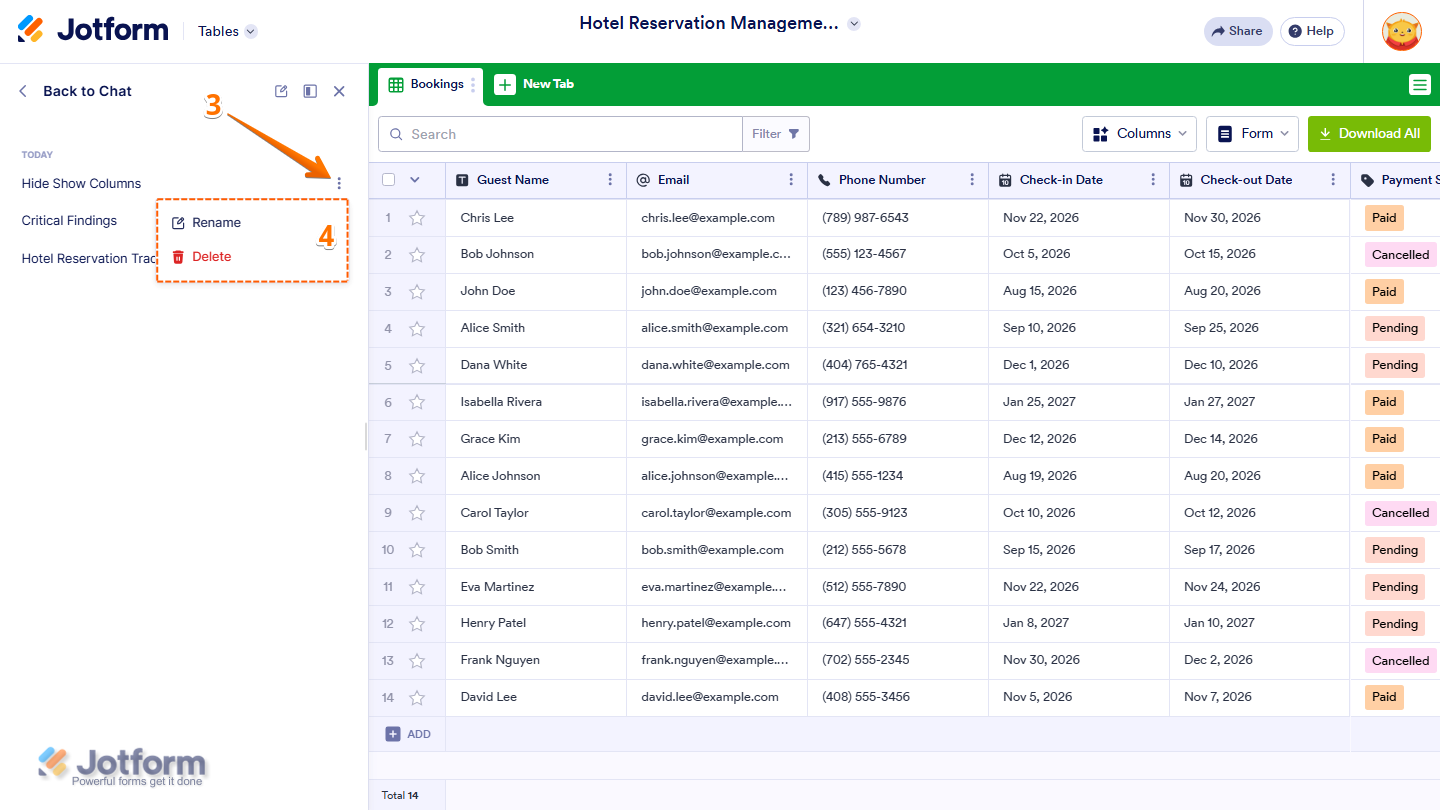
- Now, hover over the chat you want to manage, and then click the Three Dots icon.
- Next, in the menu that opens, select one of the following options:
- Rename — Change the name of the chat tab.
- Delete — Remove the chat from your chat history.
Managing Your Table Data With AI Data Assistant
AI Data Assistant lets you perform various actions on your Table using natural-language prompts. Here’s how to get started:
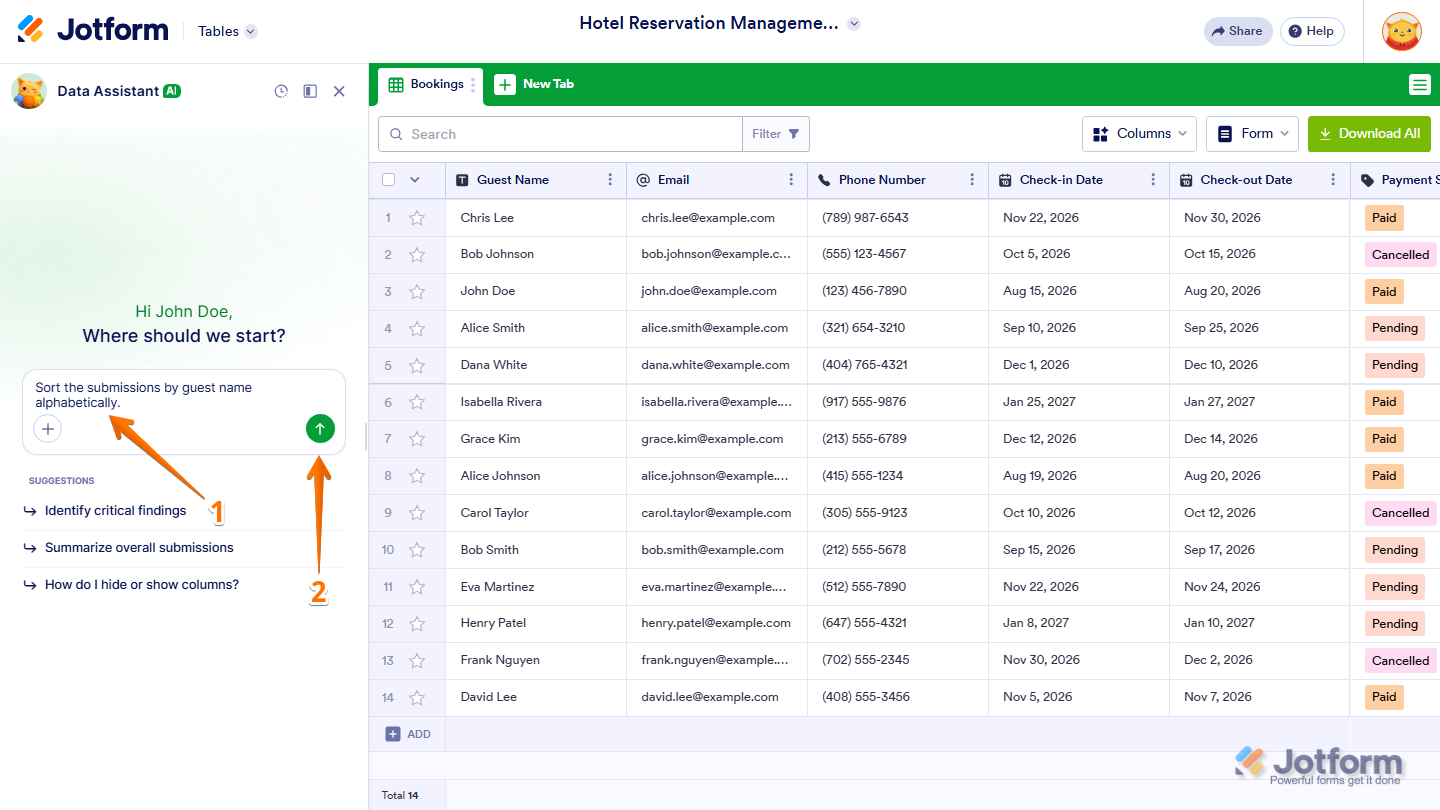
- In the AI Data Assistant chatbox, enter a prompt describing what you want to do with your Table. For example, you can enter “Sort the submissions by guest name alphabetically.” For more prompt examples, see the sections below.
- Sort and Filter Your Submissions
- Analyze Your Data
- Edit Rows
- Delete Rows
- Add Dummy Submissions
- Then, press Enter on your keyboard or click on the Upward Arrow icon.
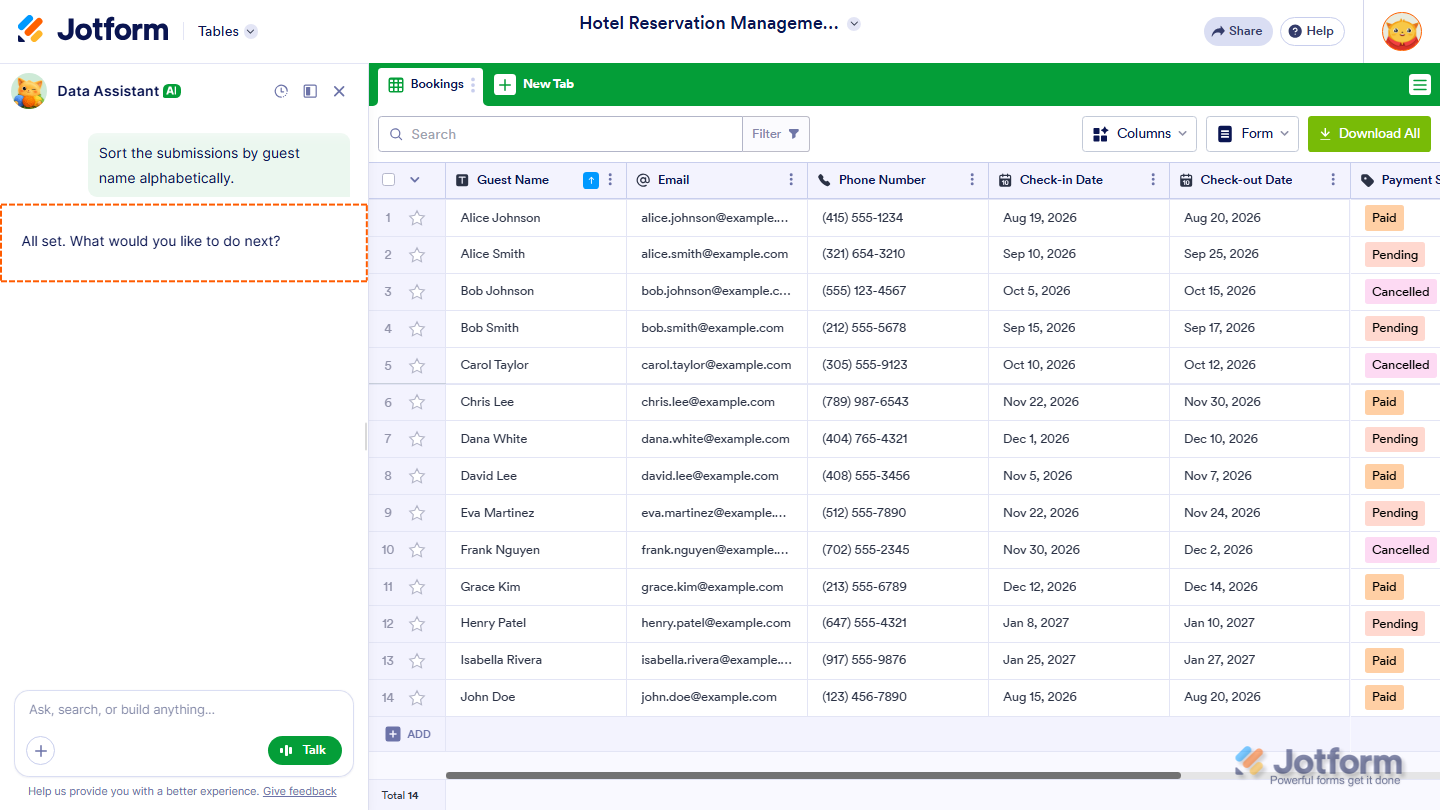
The AI Data Assistant will process your request and display the result in the chatbox.
Sorting and Filtering Data
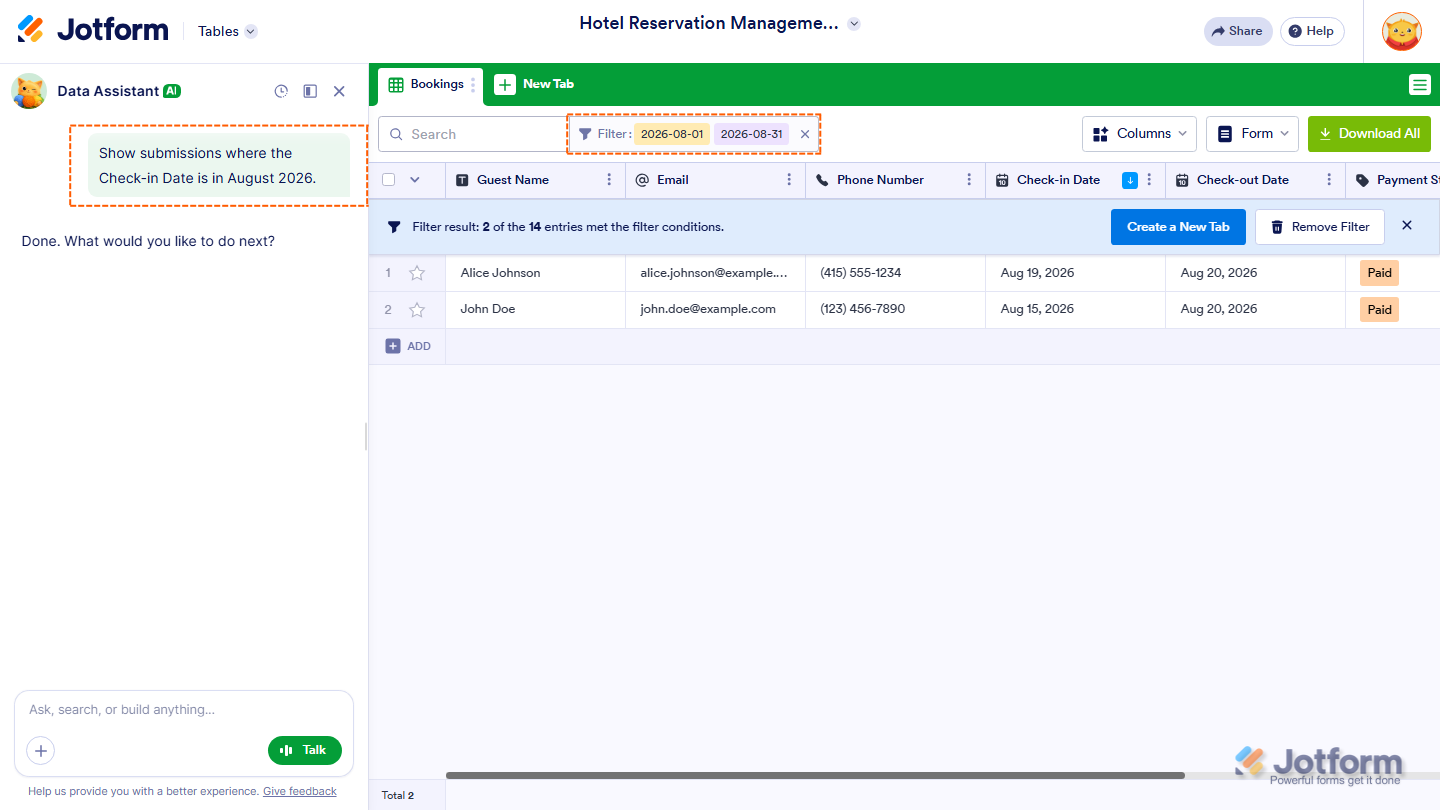
AI Data Assistant lets you organize your submissions by sorting or filtering your Table based on specific criteria.
Here are a few example prompts you can try:
- Sort the submissions by registration date from newest to oldest.
- Sort the submissions by guest name alphabetically.
- Sort the submissions by payment status.
- Show submissions where the Total Amount is greater than $500.
- Show submissions where the Check-in Date is in August 2026.
- Show submissions where the Payment Status is Paid.
Analyzing Your Data
You can also ask the AI Data Assistant to analyze the information in your submissions and summarize the results.
Here are a few example prompts you can try:
- How many guests selected Virtual as their Attendance Type?
- How many submissions have a Pending Status?
- What is the average Total Amount for all submissions?
- How many guests have a Paid Payment Status?
- What is the most common Attendance Type among the submissions?
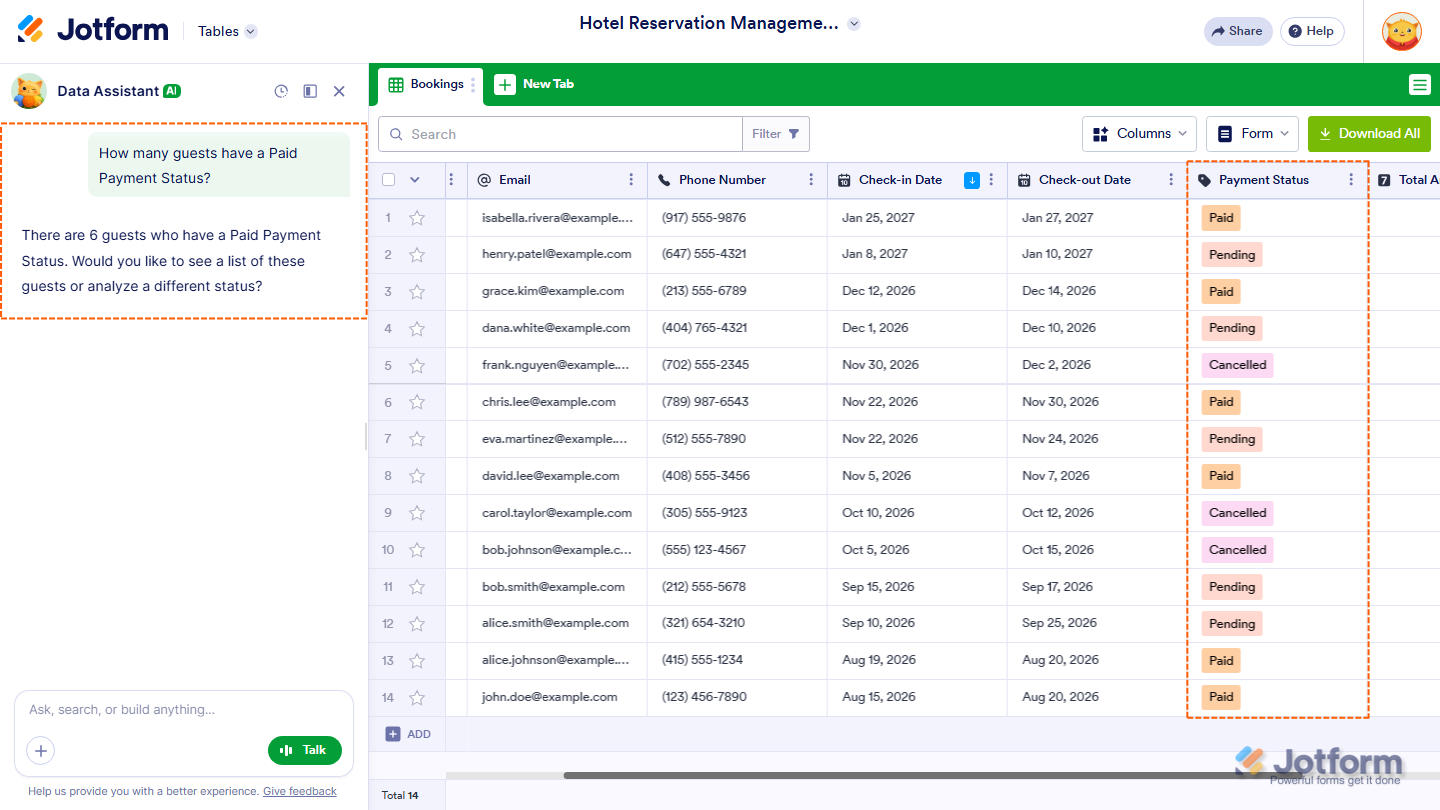
This can help you quickly identify patterns and insights without manually reviewing your submissions.
Editing the Submission Data
You can use AI Data Assistant to update information in your Table.
Here are a few example prompts you can try:
- Change the attendance type for John Doe to Virtual.
- Update the payment status for Jane Smith to Paid.
- Change the department for John Doe to Marketing.
- Update all Pending registrations to Confirmed.
- Change the event date for Jane Smith to August 30, 2026.
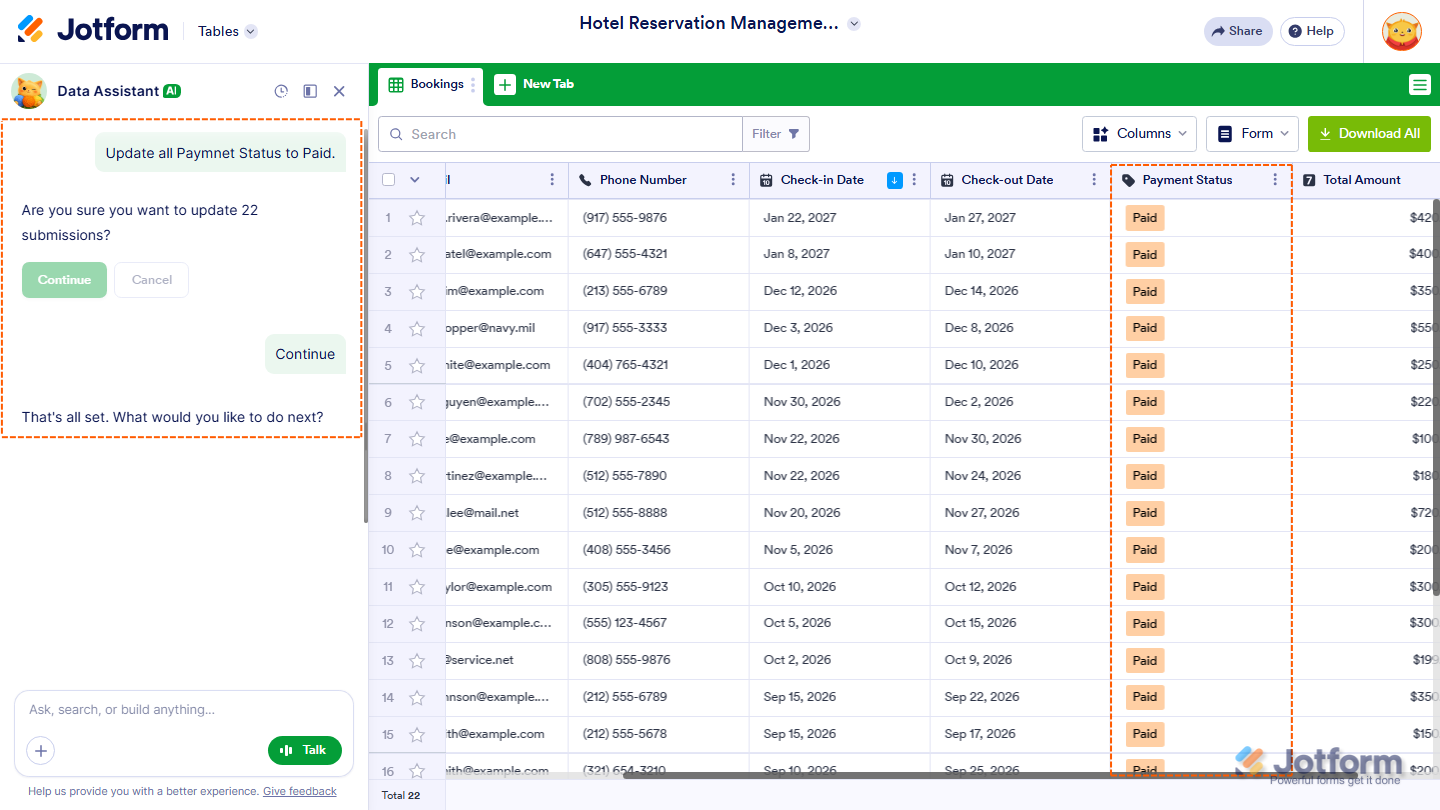
Note
When asking an AI Data Assistant to make changes, be as specific as possible about the rows or information you want to update.
Editing Rows
You can use AI Data Assistant to update information in your Table.
Here are a few example prompts you can try:
- Change the attendance type for John Doe to Virtual.
- Update the payment status for Jane Smith to Paid.
- Change the department for John Doe to Marketing.
- Update all Pending registrations to Confirmed.
- Change the event date for Jane Smith to August 30, 2026.
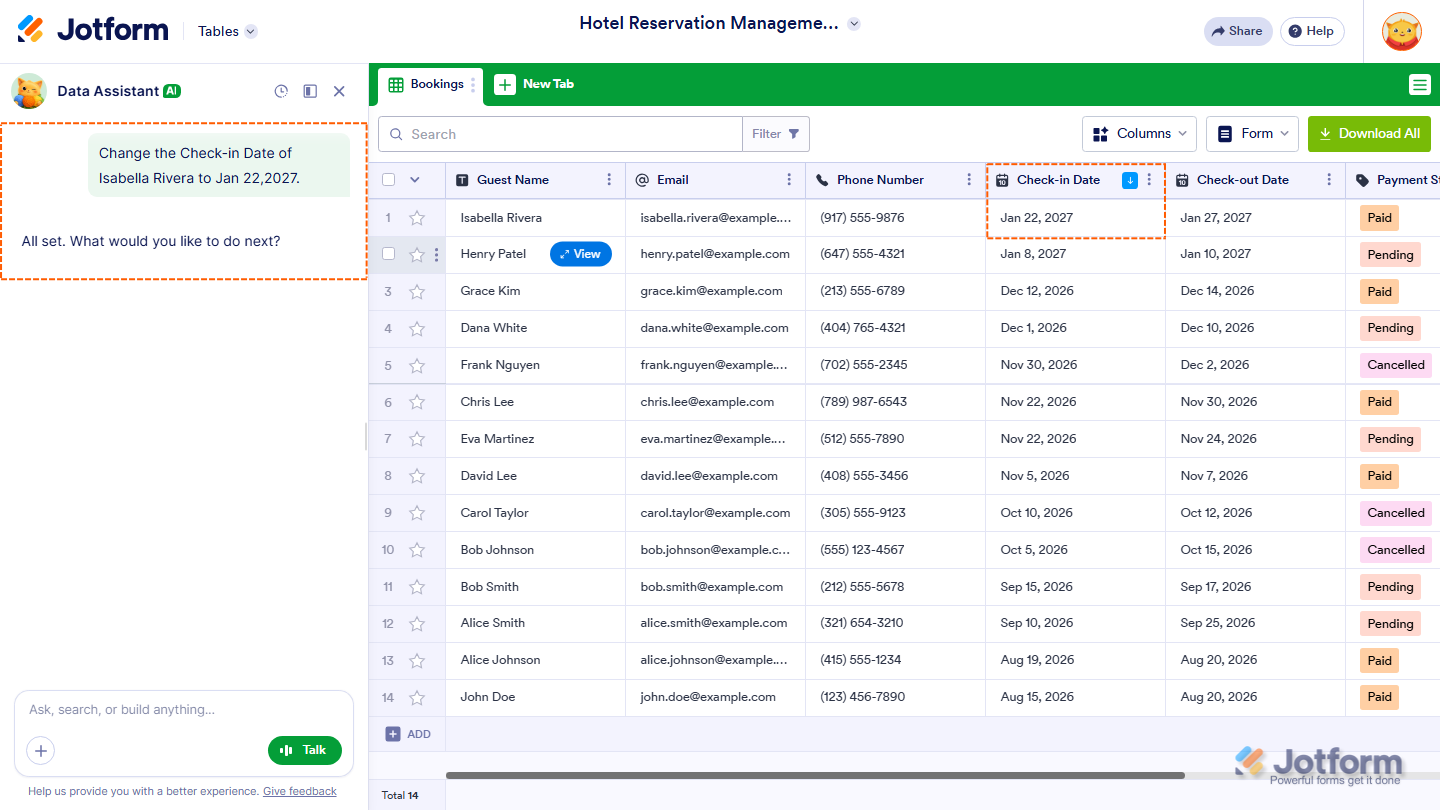
Note
When asking an AI Data Assistant to make changes, be as specific as possible about the rows or information you want to update.
Deleting Submission Data
You can also ask the AI Data Assistant to remove specific submissions from your Table.
Here are a few example prompts you can try:
- Delete the submission for John Doe.
- Delete all submissions with a Cancelled status.
- Remove the submission with the email address john@example.com.
- Delete all duplicate submissions.
- Remove all submissions from the Marketing department.
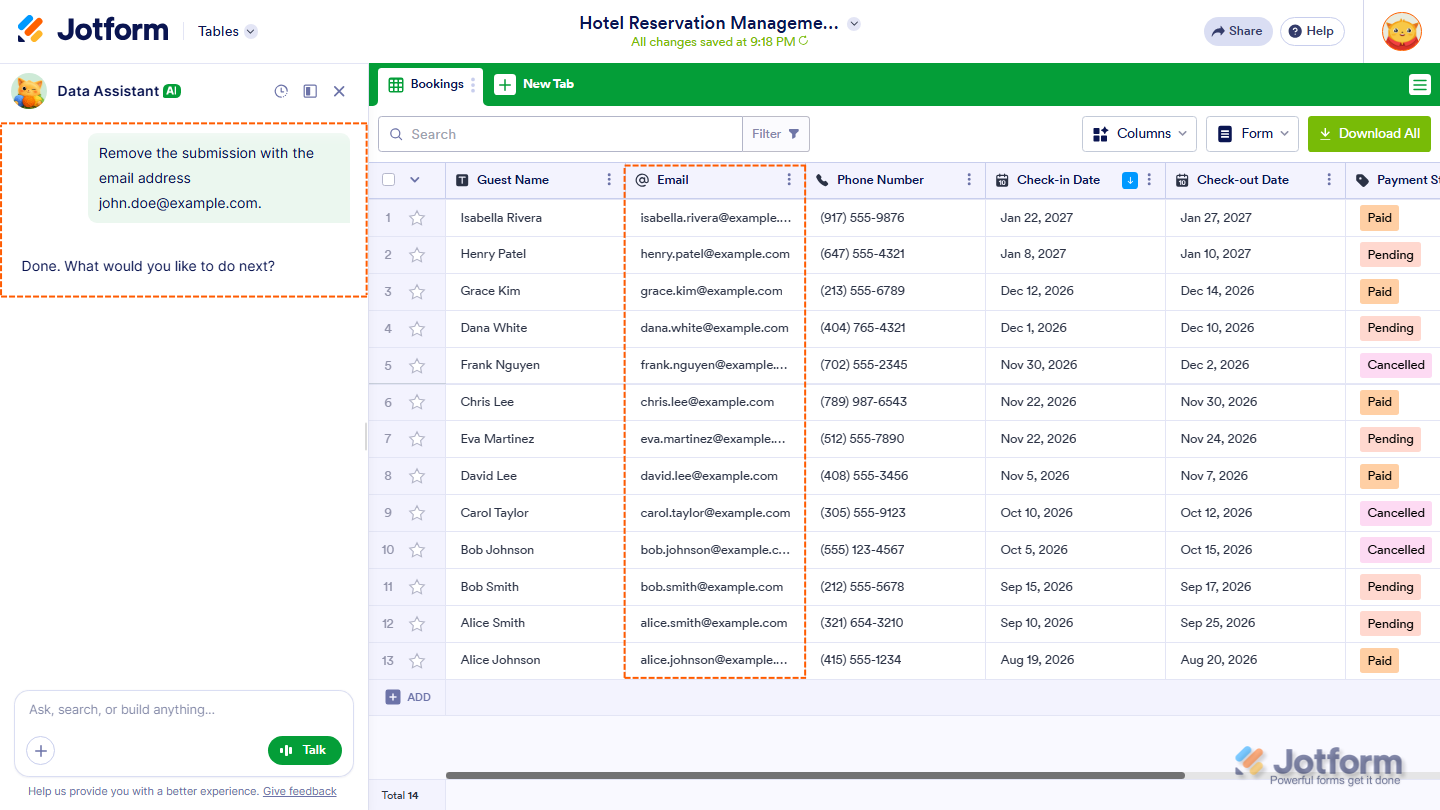
Note
Before deleting data, make sure your prompt clearly identifies the submissions you want to remove.
Adding Dummy Submissions
You can also use AI Data Assistant to add dummy submissions to your Table. This can be useful when you need sample data for testing or demonstrating your Table.
Here are a few example prompts you can try:
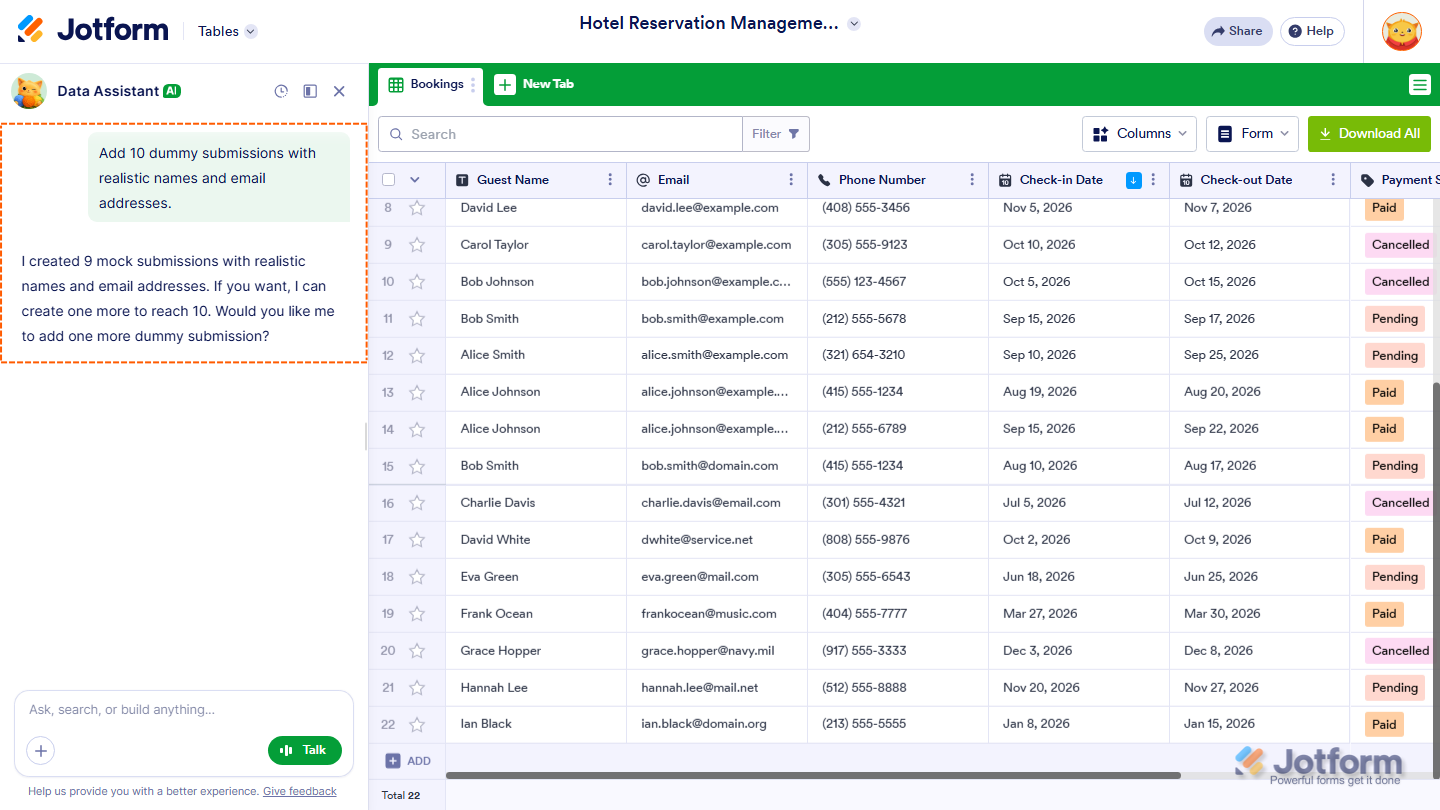
- Add 10 dummy submissions with realistic names and email addresses.
- Add 20 sample submissions with different attendance types.
- Create 10 dummy customer records with names, email addresses, and phone numbers.
- Add 15 sample registrations with different payment statuses.
- Generate 10 dummy submissions for the Marketing department.
Creating Charts With AI Data Assistant
You can use AI Data Assistant to create visual charts from the data in your Table. It supports Bar, Pie, Column, and Donut charts.
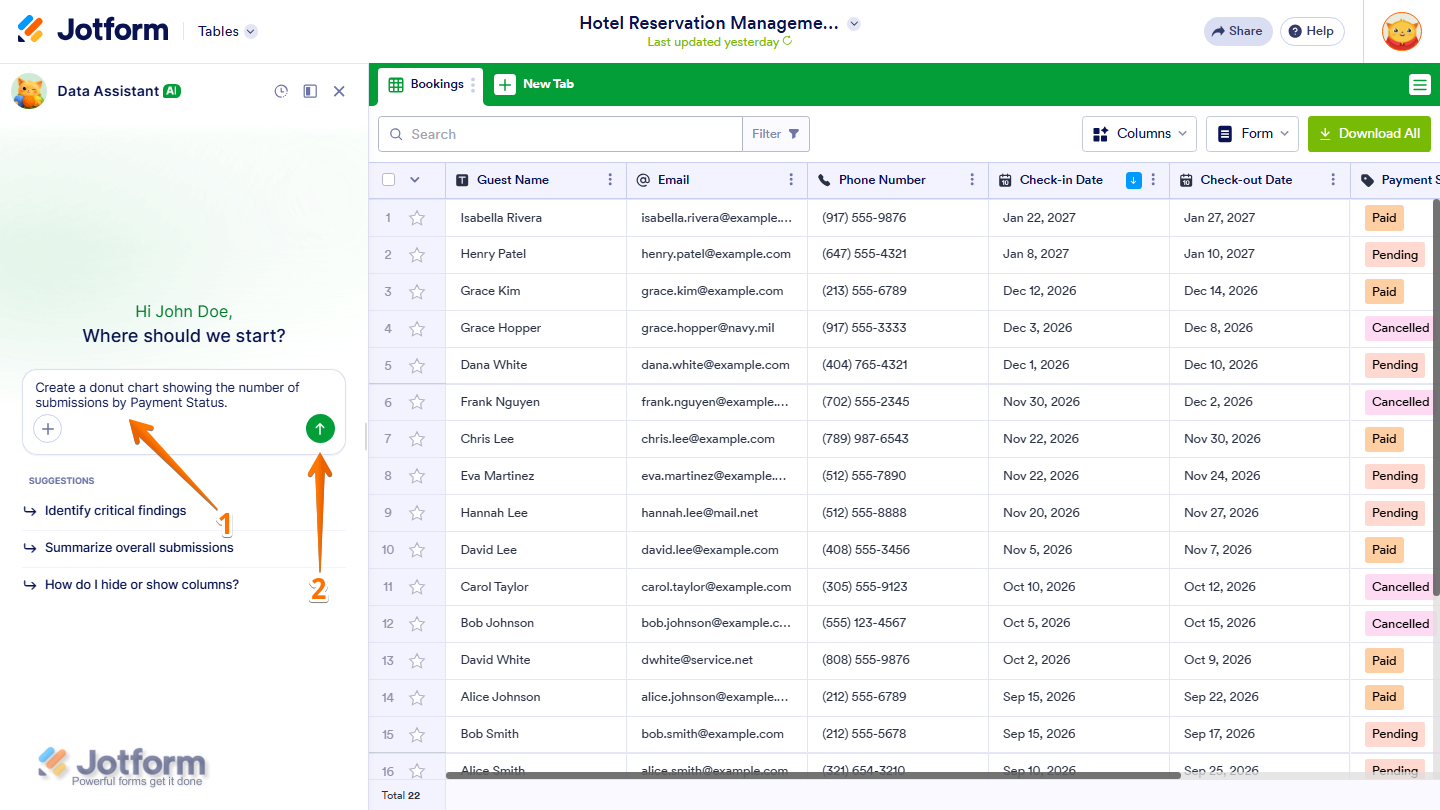
- In the AI Data Assistant chatbox, enter a prompt describing the chart you want to create. Here are a few example prompts you can try:
- Create a bar chart showing the number of guests for each Attendance Type.
- Create a pie chart showing the percentage of submissions by Registration Status.
- Create a column chart showing the Total Amount for each Guest Name.
- Create a donut chart showing the number of submissions by Payment Status.
- Then, press Enter on your keyboard or click on Upward Arrow icon.
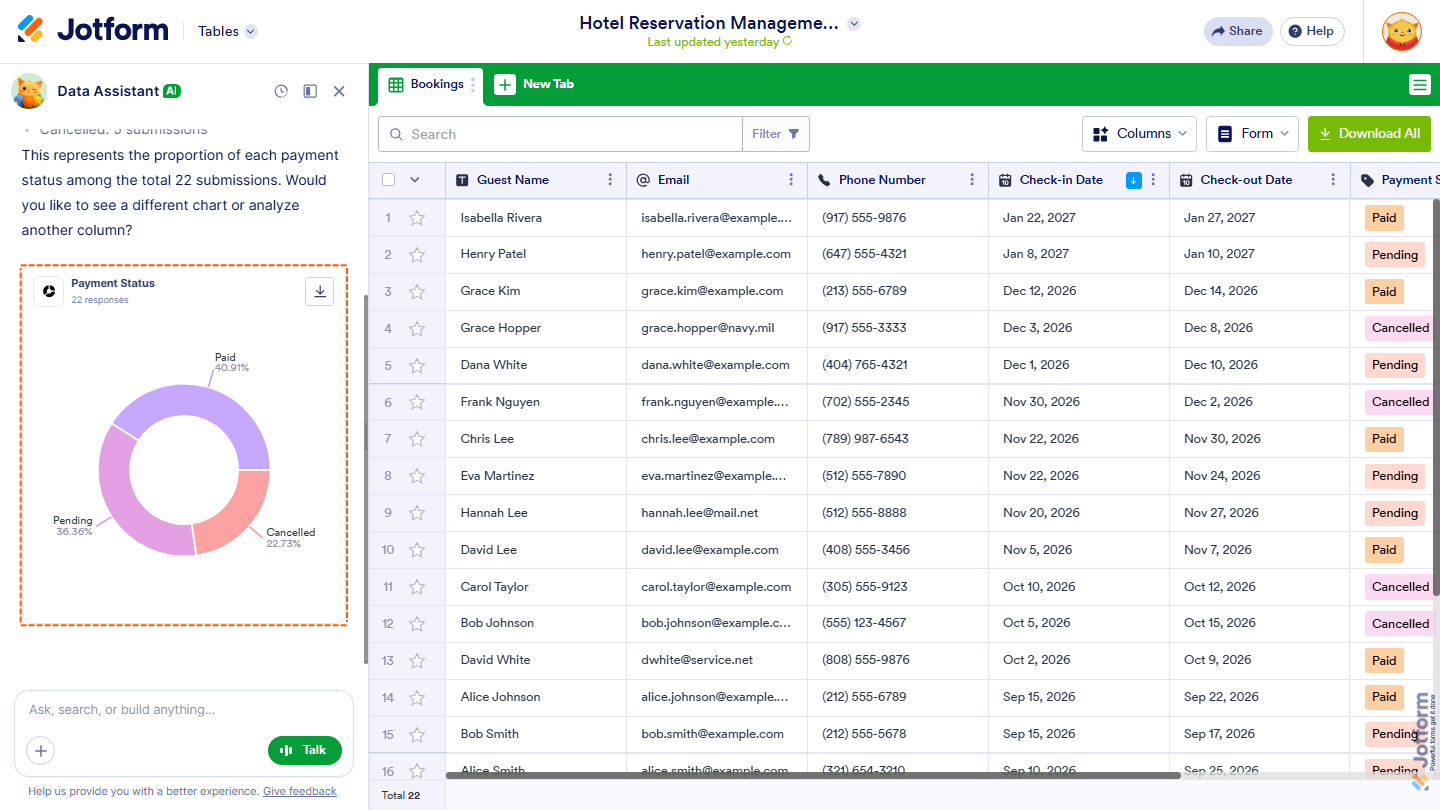
The AI Data Assistant will generate the requested chart based on the data in your Table.
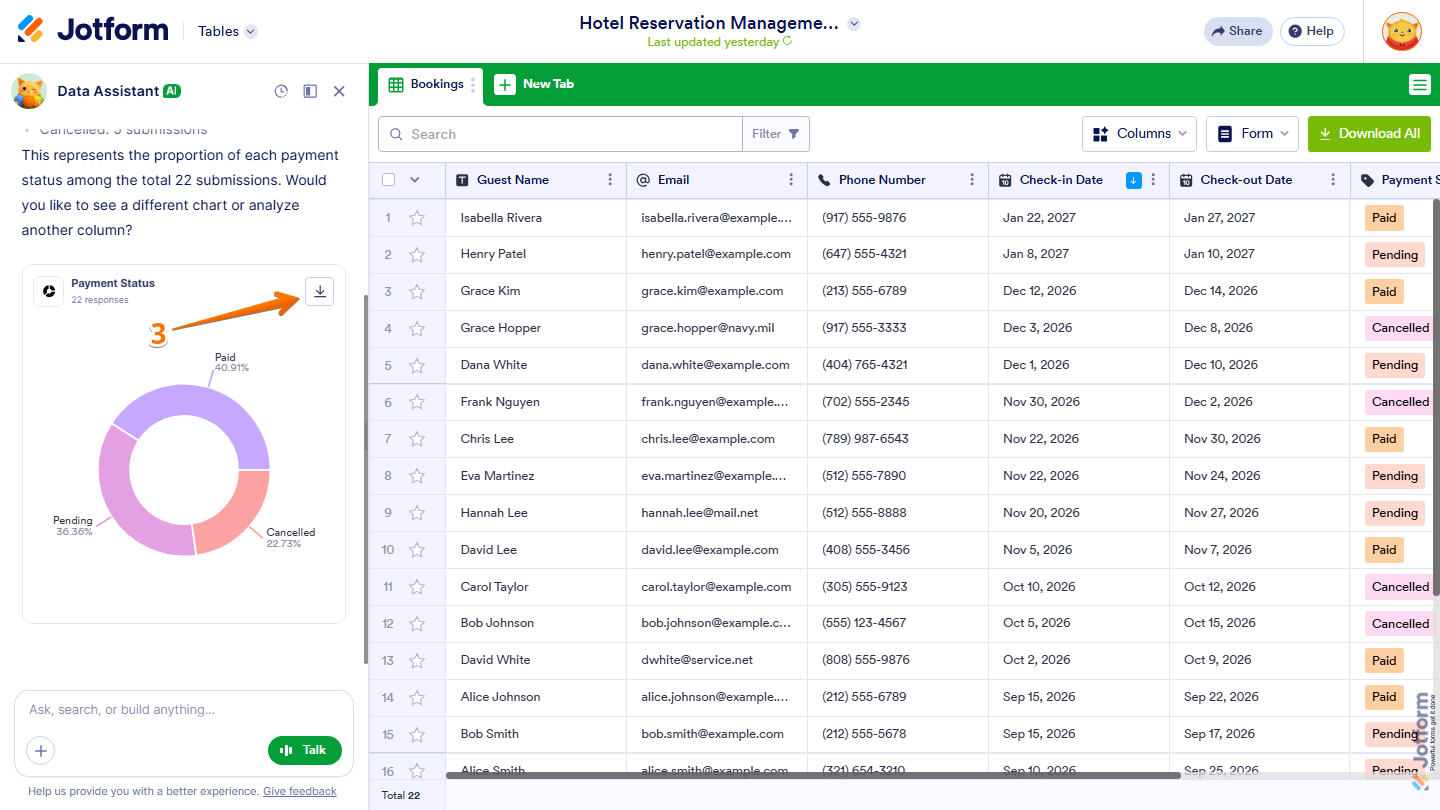
- To save the chart as a PNG file, click on the Download icon.
Creating Tables With AI Data Assistant
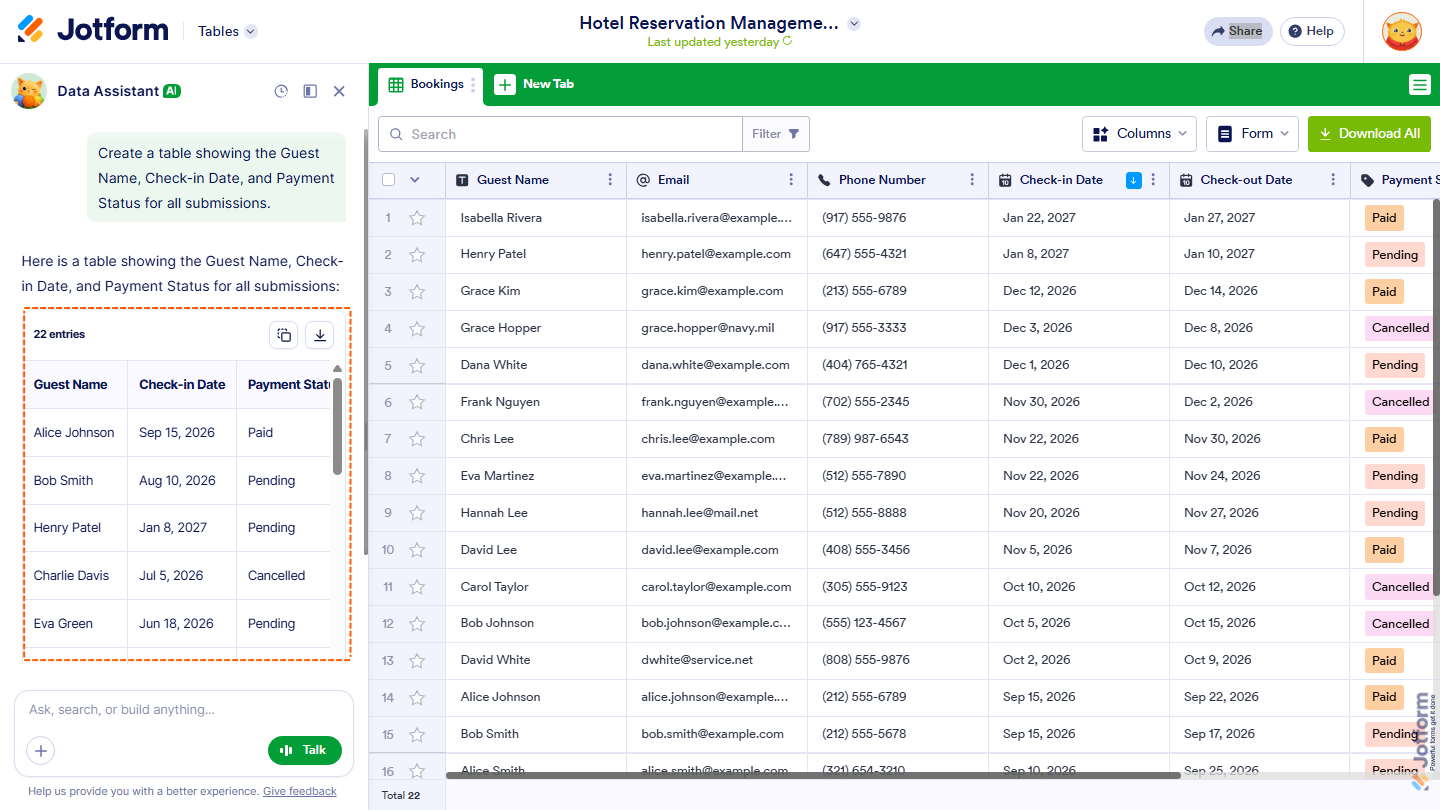
AI Data Assistant can also organize information from your Table into a Markdown table, which you can copy or download as a CSV file.
- In the AI Data Assistant chatbox, enter a prompt describing the information you want to organize into a table. Here are a few example prompts you can try:
- Create a table showing the Guest Name and Attendance Type for all submissions.
- Create a table showing the Guest Name, Registration Status, and Payment Status for all submissions.
- Create a table showing the Guest Name and Total Amount for guests with a Paid Payment Status.
- Create a table showing the Guest Name, Attendance Type, and Check-in Date for guests attending virtually.
- Then, press Enter on your keyboard or click on Upward Arrow icon.
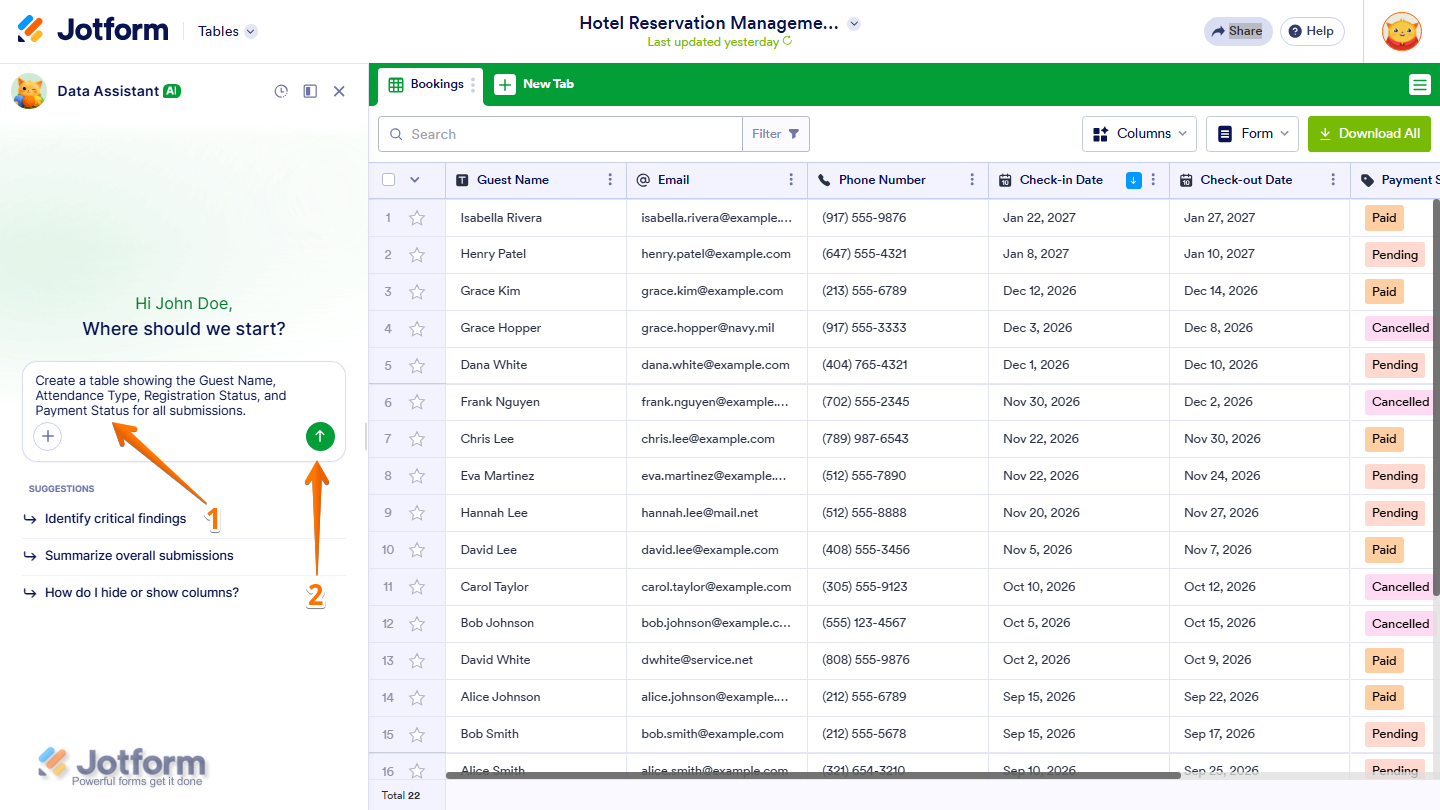
The AI Data Assistant will generate the requested information as a Markdown table in the chatbox.
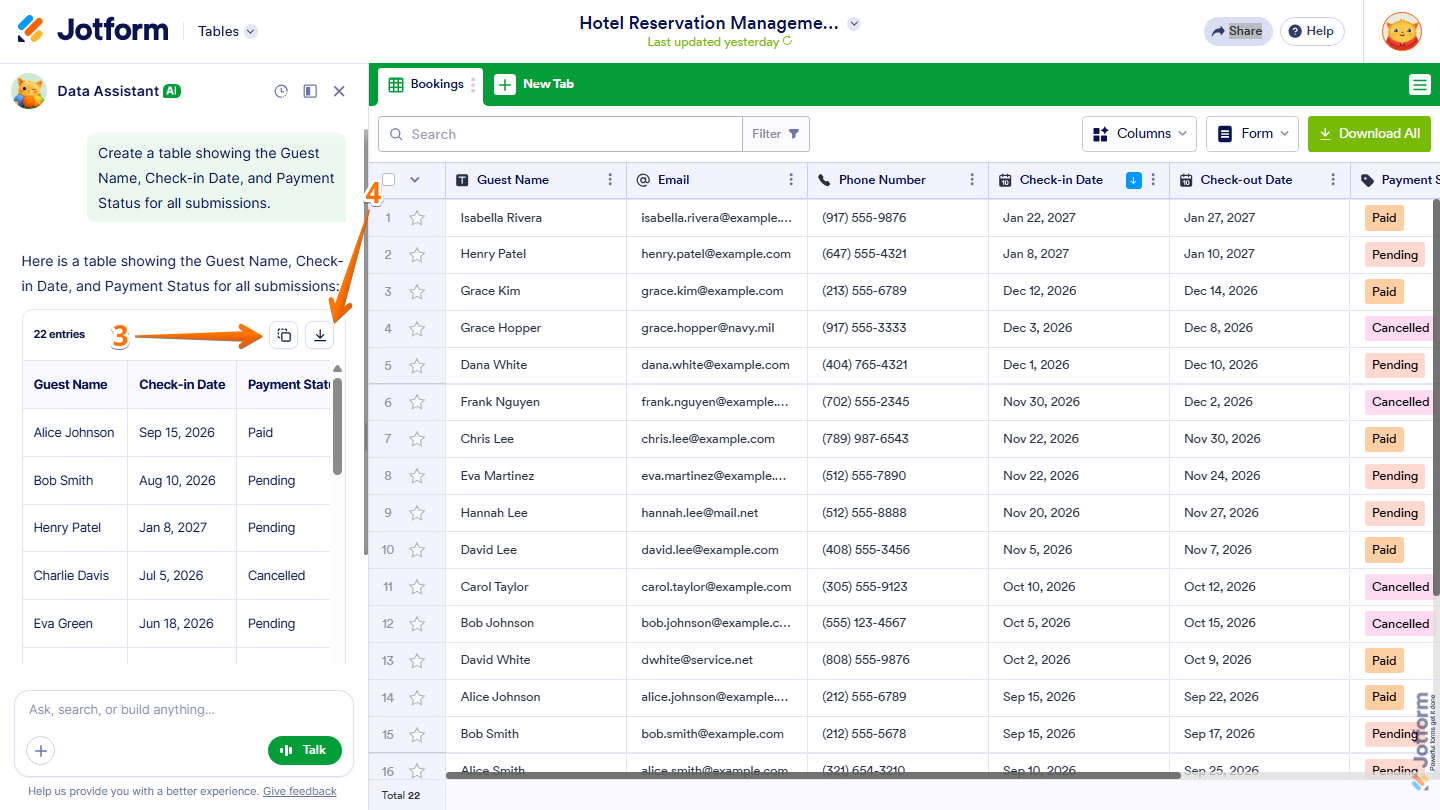
- To copy the table, click on the Copy icon.
- To save the table as a CSV file, click on the Download icon, and you’re done.
Using Voice Prompts
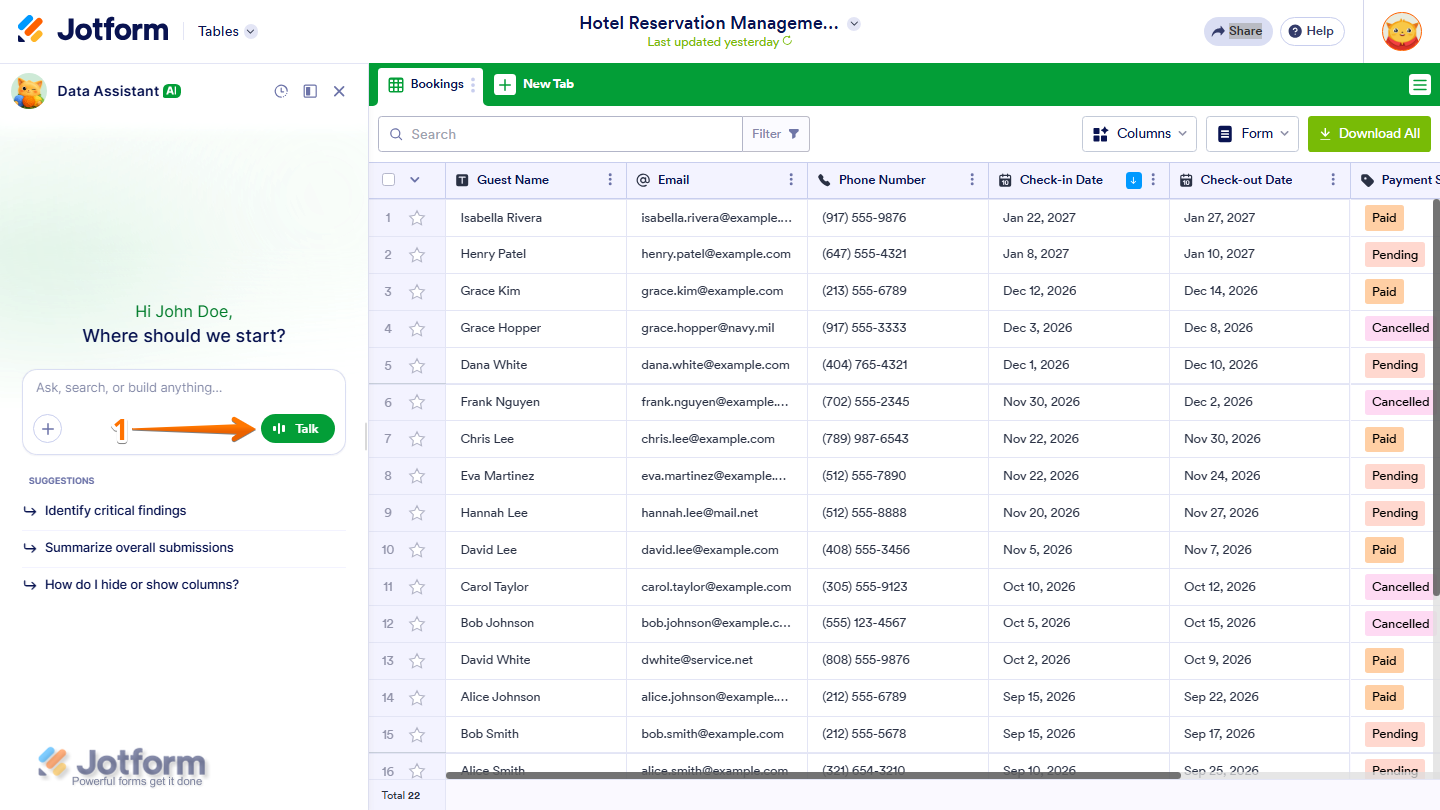
You can also interact with AI Data Assistant using voice prompts instead of typing your requests.
- In the AI Data Assistant chatbox, click on Talk.
Note
Jotform AI will prompt you to allow your browser to access your device’s microphone. Simply grant permission so it can capture your voice prompts.
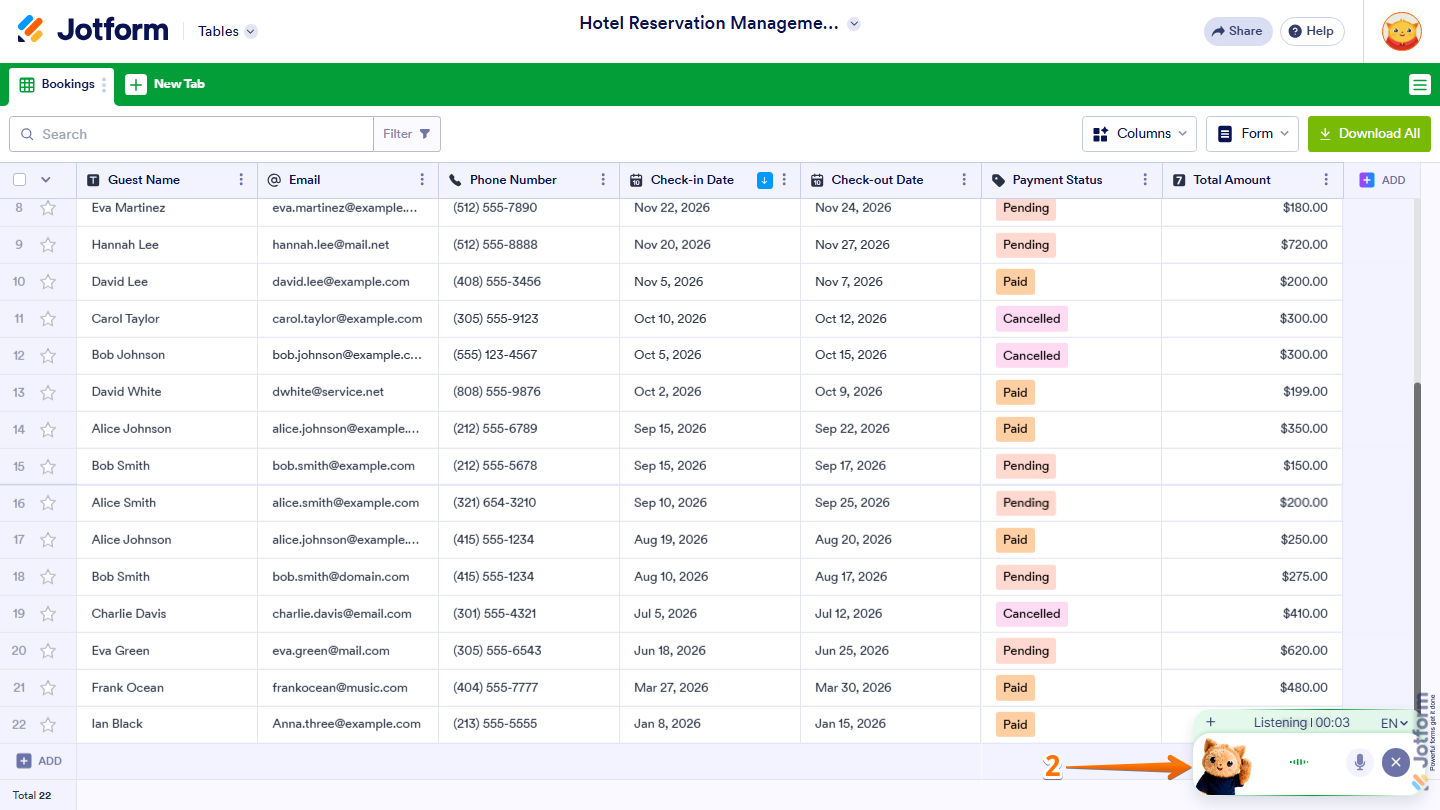
- At the bottom-right corner of the page, the AI Data Assistant will start listening and ask how it can help. Speak with the AI Data Assistant and describe what you want to do with your Table. It will interact with you as you speak and automatically perform the requested action based on your instructions.
Exporting Results With AI Data Assistant
AI Data Assistant can also export the results of your requests. You can ask it to export your data as a CSV or PDF file.
- In the AI Data Assistant chatbox, enter a prompt asking it to export the results you want. For example:
- Export the Guest Name, Attendance Type, and Payment Status as a CSV file.
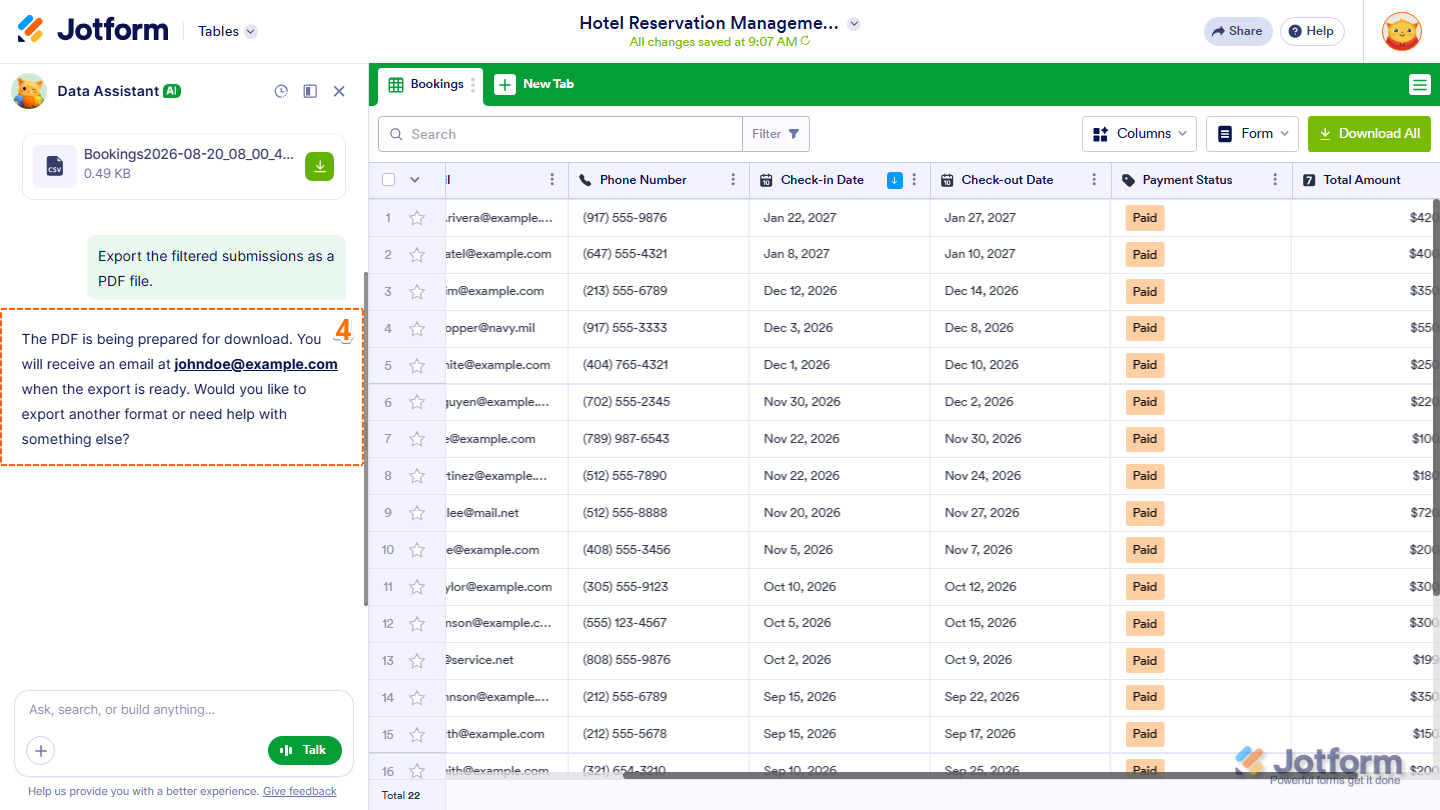
- Export the filtered submissions as a PDF file.
- Then, press Enter on your keyboard or click on Upward Arrow icon.
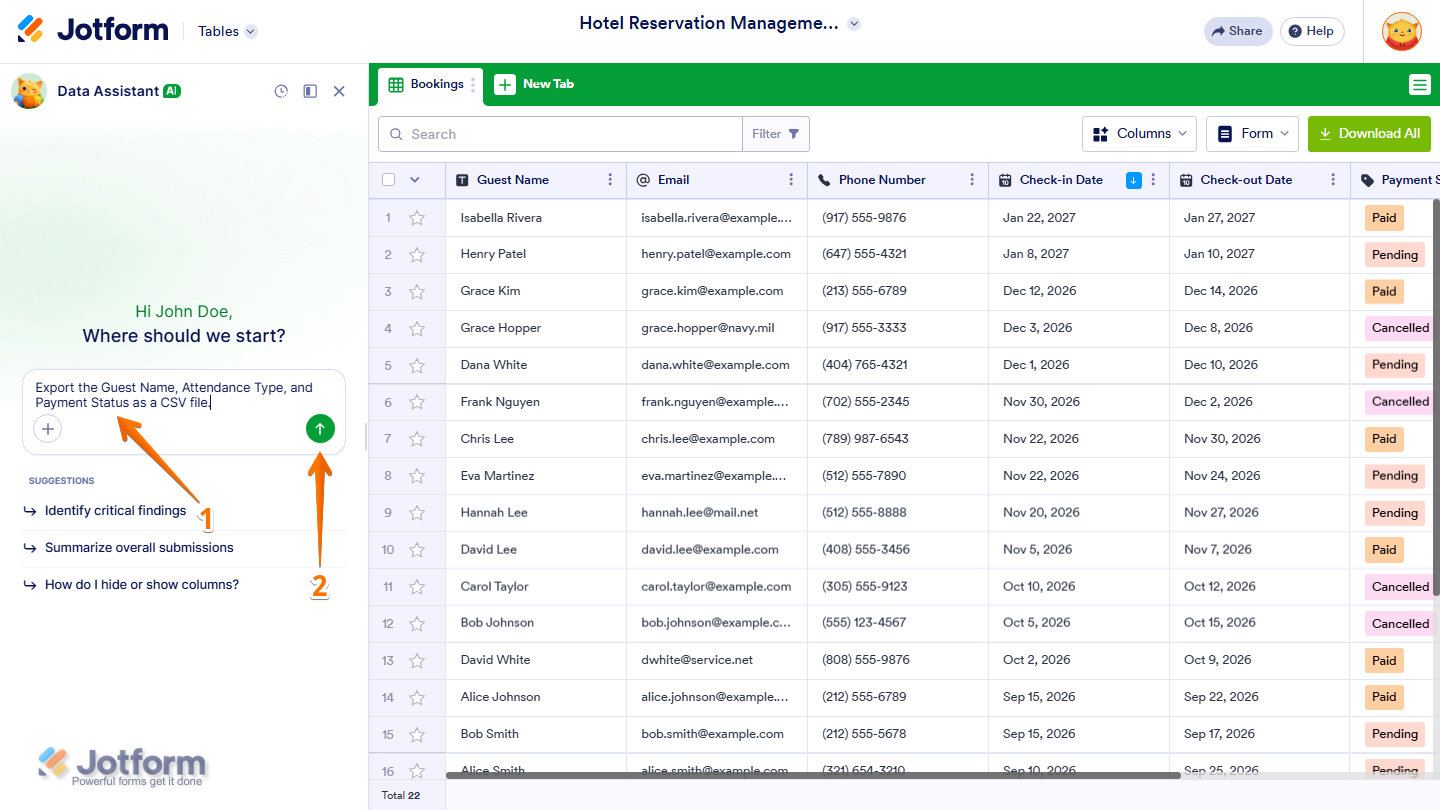
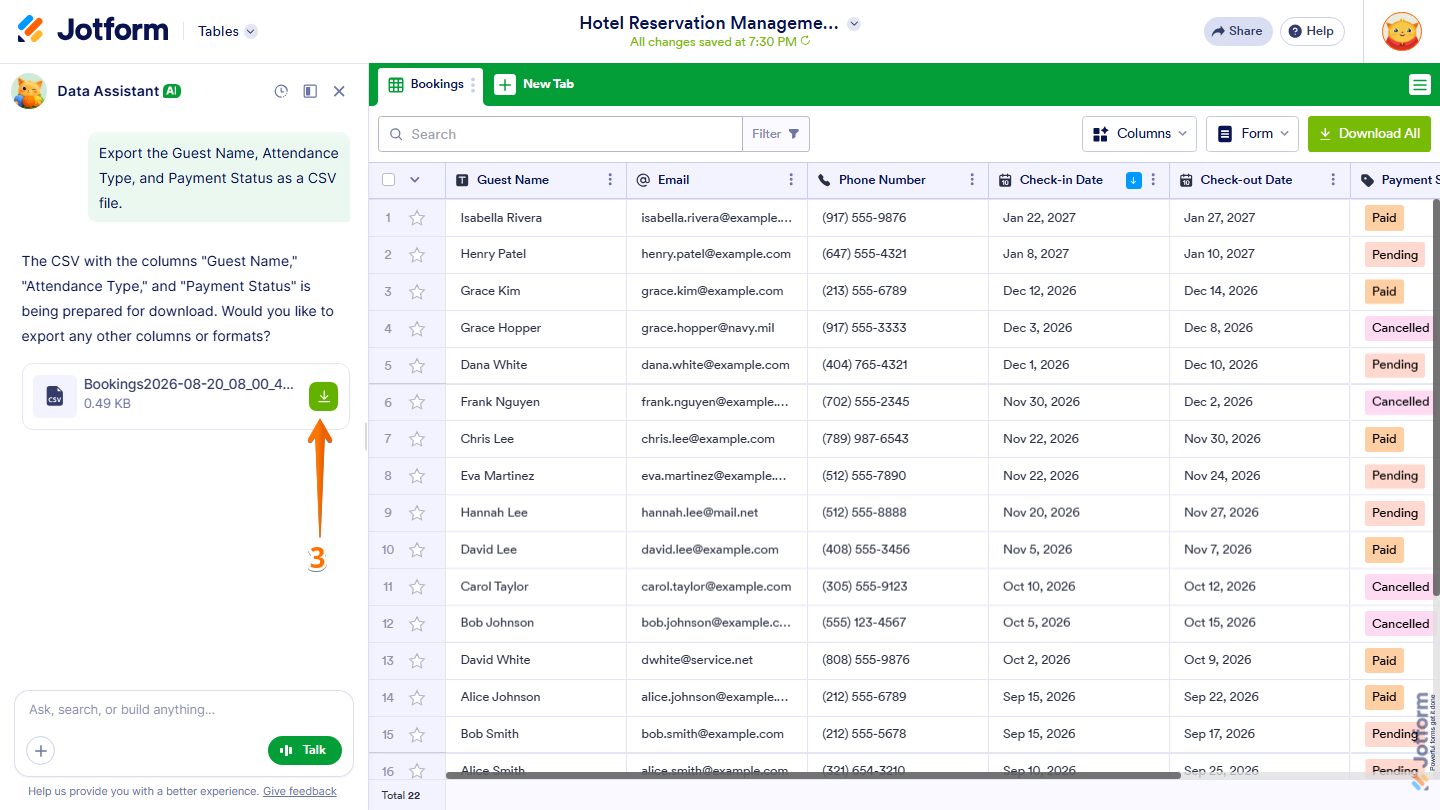
- Now, the AI Data Assistant will process your request and provide the corresponding export option. If you requested a CSV file, click on the Download icon to save the file.
- If you requested a PDF file, the AI Data Assistant will send an email to your account with a link to download the PDF.
Note
CSV exports are available directly through the download link in the conversation, while PDF exports are delivered to your account email.
Using AI Columns With AI Data Assistant
AI Data Assistant can also work with data generated by AI Columns in your Table. This allows you to use AI-generated data as part of your prompts and other Table actions.
For a detailed walkthrough of AI Columns, check out our guide on How to Use AI Columns in Jotform Tables.

Send Comment: