AI Columns in Jotform Tables, powered by AI Data Assistant, help you automatically analyze, organize, and transform your table data without writing formulas or handling each record manually. Whether you want to generate summaries, categorize responses, perform calculations, translate text, analyze sentiment, or create custom AI-powered workflows, AI Columns make it easy to work with your data in just a few clicks.
Once you’ve added an AI Column to your table, Jotform AI processes the data in that column and adds the results to a new column based on the AI tool you choose. With a range of built-in tools available, you can quickly find useful insights and automate repetitive tasks directly in Jotform Tables.
With AI Columns, you can:
- Summarize — Analyze a column and generate concise summaries of its data.
- Categorize — Analyze a column and group submission data into relevant categories.
- Sentiment Analysis — Identify the tone or sentiment of data in a selected column.
- Calculate — Perform calculations on your table data in response to a natural language prompt.
- Translate — Translate the contents of a column into another language.
- Custom AI Column — Create a custom AI-powered column using your own prompt.
Adding a Summarize AI Column
The Summarize AI Column uses AI to identify the key points in a selected column and generate a brief summary for each entry. Get started like this:
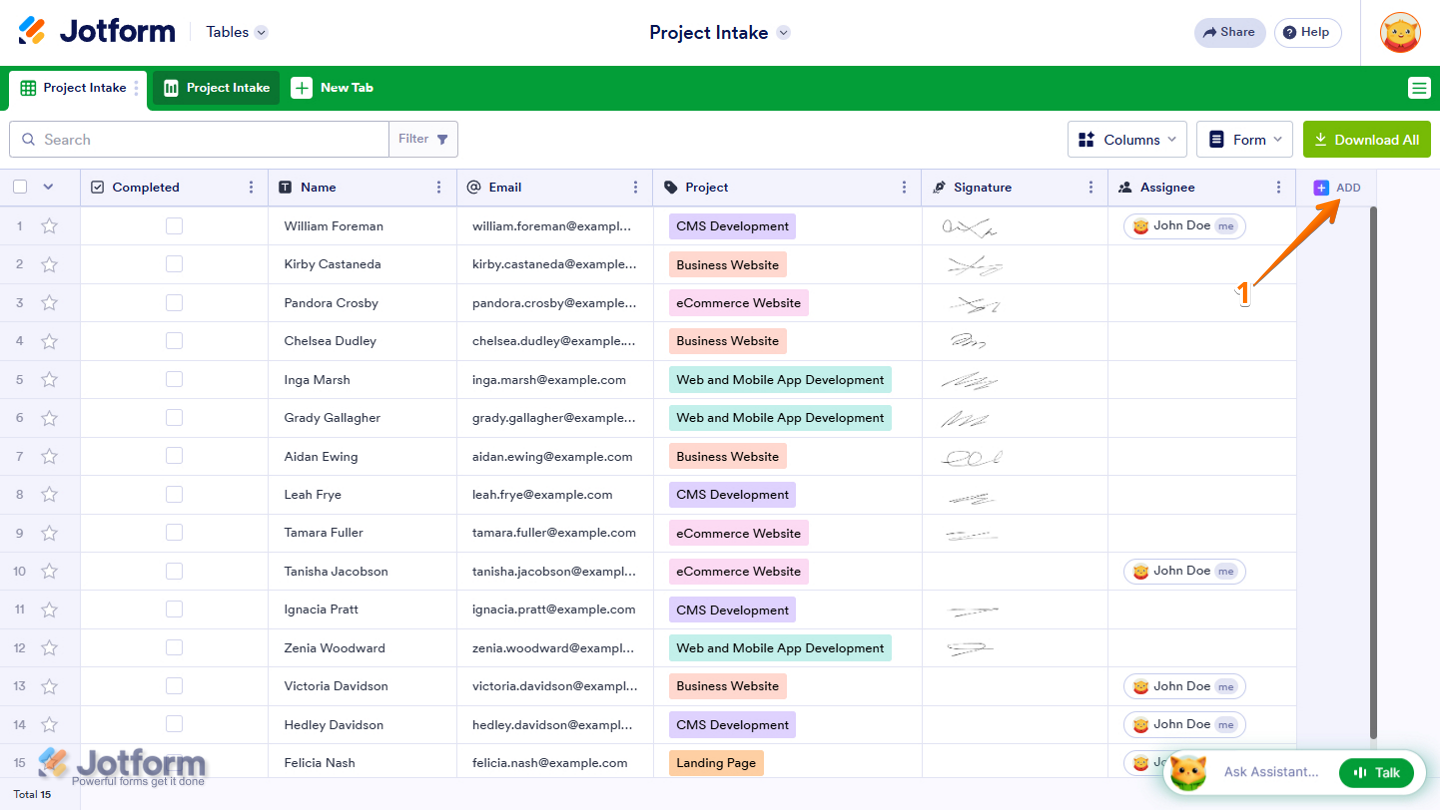
- In Jotform Tables, click on Add at the top of the last column.
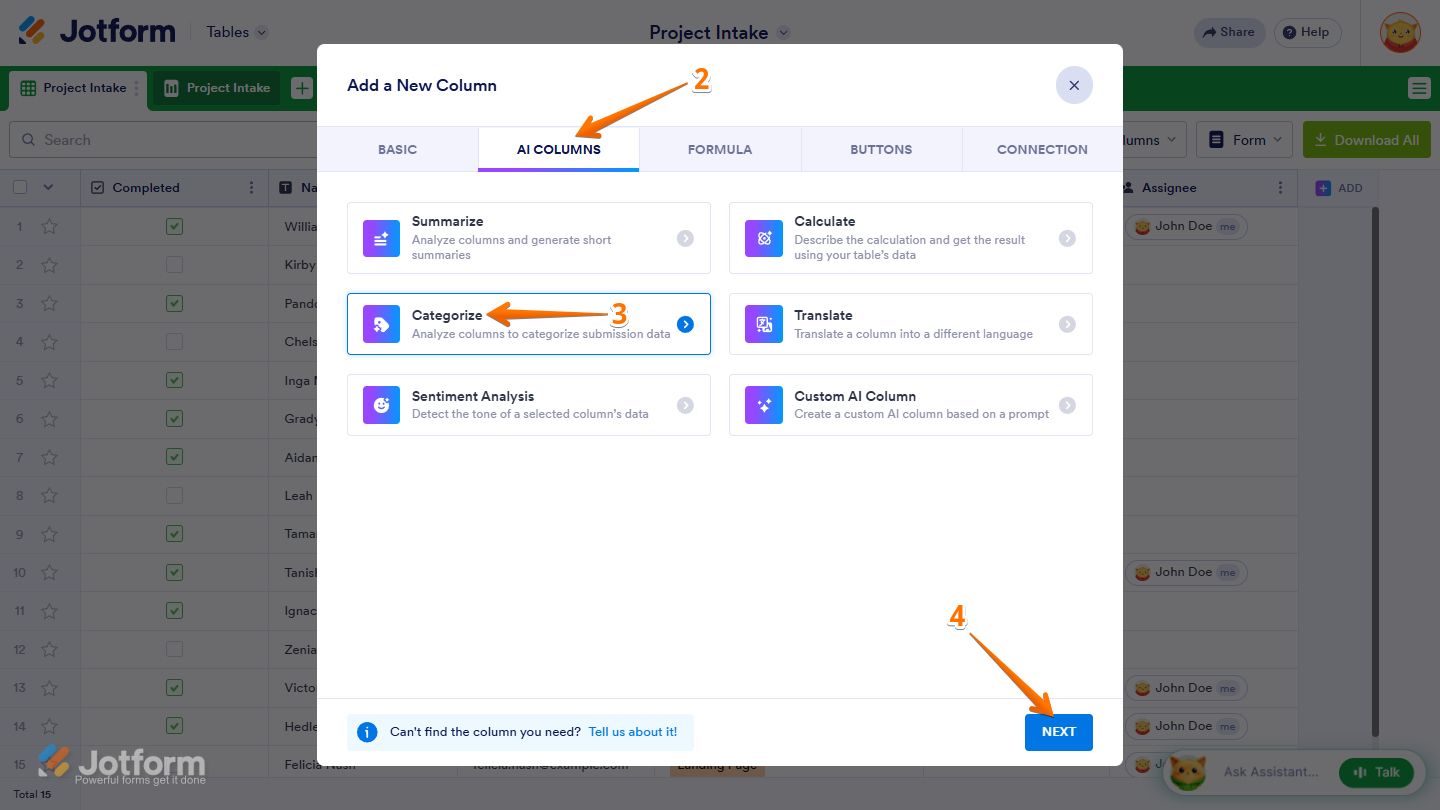
- Then, in the Add a New Column window that opens, click on AI Columns.
- Next, click on Summarize from the list.
- Now, click on Next at the bottom.
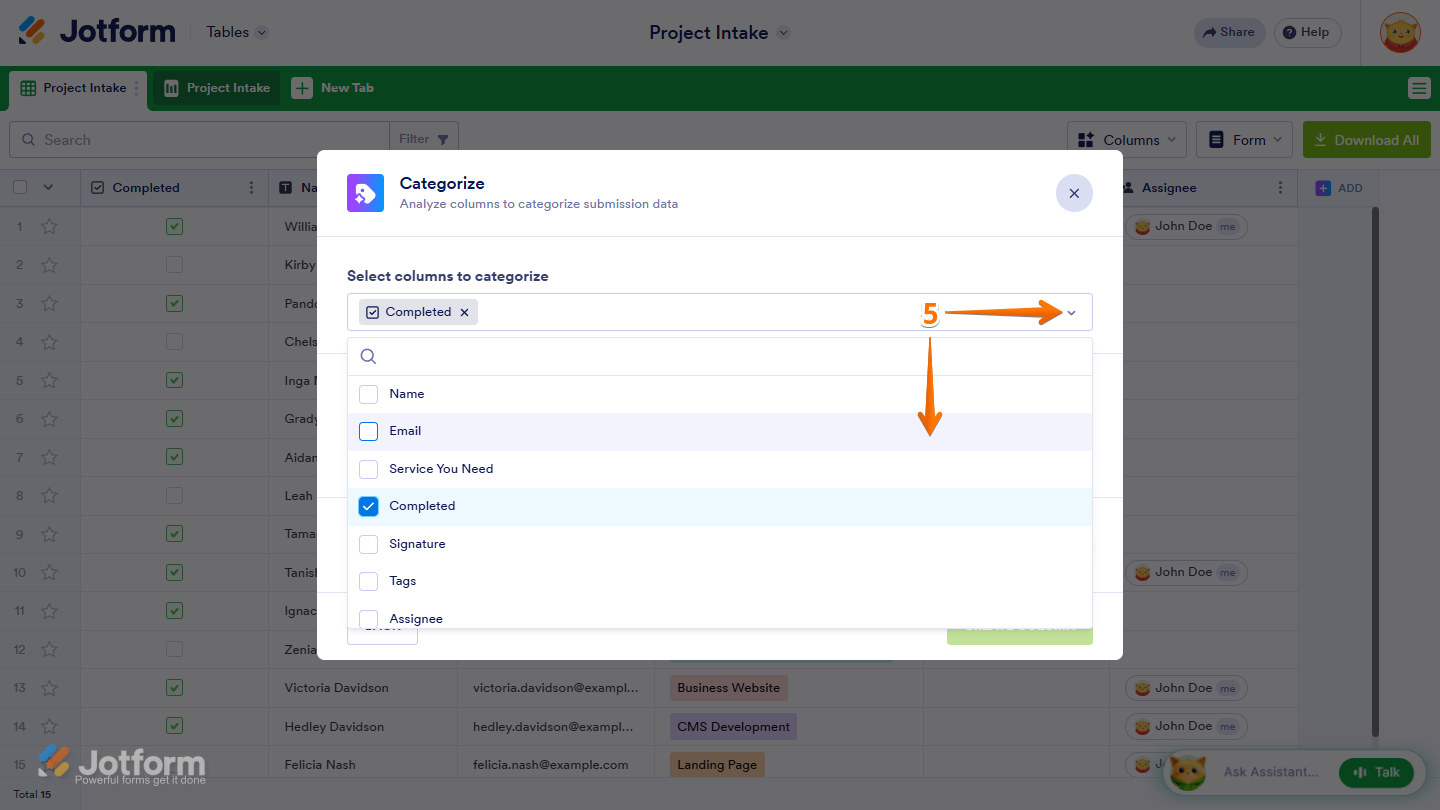
- In the Categorize window that opens up, under the Select Columns to Summarize section, click on the Downward Arrow icon and select the columns you want to summarize.
Note
All columns are selected by default. To show only specific form fields, uncheck the fields you don’t want to include from the dropdown menu.
- Next, under the Give a Prompt section, enter a prompt that determines how the AI Column generates the summary.
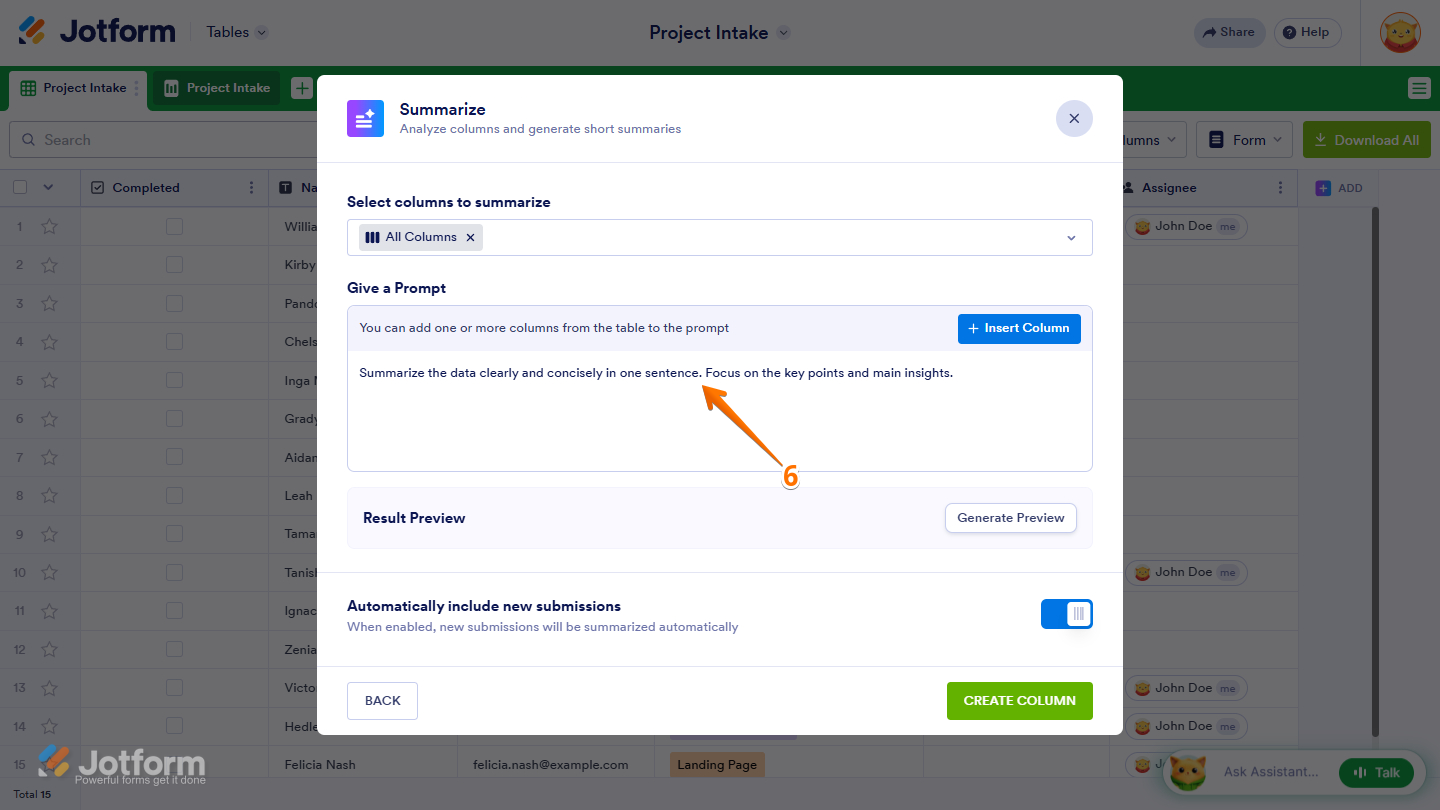
- You can also click on Insert Column to add form fields to your prompt, allowing AI to use their values as context when generating results.
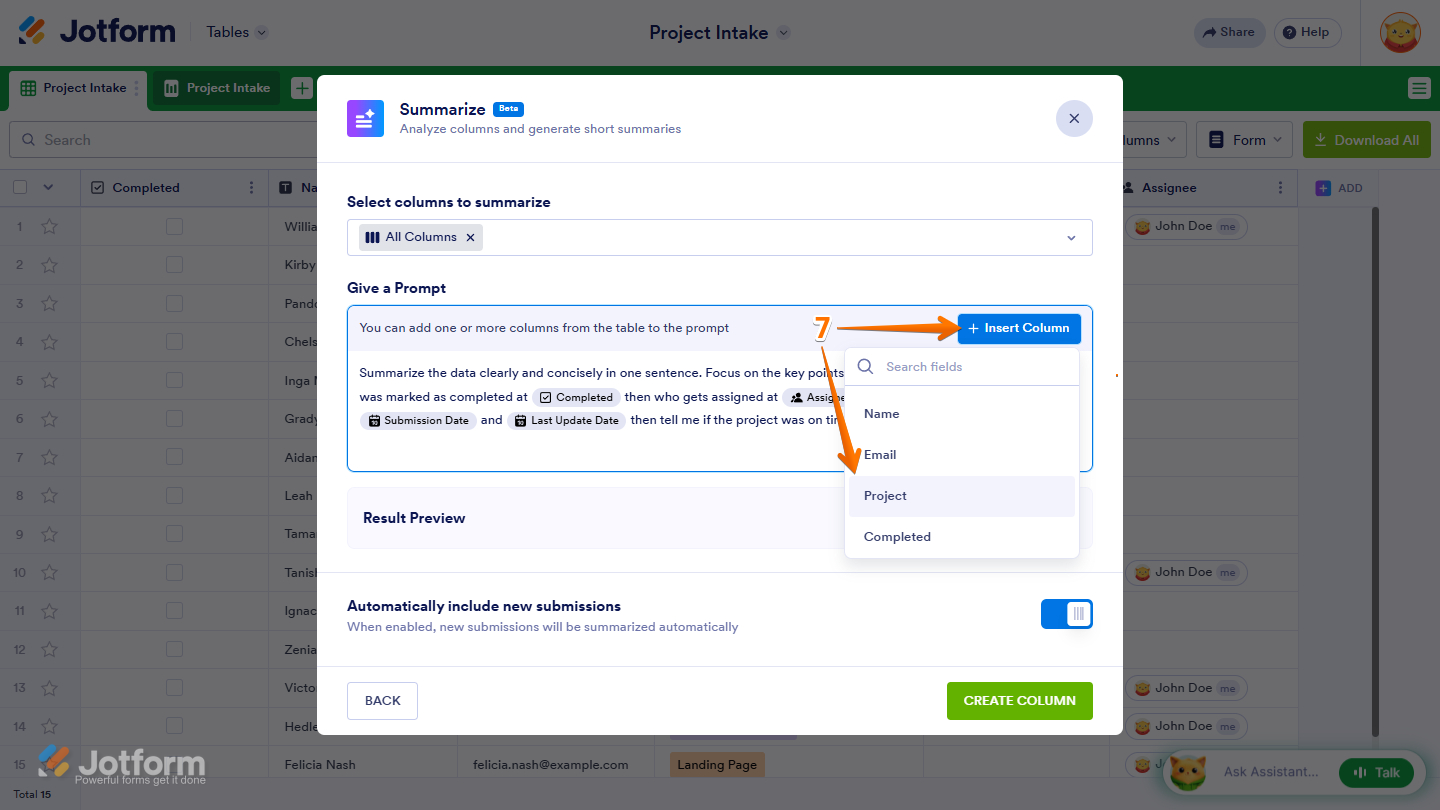
- Then, click on Generate Preview to see an example of how the AI Column generates the summary based on your prompt.
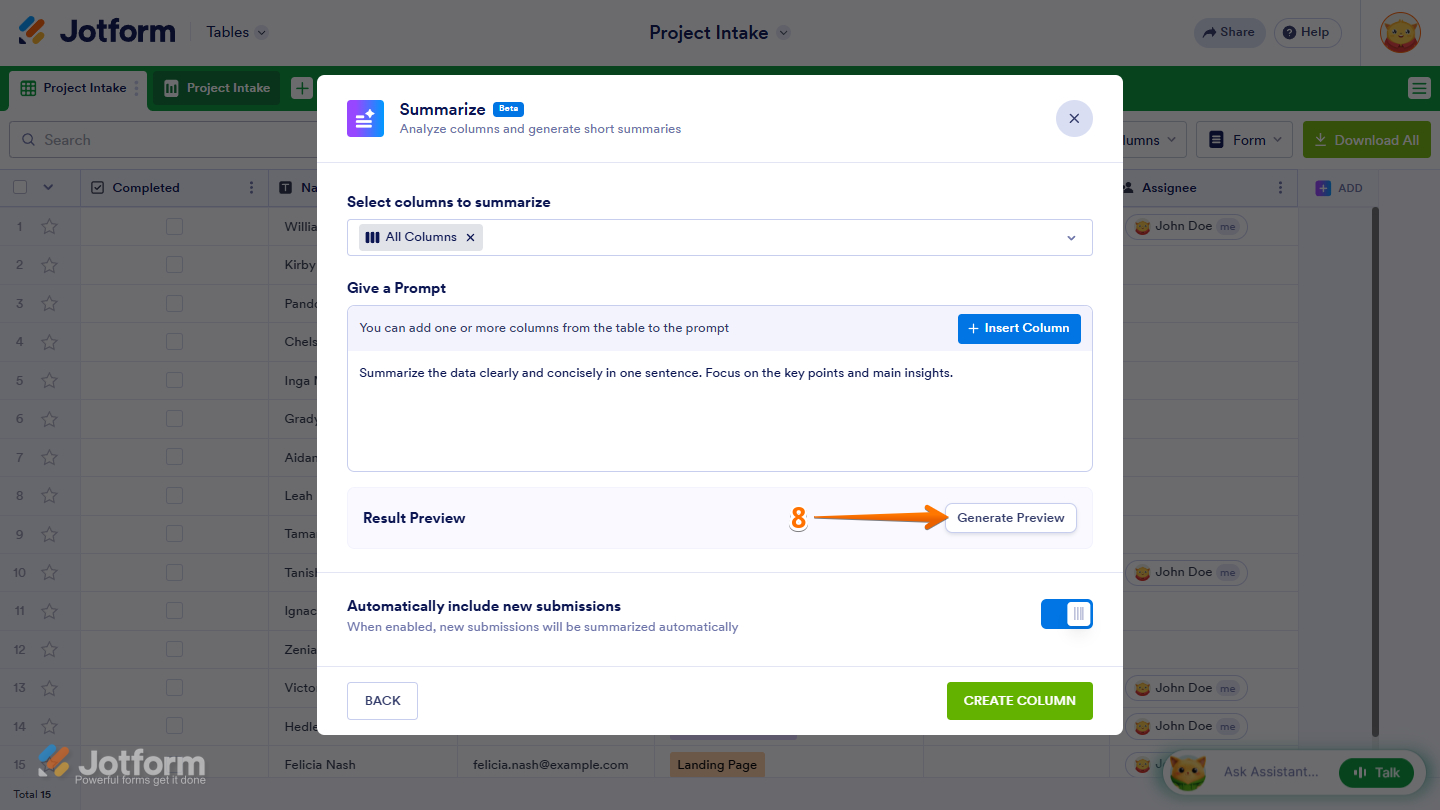
- Now, keep the Automatically Include New Submissions option toggled on so new submissions are summarized automatically.
- Once everything’s set, click on Create Column to add the Summary AI Column to your Jotform Table.
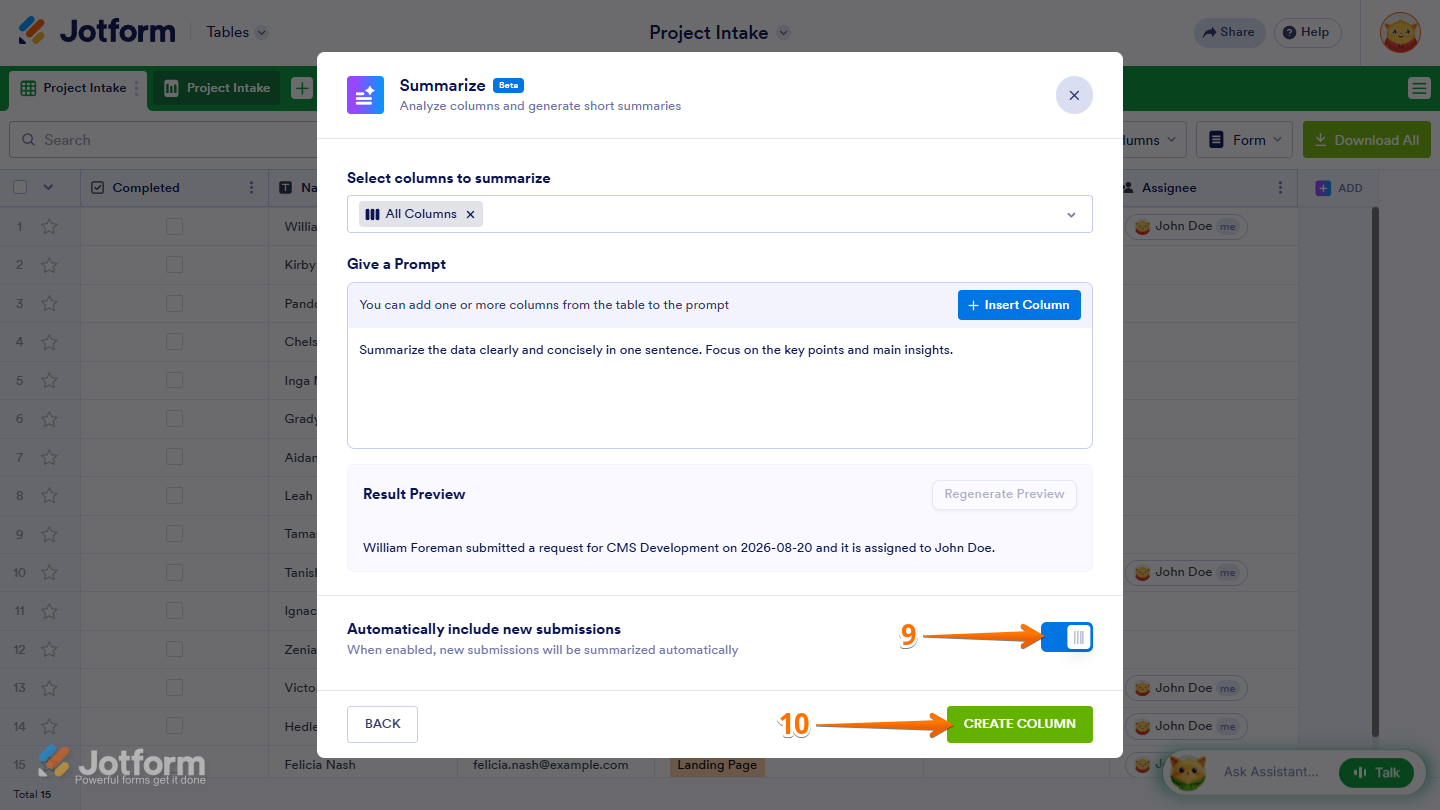
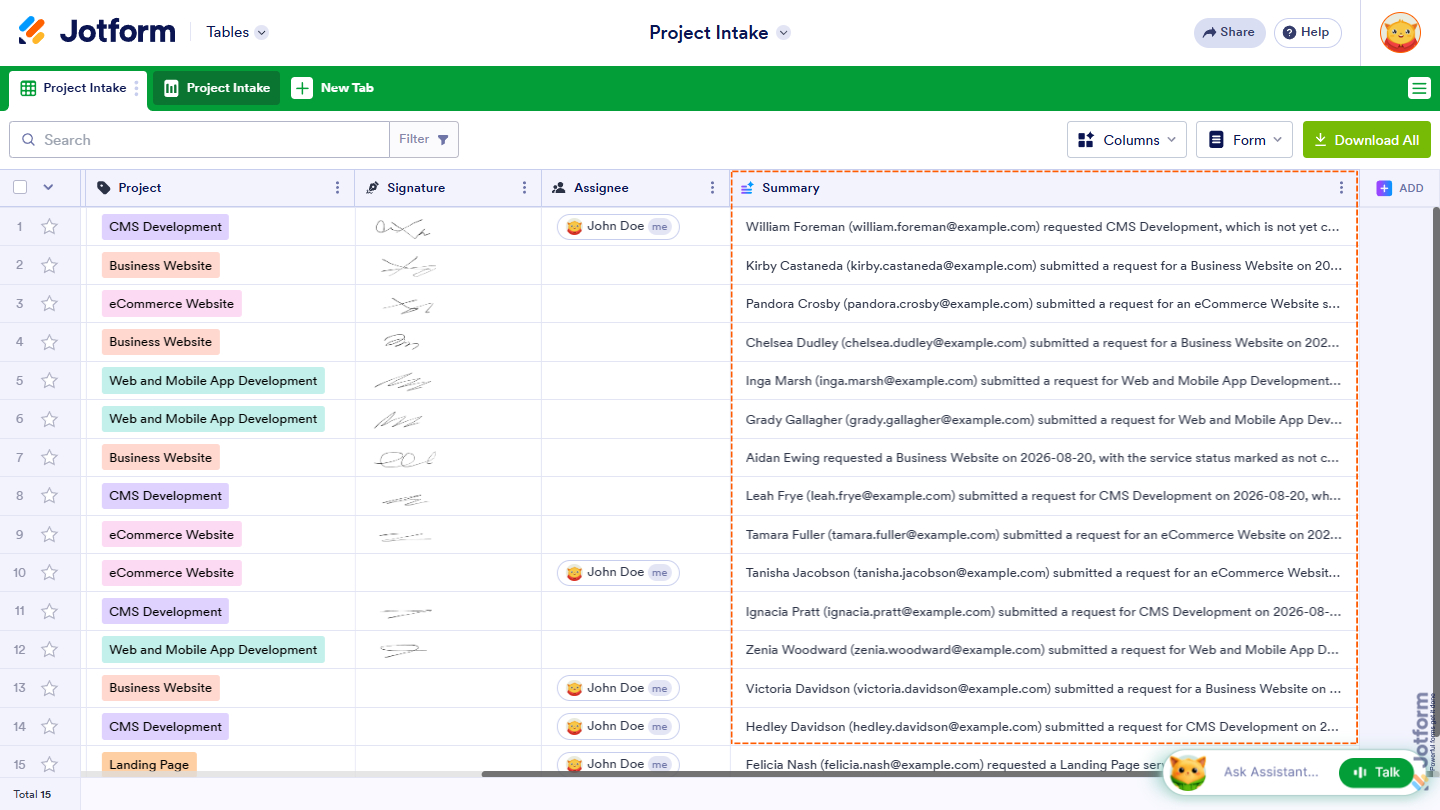
That’s it! Your Summary AI Column is ready to use and will automatically generate summaries based on the selected column. Here’s an example of the generated summaries:
Adding the Categorize AI Column
The Categorize AI Column analyzes the data in a selected column and automatically groups similar entries into meaningful categories, making your data easier to organize and review. Just set it up like this:
- In Jotform Tables, click on Add at the top of the last column.
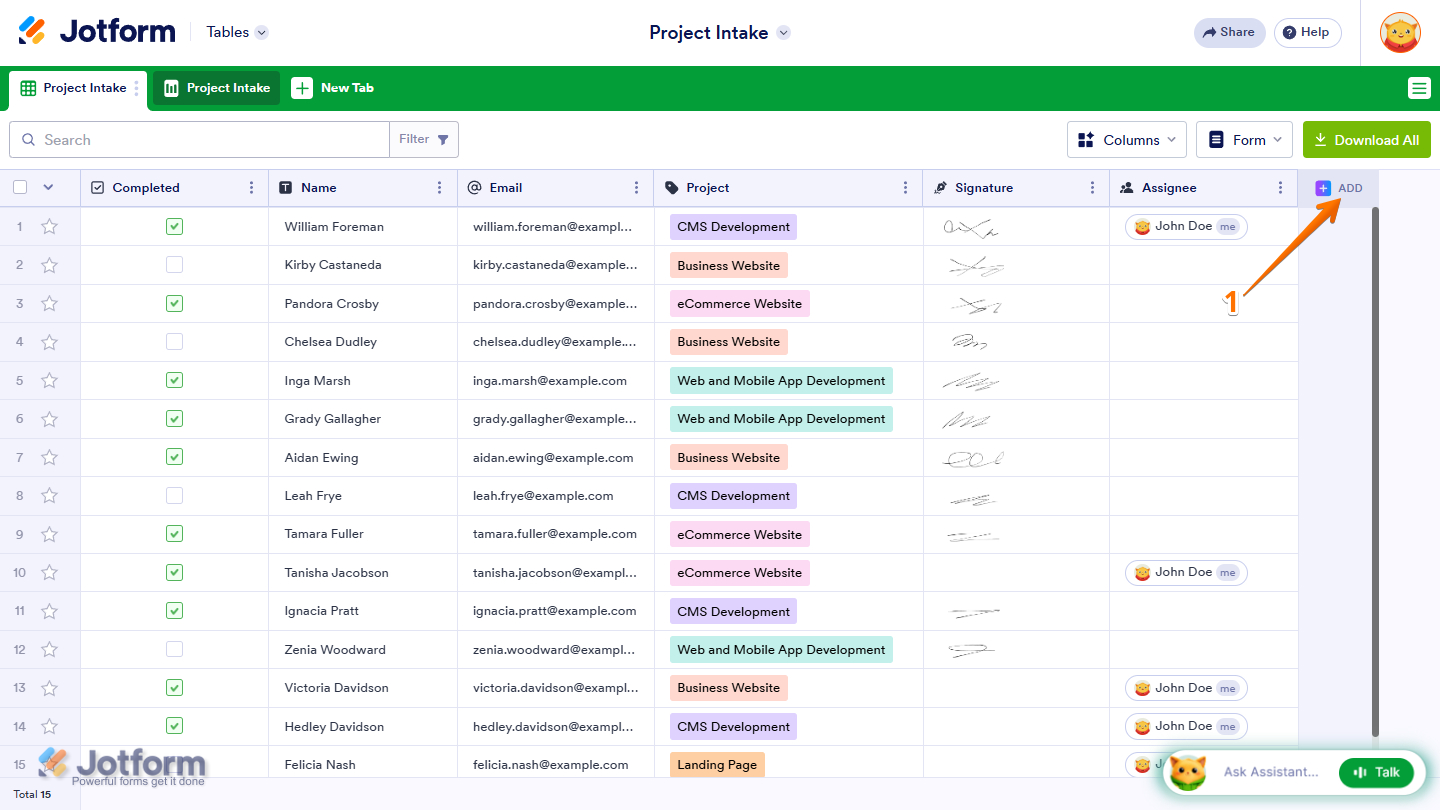
- Then, in the Add a New Column window that opens up, click on AI Columns.
- Next, click on Categorize from the list.
- Now, click on Next at the bottom.
- Then, in the Categorize window that opens up, under the Select Columns to Categorize section, click on the Downward Arrow icon and select one or more columns you want to categorize.
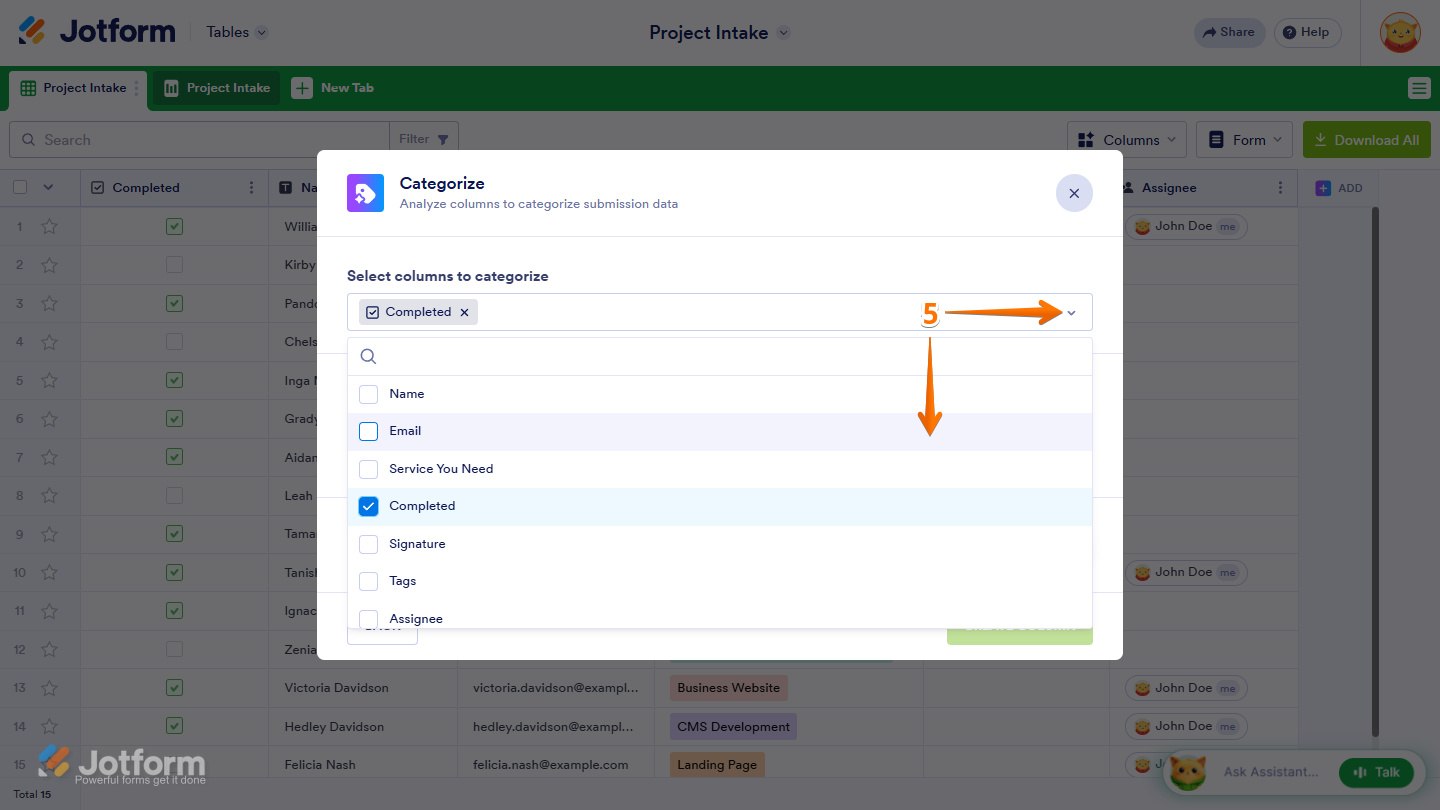
- Next, under the Add Category Options section, enter the category title in the first box and the description in the second box.
- Then, click on the Plus icon on the left to add another category.
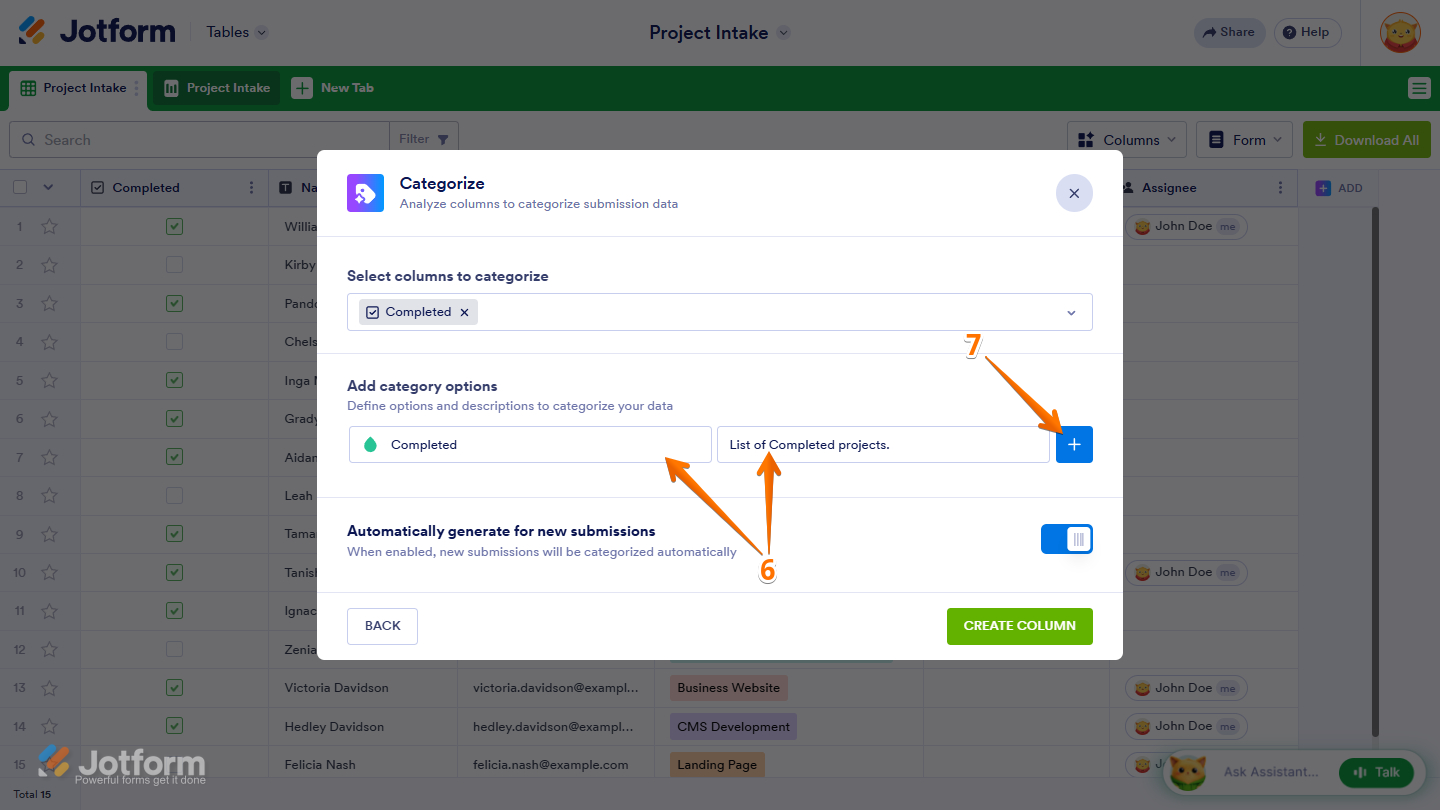
- Now, keep the Automatically Generate for New Submissions option toggled on so new submissions are categorized automatically.
- When your settings are ready, click on Create Column to add the Categorize AI Column to your Jotform Table.
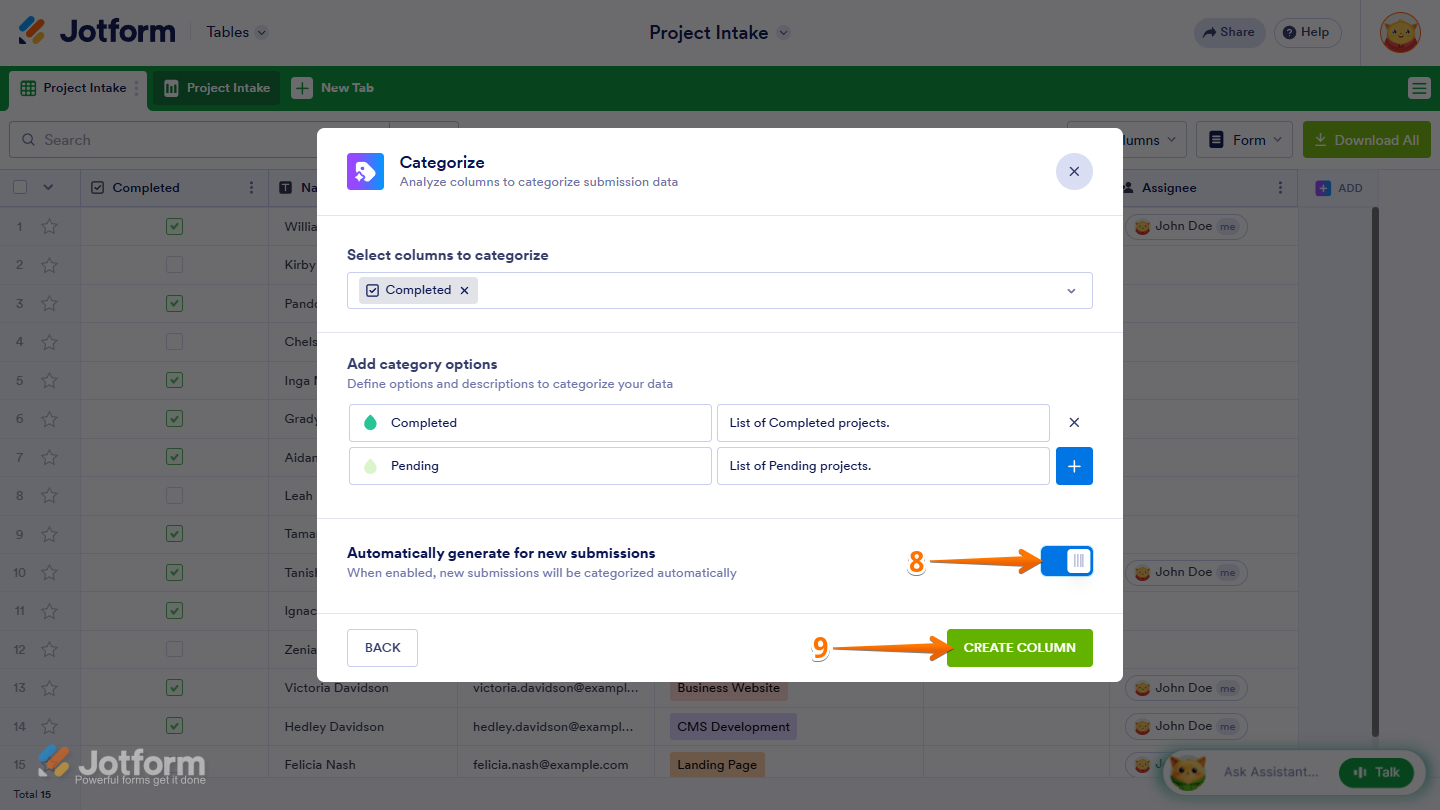
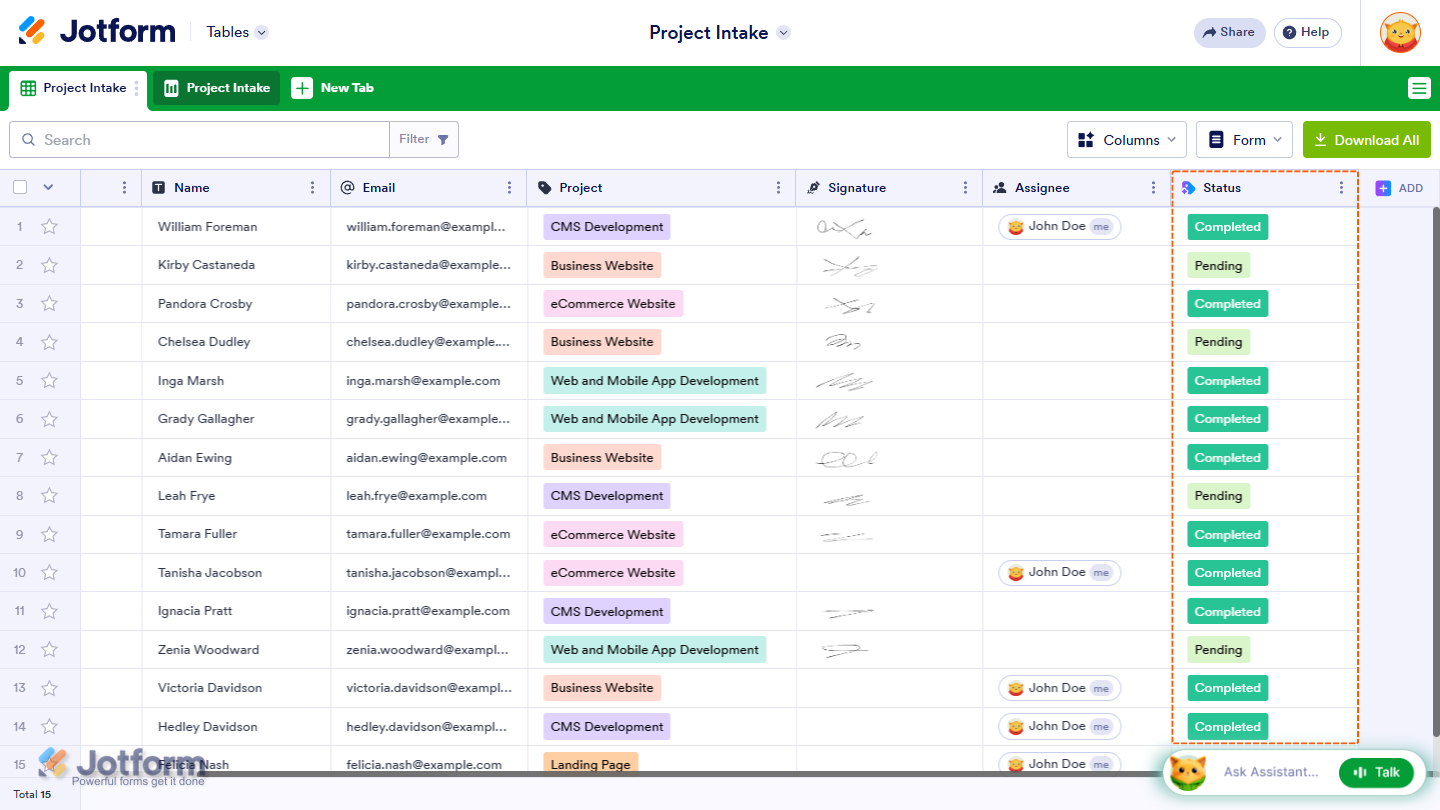
That’s it! Your table now includes a Categorize AI Column that automatically groups similar data into meaningful categories. Below is a screenshot of the Categorize column:
Configuring the Sentiment Analysis AI Column
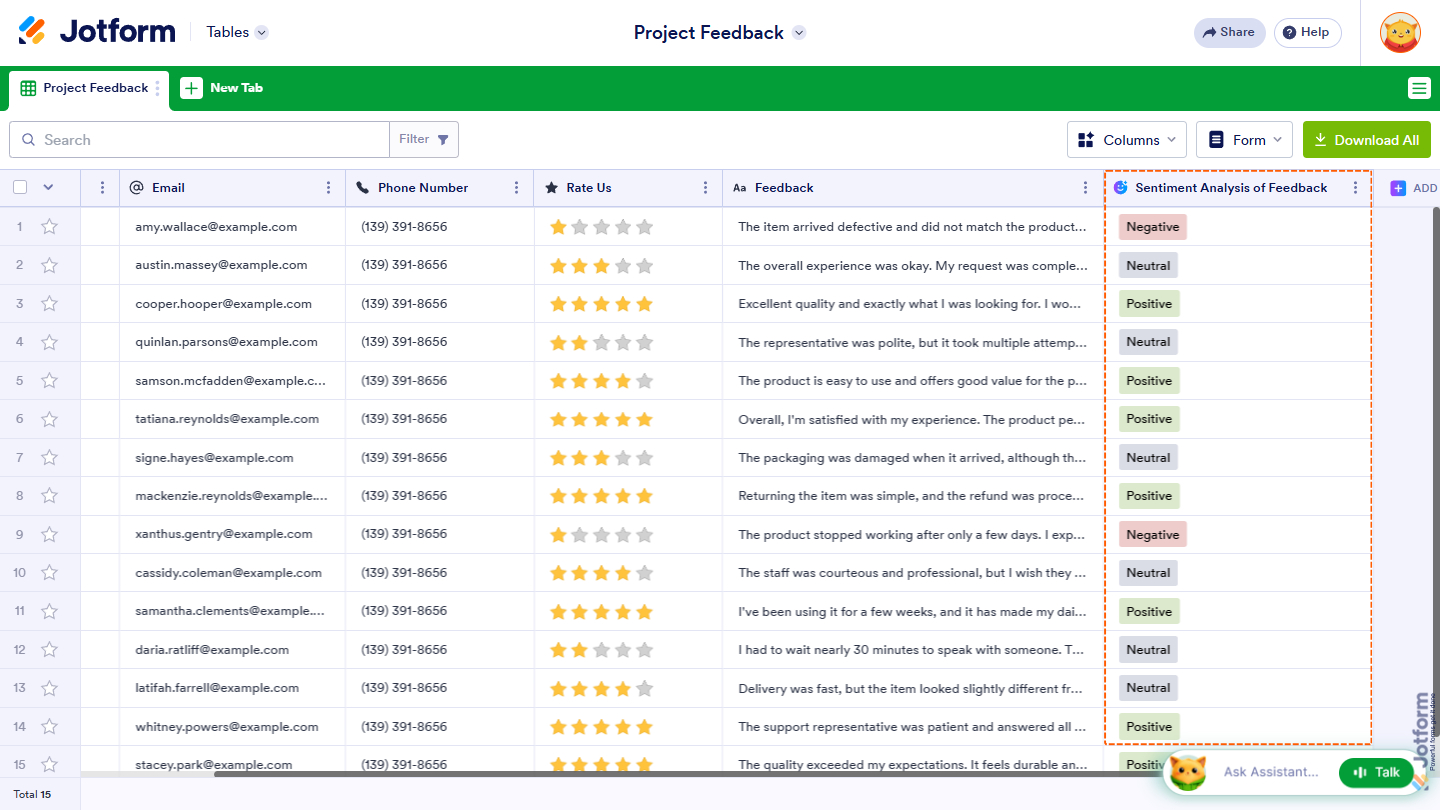
The Sentiment Analysis AI Column analyzes the data in the selected column and identifies the emotional tone of each entry as positive, neutral, or negative. You can set it up like this:
- In Jotform Tables, click on Add at the top of the last column.
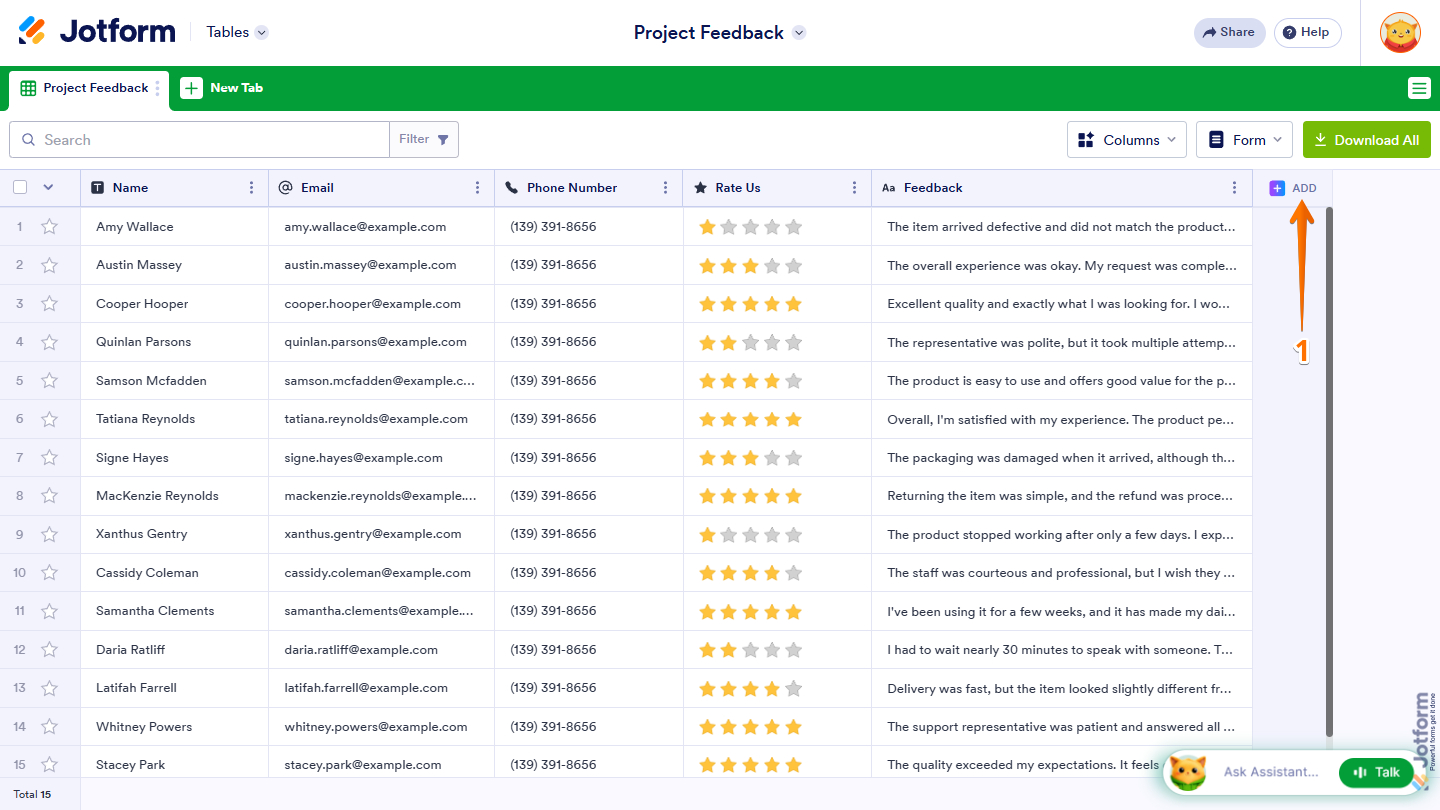
- Then, in the Add a New Column window that opens up, click on AI Columns.
- Next, click on Sentiment Analysis from the list.
- Now, click on Next at the bottom.
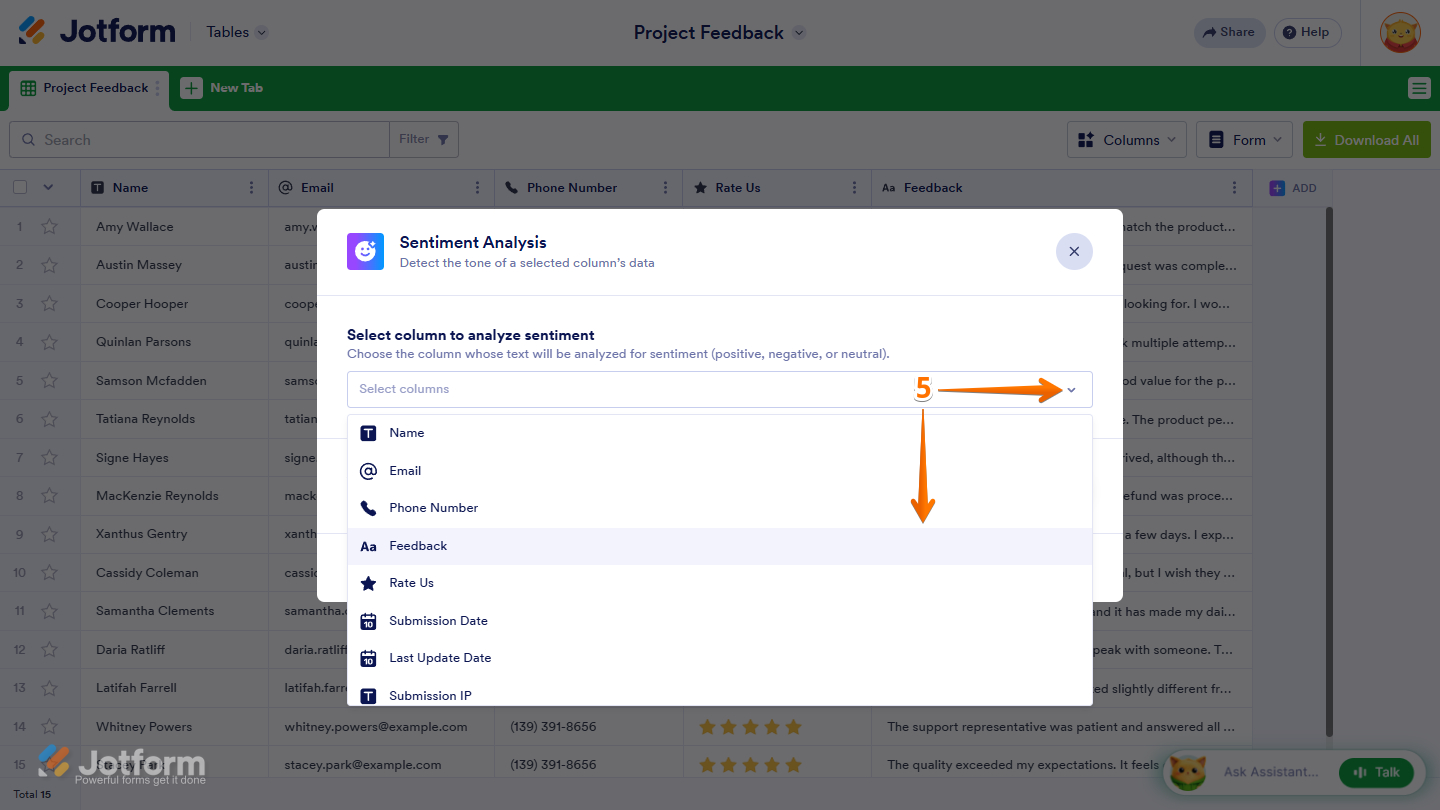
- Then, in the Sentiment Analysis window that opens up, under the Select Column to Analyze Sentiment section, click on the Downward Arrow icon and select a column whose text will be analyzed for sentiment.
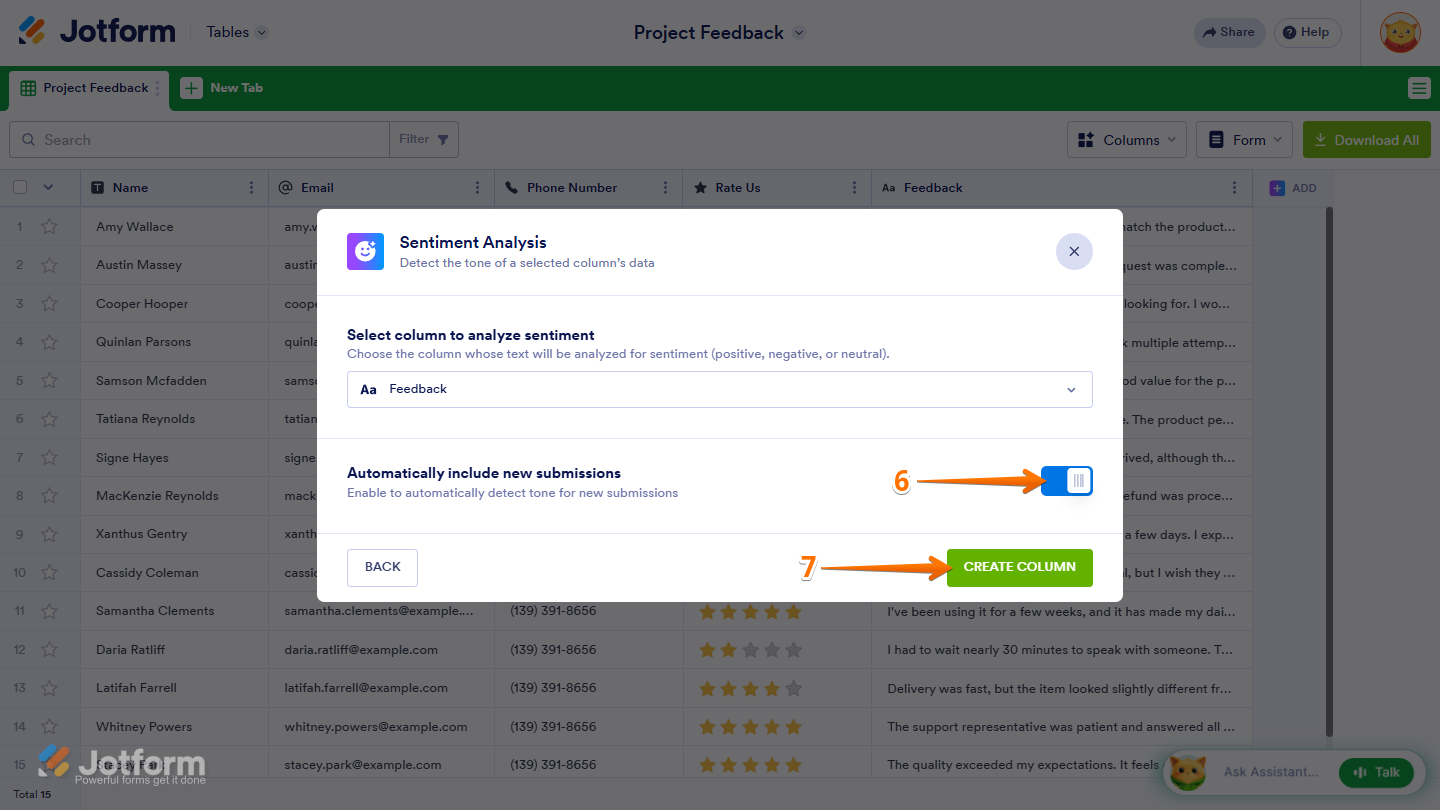
- Now, keep the Automatically Include New Submissions option toggled on to automatically detect tone for new submissions.
- Once everything’s set, click on Create Column to add the Sentiment Analysis AI Column to your Jotform Table.
That’s it! Your table now includes a Sentiment Analysis AI Column that automatically detects the emotional tone of each response. Below is an example of how the sentiments are displayed:
Setting up the Calculate AI Column
The Calculate AI Column analyzes your table data and performs AI-powered calculations based on the instructions you provide. Setting it up is quick—here’s how:
- In Jotform Tables, click on Add at the top of the last column.
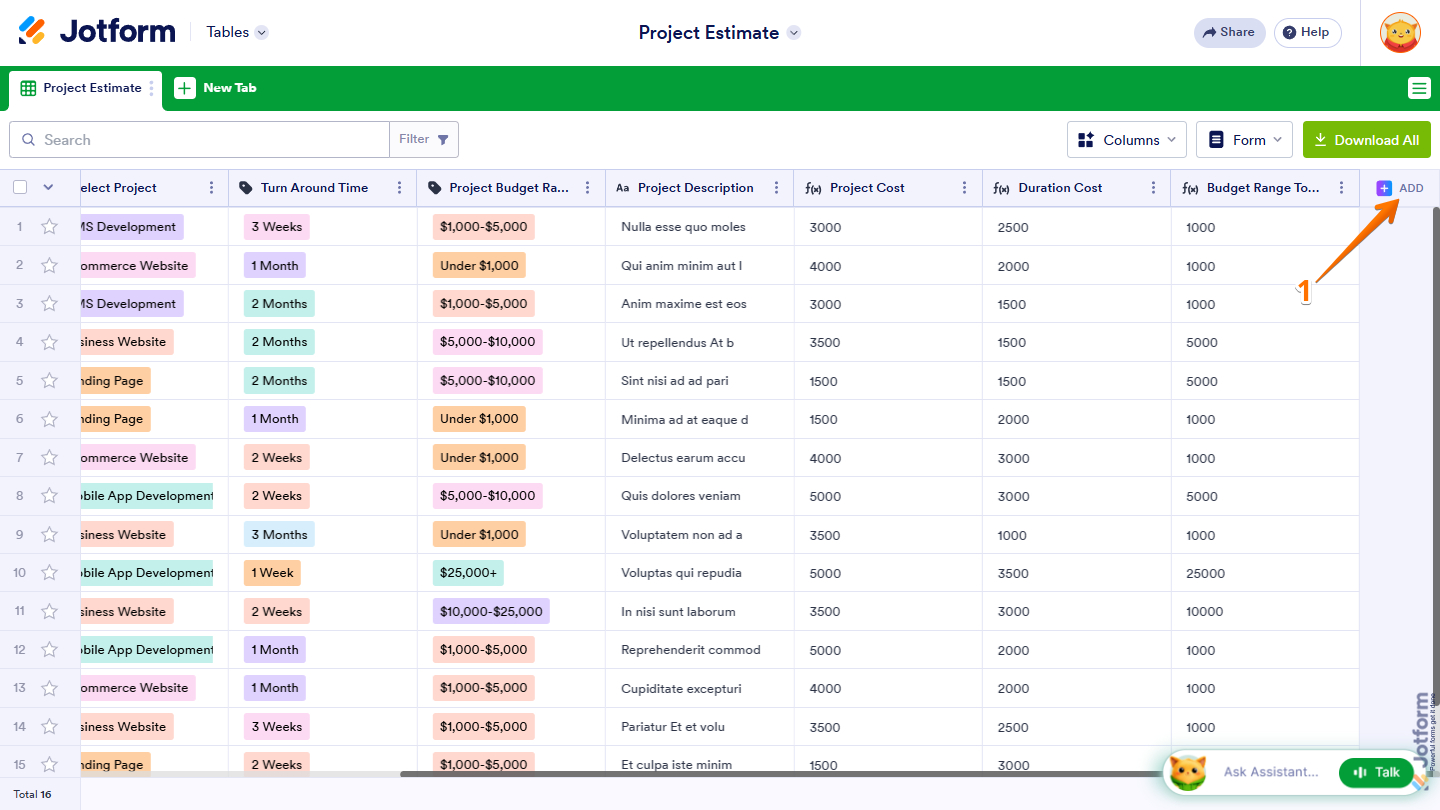
- Then, in the Add a New Column window that opens up, click on AI Columns.
- Next, click on Calculate from the list.
- Now, click on Next at the bottom.
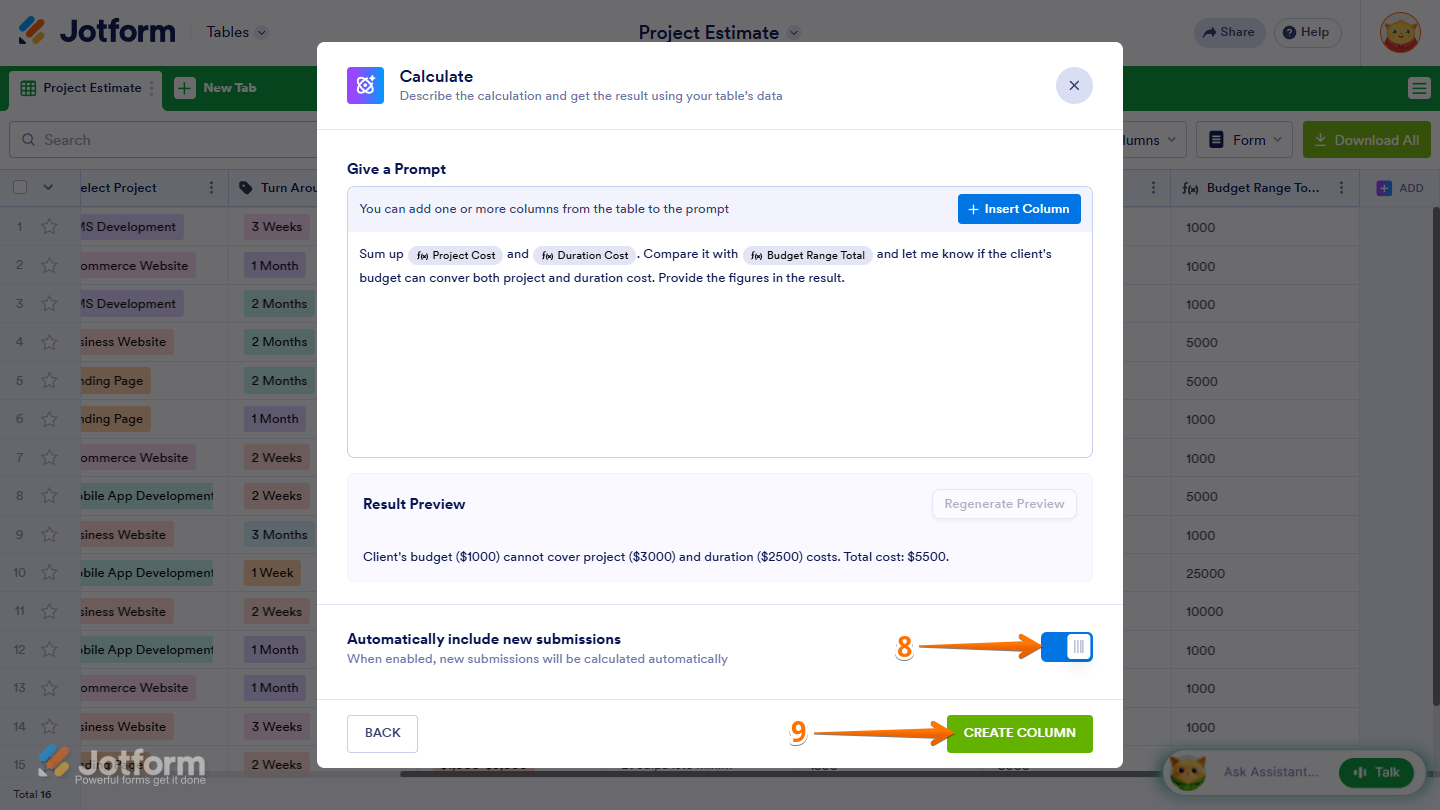
- Then, in the Calculate window that opens, enter the calculation you want to generate under the Give a Prompt section.
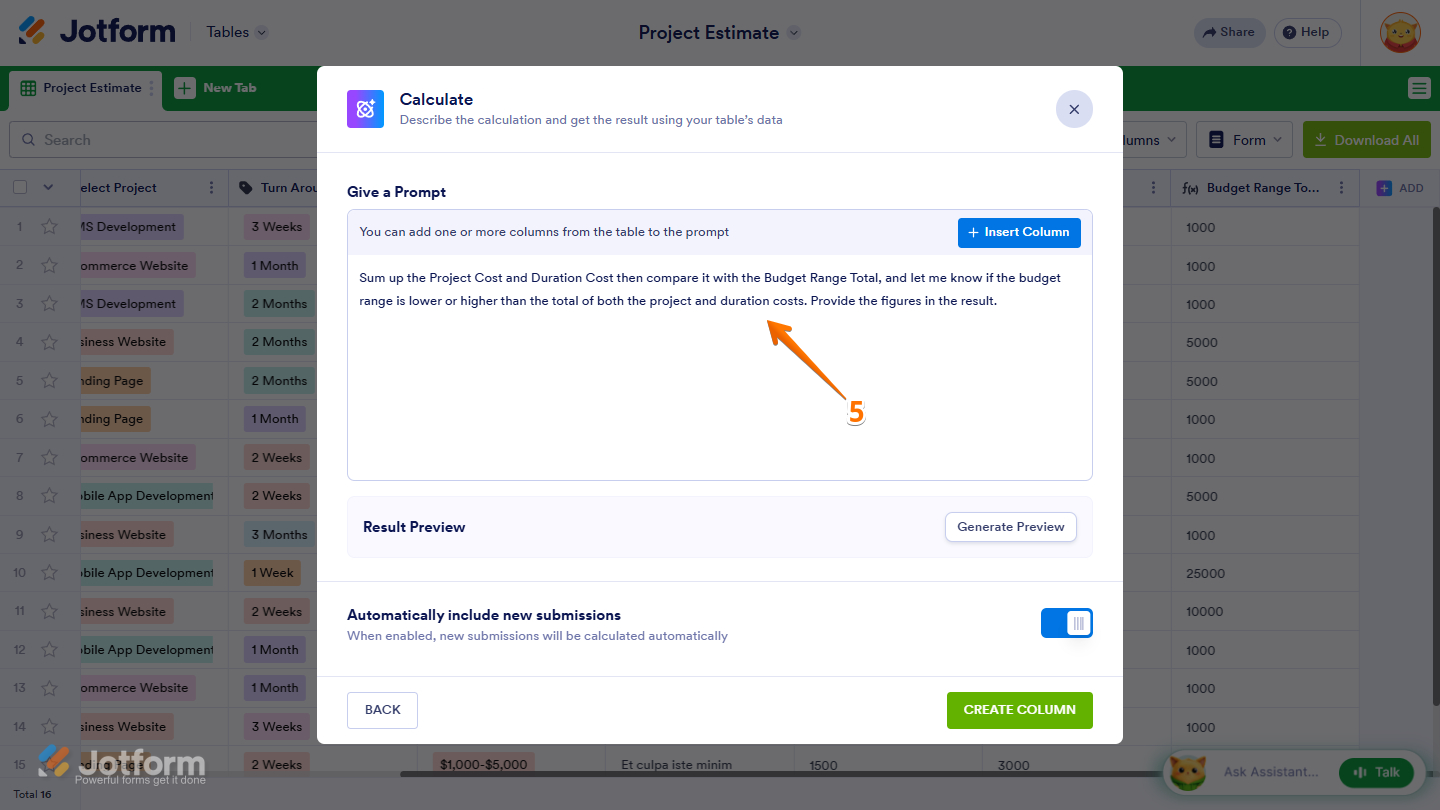
- You can also click on Insert Column to add form fields to your prompt as a reference for the result.
- Next, click on Generate Preview to see an example of how the AI Column generates or calculates the result.
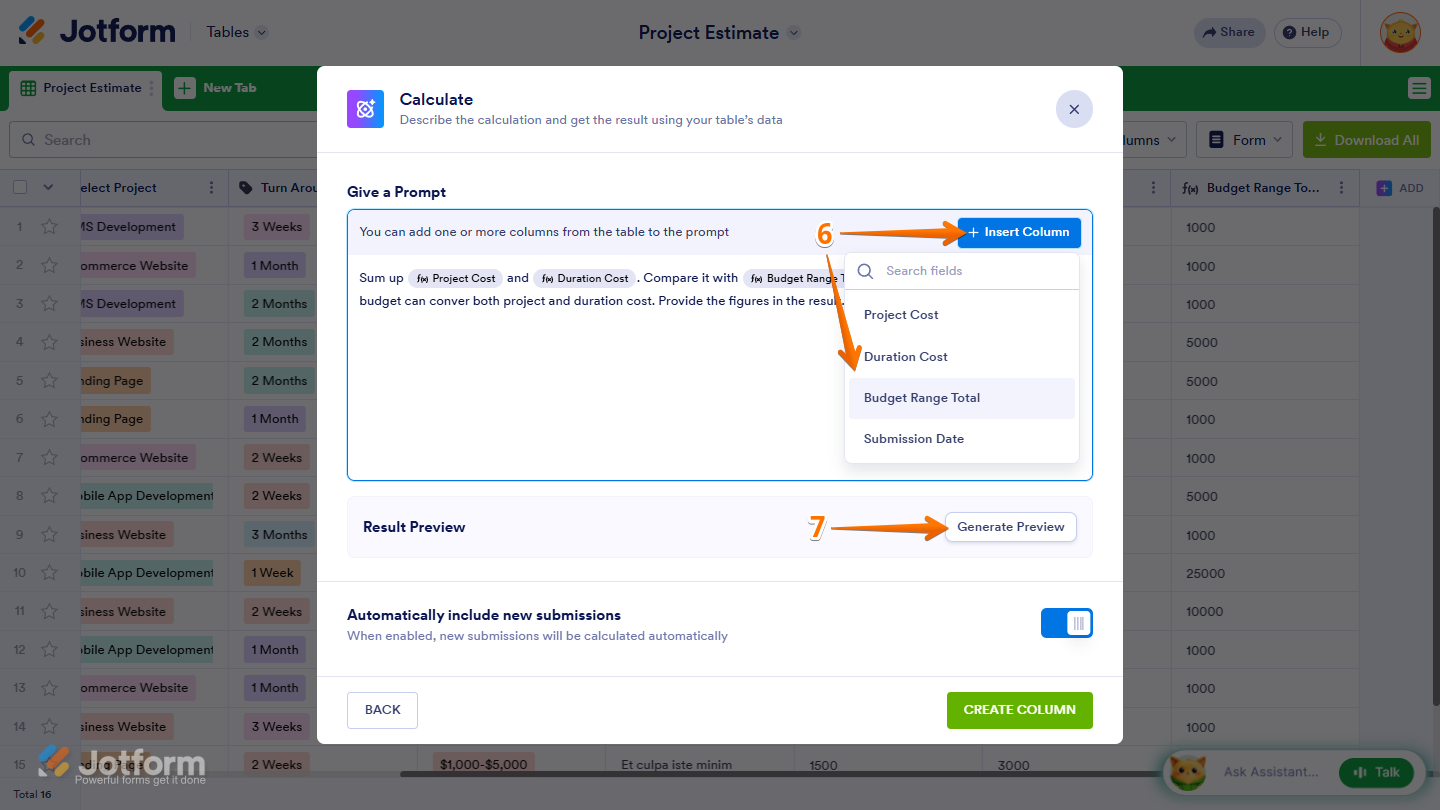
- Now, keep the Automatically Include New Submissions option toggled on to automatically calculate new submissions.
- Once everything’s set, click on Create Column to add the Calculate AI Column to your Jotform Table.
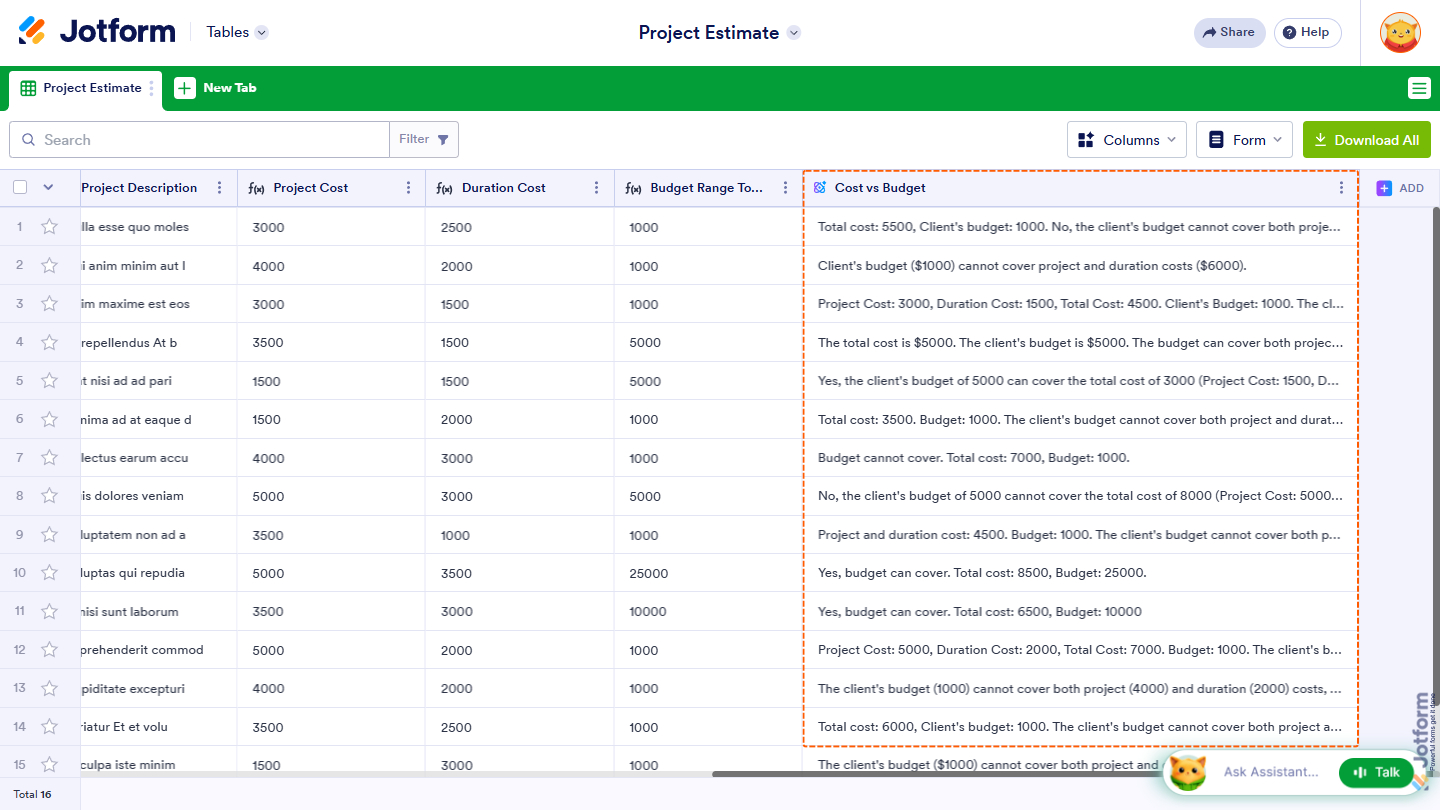
That’s it! You can now use the Calculate AI Column to perform AI-powered calculations without creating formulas manually. Below is an example of how it would display the result:
Configuring the Translate AI Column
The Translate AI Column automatically translates the contents of a selected column into the language you choose, making your data accessible to a wider audience. Here’s what to do:
- In Jotform Tables, click on Add at the top of the last column.
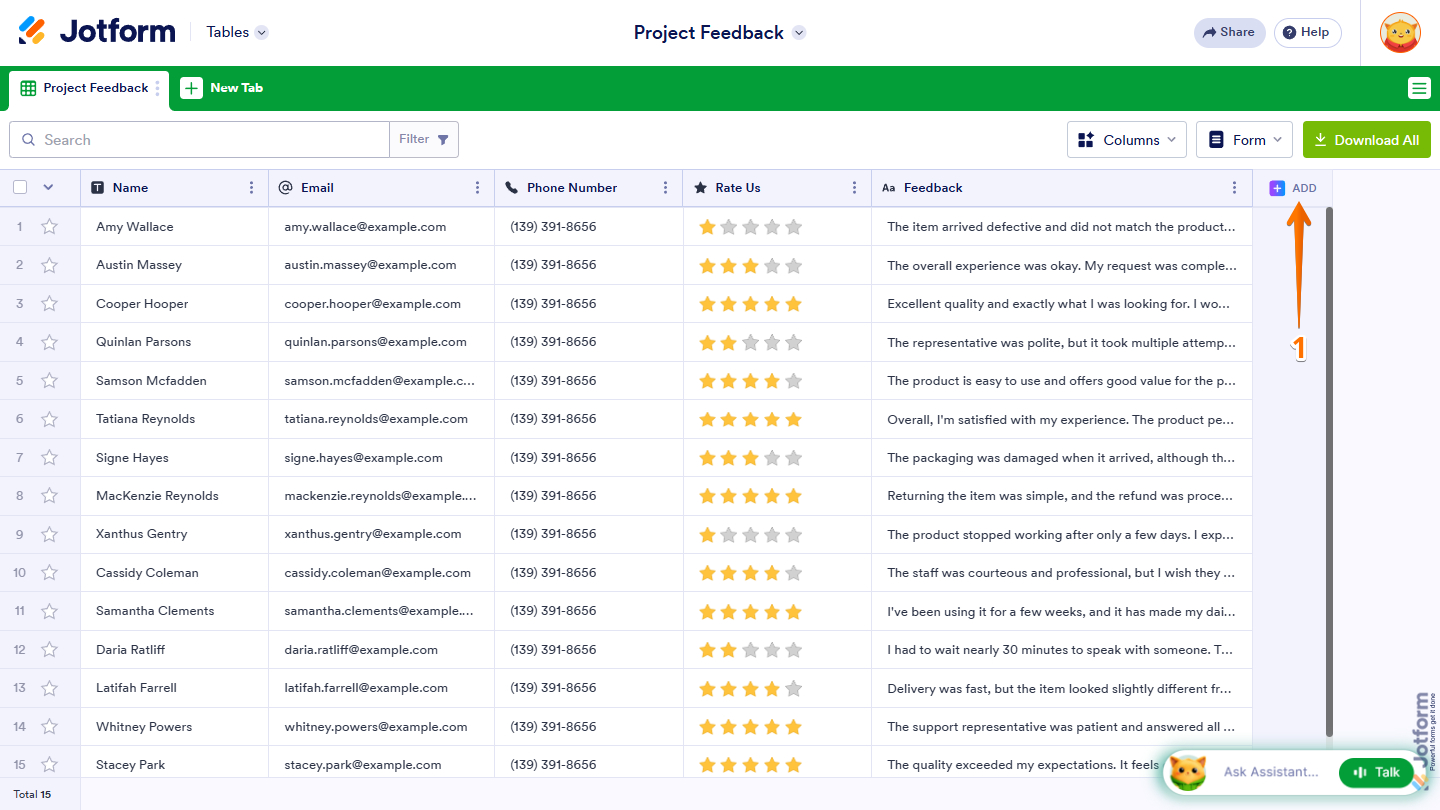
- Then, in the Add a New Column window that opens up, click on AI Columns.
- Next, click on Translate from the list.
- Now, click on Next at the bottom.
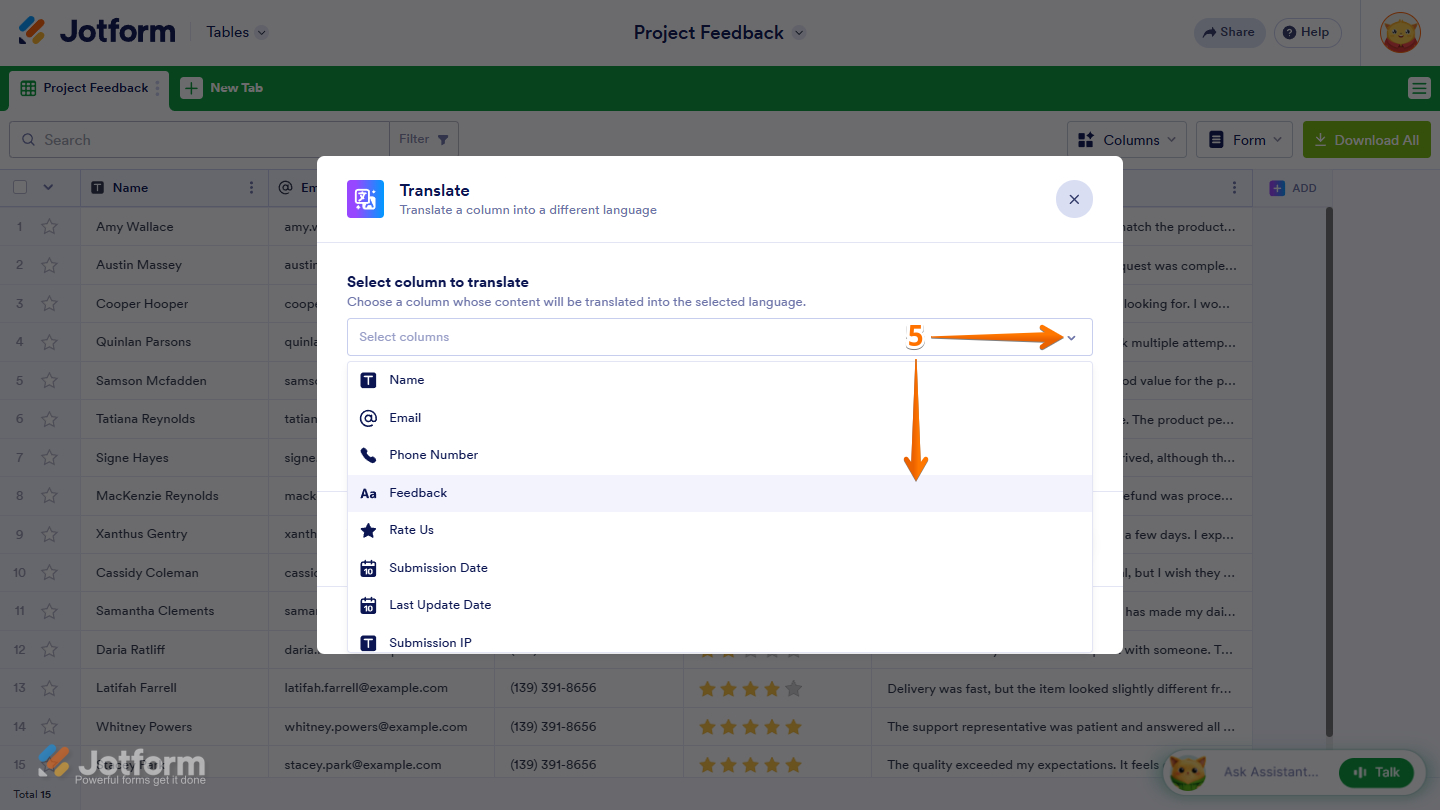
- Then, in the Translate window that opens, under the Select Column to Translate section, click on the Downward Arrow icon and select the column you want to translate.
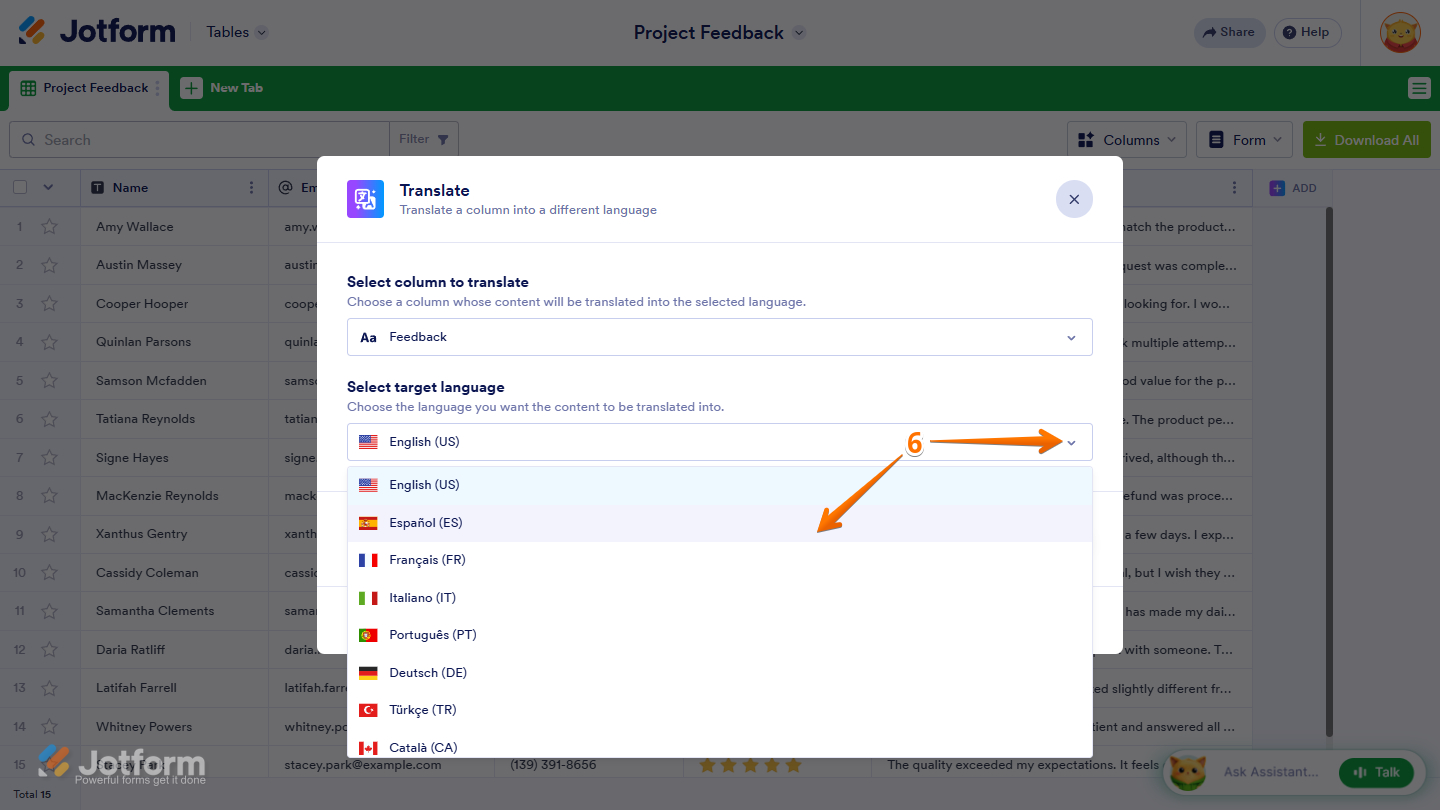
- Next, under the Select Target Language section, click on the Downward Arrow icon and select the language you want the content of the selected column translated into.
Note
The available languages are: English (US), Español (ES), Français (FR), Italiano (IT), Português (PT), Deutsch (DE), Türkçe (TR), Català (CA), Nederlands (NL), Svenska (SV), Magyar (HU), Norsk (NO), Dansk (DK), Română (RO), and Suomi (FI).
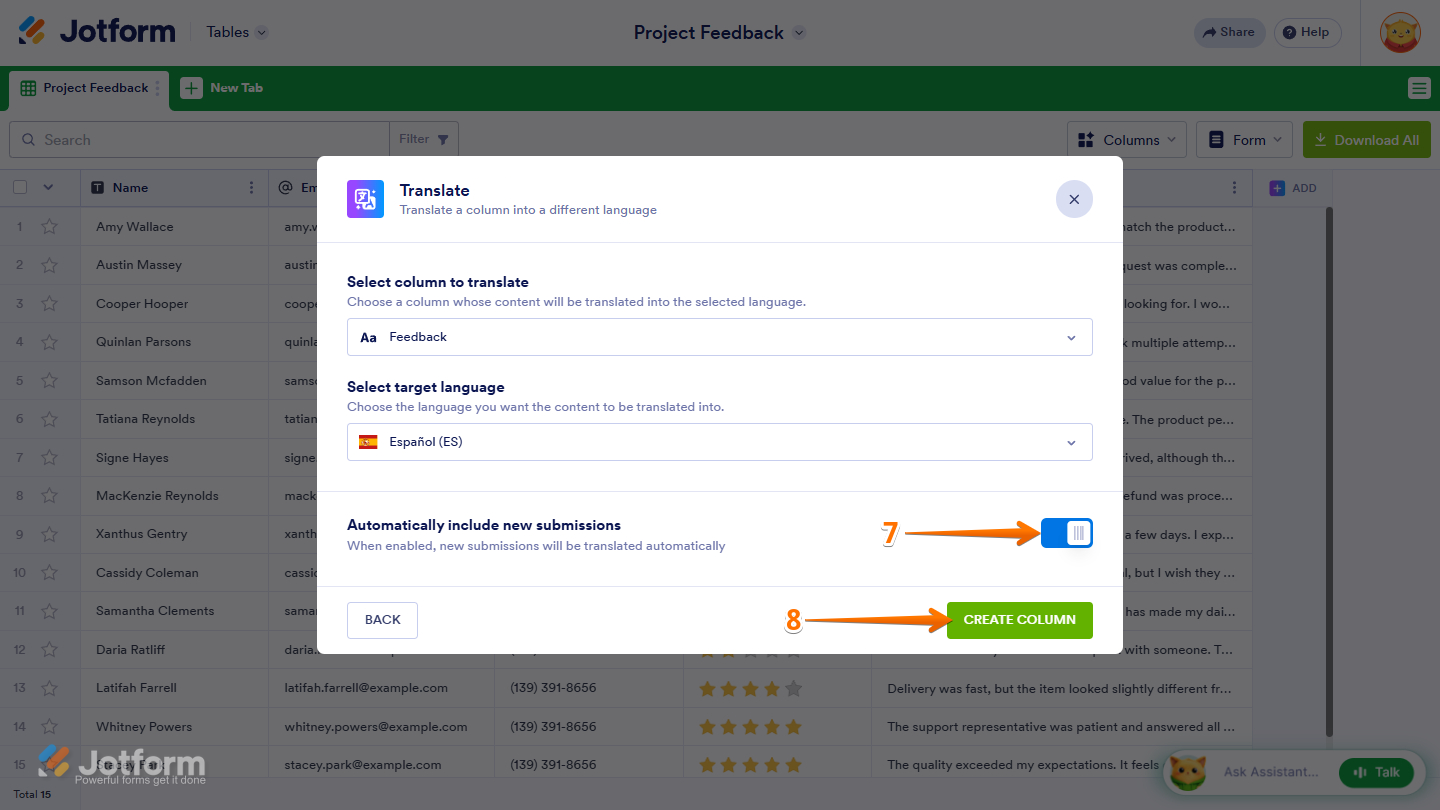
- Now, keep the Automatically Include New Submissions option toggled on to translate new submissions automatically.
- Once everything’s set, click on Create Column to add the Translate AI Column to your Jotform Table.
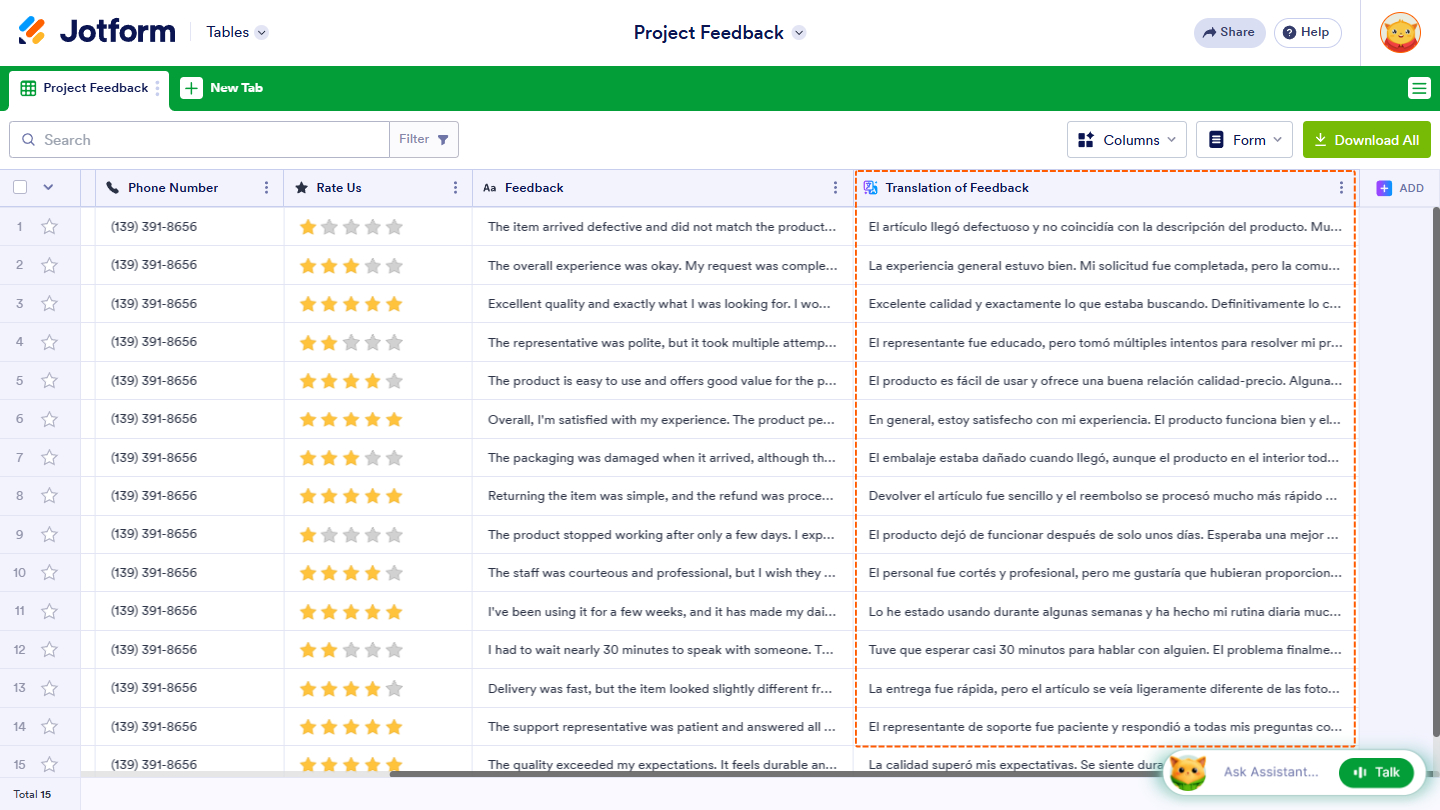
That’s it! The translated text will appear in your new AI column, while your original data remains unchanged. Here’s an example of the translated column:
Adding a Custom AI Column
Use a Custom AI Column when the built-in AI Columns don’t meet your specific needs. Simply provide a prompt, and AI will process your table data according to your instructions. Here’s how to set it up:
- In Jotform Tables, click on Add at the top of the last column.
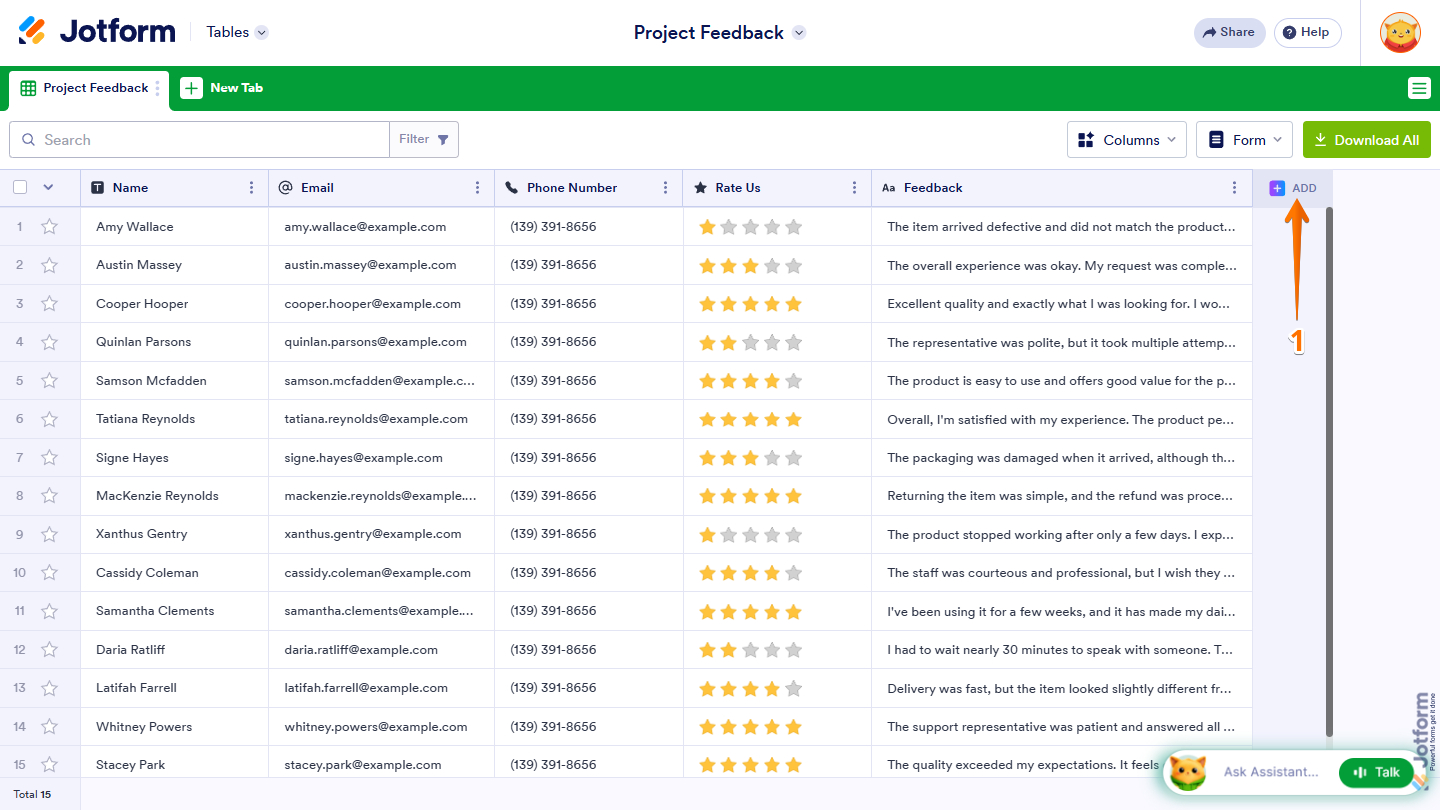
- Then, in the Add a New Column window that opens up, click on AI Columns.
- Next, click on Custom AI Column from the list.
- Now, click on Next at the bottom.
- Then, in the Custom AI Column window that opens, under the Give a Prompt section, enter your custom instruction that the AI Column will process.
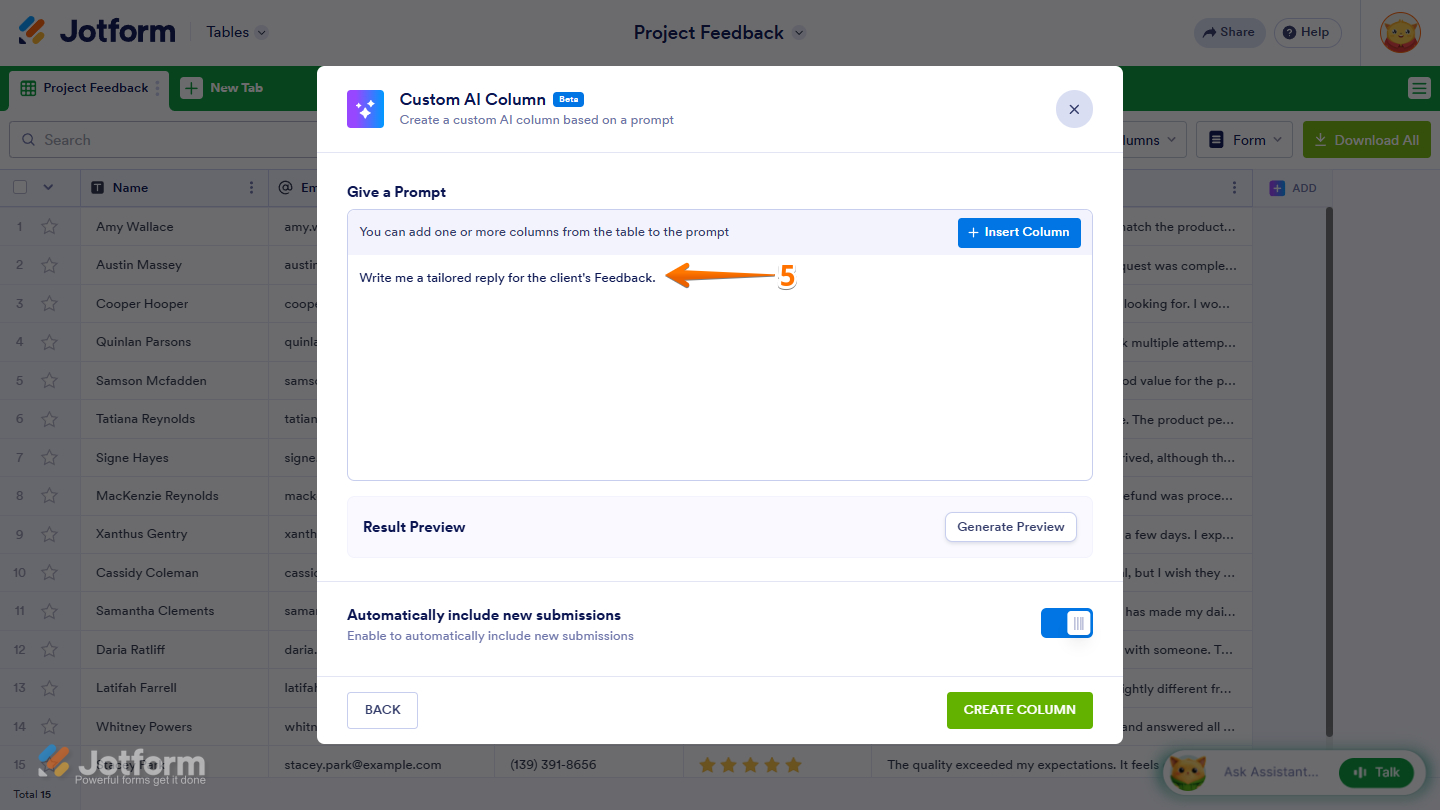
- You can also click on Insert Column to add form fields to your prompt.
- Next, click on Generate Preview to see how your prompt generates a result.
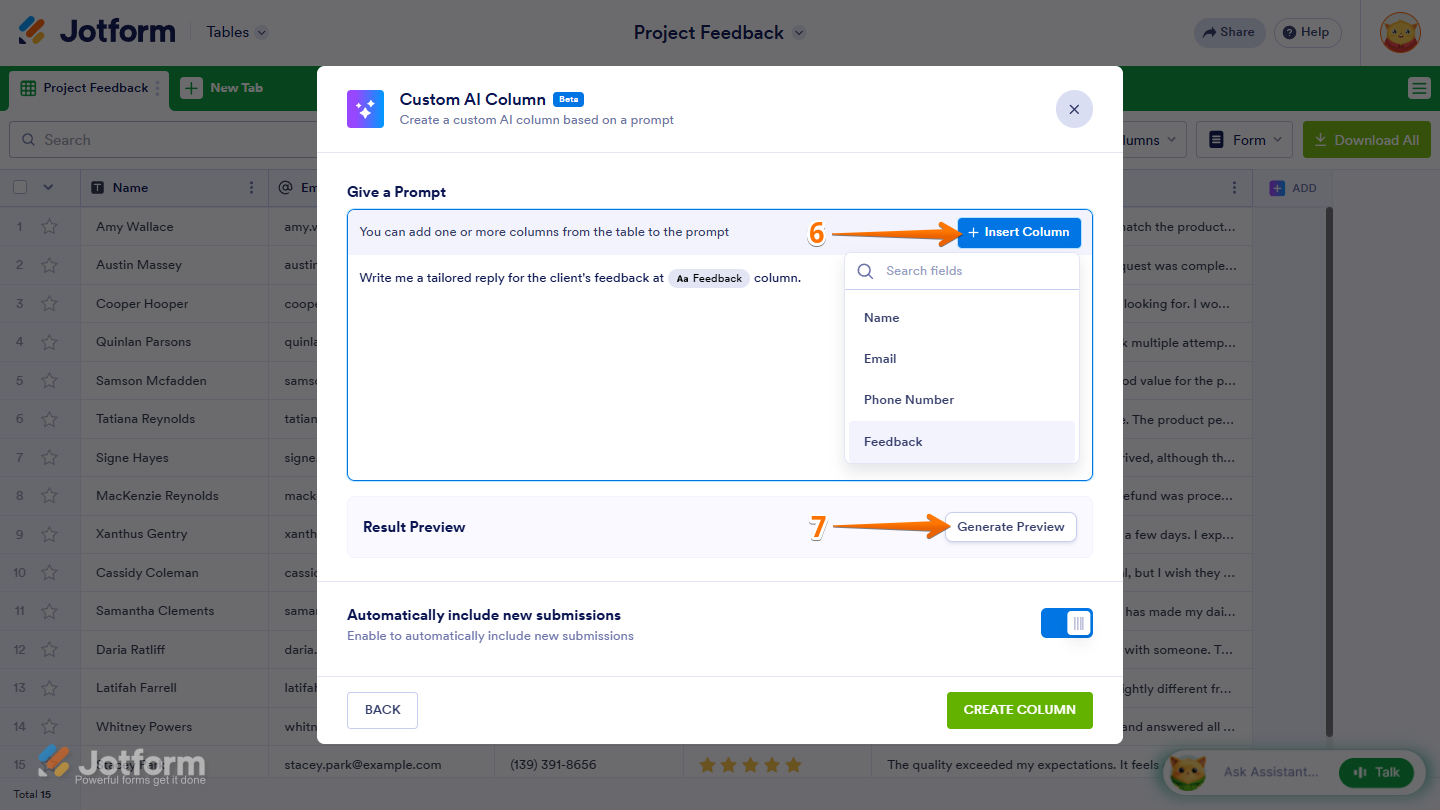
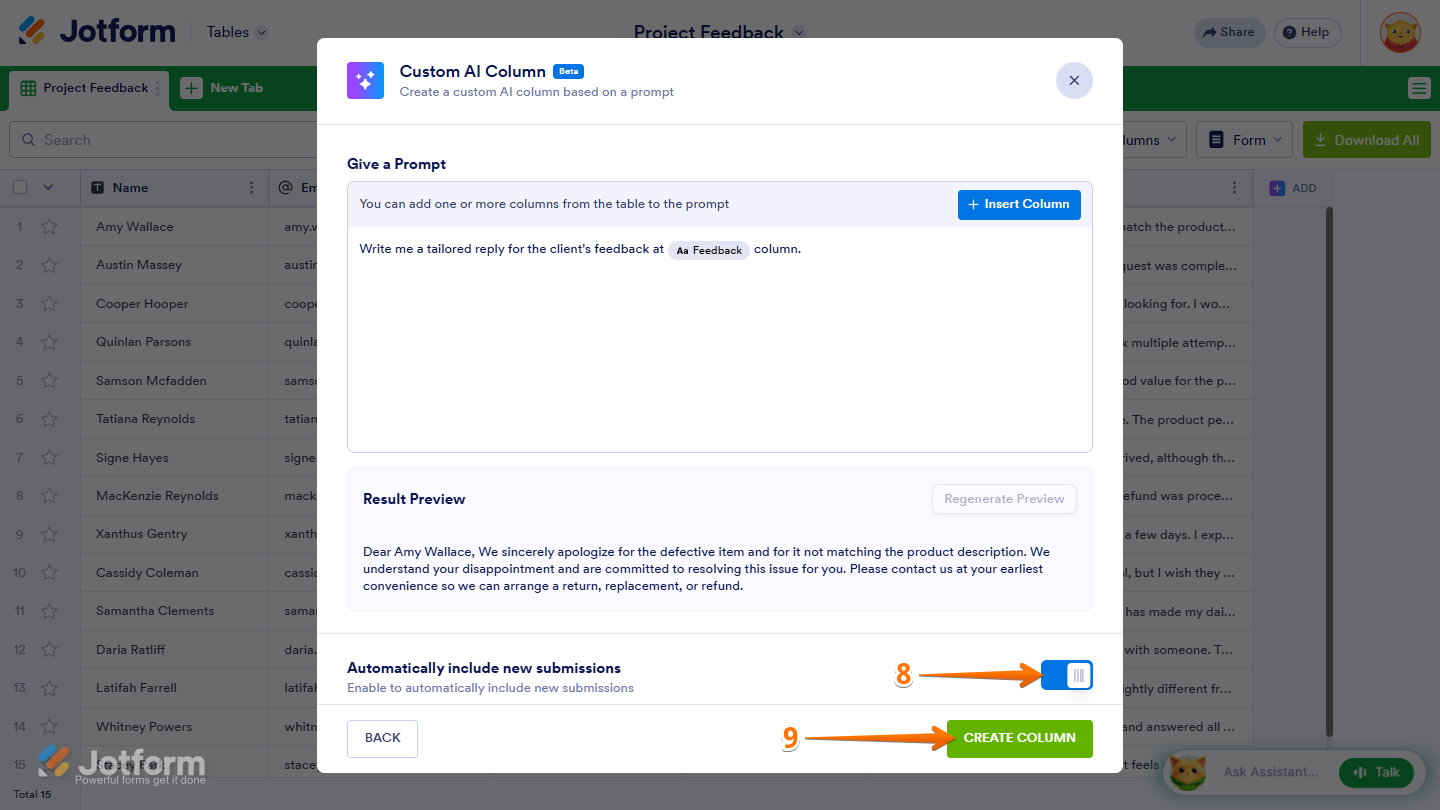
- Now, keep the Automatically Include New Submissions option toggled on to automatically process new submissions according to your prompt.
- Once everything’s set, click on Create Column to add the Custom AI Column to your Jotform Table.
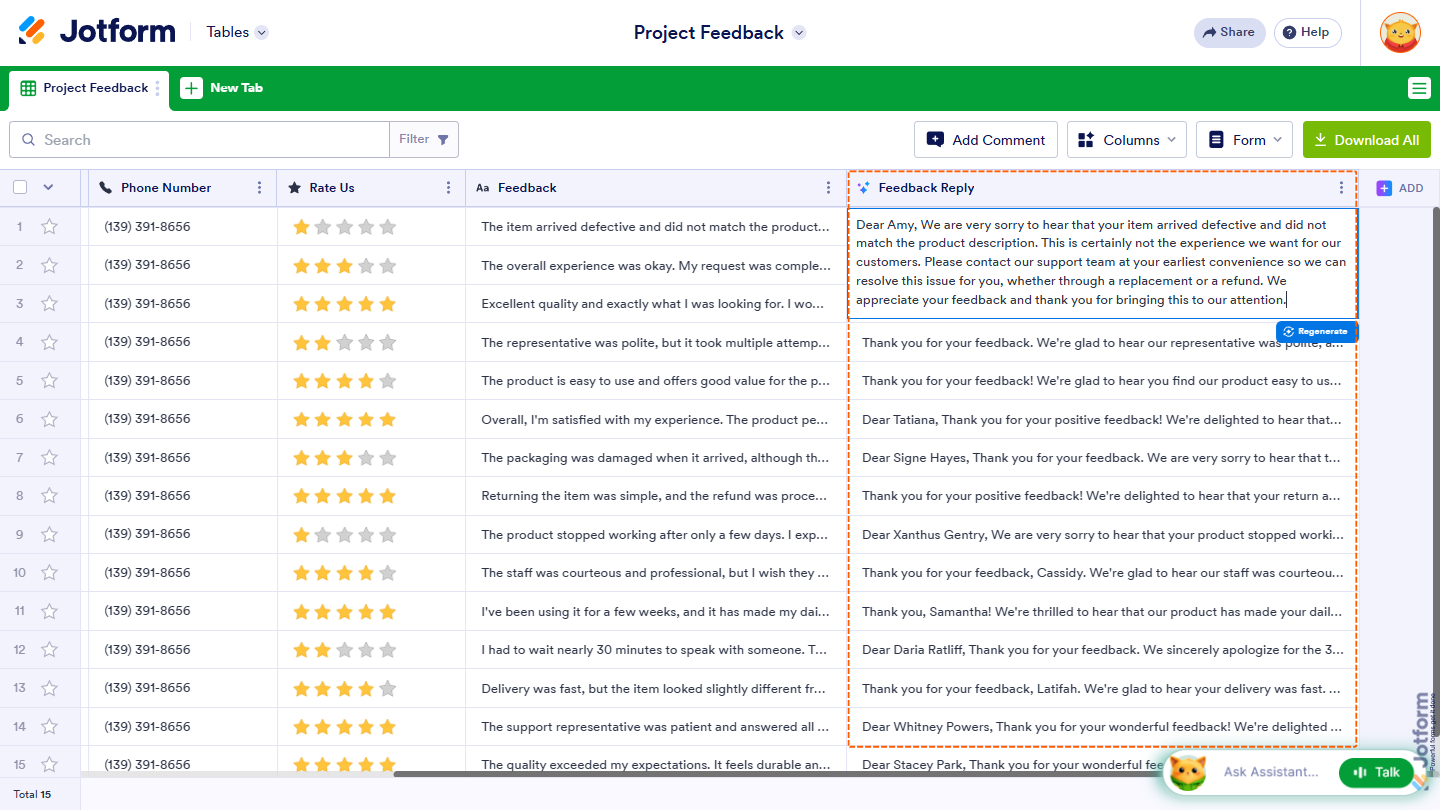
That’s it! The generated results will appear in your new AI column, customized to the prompt you defined. Here’s an example that generates a reply based on the user’s feedback:

Send Comment: