
Using a project management tool like ClickUp — and all the advanced features that come along with it — is a great way to help your team stay organized. One of the most useful features, which ClickUp itself refers to as “the heart” of the platform, is the ClickUp hierarchy.
Using the hierarchy, users can break work down into easily managed, actionable items. The result is a more organized workplace that makes it simple for teams to know what they have to do — and get it done.
Keep reading for instructions on how to set up a ClickUp hierarchy and to learn more about how power user Devin Stagg of Pupford takes advantage of it.
How does the ClickUp hierarchy work?
The ClickUp hierarchy is the backbone of the platform and is included with all plans, from free to enterprise versions. Here’s an overview of the hierarchy levels.
Workspaces
The Workspace is the highest level in the ClickUp hierarchy. Workspaces are wholly separate from one another — so tasks, user access privileges, and other aspects only apply to the Workspace you create them in. While you can create multiple Workspaces, you’ll need to pay to upgrade each Workspace individually to use the more advanced features offered in paid plans.
Since each Workspace requires a separate upgrade to use more advanced features, most users create just one for an entire organization. So, if you work with multiple clients as part of a service-based business, you might create one Workspace for your internal operations and one for client work. Alternatively, if you operate multiple companies, you might create a Workspace for each of those companies.
Spaces
Spaces sit under each Workspace in the ClickUp hierarchy. Users treat Spaces differently, depending on their needs. For example, you may create a Space for each department in your company — sales, marketing, accounting, human resources, IT, etc. “Segmenting your Workspace departmentally into Spaces can help each functional team in your business keep focused on the work most relevant to them,” says Stagg.
However, if you go the route of creating a Workspace dedicated to client work, you would likely create a Space for each client.
Folders and Lists
These two items exist at the same level in the ClickUp hierarchy. While Lists contain your tasks — which are the final level in the hierarchy — Folders group your Lists. Note that Folders are optional, as you can also create Lists directly in Spaces.
Tasks
At the bottom of the ClickUp hierarchy are tasks. These are the items you create for yourself, your team, your clients, and other stakeholders to complete. Each task must have one parent List, but you can share them with other Lists in the Workspace.
What are some examples of ClickUp hierarchies in action?
Pupford’s ClickUp hierarchy follows the typical department structure. For example, it has Spaces for marketing and product/operations, among other areas. So when Stagg clicks on his functional area, he can see all the marketing tasks assigned to him and other team members.
Stagg also has another Workspace that’s organized differently — it has a Clients Space where he creates a Folder for each client. The benefit of this setup is that he can simply click on the Clients Space and see all the current tasks across all clients. “This is a great view to get a quick, high-level glimpse of the current workload for different team members.”
If Stagg needs to see tasks for a specific client, he can click on that client’s Folder and see only the tasks related to that client.
How to set up a ClickUp hierarchy
To create a Workspace:
- Click on your Workspace avatar.
- Click the + icon on the left and follow the prompts.
To switch between Workspaces:
- Click on your Workspace avatar.
- Click on your desired Workspace on the left.
To create a space:
- Click + New Space at the top of the Spaces section in your sidebar.
- Follow the prompts to create a Space from scratch or from a template.
How can you get even more work done?
Jotform is a powerful online form builder you can use to support your ClickUp experience. You can integrate ClickUp with Jotform to gather task requests and project information through customizable forms and have them appear in your ClickUp account automatically as new tasks.
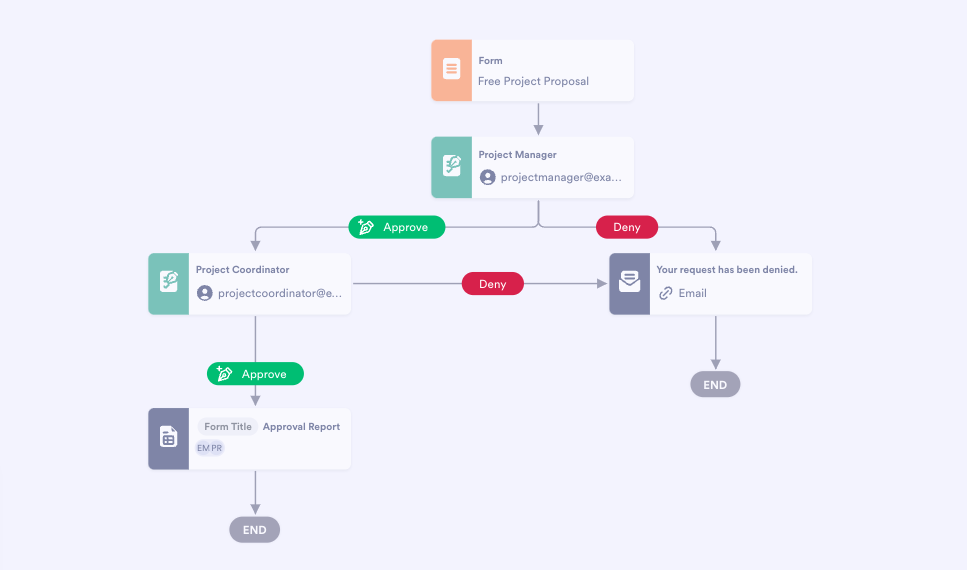
You can also make use of Jotform’s project management approval templates. Have a change request you need approved? Use this template to enable your team to submit change requests for the project manager and any other key stakeholders to review.
The request is automatically forwarded to each person you add. Customize the workflow to suit your needs with an easy drag-and-drop editor, including adding conditions and automated confirmation emails.
Ready to get started with Jotform? Check out one of these project management approval templates or try out the ClickUp integration today.


Send Comment: