Jotform – Product Quiz Builder makes it easy to add an AI-powered product recommendation quiz to your Shopify store. Create personalized quizzes that help customers find the right products based on their answers, making it easier to guide them toward products that fit their needs.
Whether you’re helping shoppers choose between products, promoting specific items, or creating a more interactive shopping experience, Product Quiz Builder can help you recommend products, collect leads, and create opportunities for upsells and cross-sells.
Installing the Jotform Product Quiz Builder
Before you can create product recommendation quizzes, you’ll first need to install Jotform Product Quiz Builder on your Shopify store. Here’s how to get started:
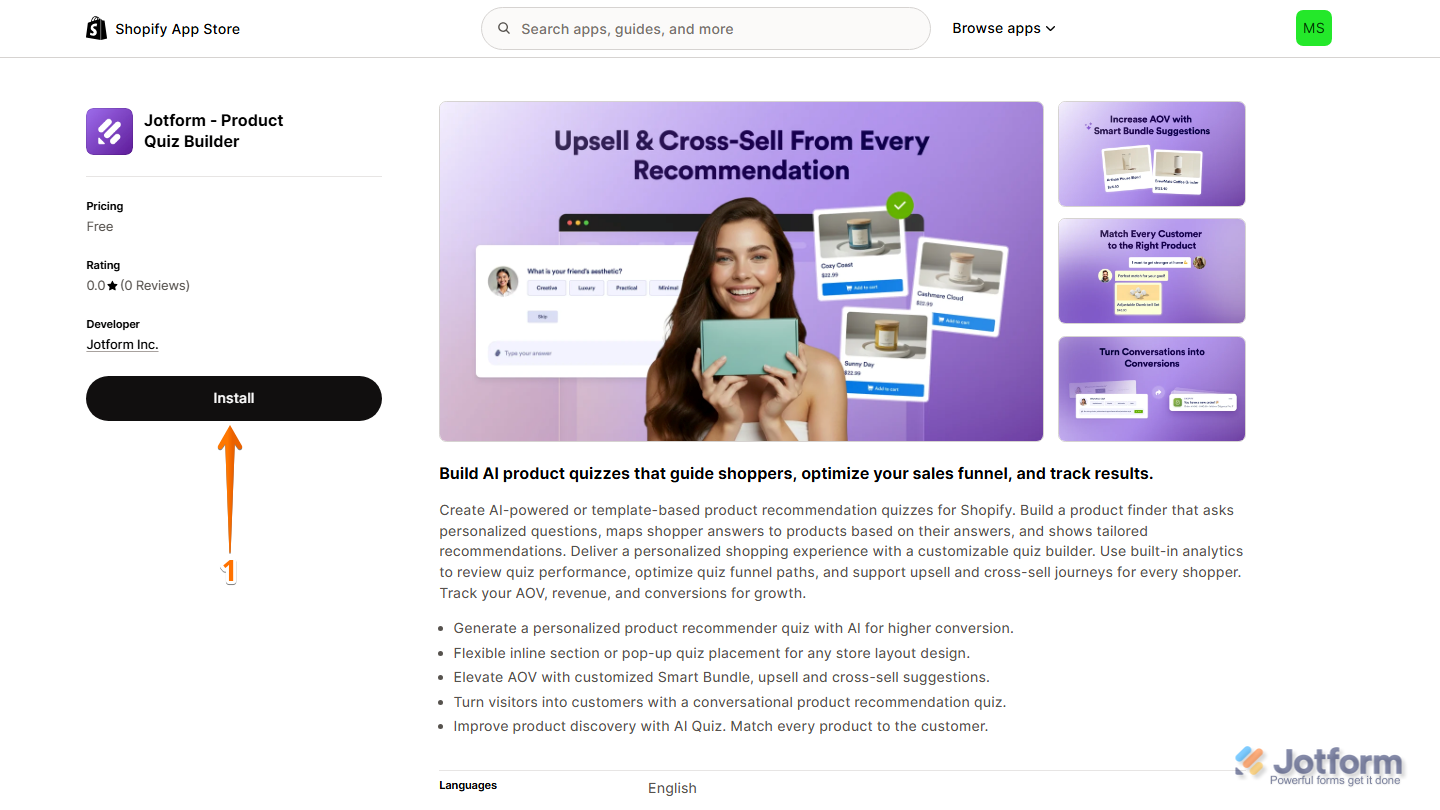
- Log in to your Shopify Store account, and then go to the Jotform – Product Quiz Builder and click on Install on the left side of the page.
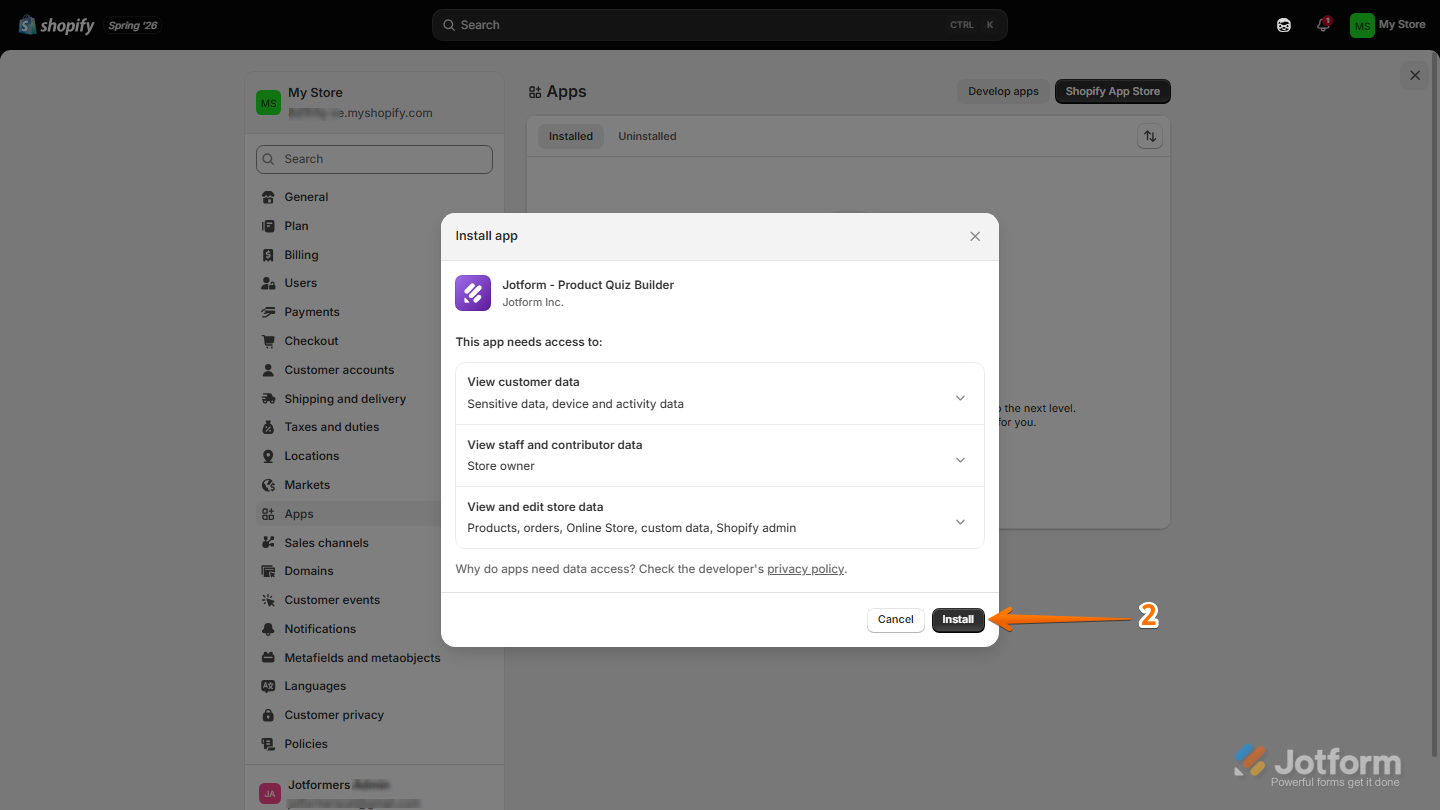
- Then, in the new tab that opens, review the requested permissions in the Install App window, and then click on Install.
That’s it! You’ve successfully installed Jotform Product Quiz Builder on your Shopify store and are ready to start creating product quizzes.
Creating Your First Quiz
Once you’ve installed Jotform Product Quiz Builder, you can create your first quiz by choosing whether to create one with AI or use a pre-built template. Here’s how to get going:
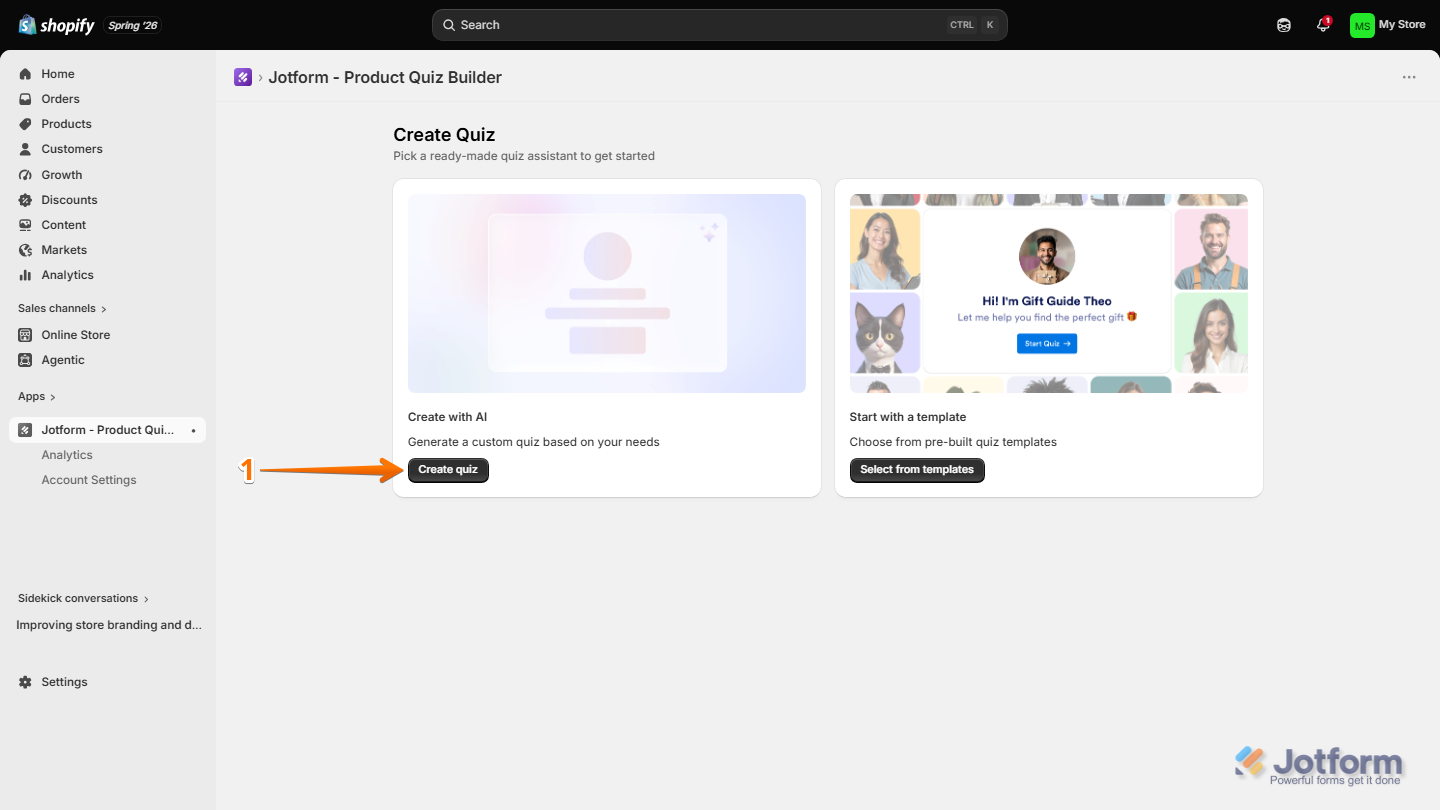
- In the Jotform Product Quiz Builder page, under Create with AI, click on Create quiz.
Pro Tip
You can also create a quiz from a pre-built template by selecting Select From Templates under Create Quiz.
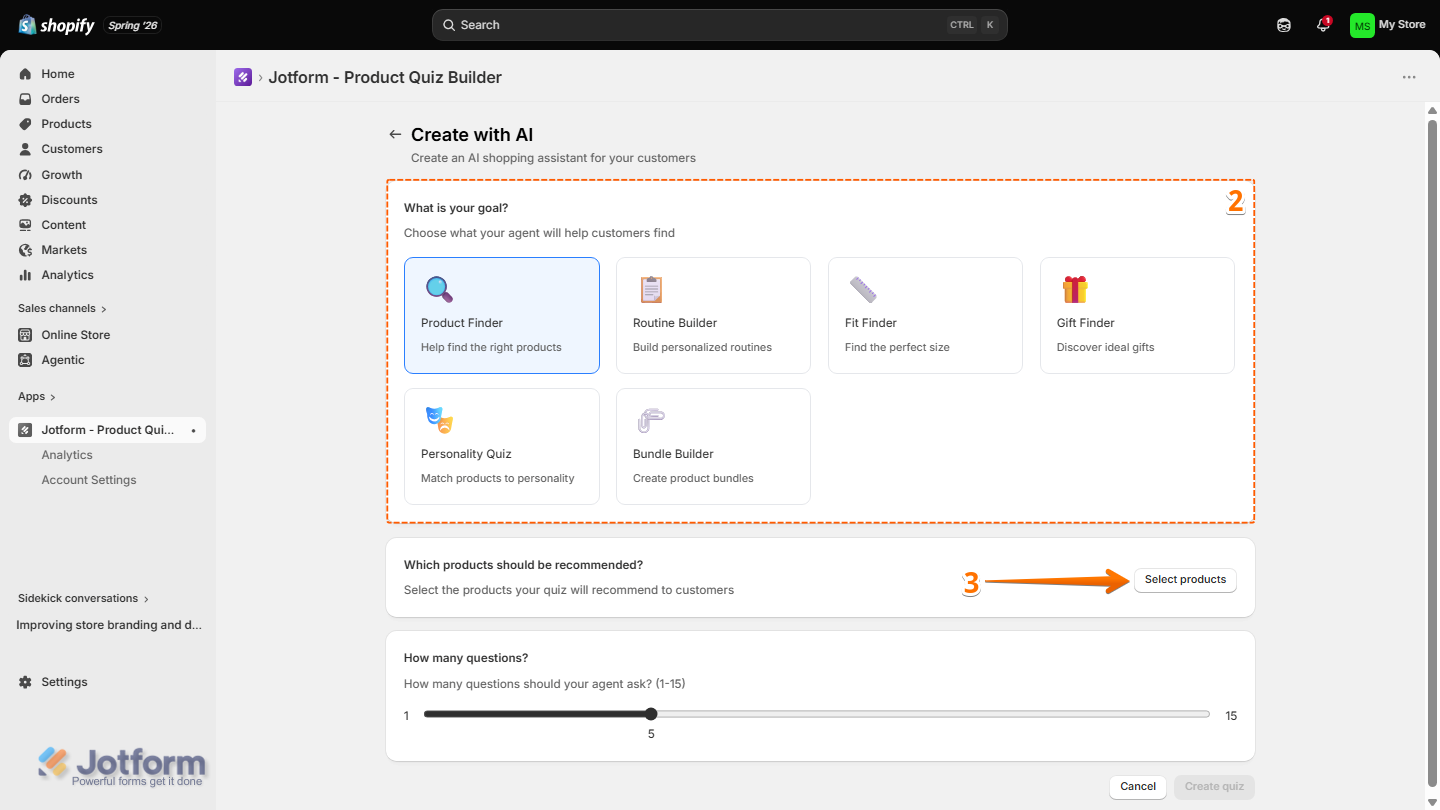
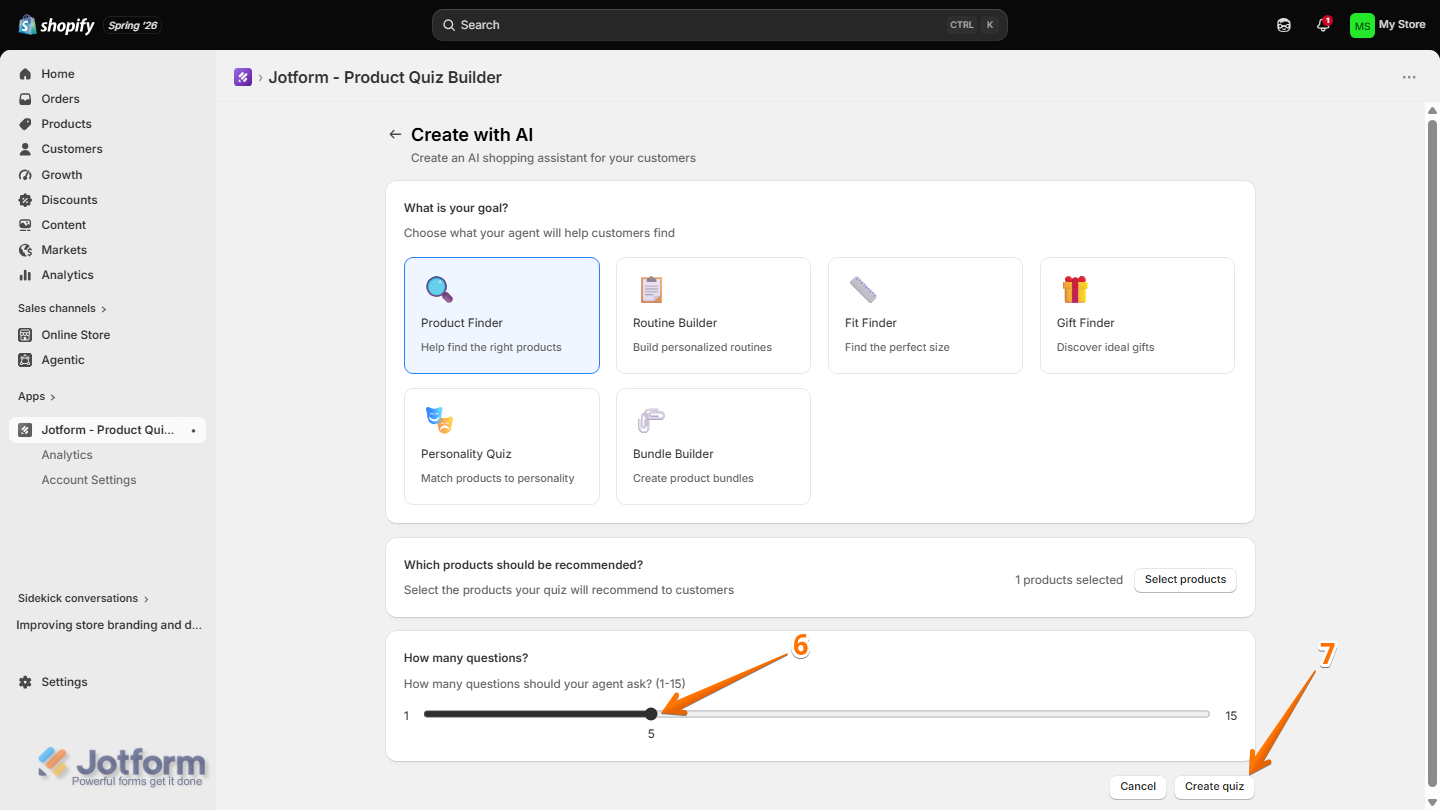
- Next, under What is your goal? section, select the quiz type that best matches your needs:
- Product Finder — Help customers find the right products.
- Routine Builder — Build personalized routines.
- Fit Finder — Help customers find the perfect size.
- Gift Finder — Help customers discover ideal gifts.
- Personality Quiz — Match products to a customer’s personality.
- Bundle Builder — Create product bundles.
- Then, to choose the products you want to feature in the quiz results, click on Select Products.
- Now, in the Select Products window that opens, tick the checkbox next to each product you want to recommend in your quiz.
- Then, click on Select at the bottom of the window.
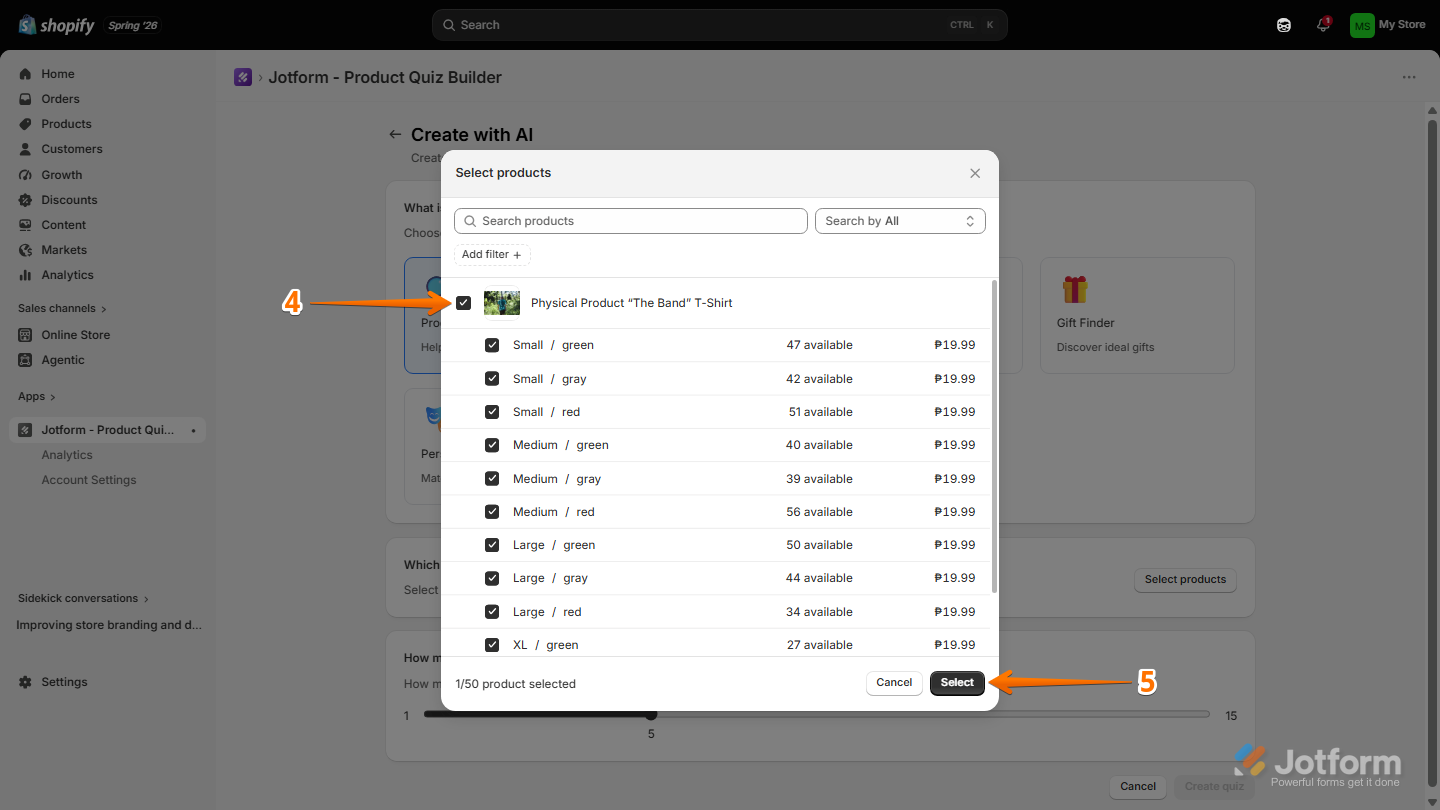
- Next, under How many questions? section, click and drag the slider to set the number of questions you want the quiz to ask.
- Once you’ve finished configuring the quiz, click on Create Quiz.
Customizing Your Product Quiz
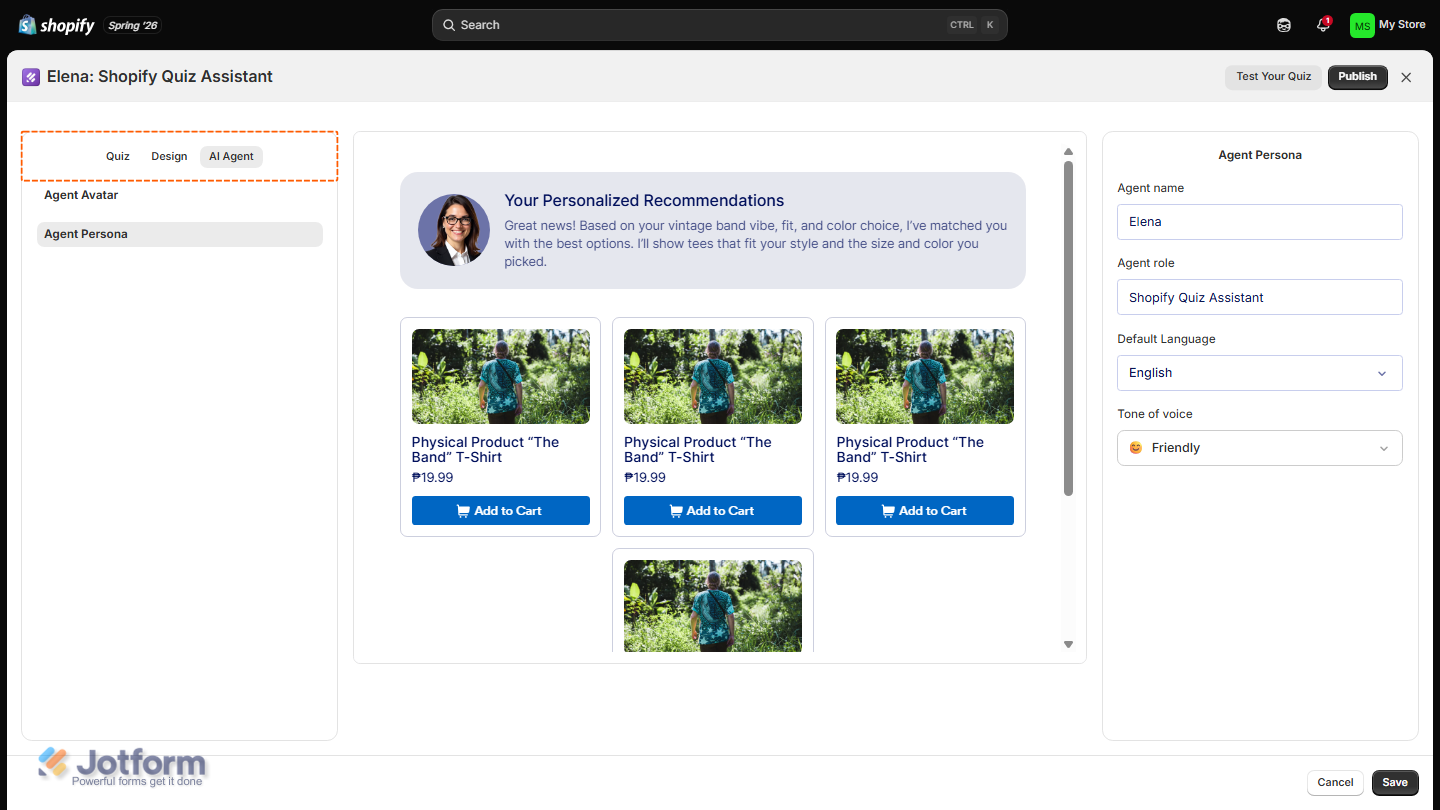
After creating your quiz, you’ll be taken to the Quiz Builder, where you can customize your quiz using the following tabs:
- Quiz tab— Customize your Cover Page and Results Page to create a unique look, and edit your questions manually.
- Design tab — Adjust your color scheme and font.
- AI Agent tab — Select an AI Shop Assistant from the Gallery, generate an avatar, or upload your own. You can also customize your Agent’s persona to fit your Shopify store.
Let’s explore each tab below:
Quiz tab
The Quiz tab lets you customize the content of your quiz, including its cover page, questions, and results page. Here’s how to configure each section:
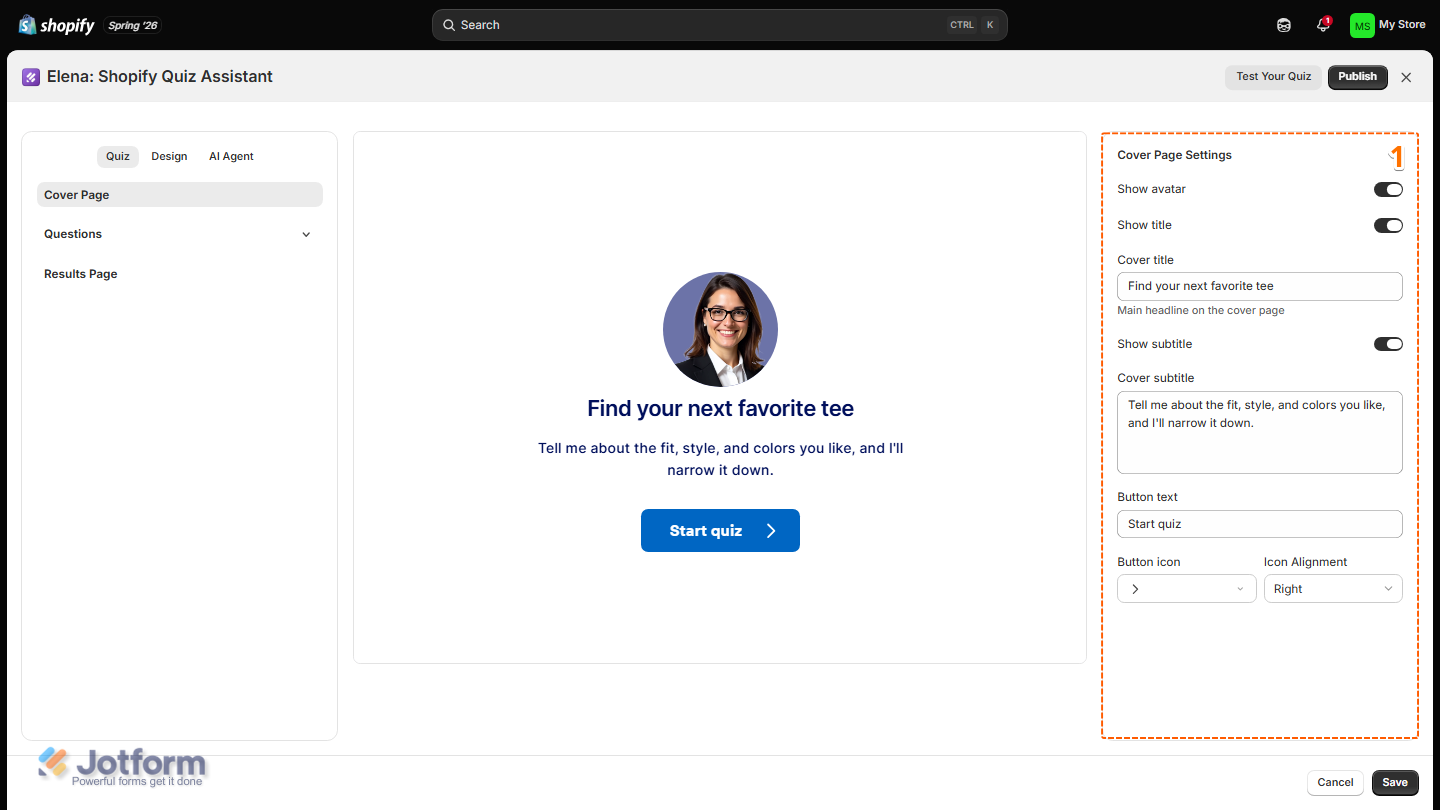
- In Jotform Product Quiz Builder, under the Quiz tab, in the Cover Page Settings section on the right, set up these things:
- Show Avatar — Toggle this on to display the AI Agent avatar on the cover page.
- Show Title — Toggle this on to display the cover title, then enter the title you want to display in the Cover title input box.
- Cover Title — Enter the title you want to display on the cover page.
- Show Subtitle — Toggle this on to display supporting text below the title, then enter the text you want to display in the Cover Subtitle input box.
- Button Text — Enter the text you want to display on the cover page button.
- Button Icon — Select an icon to display on the button.
- Icon Alignment — Select whether to display the button icon on the left or right side of the button text.
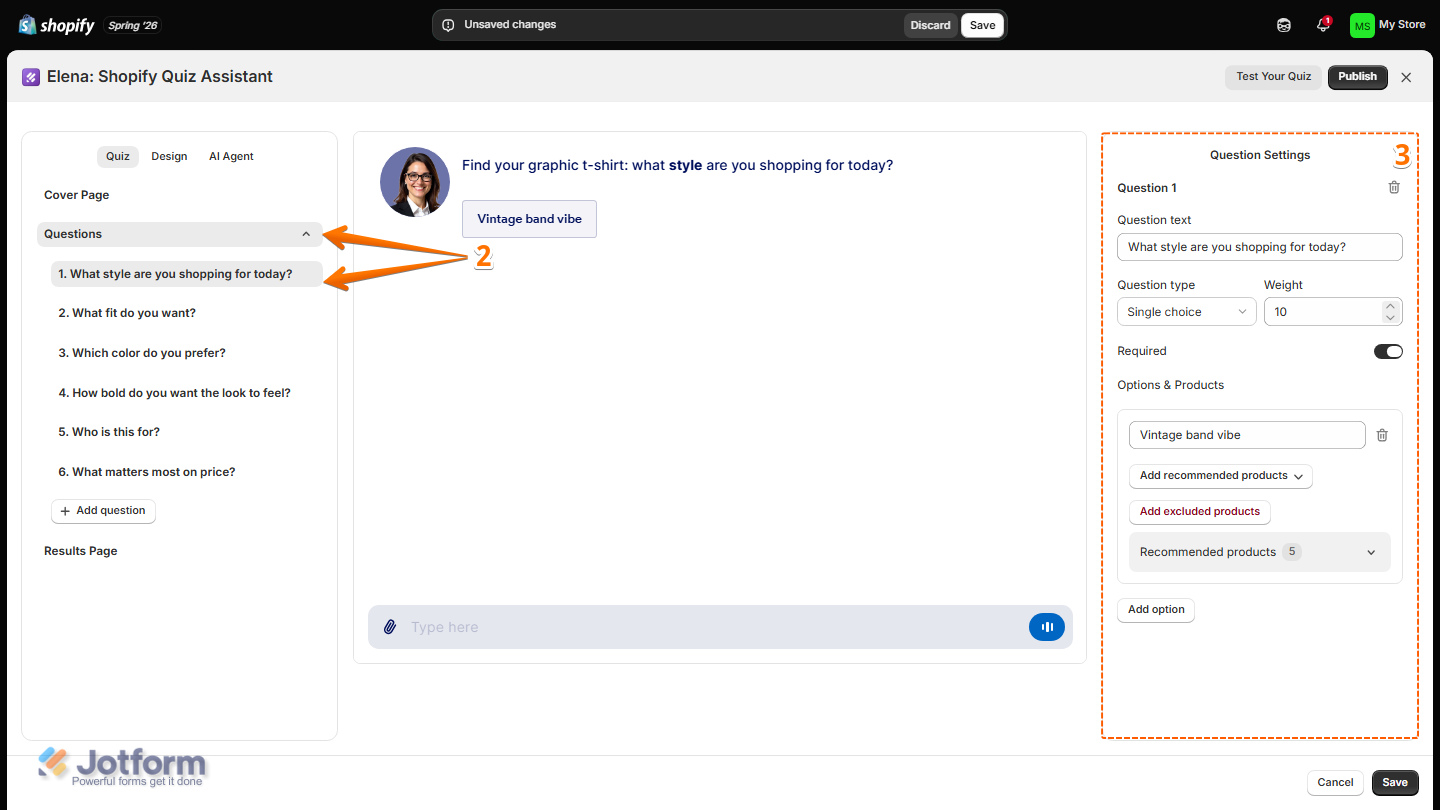
- Next, in the menu on the left, click on Questions and select the question you want to configure.
- Then, in the Questions Settings section on the right, configure these things:
- Question Text — Enter the question you want to display.
- Question Type — Select the question type you want to use.
- Weight — Enter the weight you want to assign to the question.
- Required — Keep this on to require respondents to answer the question, or toggle it off to make the question optional.
- Options & Products — Add and manage the answer options and products associated with each option:
- Option — Enter the answer option you want to display.
- Add Recommended Products — Select the products you want to recommend when respondents choose this option.
- Add Excluded Products — Select the products you want to exclude when respondents choose this option.
- Recommended Products — View and manage the products currently recommended for the option.
- Add option — Click this to add another answer option to the question.
- Now, click on the Results Page on the left.
- Then, in the Result Page Settings on the right, customize these things:
- Title — Enter the title you want to display on the results page.
- AI Subtitle — Toggle on to display a personalized subtitle on the results page, or toggle off to hide it.
- Recommended Products — Use the slider to set the maximum number of recommended products to display on the results page.
- Actions — Customize the actions available to users on the results page using the following options:
- Add to Cart Button — Toggle on to display an option for users to add products to their cart, or toggle off to hide it.
- Button text — Enter the text you want to display on the Add to Cart button.
- Button icon — Select an icon to display on the Add to Cart button.
- Icon Alignment — Select whether to display the icon on the left or right side of the button text.
- Retake Quiz Button — Toggle on to display an option for users to retake the quiz, or toggle off to hide it.
- Button text — Enter the text you want to display on the Retake Quiz button.
- Button icon — Select an icon to display on the Retake Quiz button.
- Icon Alignment — Select whether to display the icon on the left or right side of the button text.
- Once you’ve finished customizing the Quiz tab, at the bottom-right corner of the page, click on Save.

Design tab
The Design tab lets you customize the look and feel of your quiz, including its colors and fonts. Here’s how to adjust its appearance:
- In Jotform Product Quiz Builder, under the Design tab, in the Color Scheme section on the right, set up these things:
- Color Scheme — Select a preset color scheme to apply to the quiz.
- Background color — Keep the default color, or enter a new color in the input box to change the quiz background color.

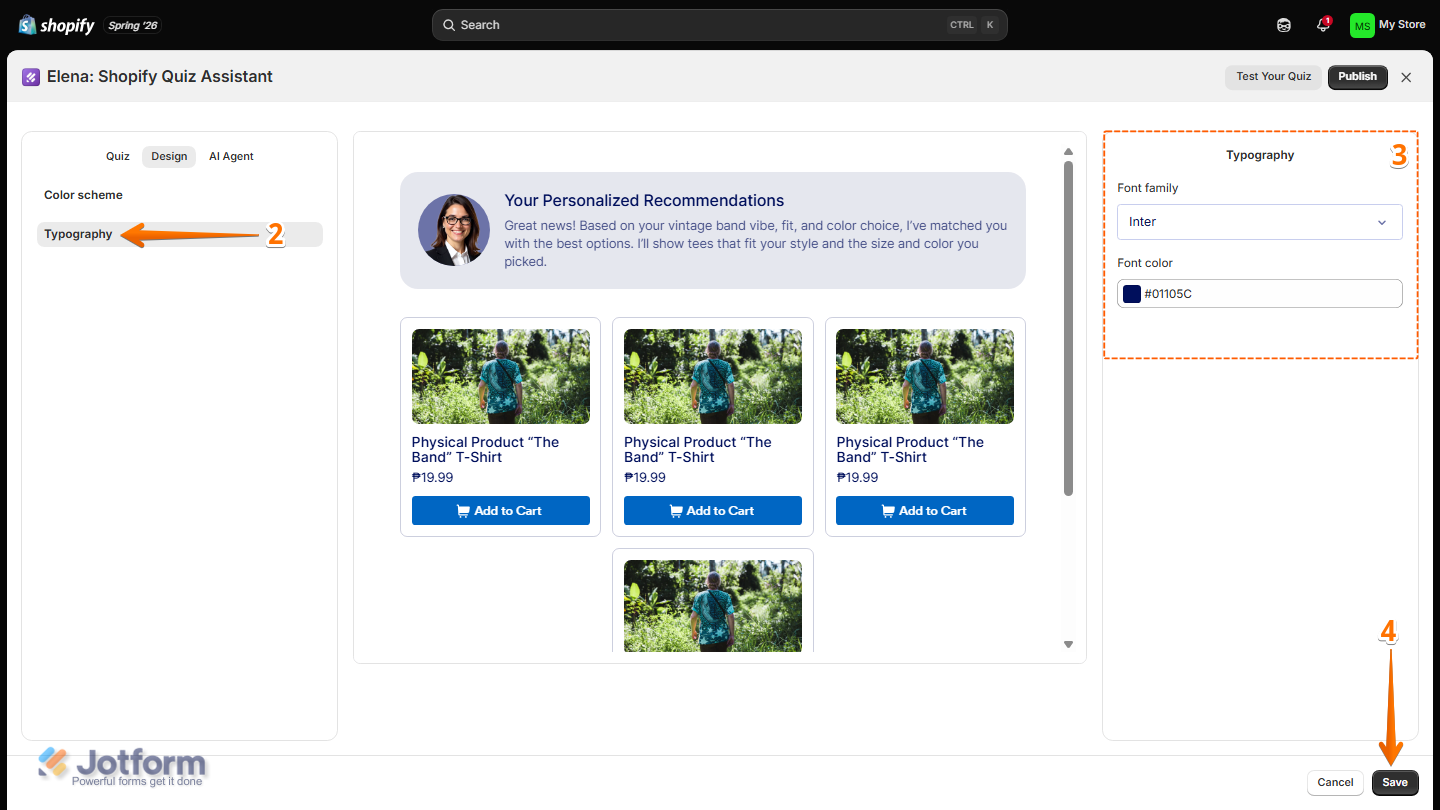
- Next, in the menu on the left, click on Typography.
- Then, in the Typography section on the right, customize these things:
- Font Family — Select the font you want to use for the quiz.
- Font Color — Keep the default color, or enter a new color in the input box to change the quiz font color.
- Once everything’s set, at the bottom-right corner of the page, click on Save.
AI Agent Tab
The AI Agent tab lets you personalize the AI Shop Assistant featured in your quiz. Here’s how to customize your AI Agent:
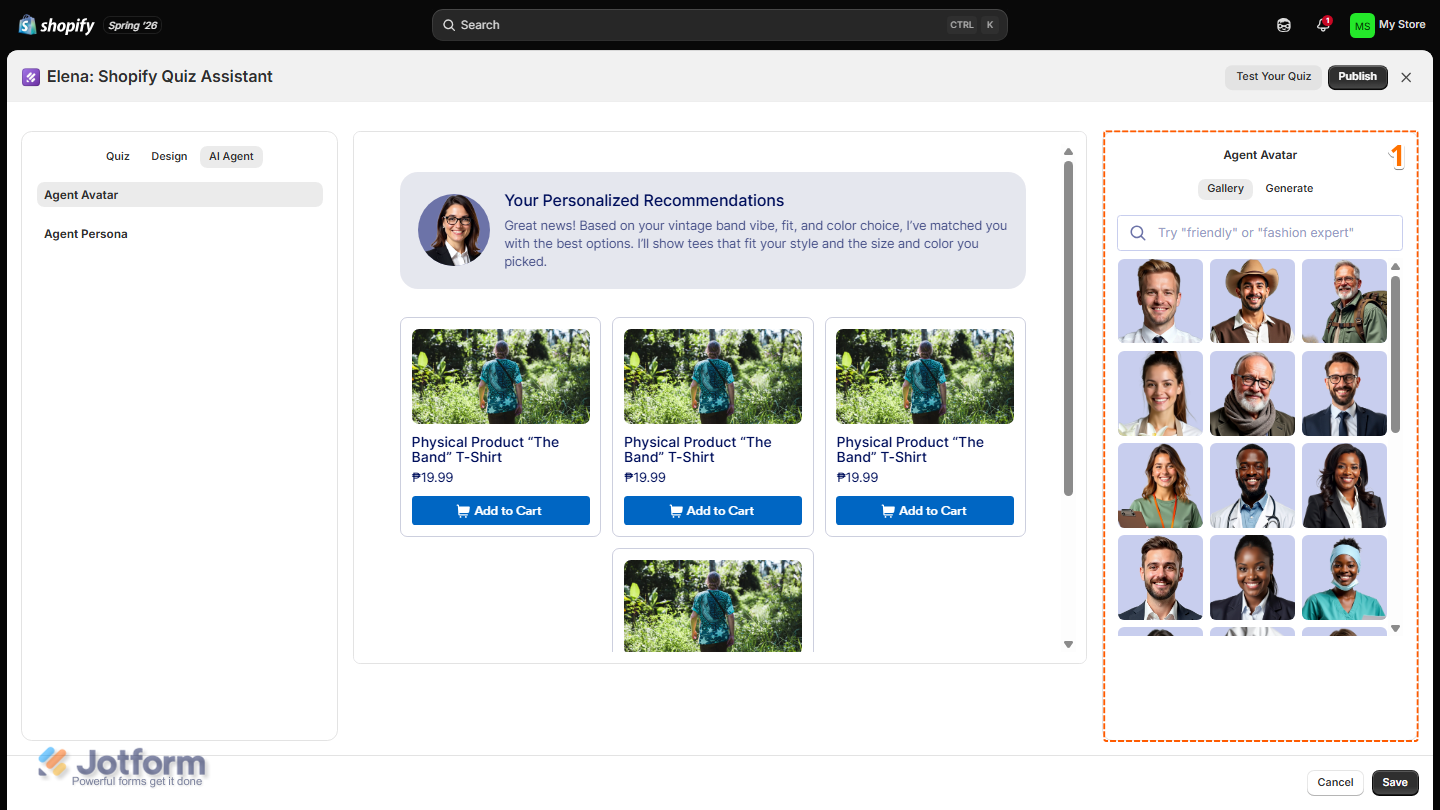
- In Jotform Product Quiz Builder, under the AI Agent tab, in the Agent Avatar section on the right, choose an avatar for your AI Agent from the available options:
- Gallery — Select a preset avatar from the available options.
- Generate — Create a new avatar based on your description.
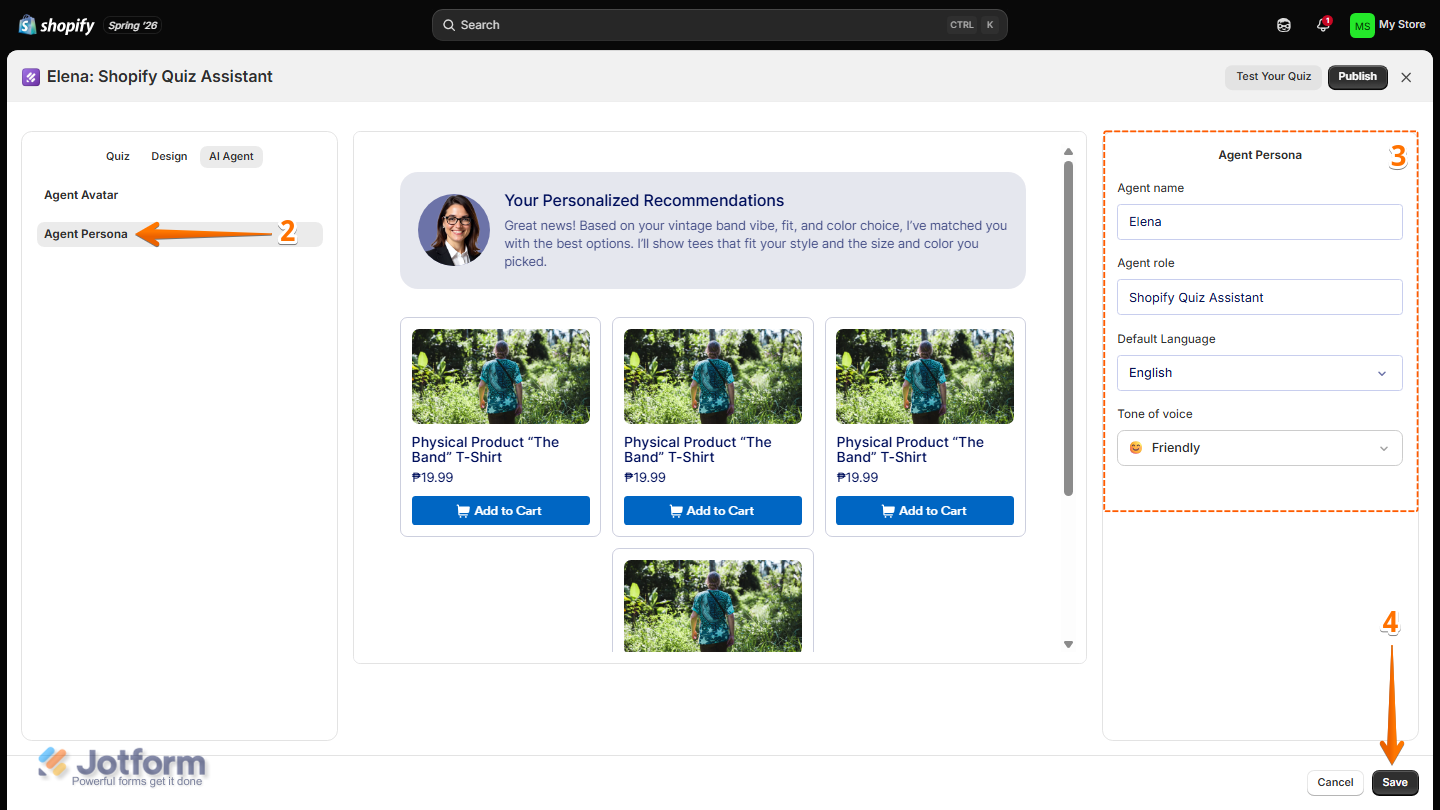
- Next, in the menu on the left, click on Agent Persona.
- Then, in the Agent Persona section on the right, configure these things:
- Agent name — Enter the name you want to assign to the AI agent.
- Agent role — Enter the role you want to assign to the AI agent.
- Default Language — Select the default language you want the AI agent to use.
- Tone of voice — Select the tone of voice you want the AI agent to use when interacting with users.
- After customizing the AI Agent settings, at the bottom-right corner of the page, click on Save.
Publishing Your Quiz on Your Shopify Store
After setting up your quiz, you can publish it on your Shopify store and choose how and where it appears. Here’s how to get it live:
- In the upper-right corner of the Jotform Product Quiz Builder, click on Publish.

- Next, in the Publish Quizpage, set up these things:
- Quiz Display — Select how you want the quiz to be displayed on your store:
- Inline Section — Embed the quiz directly into a page or section of your store.
- Popup Modal — Open the quiz in a popup when customers click a button on your store.
- Select Page — Select the page where you want the quiz to appear in your store.
- Quiz Display — Select how you want the quiz to be displayed on your store:
- Once you’re done, at the bottom-right corner of the page, click on Save.

That’s it! Your quiz is now published on your Shopify store and ready for customers to use. Take a look at the screenshot below to see how it looks in your store.


Send Comment: