Jotform’s Canvas Learning Management System (LMS) integration lets you connect your workflows with your Canvas environment to automate student account creation and course enrollment management. It’s useful for schools, universities, and training programs that regularly onboard learners or manage course registrations and want to cut down on repetitive administrative work. By bringing these processes together, education teams can save time, keep enrollment tasks more organized, and focus more on supporting learners.
What You Need for This Setup
- Canvas LMS Domain — This is the web address for your Canvas instance.
- Client ID — This is the unique identifier assigned to your Canvas developer key.
- Client Secret — This is the API key secret generated for your Canvas developer key and paired with its client ID.
For steps on getting your client ID and client secret, check out the Getting Your Canvas Client ID and Client Secret section below.
Setting Up the Canvas LMS Element in Your Workflow
Setting up the Canvas LMS element in your workflow only takes a few steps. Here’s how to get started:
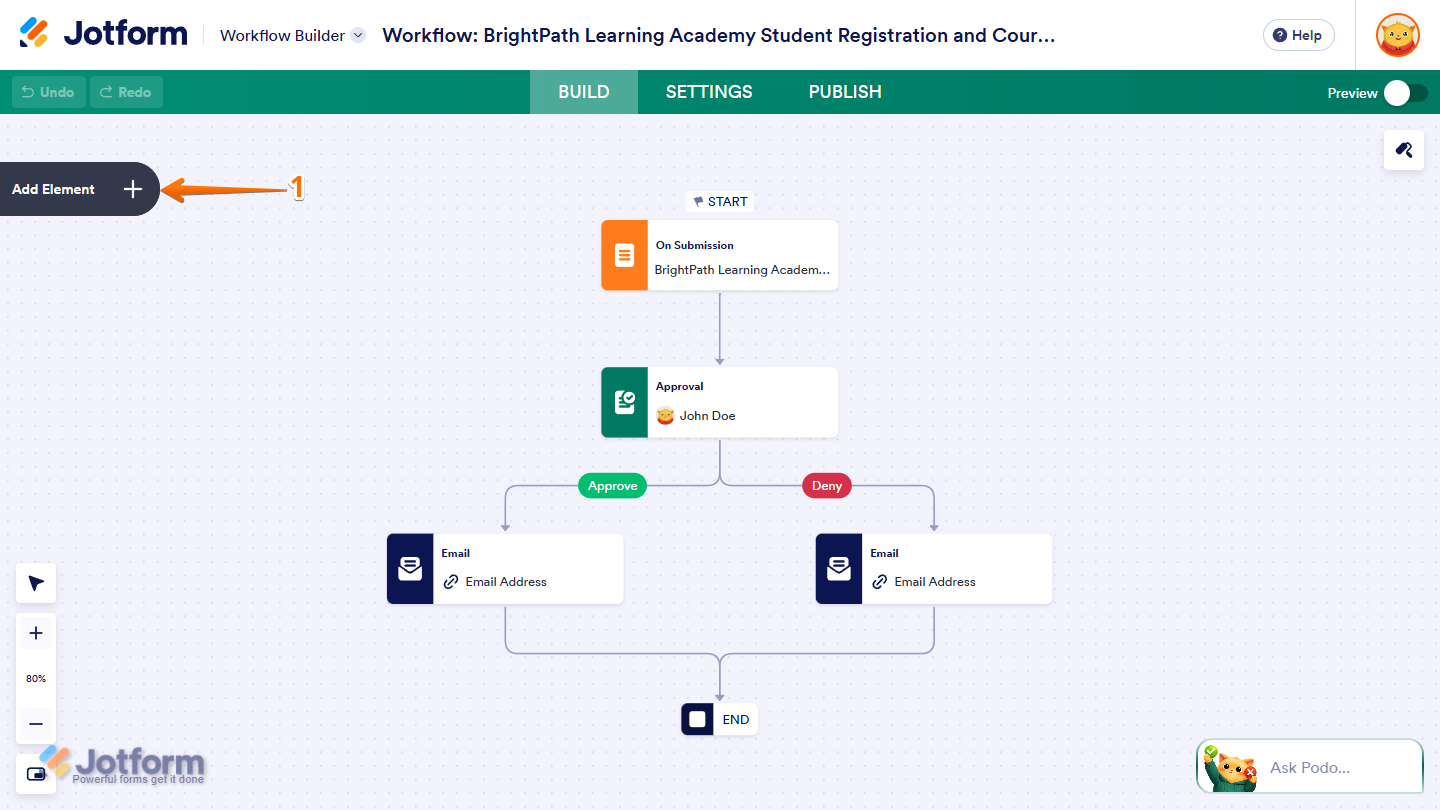
- In Workflow Builder, click on Add Element on the left side of the page.
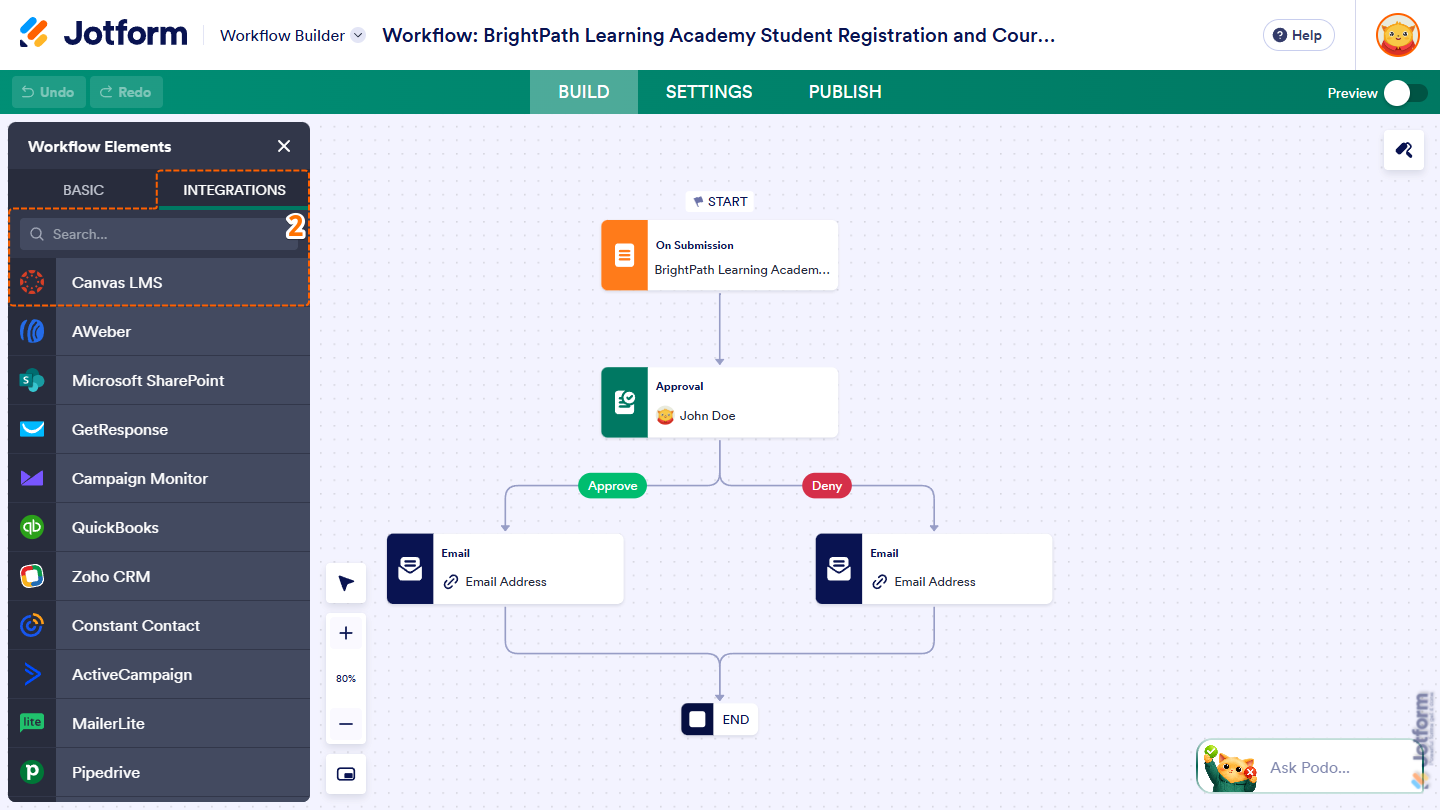
- Now, in the Workflow Elements menu, under the Integrations tab, click on Canvas LMS. Or, just drag and drop it where you want it in your workflow.
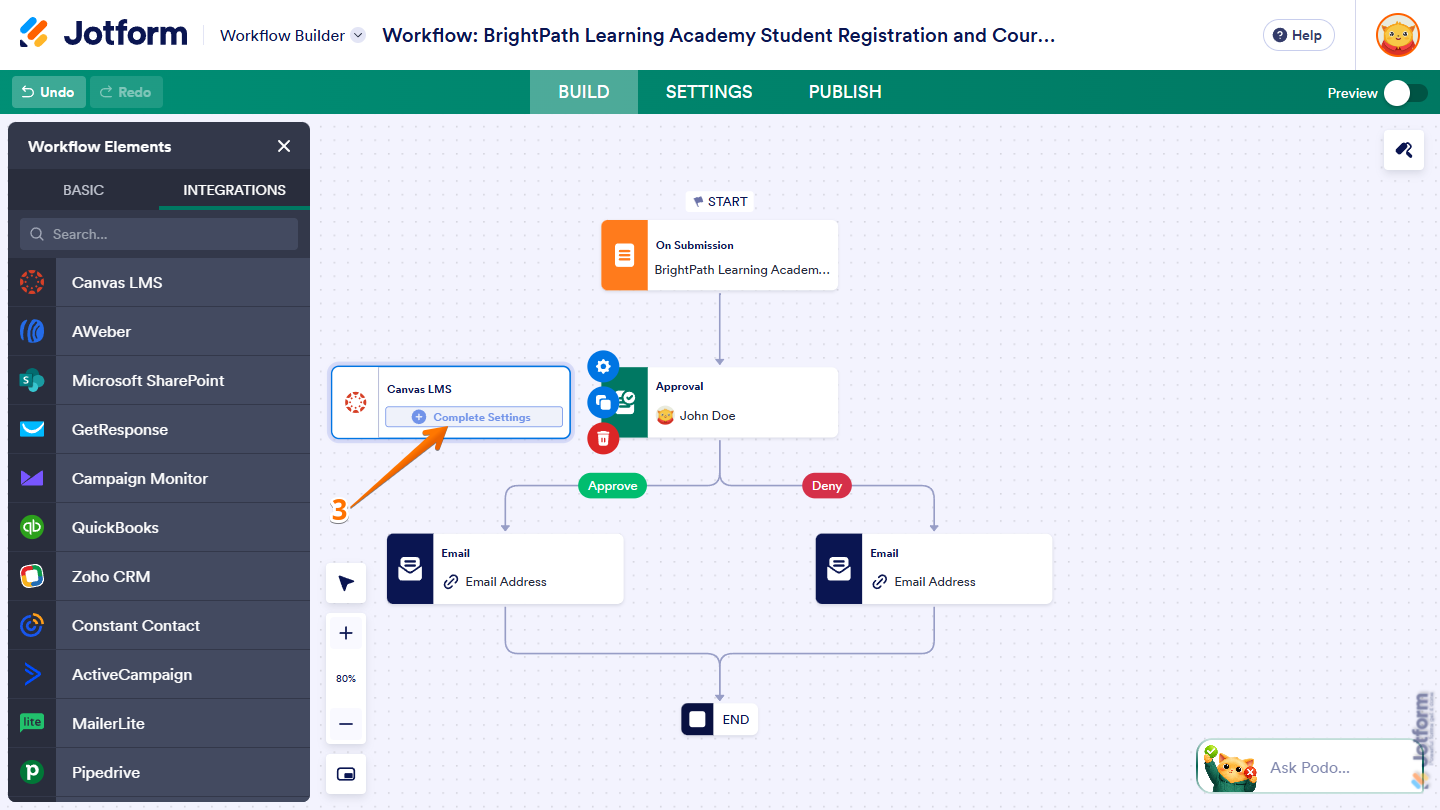
- Next, on the Canvas LMS element in your Workflow, click on Complete Settings.
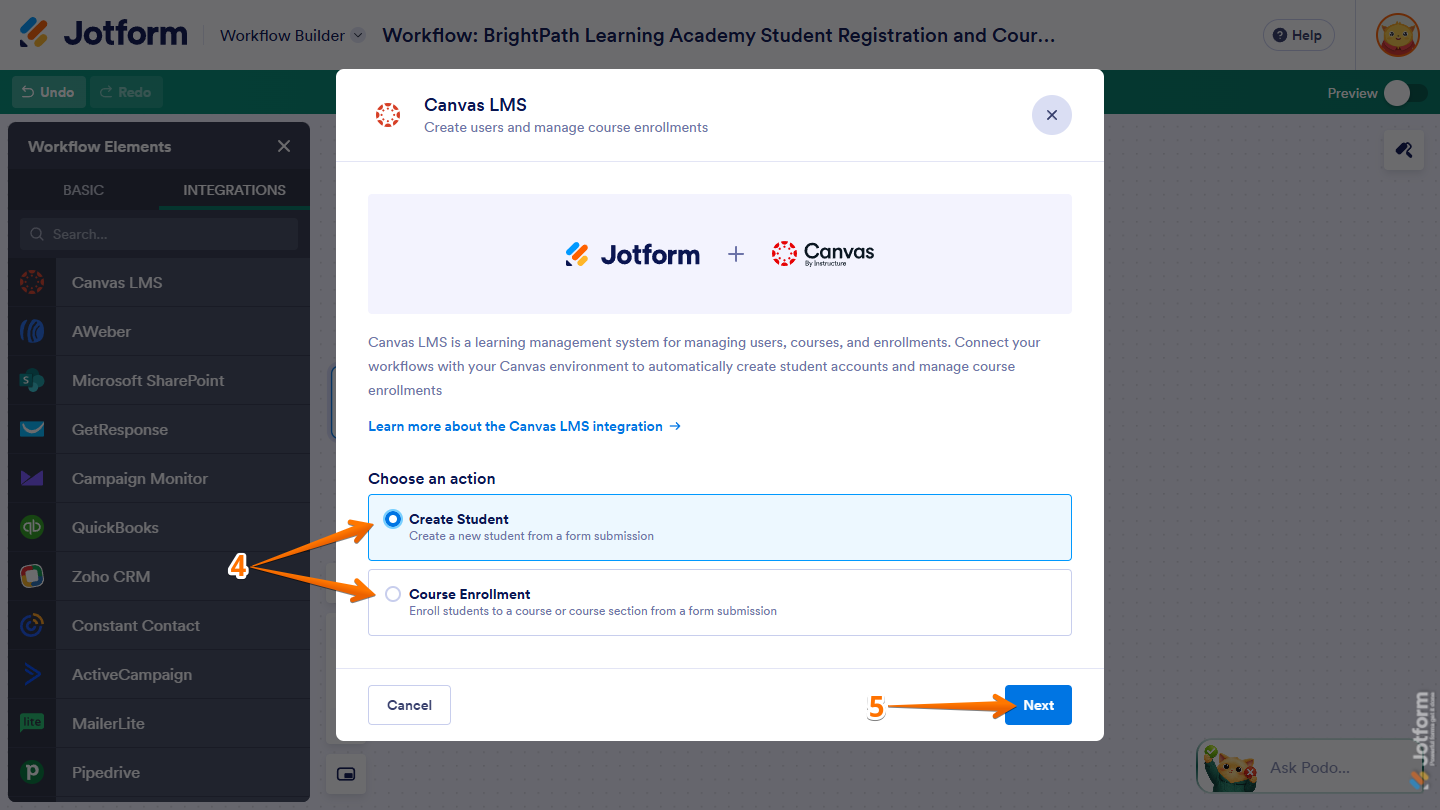
- In the Canvas LMS window that comes up, select the action you want to set up:
- Create Student — This adds a student to Canvas using form submission data when the workflow reaches this action.
- Create Enrollment — This enrolls a student in a Canvas course or course section using form submission data when the workflow reaches this action.
- Then, click on Next.
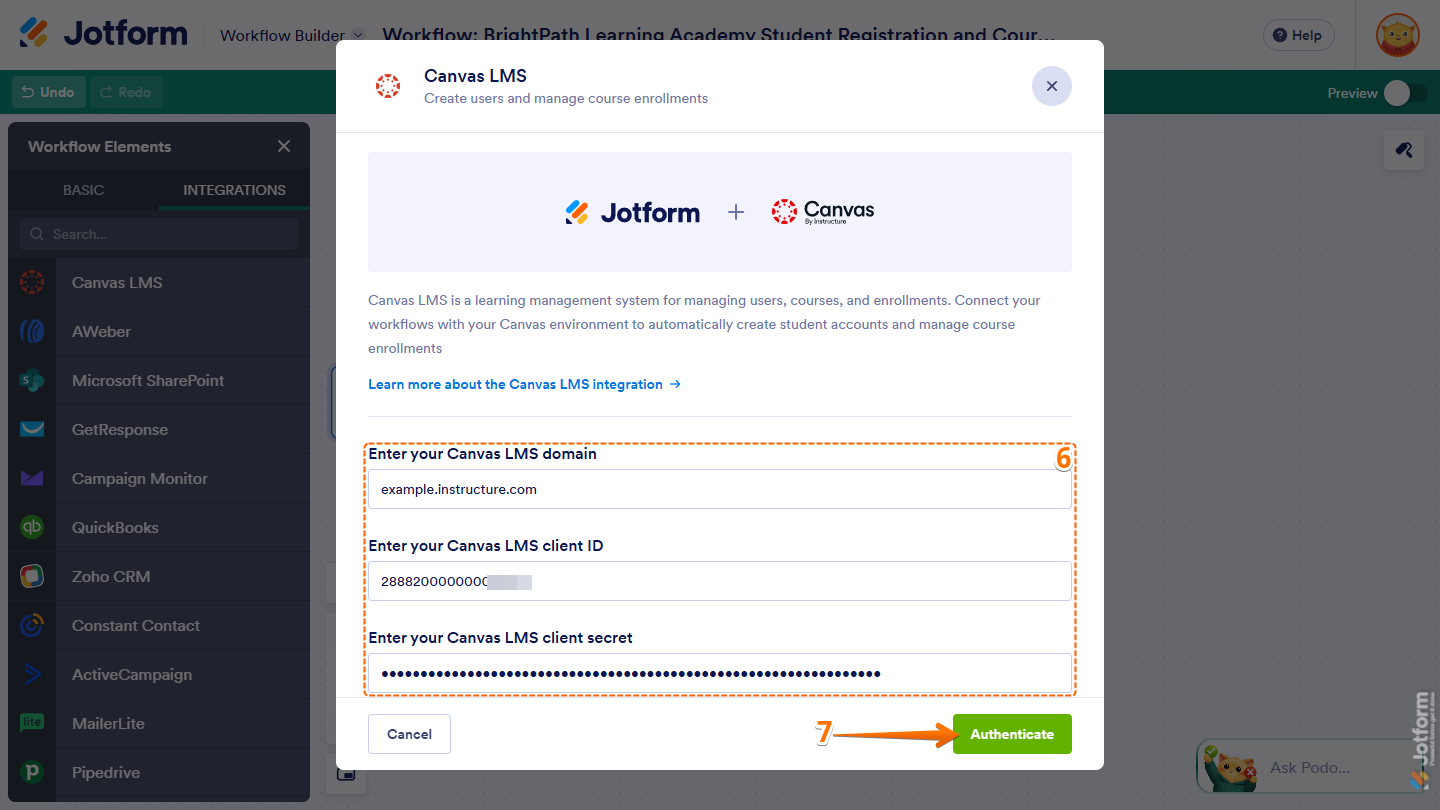
- Now, enter your Canvas LMS Domain, Client ID, and Client Secret.
- Then, click on Authenticate.
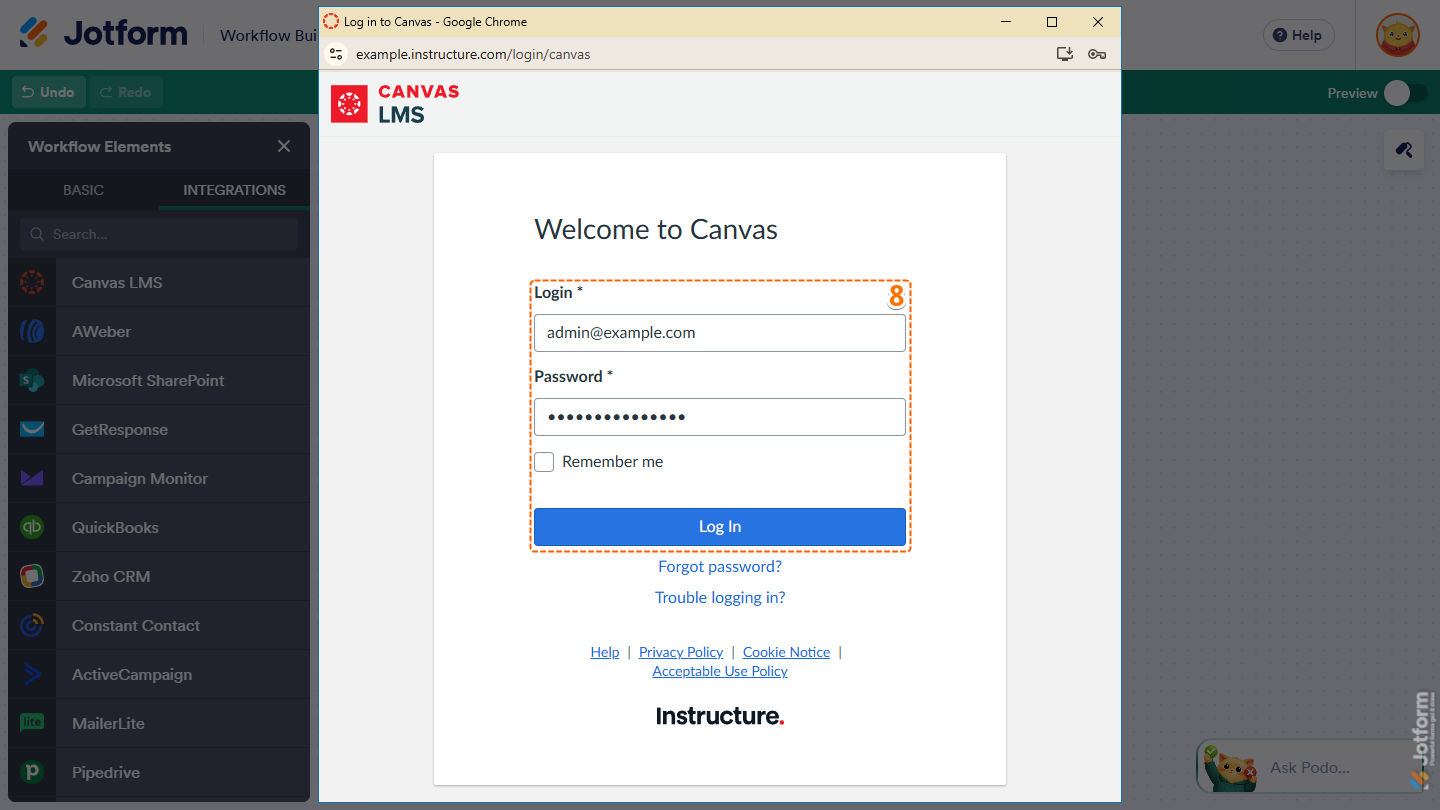
- Next, in the Log in to Canvas window that comes up, log in to your Canvas account.
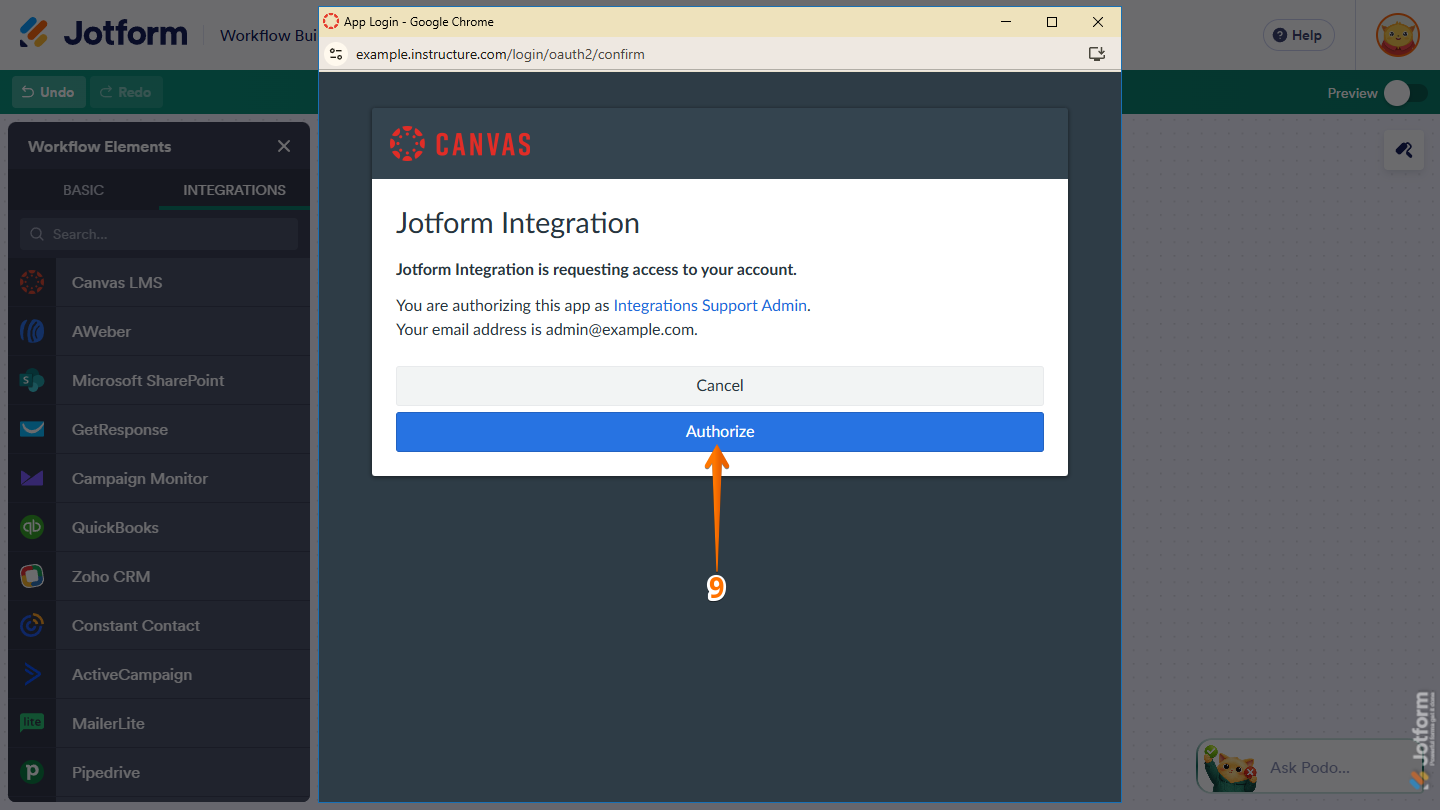
- Then, in the Canvas App Login window, click on Authorize to give Jotform Integration access to your account.
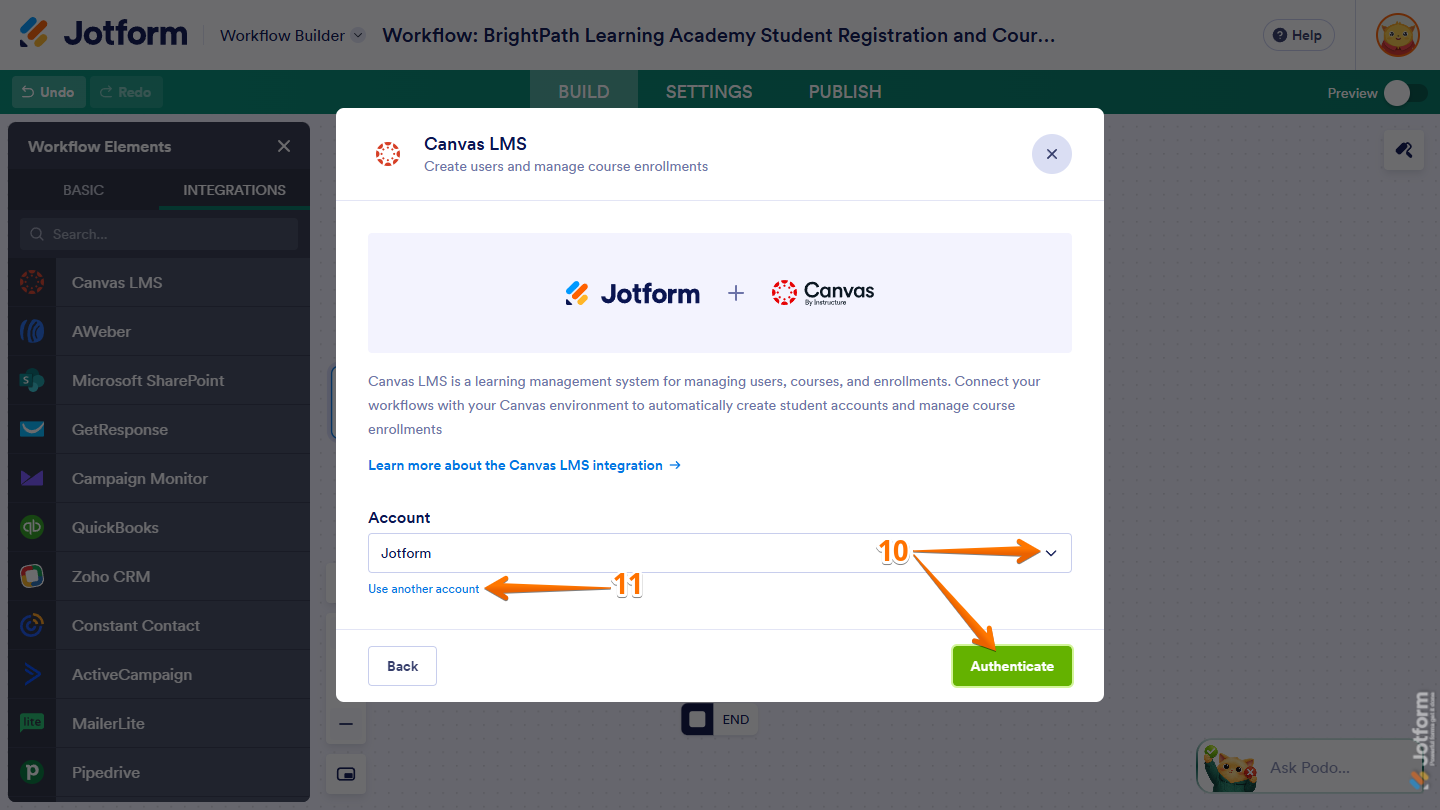
- If you’ve connected a Canvas account to a form or workflow before, click on the Downward Arrow icon on the right side of Account and, in the Dropdown menu, select it, then click on Authenticate.
- Or, to use a different one, click on Use Another Account.
That’s it. You’ve successfully authenticated your Canvas account. You can now continue configuring the Create Student or Course Enrollment action for your workflow.
Pro Tip
You can use the same or different Canvas accounts for each Canvas LMS element in your workflows. This lets you add students or manage course enrollments across different Canvas accounts in the same workflow, or use the same Canvas account across different workflows.
Configuring the Create Student Action
With the Create Student action selected and your Canvas account authenticated, you can easily set it up to add students to Canvas when the workflow reaches it. Here’s what to do:
- In the Match Your Fields section of the Create Student window, on the right side of Login ID (email) in the Canvas LMS column, click on the Downward Arrow icon in the Form Fields column, and in the Dropdown menu that opens, select the form field you want it matched to.
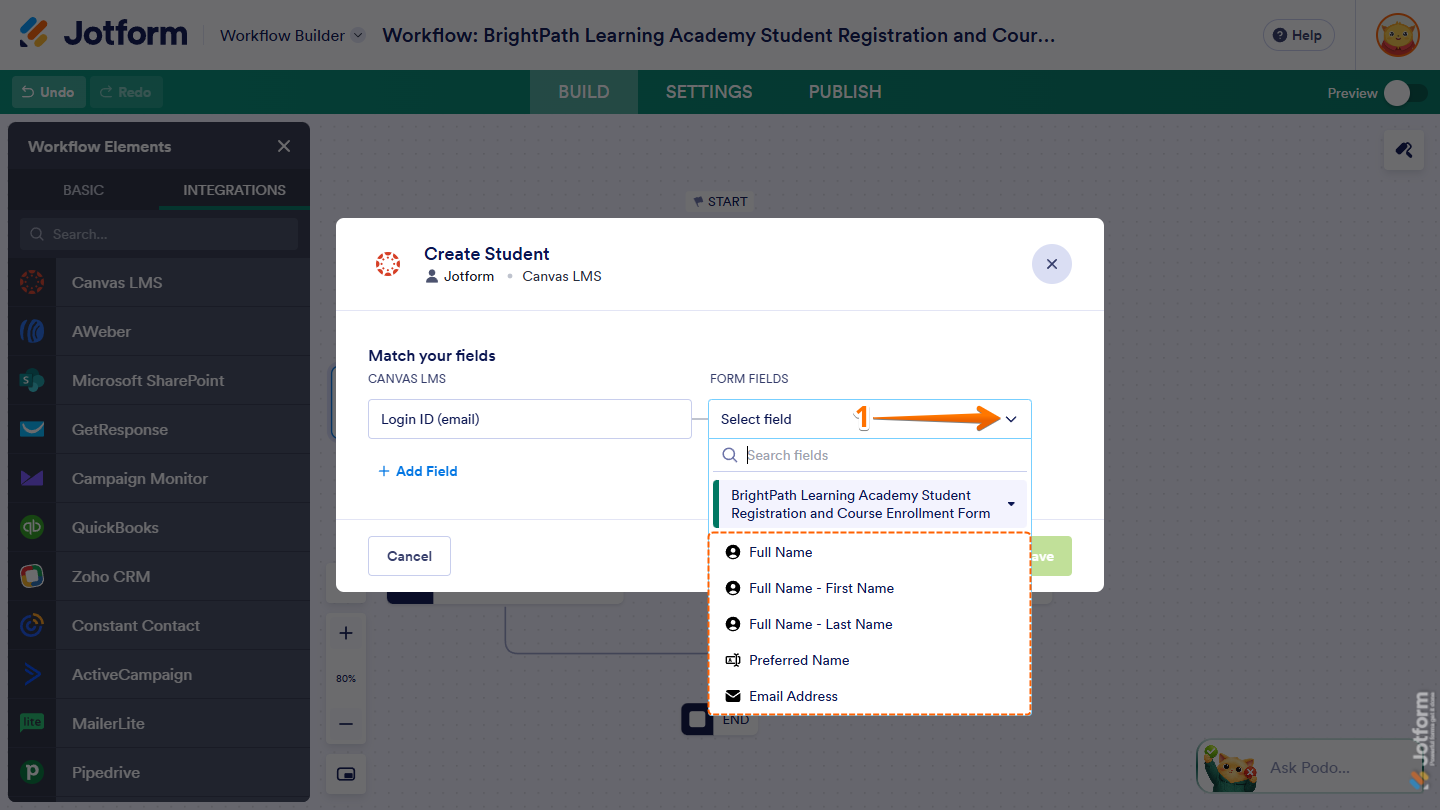
- To map additional fields, click on Add Field at the bottom of the Match Your Fields section.
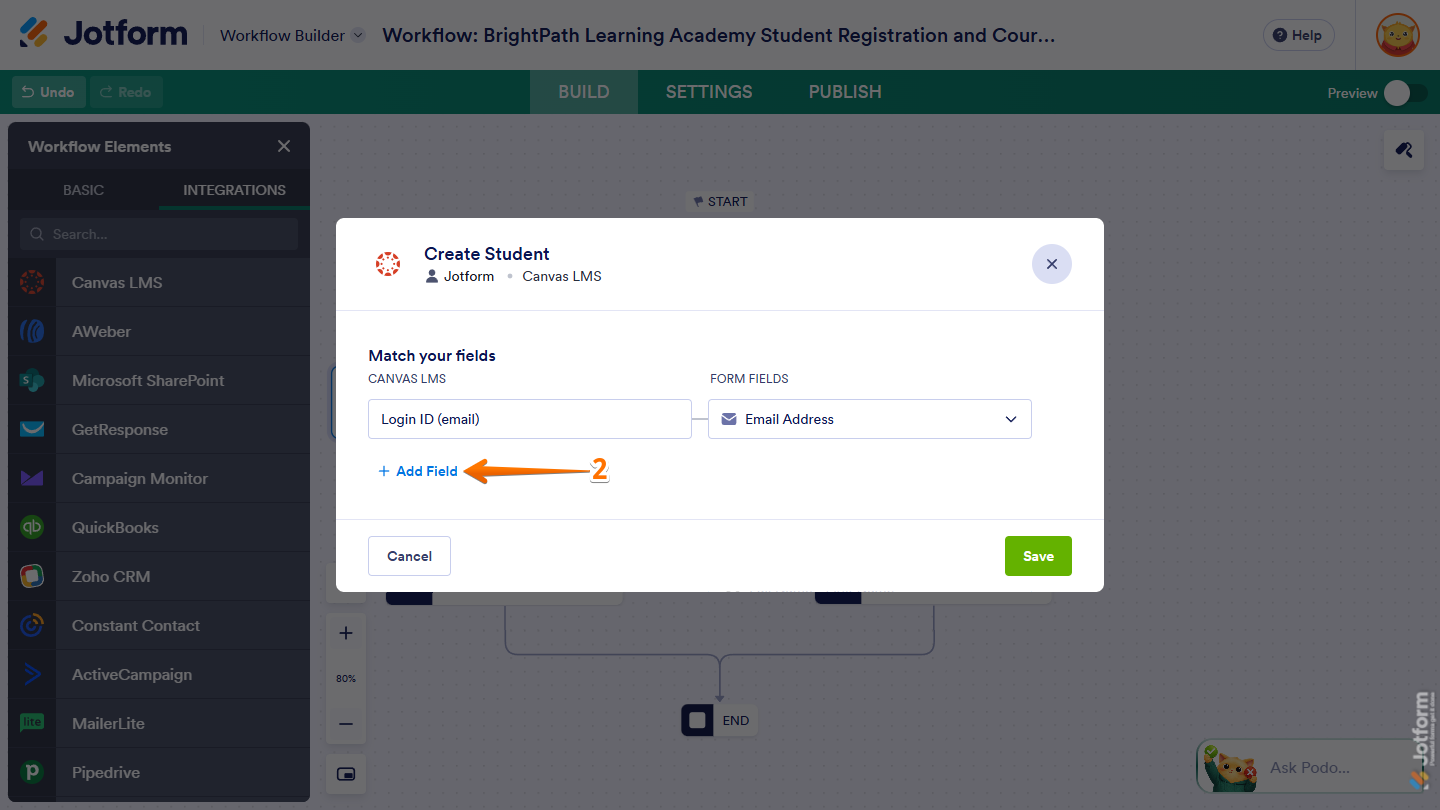
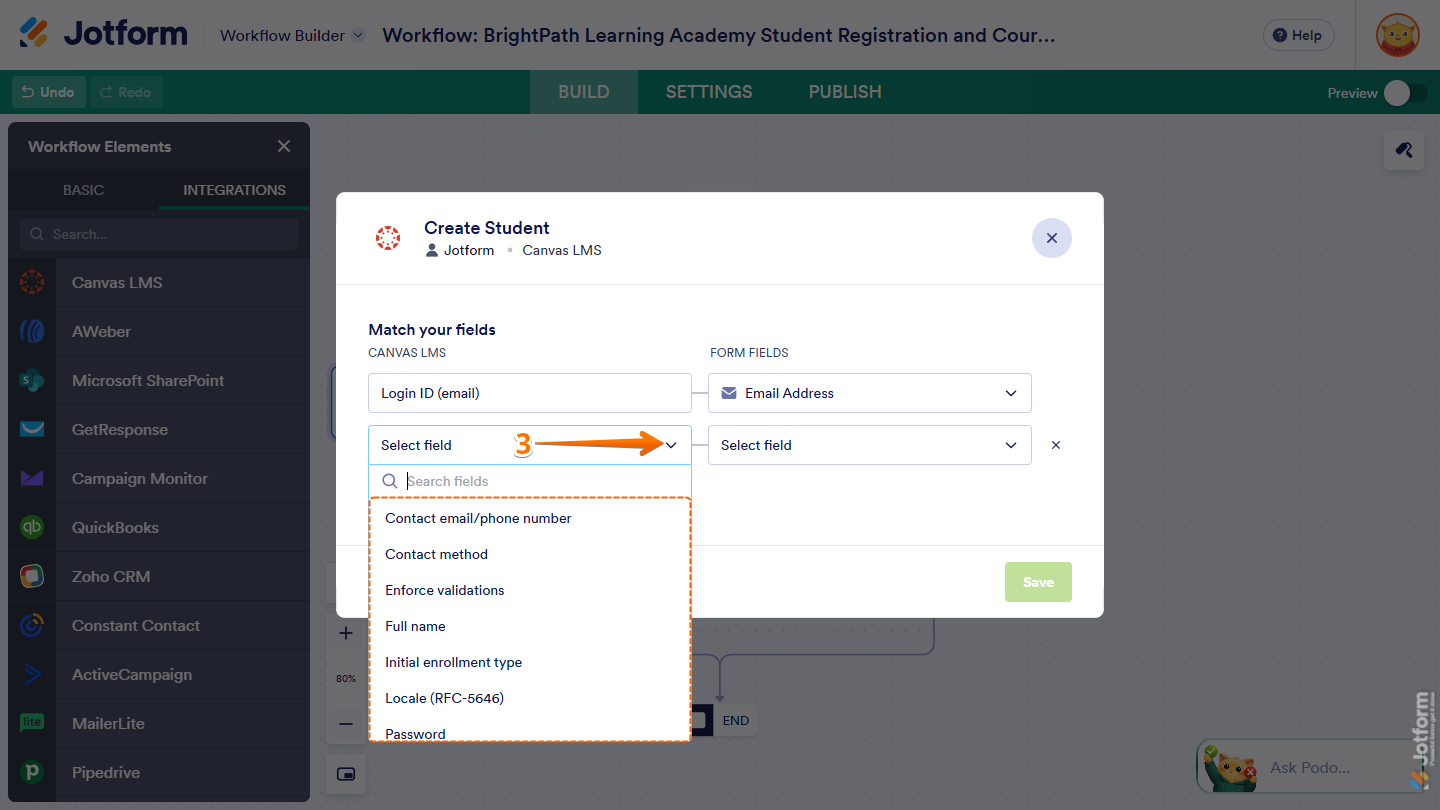
- Then, click on the Downward Arrow icon under Canvas LMS and select a field from your Canvas account.
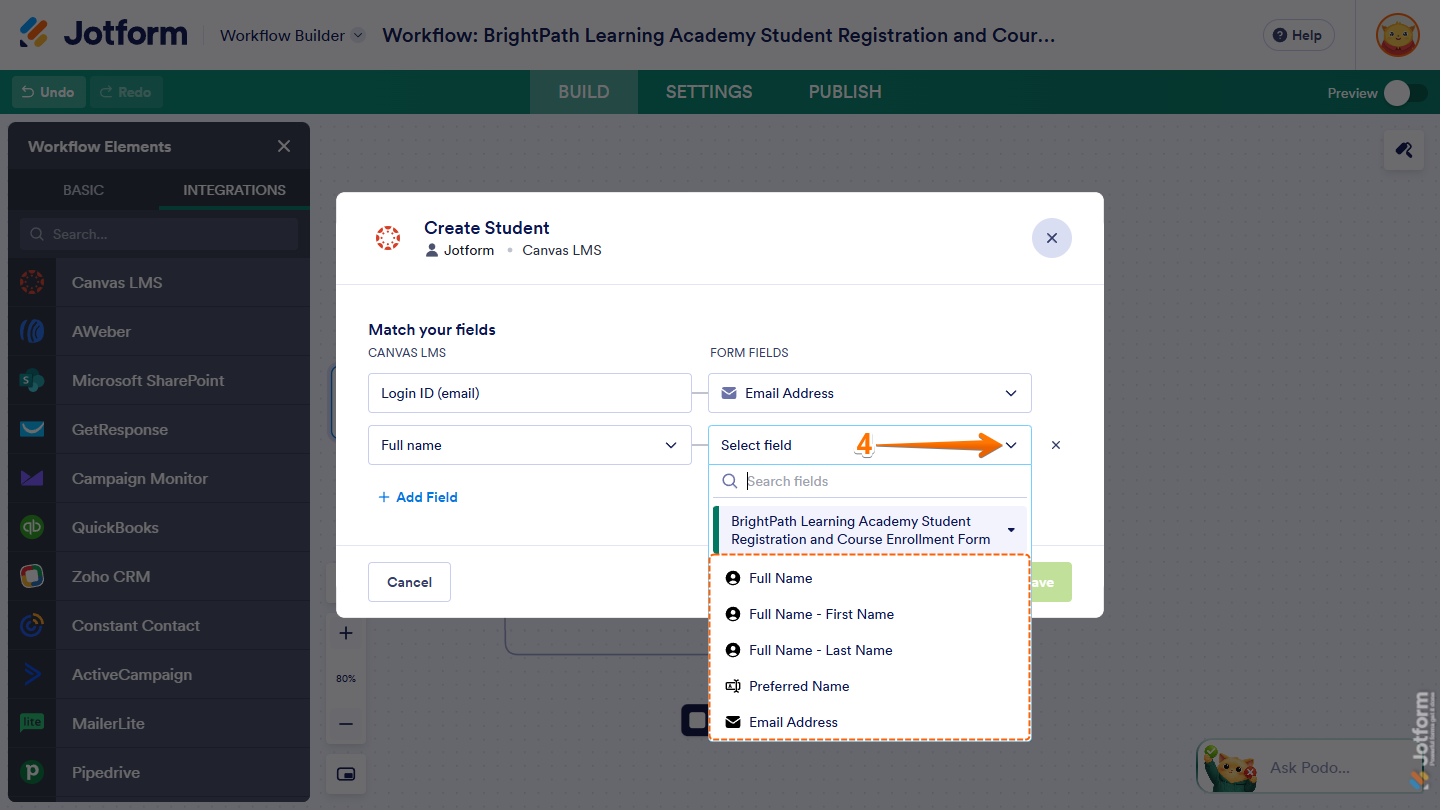
- Now, under Form Fields, click on the Downward Arrow icon and select a field from your form to match it to.
- To remove a matched field, click on the ✕ on the right side of it.
- Once everything’s set, click on Save.
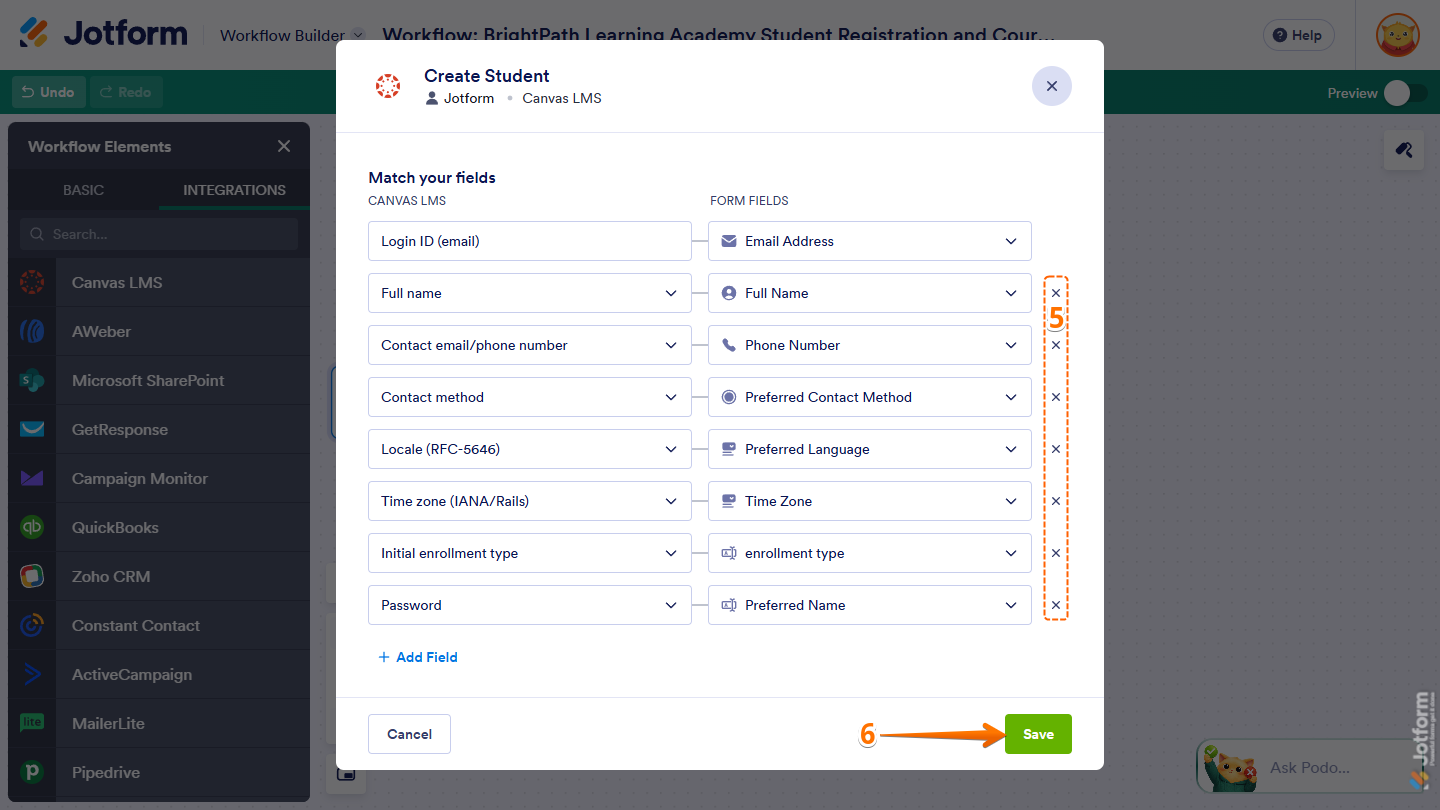
That’s it. You’ve successfully configured the Create Student action. You can now connect it to other elements in your workflow.
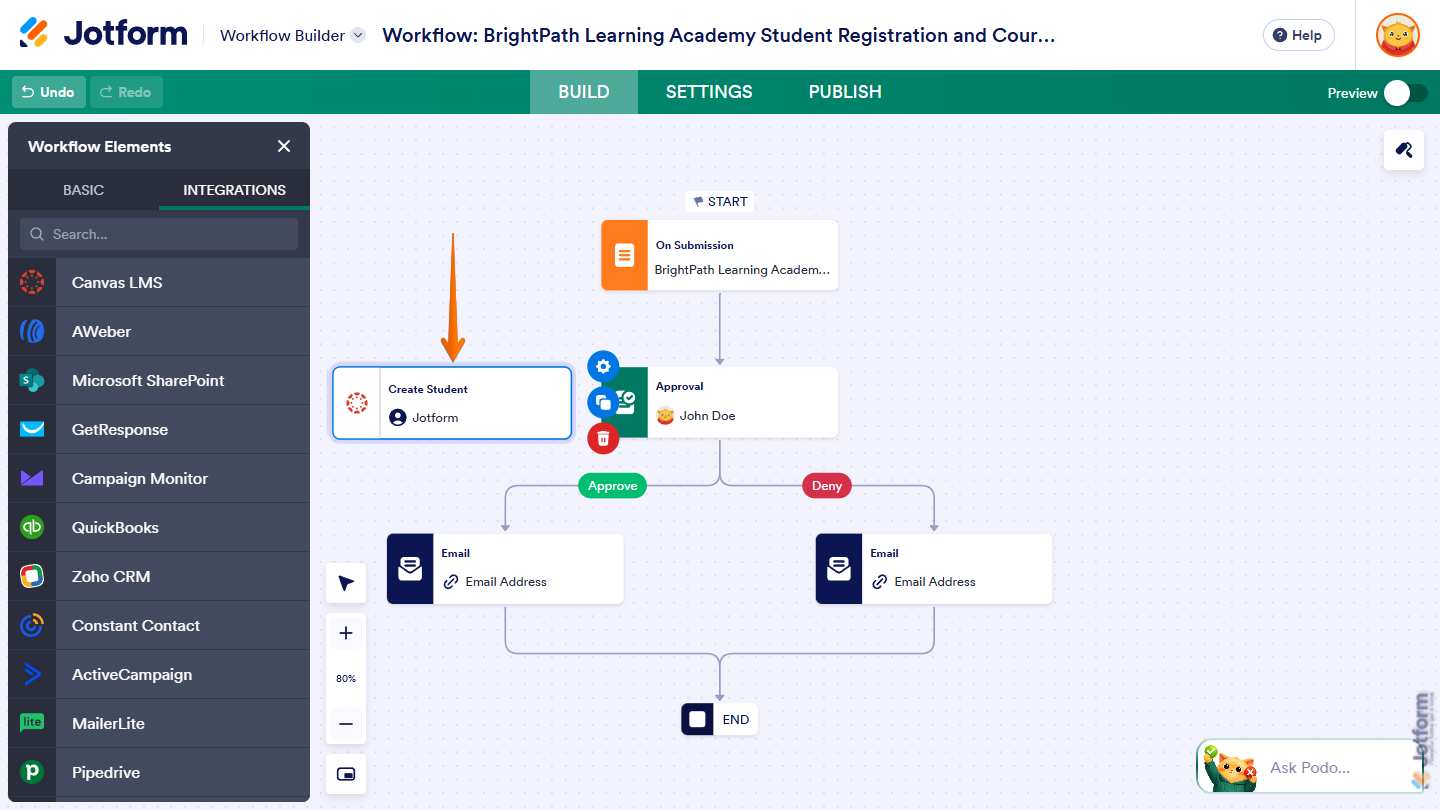
Configuring the Course Enrollment Action
With the Course Enrollment action selected and your Canvas account authenticated, you can easily set it up to enroll students in Canvas courses or course sections when the workflow reaches it. Here’s how:
- In the Course Enrollment window, click on the Downward Arrow icon on the far-right side of Course ID and select a field from your form to match it to.
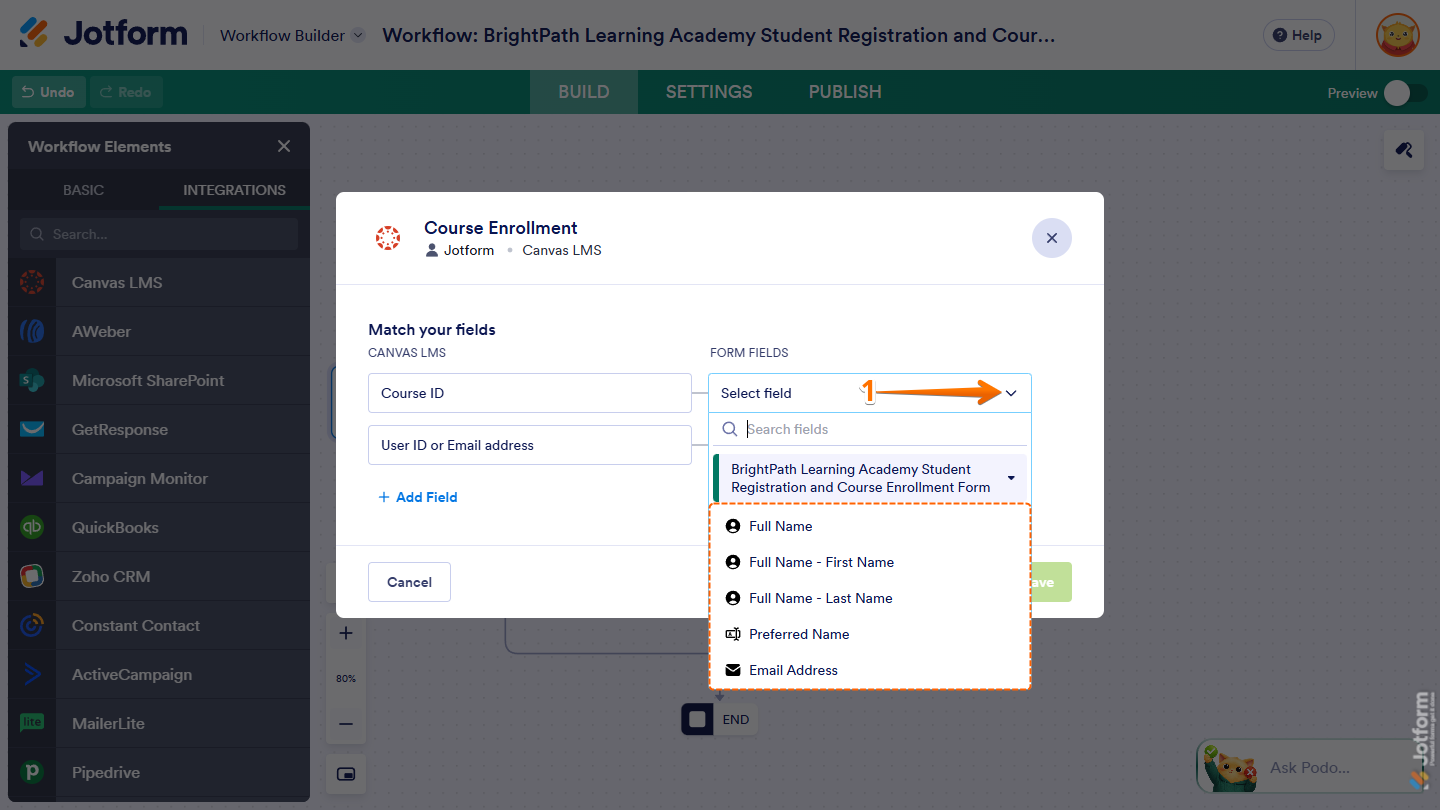
- Now, click on the Downward Arrow icon on the far-right side of User ID or Email Address and select a field from your form to match it to.
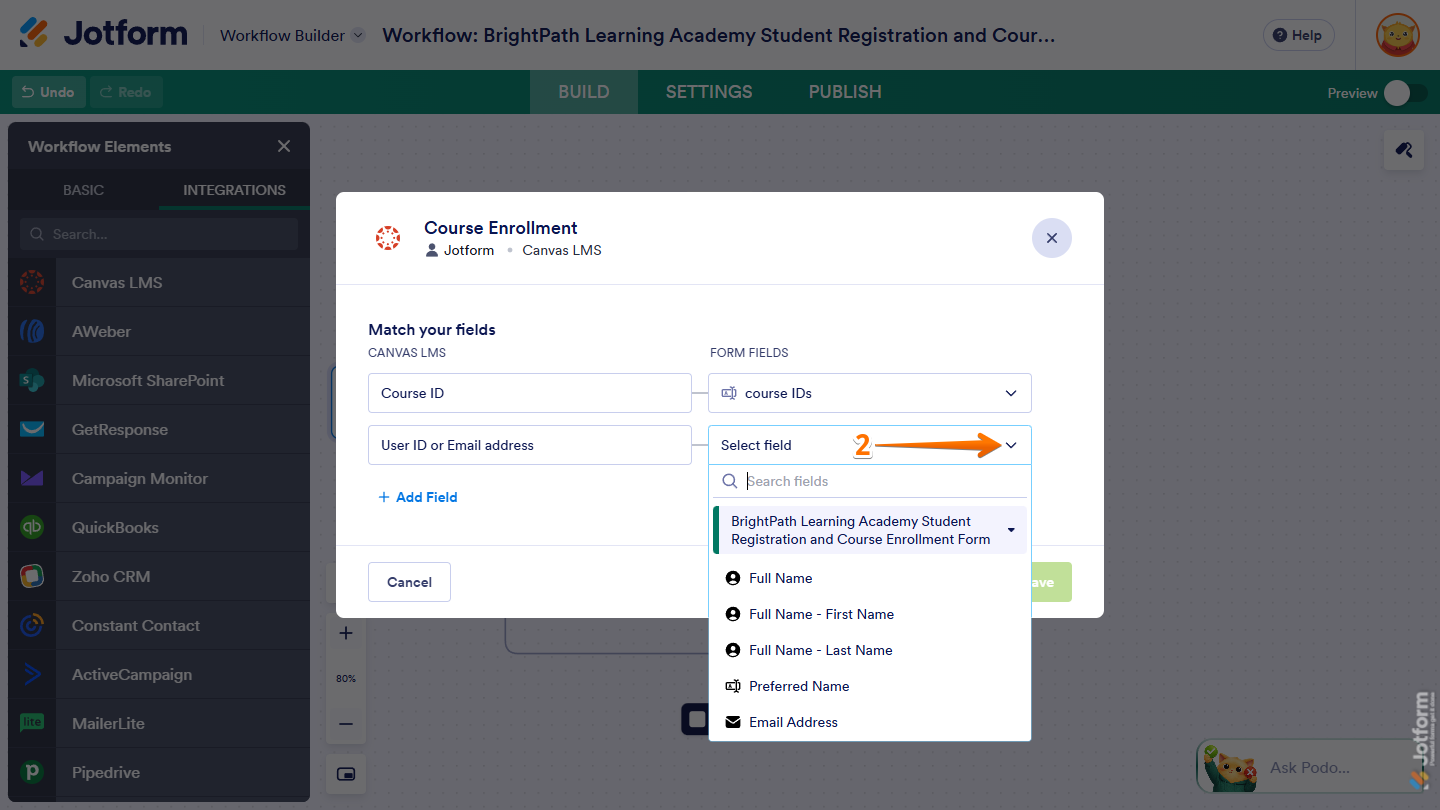
- To map additional fields, click on Add Field at the bottom of the Match Your Fields section.
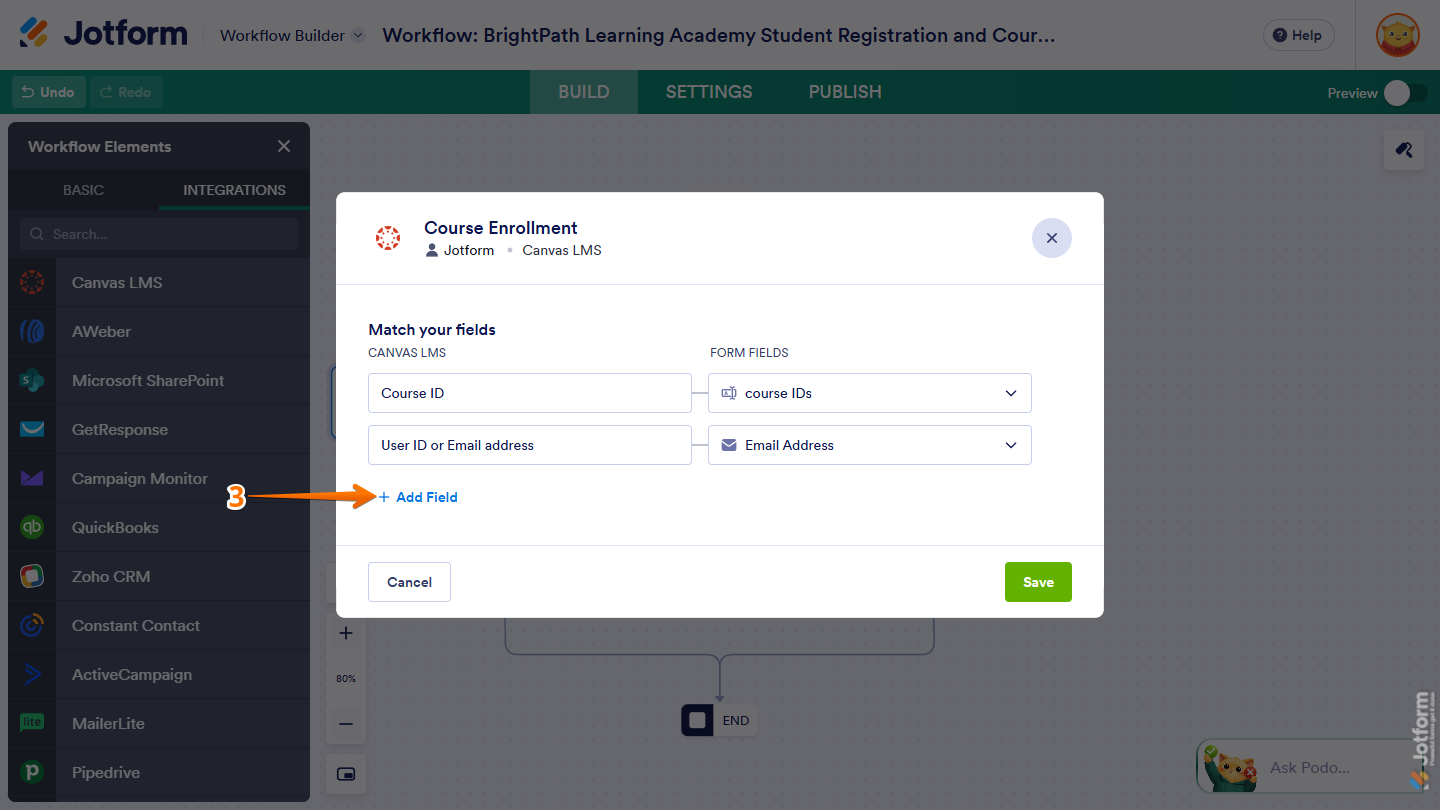
- Then, click on the Downward Arrow icon under Canvas LMS and select a field from your Canvas account.
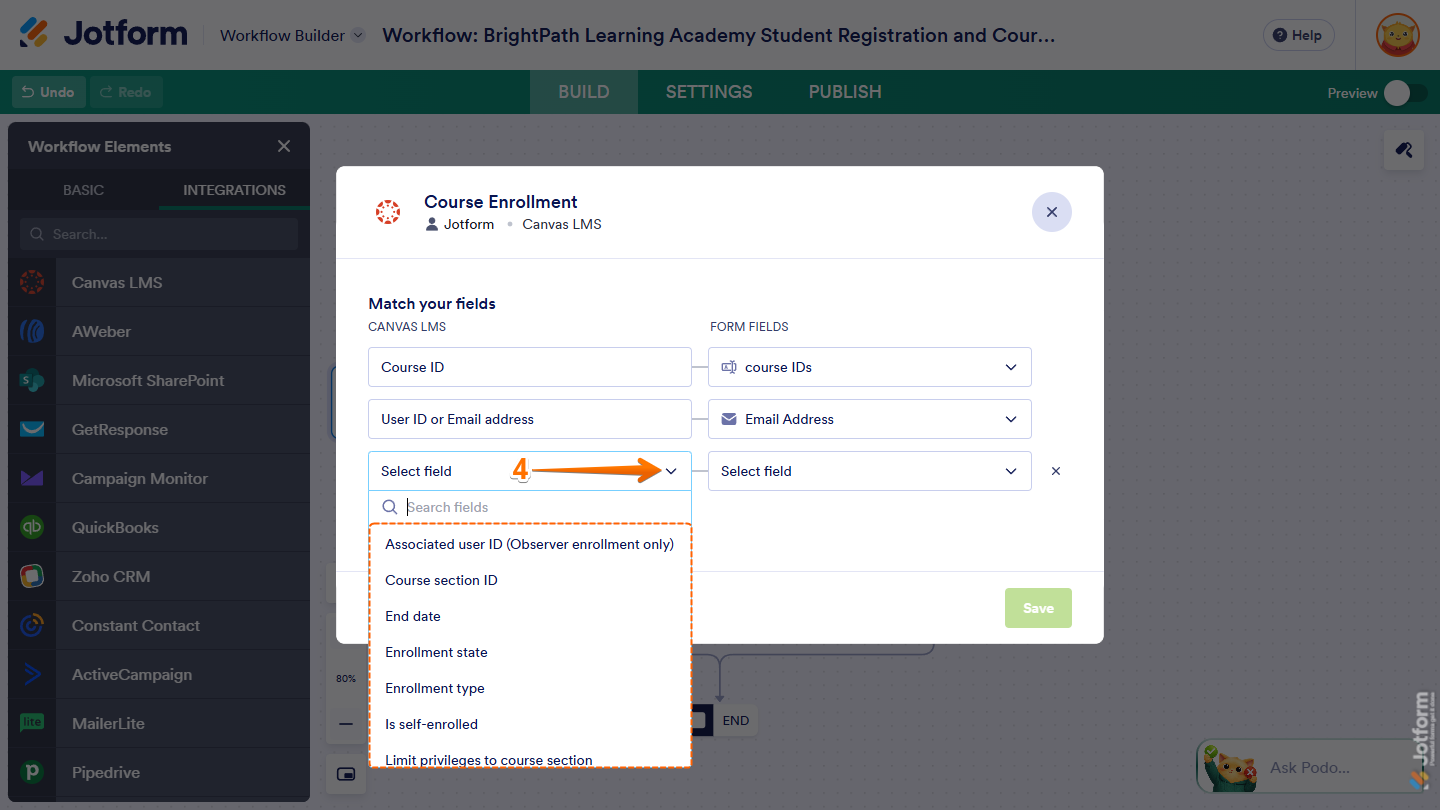
- Next, on the far-right side of that, click on the Downward Arrow icon and select a field from your form to match it to.
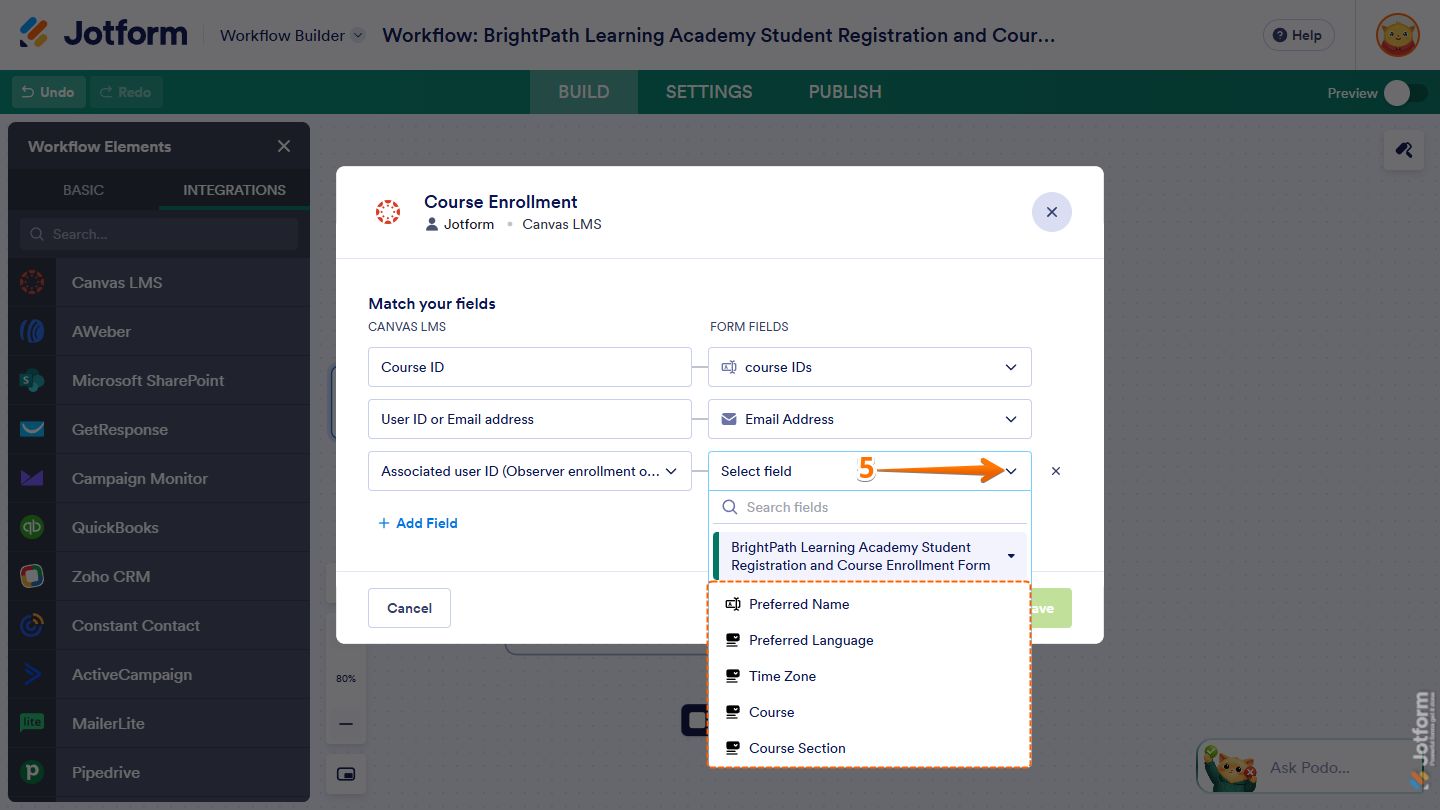
- To remove a matched field, click on the ✕ next to it.
- Once everything’s set, click on Save.
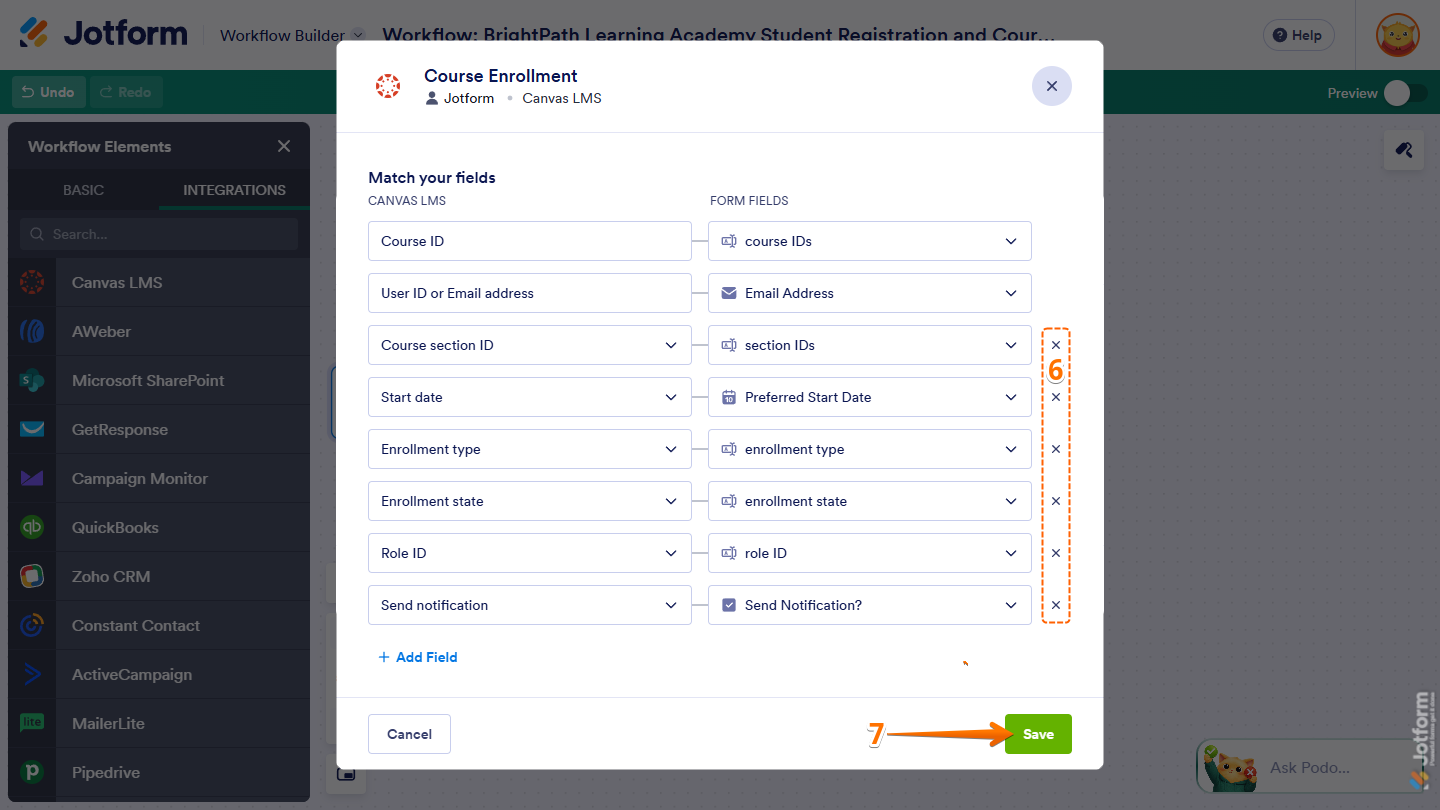
That’s it. You’ve successfully configured the Course Enrollment action. You can now connect it to other elements in your workflow.
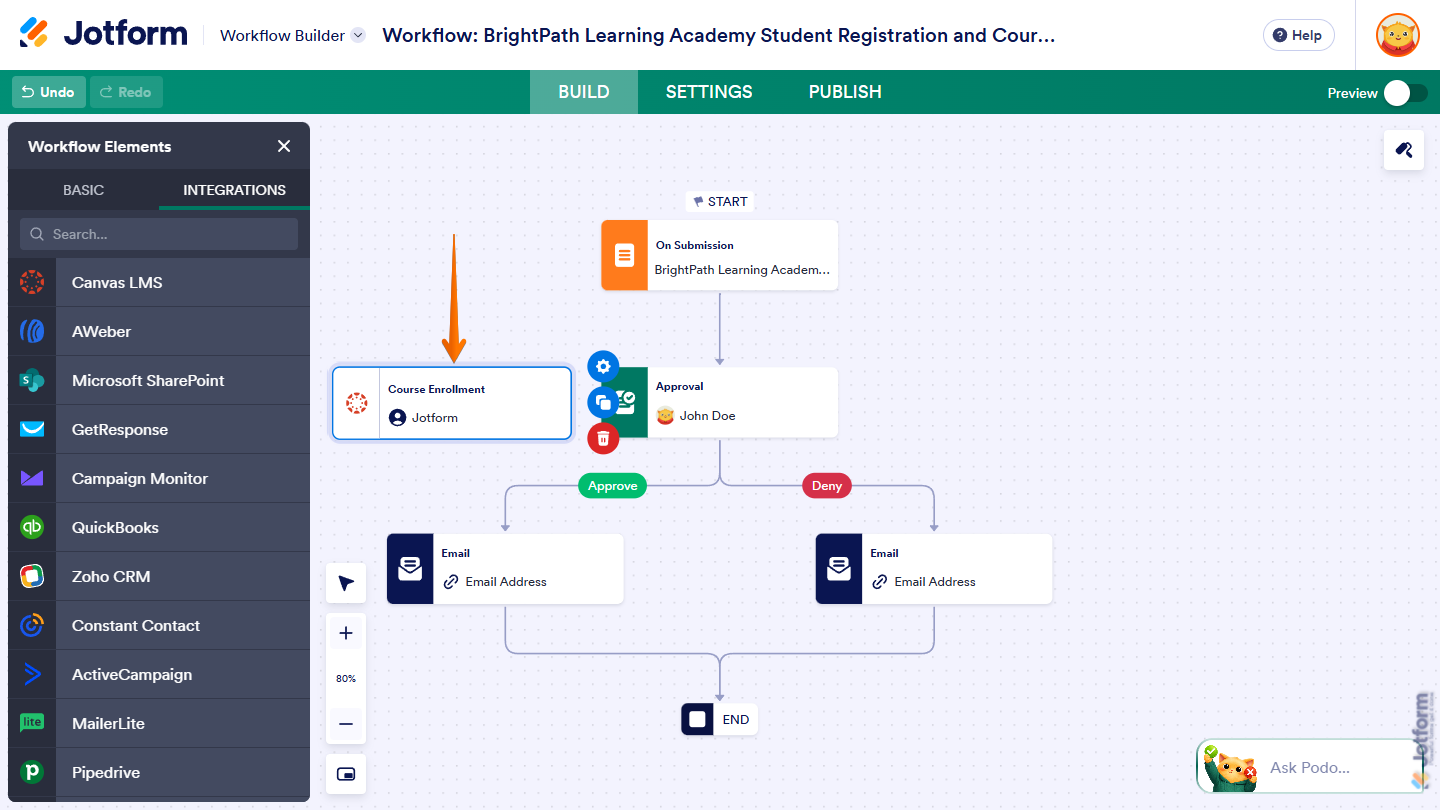
Note
You can create multiple actions of the same or different types within the same workflow.
Connecting the Canvas LMS Element to Other Workflow Elements
Once you’ve set up the Canvas LMS element, you can connect it with the elements that should come before and after it in your workflow. You can do it in just a few steps:
- While in Workflow Builder, hover your mouse over the Create Student or Course Enrollment element, and then click on and hold the Plus icon that appears around the edges.
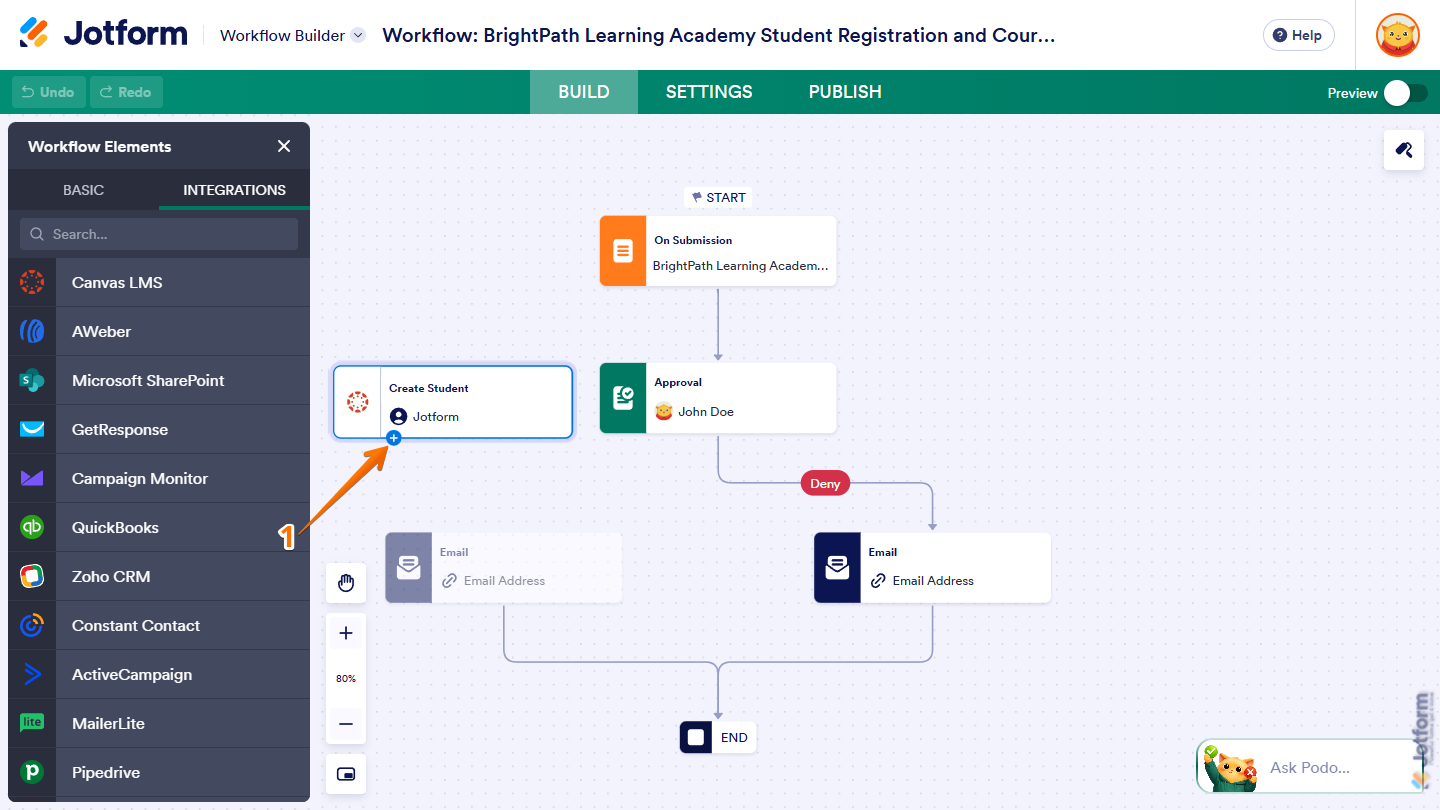
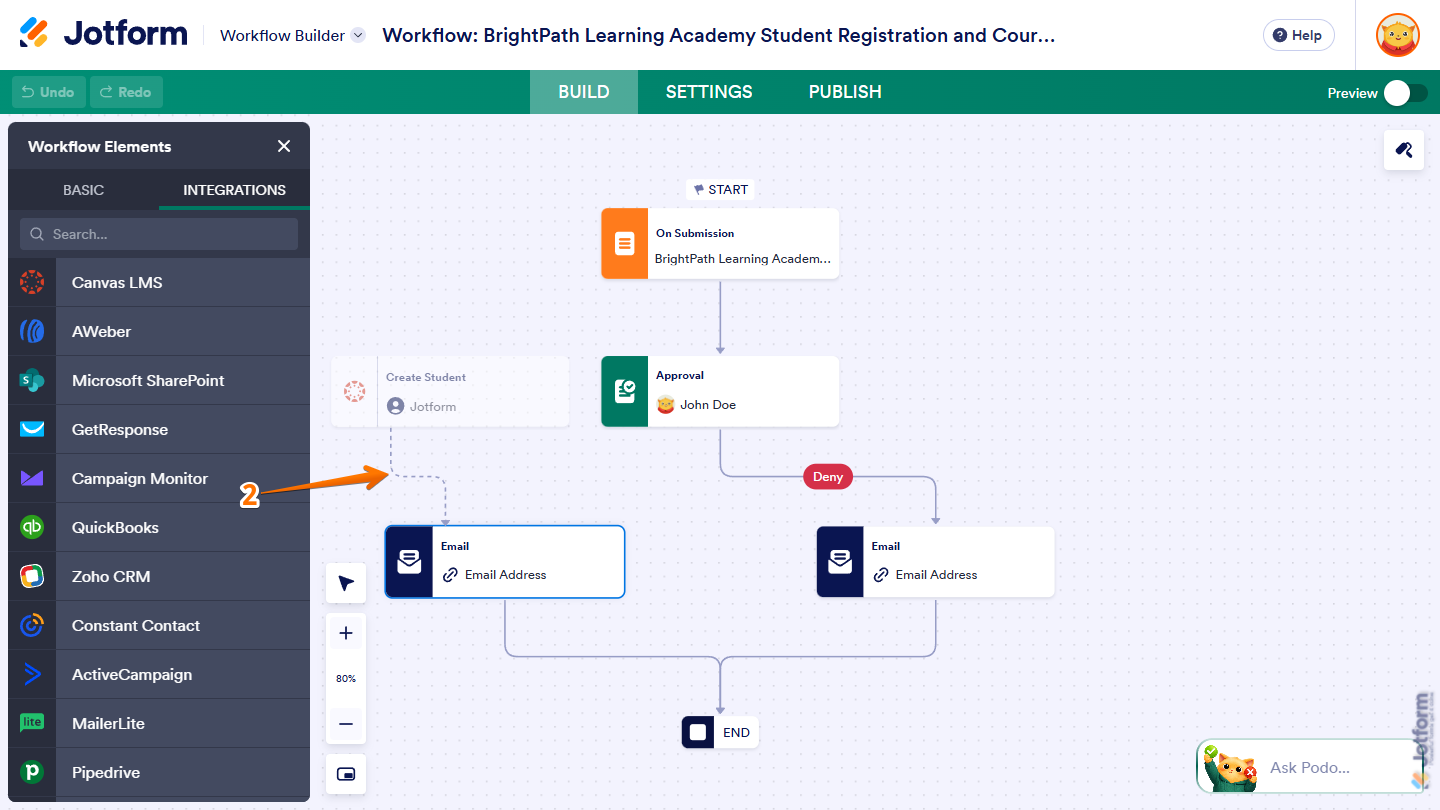
- Then, drag the flow line to another element to connect them.
- Next, draw a Flow Line from another element to the Canvas LMS Create Student or Course Enrollment element to connect it.
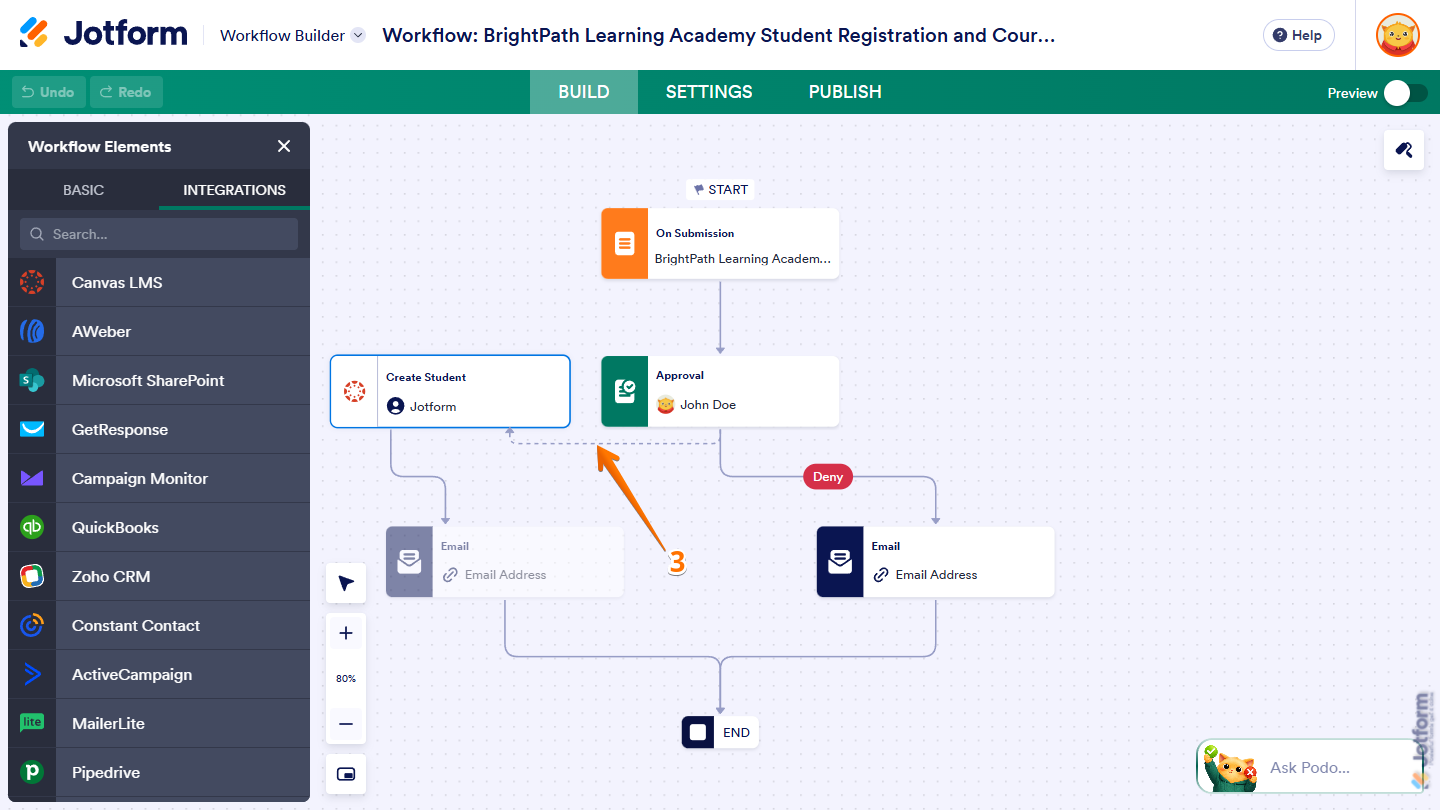
That’s it. You’ve successfully connected the Canvas LMS element to the other elements in your workflow.
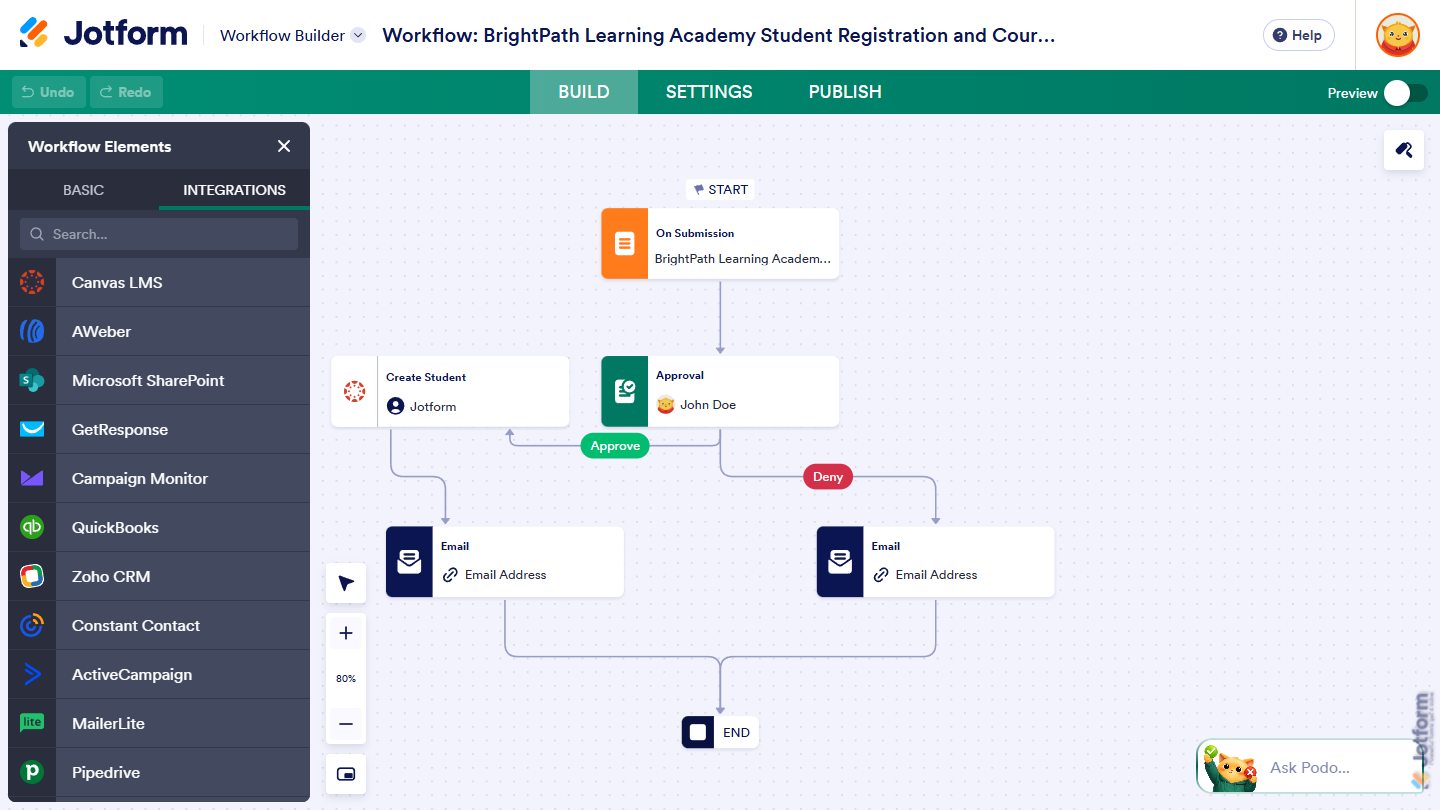
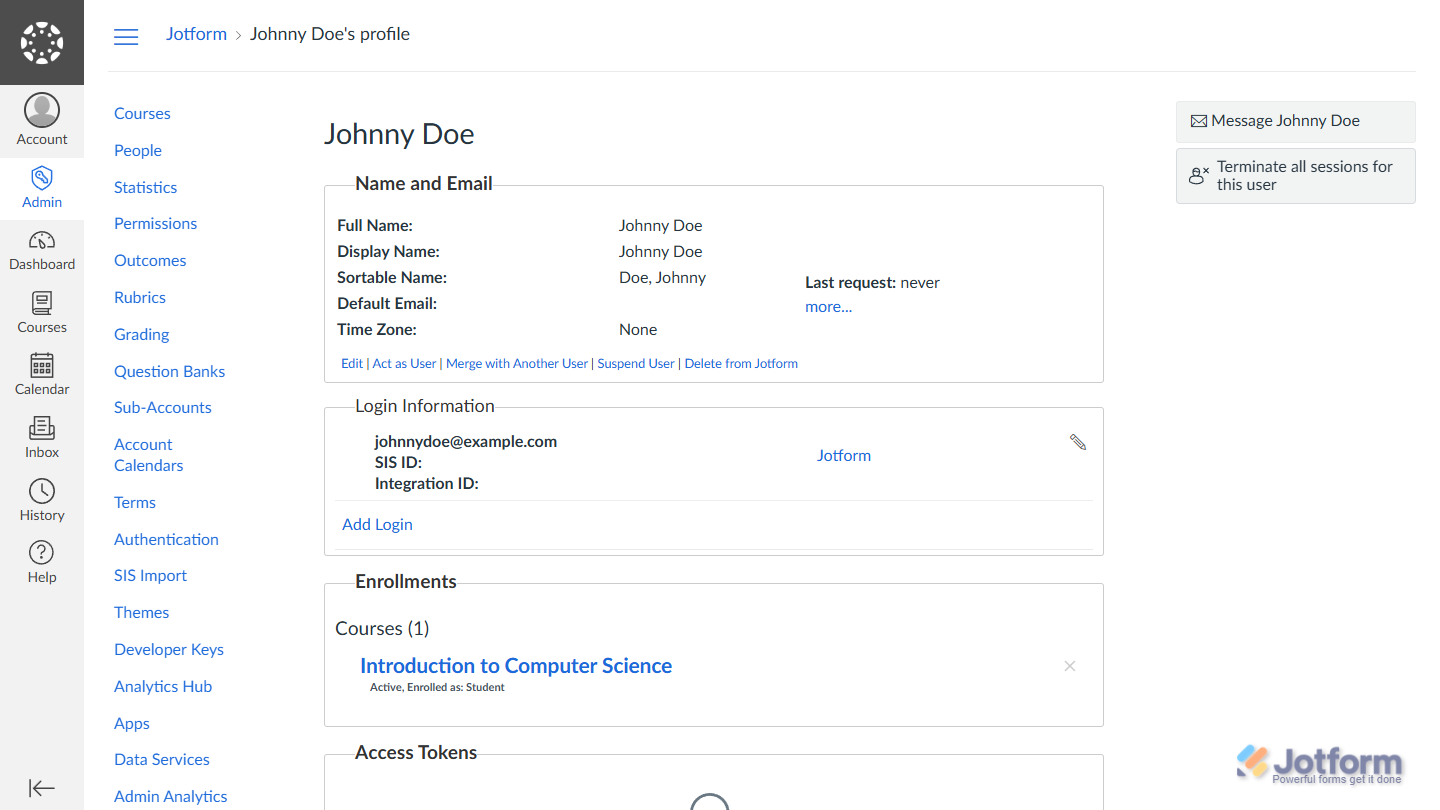
Now, whenever your workflow reaches it, a student will be added to Canvas or enrolled in the selected course or course section, depending on the action you configured.
Getting Your Canvas Client ID and Client Secret
To set up this integration, you’ll need your Canvas LMS domain, client ID, and client secret. Here’s how to get them:
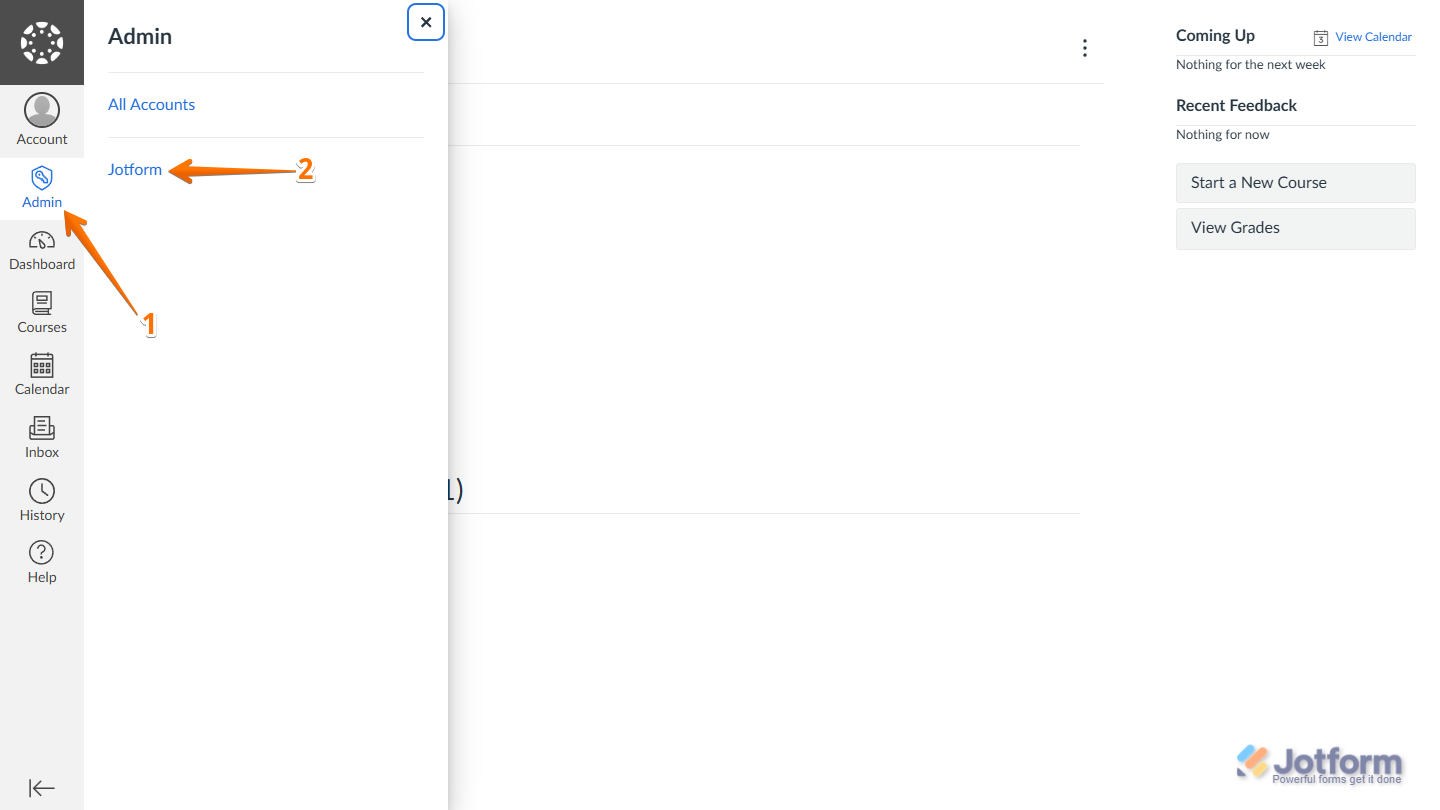
- Log in to your Canvas instance as an administrator and in the menu on the left side of the page, click on Admin.
- Then, in the Admin panel that opens, click on the account you want to use.
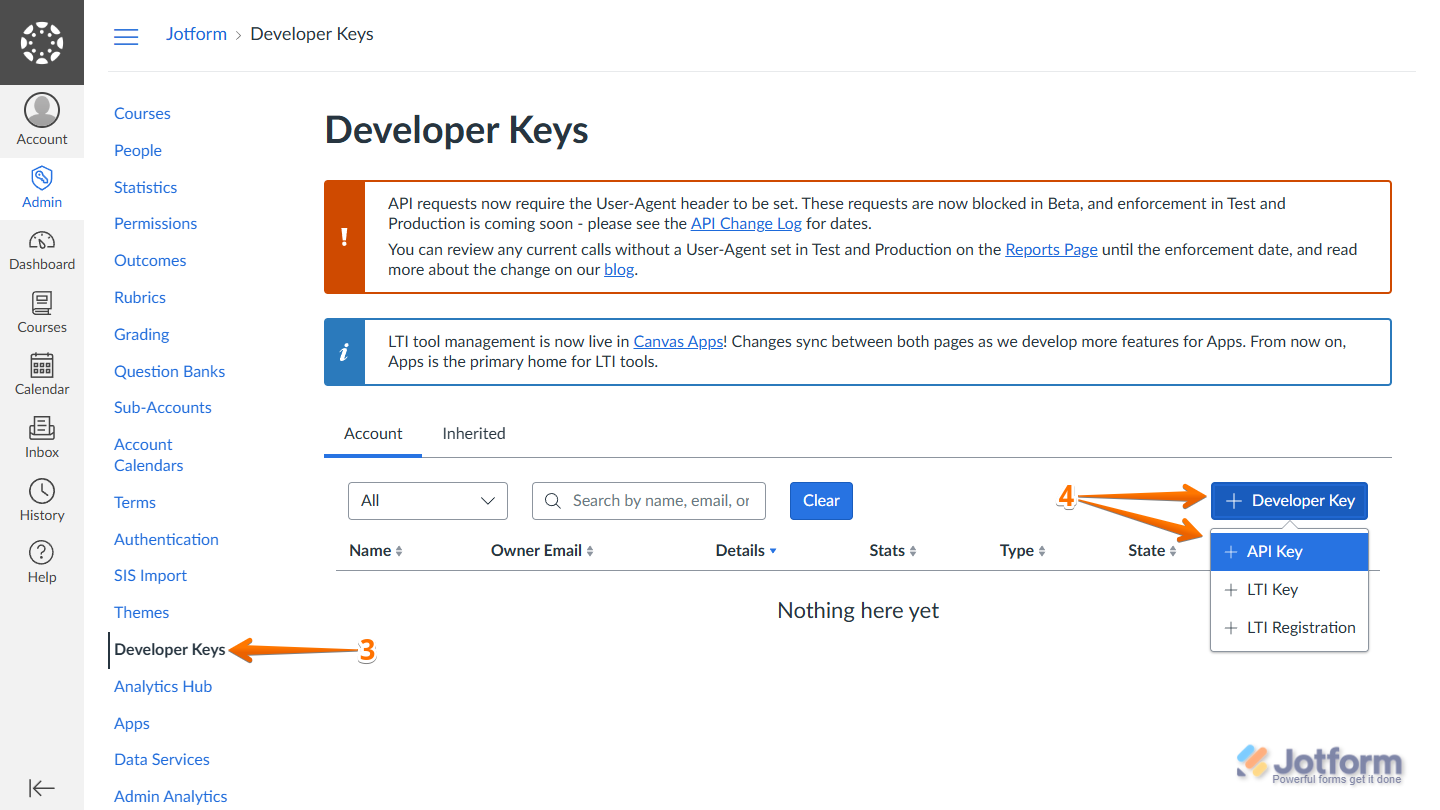
- Next, in the Admin menu on the left of your Accounts page, click on Developer Keys.
- On the right side of the Account tab in the Developer Keys section, click on Developer Key, and in the menu that comes up, select API Key.
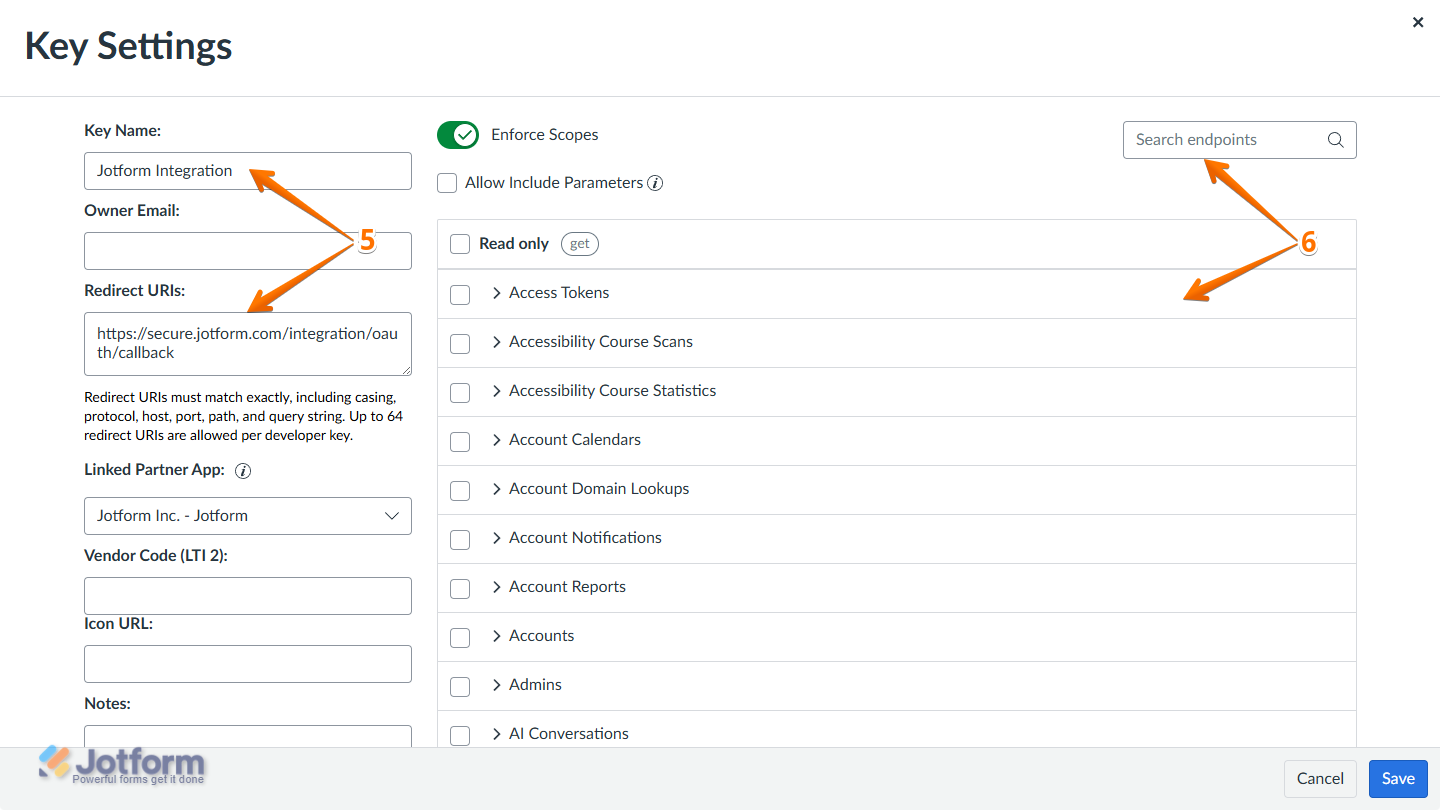
- Now, on the left side panel of the Key Settings window that comes up, configure the following settings:
- Key Name — Enter
Jotform Integrationor another recognizable identifier for the developer key. - Redirect URIs — Enter
https://secure.jotform.com/integration/oauth/callbackexactly like you see it here.
- Key Name — Enter
- Then, on the right, click on a Scope to expand it and view the available endpoints. Scroll through the list or use the Search bar in the top-right corner and enter a keyword or the exact endpoint name to find it easily.
Note
The endpoints you select will grant your developer key the permissions Jotform needs to access the related Canvas data and run the integration actions correctly.
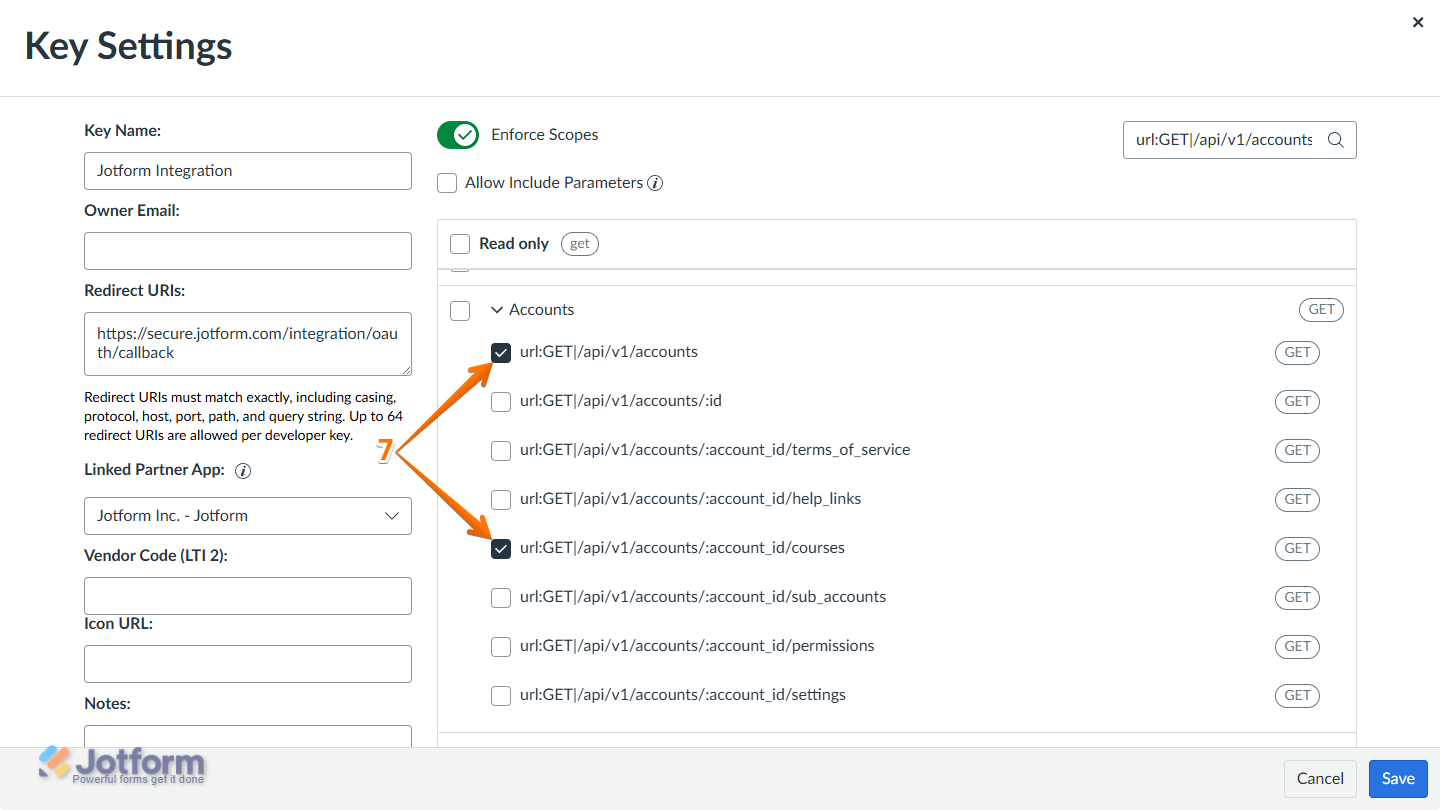
- For the Accounts scope, put checks in the boxes next to the following endpoints:
url:GET|/api/v1/accountsurl:GET|/api/v1/accounts/:account_id/courses
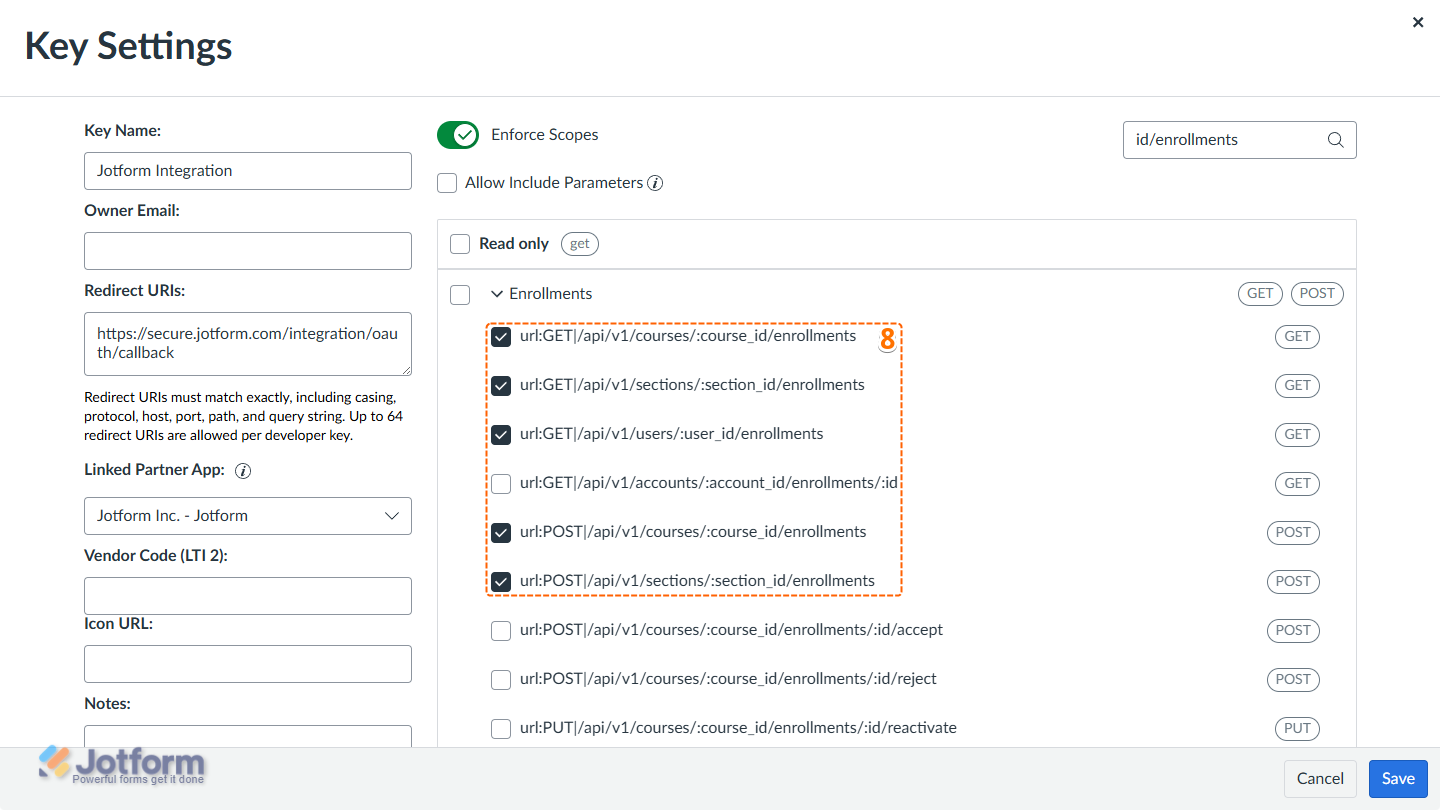
- Then, for the Enrollments scope, put checks in the boxes next to these endpoints:
url:GET|/api/v1/users/:user_id/enrollmentsurl:GET|/api/v1/courses/:course_id/enrollmentsurl:POST|/api/v1/courses/:course_id/enrollmentsurl:GET|/api/v1/sections/:section_id/enrollmentsurl:POST|/api/v1/sections/:section_id/enrollments
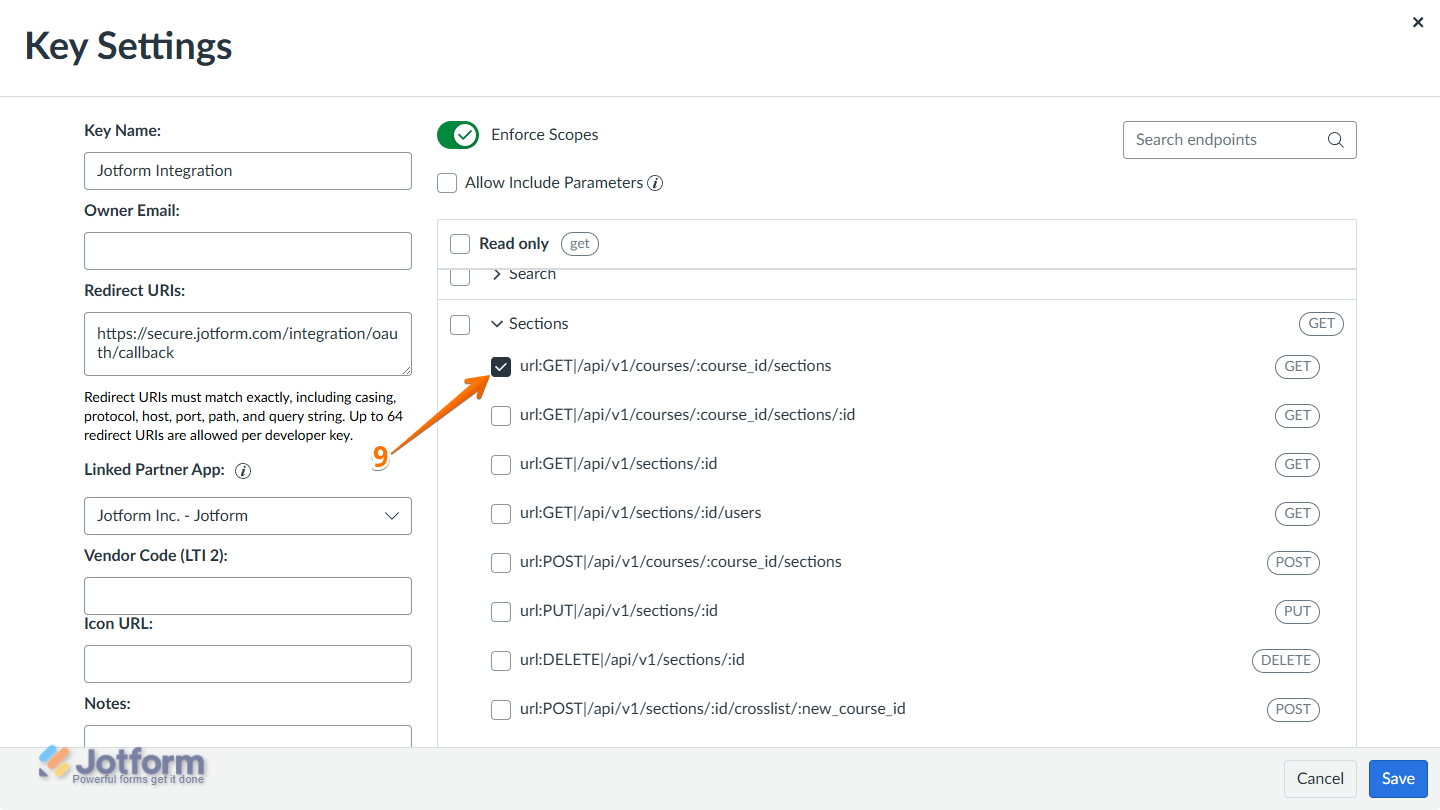
- For the Sections scope, put a check in the box next to
url:GET|/api/v1/courses/:course_id/sections.
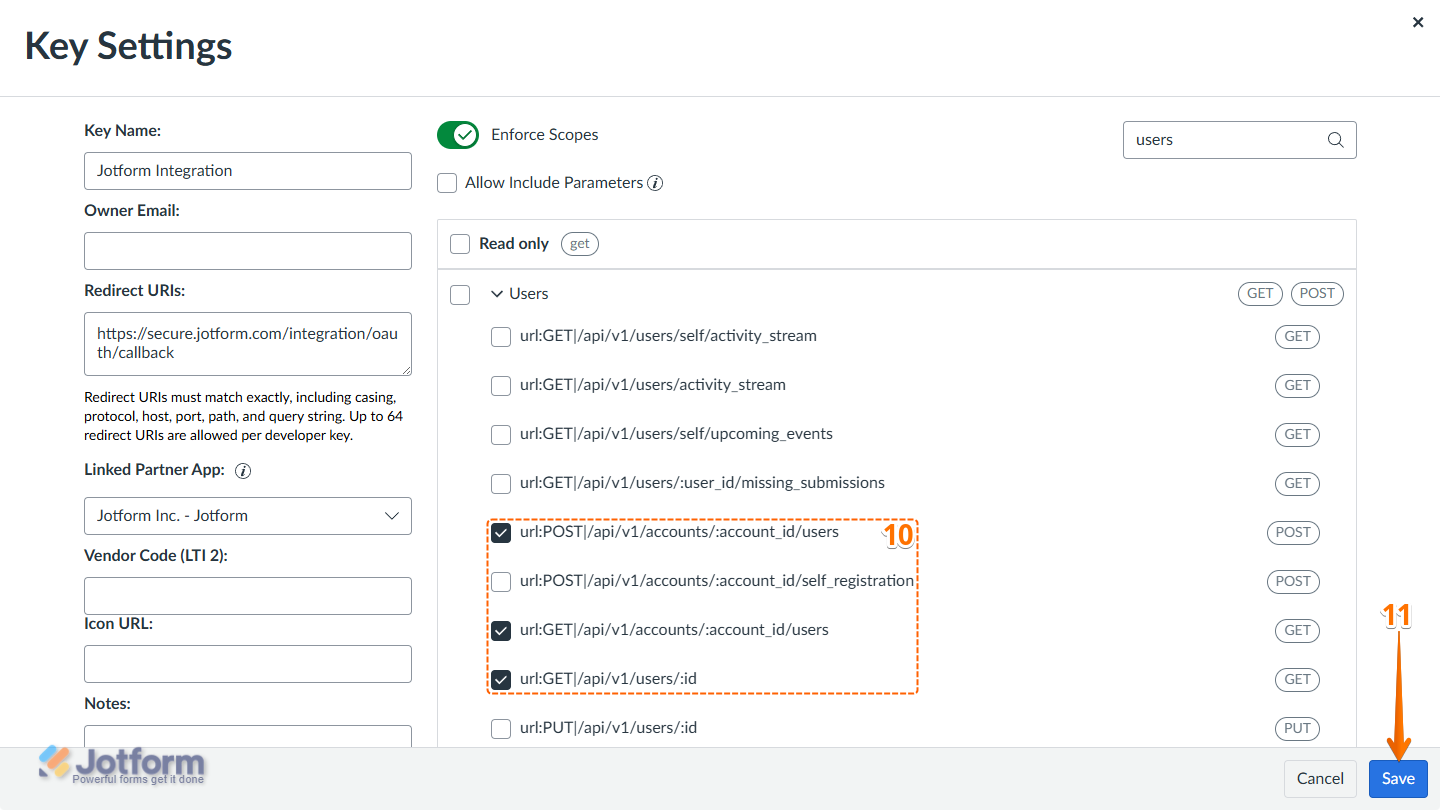
- Next, for the Users scope, put checks in the boxes next to the following endpoints:
url:GET|/api/v1/users/:idurl:GET|/api/v1/accounts/:account_id/usersurl:POST|/api/v1/accounts/:account_id/users
- When your settings are ready, click on Save in the bottom-left corner of the window.
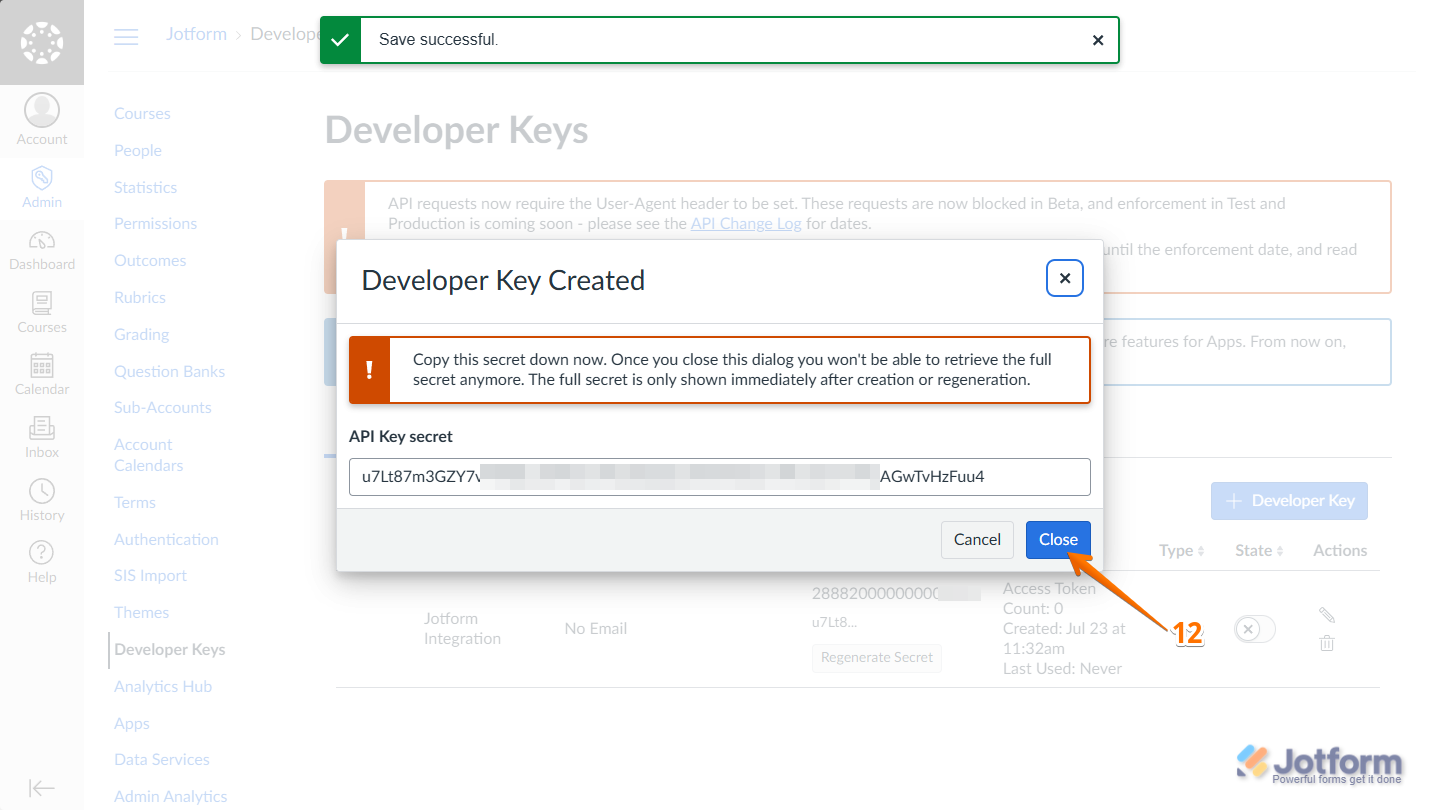
- Now, in the Developer Key Created window that comes up, copy the generated API Key secret, then click on Close.
Note
Your Canvas API Key secret is shown only once, so keep it somewhere safe and easy to find. If you ever need to replace it, you can generate a new one.
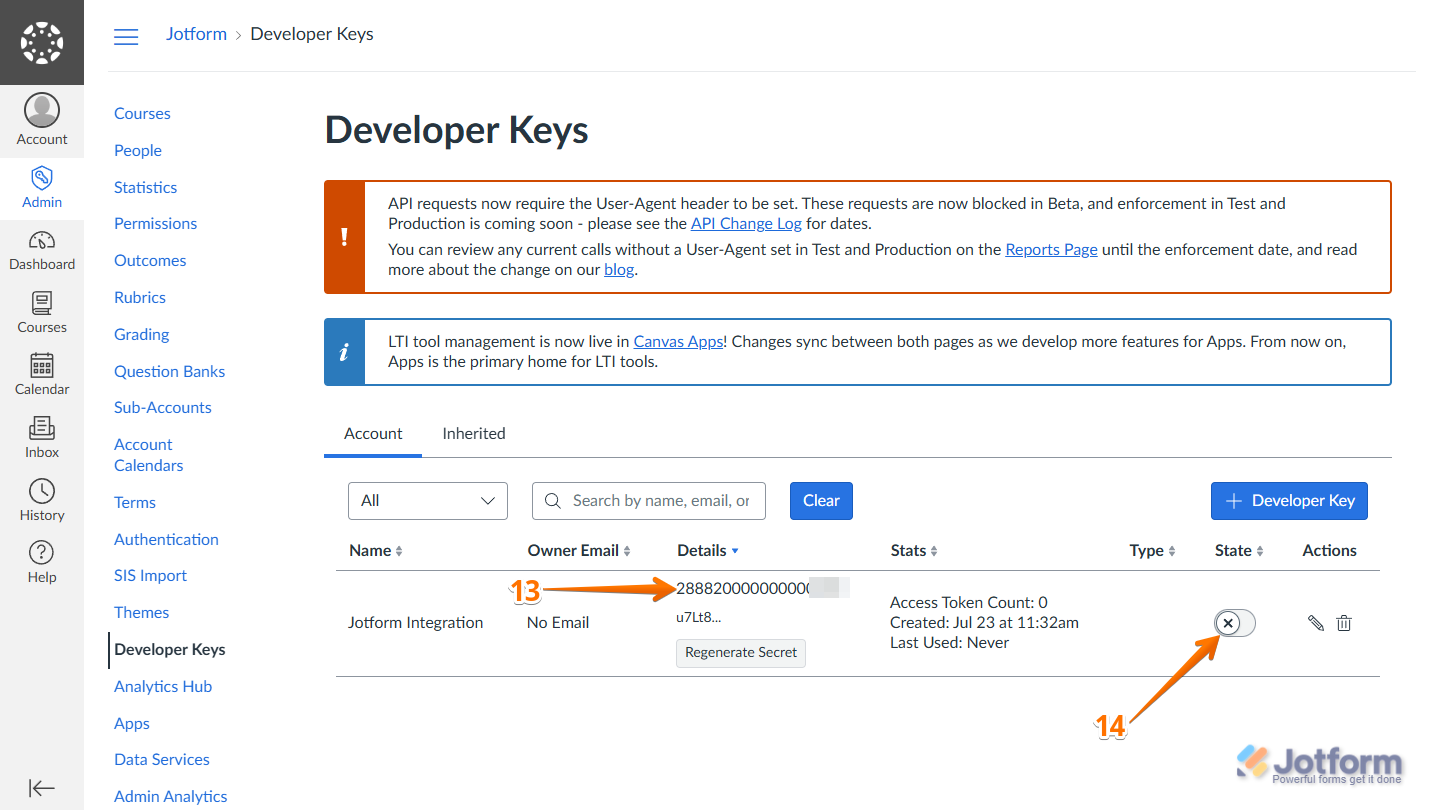
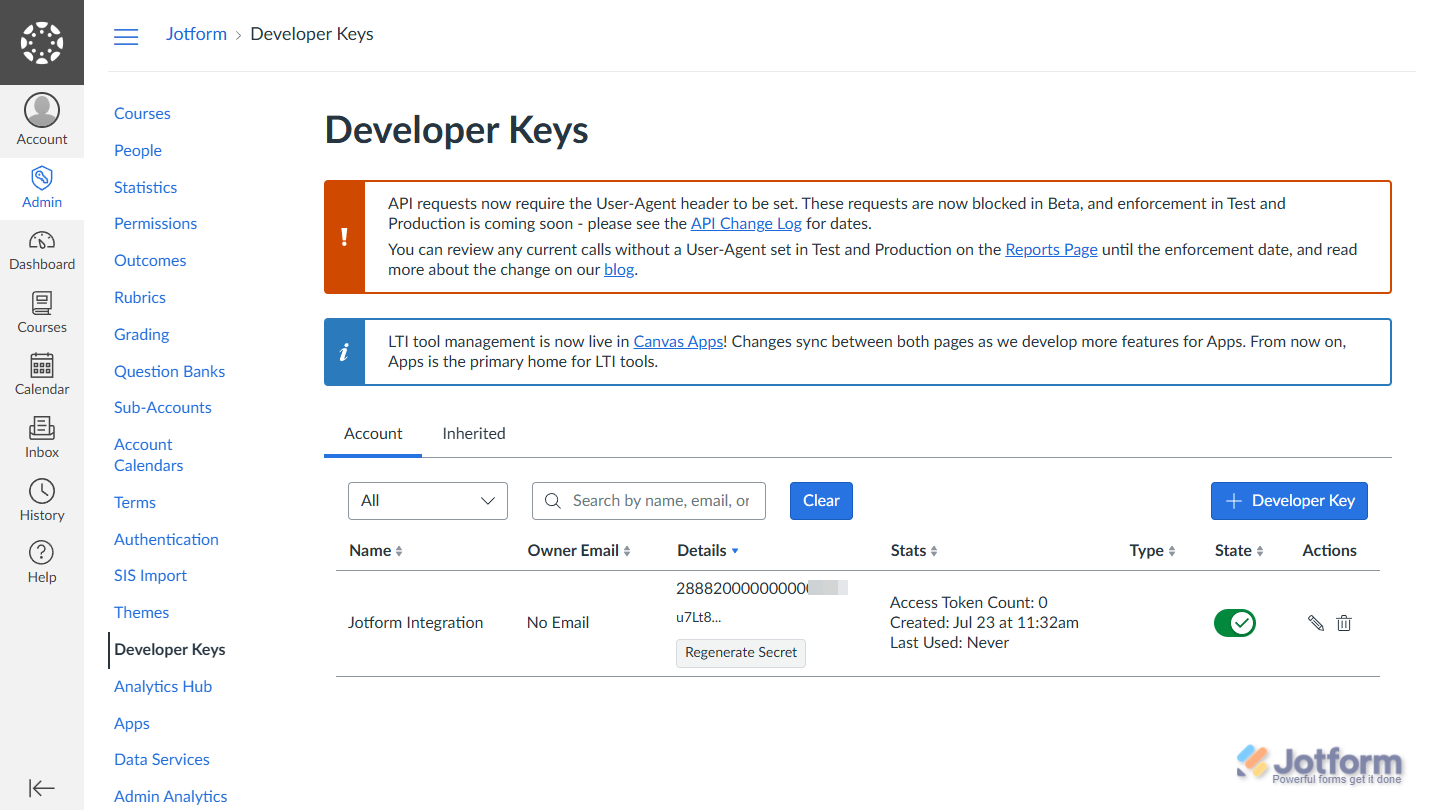
- Then, under the Account tab of the Developer Keys section, in the Details column, copy the client ID for the developer key you just created.
- Next, in the State column, toggle the switch on to enable that key.
- Then, in the Turn On Developer Key window that comes up, click on Switch to On.
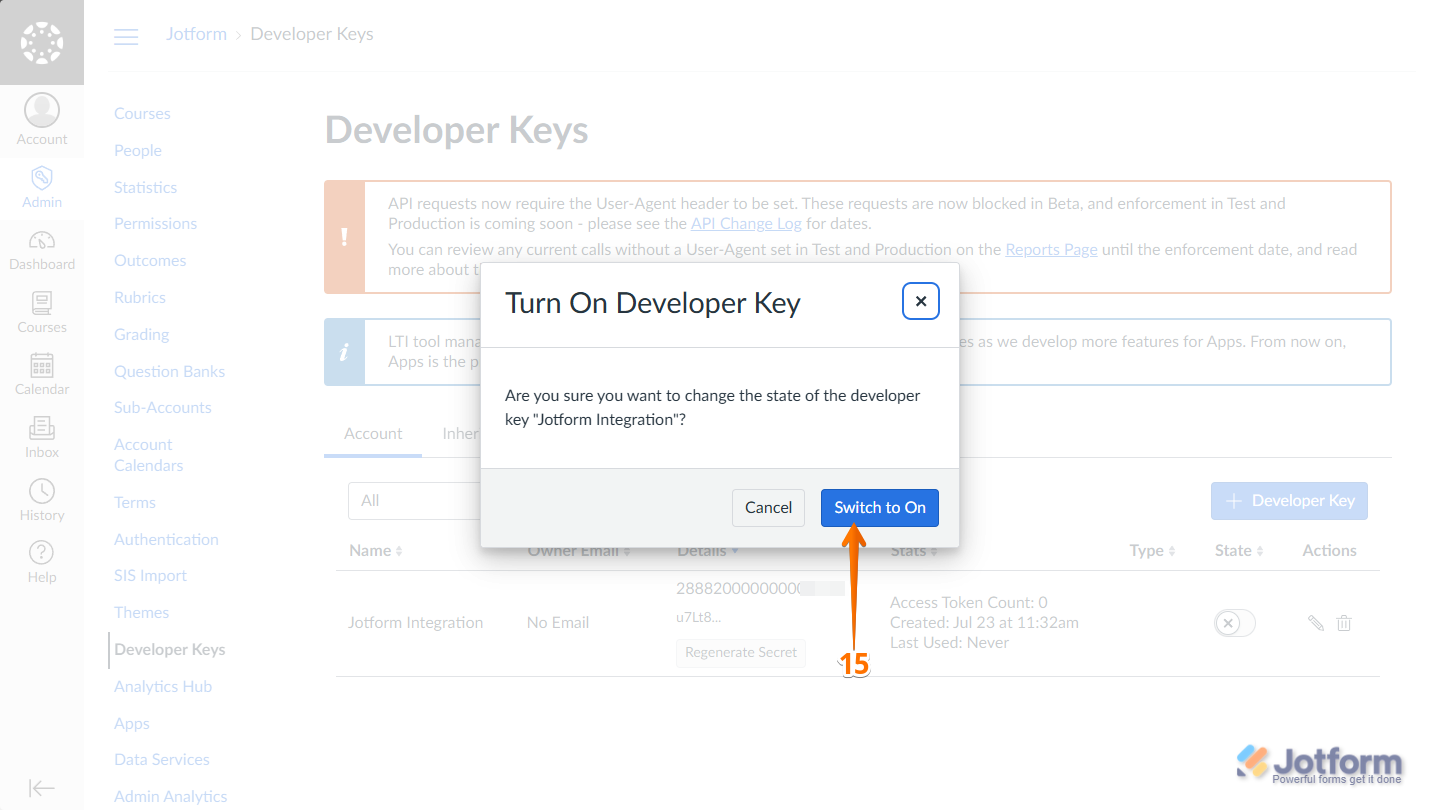
That’s it. Your Canvas developer key is now enabled, and you have the client ID and API Key secret needed to connect your Canvas account to the Canvas LMS element in your workflow.

Send Comment: