


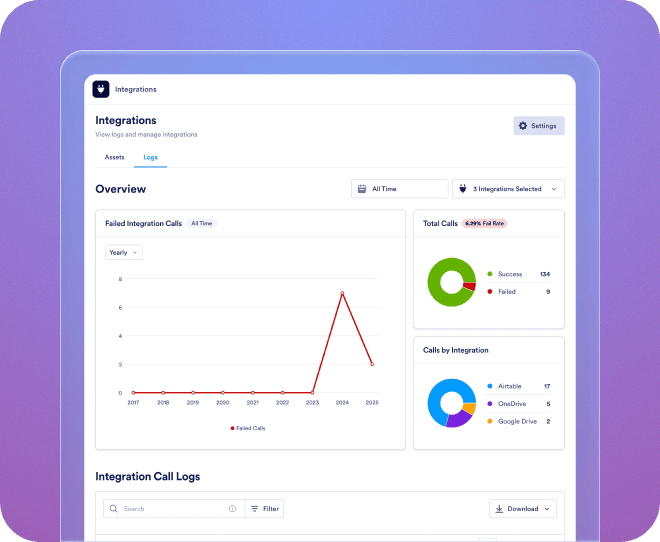
View logs for all your third-party integrations and manage data pipelines across your whole organization.
Unify analytics, management, and security controls for every team, asset, and integration in a centralized hub. The Admin Console speeds up work, ensures greater safety, and allows you to run your enterprise smarter.
Zapewnij bezpieczny dostęp dla członków zespołu, zachowując płynną współpracę. W Konsoli Administratora możesz zarządzać rolami użytkowników, kontami gości i przestrzeniami roboczymi z centralnej platformy.
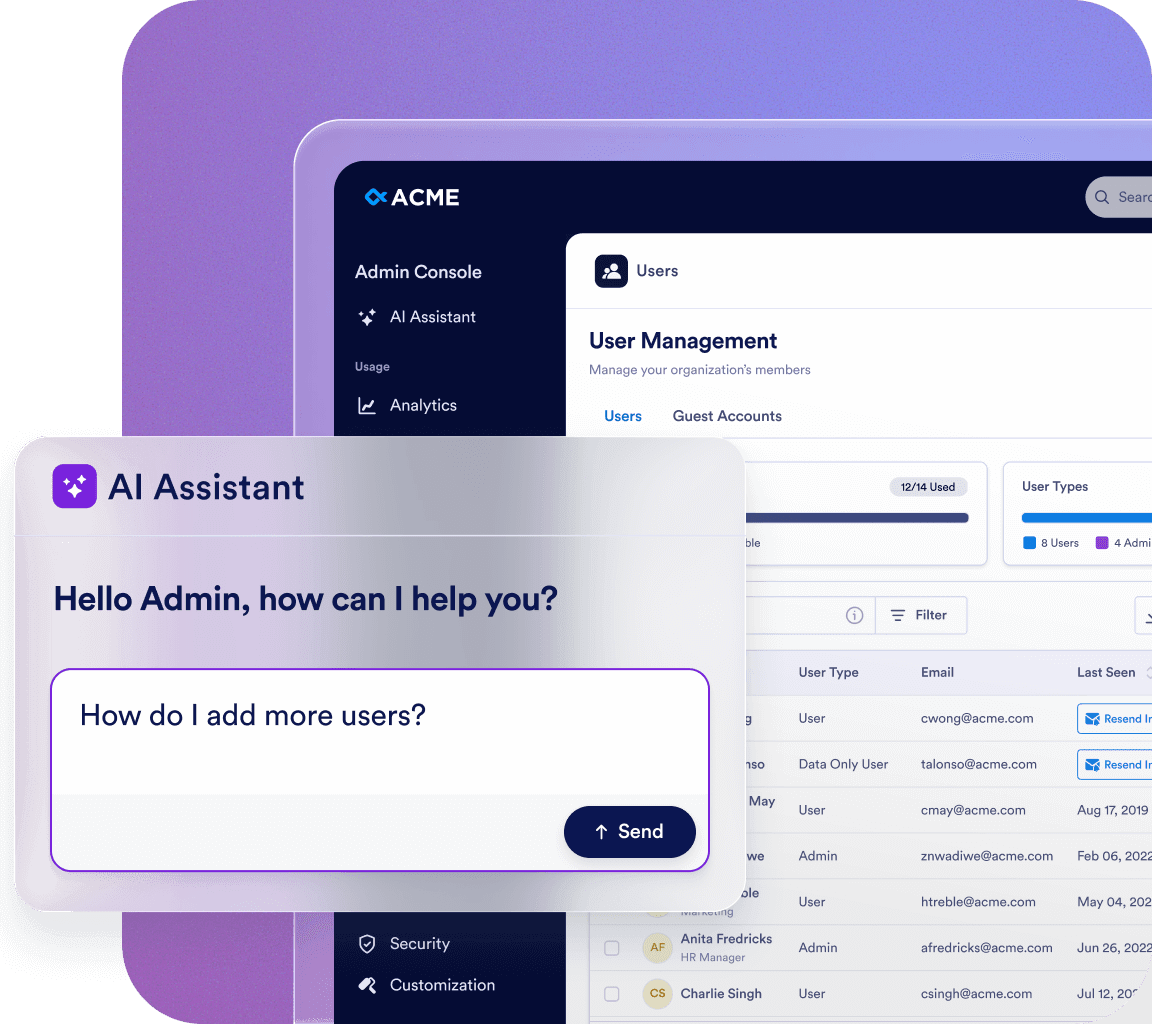
Instant answers, guidance, and actions — all in one place. Want to know how to navigate the Admin Console? Need to manage users or update your organization’s settings? The AI Assistant will give you the answer or handle it for you. All you have to do is ask.
Zapewnij spójne doświadczenie marki w całej organizacji dzięki w pełni konfigurowalnym elementom wizualnym, ekranom logowania i motywom formularzy. Pozwól użytkownikom wybrać wygląd własnego obszaru roboczego lub wymuś jednolity wygląd, aby odzwierciedlić tożsamość Twojej organizacji w każdym punkcie styku.
Jotform Enterprise easily adapts to your needs for faster ROI. Move data, tailor workflows, and customize widgets with our easy-to-use API and hundreds of integrations. Use webhooks to trigger the flow of data or direct submission notifications to a specified URL.
View logs for all your third-party integrations and manage data pipelines across your whole organization.
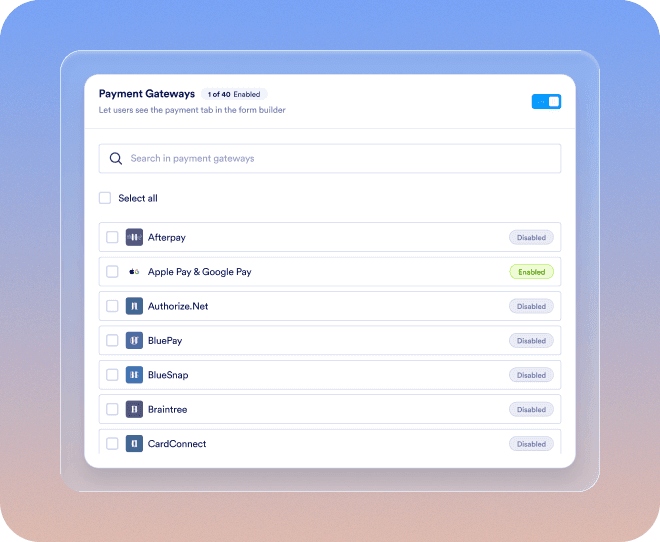
Dodaj nowe bramki płatności, połącz je z zasobami, skonfiguruj ustawienia płatności i bez wysiłku zarządzaj nadzorem w całej organizacji.
Dodawaj, śledź i zarządzaj adresami e-mail nadawców w całej organizacji.
Ciesz się płynnym procesem wdrożenia od pierwszego dnia. Twój dedykowany menedżer ds. sukcesu klienta zapewnia bezpośrednie wsparcie dla Twojej organizacji. Uzyskaj pomoc na żywo przez Zoom lub szybkie odpowiedzi na przesłane pytania. Możesz również skorzystać z kompleksowych, aktualnych zasobów, w tym e-booków, przewodników użytkownika i newsletterów.
Zabezpieczenia na poziomie korporacyjnym obejmują kontrole na poziomie serwera, takie jak logowanie jednokrotne (SSO), uprawnienia oparte na rolach, uwierzytelnianie dwuskładnikowe, limity czasu sesji oraz ograniczenia IP. Jotform Enterprise jest zgodny z przepisami RODO i CCPA, a także oferuje opcjonalne formularze zgodne z HIPAA. Możesz również przechowywać wszystkie swoje dane w lokalnym centrum rezydencji danych.
Kontakt z Działem SprzedażyMonitor every change across your organization with detailed logs:
Upon request, the Jotform team will build and maintain a custom, native, mobile app for your organization. Access Jotform Enterprise anytime and anywhere in a secure environment that’s branded to reflect your organization’s identity. You can easily track users and devices, and invite your team to download the app.
Our dedicated team is here to ensure a seamless implementation tailored to your organization’s needs. Get expert guidance every step of the way, from form creation to workflow optimization. Let us prepare your enterprise for success.
The Admin Console is the central management area where admin users can manage all organization-related settings. From here, you can manage users and guest accounts, configure security settings, monitor logs, manage assets, view usage analytics, and access all account and billing information related to your organization.
Jeśli masz rolę Administratora, kliknij zakładkę Avatar, a następnie wybierz opcję Admin Console z menu rozwijanego. Zostaniesz przekierowany na stronę główną Admin Console.
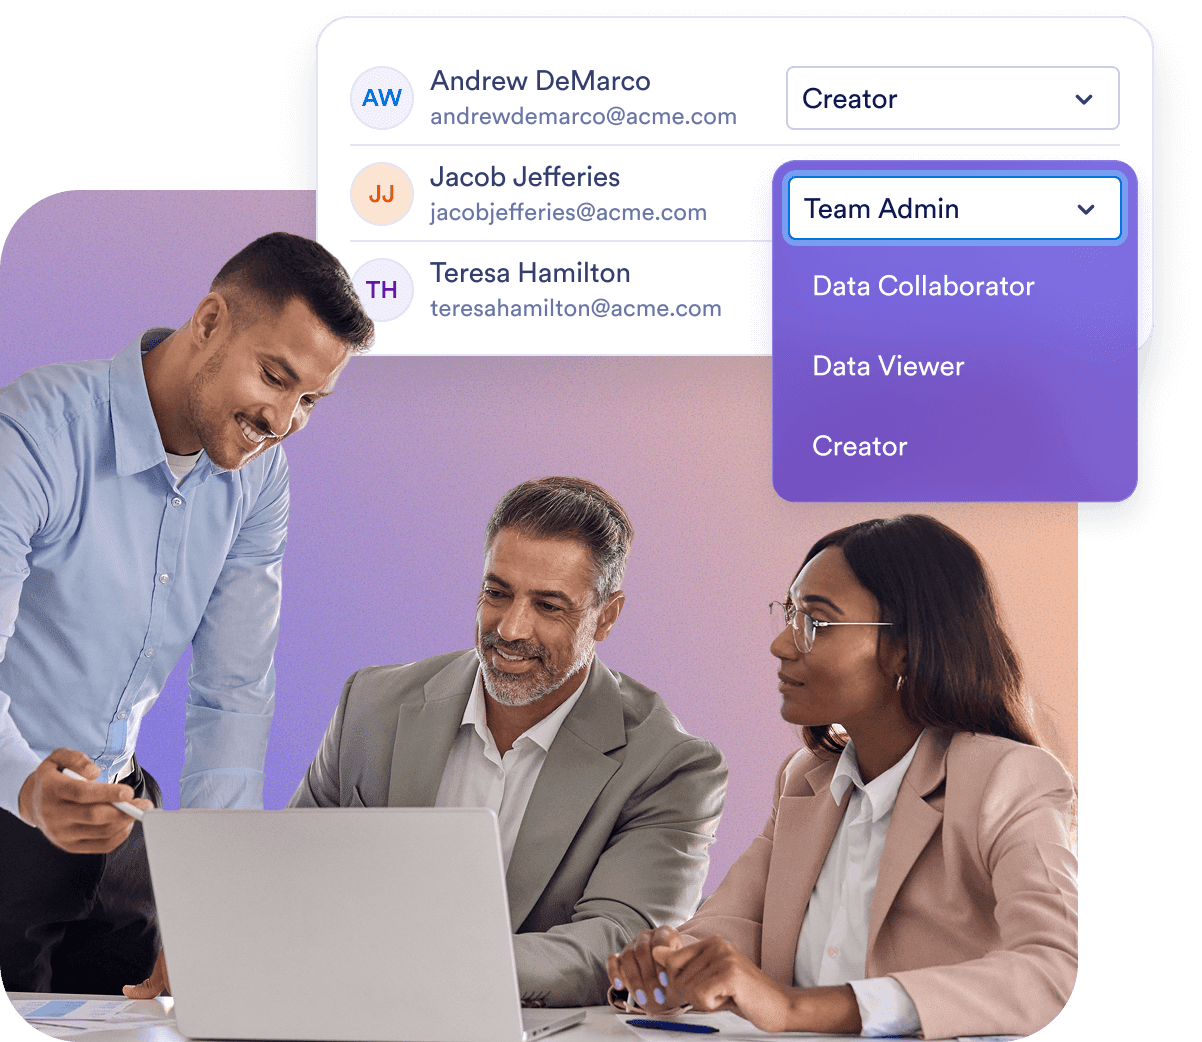
Yes. In the Admin Console, go to the left menu and select Users. You’ll find two separate tabs: Users and Guest Accounts. From there, you can add new members, update their roles, and make security-related changes.
Yes. In the Admin Console, go to Users > Guest Accounts. You can view all guest users in your organization, check their assigned assets, and revoke their access when needed.
Yes. In the Admin Console, go to the left menu and click on Users section. You can view the list of all users, and clicking the three-dot action button to the right of each listed user opens the sidebar where you can check the Assets tab to view each permitted user’s owned, shared, and assigned assets, and revoke access if necessary.
No. When deleting a user, a confirmation modal will appear, allowing you to transfer all associated assets to another active user before completing the deletion.
Yes. In the Admin Console, go to the left menu and select Account & Billing > Invoices. You can view a list of all invoices, including paid and unpaid status.
W Konsoli Administratora, z menu po lewej stronie, przejdź do Konto i Płatności > Konto. Możesz monitorować miesięczne limity agentów SMS (1000 wiadomości) i Voice (1000 minut) oraz przeglądać alerty związane z progami użycia. Te limity są widoczne na tej stronie, jeśli włączyłeś agentów dla swojej organizacji w Zasoby > Agenci > Ustawienia.
Yes. In the Admin Console, from the left menu, go to Account & Billing > Billing Info. From this page, you can review and update your organization’s billing address, billing contact person details, and other related information to ensure your billing records stay accurate and up to date.
Yes. In the Admin Console, from the left menu, go to Customization. In this section, you can open the Workspace, Login Page, or Error Page tabs to design and customize each page’s appearance and content for your organization.
Yes. In the Admin Console, go to Assets from the left menu and select Forms > Form Settings. Then, open the Form Theme tab to create a custom form theme for your organization. You can customize the logo, size, background color, and overall style. The theme applies only to Classic Forms and can be set as the default or enforced for all users.
Yes. In the Admin Console, go to Customization from the left menu and open the Brand Kit tab. With the help of AI, you can automatically generate a complete brand kit using your organization’s logo or website. From there, you can review and adjust the suggested colors, fonts, and styles to match your organization’s visual identity. Once finalized, you can apply this brand kit across your Login, Error, Workspace, and other customizable pages.
Yes. In the Admin Console, go to Integrations from the left menu and select the Logs tab. You can view all connected integrations across your organization, review detailed logs for each integration, track use history, and quickly identify any failed calls or errors. This allows you to monitor integration performance and troubleshoot issues effectively.
Yes. In the Admin Console, go to Integrations from the left menu and open the Settings tab. From here, you can view all available integrations for your organization and configure their visibility. You can choose to hide or display specific integrations for users in the form builder, or even hide the entire Integrations section if needed. This allows you to control which integrations are accessible to users and ensure a streamlined experience in the form builder.
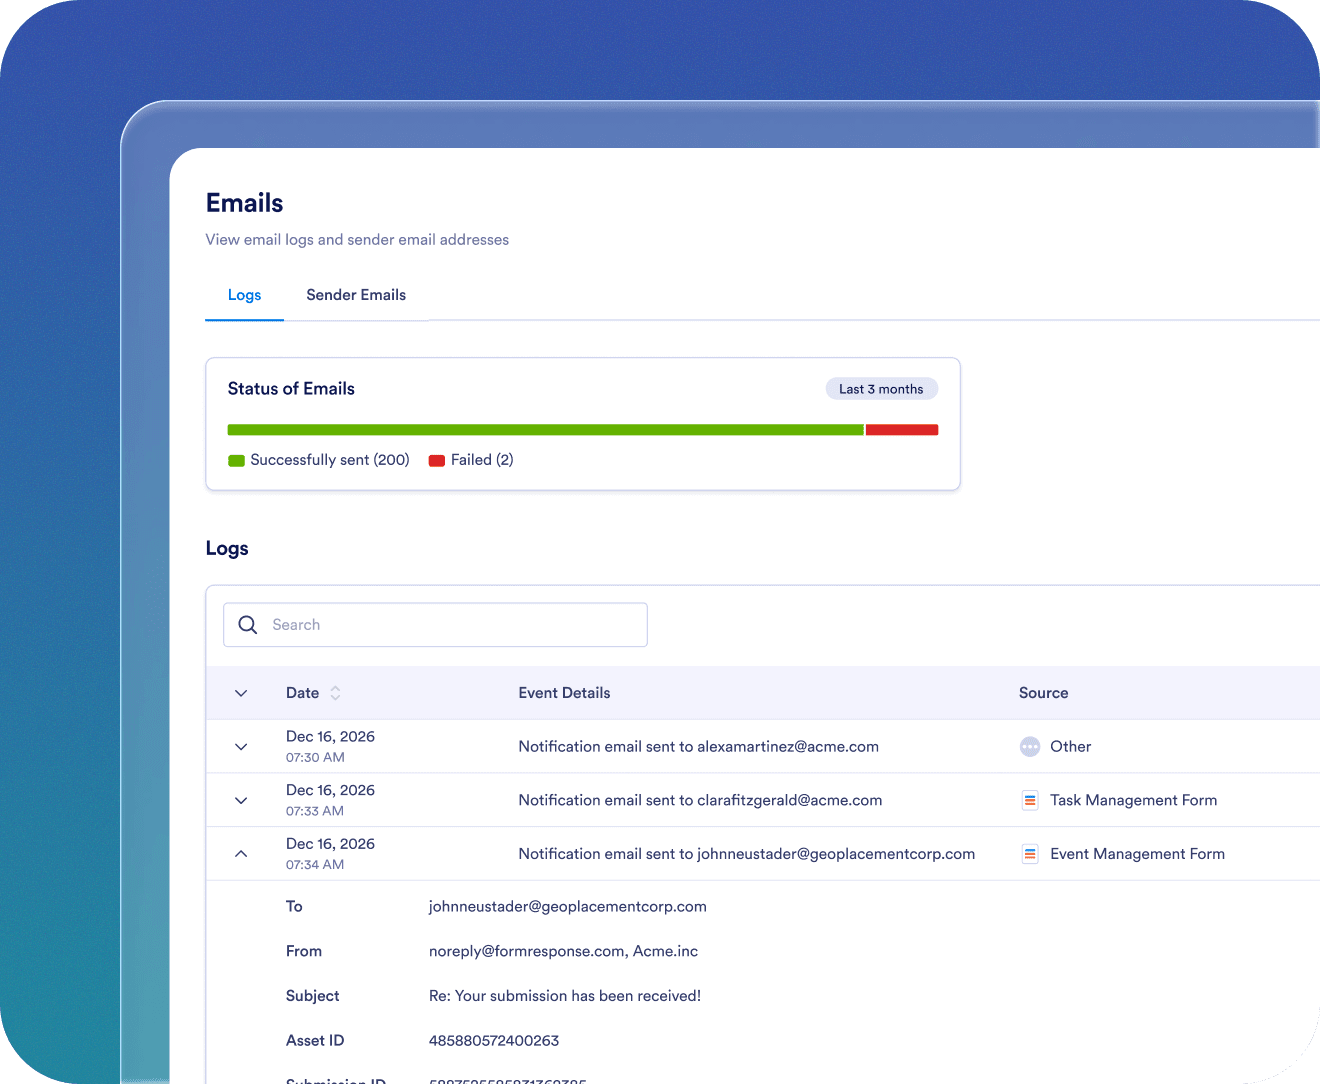
Yes. In the Admin Console, go to Emails from the left menu and select the Logs tab. You can track all organization-wide emails, including autoresponders and recipient notifications. The logs enable you to filter emails by date range, review delivery status, identify any errors or failures, and download the log data for reporting or auditing purposes. This provides full visibility into your organization’s email activity.
Yes. In the Admin Console, go to Emails from the left menu and open the Settings tab. From here, you can add new sender email addresses, whether custom, Microsoft, or Google, and decide if each email should be optional or required for all users. This helps keep sender information consistent and makes it easier to manage email settings across your organization.
Yes. In the Admin Console, from the left menu, go to Assets. You can access all asset types, including Forms, AI Agents, Sign Documents, Apps and Workflows. For each asset, you can view details, edit settings, delete, or download it. You can also review submissions and open the analytics page to monitor usage and performance across your organization.
You can only change the owner of Form assets. If a form is linked to another asset, such as a workflow, the ownership of the related workflow will automatically update whenever the form’s owner is changed.
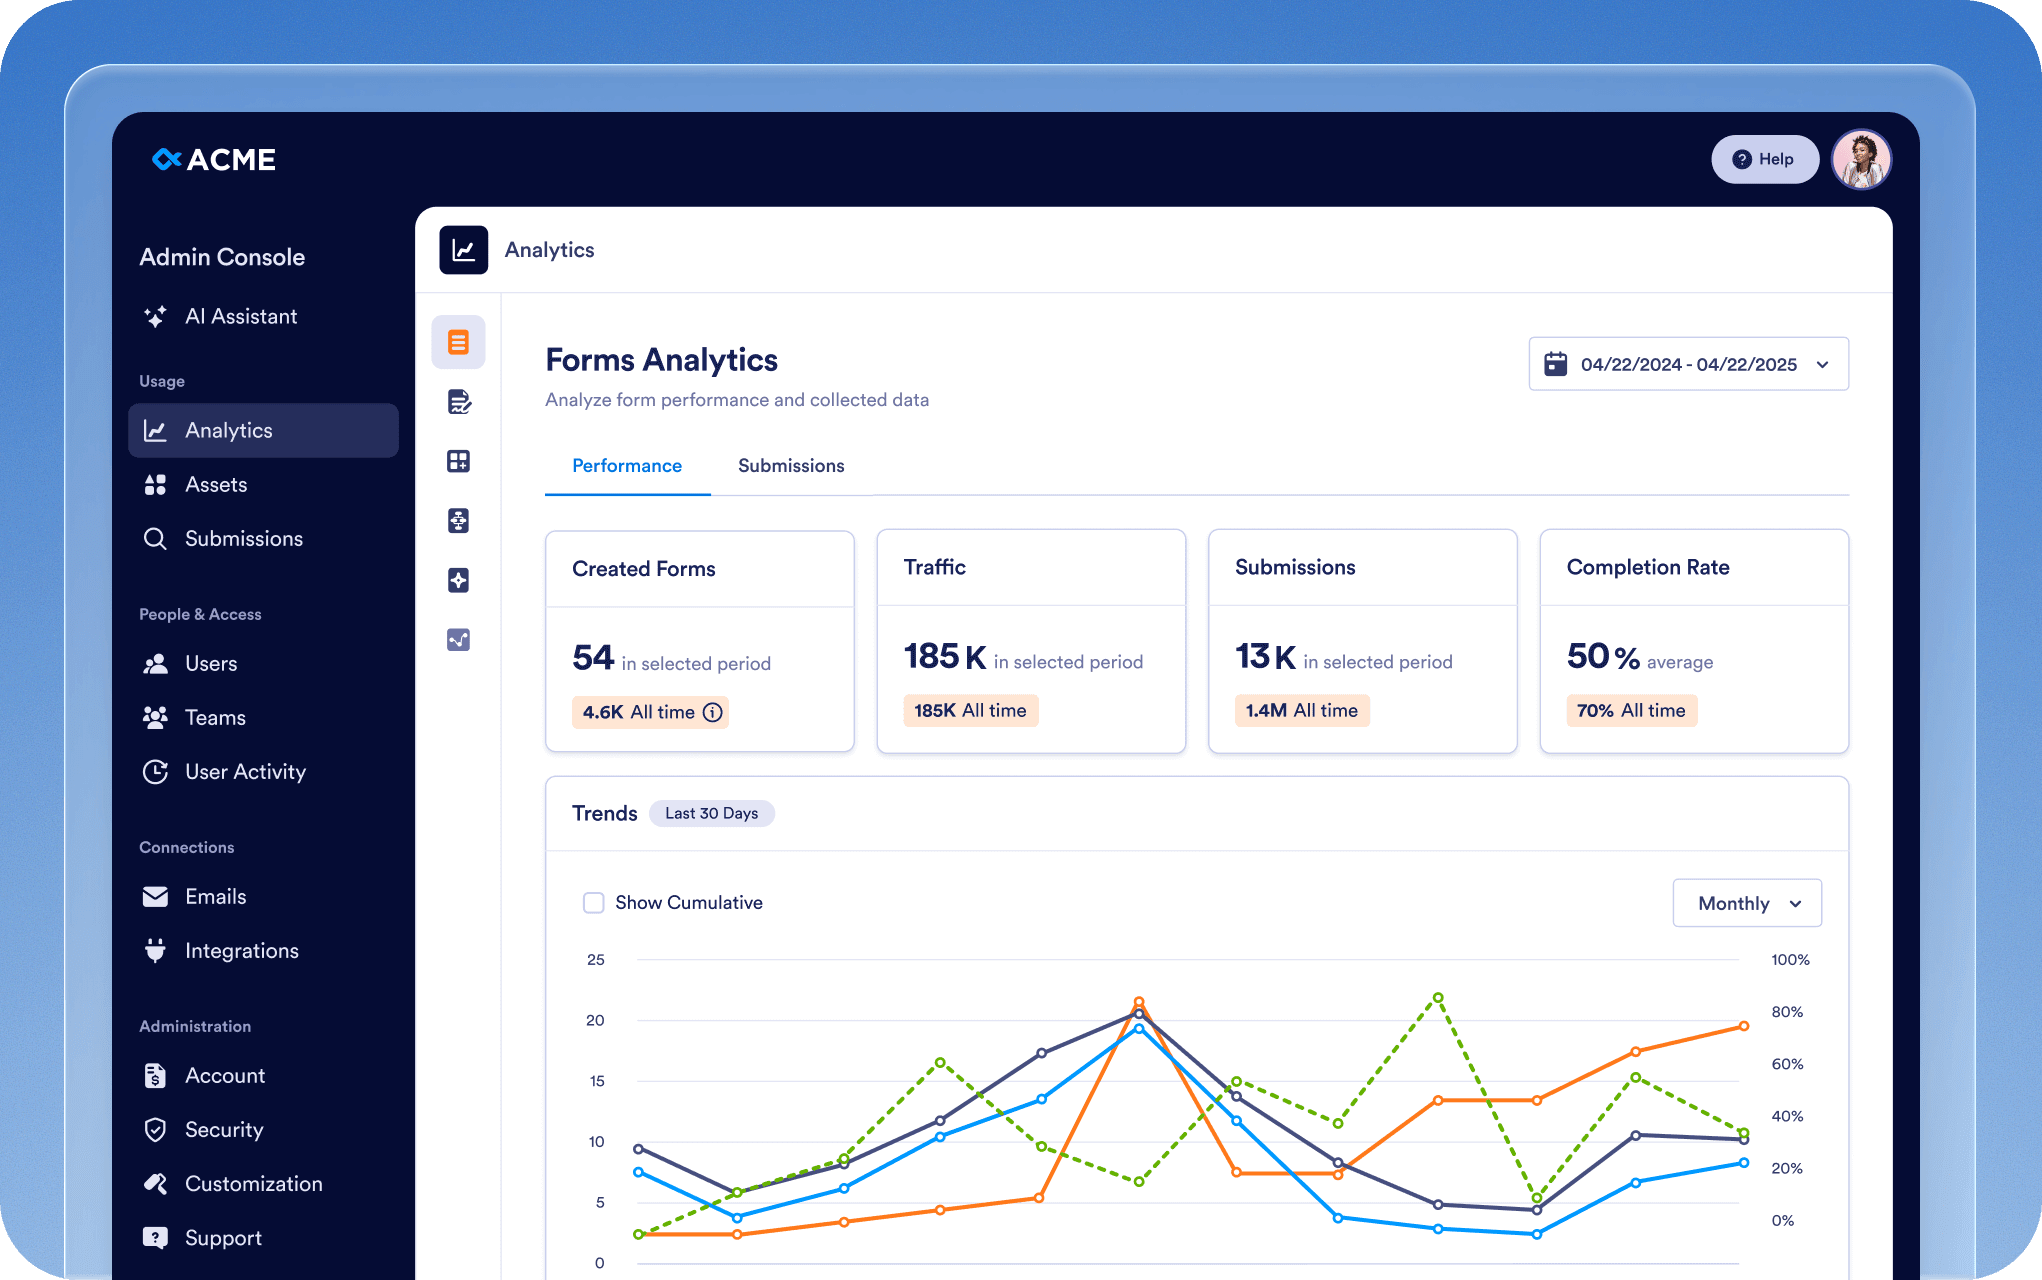
Yes. In the Admin Console, from the left menu, go to Analytics. You can view organization-wide usage data for Forms, AI Agents, Sign Documents, Apps and Workflows. Additionally, you can open each asset’s detailed page to review individual use metrics, submission data, and performance insights, helping you monitor activity and make informed decisions.
Yes. In the Admin Console, from the left menu, go to Assets > Mobile App. You can download your Enterprise App, invite users from your organization, and even create a custom mobile app for an additional fee. You can personalize it with your organization’s branding, including the logo, name, and colors, to match your visual identity.
Yes. In the Admin Console, from the left menu, go to Security. From this section, you can configure all organization-wide security settings, including access controls, authentication options, and other policies to ensure your organization’s data and assets remain secure.
You can enable SSO once it has been activated for your account. If SSO is not yet enabled, contact your Account Manager to request activation. Once activated, the Add SSO Provider button will become active in the Security section, allowing you to connect and configure your SSO provider for your organization.
Yes. In the Admin Console, from the left menu, go to Security > Two-Factor Authentication (2FA). You can enable 2FA for your organization and choose to enforce it for all users, helping to enhance account security and protect organizational data.
Yes. First, in the Admin Console, from the left menu, go to Security and enable 2FA for your organization. Then, go to Users, click the three-dot menu next to a specific user, and select 2FA Settings to configure two-factor authentication individually for that user.
Yes. In the Admin Console, from the left menu, go to Security > Session Timeout. You can define session timeout durations for all users in your organization, with options including Never, 15 Minutes, 30 Minutes, 1 Hour, or 2 Hours, helping to manage security and user activity efficiently.
Yes. In the Admin Console, from the left menu, go to Security > IP Address Restrictions. You can add specific network addresses using the Add Network tab and mark them as Trusted or Restricted. This enables you to effectively control server access and manage network permissions across your organization.
W Konsoli Administracyjnej przejdź do Wsparcie z menu po lewej stronie. Możesz przeglądać wszystkie zgłoszenia utworzone w Twojej organizacji, tworzyć nowe zgłoszenia, a nawet planować rozmowy Zoom z zespołem wsparcia, aby skutecznie rozwiązywać problemy.
Yes. In the Admin Console, from the left menu, go to Teams. You can view all teams in your organization, update team members, modify permissions, and adjust visibility settings (private or organization). To create a new team, use the Create Team button. You can also click the Settings button on the same page to configure general team-related options and preferences.
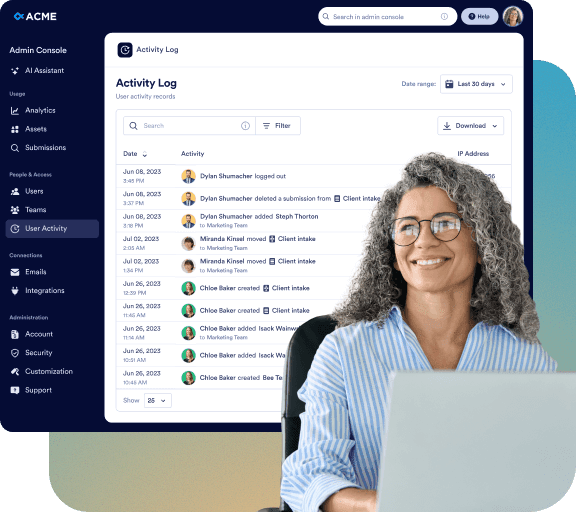
W Konsoli Administratora przejdź do sekcji Dzienniki Aktywności z menu po lewej stronie. Możesz wyświetlić wszystkie dzienniki aktywności w całej organizacji, filtrować je według Użytkownika, Aktywności (np. tworzenie, usuwanie lub aktualizacja zasobów), Typu Zasobu i Zakresu Dat, a także pobrać przefiltrowane dzienniki w razie potrzeby.