WhatsApp message templates allow you to send automated notifications and updates through your forms and workflows. Before a template can be used in Jotform, it must first be created in your WhatsApp Business account and approved by Meta. Once approved, the template becomes available in the Jotform WhatsApp Business integration, where you can map its variables to form fields or Workflow data to automatically personalize each message.
Note
Before setting up your WhatsApp message template, ensure you have the following ready:
- A WhatsApp Business account connected to Meta Business.
- Permission to create and manage message templates.
- The Jotform fields or Workflow values you plan to use for personalization.
- A clear message use case that aligns with Meta’s template categories and policies.
Creating a WhatsApp Business Message Template
While creating a WhatsApp Business message template involves several technical steps, you can set one up at any time once all required prerequisites are in place. There is no need to wait for a specific stage in your Jotform setup, allowing you to prepare and submit your template whenever it is convenient. This is how it’s done:
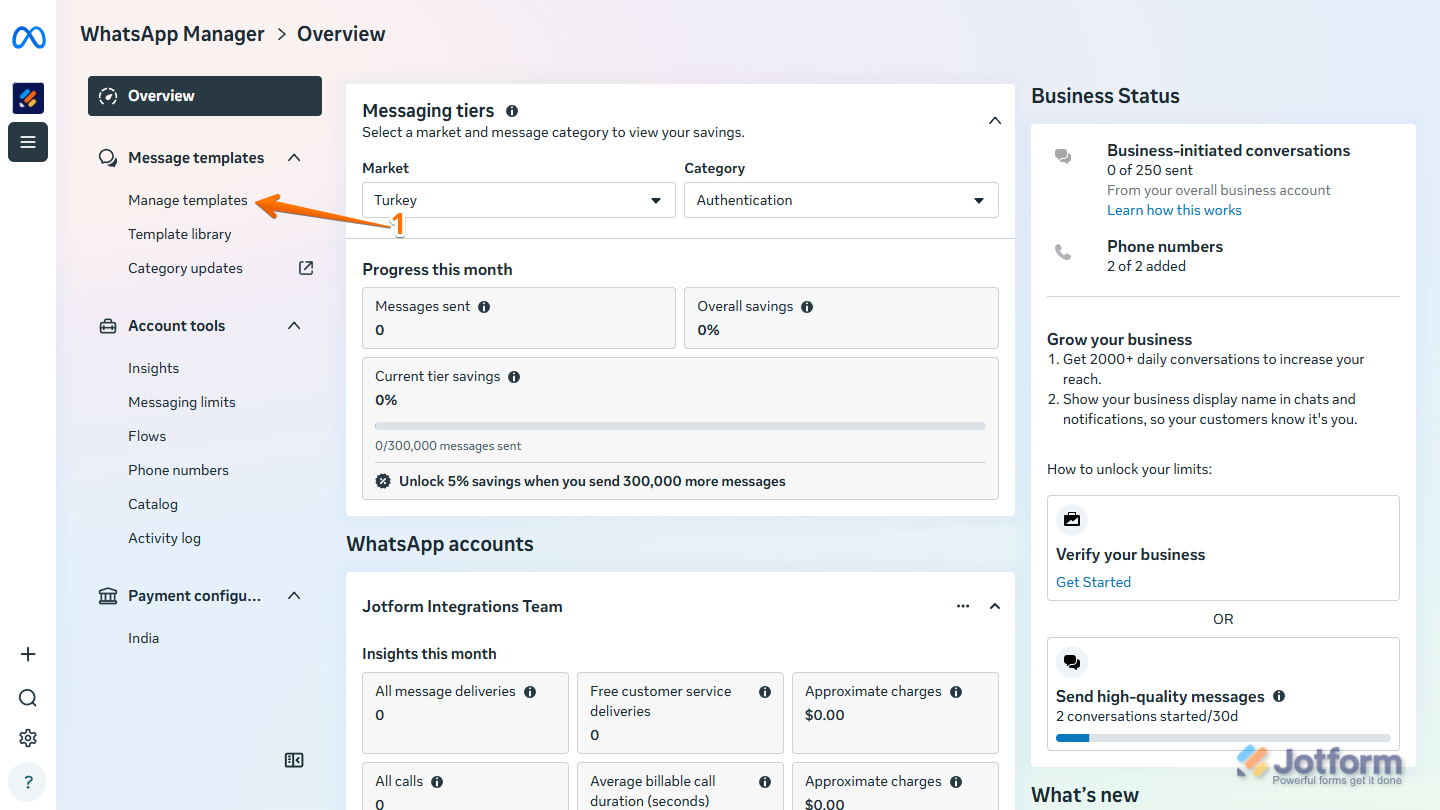
- On the top-left side of your Meta WhatsApp Manager page, in the Message Templates Dropdown menu, click on Manage Templates.
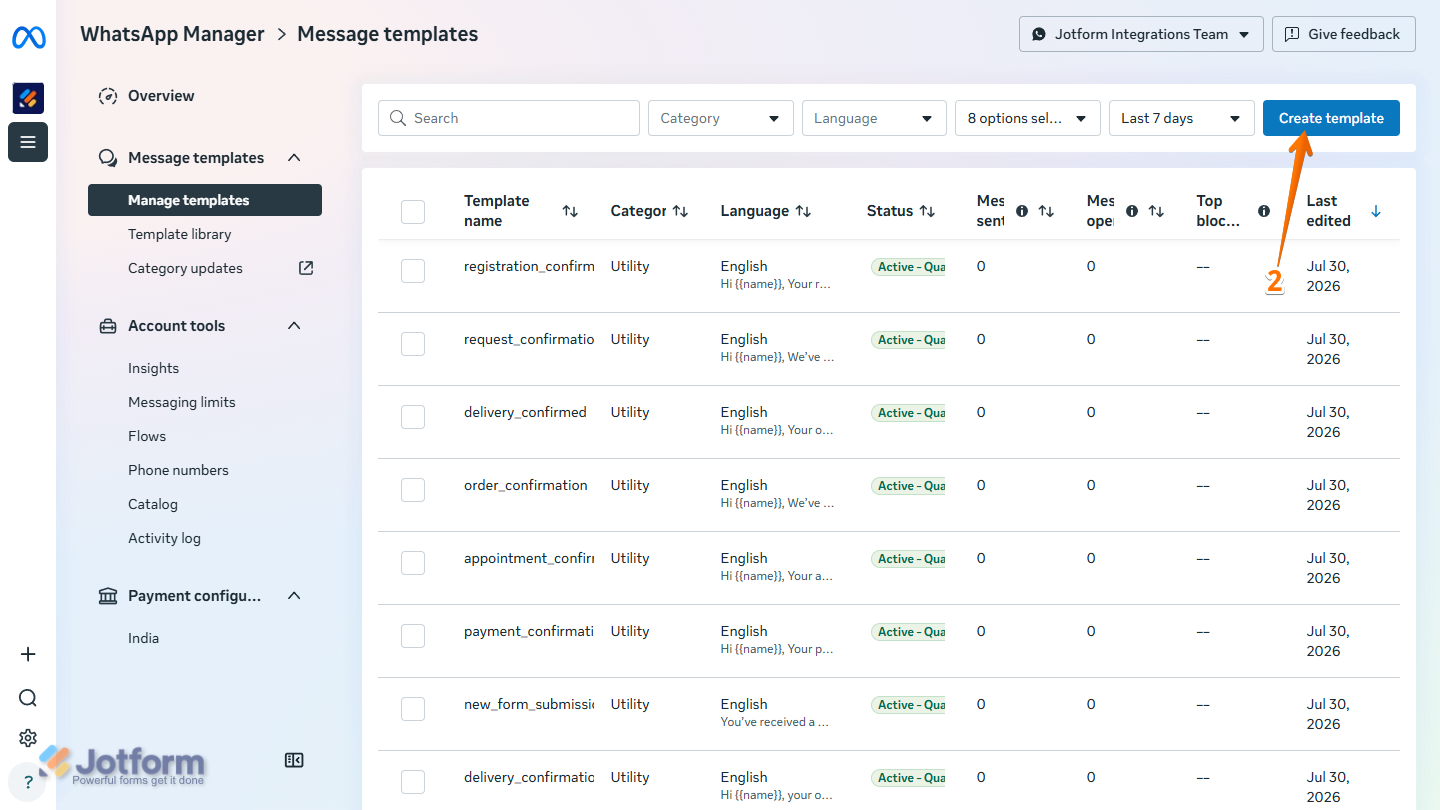
- Then, in the upper-right corner of the Message Templates page, click on Create Template.
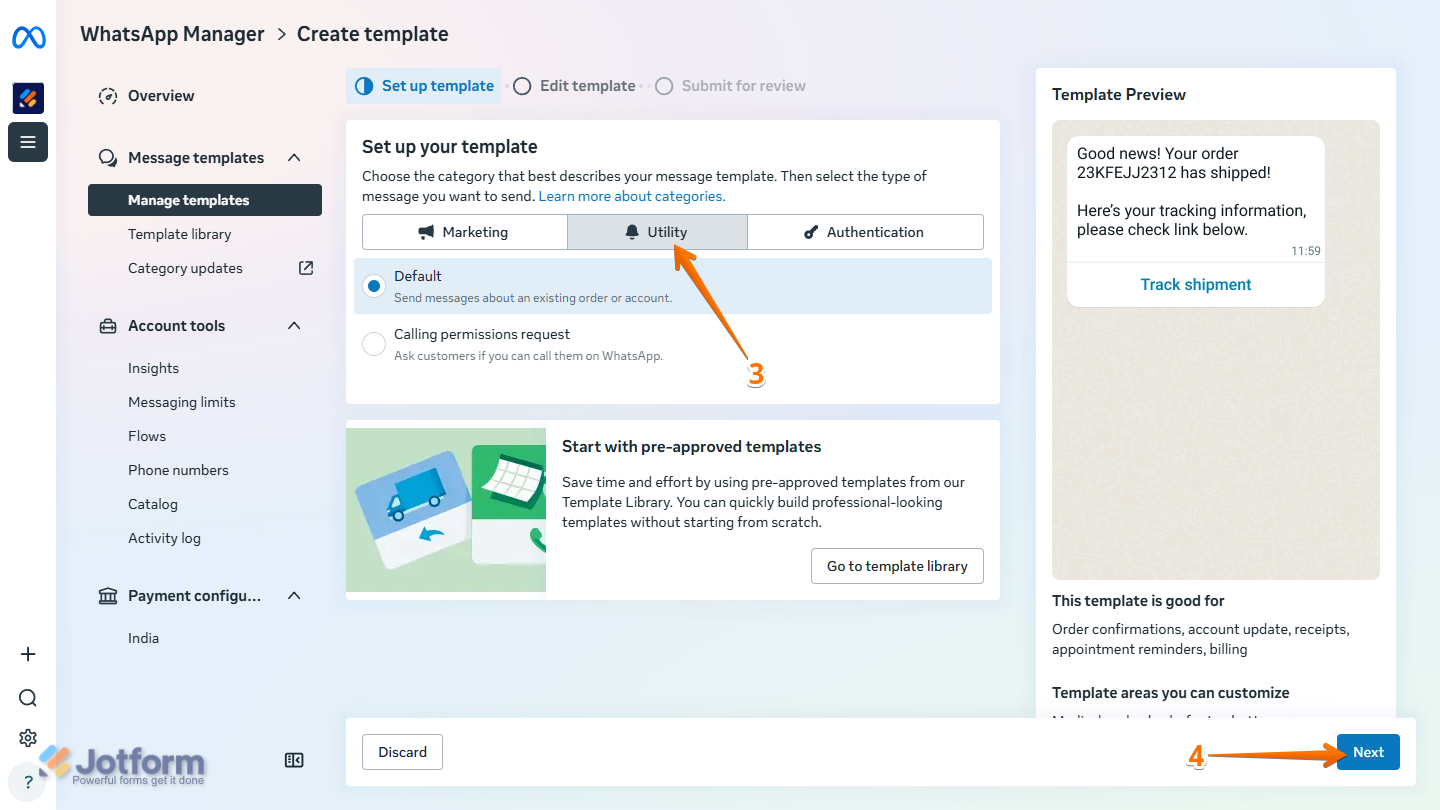
- Next, in the Set up Your Template section in the middle of the page, select Utility.
Pro Tip
For confirmations, account updates, receipts, appointment reminders, shipping updates, and similar transactional messages, Utility is typically the appropriate category. Meta determines the final category and approval status, so make sure the selected category accurately reflects the message you intend to send.
- Now, at the bottom right corner, click on Next.
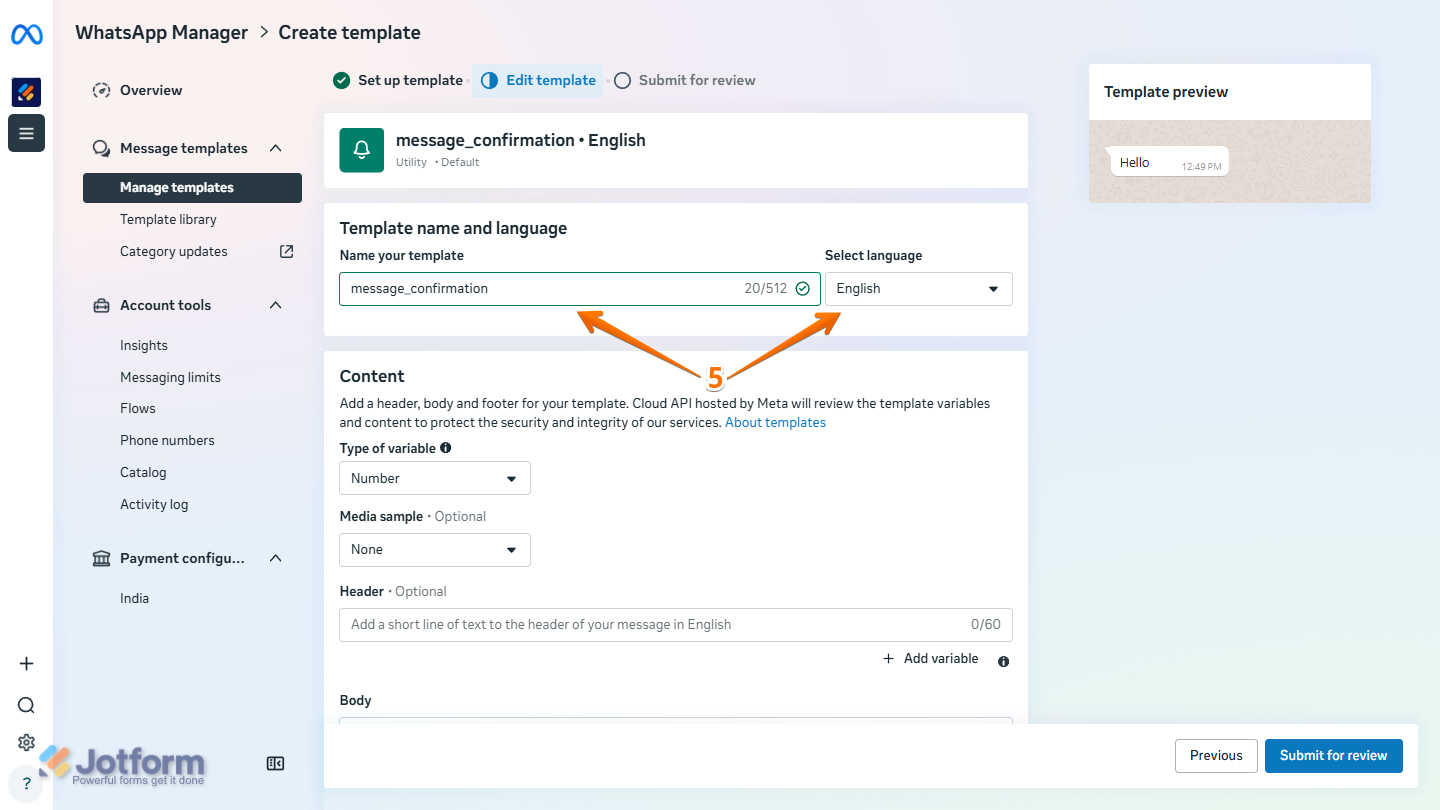
- Then, in the Template Name and Language section, set up these things:
- Name Your Template — Provide a descriptive name for your template. Meta template names typically use lowercase letters and underscores, such as order_confirmation.
- Select Language — Select the language for your template. You can create separate versions of the template for different languages as needed.
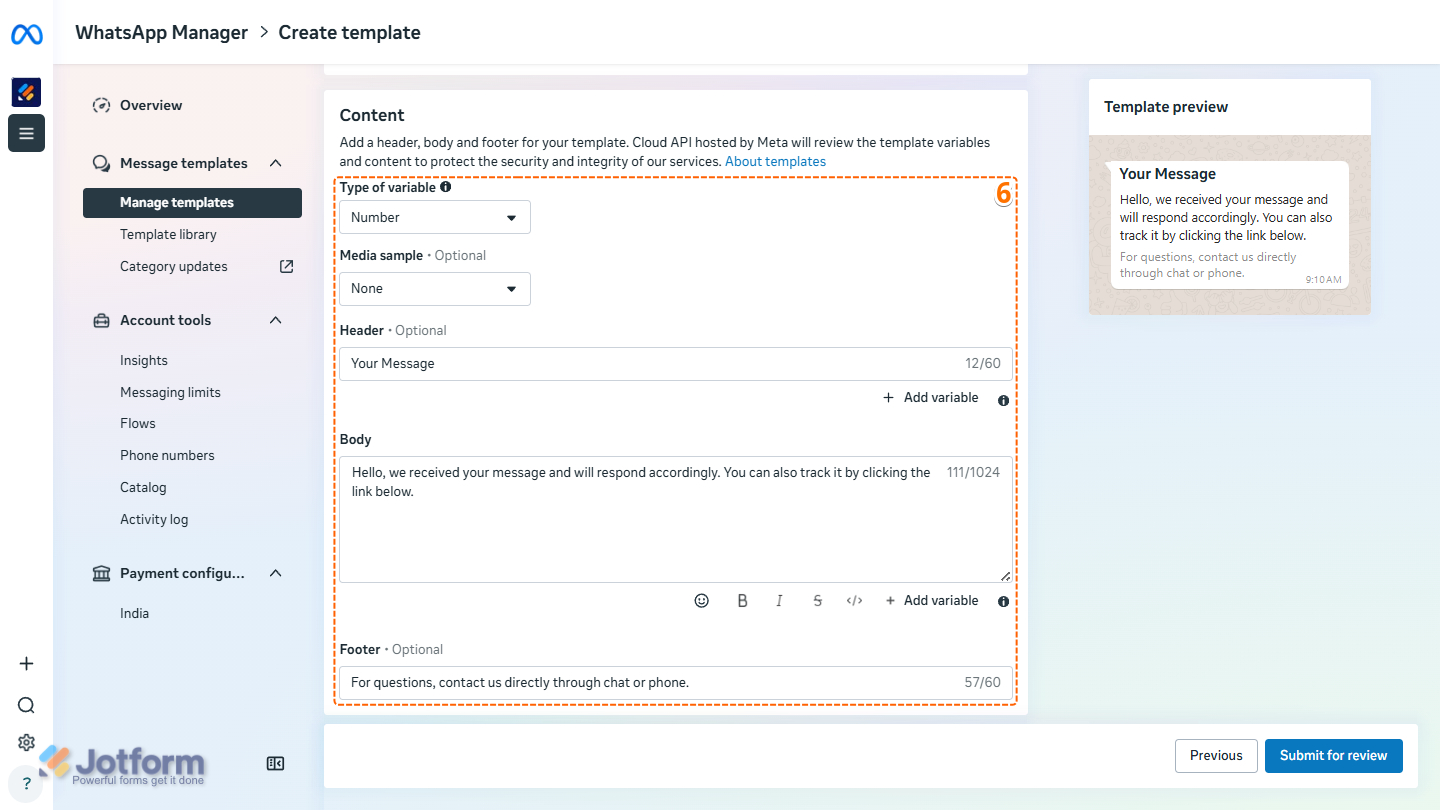
- Next, scroll down to the Content section, and configure these things:
- Type of Variable — Select Number or Name to dynamically insert specific information or data into your template.
- Media Sample — Select the type of media to display at the top of your message: Image, Video, Document, or Location. Select None, which is the default option, if you do not want to include media in your template.
- Header — Include an optional short line of text to appear at the top of your message template.
- Body — Provide the main content of your message template. The body can be as short or detailed as needed, provided it stays within the character limit.
- Footer — Specify a short message to appear at the bottom of the message, below the main body.
Notes
- Your Header can include one template variable that can be personalized with form or Workflow data when the template is used in your WhatsApp integration. Similarly, the Body can include multiple template variables, allowing you to personalize the message with data from submitted forms or Workflow submissions. Scroll down to Adding Template Variables for the steps.
- You can also add buttons to your template that let you include dynamic links your recipients can access. Scroll down to Adding Buttons to Your Template to know more.
- Now, in the Message Validity Period section, toggle on Set Custom Validity Period for Your Message, then select a time from the Validity Dropdown menu.
- Once everything’s set, click on Submit for Review at the bottom-right corner of the page.
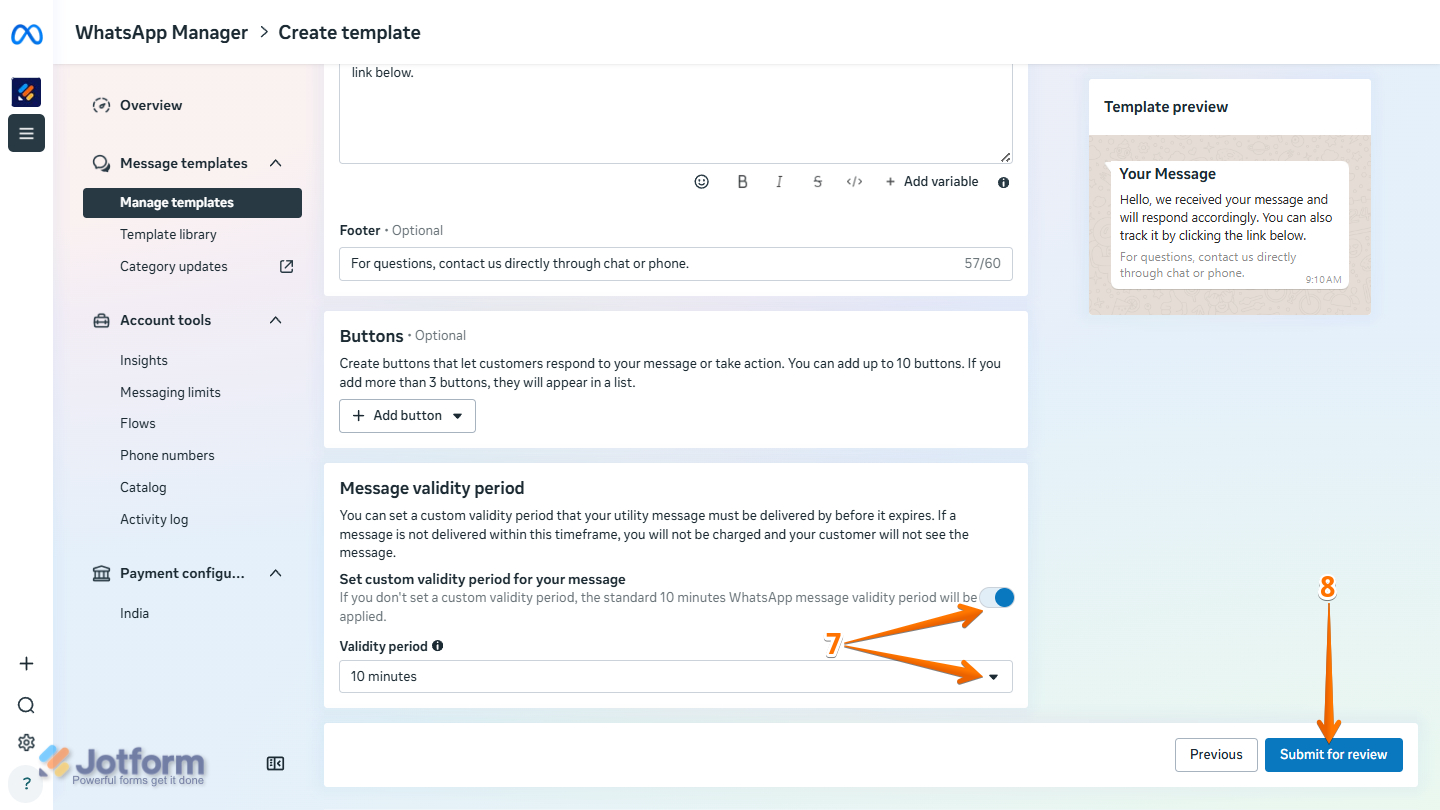
That’s it! Your WhatsApp Business message template is now ready for Meta’s review. Once it’s approved, return to your form or Workflow to complete the WhatsApp Business integration and start using your template. You can also check out Meta’s guide on Create Message Templates to learn more.
Adding Template Variables
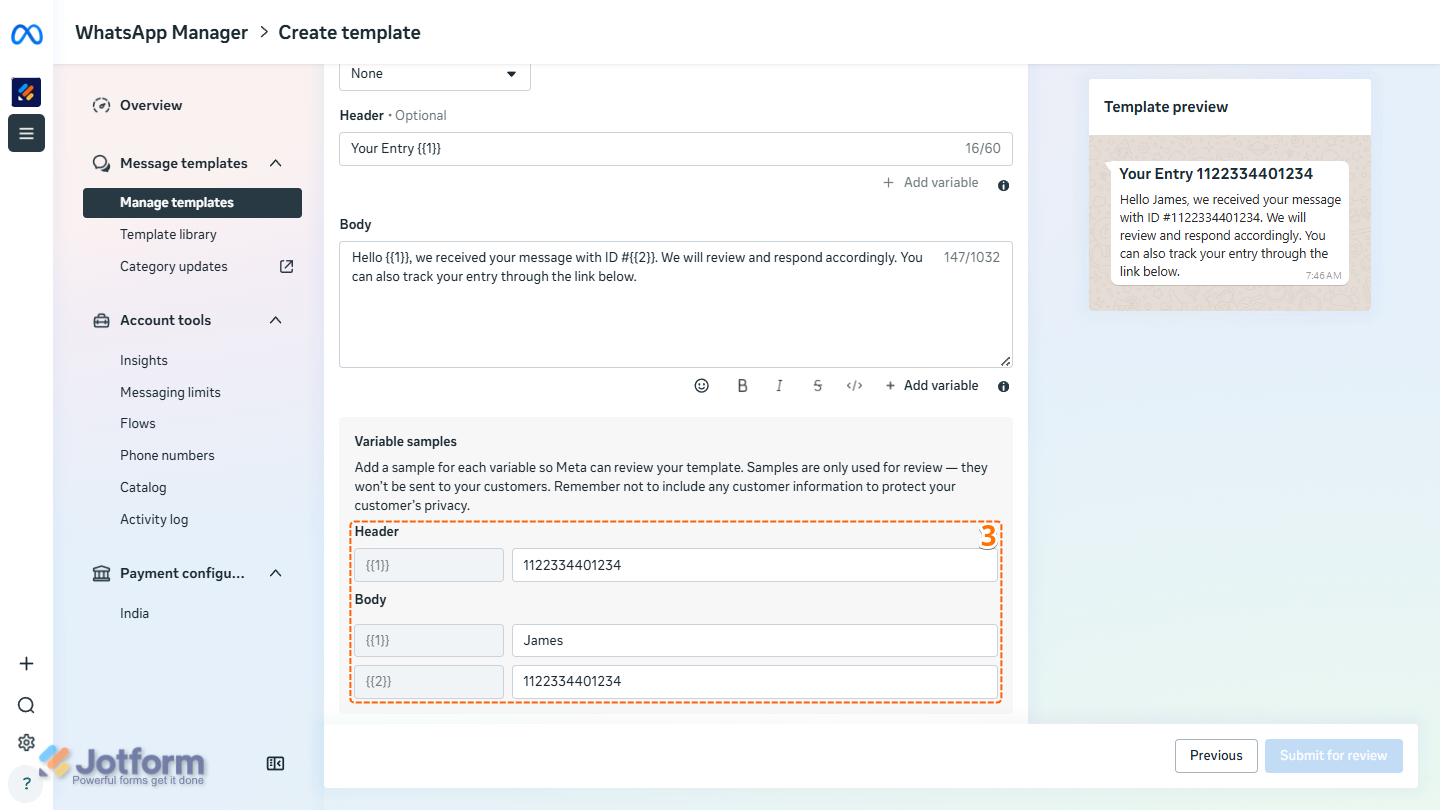
Variables are placeholders that Jotform replaces with form fields or Workflow data when it sends the template. When Number is selected as the Variable type, Meta displays numbered placeholders such as {{1}} and {{2}}. Here’s how to set it up:
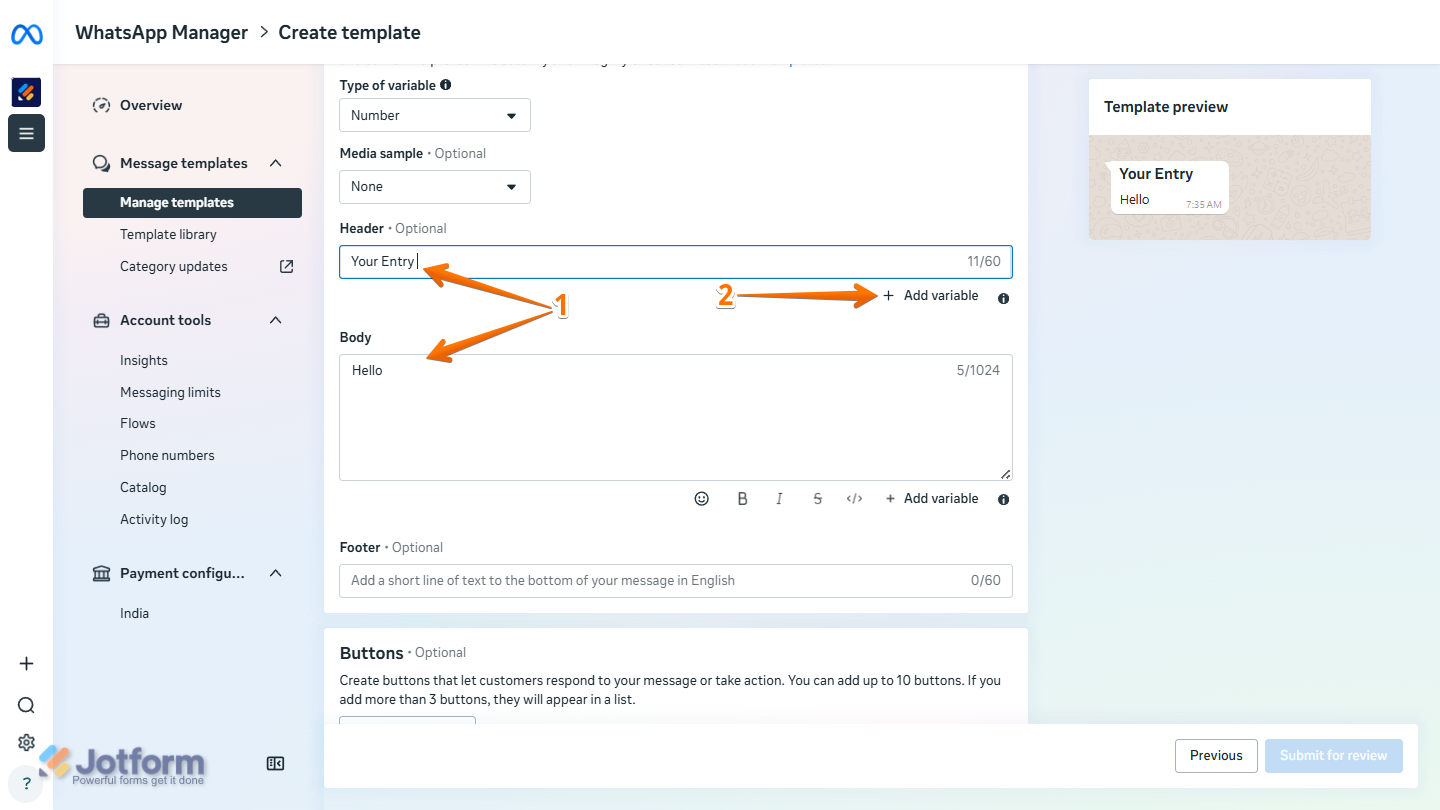
- In the Content section of the Create Template page, place your cursor in the Header or Body boxes where you want to add the variable.
- Then, at the bottom-right corner of either field, click on Add Variable.
- Next, in the Variable Samples section that is shown below, enter a sample value in the Header and Body boxes.
Pro Tip
- Provide a realistic sample value for each variable when submitting your template for review. These samples are used only by Meta during the review process, so avoid using real customer information.
- In the Body section, format your text by selecting it and clicking the Bold, Italic, Strikethrough, or Monospace icons. You can also insert emojis by clicking the Smiley icon.
Adding Buttons to Your Template
Buttons in your message template let you redirect recipients to your website, call you through WhatsApp, or call a specific phone number. You can also ask recipients to share contact information with you. You can set it up like this:
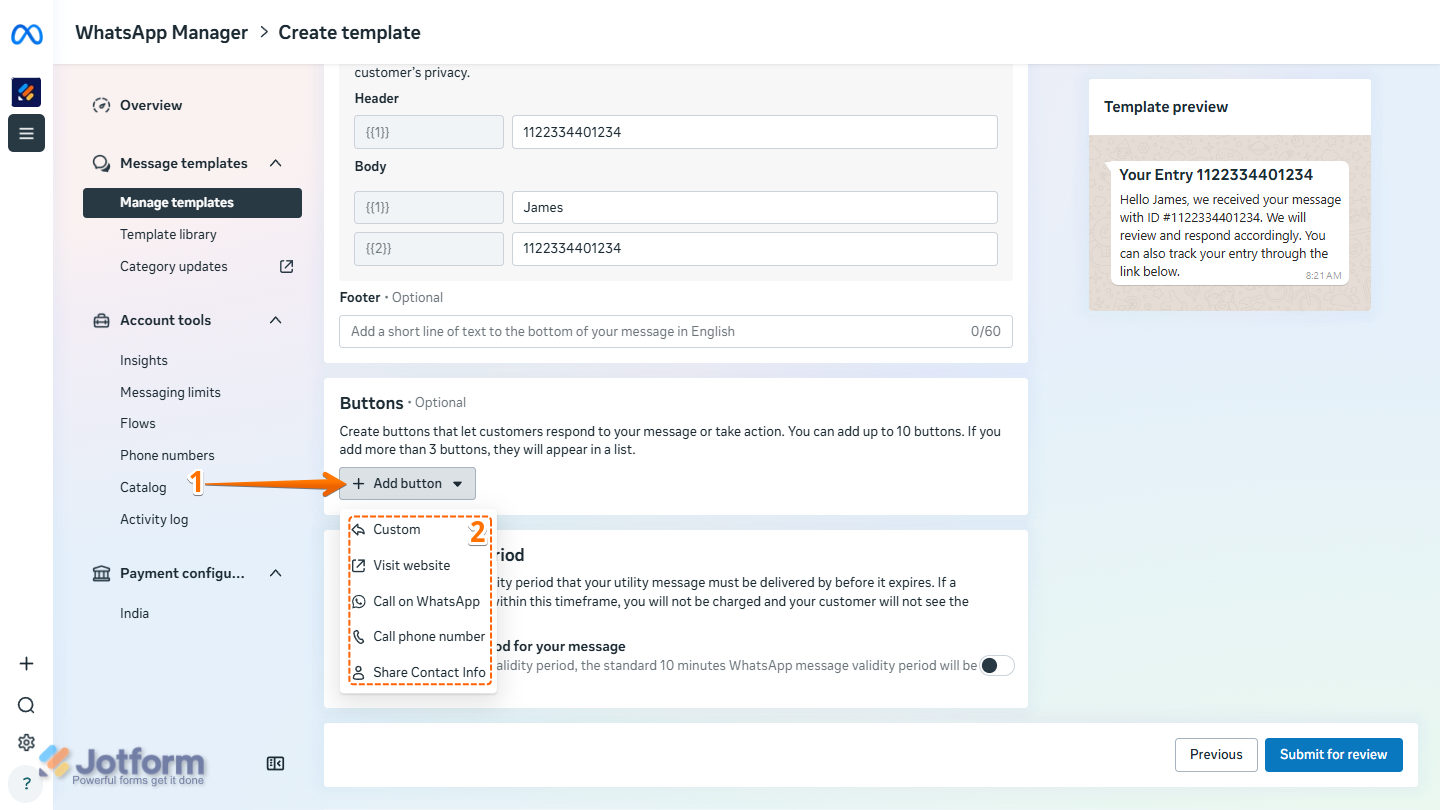
- In the Buttons section of the Create Template page, click on Add Button.
- Then, in the Dropdown menu that opens, select the type of button you want to add:
- Custom — Configure a Quick Reply or Preconfigured Response that recipients can tap to send.
- Visit Website — Configure the button to open a fixed website URL or a dynamic URL populated with your form data.
- Call on WhatsApp — Include a button that lets recipients call you directly through WhatsApp.
- Call Phone Number — Provide a button that recipients can tap to call a specified phone number directly.
- Share Contact Info — Add a button that allows recipients to share their contact information.
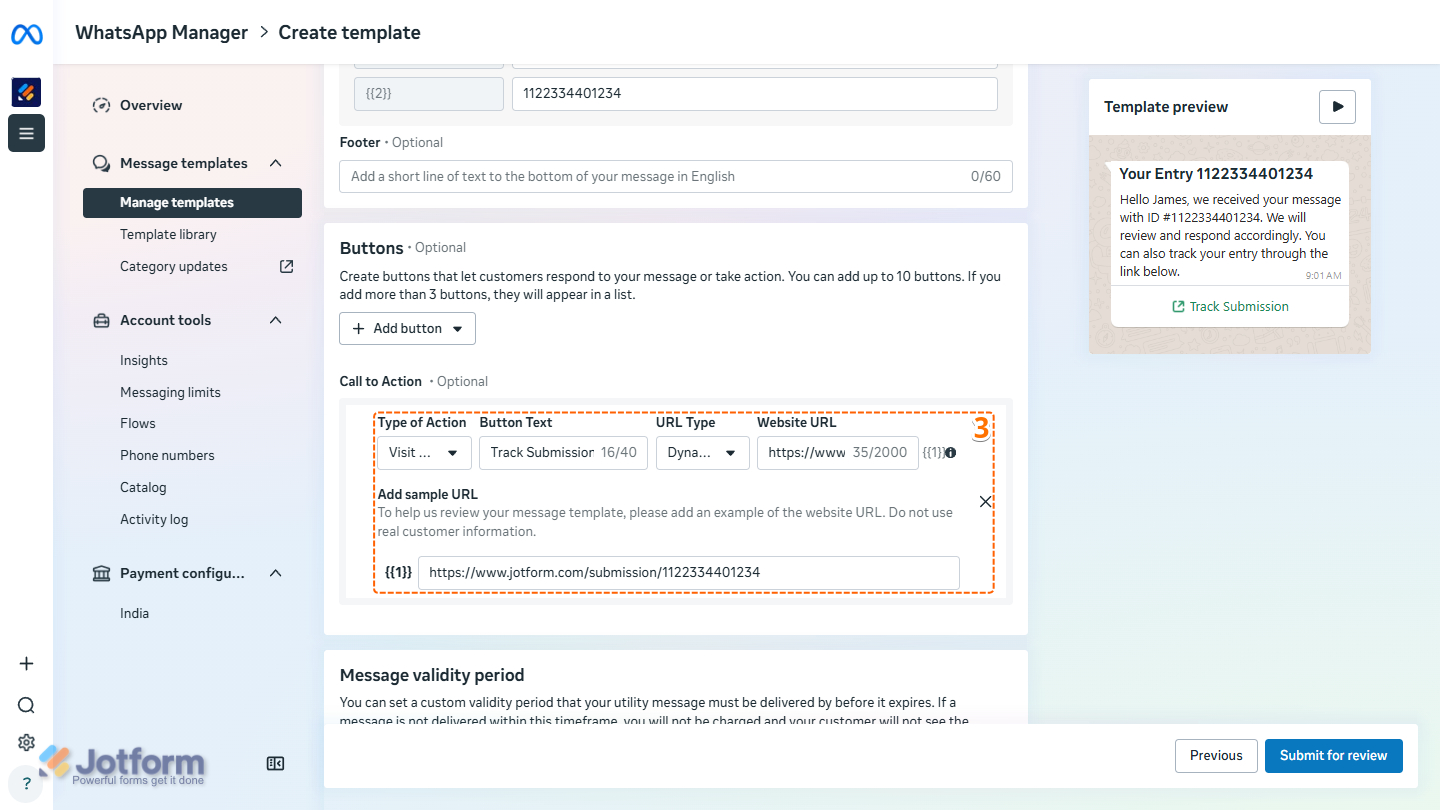
- Next, when selecting the Visit Website option, set things up like this:
- Type of Action — Visit Website is automatically selected.
- Button Text — Specify the text that appears on the button for recipients to tap.
- URL Type — Select Static to direct recipients to a specific page, or Dynamic to generate a URL based on data populated from your form or workflow.
- Website URL — Provide the URL you want recipients to visit, or specify the base URL used to generate a dynamic URL.
- Dynamic Placeholder — Meta automatically generates this value.
- Add Sample URL — Provide a sample URL for recipients to visit, or an example of the resulting URL generated by the dynamic URL settings.
Note
- Your Website URL and Sample URL should follow the same structure, regardless of the selected URL type. Meta automatically appends the template variable, and Jotform replaces that variable with the mapped form field or Workflow value when the message is sent.
- Avoid including sensitive customer information directly in the URL. If the destination contains private information, require authentication or use a non-guessable, short-lived access token instead of a predictable ID. Always use test data, not real customer information, in the sample URL submitted to Meta.
If you encounter issues with your buttons, particularly the Visit Website option and dynamic links, refer to the table below for common problems and troubleshooting steps.
| Issue | Troubleshooting |
|---|---|
| The button variable does not appear in Jotform | Confirm that the approved Meta template includes a Visit Website button with URL Type set to Dynamic. |
| The link mapping is unavailable | Verify that the Meta button uses URL Type: Dynamic and that the approved template contains the {{1}} URL placeholder. |
| The button opens the wrong destination | Check that the fixed URL ends at the correct path-or-query-string boundary, and make sure the button variable is mapped to the form field or Workflow value expected by your website. |
| The final URL is malformed | Check whether the fixed URL requires a trailing slash, question mark, or parameter name. For example, https://portal.example.com/request?id= followed by the mapped Submission ID. |
| The template does not appear | Make sure the template is approved and belongs to the same WhatsApp Business account connected to Jotform. |
Managing WhatsApp Business Message Templates
Once your WhatsApp Business message templates are created, you can manage them from the template list regardless of their current approval status. Depending on what you need to do, you can remove a template, archive it to keep it out of your active list, or restore an archived template when you need to use it again. These options help you keep your templates organized as your messaging needs change.
For approved templates, you have additional options to review their performance and make updates. View insights to monitor impressions, clicks, and overall spend, or edit a template to update its content or settings.
Deleting, Archiving, or Unarchiving a Template
If you no longer need a template, you can delete it permanently. If you want to keep the template for future reference without using it, archive it instead. You can also unarchive it later if you need to use the template again. Here’s the quick way to do it:
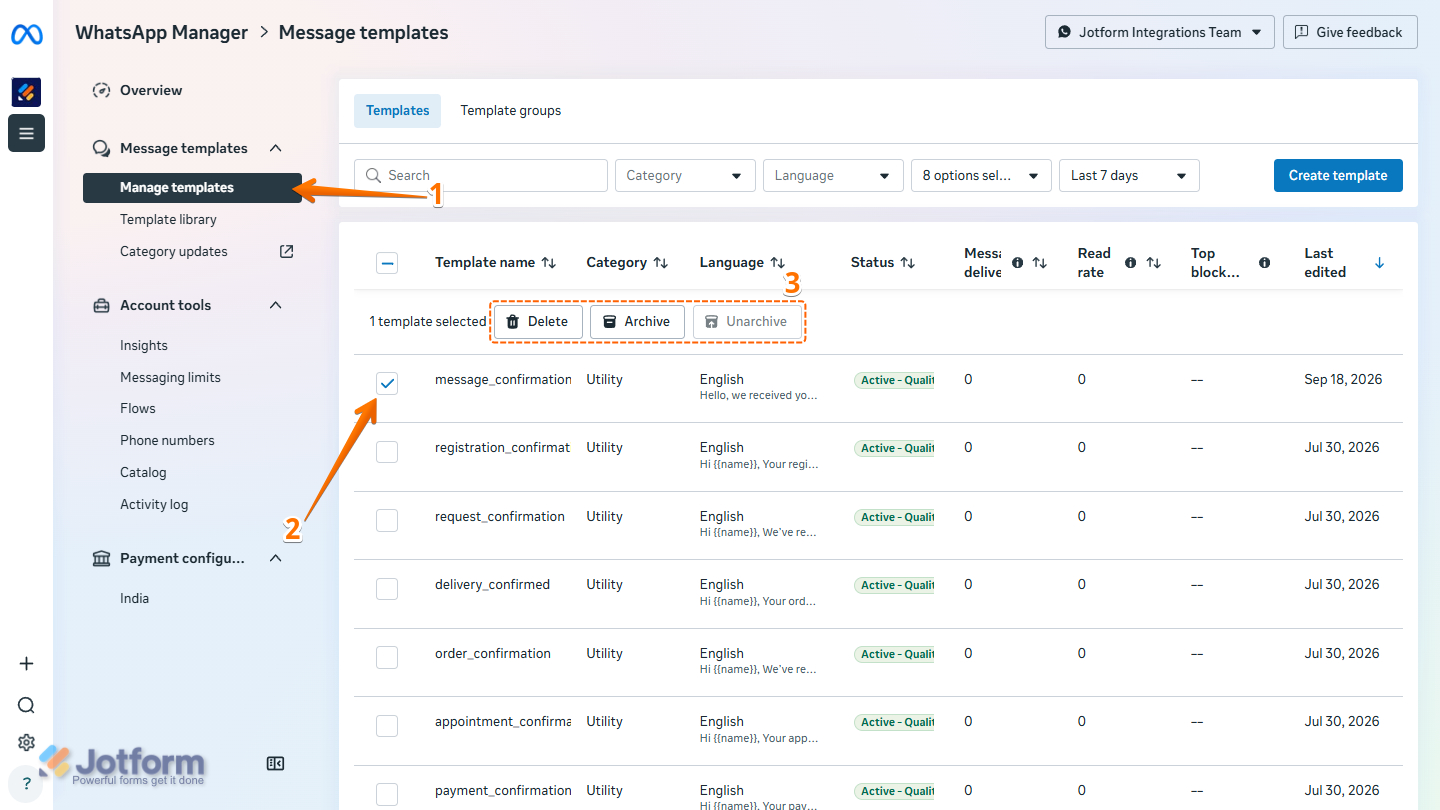
- On the top-left side of your Meta WhatsApp Manager page, under the Message Templates Dropdown menu, click on Manage Templates.
- Then, under the Templates tab of the Message Templates page, tick the box on the left side of the Template Name.
- Now, at the top of the selected template, select what you want to do:
- Delete — Permanently remove the selected template.
- Archive — Move the selected template to your archived templates without deleting it.
- Unarchive — Restore an archived template to your active templates. This only applies to archived templates.
Viewing Insights and Editing a Template
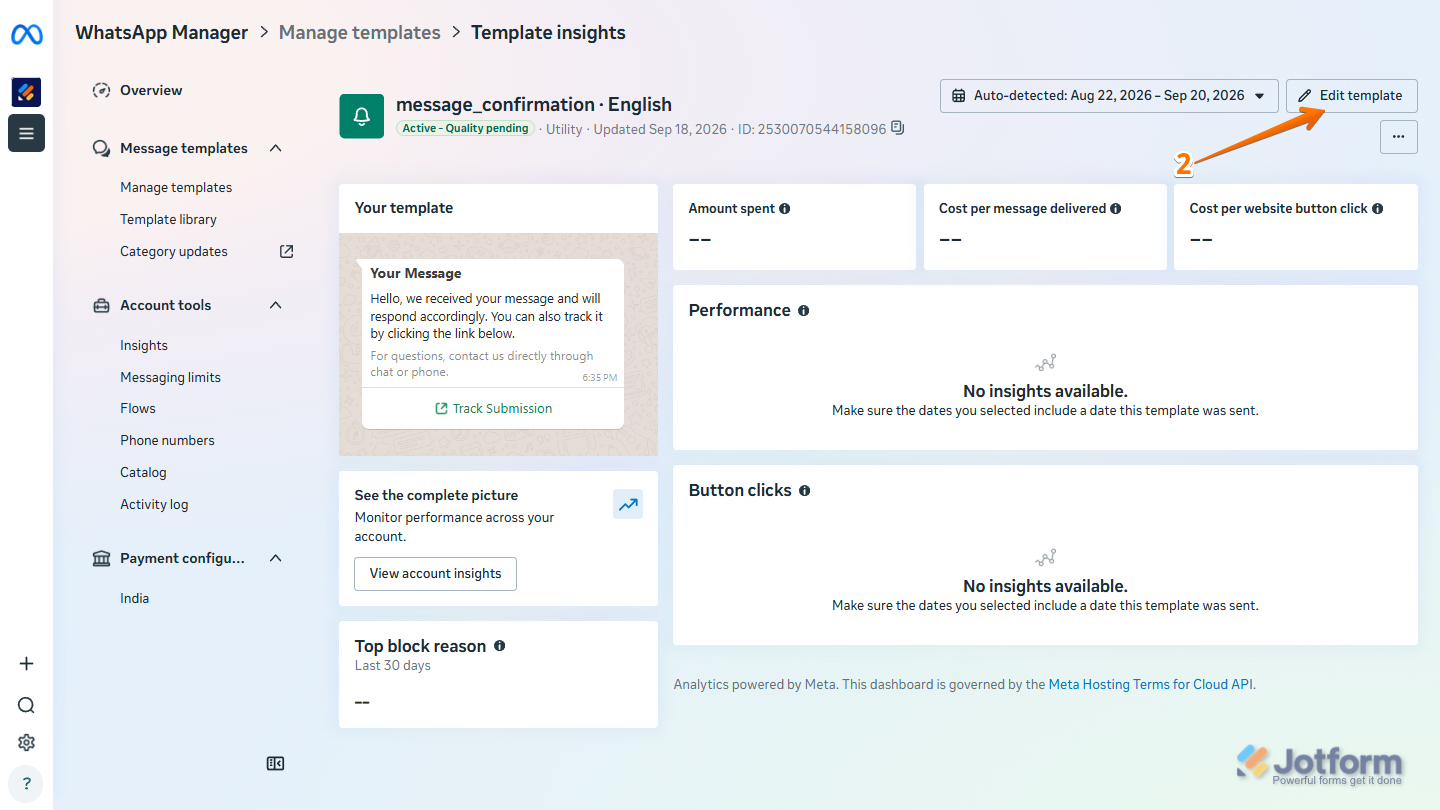
For approved templates, you can view insights such as impressions, clicks, and overall spend to monitor their performance. You can also edit an approved template to update its content or settings. Here’s what to do:
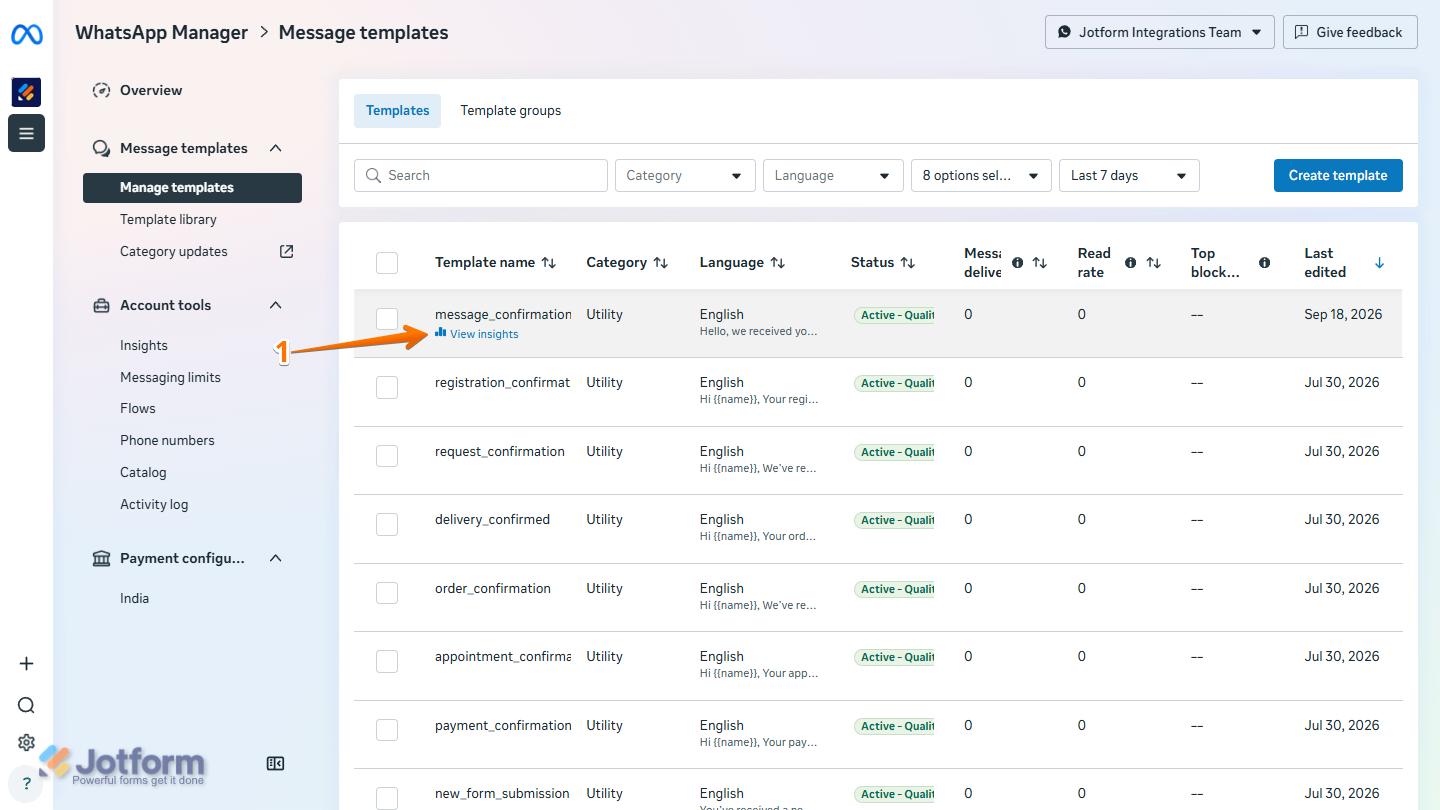
- On the Message Templates page, under the Templates tab, click on any active message template or hover over it, then click on View Insights beneath the template name to view its insights.
- At the top-right side of the Template Insights page, click on Edit Template to edit the selected template. Otherwise, you have the insights ready for analysis.
Note
Editing a template requires Meta’s approval. After making changes, you’ll need to wait for Meta to review and approve the updated template before you can use it in the Jotform WhatsApp Business integration.
That’s it for creating and managing your WhatsApp Business message templates. You’ve now created your template, submitted it for approval, and learned how to manage, update, and monitor your approved templates.

Send Comment: