You can utilize Jotform’s Wix Plugin features to add a payment form to your Wix website, allowing your visitors to submit payments directly from your site. This makes it easier to collect payments for products, services, registrations, donations, and other transactions while keeping the payment experience within your Wix website.
Since the Jotform Wix Plugin serves as your form assistant within the Wix website editor, you can create a new form from scratch, select a template, or add an existing payment form from your Jotform account.
Notes
- Adding a payment form to your Wix website requires the Jotform Wix Plugin to be installed and a Jotform form already added to your Wix page using the plugin.
- The steps in this guide use the Wix Harmony Editor. But the steps are essentially the same on the Classic Editor.
Adding the Jotform Form Embed to Your Wix Page
After installing the Jotform Wix Plugin, you can easily add the Jotform Form Embed to your Wix website directly through the plugin. Here’s how to get started:
- On your Wix Sites page, hover your mouse over the site, and click on Edit Site.

- Then, at the top-left side of your Wix Harmony Editor, click on the Downward Arrow icon next to the Page.

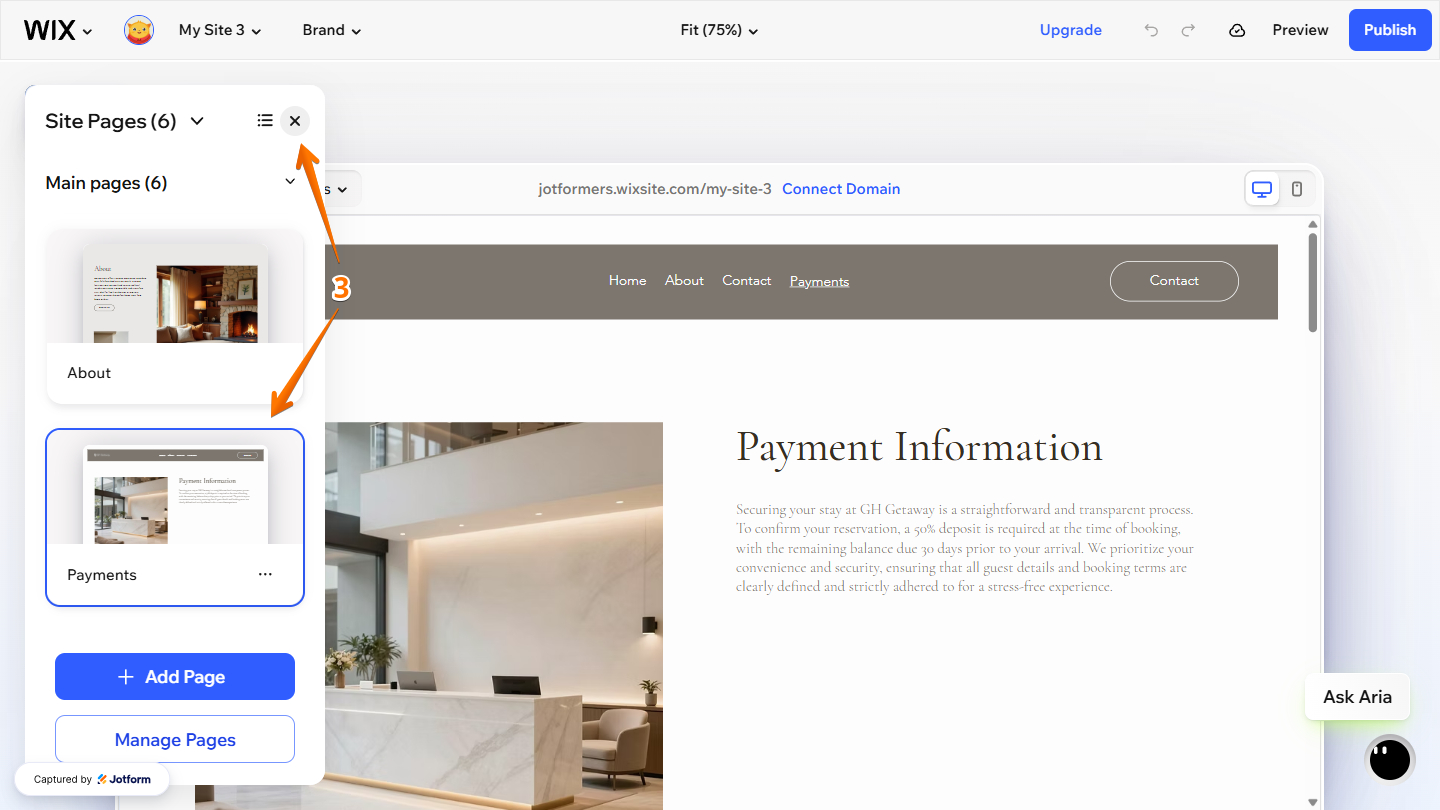
- Next, in the Site Pages menu that opens, under the Main Pages section, click on the page where your form is currently located, and then click on X at the top to close it.
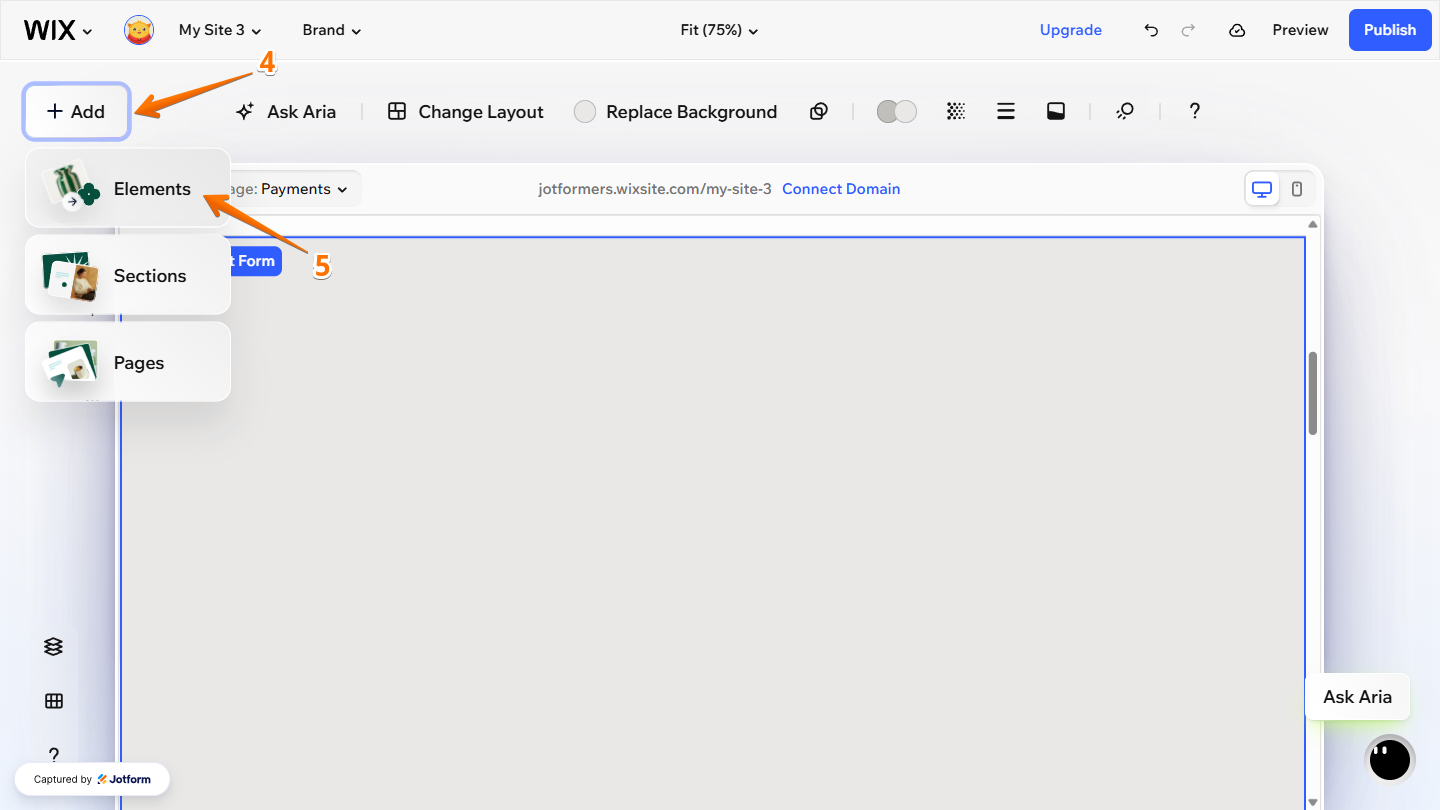
- Now, on the Wix Harmony Editor page, click on Add at the top-left corner.
- Then, in the Dropdown menu that opens, click on Elements.
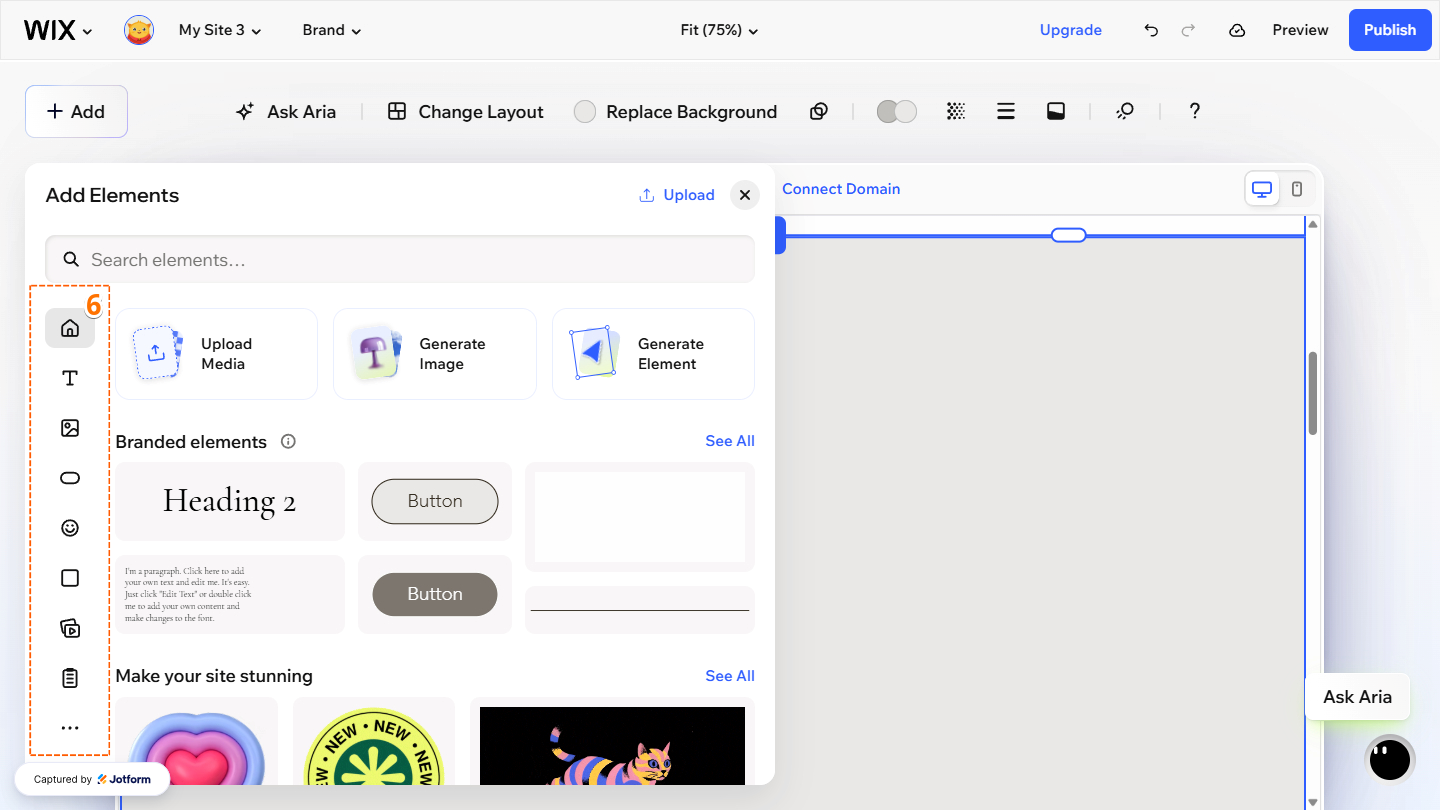
- Next, in the Add Elements menu that opens, hover your mouse over the Element icons on the left.
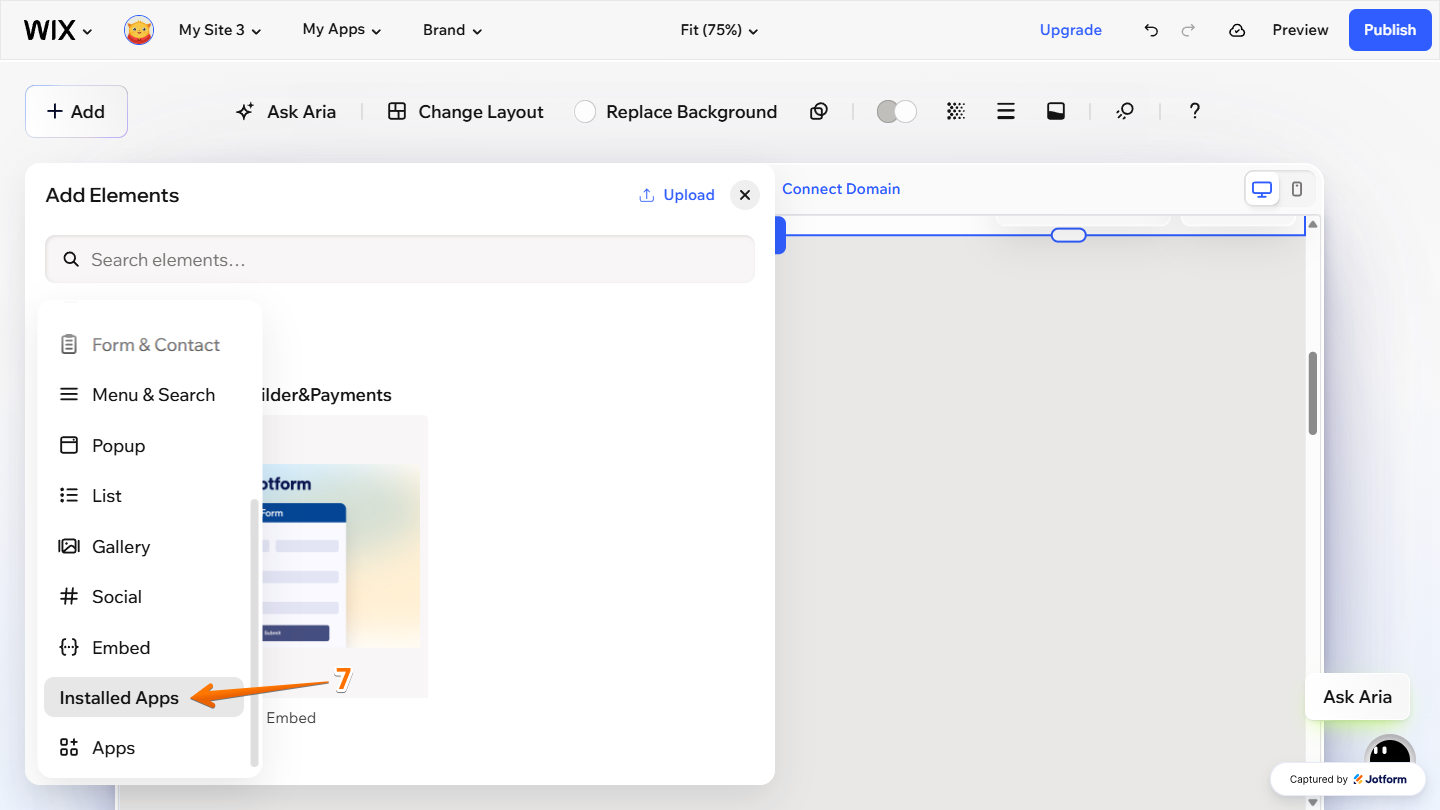
- Now, scroll down to the Installed Apps and click on it.
- Finally, in the Installed Apps section on the right, click or drag and drop Jotform: Form Builder&Payments app to your Wix section editor.
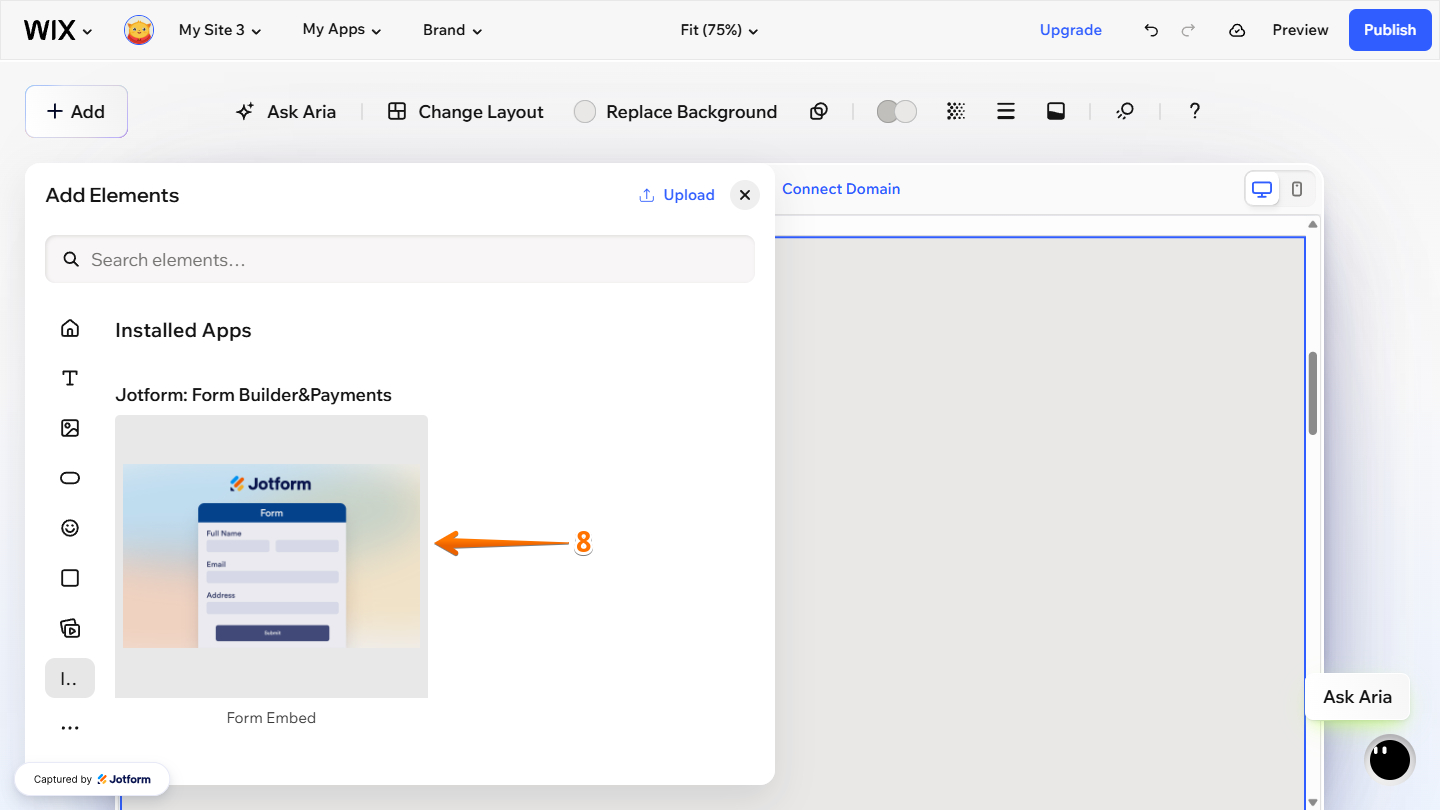
That’s it! Your Form Embed is now added to your Wix page. You can now add your payment form using any of the available options described below.
Creating and Adding a Payment Form from Scratch
The Jotform Wix Plugin lets you create a payment form from scratch directly within the Wix Editor. This convenient feature lets you build and customize your form without leaving your Wix website editor. Here’s a quick how-to:
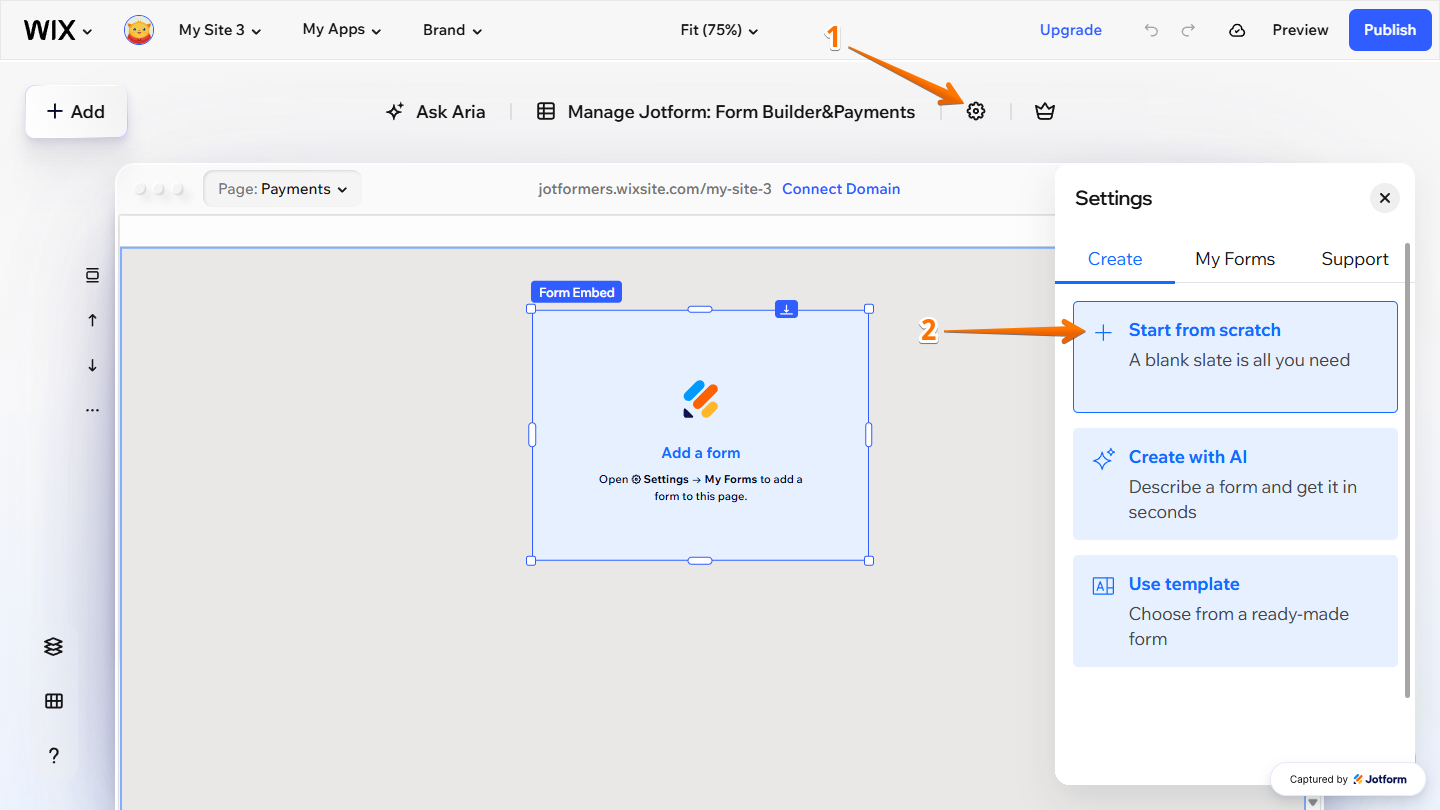
- In your Wix Harmony Editor, while Jotform Form Embed is active, click on the Gear icon at the top to open the Settings menu.
- Then, in the Settings menu that opens on the right, under the Create tab, click on Start From Scratch.
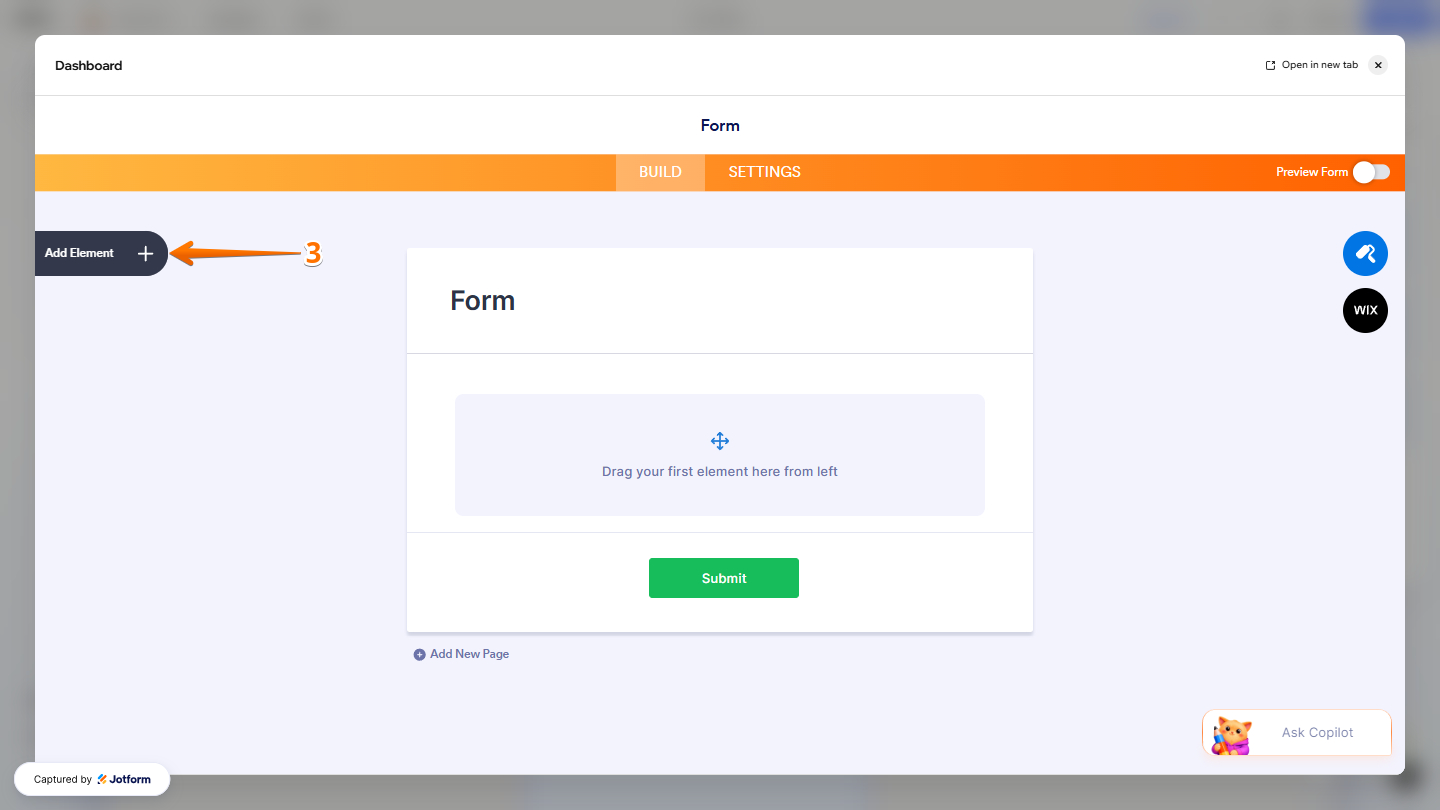
- Next, in the Jotform Form Builder that opens, click on Add Element on the left side of the window.
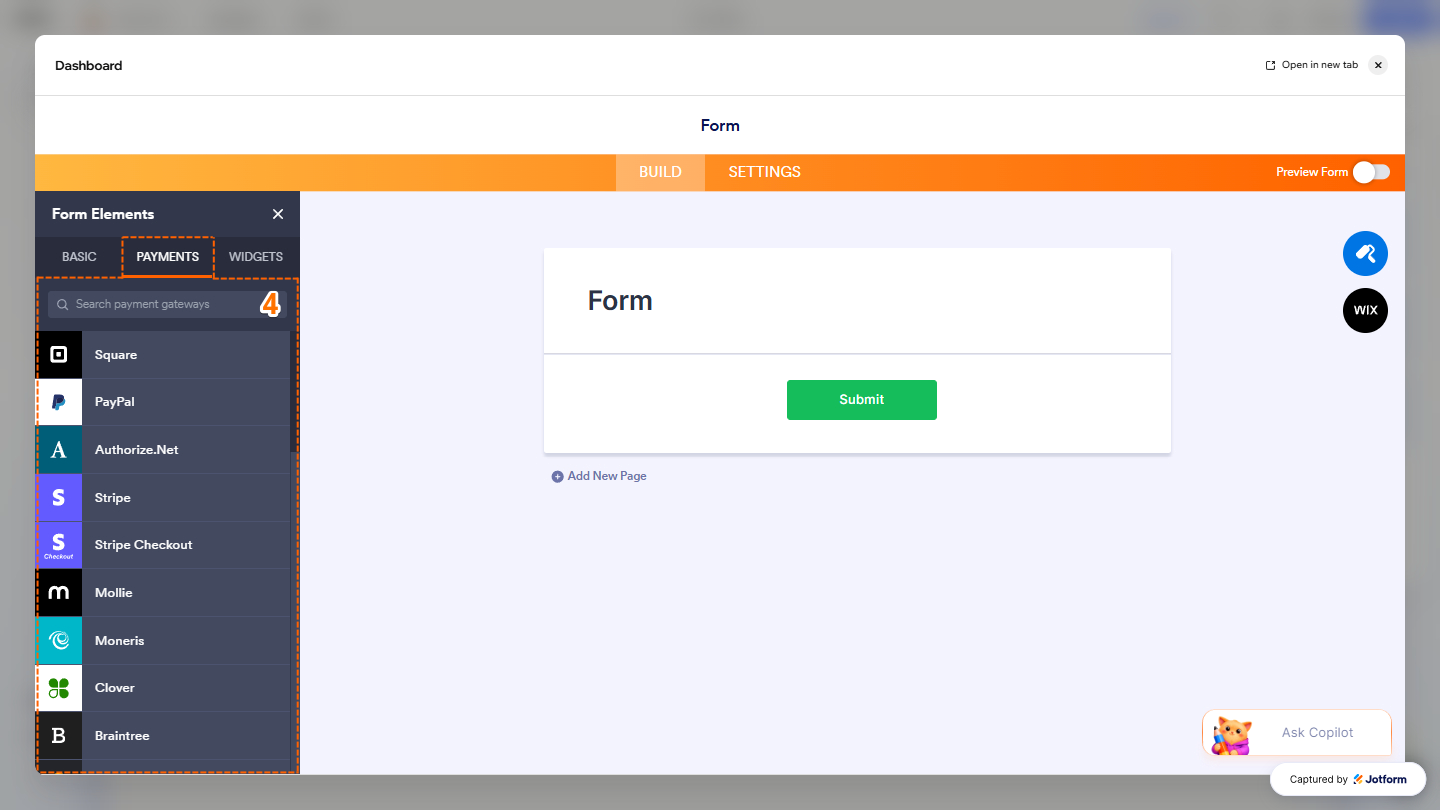
- Now, in the Form Elements menu, under the Payments tab, search for your preferred payment gateway and then click on it. Or just drag and drop it where you want it on your form.
- Once everything is set up, click on X at the top-right of the window to close the Form Builder and add the form to your Wix page.
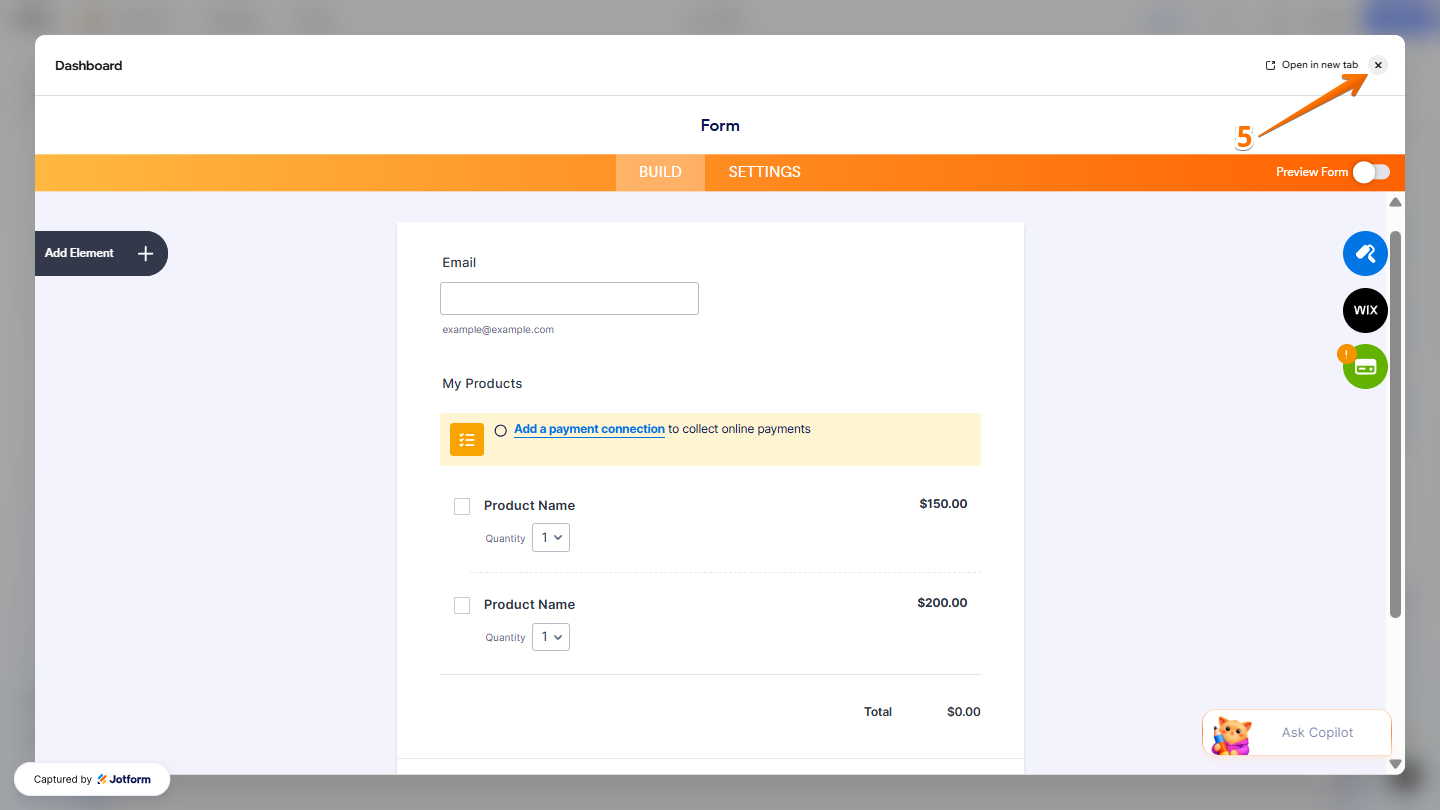
That’s it! You’ve successfully created a payment form from scratch and added it to your Wix page with just a few simple steps. In the Settings menu that is still open, you can edit the form, view its submissions, or set its transparency.
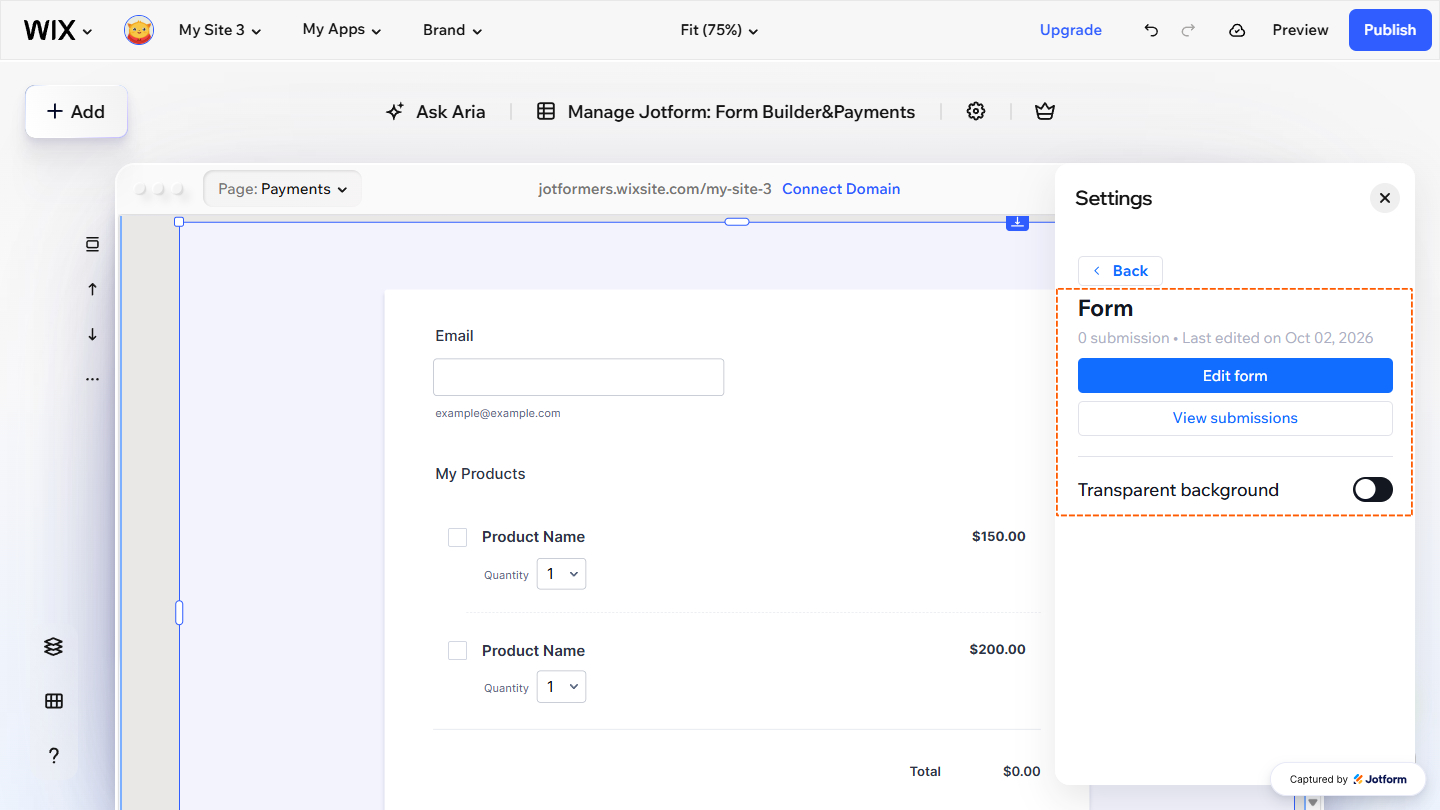
Creating and Adding a Payment Form with AI
With the Jotform Wix Plugin, you can also create a payment form using AI. Simply describe what you need your payment form to include, and the AI will generate a form based on your requirements, giving you a convenient starting point for customization. This is how it’s done:
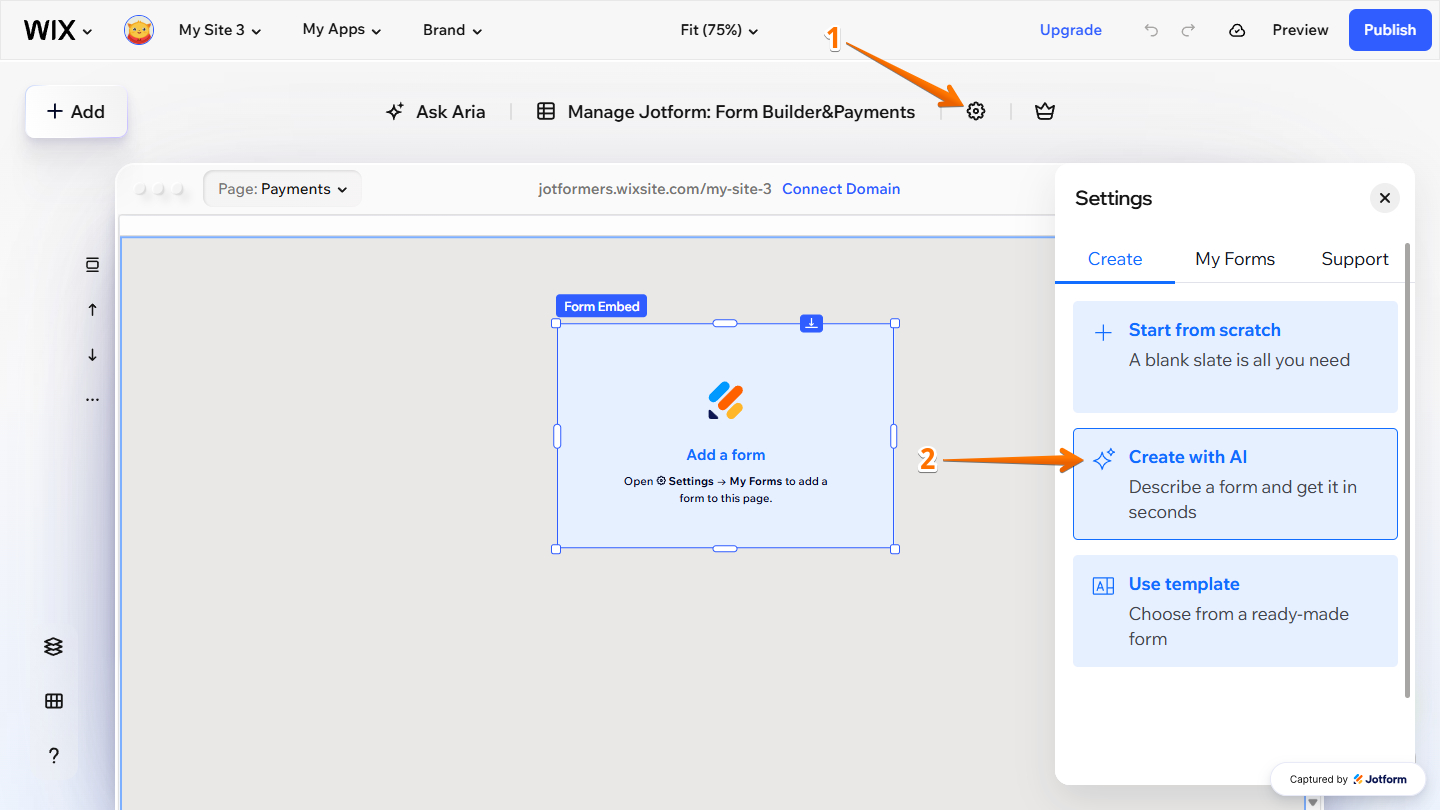
- In your Wix Harmony Editor, while Jotform Form Embed is active, click on the Gear icon at the top to open the Settings menu.
- Then, in the Settings menu that opens on the right, under the Create tab, click on Create with AI.
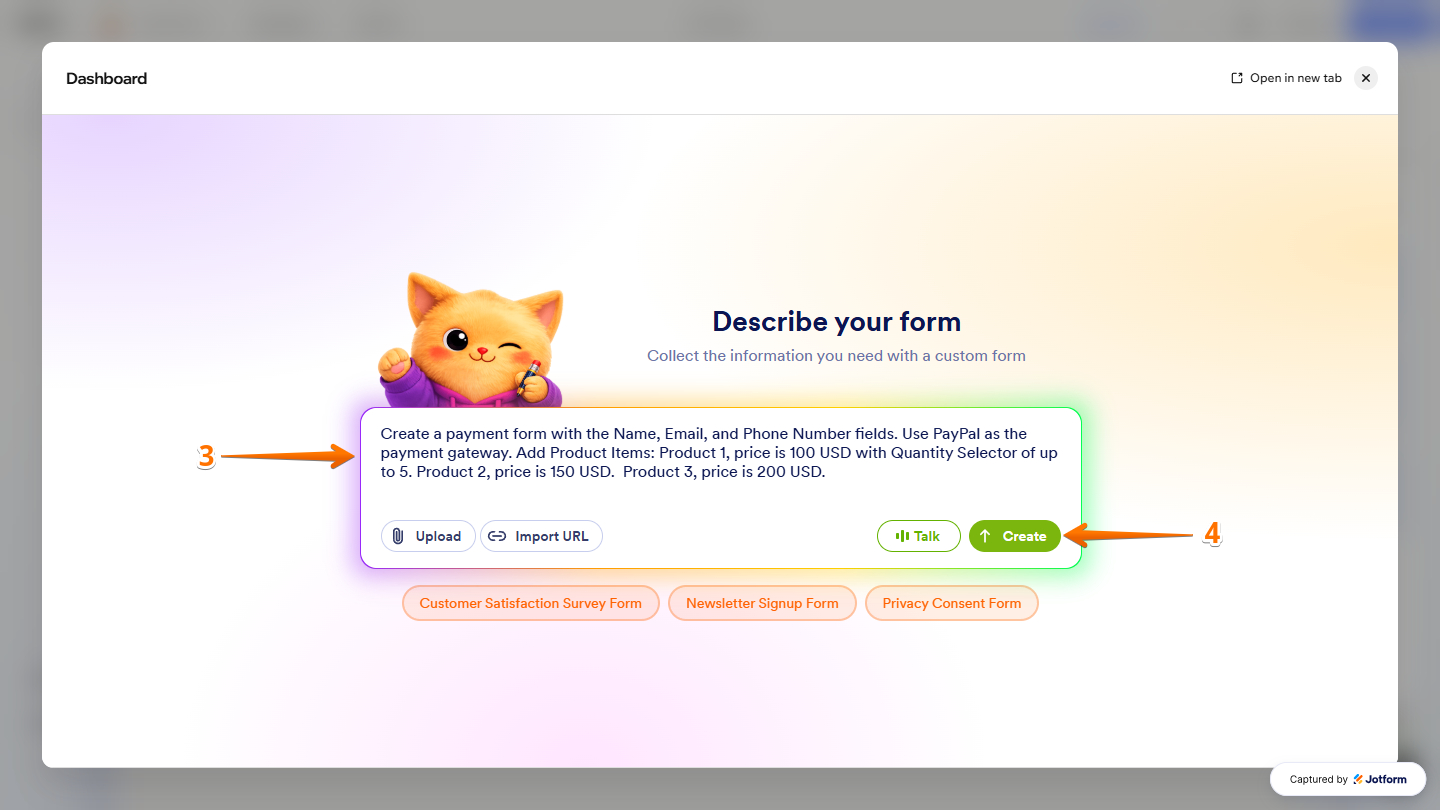
- Next, in the Describe Your Form window that opens, enter how you want to create the payment form in the Prompt box.
- Now, click on Create. The form is created at this step.
- Then, in the Jotform Form Builder window, click on the Credit Card icon on the right side of the page.
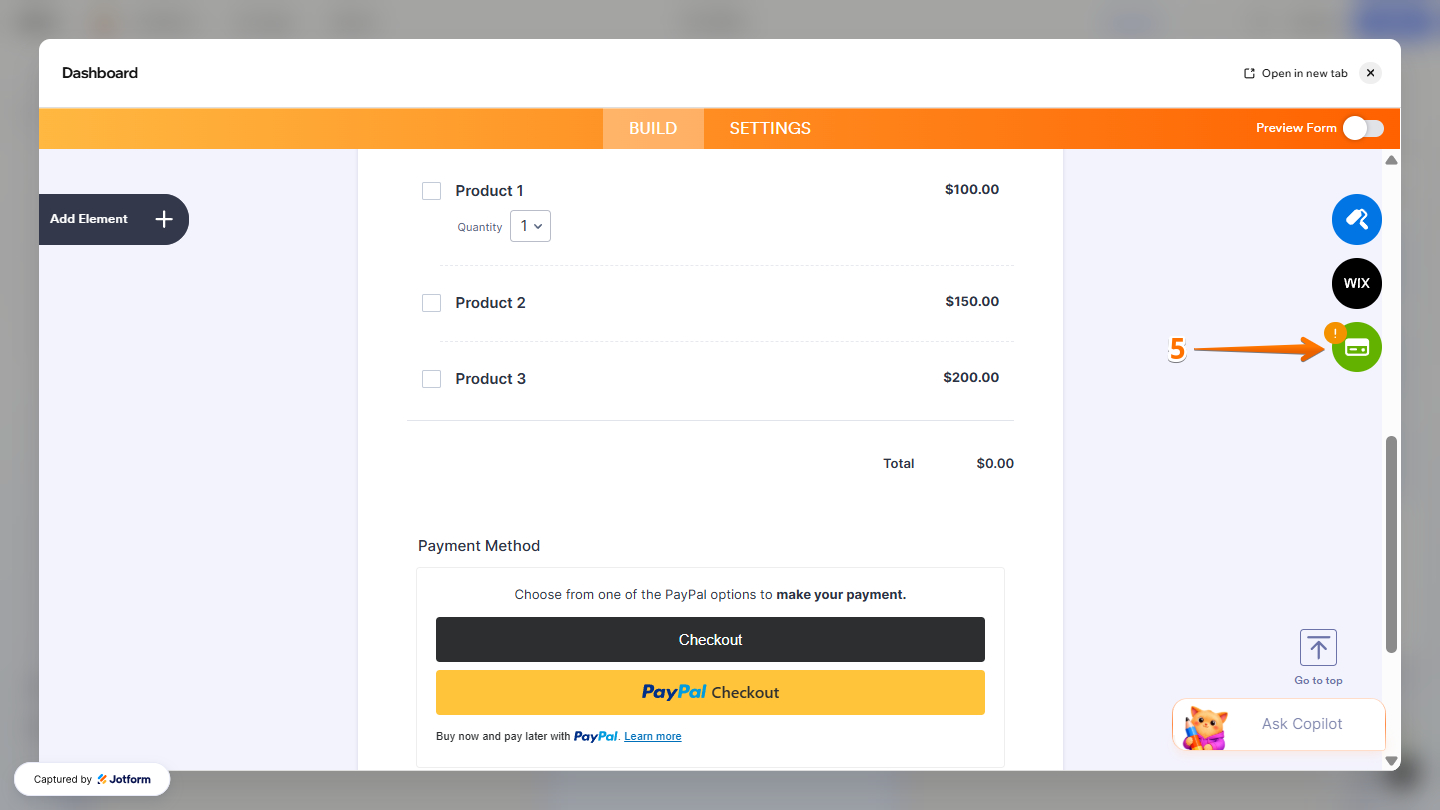
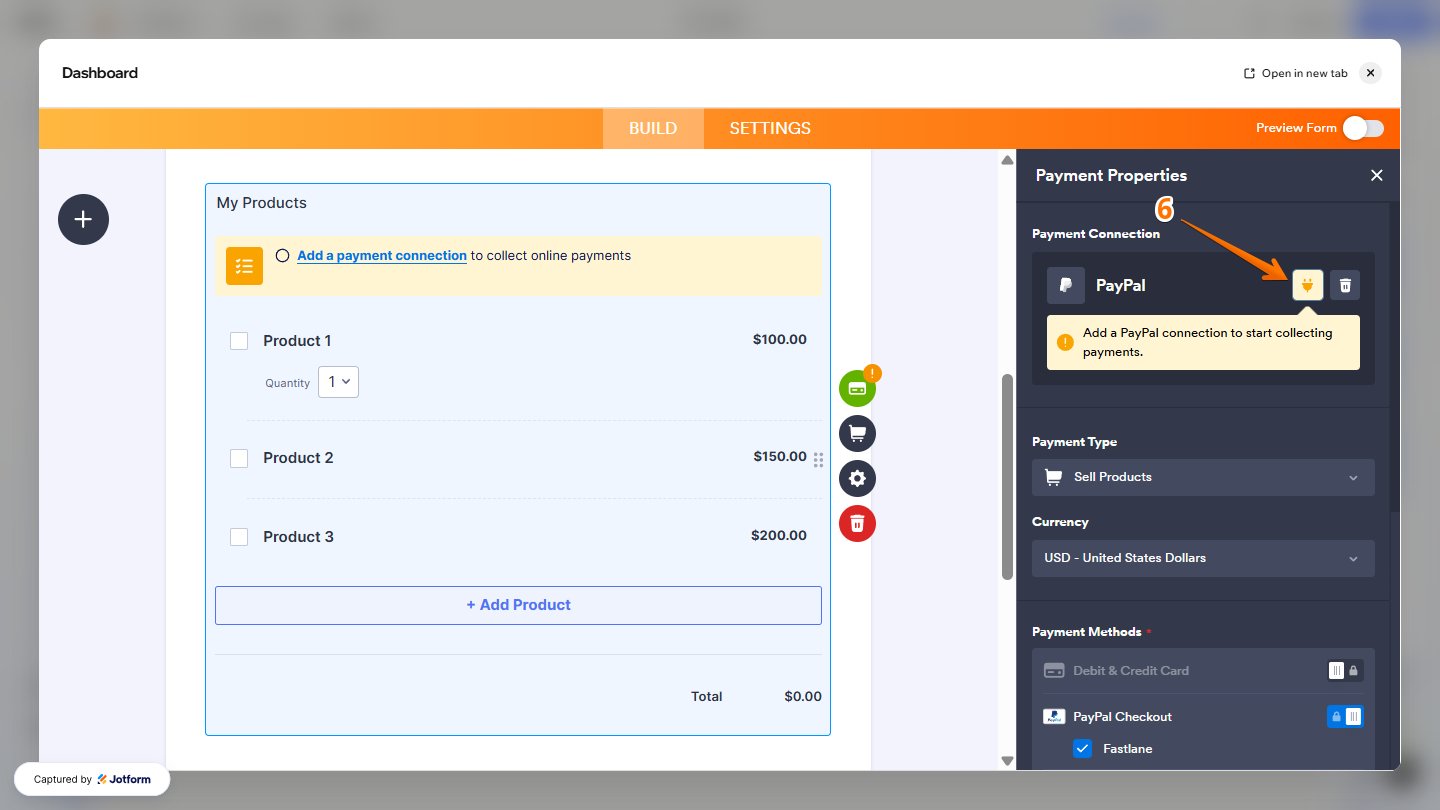
- Next, in the Payment Properties menu that opens, click on the Plug icon under the Payment Connection section.
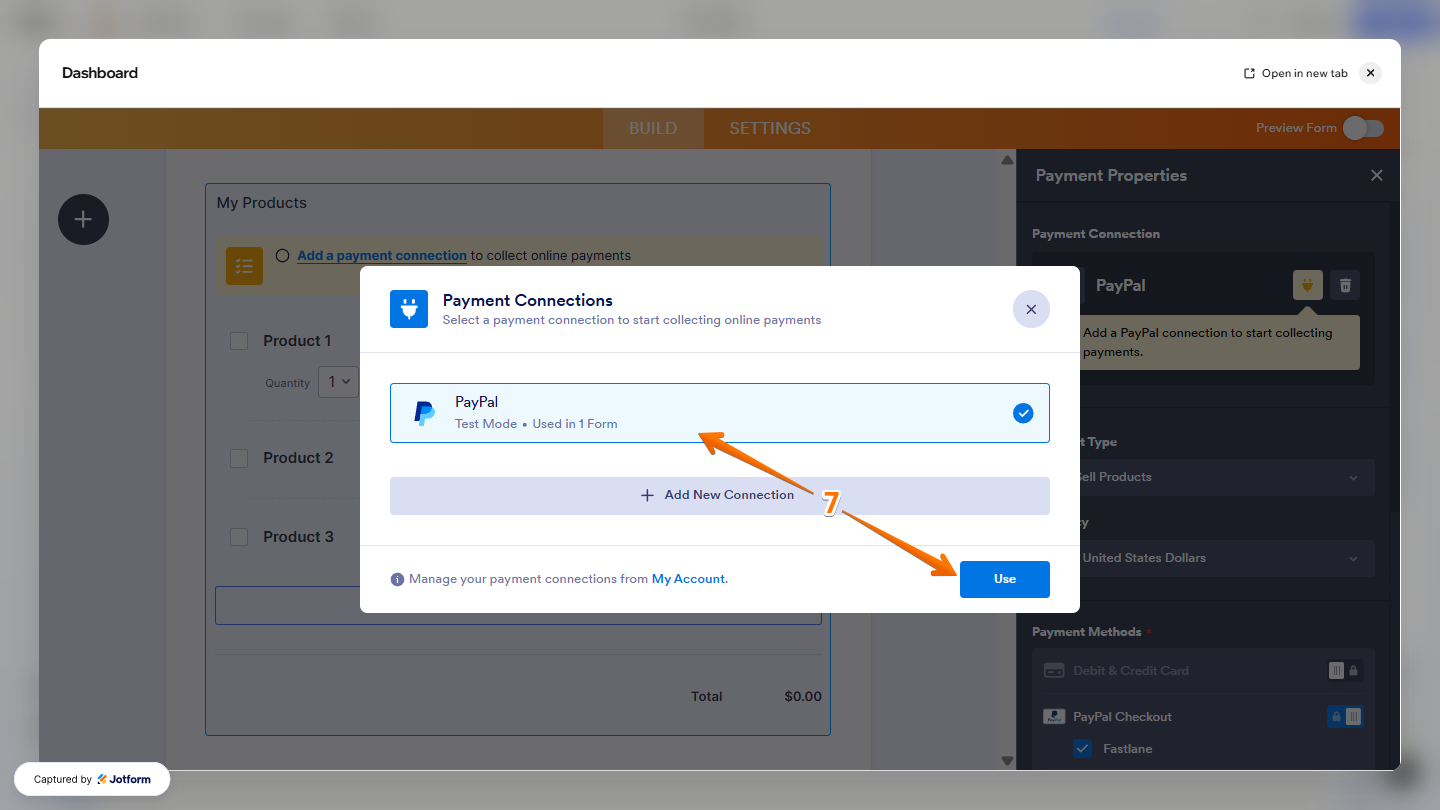
- Now, in the Payment Connections window, select PayPal, and then click on Use.
Note
You can add and manage existing Payment Connections through your Account page. You can check out our guide on How to Add and Manage Reusable Payment Connections to learn more.
- Then, at the top-right side of the Payment Properties menu, click on the X icon to close it.
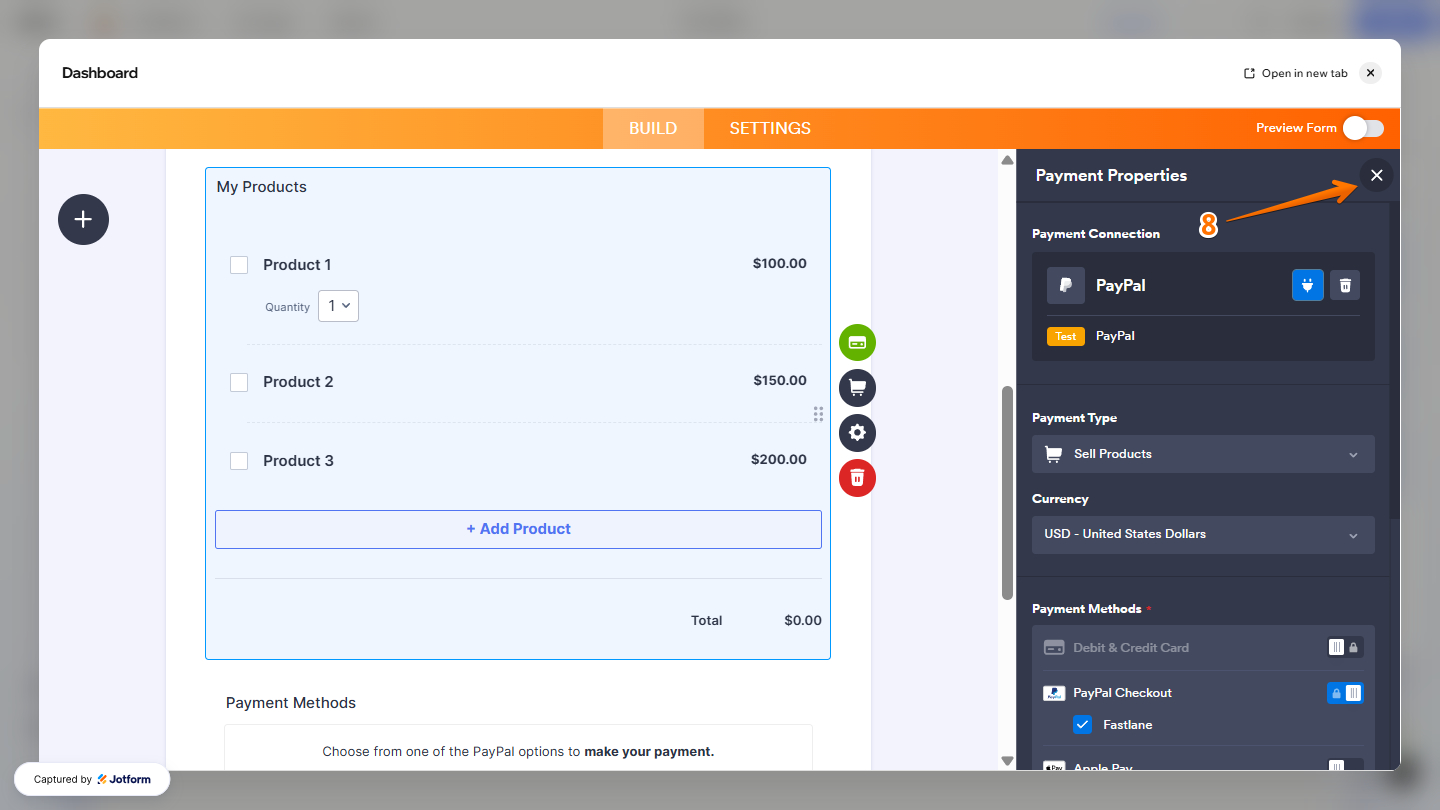
- Now, click the X icon at the top of the Form Builder window to close it, and add the form to your Wix page.
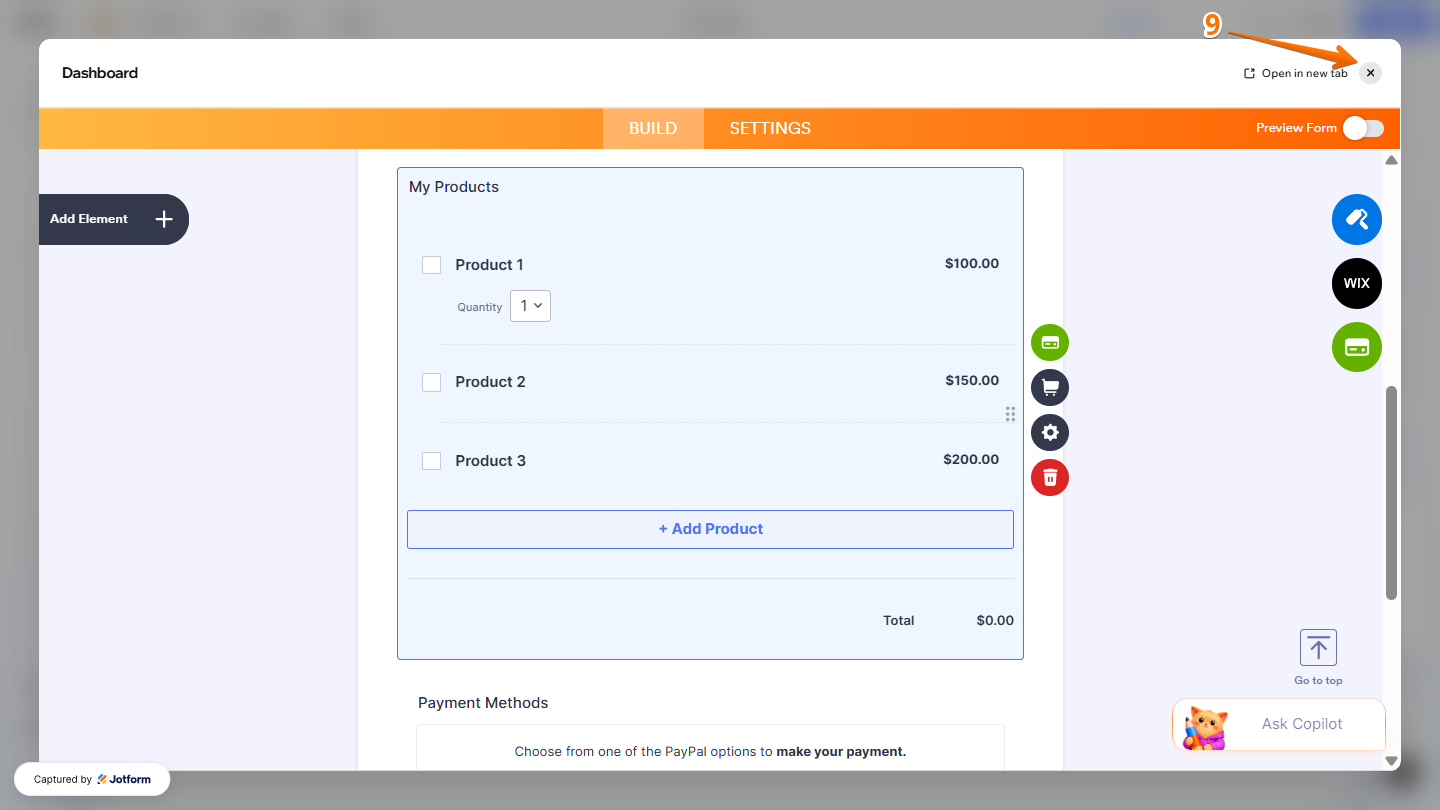
That’s it! You now have your Payment Form with all the elements you requested, including the Payment Gateway you’ve asked for.
Using an Existing Payment Form Template
If you want to skip the hassle of creating a payment form from scratch or generating one with AI, you can select from our collection of ready-made Form Templates. These templates provide a convenient starting point, with prebuilt forms you can customize to fit your payment needs. You can do it in a few simple steps:
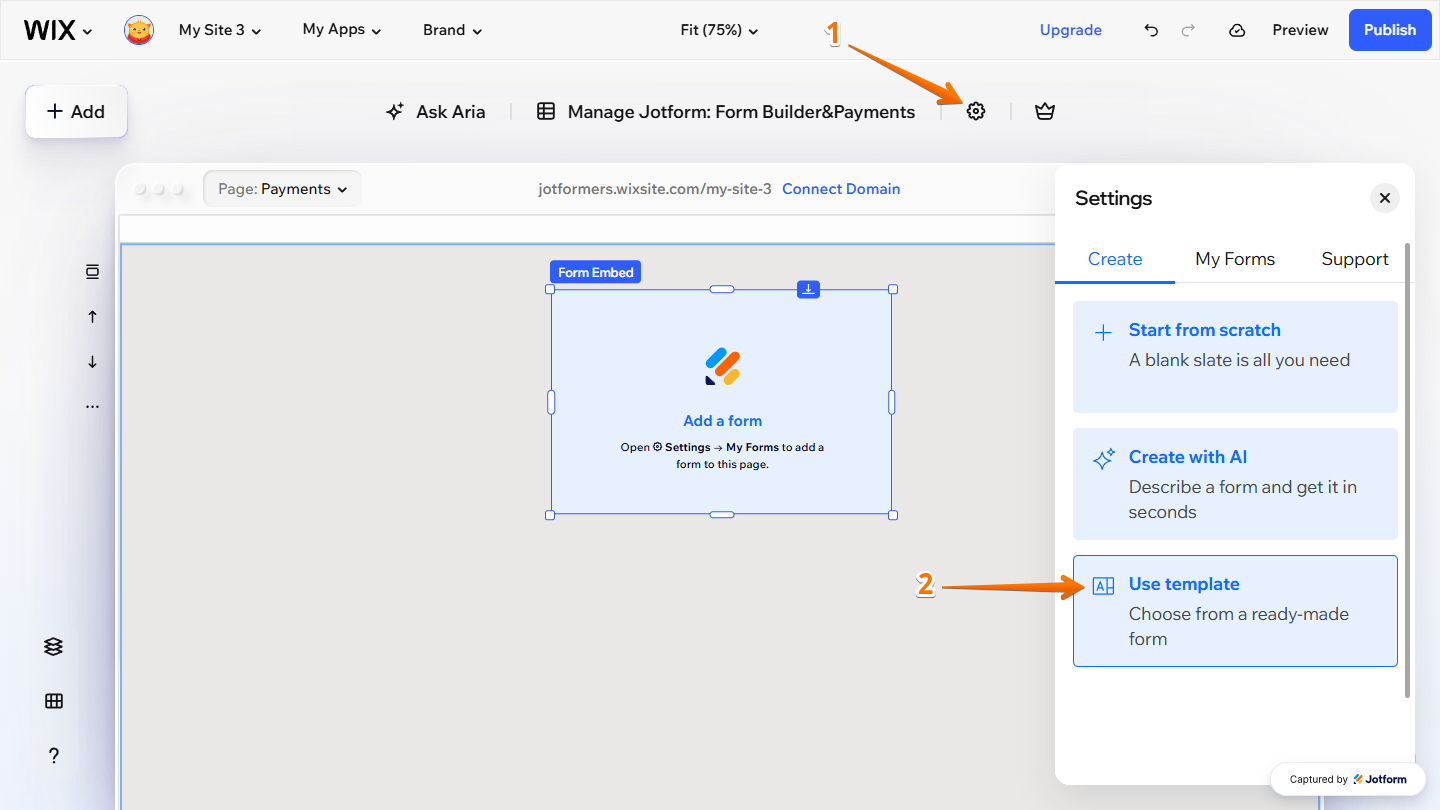
- In your Wix Harmony Editor, while Jotform Form Embed is active, click on the Gear icon at the top to open the Settings menu.
- Then, in the Settings menu that opens on the right, under the Create tab, click on Use Template.
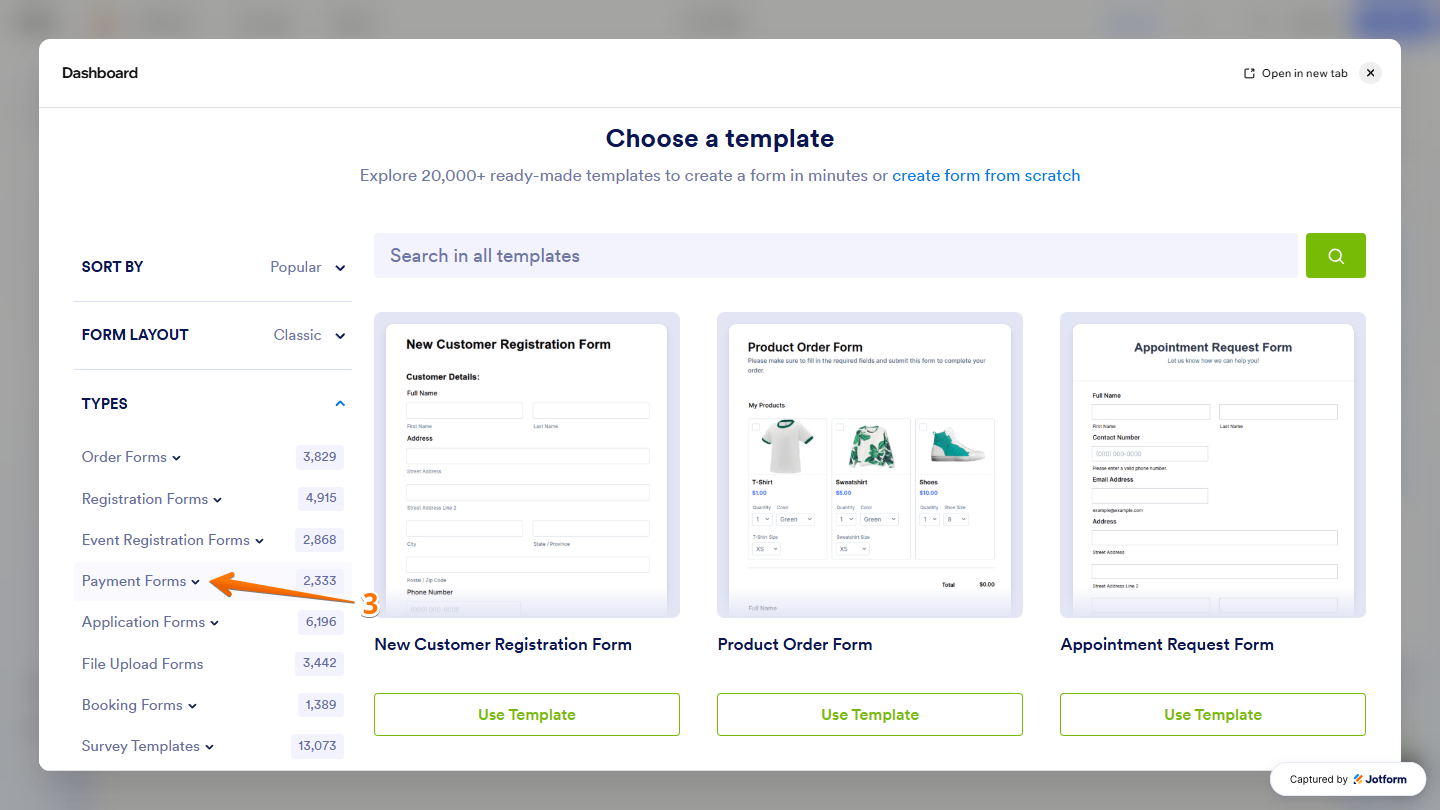
- Next, in the Choose a Template window, under the Types dropdown menu on the left, click on Payments Forms.
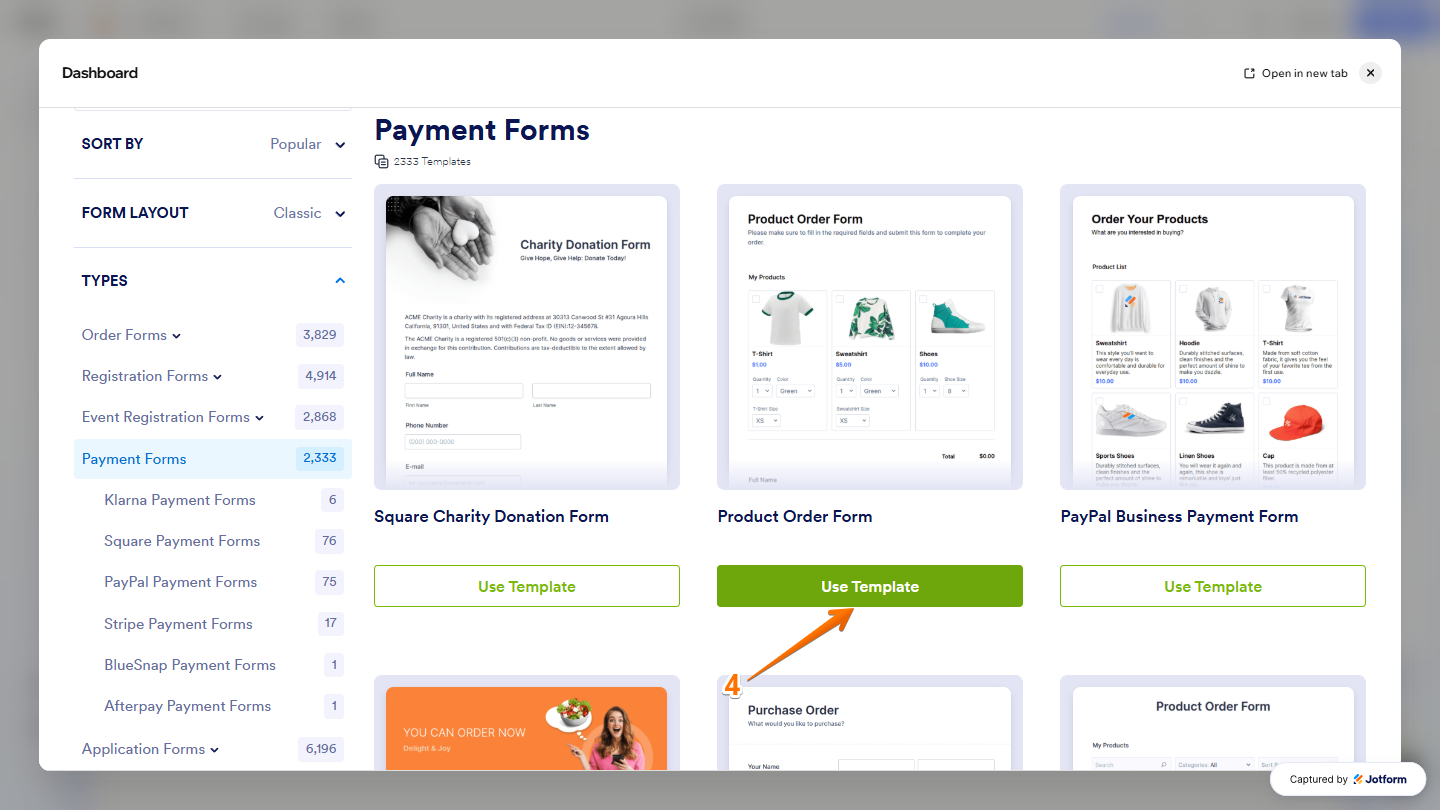
- Now, find your template in the list and click on Use Template to create the payment form based on it.
That’s it! Simply connect your preferred payment gateway, and your form will be ready to publish and start accepting payments.
Adding an Existing Payment Form From Your Account
If you already have a payment form set up in your Jotform account, the Jotform Wix Plugin also lets you add it directly to your Wix page. This is how it’s done:
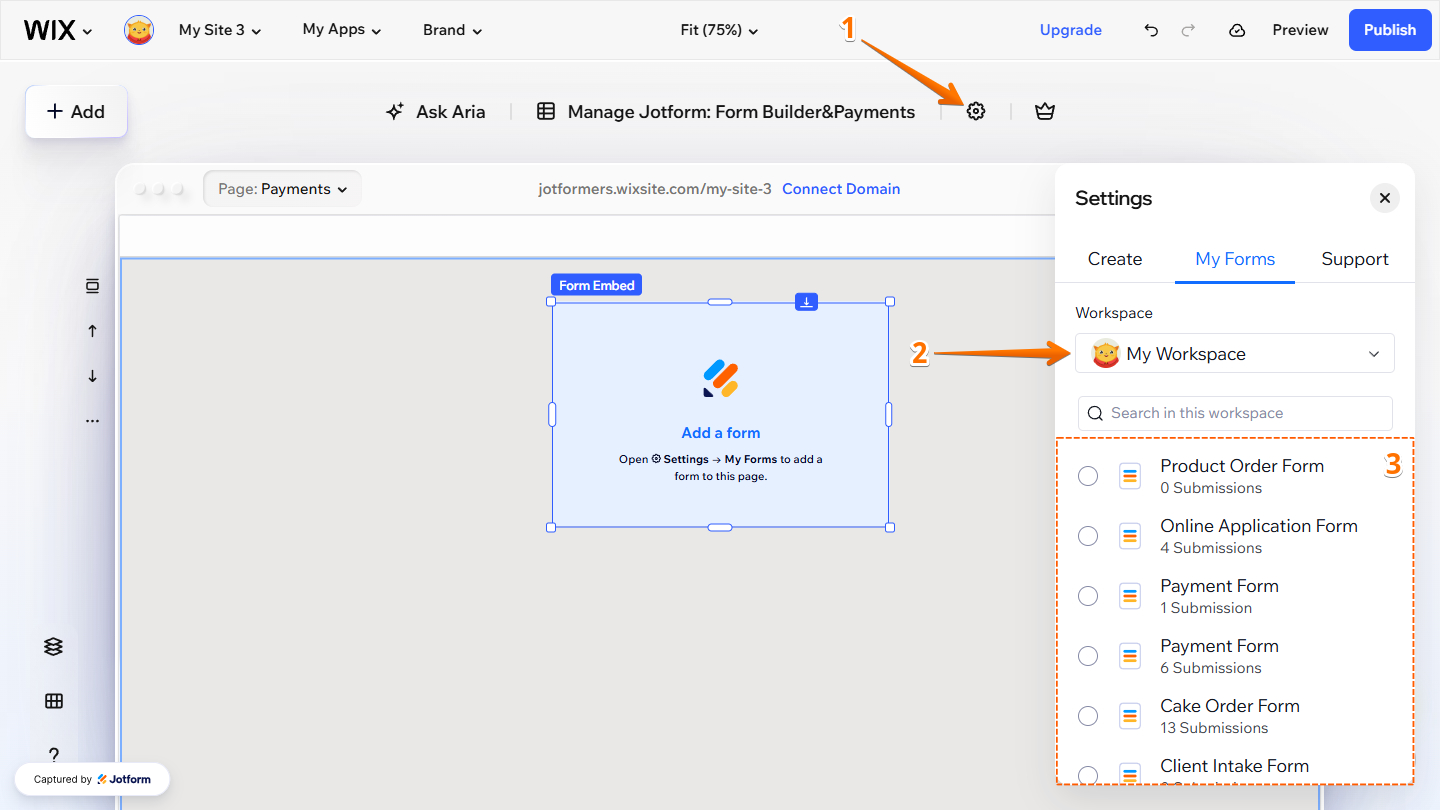
- In your Wix Harmony Editor, while Jotform Form Embed is active, click on the Gear icon at the top to open the Settings menu.
- Then, in the Settings menu that opens on the right, under the My Forms tab, select My Workspace from the Workspace dropdown menu.
- Now, select the payment form from the selected workspace.
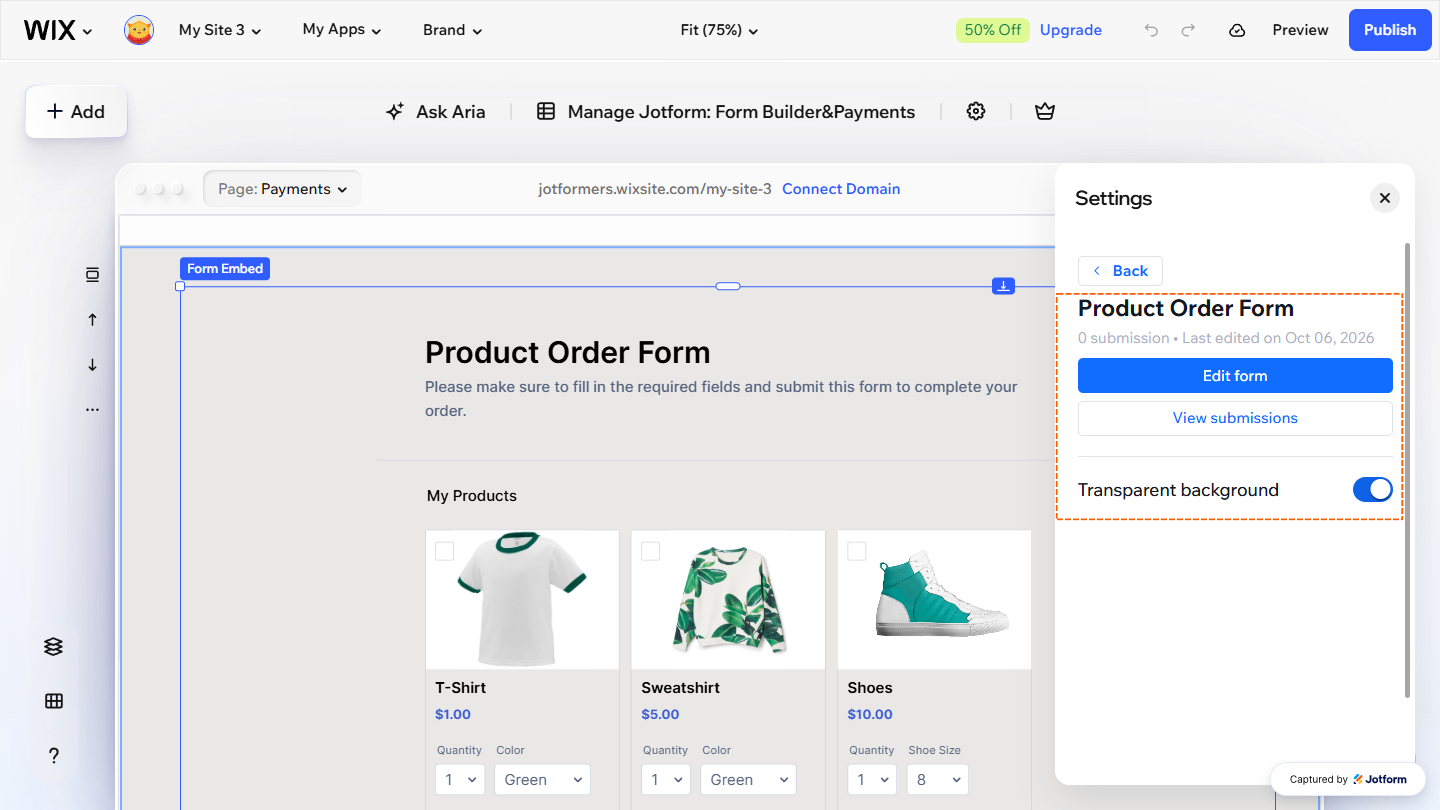
That’s it! You now have the payment form added to the page. Adjust the height and width accordingly. In the Settings menu that is still open, you can edit the form, view its submissions, or set its transparency.

Send Comment: