
If you’re a WordPress site owner, developer, or operations team member using Gravity Forms, you may be looking for a way to get form submission data into Microsoft Excel. Unfortunately, Gravity Forms doesn’t have a native integration with Excel, which means you’ll have to use third-party tools if you want data to flow directly from one tool to the other.
The other option is to use Gravity Forms’ built-in data export functionality. This requires some manual work on your part because it only produces a CSV file that you’ll then have to transfer to Excel.
In this article, I’ll show you how to export Gravity Forms entries to Excel using both methods. And if you’re looking for a better option that syncs form submissions to Microsoft Excel automatically — without any manual steps or third-party tools — I’ll also introduce you to Jotform, a leading Gravity Forms alternative.

Migrate existing forms instantly
There’s no need to rebuild your online forms from scratch. Instead, migrate existing forms and submission data into your Jotform account in one click — so you can collect data without skipping a beat.
Your form can not be migrated.
Please ensure that your form URL is correct and that your form is set to “public” before attempting to migrate it again.
Export Gravity Forms entries to Excel using the built-in export tool
Without a Gravity Forms–Microsoft Excel integration, the most obvious way to run a Gravity Forms export to Excel is to use Gravity Forms’ built-in export feature. This method produces a CSV file that you would then manually open in Excel.
Note that this solution doesn’t update the CSV file in real time when new submissions come in — it only exports the submissions you select at a specific moment in time. That means you’ll have to do this process regularly to keep your Excel file up to date.
Follow these steps to export your Gravity Forms submissions to a CSV file using its built-in tool:
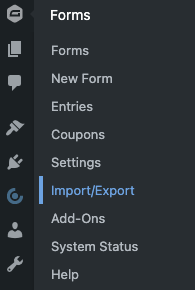
- Log into your WordPress admin dashboard.
- Hover over Forms. Click Import/Export.
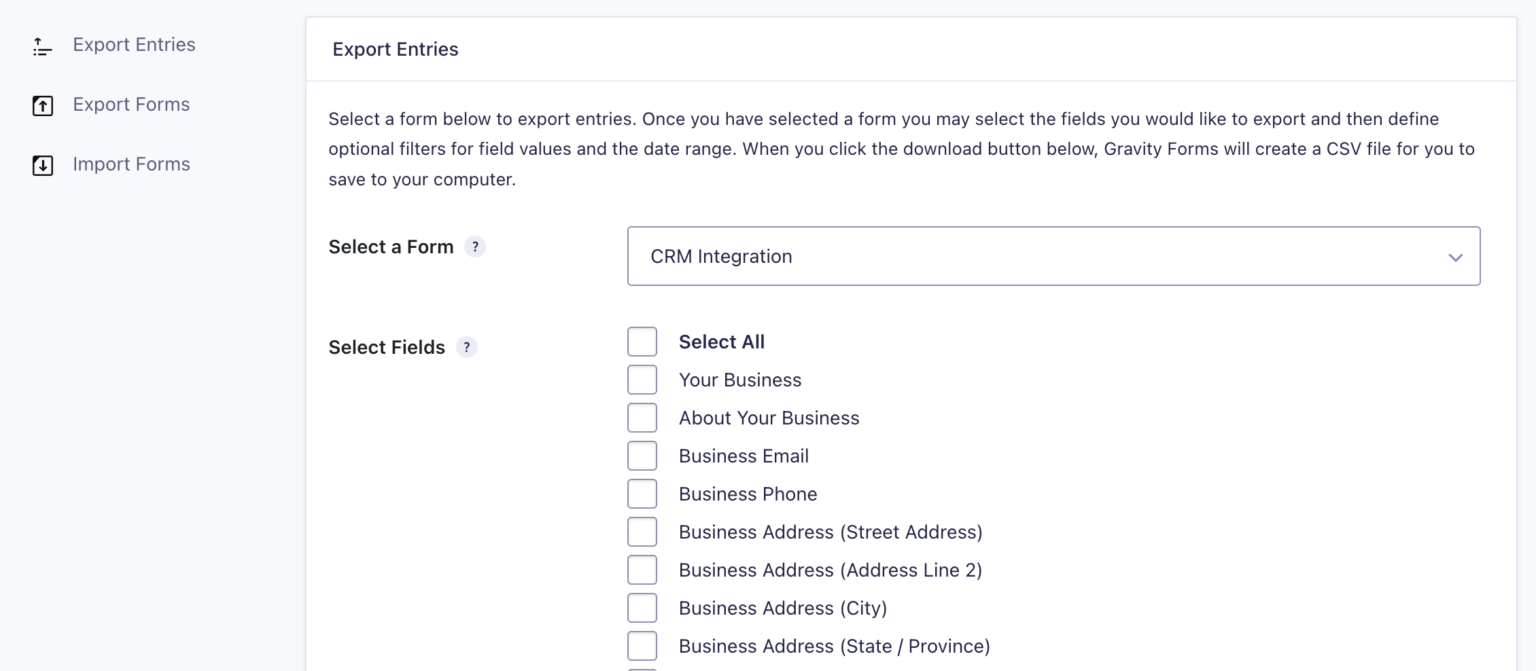
- The Export Entries tab will open. Select the form from which you want to export the submissions.
- Under Select Fields, select the checkboxes for the specific form fields you want to export.
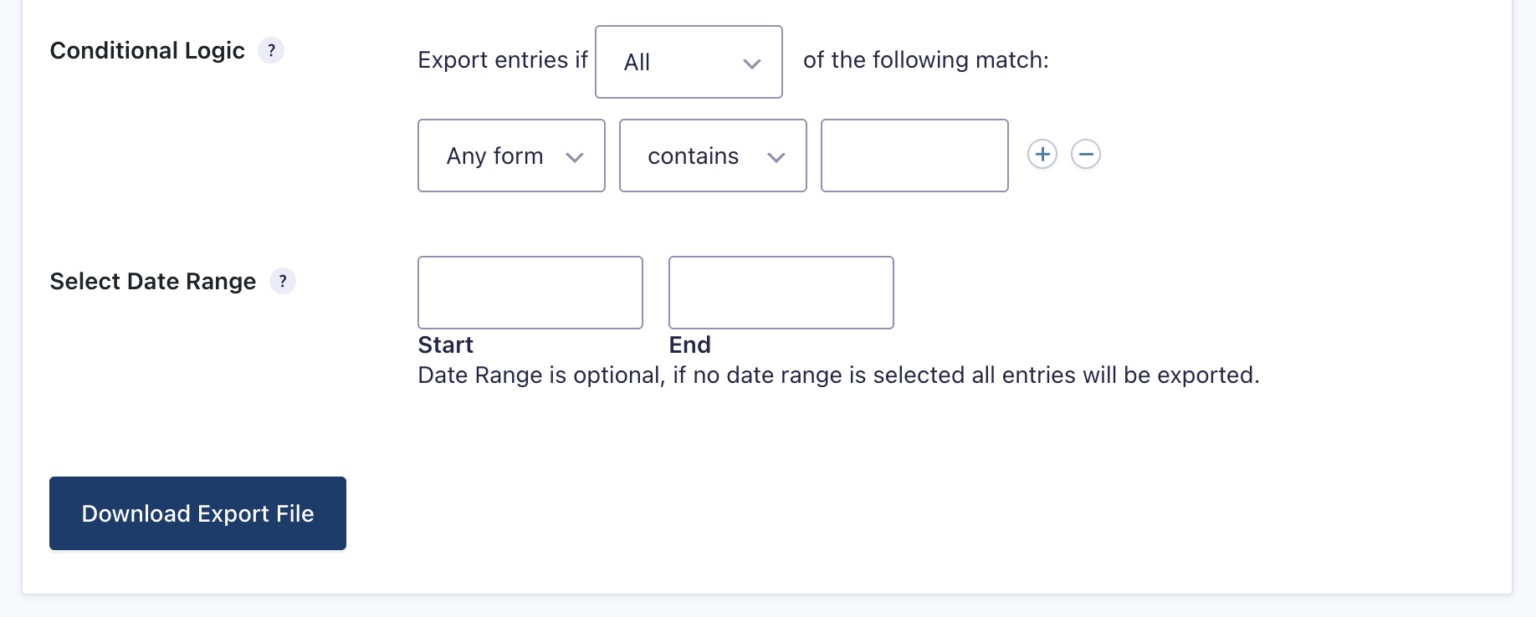
- Under Conditional Logic, you have the option to filter submissions based on specific criteria, such as location or business size. Note that, to use this feature, you must have previously enabled Conditional Logic and configured the rules.
- Under Select Date Range, specify the start and end dates for the range of submissions you’ll be exporting.
- Click Download Export File.
- Save the CSV file to your device.
- Open Microsoft Excel.
- Go to File > Open, and navigate to the folder where your CSV file is located.
- Select Text Files in the file type dropdown list in the Open dialog box.
- Double click on the file you want to open. Excel will automatically open the CSV file and display the data in a new workbook.
Export Gravity Forms entries directly to Excel with third-party add-ons
If you want a true Gravity Forms Excel export for entries in an XLSX format or want to skip the manual CSV step entirely, you can use third-party tools.

GravityExport by GravityKit is a certified Gravity Forms add-on that generates real-time Excel reports via a secure, sharable download link — without requiring anyone to log into WordPress. It’s one of the best Gravity Forms add-ons available and offers an excellent way to share and analyze your data in Microsoft Excel.
GravityExport is available in three plans:
- A free lite version for Gravity Forms allowing you to export entries to XLSX (Excel) files
- A $99 annual plan that supports the additional export formats of CSV and PDF files
- A $396 all-access annual plan that includes several other tools to use with Gravity Forms
While GravityExport solves the Excel output problem, it’s still a third-party tool that adds unnecessary complexity to the process. For teams that want form submission data to flow into Excel automatically — and natively — in real time, a simpler solution is to switch to Jotform.
Pro Tip
If you’re already using Gravity Forms, you don’t need to rebuild your forms in Jotform. Just use Jotform’s free migration tool to transfer your existing forms and submission data into Jotform from Gravity Forms in a few clicks. No lost forms, no lost entries, and no rebuilding from scratch.
Skip the workarounds: Jotform sends form submissions straight to Excel
Jotform is a free, no-code form builder with a native Microsoft Excel integration. There’s no need to install an add-on or use a CSV file as part of a cumbersome manual workaround. Every form submission in Jotform is automatically sent to a connected Excel spreadsheet in real time.
With the integration, you can
- Add rows to a new Excel worksheet.
- Add rows to an existing Excel worksheet.
- Add rows to a new Excel table.
- Add rows to an existing Excel table.


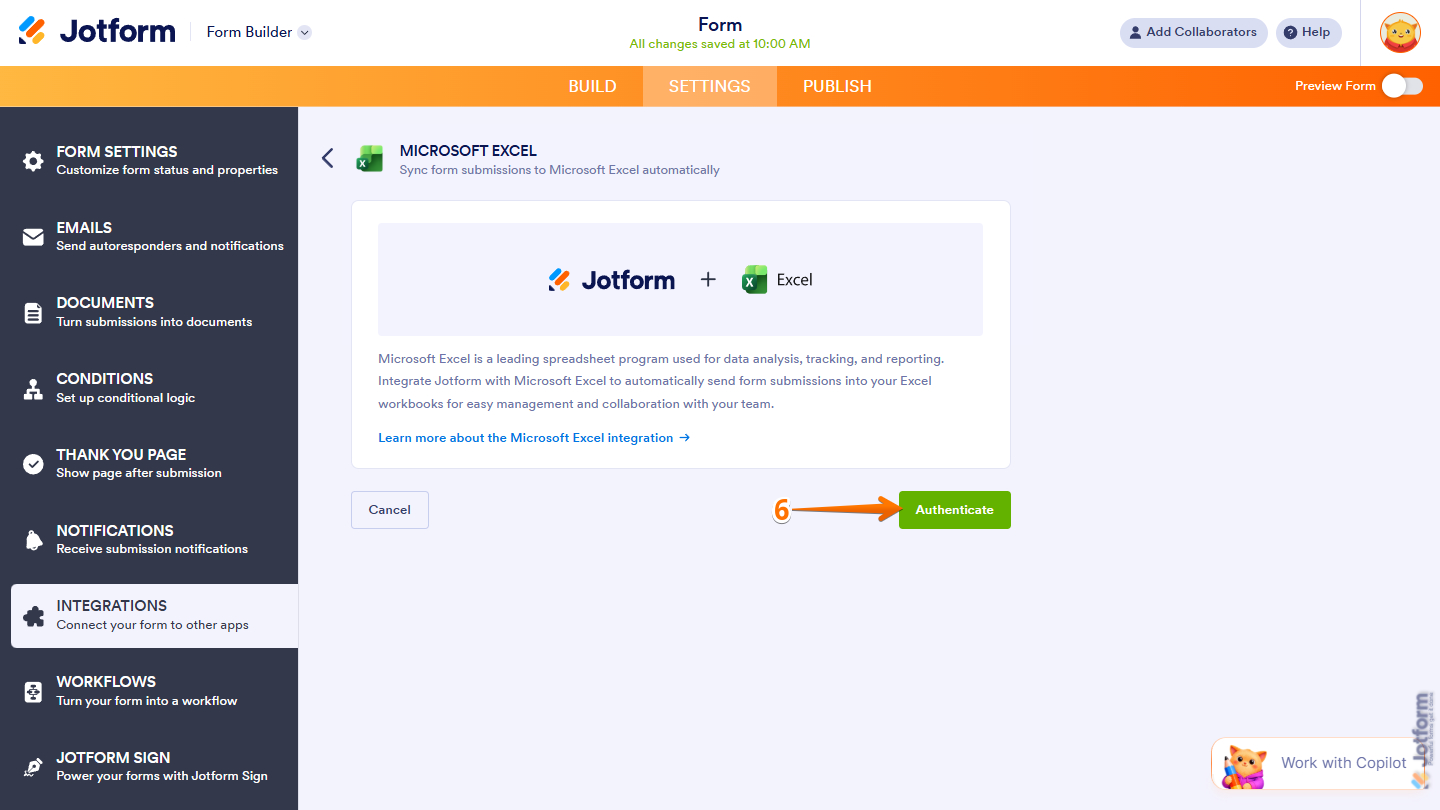
Here’s how to integrate a Jotform form with Microsoft Excel:
- In the Jotform Form Builder, click Settings at the top.
- Click Integrations in the left-hand menu.
- Search for and click on Microsoft Excel.

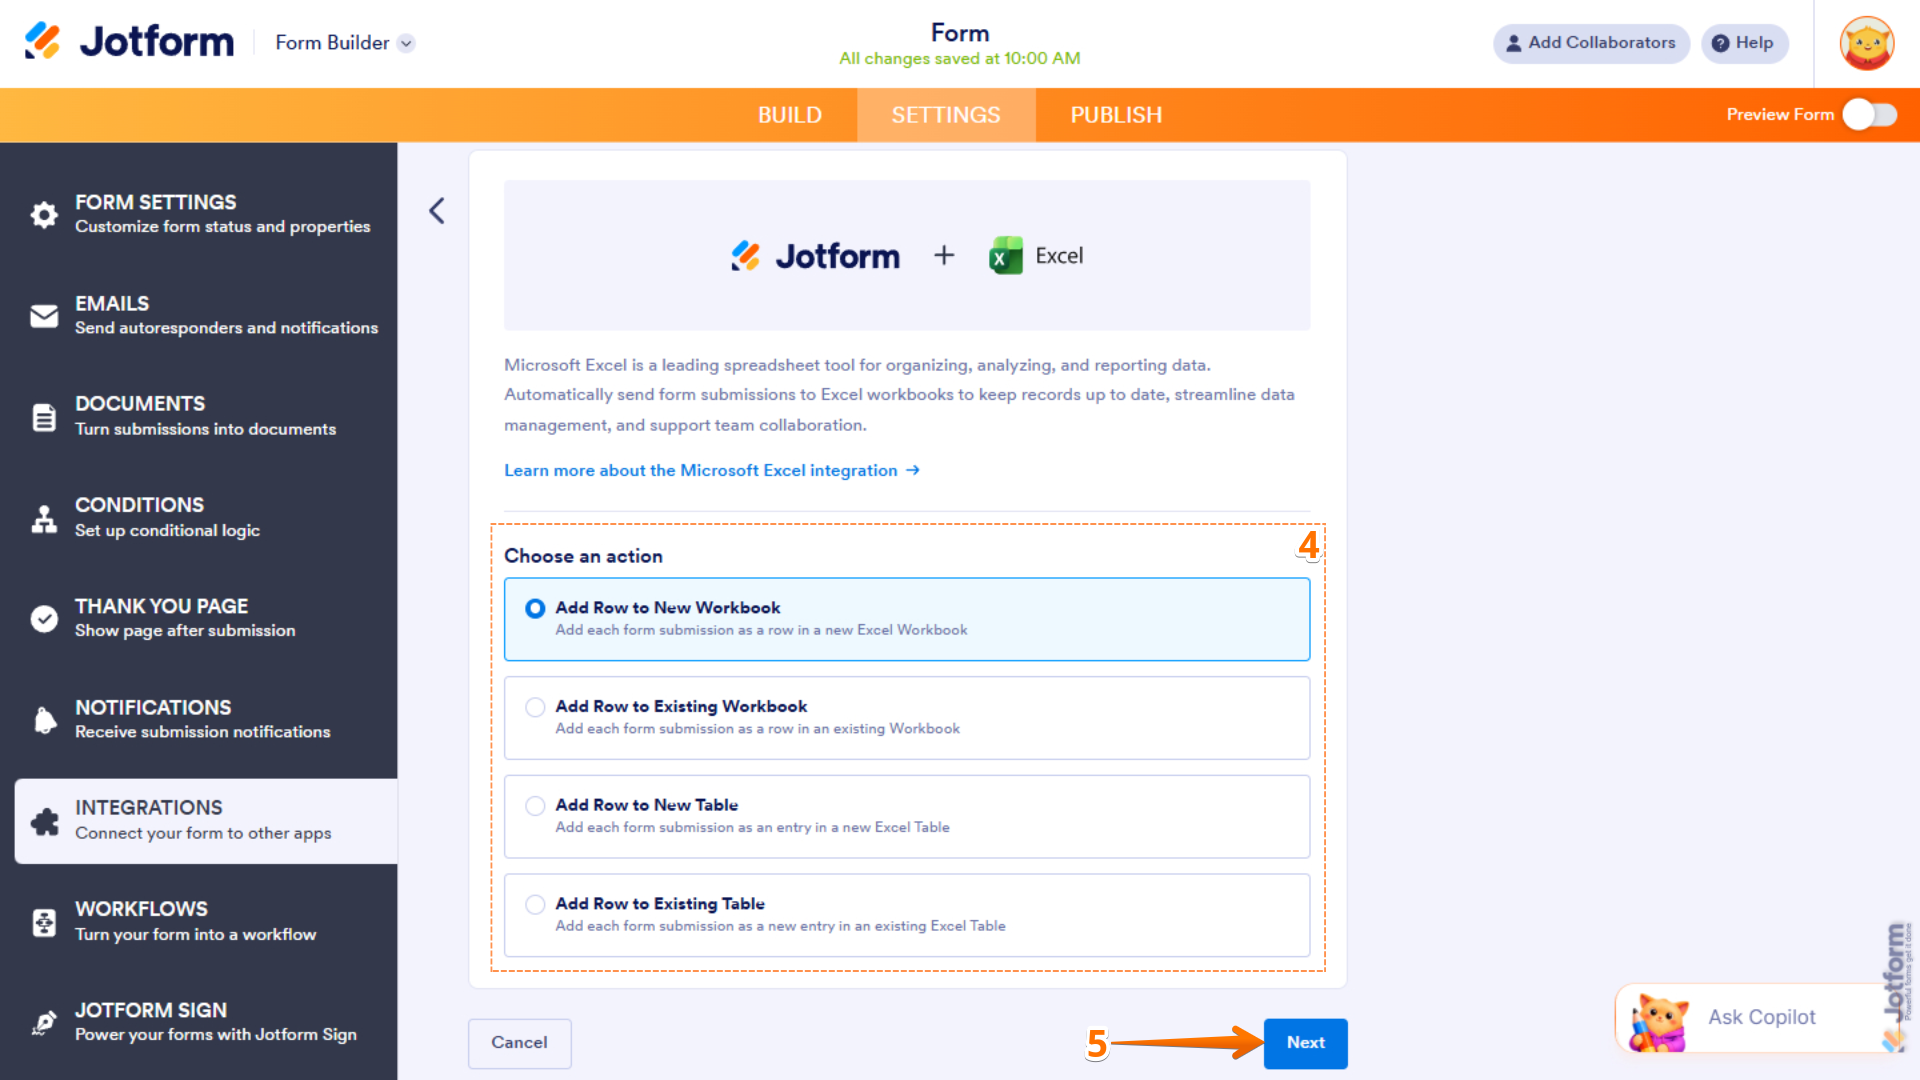
- Under Choose an Action, make a selection based on what you want to do with the integration:
- Add Row to New Workbook: Choose this option if you want to create a new Excel workbook and record each form submission as a new row within it.
- Add Row to Existing Workbook: Choose this option if you want to add each form submission as a new row in an existing workbook.
- Add Row to New Table: Choose this option if you want to create a new Excel table and record each form submission as a new entry in it.
- Add Row to Existing Table: Choose this option if you want to add each form submission as a new entry in an existing Excel table.
- Click Next.
- Click Authenticate. Log into your Microsoft account.
Integrating Jotform with Microsoft Excel is that easy. Now you can specify the settings for the action you selected in step 4 and you’re ready to go. All form submissions will appear in Excel in real time, and they’ll be automatically stored within Jotform’s submission inbox for easy access and review.
Pro Tip
Not really familiar with Microsoft Excel? Check out this Microsoft Excel tutorial or learn how to create a form in Excel (though form creation is easier in Jotform).
Why Jotform is the best Gravity Forms alternative for Excel users
Why do Gravity Forms users switch to Jotform? Here are a few reasons why they migrate:
 Jotform | Gravity Forms | |
|---|---|---|
| Native Microsoft Excel integration | Yes, automatic and real time | No, CSV export only |
| Direct XLSX export | Requires third-party add-on | |
| No plug-in or add-on required | ||
| Works outside of WordPress | No, WordPress only | |
| Shareable form link | ||
| Works on mobile | ||
| Field types | More than 20 fields, more than 100 widgets | Standard field set |
| Conditional logic | ||
| Payment integrations | More than 40 (including PayPal, Stripe, and Square) | Available via add-ons |
| Third-party integrations | More than 150 | Available via add-ons |
| Data management integrations | More than 70 | Limited |
| Free to use | Yes (free plan available) | Paid license required |
Stop exporting manually and let Jotform do it for you
You don’t need Gravity Forms to export to Excel when you have Jotform. This leading form builder not only has a direct integration with Microsoft Excel, but it also offers a number of benefits you don’t get with other form builders:
- Stunning form templates: Jotform comes with over 20,000 form templates covering a range of use cases like order forms, intake forms, human resources surveys, and so much more. Simply select a form and start customizing it in the Jotform Form Builder.
- Collaborative spreadsheet tools: Jotform Tables is a spreadsheet-style workspace that captures submissions without needing to export or sync anything. You can use it to track, manage, and understand your data.
- Payment processor solutions: Need to collect money through forms? Jotform comes with dozens of payment processor integrations, including connections to tools like PayPal, Stripe, and Cash App.
- Data management workflow options: If you want to route form submissions to other tools beyond Microsoft Excel, Jotform offers over 70 data management integrations. Connect to tools like Airtable, OneNote, and OneDrive with ease.
Getting started with Jotform is not only easy — it’s free. Just pick a form template, customize it, and connect it to Microsoft Excel. Explore Jotform today.
FAQs on Gravity Forms Excel exporting
Here’s a quick overview of how to export entries from Gravity Forms to spreadsheet software like Excel:
- Use Gravity Forms’ built-in export tool to export your submissions as a CSV file.
- In the WordPress admin dashboard, go to Forms > Import/Export.
- In the Export Entries tab, select the form and the specific fields you want to export.
- Click Download Export File. You can then manually open the CSV file in Microsoft Excel or another tool.
Converting a form to Excel depends on the type of form you use. For Jotform, you can set up a native integration so that all form submissions automatically go into Microsoft Excel.
This article is for WordPress site owners, developers, marketing managers, and operations teams using Gravity Forms who need to get their form submission data into Microsoft Excel whether for reporting, analysis, or sharing with stakeholders who don’t have access to the WordPress dashboard.


Send Comment: