
If you have a WooCommerce store, you know that each new order isn’t just a sale for your business. It’s valuable data you need to track in QuickBooks to understand your cash flow, file your taxes, and manage your growth.
There are different ways to import orders from WooCommerce to QuickBooks, ranging from using CSV files to third-party automation tools. Whether you’re an e-commerce store owner, accountant, or operations manager, this guide will cover all the necessary details for anyone who wants to streamline order management.
You’ll learn why moving sales data from WooCommerce to QuickBooks matters, how to import an order from WooCommerce to QuickBooks, and best practices for WooCommerce and QuickBooks integration. Plus, we’ll show you how to make the process faster, easier, and cleaner with Jotform.
Why import WooCommerce orders into QuickBooks?
Whether you do a one-time import or an automated sync, you’re going a step beyond convenience by importing WooCommerce orders to accounting software such as QuickBooks. You’re integrating the two tools so they work together, which is a smart business decision that will pay off when you need to do the books or make financial decisions.
When you list your products on your website, they don’t automatically show up in QuickBooks. Automating the import of WooCommerce data to QuickBooks saves time and minimizes manual work because orders automatically flow from your e-commerce platform to your accounting platform.
If you import your orders from WooCommerce into QuickBooks, you don’t have to manually enter customer details, products sold, or payments received into QuickBooks. This speeds up your bookkeeping process so you have more time for more strategic tasks. You also significantly reduce the chances of making a manual error, such as a typo.
Another of the benefits of QuickBooks and WooCommerce integration is that it helps to keep your books accurate and tax-ready. This way, your revenue is up to date in your accounting software, making reconciliation faster.
Keeping your financial records in sync with your actual sales is also handy so you have detailed, tax-ready data for your accountant at tax time. And you can better manage your inventory and ensure you don’t run out of stock when you connect your WooCommerce data with QuickBooks.
If you don’t properly import your data, however, you could run into some issues. Duplicate entries, mismatched deposits, missing transactions, and more could lead to problems reconciling accounts and cause major headaches come tax or audit time.
How to manually import WooCommerce orders into QuickBooks
One option for WooCommerce and QuickBooks integration is to do so manually. This isn’t an automated sync but a one-time import. If you’re importing a small amount of data or need to import data only infrequently, this option may work well for you.
Here’s what you need to do:
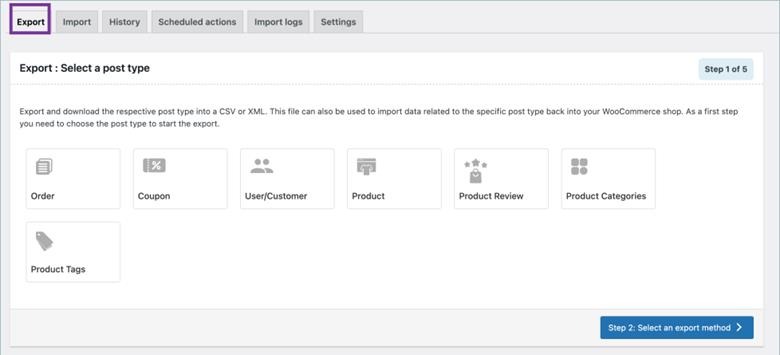
1. Export your WooCommerce orders as a CSV file. When downloading the file, you can choose specific data filters, such as a date range or order status. Consider which orders you want to import into QuickBooks.
2. Prepare your CSV file for QuickBooks. WooCommerce and QuickBooks organize data differently, so if you’re importing a CSV file from WooCommerce, you have to make sure all the fields align with QuickBooks. Remove any unnecessary columns or rows to keep your data clean. Each order will typically require this information in the CSV file:
- Sales receipt number
- Sales receipt date
- Customer name
- Product/service
- Quantity
- Amount
- Tax amount
- Category
- Currency
3. Import your CSV file into QuickBooks. Import the CSV file into either Sales Receipts or Invoices, depending on how you want to organize the data. Because you already aligned your data in step 2, this process should be hassle-free as you map column headings to the appropriate QuickBooks fields.

4. Verify the import. Review a few sample orders in QuickBooks to ensure they look correct based on your WooCommerce data. Reconcile deposits with your payment gateway to confirm the totals match your sales.
The most common issue you will face in this process is the data from WooCommerce not mapping correctly with the columns in QuickBooks. It’s best to take a few extra minutes to make sure the data is in the format QuickBooks requires for import.
Try this import process with a small amount of data first, such as with 100 sales receipts at a time, to make sure you have a handle on how to structure your data for QuickBooks correctly. Once you’ve imported your trial data successfully, you can complete an import of a larger dataset.
How to automatically sync WooCommerce orders to QuickBooks
Using a CSV file to import orders from WooCommerce to QuickBooks is a good option if you’re working with a small number of orders or need to import orders only infrequently. If you want to make sure all WooCommerce orders automatically flow into QuickBooks continuously, it’s best to sync WooCommerce with QuickBooks.
Several integrations and third-party tools can help you automate the syncing process. Some options include WooCommerce Connector by Intuit and QuickBooks Sync for WooCommerce by MyWorks.
The general process to automate WooCommerce order management with QuickBooks is to
- Download or install the tool or plug-in.
- Connect it to WooCommerce and QuickBooks and authorize both platforms.
- Map the data fields.
- Set the syncing frequency.
- Enable the sync.
These tools will then sync data between them in real time on a continuous basis.
With real-time syncing, you eliminate the process of having to manually import your orders into QuickBooks. This process not only saves time but also reduces the chance of human error.
With an automated sync, your QuickBooks account is always up to date and accurate, making month-end close and reconciliation processes easier. You also have instant insights into all of your business’s sales, payments, refunds, and discounts. Your business is always ready for tax season, and you don’t have to worry about missing transactions.
Imagine running an online collector card store where you have over 100 orders per week. Without automated syncing, you would have to manually export the CSV files each week, clean up the data, and then import it into QuickBooks, which could take a few hours each time. With automated syncing, your orders flow into QuickBooks automatically so you can use that time to work on other business tasks.
Best practices for a WooCommerce to QuickBooks integration
Wondering how to import orders from WooCommerce to QuickBooks effectively? It’s important to follow industry best practices. Like any system, WooCommerce and QuickBooks are only as good as the data you feed them. Ensure your books are accurate and your workflows are smooth with these helpful tips:
- Use standardized product names and SKUs: To keep your data clean and consistent, ensure your products all follow the same naming convention in WooCommerce. Inconsistent names may result in data being misaligned in QuickBooks.
- Keep clean customer records: To keep QuickBooks and WooCommerce accounting tools up to date, make sure you collect customer information, such as first and last name, email, and billing address, for every checkout.
- Conduct weekly or monthly spot checks: Check regularly that the sync is working. Try to spot missing transactions, mismatched totals, or incorrect taxes.
- Don’t ignore the error logs: Some tools offer error logs, which show sync errors across the platforms. Review them and determine any fixes as needed.
- Pay special attention to payment deposits: Check your deposits in the payment processors to make sure everything matches your QuickBooks entries.
- Sync inventory levels: In addition to your sales, sync inventory levels so you know your product availability within QuickBooks.
- Set up a monthly calendar reminder to review integration settings: Conduct regular maintenance to make sure everything is running as it should.
Streamline importing orders from WooCommerce to QuickBooks with Jotform
Manually importing your WooCommerce orders into QuickBooks is a good option if you receive a small number of orders and don’t need to import very frequently. However, having to prepare the CSV file to align with QuickBooks can be time-intensive, confusing, and overwhelming.
You may run into formatting issues, missing fields, or duplicate data, which can botch the import into QuickBooks.
To streamline the process of preparing your CSV file, try Jotform’s product list and CSV import tools. With Jotform, you can clean, map, and organize your order data more easily before moving it to QuickBooks.
Uploading your WooCommerce CSV to Jotform allows you to
- Standardize order details: Ensure fields such as SKUs, customer names, and totals are in a format that works for QuickBooks.
- Clean up data: You can remove duplicate or canceled orders before syncing with QuickBooks.
- Adjust tax or shipping fields: You can align tax and shipping costs with QuickBooks categories so your totals match with WooCommerce.
- Keep an organized record: When it comes to auditing or reporting, it’s important to have a well-organized and categorized record of your sales.
So how can you use Jotform to help prepare your CSV file? It takes only a few steps:
- Export your WooCommerce orders as a CSV file.
- In Jotform’s Form Builder, add a Product List or Table field and select Import.
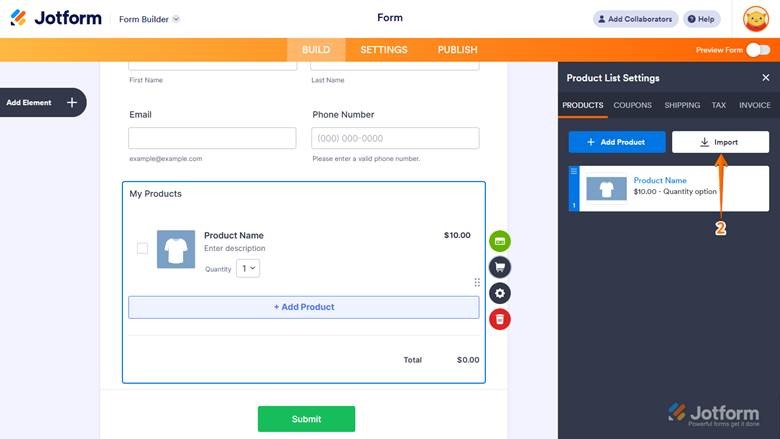
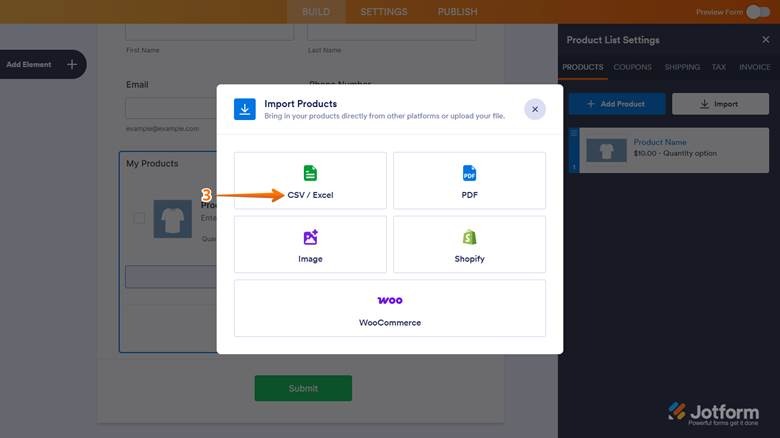
- Upload your CSV file to Jotform.
Note: You don’t need to map any fields. Jotform automatically maps fields such as order number, customer info, and totals.
- Review and edit the data to fix any issues.
- Save and then import the cleaned file directly into QuickBooks.
Pro Tip
Jotform also integrates with QuickBooks Online, allowing you to automate parts of the workflow and reduce manual entry even further. You can also use Jotform for QuickBooks forms for processes like client intake and invoices.
Choose the right import method for your business
When it comes to moving data from WooCommerce to QuickBooks, you have options. Whether you take the one-time approach by using a CSV file or integrate a third-party app for an automated sync, it’s important to choose the right method for your business.
Regardless of what you choose, keep in mind that your methods may change as your business grows. For example, while you might take the manual approach now, you can always upgrade to an automated one later. Either way, you’ll be able to ensure QuickBooks always stays up to date with your WooCommerce orders. Whether it’s tax time or month-end reconciliation, you’ll have the financial data in QuickBooks to get the job done.
For e-commerce stores that have small amounts of data, importing using a CSV file makes perfect sense. Jotform’s product list and CSV import tools can streamline the process of cleaning up your CSV files and mapping the fields with QuickBooks so your import is stress-free. Give Jotform a try today and see how easy it is to upload your CSV file and edit your data.
This article is for eCommerce store owners, accountants, operations managers, and anyone who wants to streamline order management by importing WooCommerce orders into QuickBooks efficiently and accurately.


")


Send Comment: