Workflows help automate processes that usually take multiple steps or people to complete. They’re useful when tasks require approvals, handoffs, or actions that depend on earlier submissions. With a workflow in place, everything moves automatically from one step to another, keeping your team organized and saving time on repetitive follow-ups.
This feature works well for teams that manage internal requests, client approvals, or multi-step tasks. It helps businesses stay efficient, ensures nothing gets missed, and keeps everyone informed without manual coordination.
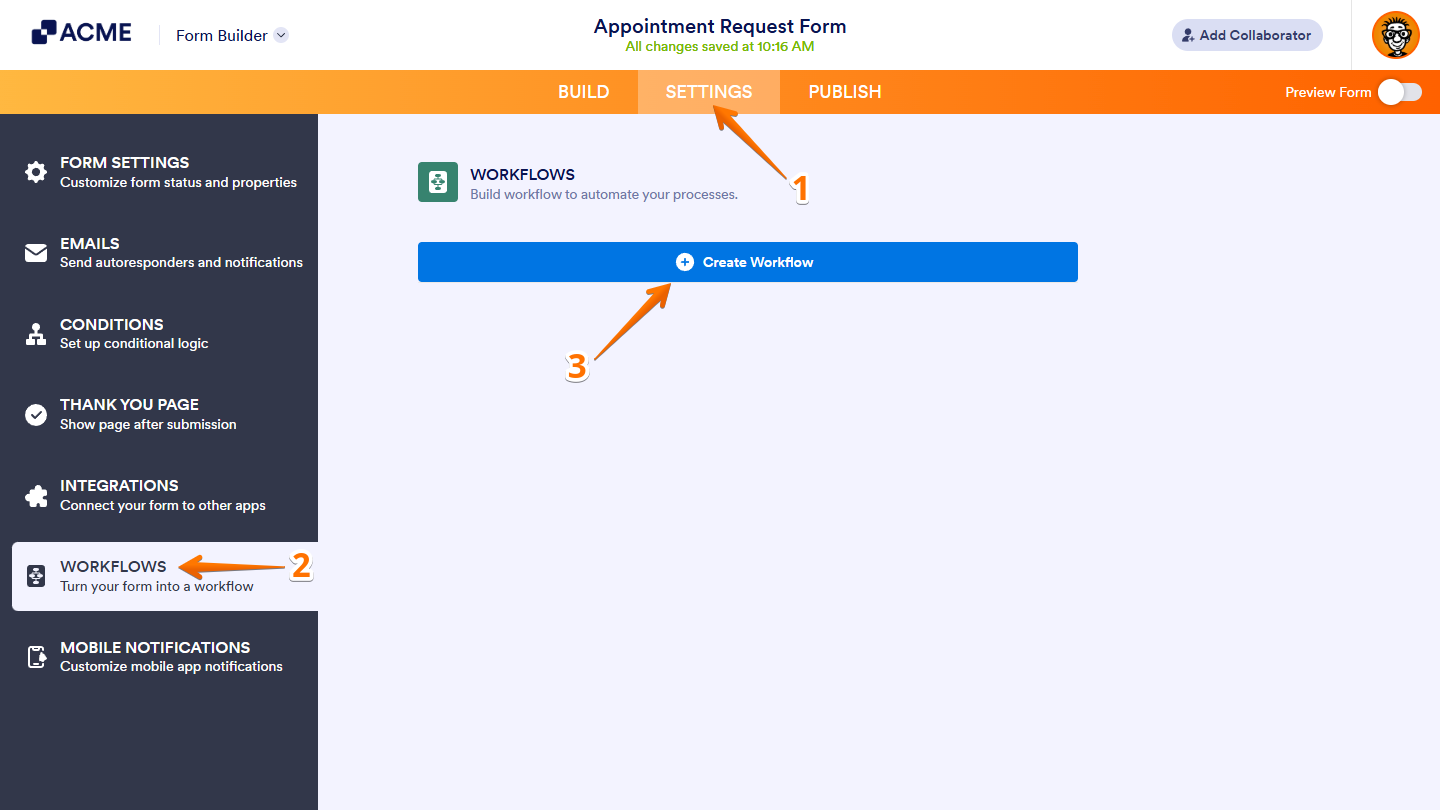
Whether you’re creating a new form or updating an existing one, it’s easy to set up a workflow for it. Follow these quick steps to get started:
- In Form Builder, in the orange navigation bar at the top of the page, click on Settings.
- Then, in the menu on the left, click on Workflows.
- Next, in the Workflows section on the right, click on Create Workflow, which will automatically take you to Workflow Builder in a new browser tab.
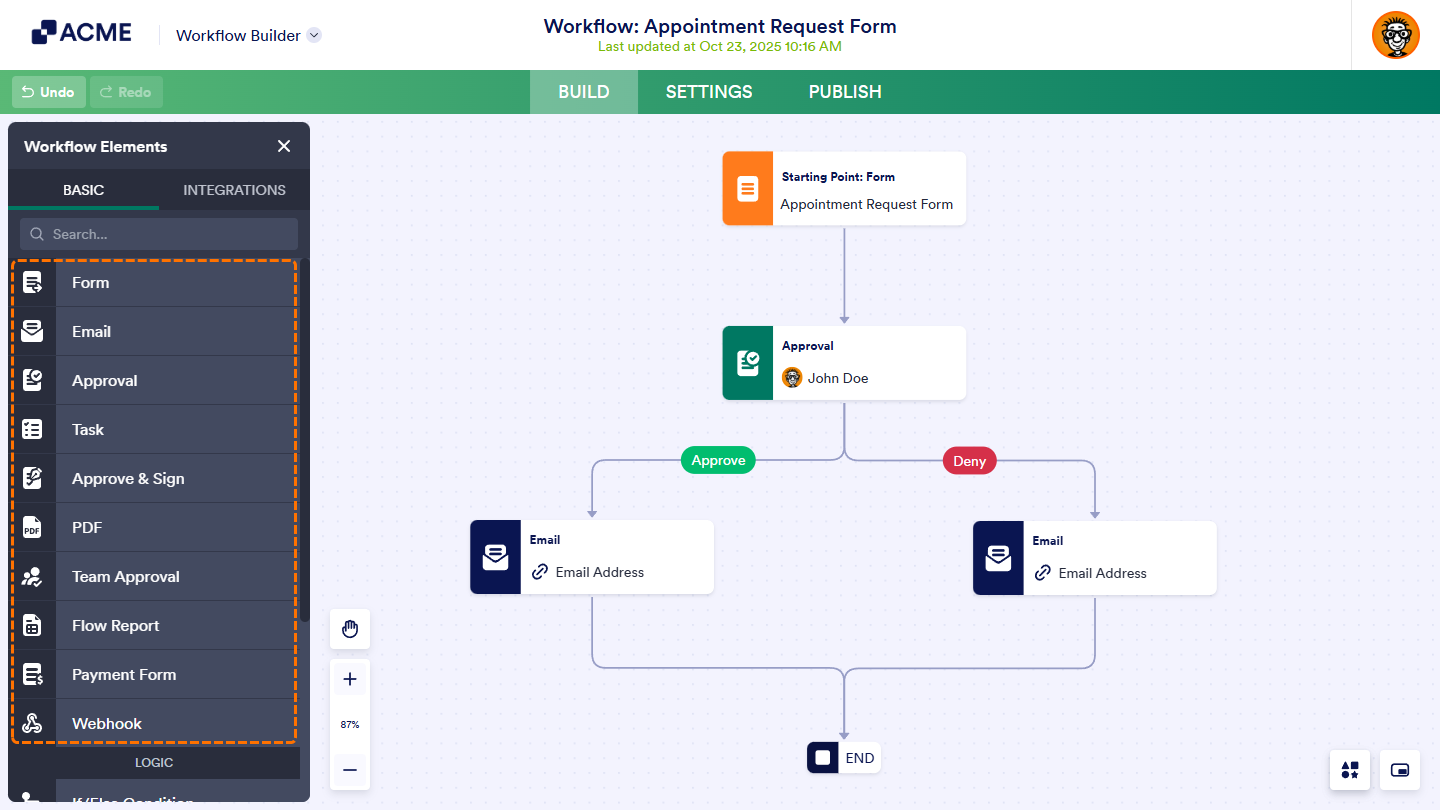
Workflow Elements
Now, in the Workflow Elements menu on the left side of the page, you’ll see a list of elements you can use in your workflow:
Basic Elements
Under the Basic tab, the Basic Elements section provides the main components used to build a workflow. These include the following tools for collecting data, assigning tasks, sending updates, and handling approvals:
- Form — Add this element to collect extra information through a follow-up form within your workflow. This helps gather the data needed for the next steps in the process.
- Email — Add this element to send updates or notifications that keep everyone informed as the workflow moves forward. It keeps communication active among everyone involved.
- Approval — Use this element to create a standard approval process and define possible outcomes for each request. This ensures requests are reviewed and confirmed before proceeding.
- Task — Use this element to assign specific responsibilities to individuals or groups within your workflow. It keeps progress organized and tasks on schedule.
- Approve & Sign — Add this element to request both approval and a signature from the approver in one step. This makes the approval process quicker and more efficient.
- Sign Document — Use this element to request and collect signatures from people involved in your workflow. It provides an easy way to confirm actions or finalize agreements.
- PDF — Add this element to send a PDF copy of the data collected from forms and tasks within your workflow. This keeps a record of all submitted information and completed actions.
- Team Approval — Add this element to send approval requests to selected teams within your organization. It helps coordinate decisions that require input from multiple members.
- Flow Report — Use this element to generate detailed reports for ongoing or completed approval processes. This provides a clear overview of workflow activity and outcomes.
- Payment Form — Add this element to include a payment form in your workflow for collecting payments. It makes payment collection part of your automated process.
- Webhook — Add this element to send data from your workflow to an external system in real time. It connects your workflow with other apps or services that support incoming webhooks.
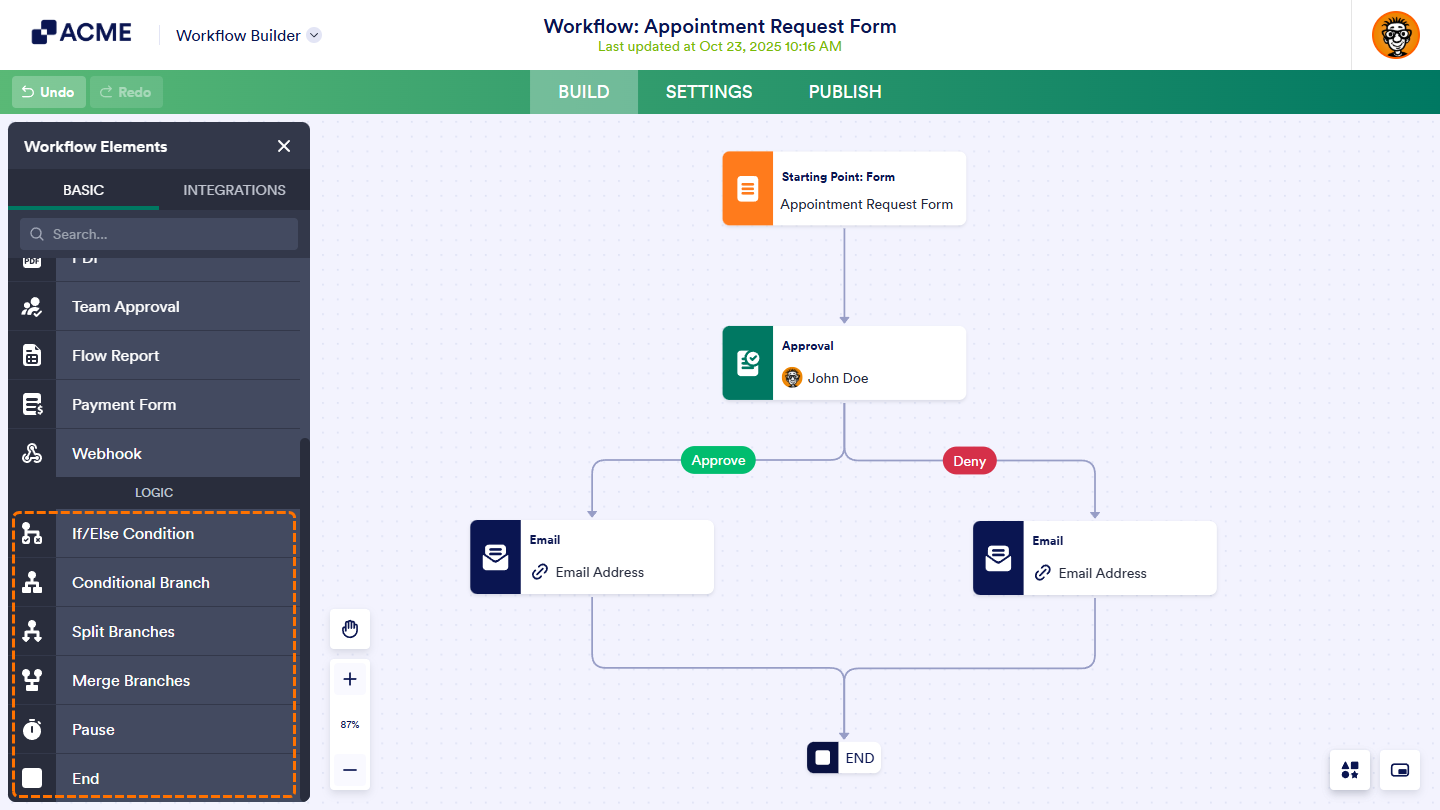
Logic Elements
Scrolling down the Basic tab reveals the Logic Elements section, which controls how a workflow behaves. The following elements define conditions, split paths, and merge branches to manage different process outcomes:
- If/Else Condition — Add this element to automate decisions based on form responses. It directs the flow depending on how users answer specific questions.
- Conditional Branch — Use this element to route workflows through different branches based on set criteria. It helps organize processes that require separate paths for different scenarios.
- Split Branches — Add this element to create parallel paths for tasks that can run at the same time. It keeps related actions moving together without waiting for one another.
- Merge Branches — Use this element to combine multiple paths back into a single flow. It simplifies the process by bringing separate branches together once their tasks are done.
- Pause — Add this element to delay workflow actions until the right time. You can set it to hold the flow until a specific date and time or for a set duration. Once the pause ends, the workflow continues automatically with the next step.
- End — Add this element to mark the end of a branch. It can also be configured to terminate specific flows when needed.
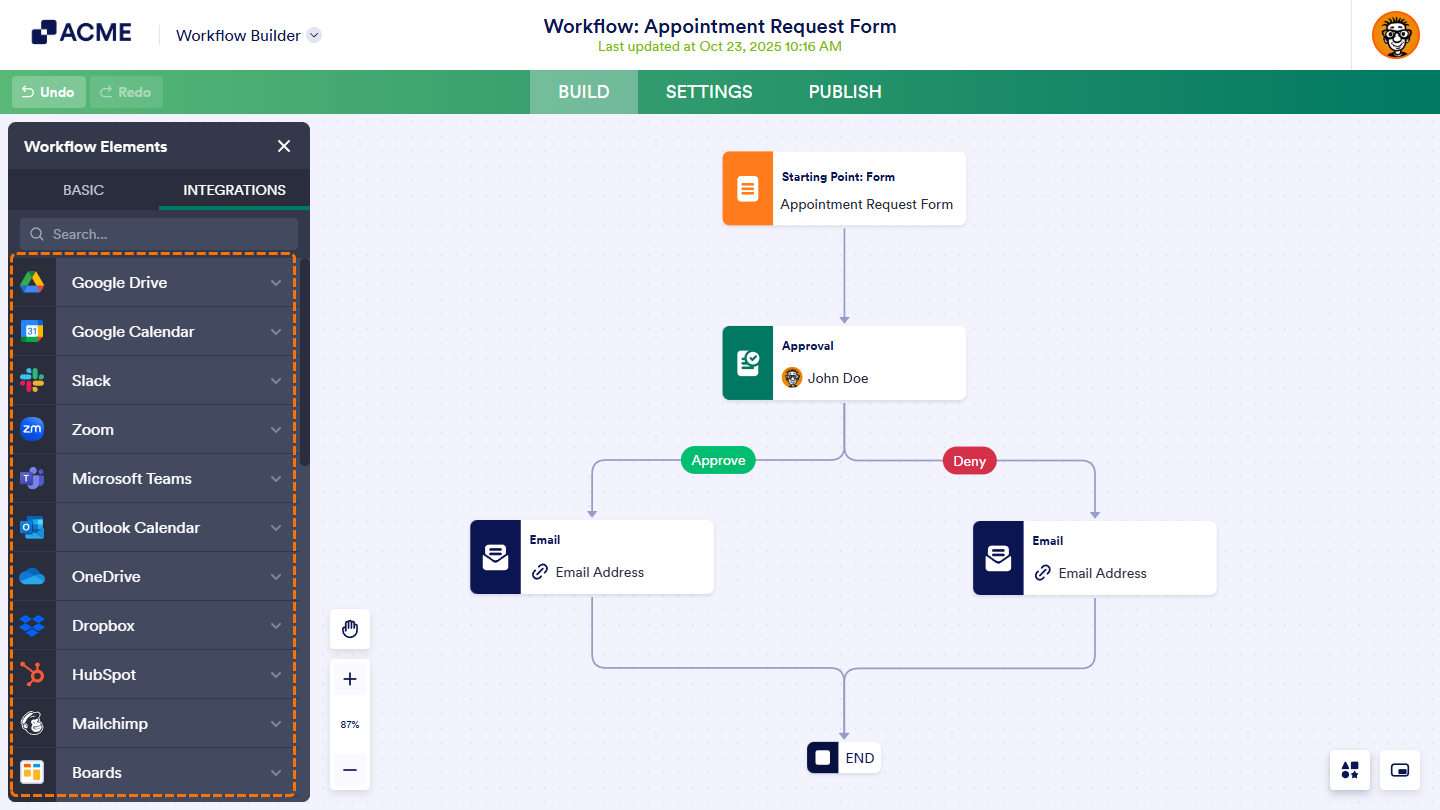
Integration Elements
In the Integrations tab, you’ll find a list of supported third-party apps. The following integrations connect workflows with external tools and help automate data sharing across platforms:
- Google Calendar — Add this integration to automatically create calendar events or Google Meet sessions from workflow submissions.
- Google Drive — Use this integration to sync uploaded files and submission PDFs directly to your Drive folders.
- Mailchimp — Add this integration to create or update contacts in your email marketing lists automatically.
- Dropbox — Use this integration to send uploaded files straight to your Dropbox account.
- HubSpot — Add this integration to send new contacts to your CRM and automatically create deals, tickets, or records.
- Slack — Use this integration to send messages to public or private channels, or chat directly with teammates when submissions are received.
- OneDrive — Add this integration to send uploaded files and submission PDFs to your OneDrive storage.
- ActiveCampaign — Use this integration to create or update contacts, accounts, and deals in your CRM.
- Airtable — Add this integration to turn submissions into new records in your Airtable database.
- Zoom — Use this integration to schedule meetings or add registrants to webinars automatically.
- Asana — Add this integration to create new projects, tasks, or comments from workflow submissions.
- monday.com — Use this integration to add new items or updates to your team’s project boards automatically.
- Pipedrive — Add this integration to send new contacts, deals, or activities to your sales pipeline.
- Zoho CRM — Use this integration to instantly send new contacts to your CRM system.
- Constant Contact — Add this integration to automatically add new contacts to your mailing lists.
- Box — Use this integration to send uploaded files to your Box storage.
- AWeber — Add this integration to collect new subscribers and add them to your email lists automatically.
- ClickUp — Use this integration to turn form submissions into tasks, subtasks, or comments in ClickUp.
- GetResponse — Add this integration to automatically add contacts to your campaign lists.
- MailerLite — Use this integration to send subscriber emails to MailerLite automatically.
- Campaign Monitor — Add this integration to collect new subscribers and sync them with your email lists.
- Egnyte — Use this integration to send files and submissions to your enterprise storage account.
- SendGrid — Add this integration to sync new contacts with your SendGrid lists.
- Freshdesk — Use this integration to turn submissions into new support tickets automatically.
- Microsoft Teams — Add this integration to send messages, create meetings, or sync submissions with Teams channels or teammates.
- QuickBooks — Use this integration to automatically create new customer records or invoices in QuickBooks.
- Boards — Add this integration to create new tasks and track progress with your team automatically.
- Outlook Calendar — Use this integration to add new events to your Outlook Calendar automatically.
- Mailsoftly — Add this integration to create customer profiles in Mailsoftly from new submissions.

Send Comment: