Systeme.io is an all-in-one platform that helps you build websites, sell products, manage contacts, and handle your marketing. With Jotform’s Systeme.io integration in Workflow, you can create contacts, update their details, get contact information, and add or remove tags. This helps you keep your contacts organized and their details up to date.
Setting Up Your Workflow with Systeme.io
Whether you’re creating a new workflow or updating an existing one, connecting your Systeme.io account is quick and easy. Here’s what to do:
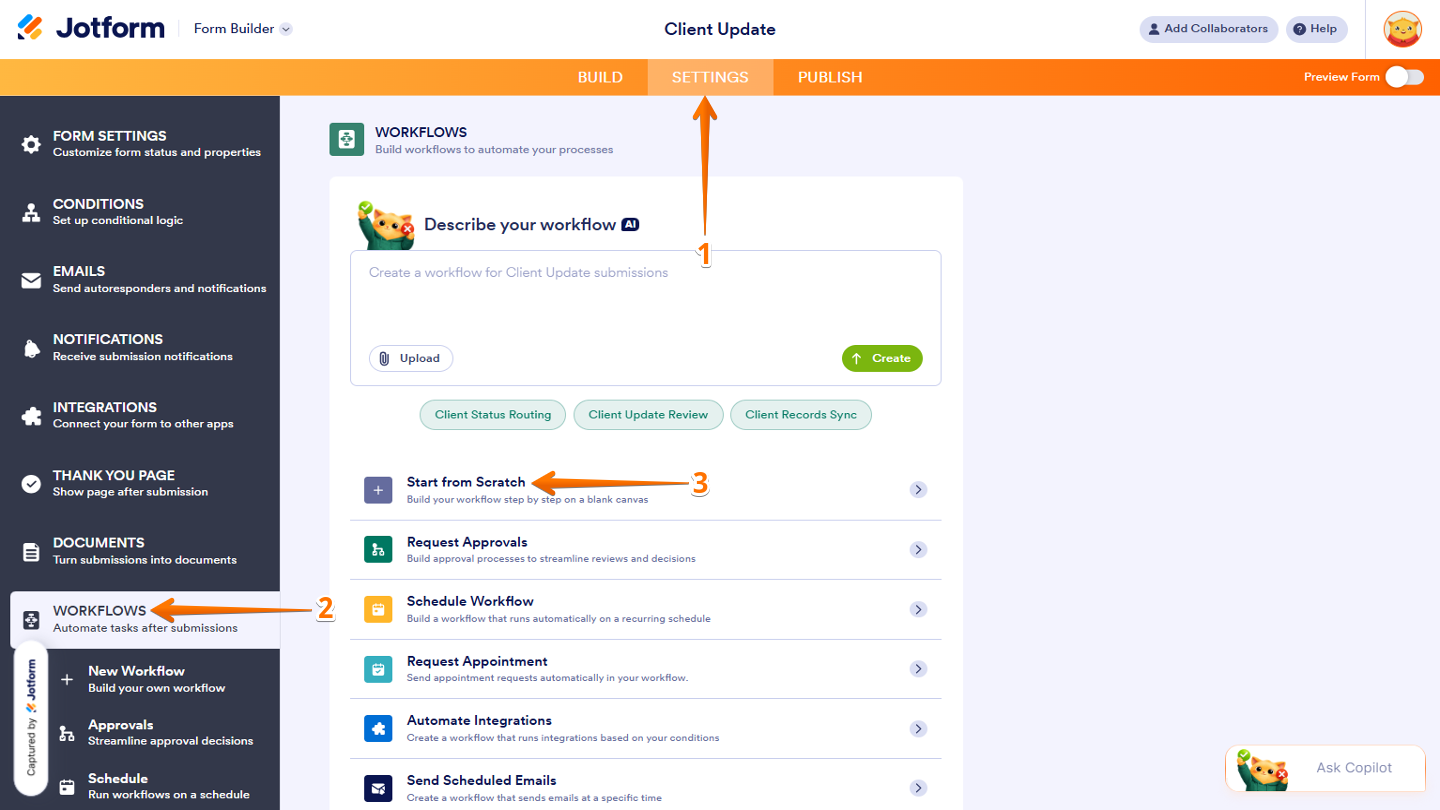
- In Form Builder, in the orange navigation bar at the top of the page, click on Settings.
- Then, click on Workflows in the menu on the left.
- Now, in the Workflow section on the right, select Start From Scratch.
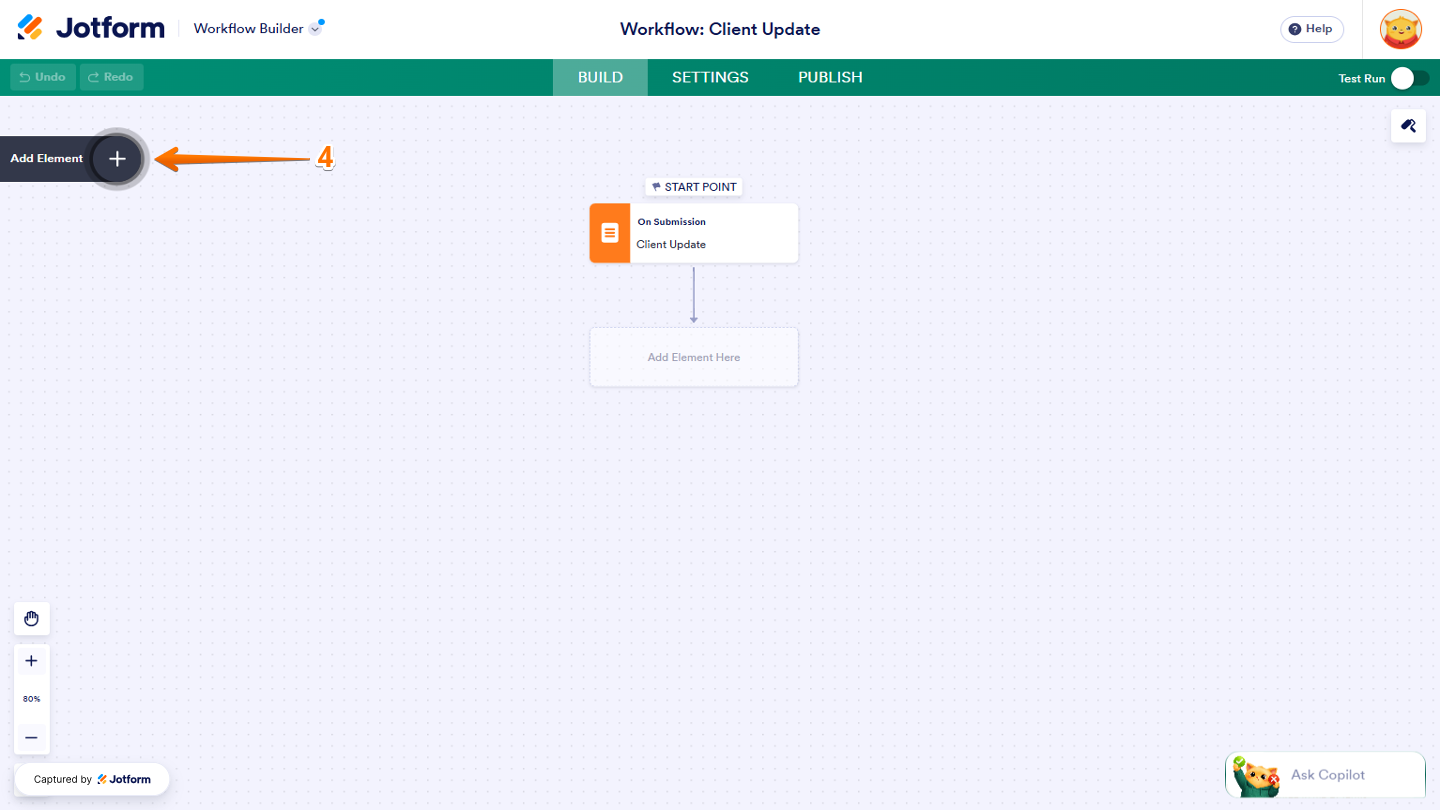
- Next, in Workflow Builder, click on Add Element on the left side of the page.
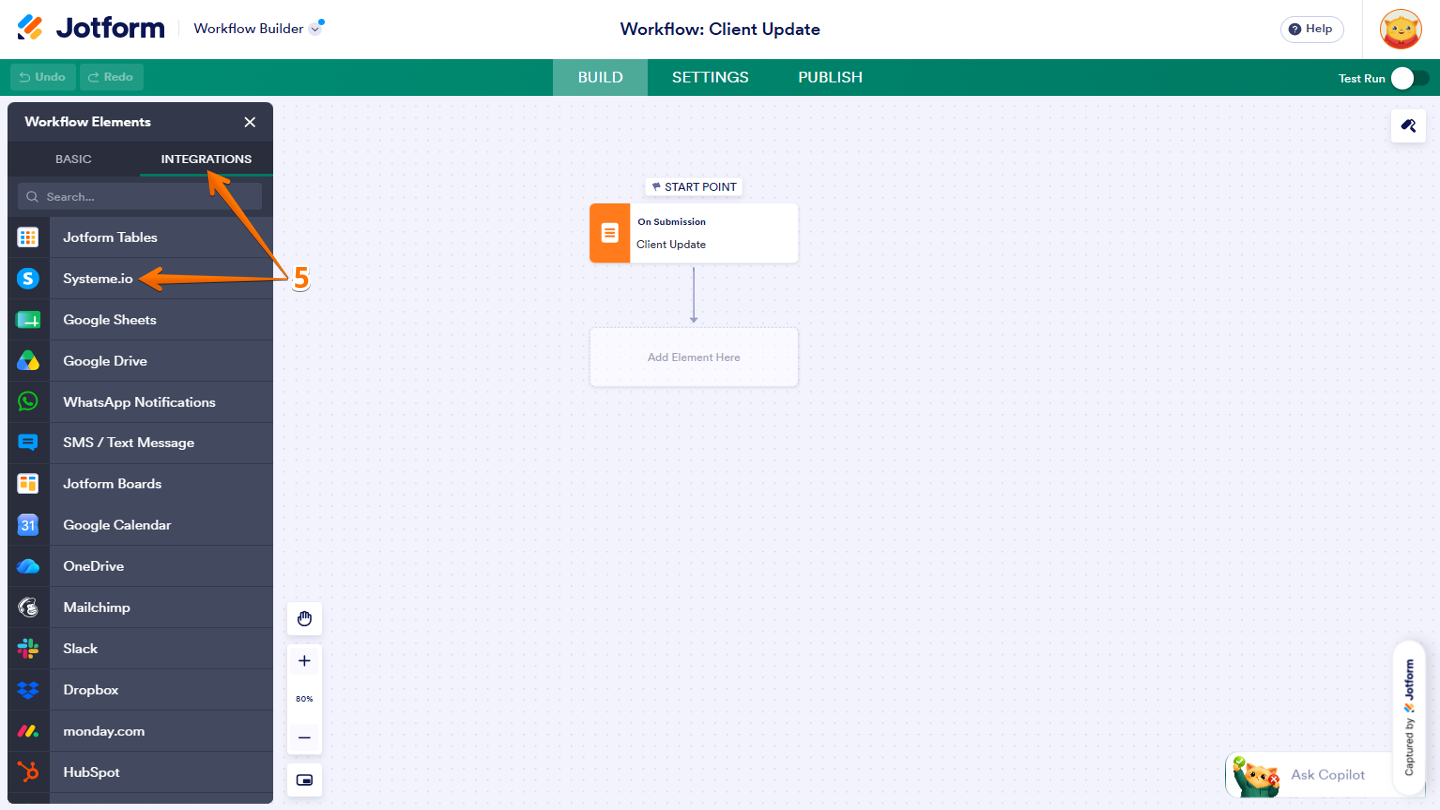
- Then, in the Workflow Elements menu that opens, click on the Integrations tab, and then select Systeme.io. Or, just drag and drop it to where you want it to be in your workflow.
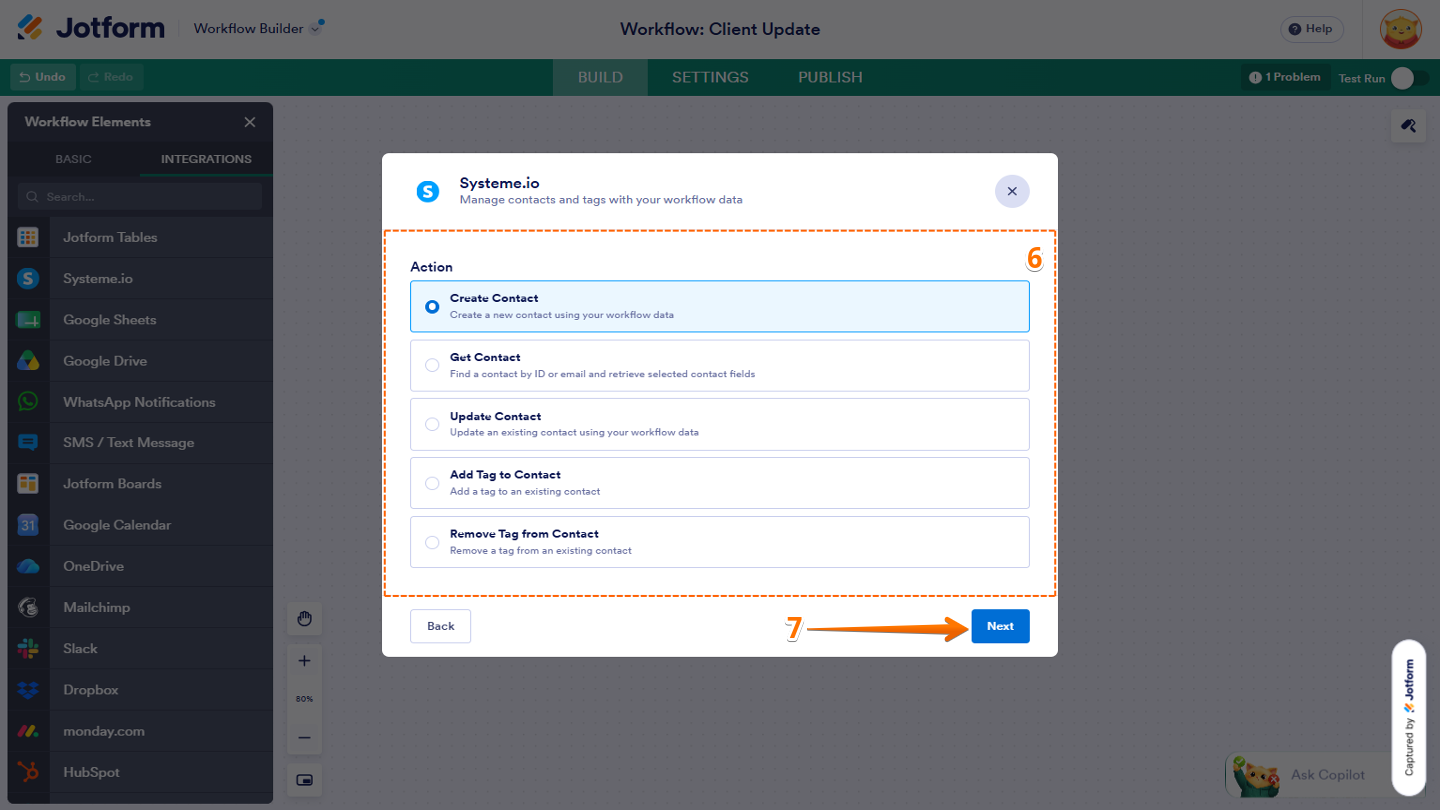
- Next, in the Systeme.io window that opens, under the Action section, choose one of these options:
- Create Contact — Add a new contact using your form or workflow data.
- Get Contact — Find a contact by ID or email and get selected contact fields to use in the next workflow step.
- Update Contact — Change selected details of an existing contact.
- Add Tag To Contact — Add a selected tag to an existing contact.
- Remove Tag From Contact — Remove a selected tag from an existing contact.
- Now, click on Next to proceed.
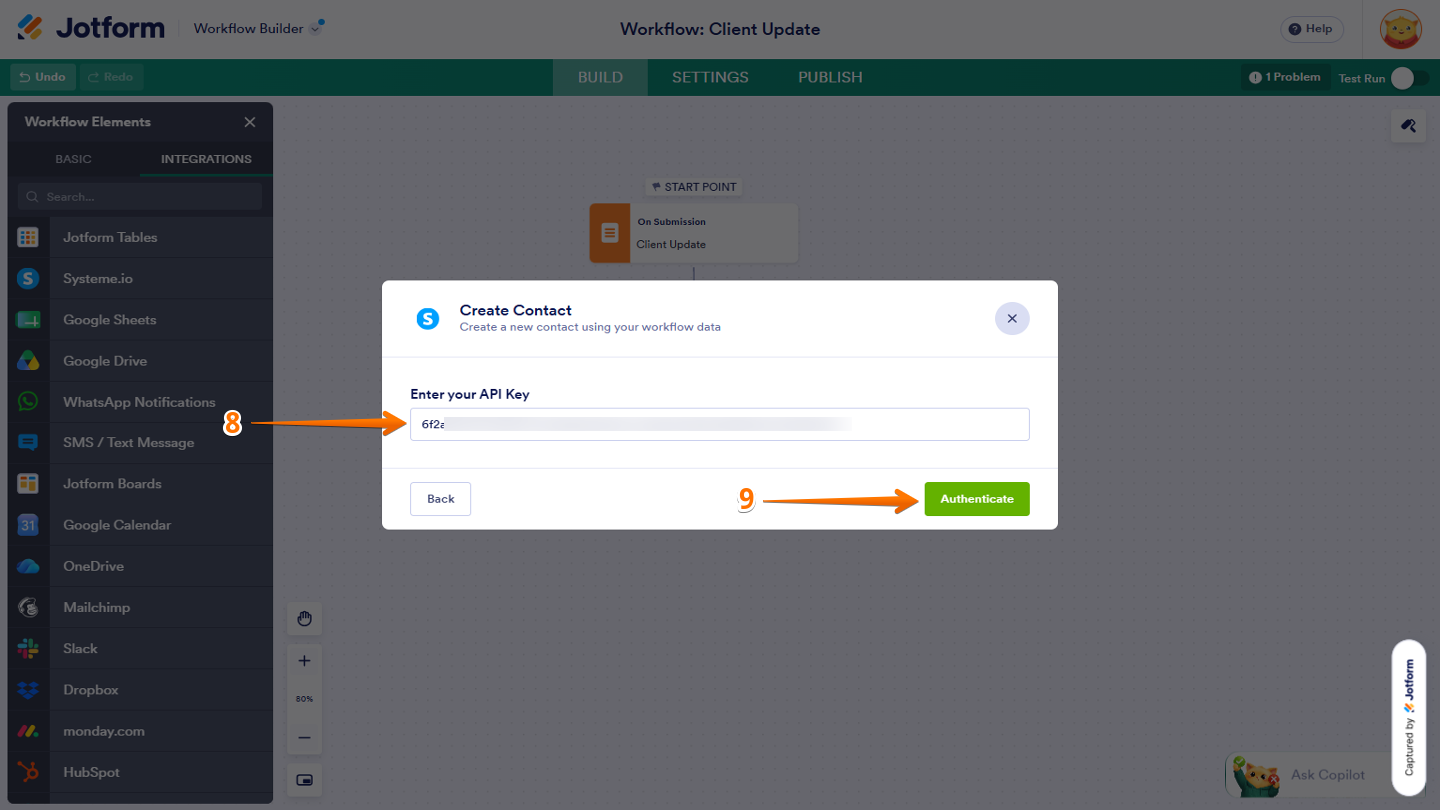
- Next, under the Enter Your API Key section, add your Systeme.io API Key.
- Once you’re done, click on Authenticate to continue.
Creating a Contact
The Create Contact action adds new contacts to your Systeme.io account using data from your Jotform Workflow. This way, you can keep your contacts organized and their details up to date. Follow these quick steps to get started:
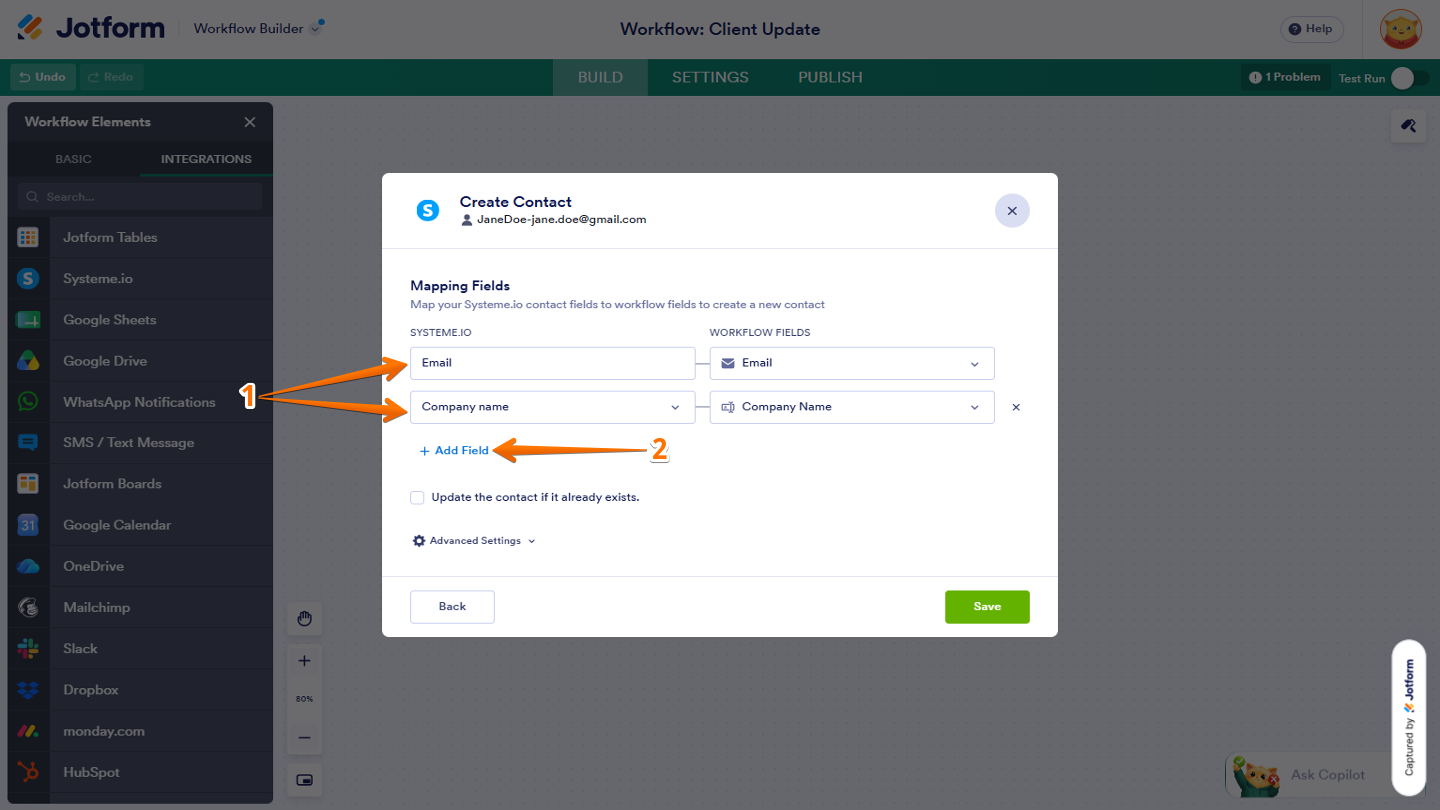
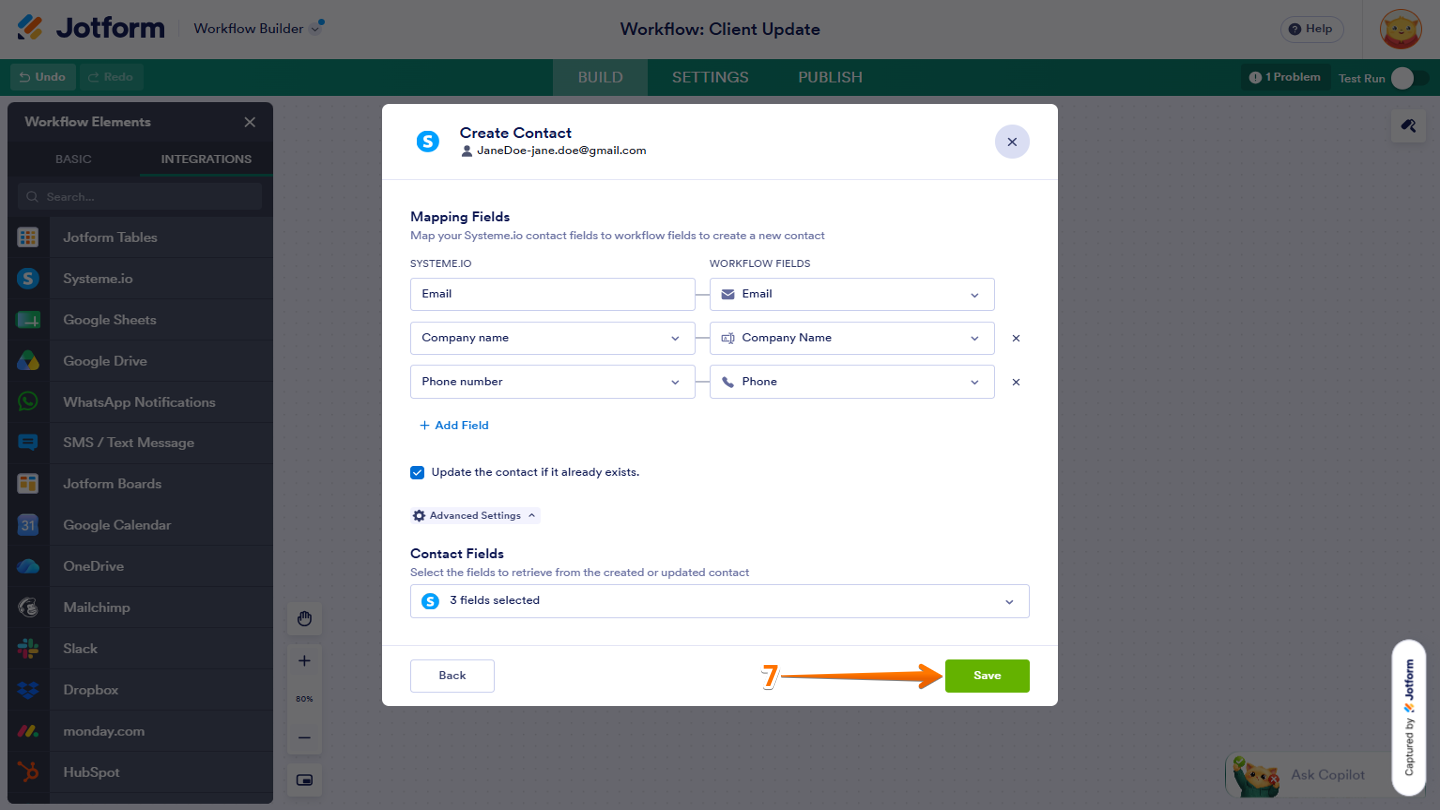
- After authenticating your Systeme.io account, in the Create Contact window that opens, under the Mapping Fields section, map your Jotform form fields to your Systeme.io fields.
- Then, click on Add Field at the bottom of the field list to add more fields.
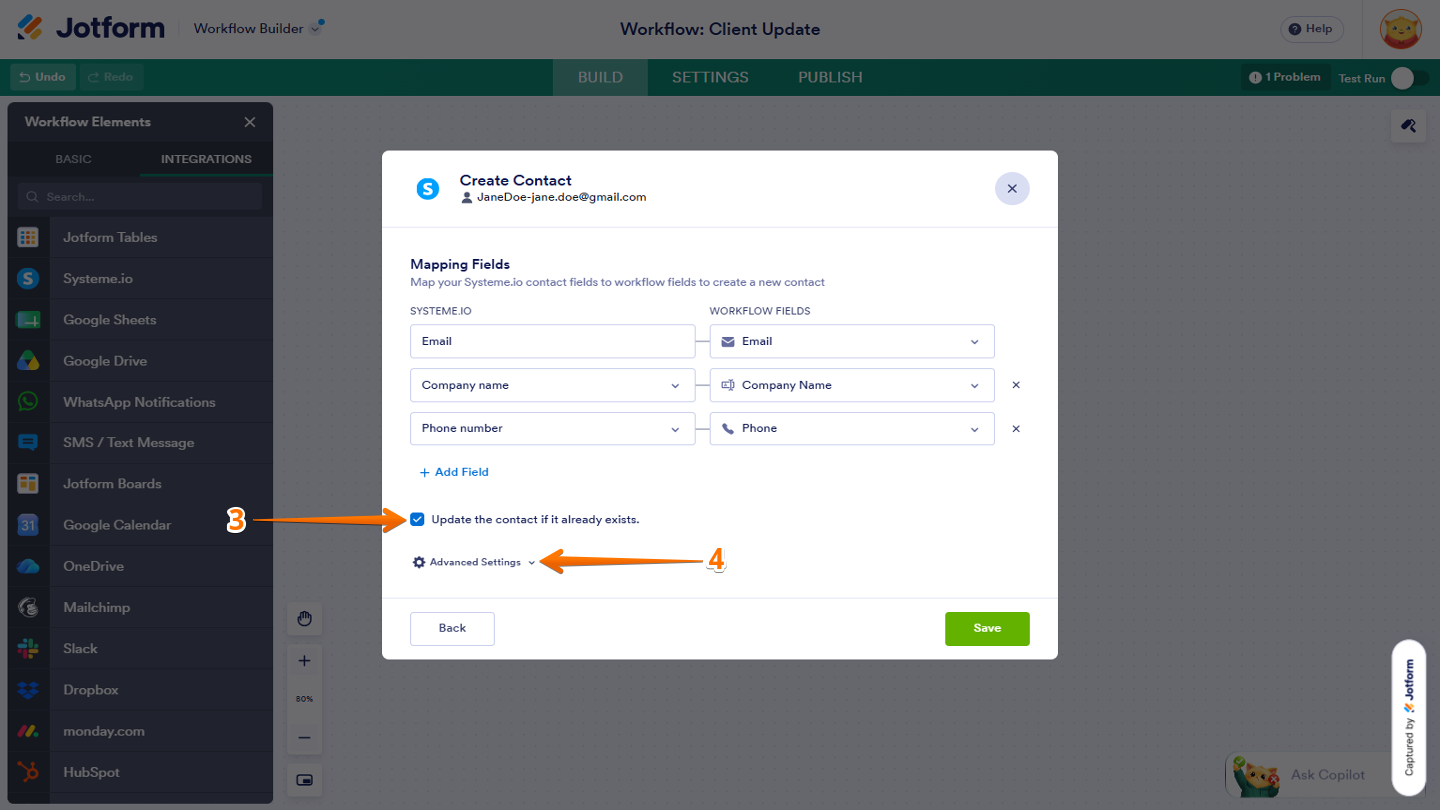
- Next, tick the box next to Update The Contact If It Already Exists to let Systeme.io update a contact when the selected field values match an existing record.
- Now, click on the Downward Arrow icon next to Advanced Settings to use specific fields in your workflow.
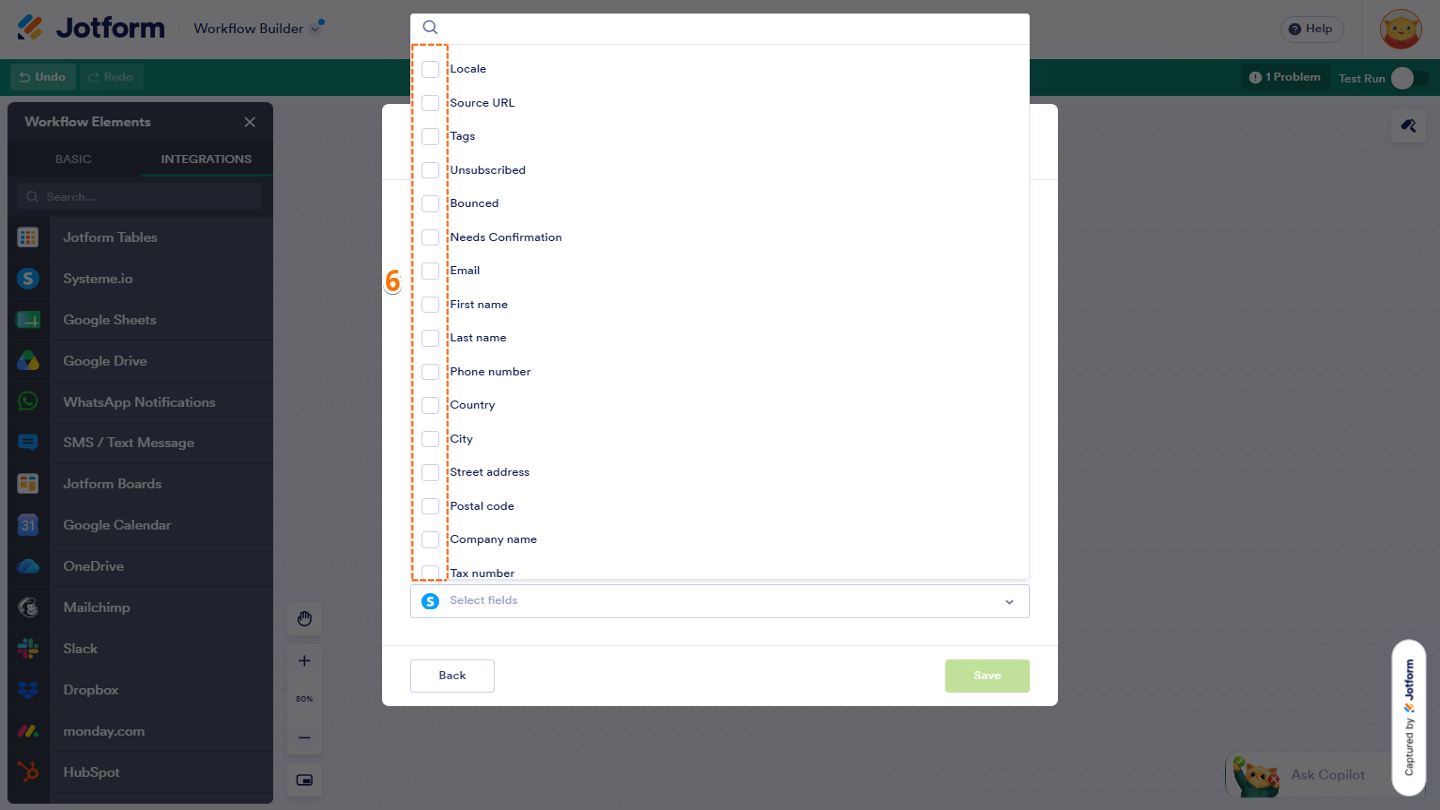
- Then, under the Contact Fields section, click on the Downward Arrow icon.
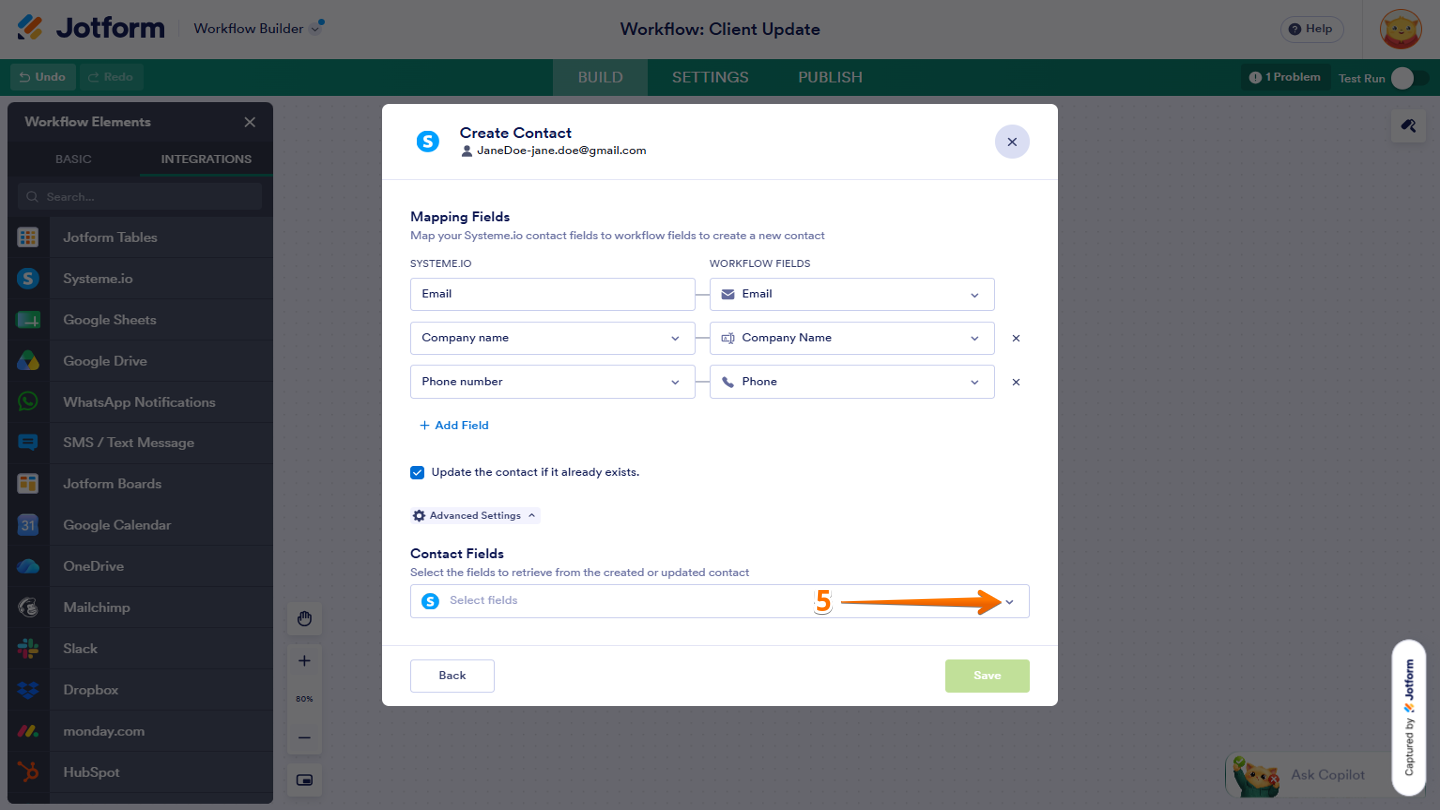
- Next, in the menu that opens, tick the boxes next to the fields you want to add or update a contact.
- Once you’re done, click on Save.
Getting Contact
With the Get Contact action, you can look up an existing Systeme.io contact using their contact ID or email address. You can then use this information in the next steps of your workflow. Here’s a quick how-to:
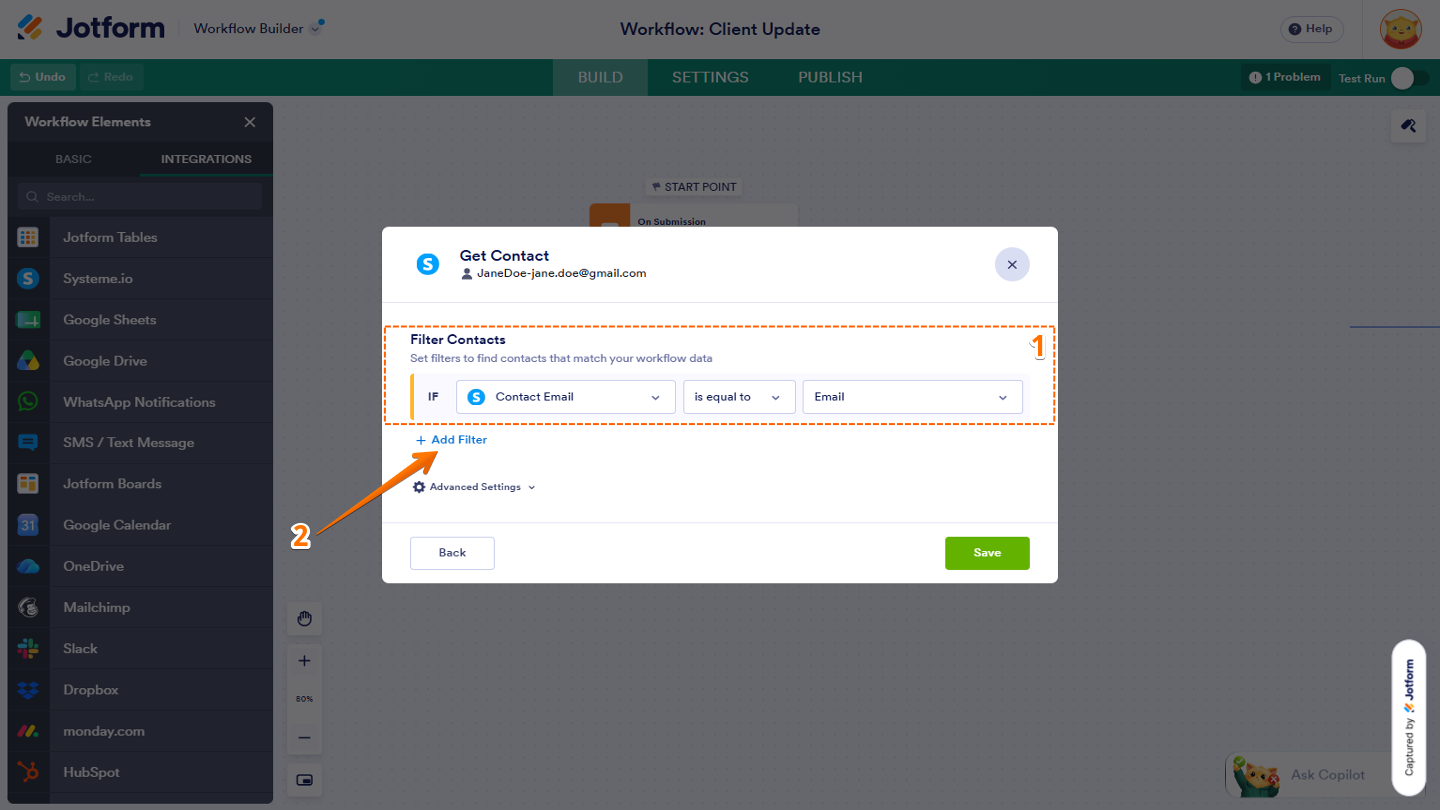
- In the Get Contact window that opens, under the Filter Contacts section, configure these conditions:
- IF — Click on the Downward Arrow icon and select a contact field in Systeme.io.
- Condition — Choose Is Equal To or Not Equal To in the Dropdown menu.
- Value — Click on the Downward Arrow icon and choose the fields you want to get information from.
- Then, click on Add Filter to add another condition.
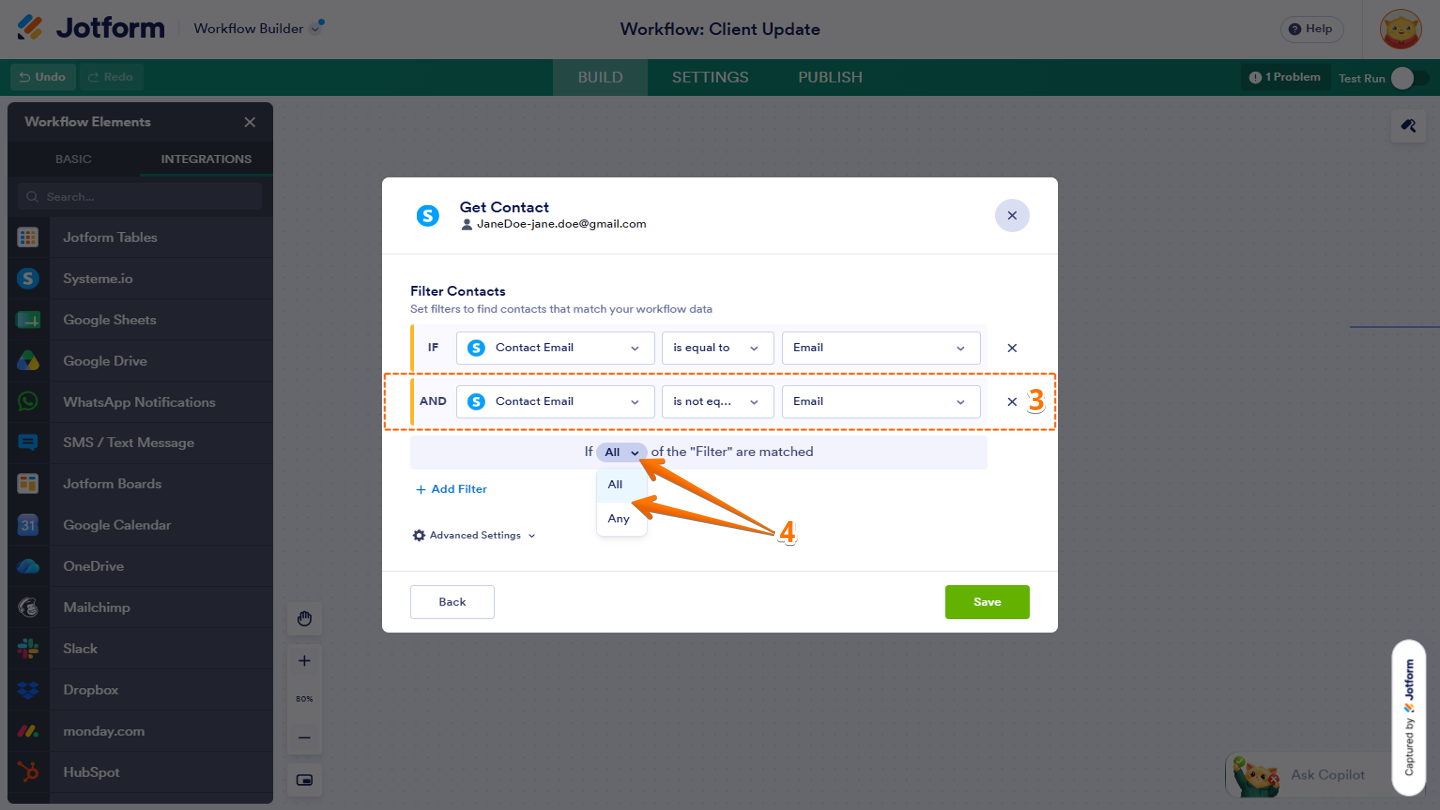
- Now, set up the new condition the way you want.
- Next, click on the Downward Arrow icon next to All and in the menu that opens, select All if you want every condition to match, or Any if only one condition needs to match.
- After that, click on the Downward Arrow icon next to Advanced Settings to use specific fields in your workflow.
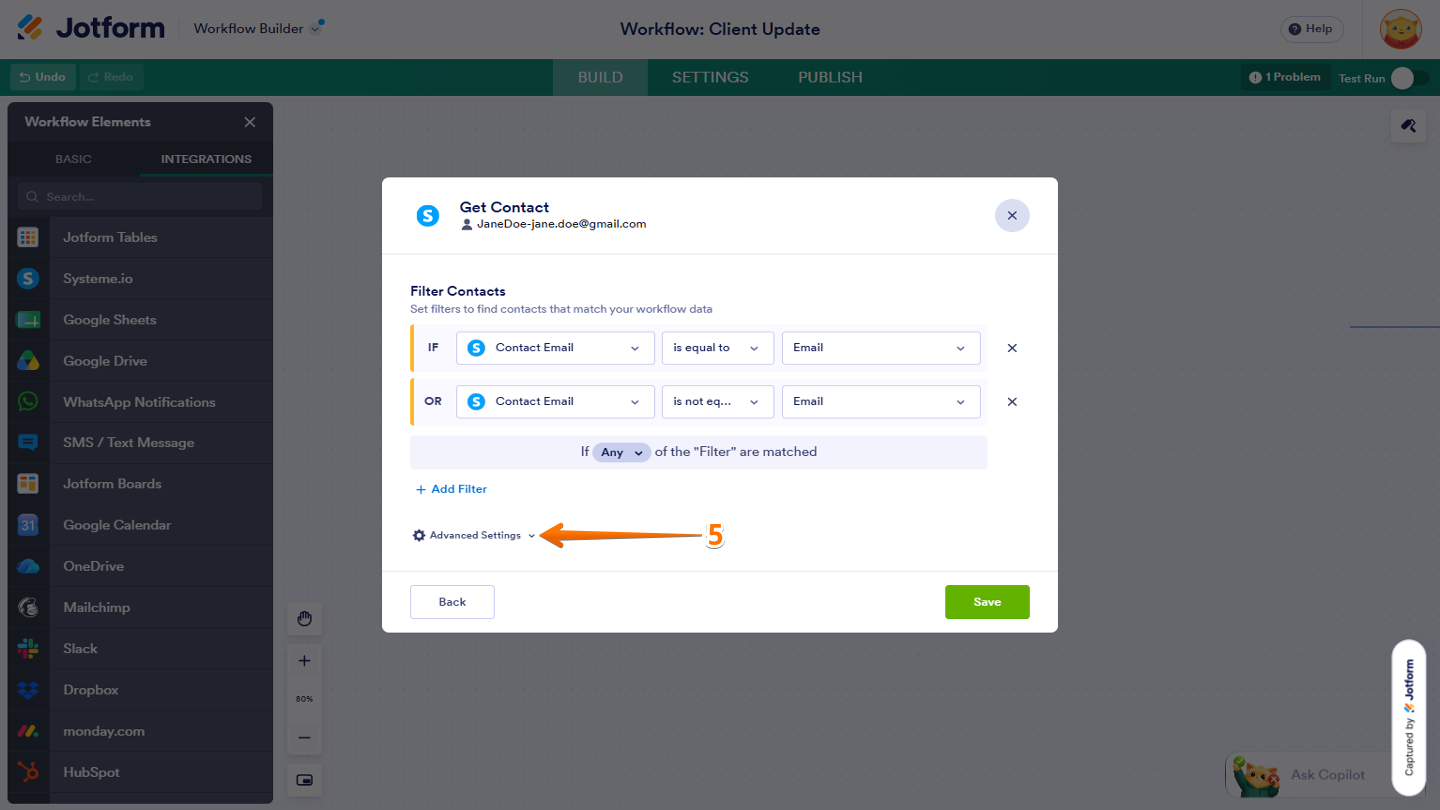
- Now, under the Contact Fields section, click on the Downward Arrow icon.
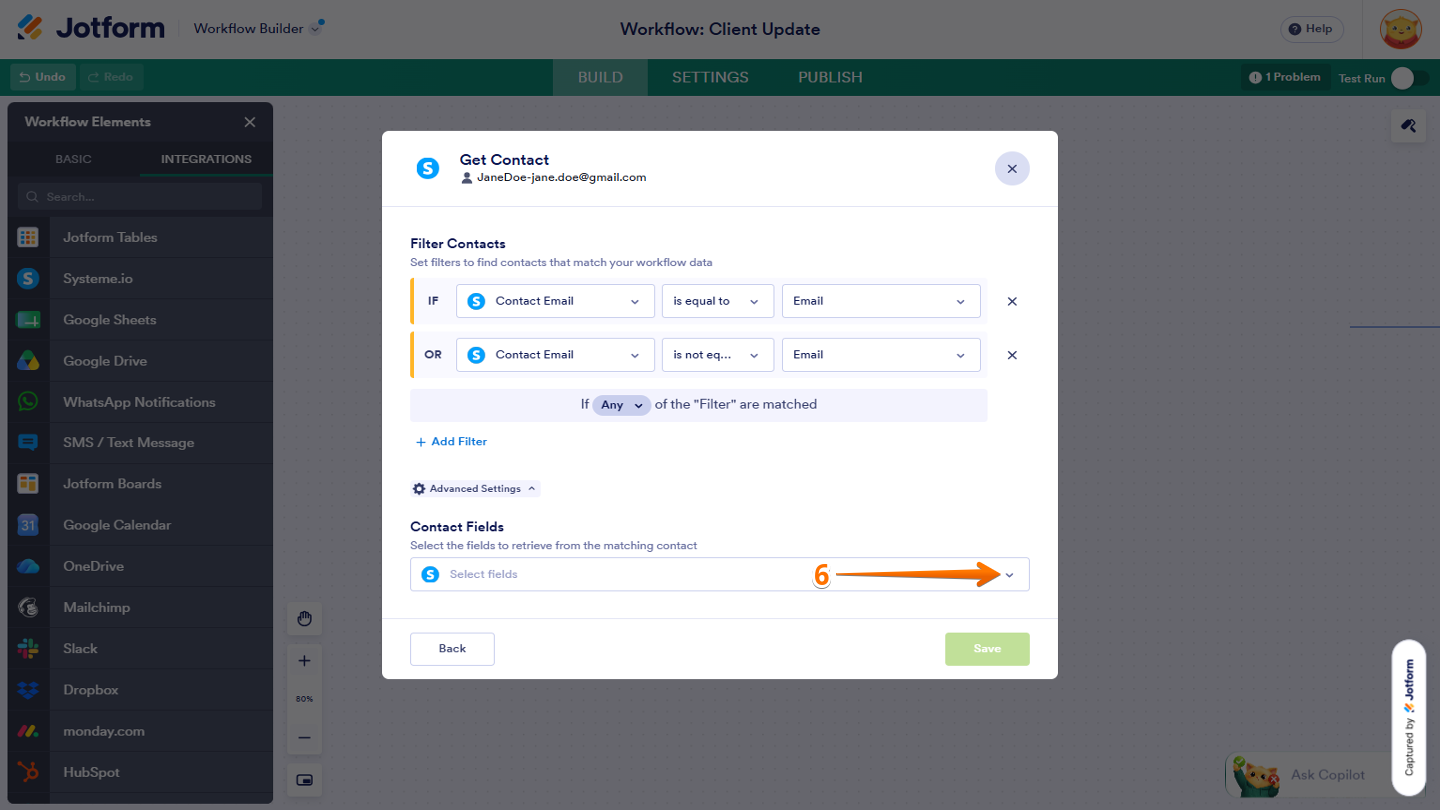
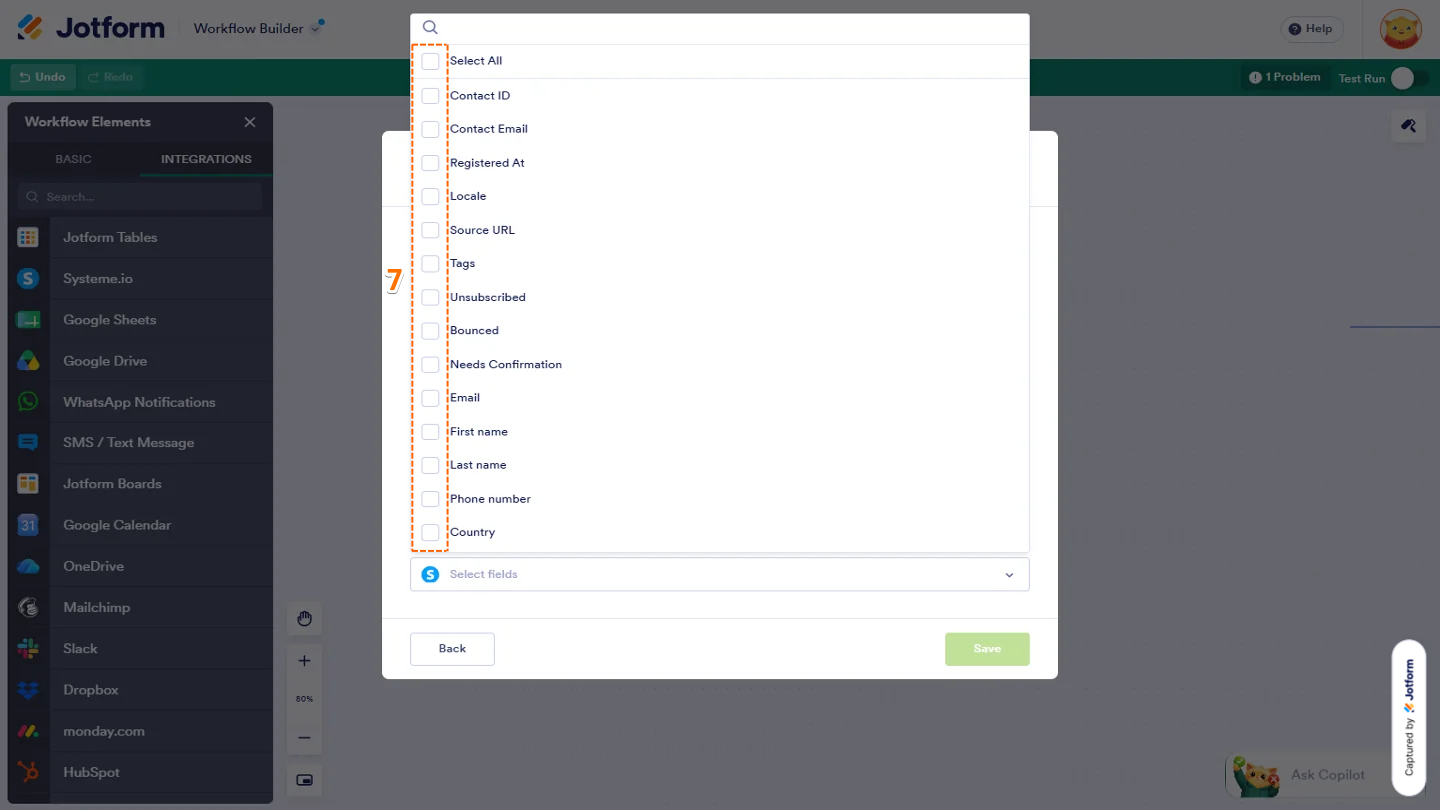
- Next, in the menu that opens, tick the boxes next to the fields you want to get from the contact.
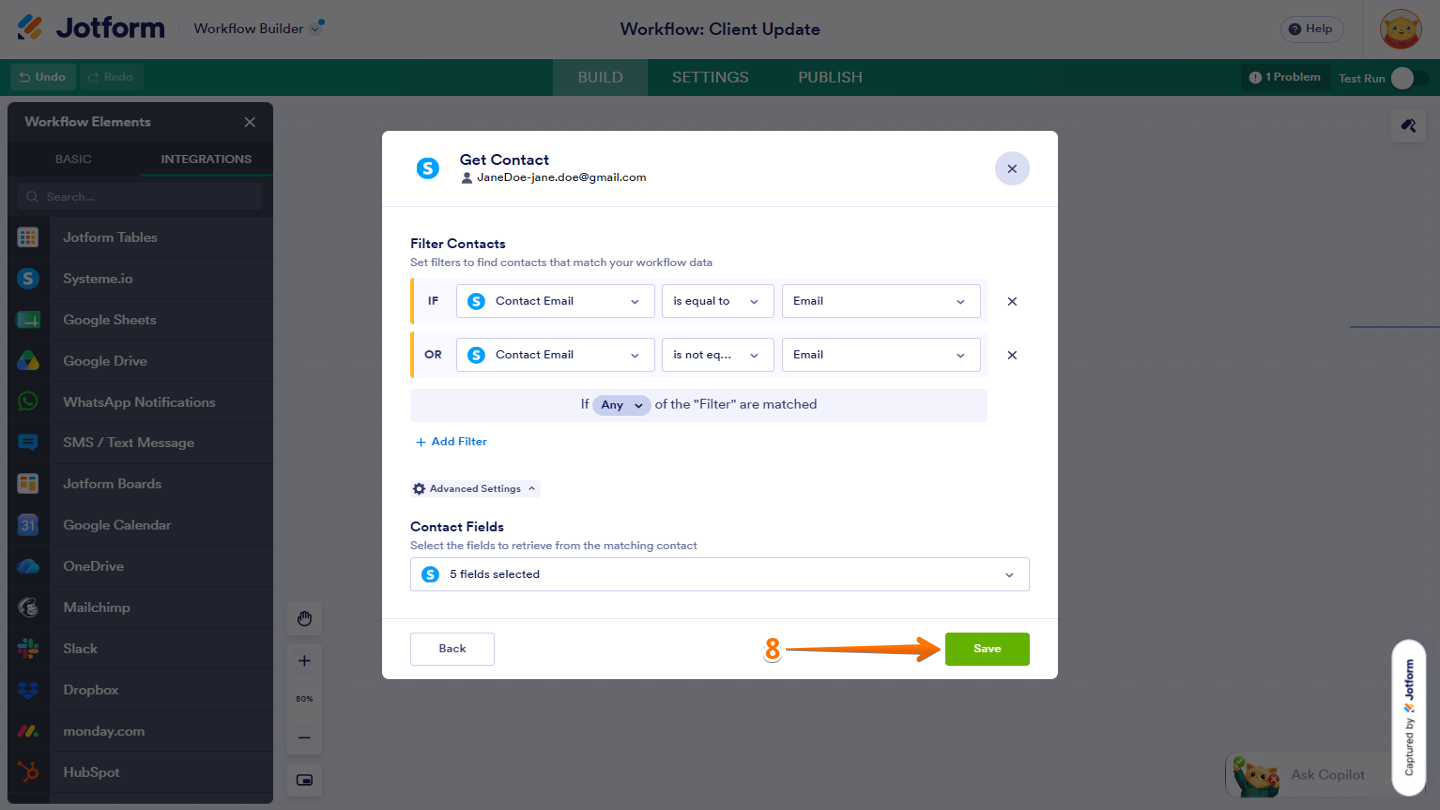
- Once everything’s set, click on Save.
Updating a Contact
The Update Contact action lets you change an existing Systeme.io contact’s details using data from your Jotform Workflow. This helps you keep your contact information up to date. Here’s how to get going:
- In the Update Contact window, under the Filter Contacts section, set up the following conditions:
- IF — Click on the Downward Arrow icon and select the Systeme.io contact field you want to use.
- Condition — Select Is Equal To or Not Equal To in the Dropdown menu.
- Value — Click on the Downward Arrow icon and choose the fields you want to update.
- Now, click on Add Filter to add another condition.
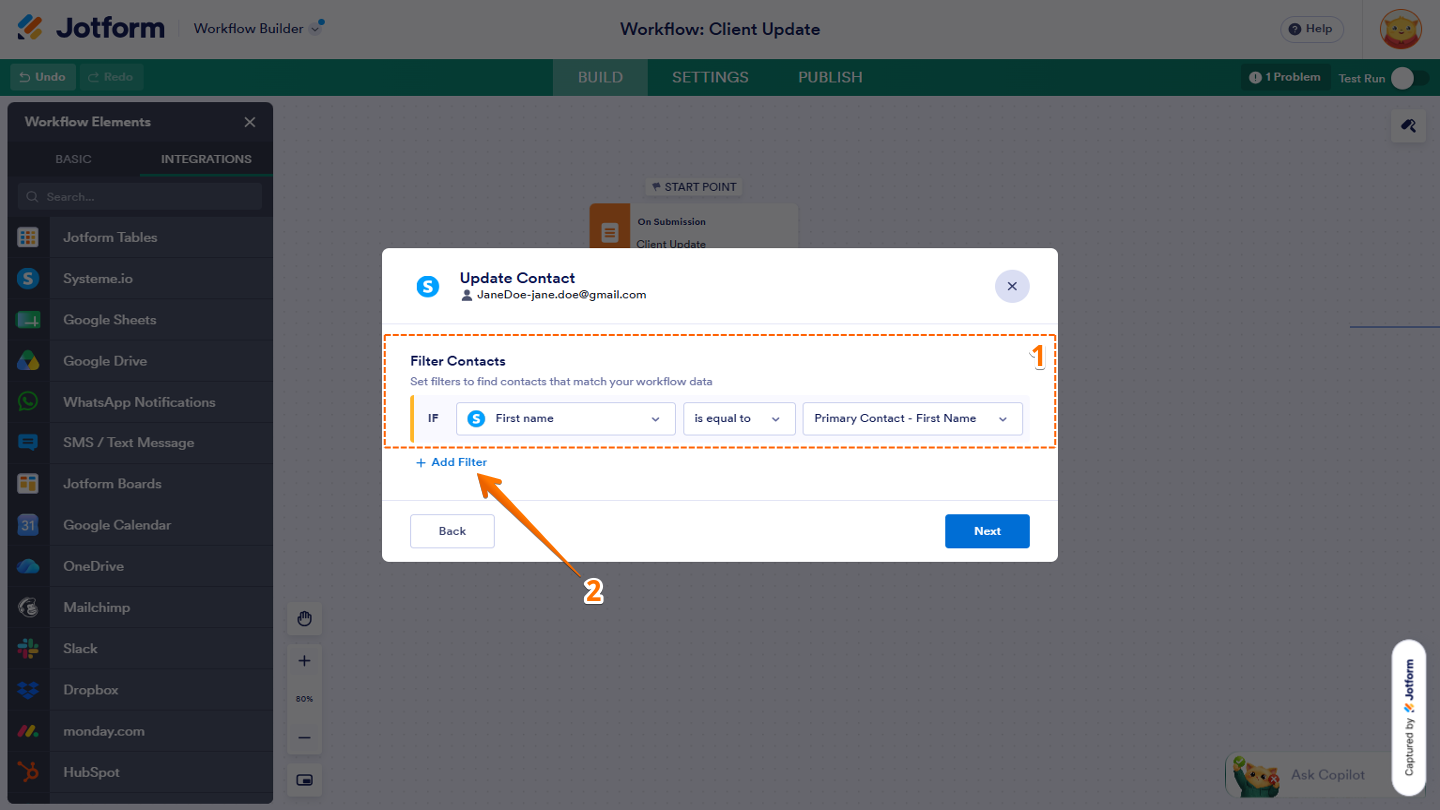
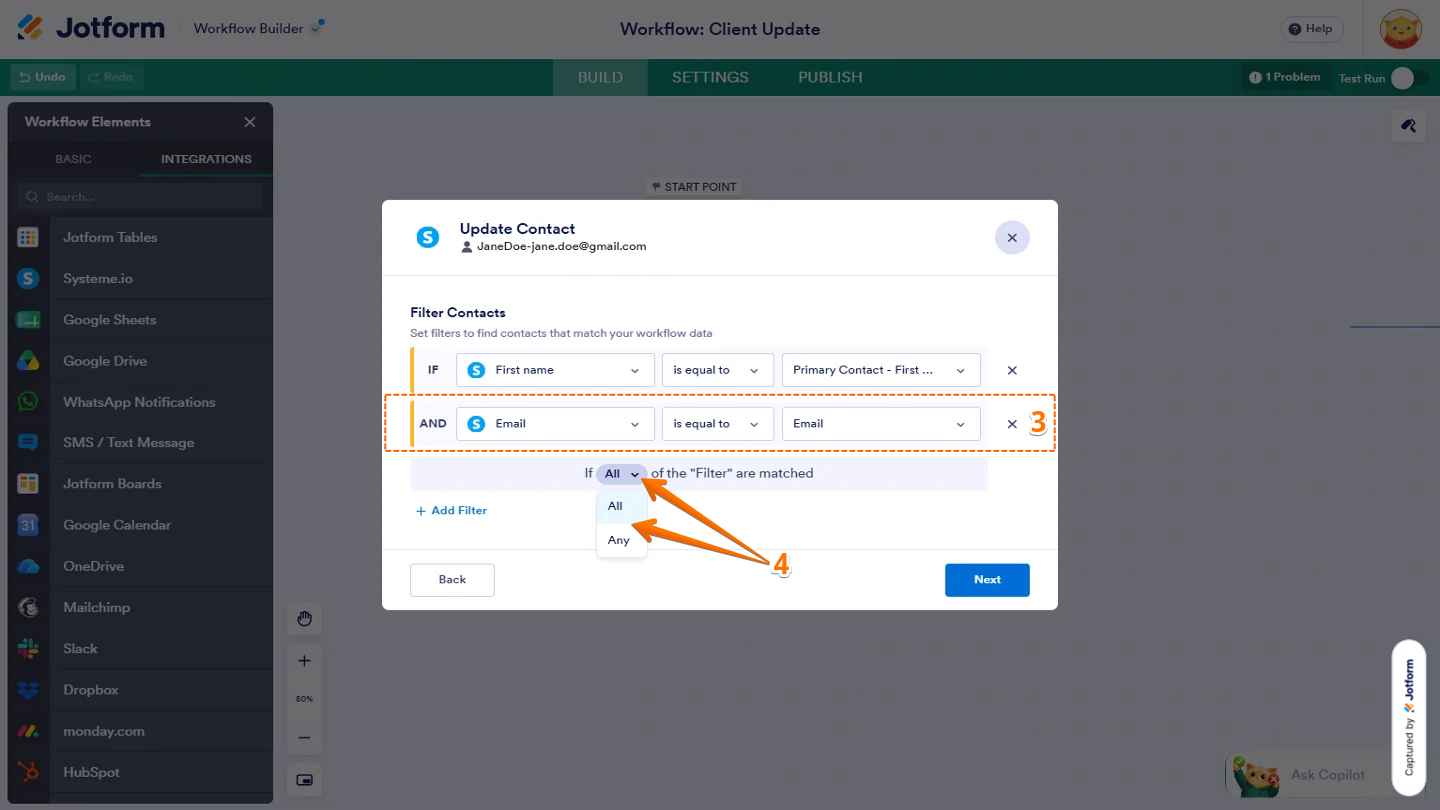
- Next, set up the new condition the way you want.
- Then, click on the Downward Arrow icon next to All and in the menu that opens, select All if you want every condition to match, or Any if only one condition needs to match.
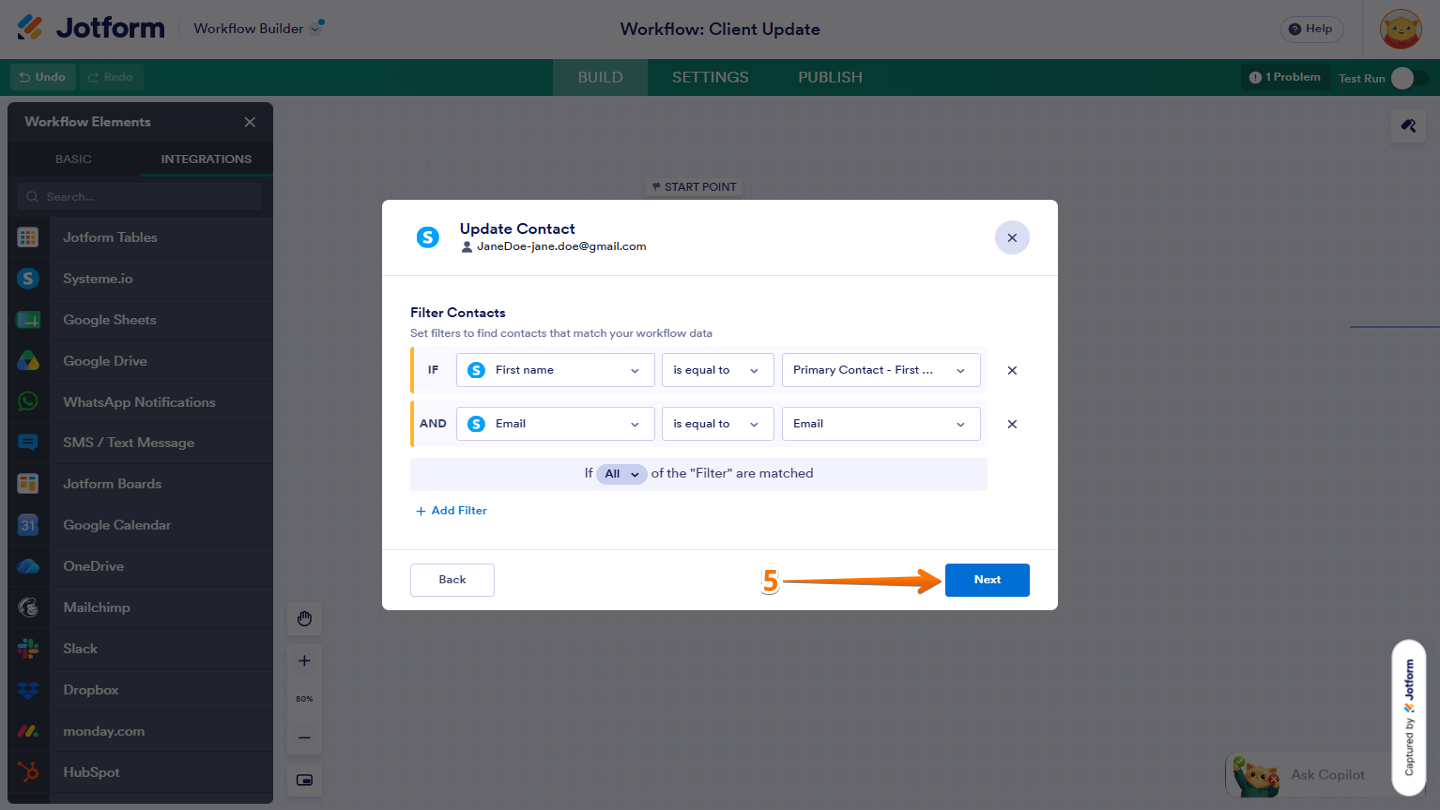
- Once you’re done, click on Next to continue.
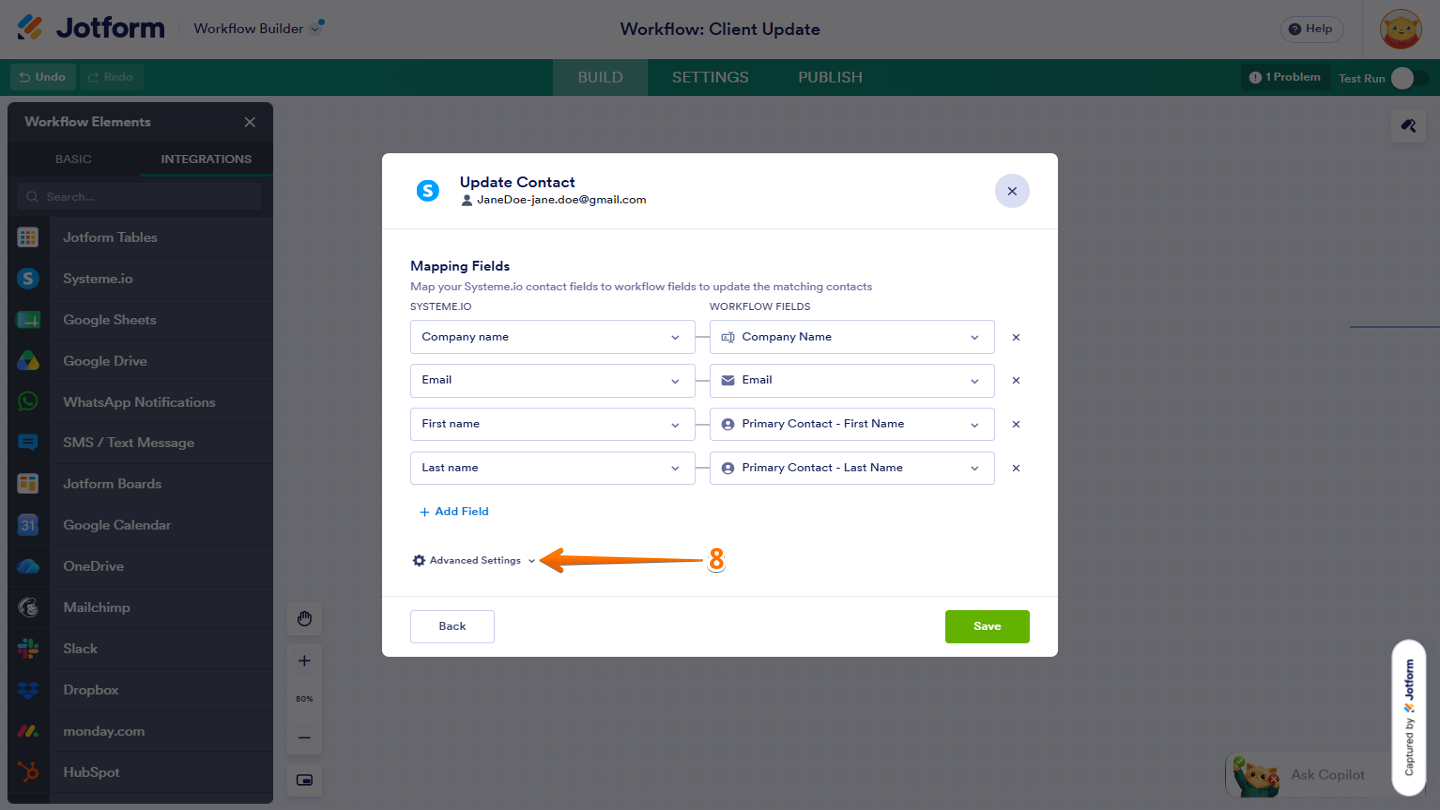
- Next, in the Update Contact window that opens, under the Mapping Fields section, map your Jotform form fields to your Systeme.io fields.
- To add more fields, click on Add Field at the bottom of the field list.
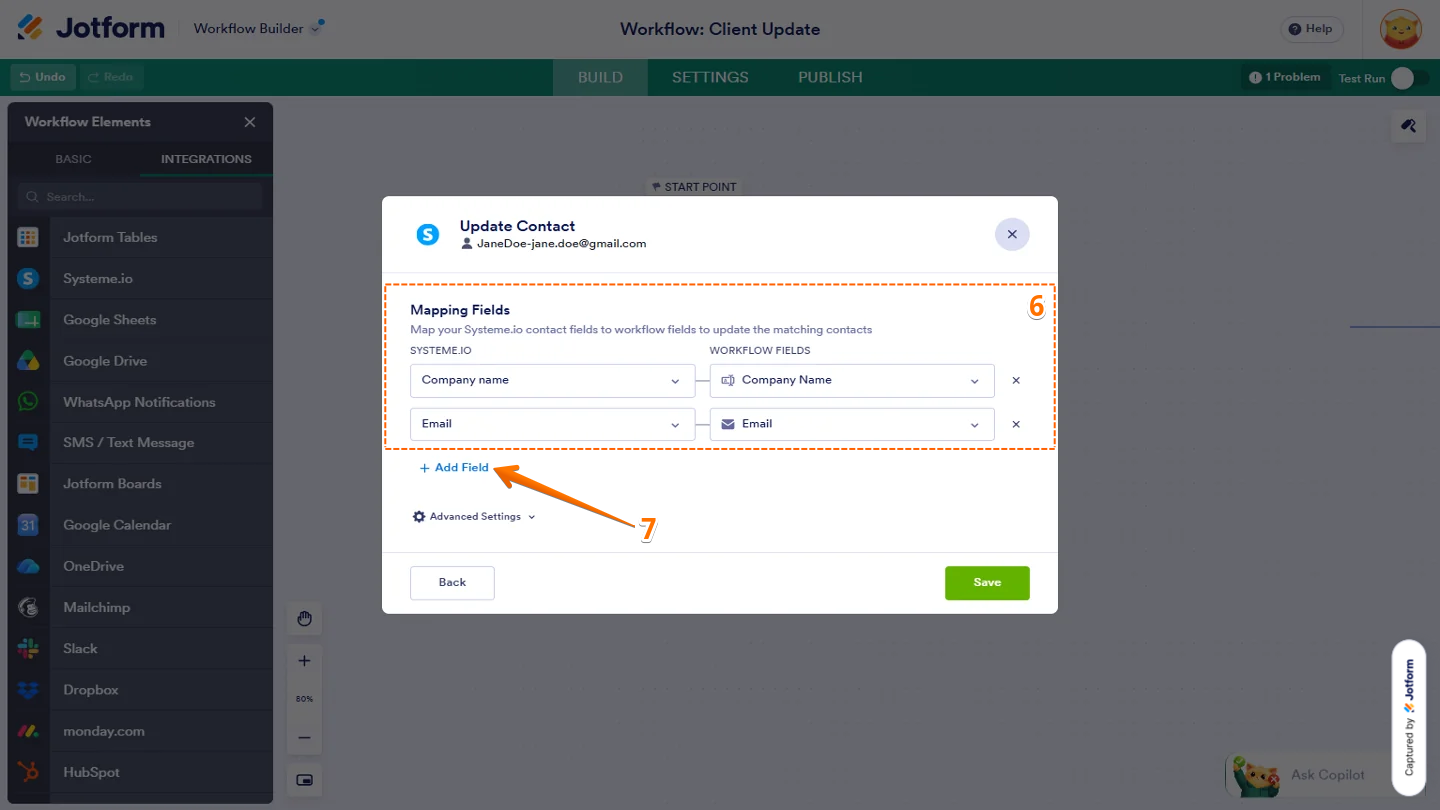
- Then, click on the Downward Arrow icon next to Advanced Settings.
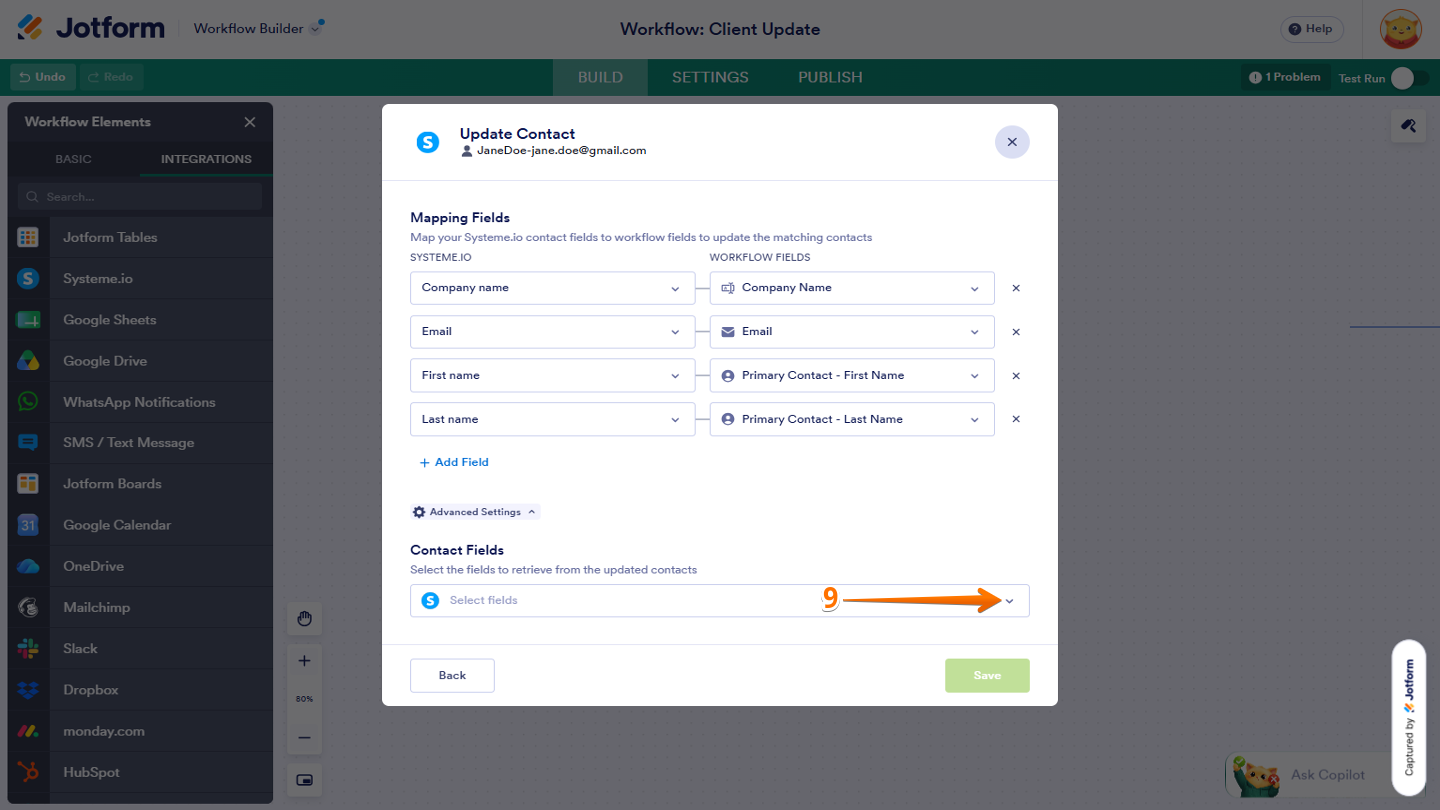
- Now, under the Contact Fields section, click on the Downward Arrow icon.
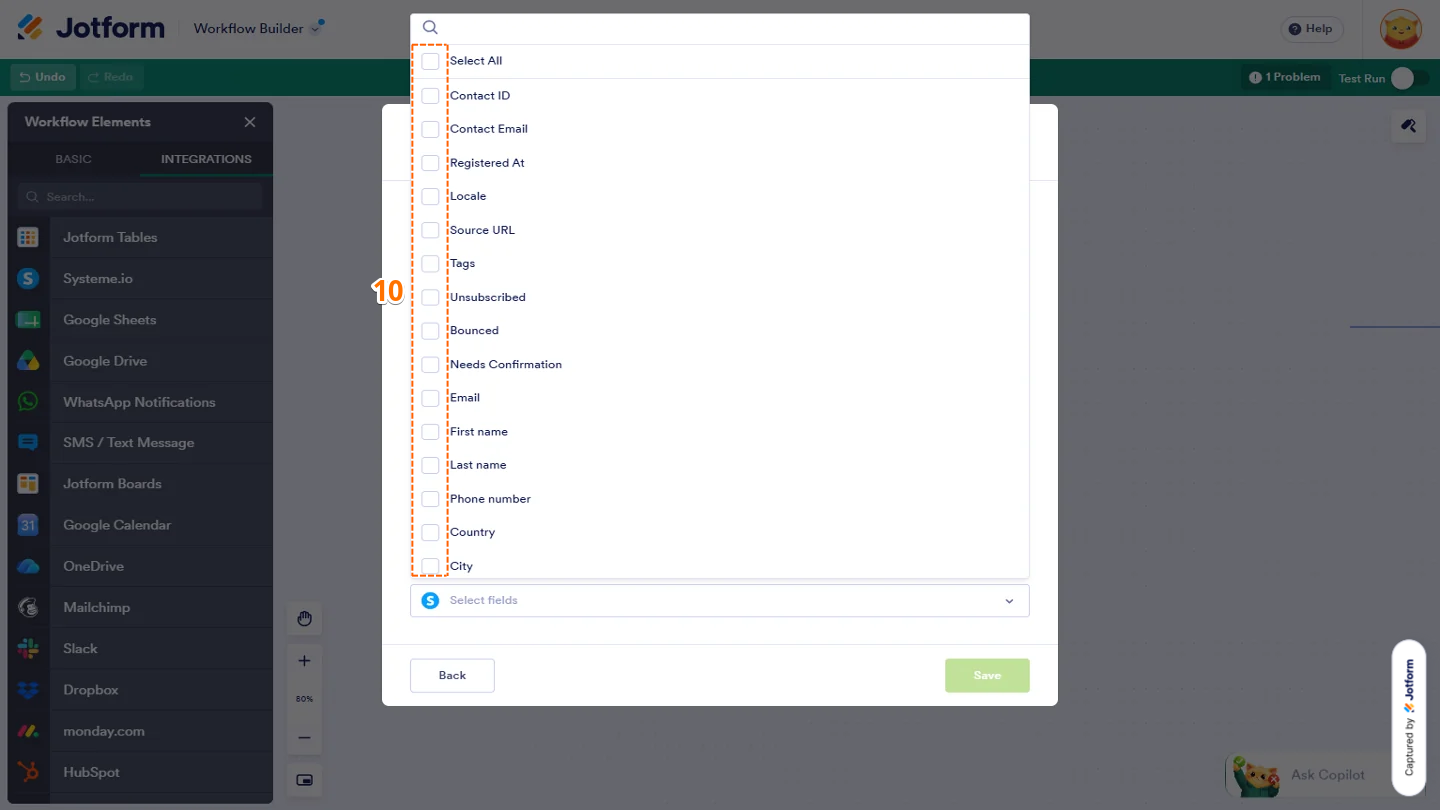
- Next, in the menu that opens, check the boxes next to the fields you want to update from the contact.
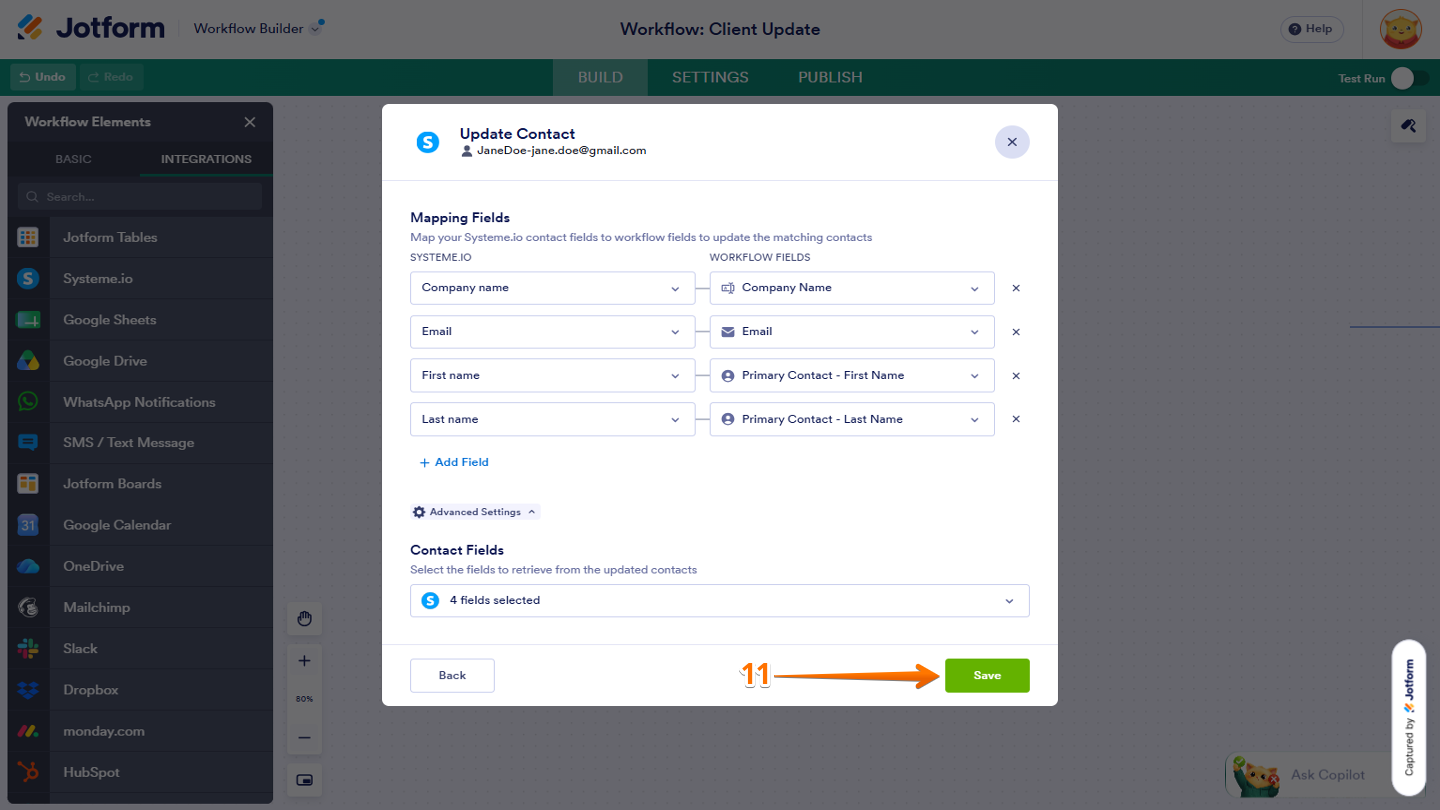
- Once everything’s set, click on Save.
Adding a Tag to Contact
The Add Tag to Contact action lets you add an existing tag to a Systeme.io contact using your Jotform Workflow data. This helps you organize your contacts based on the information submitted through your form. Here’s what to do:
- In the Add Tag to Contact window that opens, under the Filter Contacts section, configure these conditions:
- IF — From the Dropdown menu, select a contact field in Systeme.io.
- Condition — Choose Is Equal To or Not Equal To in the Dropdown menu.
- Value — Click on the Downward Arrow icon and choose the fields you want to get information from.
- Then, click on Add Filter to set another condition.
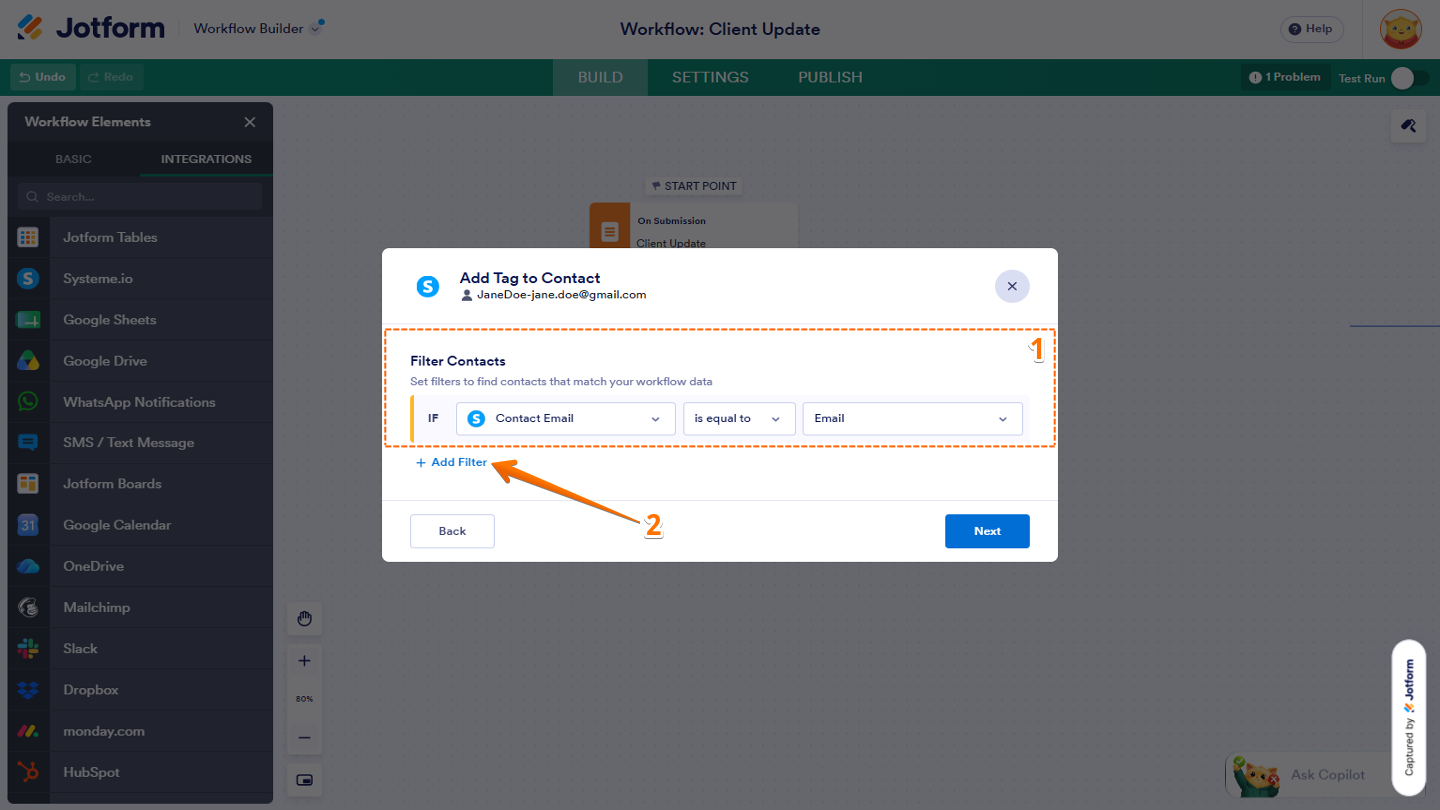
- Now, add a new condition the way you want.
- Next, click on the Downward Arrow icon next to All, and in the menu that opens, select All if you want every condition to match, or Any if only one condition needs to match.
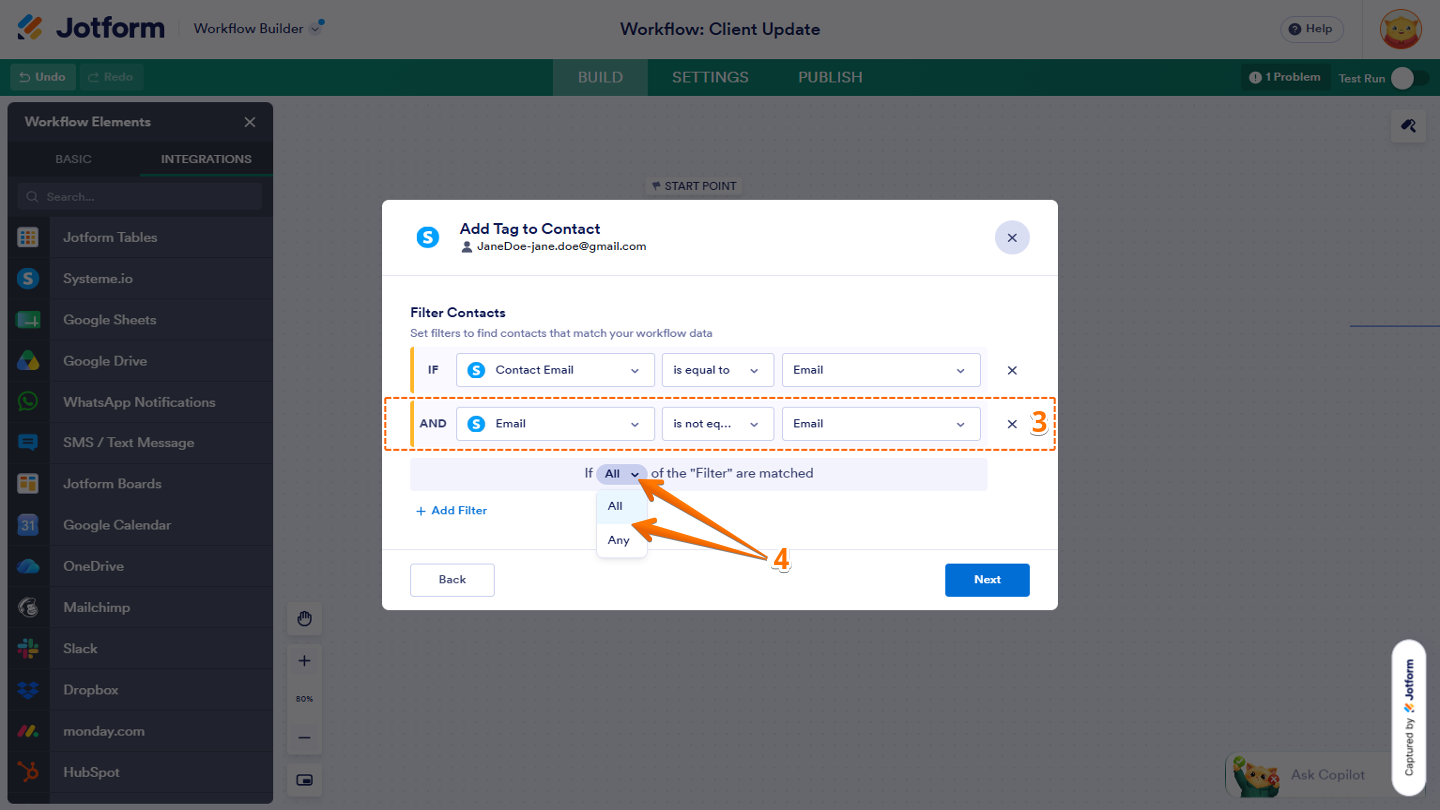
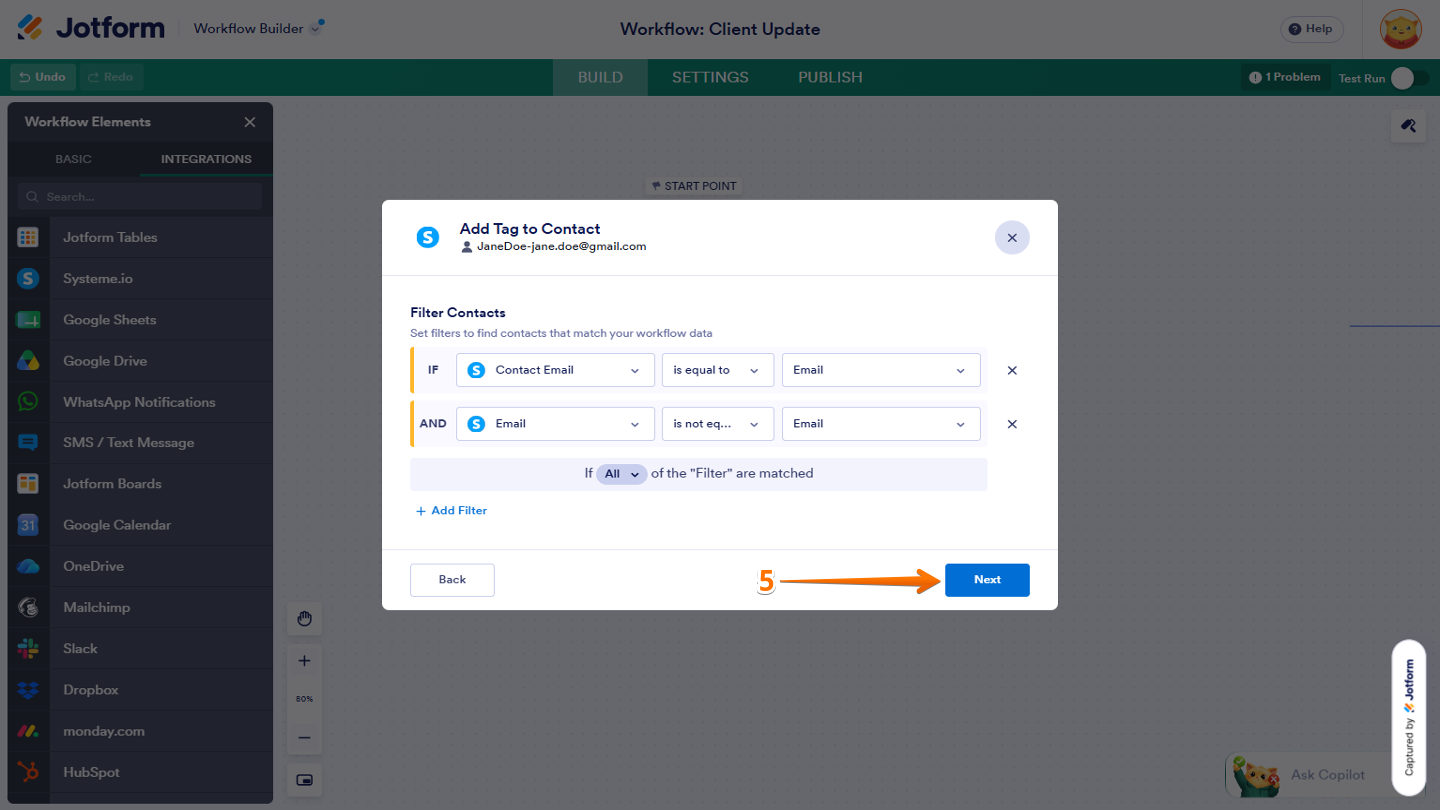
- Once you’re done, click on Next to proceed.
- Now, in the Add Tag To Contact window that opens, under the Contact Tag section, select a tag from the Dropdown menu.
- Then, click on the Downward Arrow icon next to Advanced Settings.
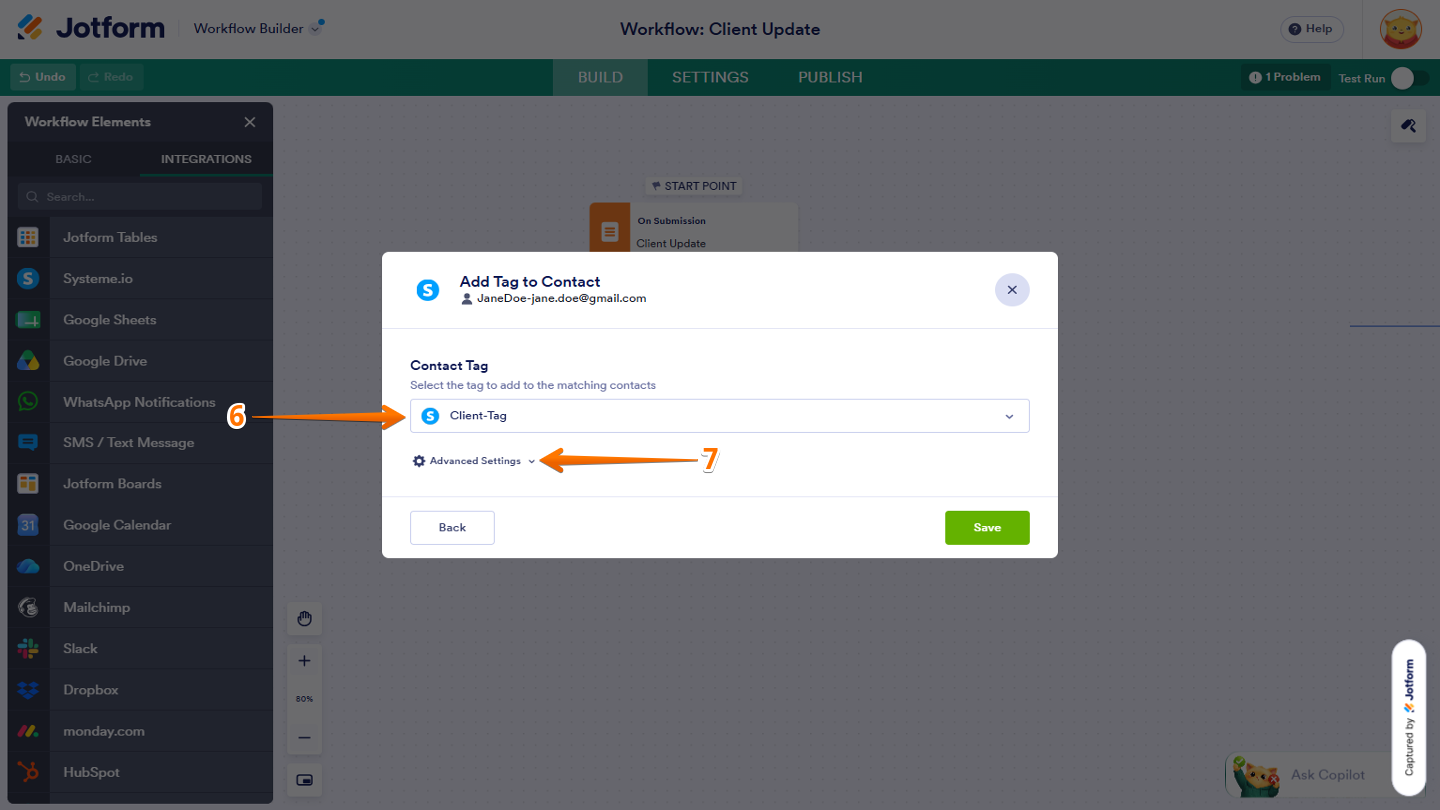
- Next, under the Contact Fields section, click on the Downward Arrow icon.
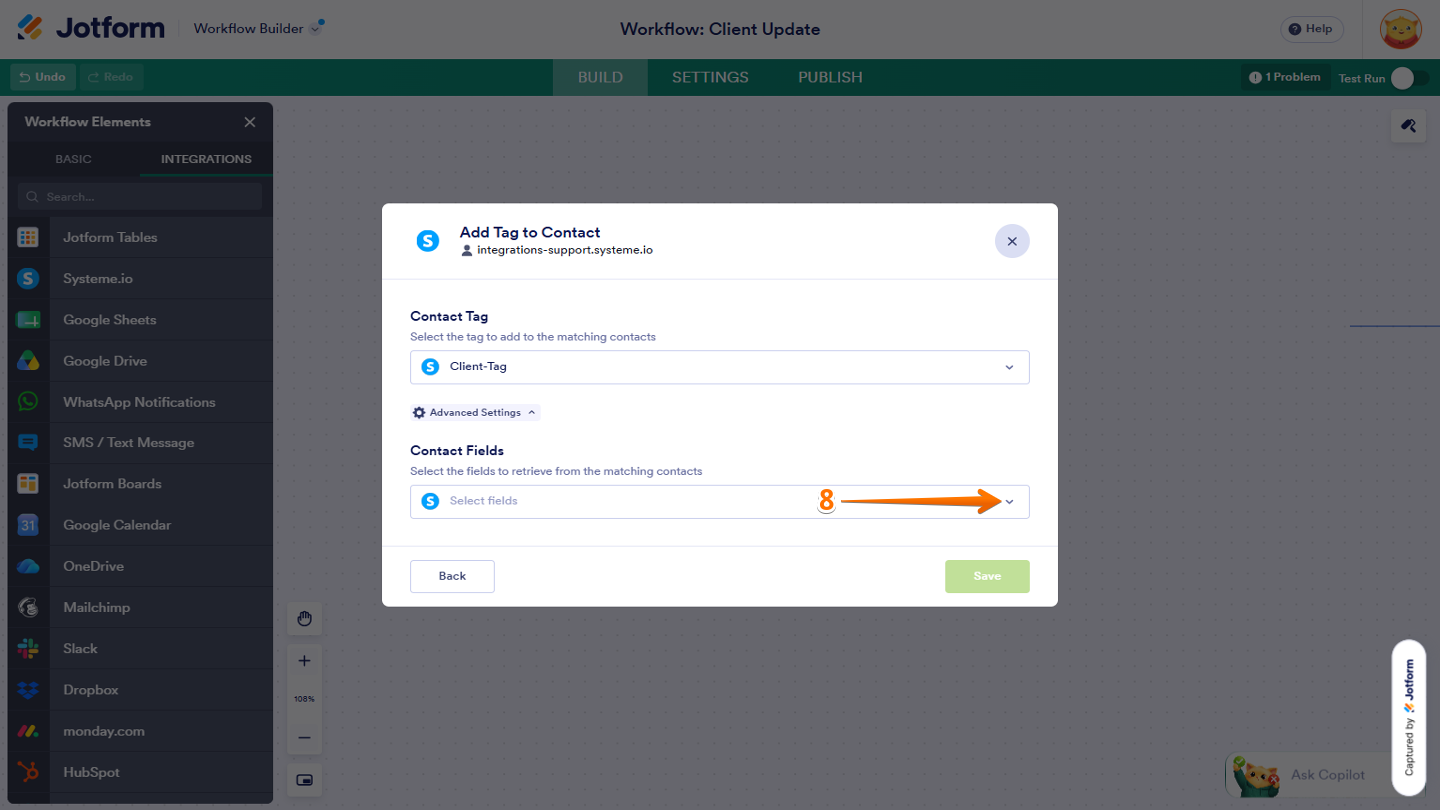
- Now, in the menu that opens, tick the boxes next to the fields you want to use to match the contact.
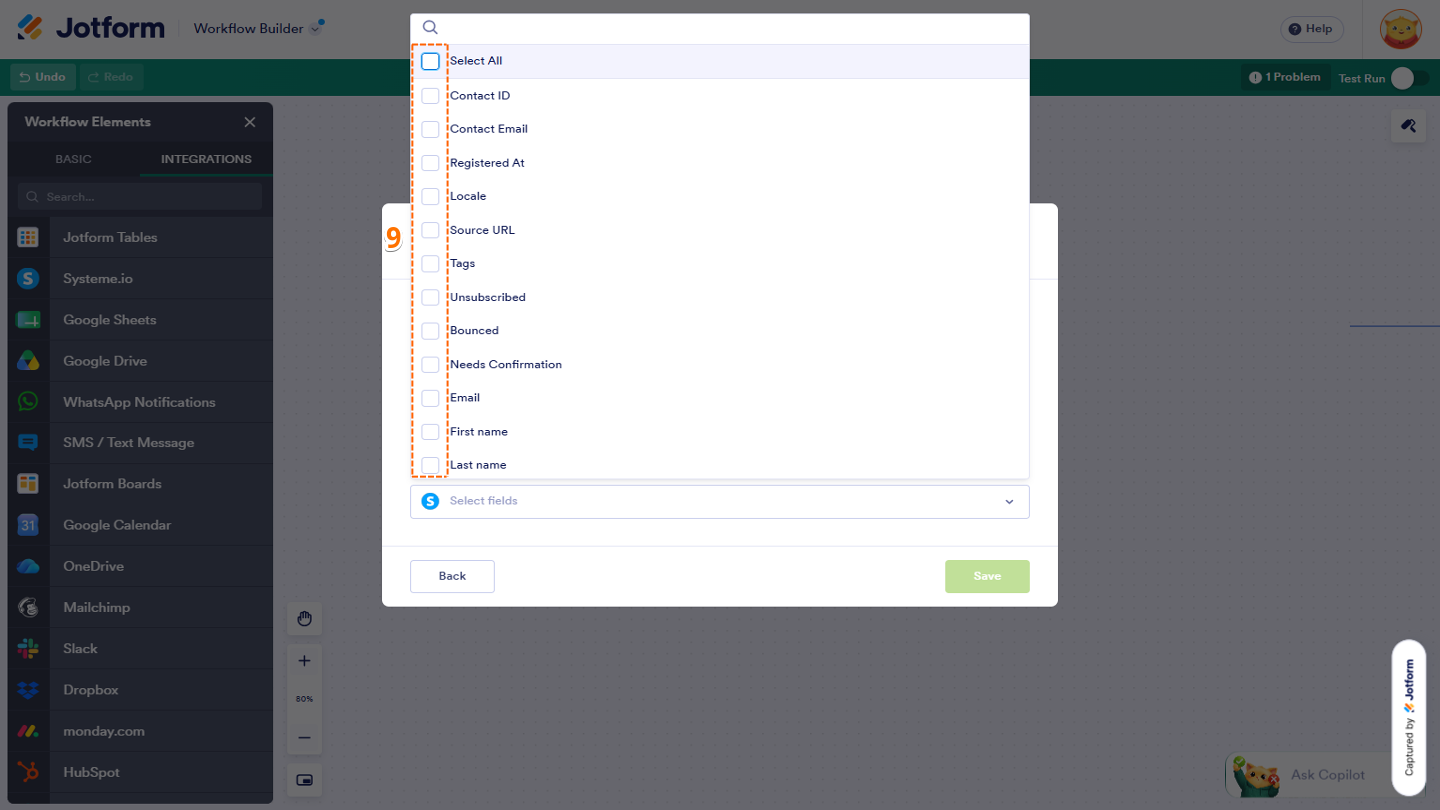
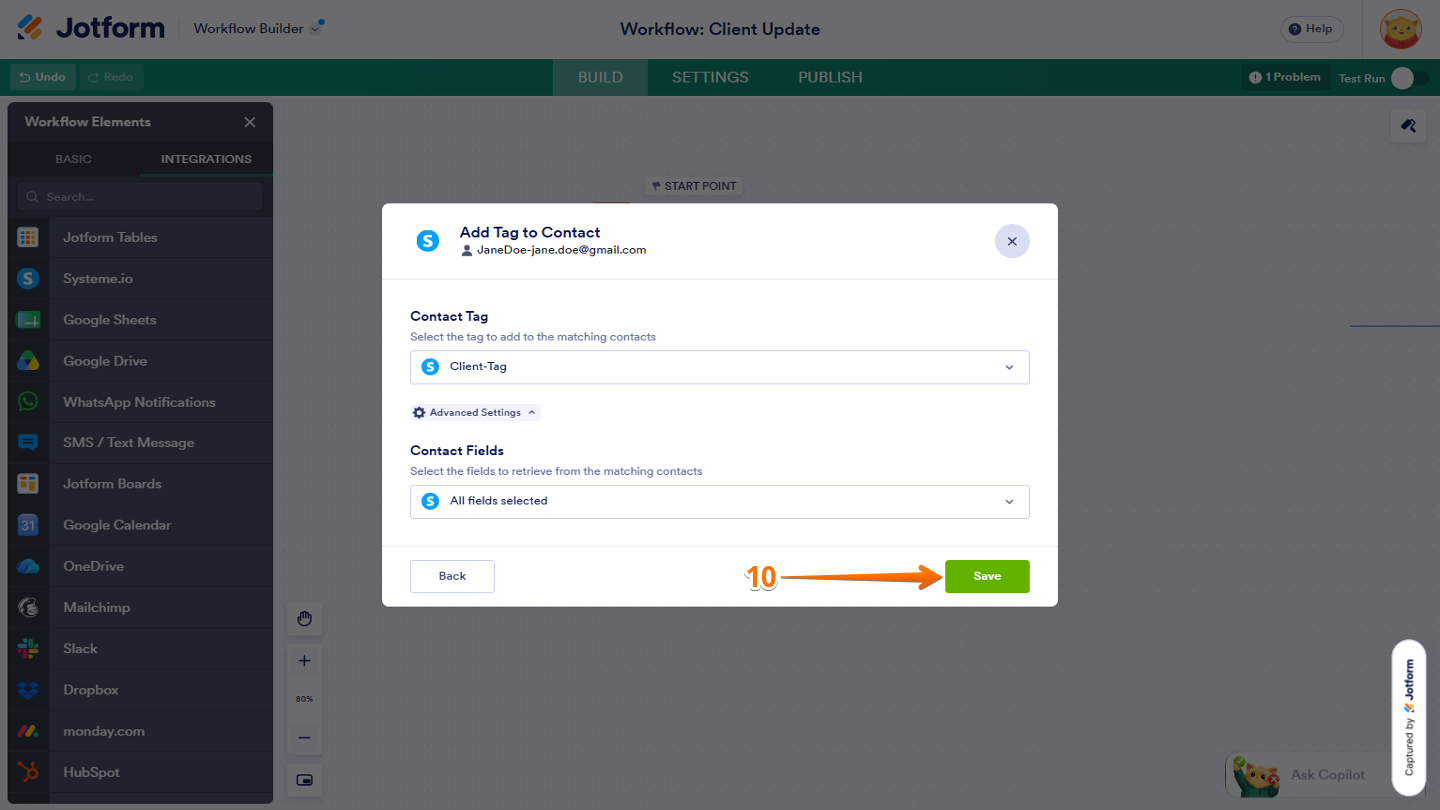
- Once everything’s set, click on Save.
Removing a Tag From Contact
Use the Remove Tag from Contact action to remove an existing tag from a Systeme.io contact based on your Jotform Workflow data. You can do it in a few simple steps:
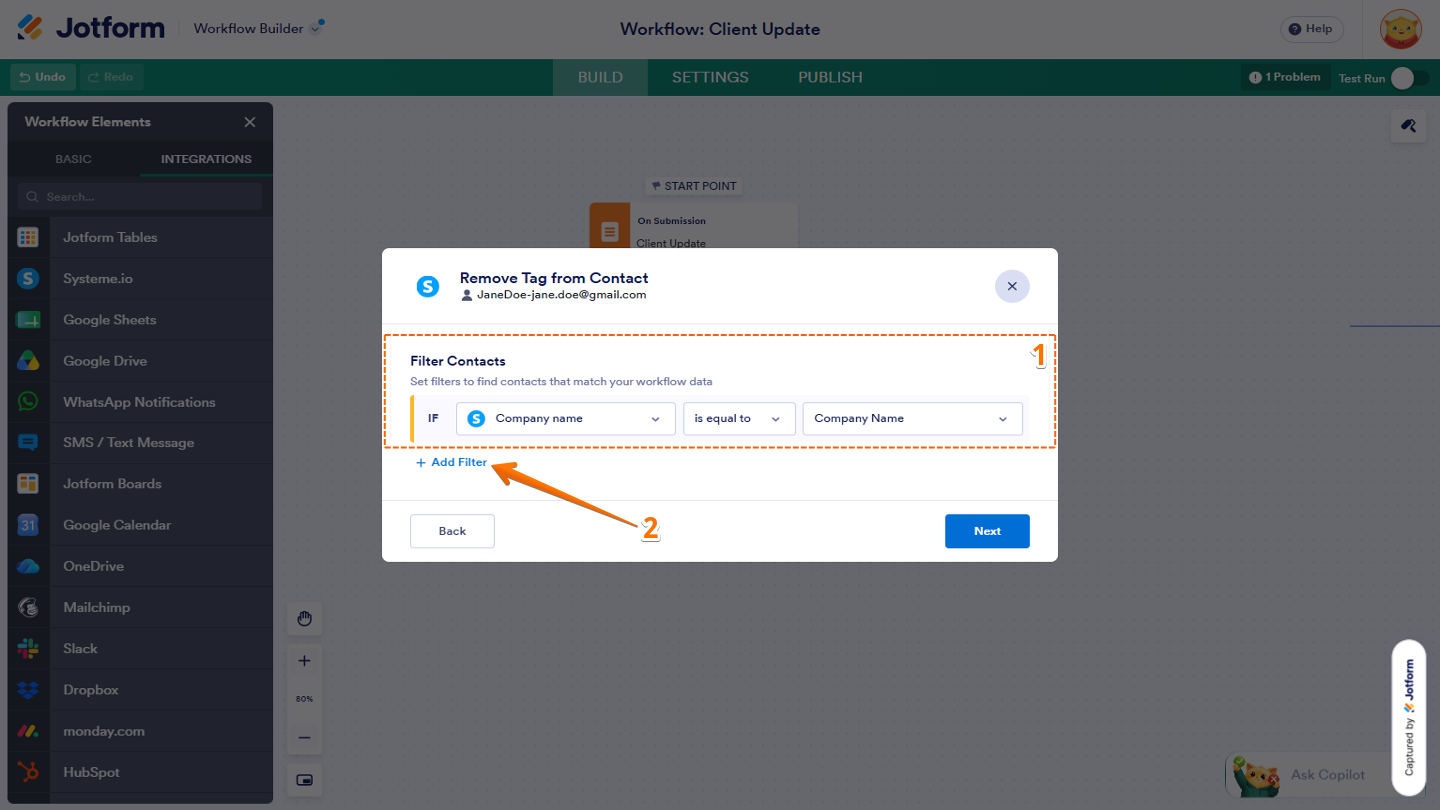
- In the Remove Tag From Contact window that opens, under the Filter Contacts section, set up the following conditions:
- IF — Click on the Downward Arrow icon and select the Systeme.io contact field you want to use.
- Condition — Select Is Equal To or Not Equal To in the Dropdown menu.
- Value — Click on the Downward Arrow icon and choose the fields you want to remove.
- Next, click on Add Filter to add another condition.
- Now, set up the new condition the way you want.
- Then, click on the Downward Arrow icon next to All and in the menu that opens, select All if you want every condition to match, or Any if only one condition needs to match.
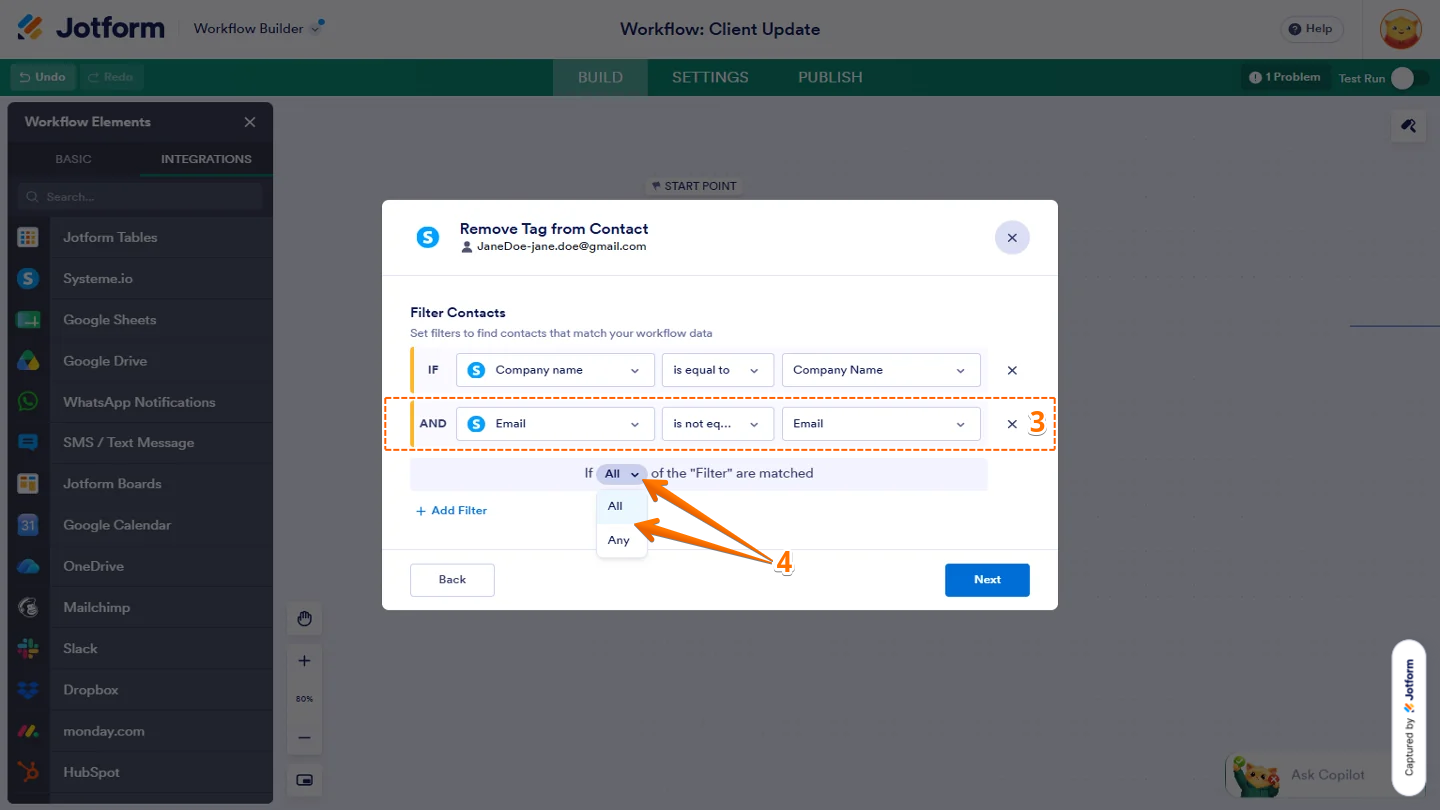
- Once everything’s set, click on Next to continue.
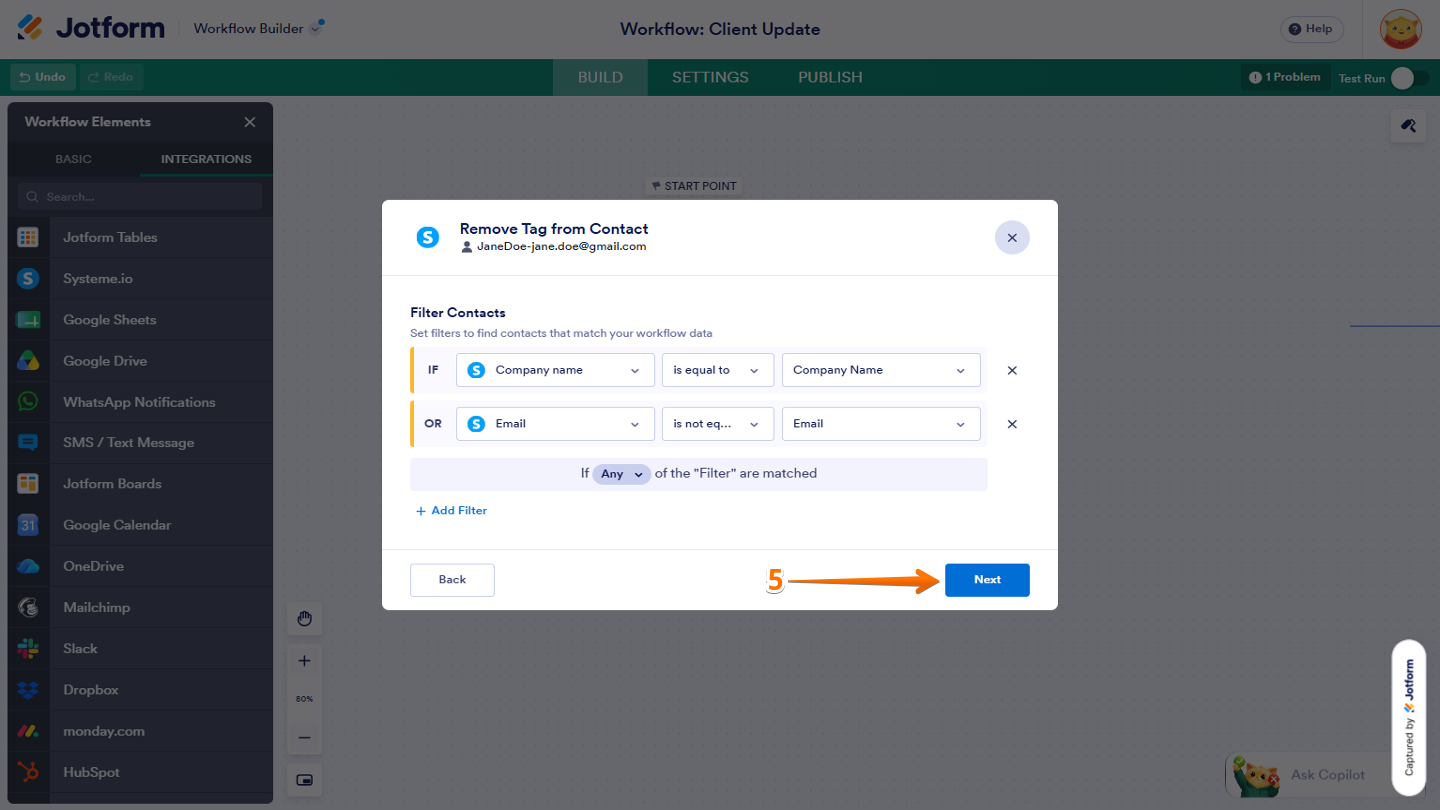
- Next, in the Remove Tag From Contact window that opens, under the Contact Tag section, select a tag from the Dropdown menu.
- After that, click on the Downward Arrow icon next to Advanced Settings to use specific fields in your workflow.
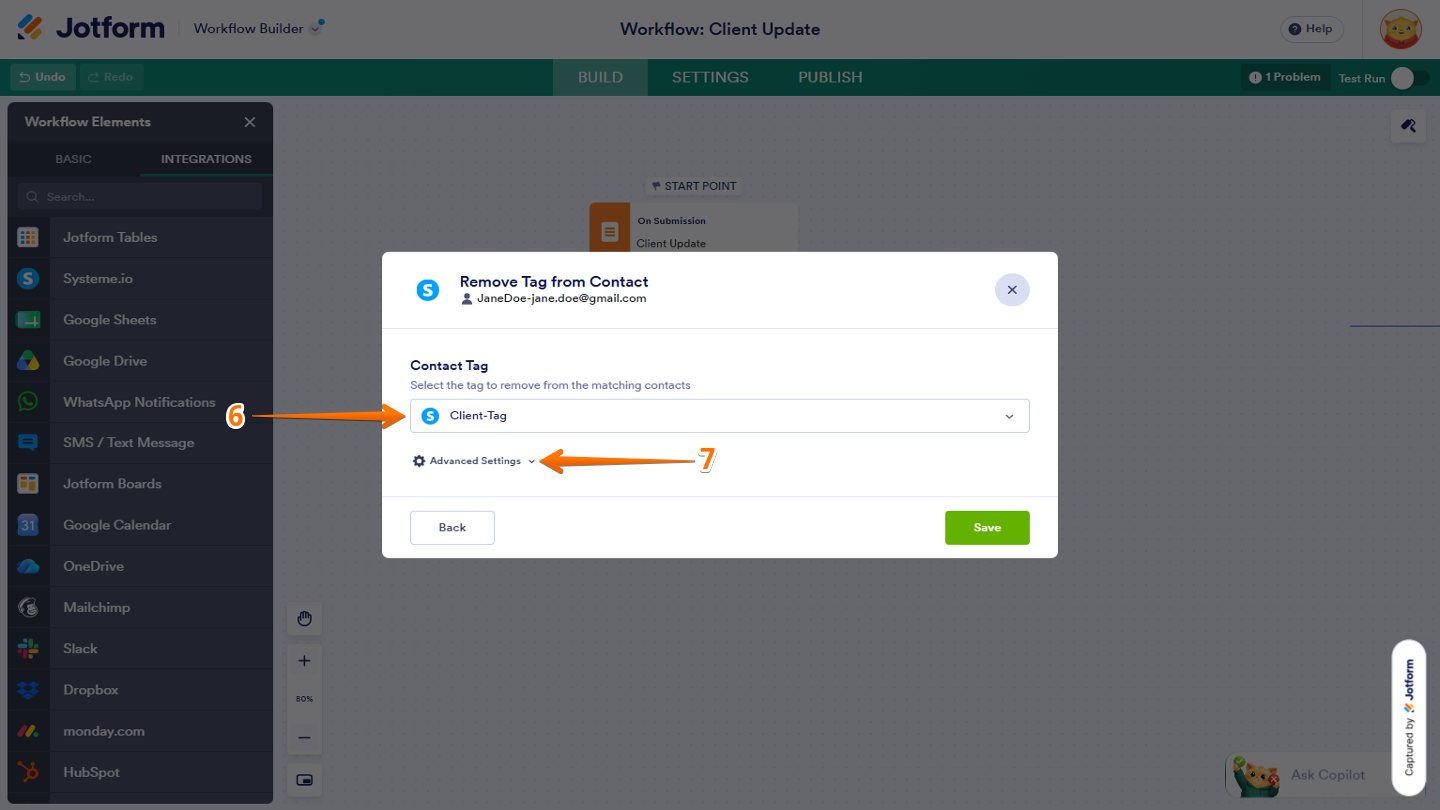
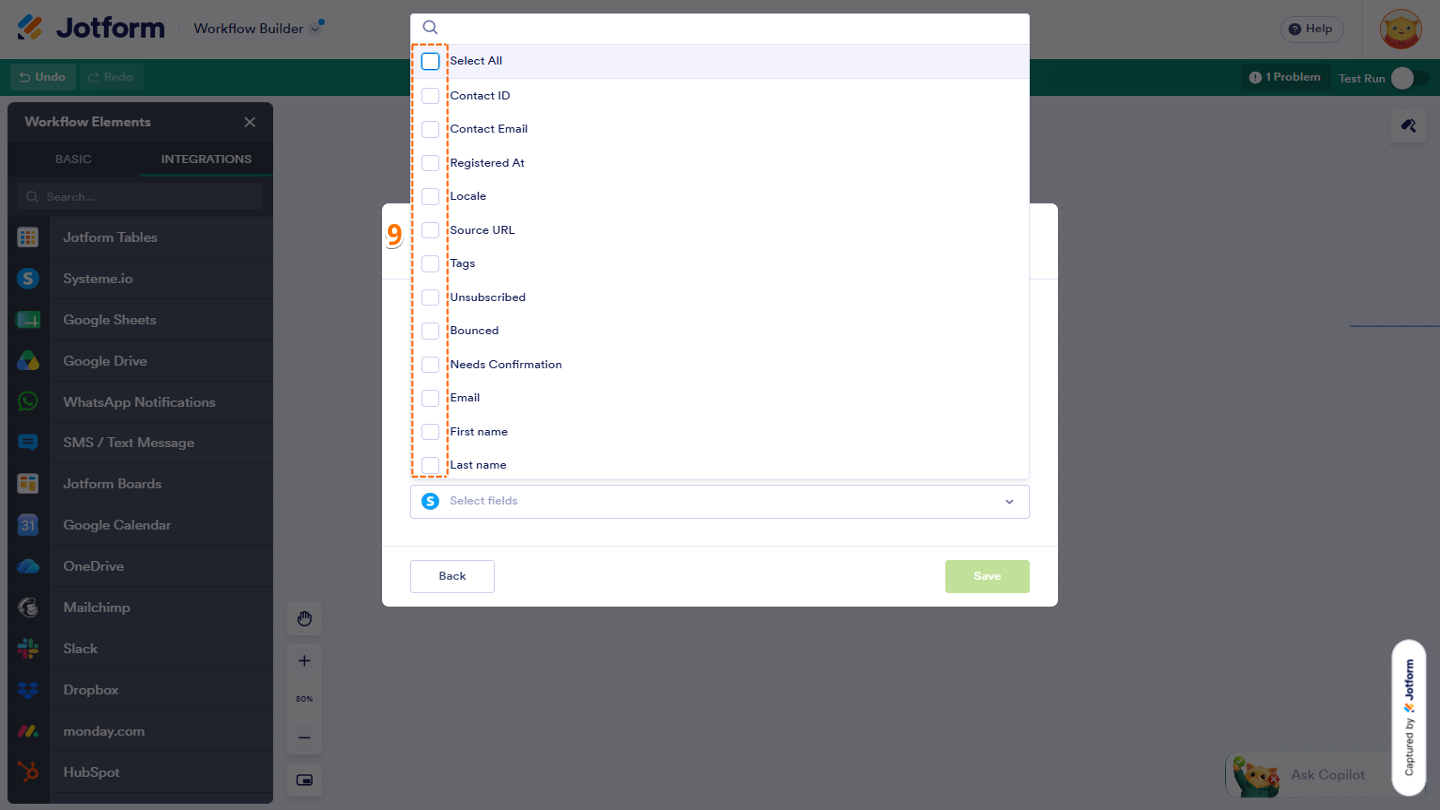
- Then, under the Contact Fields section, click on the Downward Arrow icon.
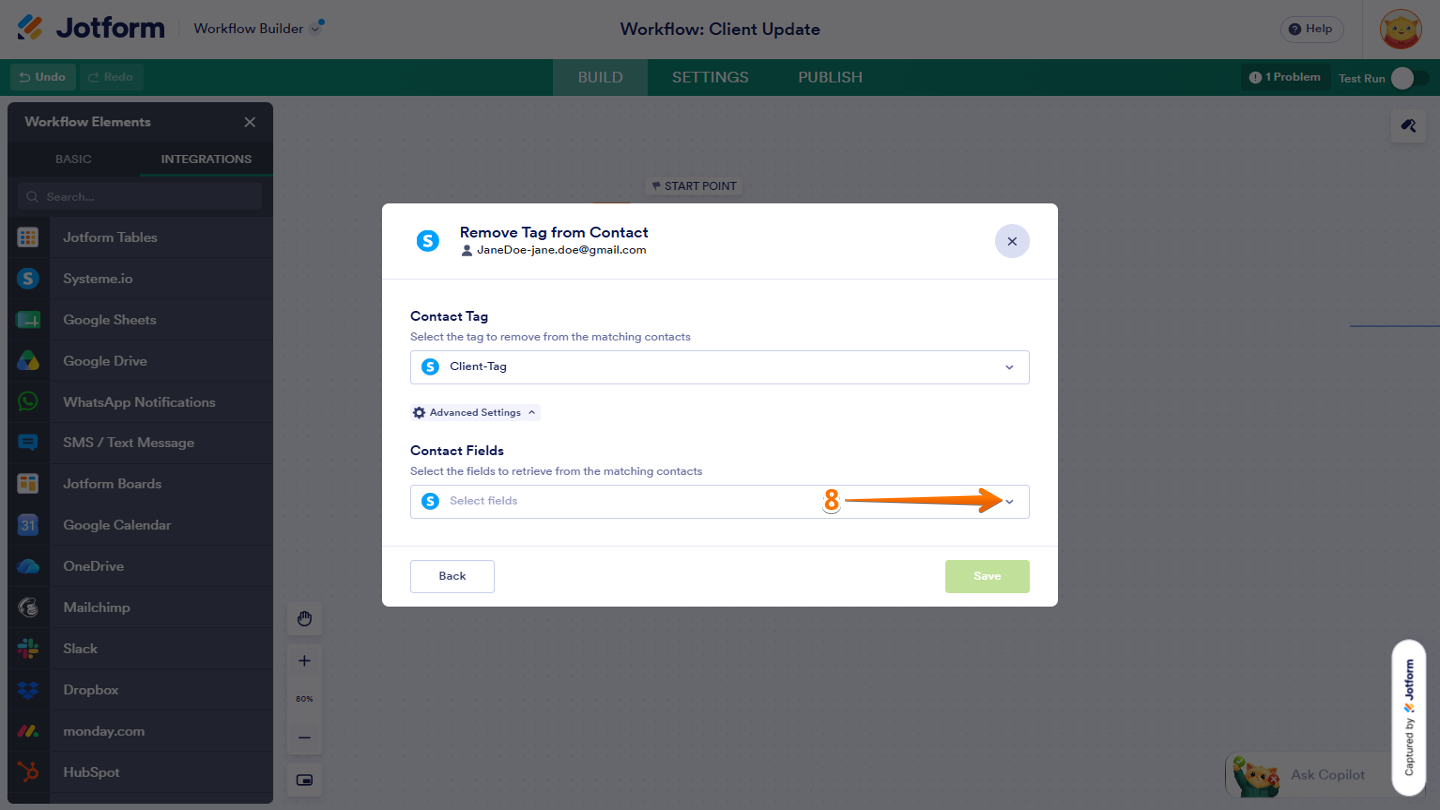
- Now, in the menu that opens, tick the boxes next to the fields you want to match from the contact.
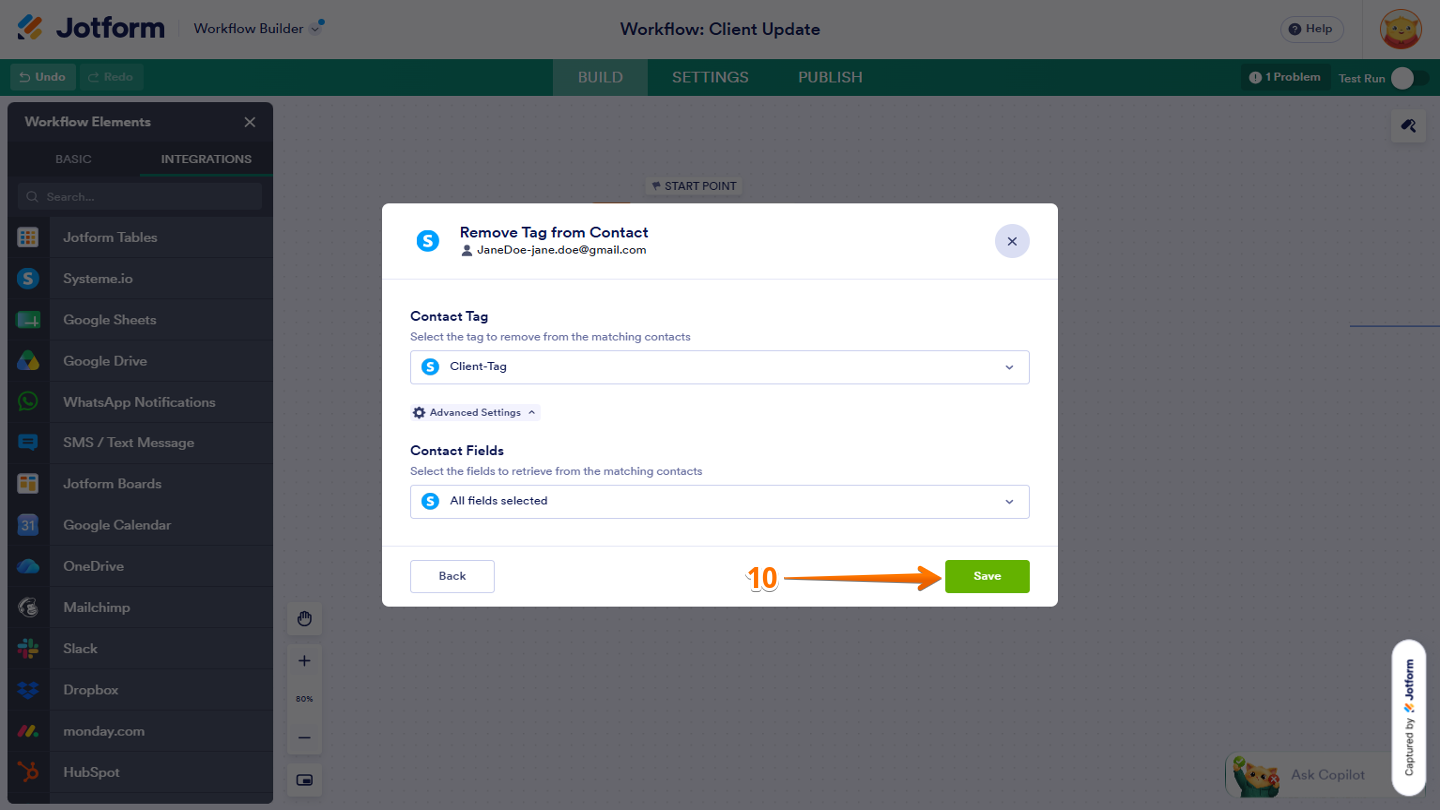
- Once you’re done, click on Save.
Testing Your Workflow
Before using your workflow, test the Systeme.io integration to make sure everything works as expected. Follow these steps to get started:
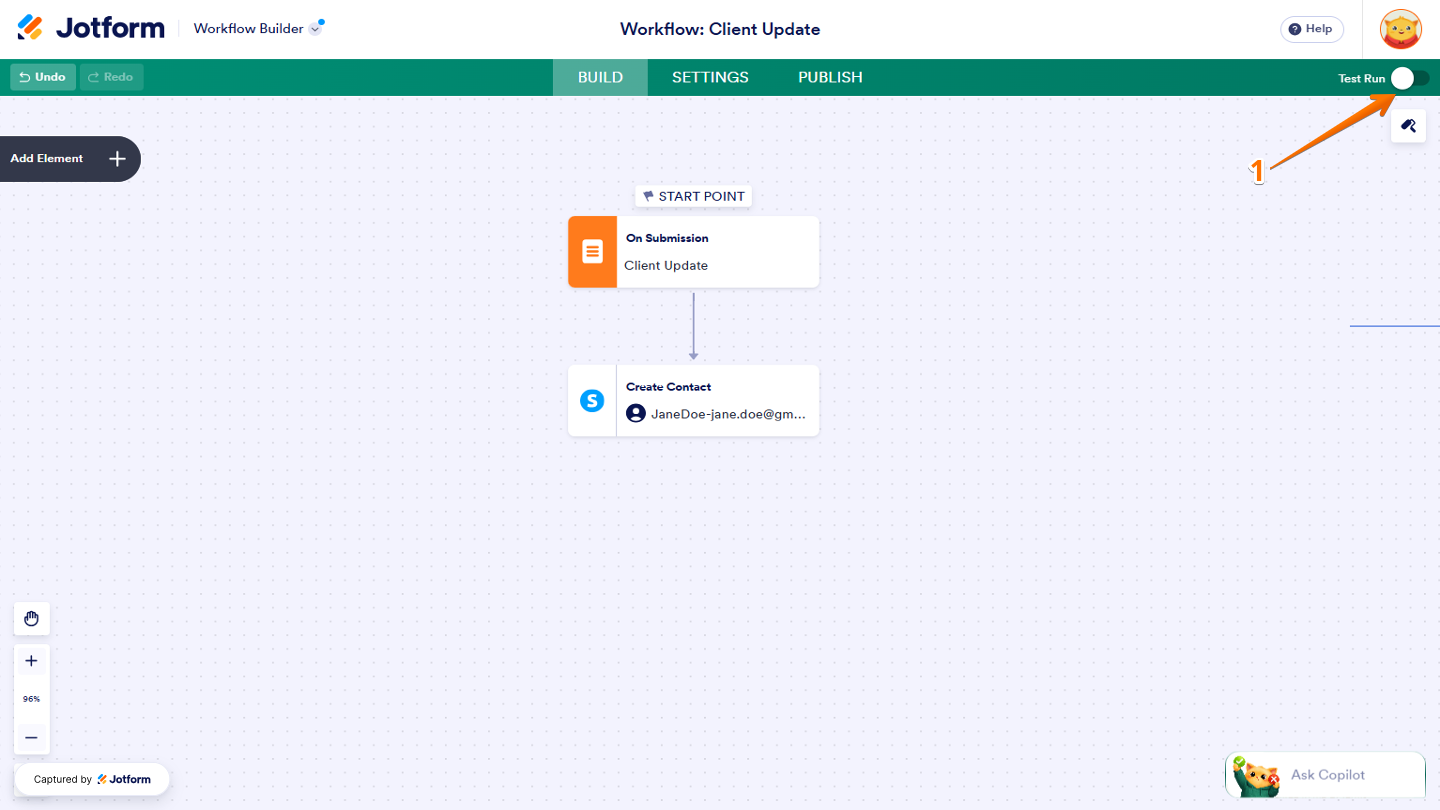
- In Workflow Builder, at the top-right side of the page, toggle on Test Run.
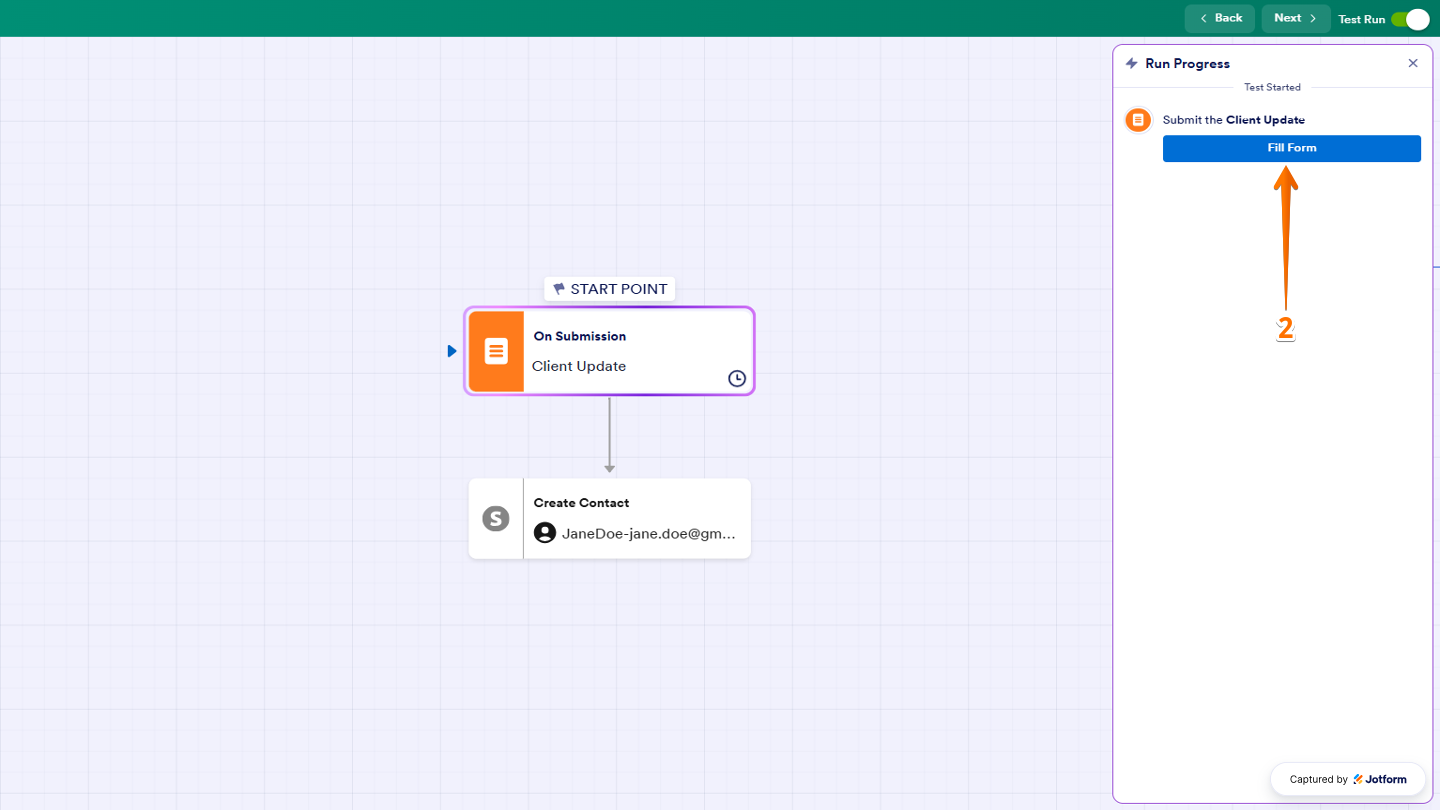
- Next, in the Start Test Run window that opens on the right, click on Fill Form to make a test submission from your connected Systeme.io account.
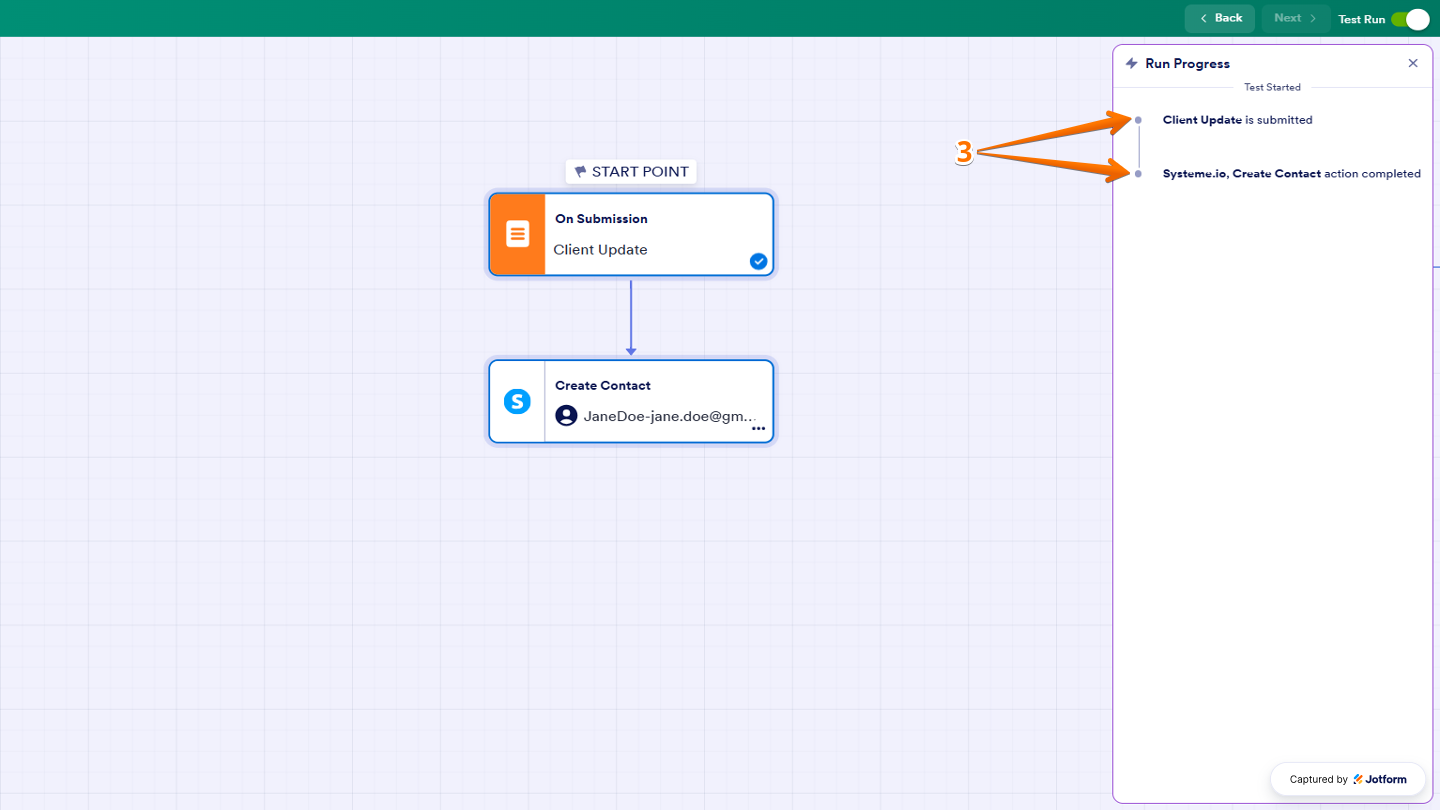
- Now, in the Run Progress window on the right, check the Systeme.io Integration status.
You’re all set! Your workflow is now connected to Systeme.io. You can use it to add contacts, update contact details, get contact information, and manage their tags automatically.
Notes
- You’ll need to have an existing contact for the Update Contact, Add Tag to Contact, and Remove Tag from Contact actions.
- When choosing a contact, ensure the form field you selected has the correct Systeme.io contact ID or email address.
- Create the tags you want to use in Systeme.io before selecting them in Jotform. For a quick how-to, check out this article on How to Create a Tag in Systeme.io.

Send Comment: