


-
HalerAsked on December 24, 2014 at 7:19 AM
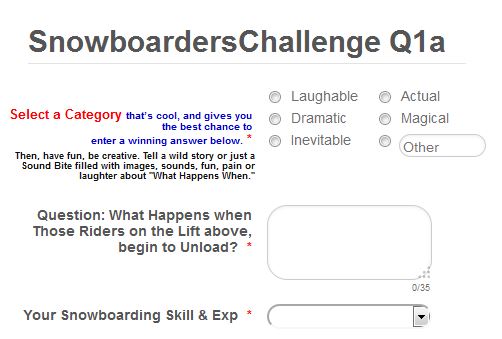
I have a form that needs true sub-labels as: 1, 2, or 3 lines of 7pt, located immediately under the Label text.
In the image attached, one of the four places wher such a sub-Lable is needed. Does JotForm have any way for me to make and reliably control it?
-
BenReplied on December 24, 2014 at 9:28 AM
Hi,
I presume that this is what you wanted to achieve: http://form.jotformpro.com/form/43573504831959
Now we can not add the sub-labels as we would add some other fields, but we can utilize CSS to help us along.
Now to create the blue text, we just add an element with a class into the sublabel, like so:
Select a Category <span class="ben-sublabel">that's cool, and gives you the best chance to enter a winning answer bellow</span>
Now we can use this to our advantage and set the styles for the class "ben-sublabel" like so:
.ben-sublabel {
color: blue;
font-size: 7pt;
}Now since the other label was set to be behind the * (required star) we should add it using the after pseudo-class like so:
#label_3:after {
content: "Then, have fun, be creative. Tell a wild story or just a Sound Bite filled with images, sounds, fun, pain or laughter about \"What Happens When.\"";
display: inline-block;
font-size: 7pt;
margin-top: 10px;
}This is actually a good example of what we must pay attention to. Since the original string had double quotes around them, we must escape them since we already have quotes marking the start and end of the content.
We escape them by placing \ in front of them so "What Happens When." becomes: \"What Happens When.\"
Now the label_3 is just an ID of the label that we want to append this to. You can find the IDs of elements that you want to style following the steps here: How to find Field IDs & Names
I would only like to note one thing.
Labels set with custom classes like above:
Select a Category <span class="ben-sublabel">that's cool, and gives you the best chance to enter a winning answer bellow</span>
will turn into Select a Category that's cool, and gives you the best chance to enter a winning answer bellow if you double click to edit them, so it is important to always add the class back in.
If you want to clone the jotform to your account you can do so by following these steps:
How to Clone an Existing Form from a URL
Do let us know if you have any further questions.
Best Regards,
Ben -
HalerReplied on December 26, 2014 at 7:16 AM
Hi Ben,
Yes you have it right, but, I'm so limited, I can't apply it.
I really appreciate the help, but without a step by step starting at ___ and going to ___ etc, I am at a loss to know how to implement your good stuff.
I had thought I might be able to figure it out, but no luck. So my next alternative seemed to be to fully clarify what I need in terms that black and red, and display what you already understand but in a way I can more likely follow. Here is a URL where I have use layers to do what I need so you can see it at:
http://www.snowcloudrider.com/zJotFormC21_copy(1).htmYou will notice that what I did screwed up the fix of the Radio Buttons you helped me with earlier, and which I made a How to of some 18 steps for future reference.
I tried to use some of those steps to see if I might be able to make adjustments to get the Radio Button to move into their proper place, which probably was caused because I had to increase the form width in order to get everything else to display properly.
I do hope there is a way you can tell me in a little bit more specific terms for one who knows next to nothing about CSS and using it artfully in JotForms.
So Ben, whatever you decide , I thank you for your effort.
Sincerely,
Haler
-
BenReplied on December 26, 2014 at 9:06 AM
Hi Haler,
OK, not a problem, I will give you a step by step instructions and you will let us know in case any of the steps are not quite 100% and we will be happy to go into more details.
Now first this is the outcome of all the steps: http://form.jotformpro.com/form/43573504831959
How to add a sub-label
Prepare the text in a notepad or any such editor and place this before it:
1. Find the ID of the element, which you can see how here: http://www.jotform.com/help/146-How-to-find-Field-IDs-Names.
2. Once we have the ID of the element, we will edit it by creating a CSS rule for it. In our case, the first element is "label_3".
Since we are using IDs we need to put # in front of the name so it looks like this: #label_3
Now as we want it to appear after the sub label we are going to add it a pseudo class "after"
What we end up with is this:
#label_3:after {}
3. Now lets add some CSS properties to make it look nice:
#label_3:after {
content: "Then, have fun, be creative. Tell a wild story or just a Sound Bite filled with images, sounds, fun, pain or laughter about \"What Happens When.\"";
display: inline-block;
font-size: 7pt;
margin-top: 10px;
}OK. The interesting part is the "content" property as that is where we add the text and this is different each time, while the other properties are the same (unless you want to change something).
4. Repeat the steps from 1 to this step until you get it all done.
Lets take a look at the next one - it is "label_4". If you remember the step 2 it will be easy to turn it into what we want and that is? - Correct! It is #label_4:after {}.
OK, so we are off to another step 3. It is like a turkey for thanks giving - we need to stuff it up a bit and when we do we go from #label_4:after {} to:
#label_4:after
{
content: "Let experience, & boldness, in 3 to 30 words, astound and move the Social Media judges for you to Win.";
display: inline-block;
font-size: 7pt;
margin-top: 10px;
}Did you get the same finish? Yes? Cool lets hoop to the next one then :)
It is "label_9", hm "Label 9" is always good ;)
OK, as you see once we have the label ID, we are practically at the step 4 looking for another. What we end up with now is:
#label_9:after
{
content: "If you've Boarding Buds have entered, ask if you can help them WIN. If not, ask them to help you Win.";
display: inline-block;
font-size: 7pt;
margin-top: 10px;
}and last, but not least is label_14.
Can you try and build this one yourself? After you do take a look at the one I did and see how easy it is becoming to modify the CSS :)
#label_14:after
{
content: "1st 2 letters of your 1st Name+1st3 letters of your last name, a Dash +last 5 digits of your Phone Number.";
display: inline-block;
font-size: 7pt;
margin-top: 10px;
}And the next step, is to save and relax adore what we did :)
Now, I do want to check with you if you would like to add the blue sub labels as well? If so just let us know and we will make the steps for that as well, I was not sure so I did not include it.
Do let us know how it goes.
Best Regards,
Ben -
HalerReplied on December 27, 2014 at 7:00 AMHi Ben,
It looks like this is the same stuff I’ve seen three times before, but still I do not find where exactly the code is to be inserted.
Thank you,
Haler
... -
abajan Jotform SupportReplied on December 27, 2014 at 10:49 AM
Hi Haler,
The code can be added either to the form's injected CSS or via the Form Designer which is accessed by clicking the button highlighted below:

Click the CSS tab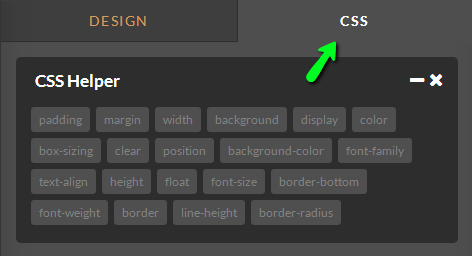
and insert the codes from Ben's post there. Here you can see inserted the rules which were mentioned in his penultimate reply: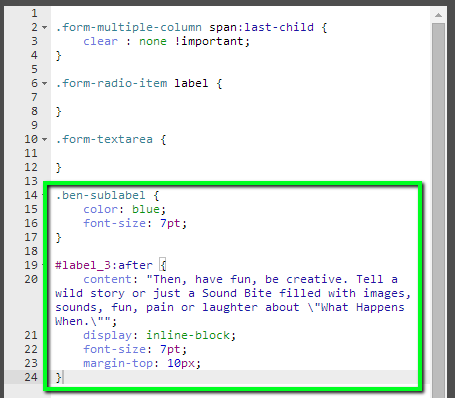
and the effect they have on the form: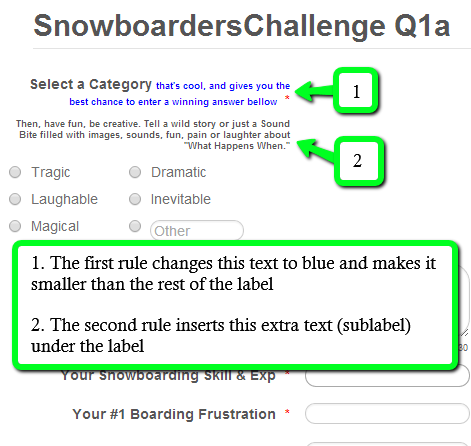
Insert all the other code provided by Ben, in the Form Designer as explained and the result should be correct. As Ben has stated, just be sure not to double-click the labels. Otherwise, you will have to re-insert the classes.
As always, if anything's unclear, please let us know.
Cheers
- Templates
- Integrations
- INTEGRATIONS
- See 100+ integrations
- FEATURED INTEGRATIONS
 PayPal
- Slack
- Google Sheets
- Mailchimp
- Zoom
- Dropbox
- Google Calendar
- Hubspot
- Salesforce
- See more Integrations
- Products
- PRODUCTS
- Form Builder
- Jotform Enterprise
- Jotform Apps
- Store Builder
- Jotform Tables
- Jotform Inbox
- Jotform Mobile App
- Jotform Approvals
- Report Builder
- Smart PDF Forms
- PDF Editor
- Jotform Sign
- Jotform for Salesforce Discover Now
- Support
