
How to add a submit button to an HTML form
- Access the space in your website builder
- Copy and paste HTML code into that space
- Click the button to close out the code box and save your change
- You should then see a form
If you’ve ever completed a survey, job application, product order, or event registration, you’ve filled out a form. Forms — whether printed or online — help businesses request valuable information from their customers.
Web forms — or HyperText Markup Language (HTML) forms — are simply forms you complete online using form elements like text boxes, blank fields, and radio buttons. Once you hit the “submit” button on an online form, a web server with a Structured Query Language (SQL) database and Hypertext Preprocessor (PHP) programming language processes and saves the data for the organization hosting the form to use.
Though online forms are easier to complete, manage, and track than printed forms, they can be a bit more difficult to create if you have no coding experience. There’s a lot that goes into creating even that little submit button. So, if you need to know how to create an HTML form with a submit button, you’ve come to the right place. If you want a simpler beginner-friendly walkthrough, here’s how to create a web form with Jotform.
First, let’s go over how to manually add a submit button — i.e., using code — to your HTML form.
How to add a submit button to an HTML form
Imagine you just opened a small business — say, a plant nursery — and you’d like to encourage visitors to your website to share their contact information through a simple online form.
If you’re building your own website using a tool like WordPress, Wix, or GoDaddy, you can find examples of code online to help you get started building your form. For example, here’s how you can take some simple code from FreeCodeCamp to create a simple contact form with basic fields for your website:
- First, access the space in your website builder where you can add custom code. Typically, this is located in your admin dashboard. For example, it could be in the text editor for a page in WordPress.
- Copy and paste this HTML code into that space:
<form action=example-server.com">
<fieldset>
<legend>Contact me</legend>
<div class="form-control">
<label for="name">Name</label>
<input type="name" id="name" placeholder="Enter your name" required />
</div>
<div class="form-control">
<label for="email">Email</label>
<input
type="email"
id="email"
placeholder="Enter your email"
required
/>
</div>
<div class="form-control">
<label for="message">Message</label>
<textarea
id="message"
cols="30"
rows="10"
placeholder="Enter your message"
required
></textarea>
</div>
<input type="submit" value="Send" class="submit-btn" />
</fieldset>
</form>
- Click the button to close out the code box and save your changes — it could be labeled “Save,” “Submit,” or something similar.
- You should then see a form like this on your site:
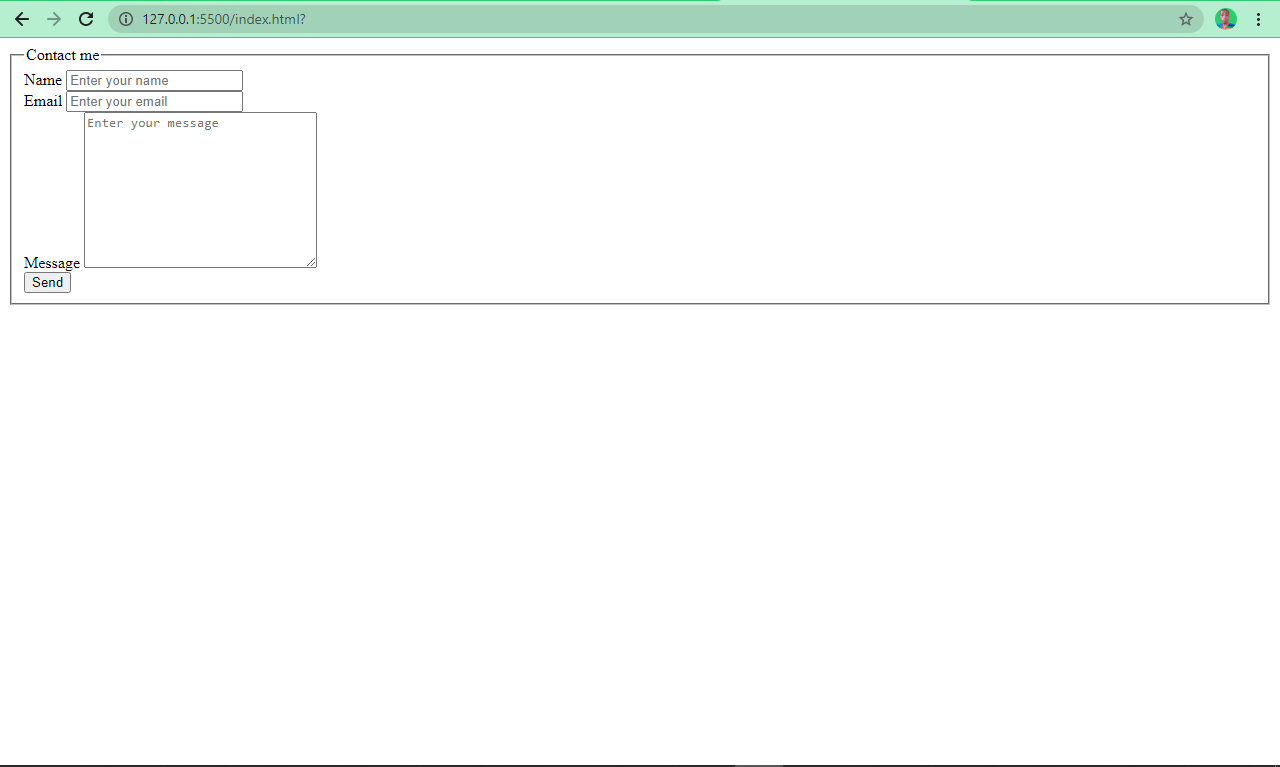
While this example isn’t the snazziest contact form of all time, it does get the job done, thanks to the following components in the code:
- Form elements are containers that enable users to add information to the form.
- Fieldset elements group related inputs together, like buttons, checkboxes, and images.
- Attributes, which add properties to an element, are specified in the start tag and ensure the form works as it’s supposed to. For example, in the above contact form’s code, the word “required” is an attribute — ensuring the form can’t be submitted when someone leaves form fields like “name” or “email’ blank or fills them out incorrectly.
But whether or not you’re a programmer, typing out code is tedious — and that’s just for a basic, boring contact form. To create an HTML form with a submit button, you have to be knowledgeable about a wide range of possible form and fieldset elements and how to use them to create the look and functionality you need.
You also have to be careful as you enter your code — coding typos aren’t detected the way spelling and grammar errors are in most word processing programs. If there’s a mistake in your code, your form simply won’t work, and you’ll have to comb through it to find the error (or start from scratch).
Luckily, software like Jotform can help.
How to create an HTML form with a submit button using Jotform
With more than 20,000 form templates to choose from — and 100-plus third-party app integrations — online form builder Jotform has all the design tools and form elements you need to create dynamic, stunning HTML forms. You can drag and drop form fields exactly where you need them to be; customize colors, fonts, logos, and layouts to match your brand aesthetic; and create, publish, and embed your HTML form on your website — all from one powerful platform. Jotform is fully customizable, intuitive to use, and, best of all, requires no coding experience.
Though writing code is no easy task, it does allow you the creative freedom to make your own unique, branded forms. Instead of being restricted to particular design parameters or elements, you can create something that matches your intent, budget, and, most important, your intended audience.
Fortunately, the same can be said for Jotform, even though it’s code-free. You can still build an impressive, fully customized form — just using a slightly different (and less complicated) approach — whether you want to build your form from scratch or use a pre-made template.
How to create an HTML form with a Jotform template
First, here’s how to create an HTML form with a submit button using a premade Jotform template.
- Navigate to Jotform’s Form Builder.
- Select Create Form.
- Select Use Template to choose from Jotform’s library of premade forms.
- On the left in the template library, you should see a list of form template categories to search from, including Types, Industries, and Professions.
- To stick with our plant nursery example, type “plant” into the Search in all templates field.
- Scroll down to the second row, click on the middle Online Plant Order Form template, and select Use Template. This template is divided into three pages:
- The first page is the order form. This is what your customers would see when deciding which plant(s) to purchase.
- The second page is the checkout page, complete with necessary contact information fields for your customers to ensure seamless ordering and delivery: name, email, delivery date, time, address, and payment method.
- The last page thanks your customers for shopping with you and confirms that they’ve successfully placed their order.
- Now it’s time for the fun part: customization! To tailor the branding to match your plant nursery, let’s imagine your business is called Dew Drops and your primary colors are orange and yellow.
- To change the form title, click into the Online Plant Order Form text and amend it to “Dew Drops Plant Order Form.” (Pro tip: You can upload a business logo right above this section where it says Add Your Logo.)
- To add some fun widgets, click the + Add Form Element button on the left. This is where you can add elements like quick response (QR) codes, text boxes, and CAPTCHA fields for additional form security. Simply scroll through the widgets to see what’s available or use the search bar to find specific widgets.
- To change the look of the form, click the paint roller icon on the right to access Jotform’s Form Designer. Here you can alter page, font, and form colors; font style and sizing; and form width. Click the third square under the Color Scheme field to change your form and page colors to match your brand colors of orange and yellow.
- The Form Designer is also where you would change the look and text of your submit button. Scroll down to the bottom of the second page of the form — the order form — and click on the Order button.
- Select the gear icon next to the button to access the Properties box.
- Here you can change the button alignment and style, as well as the text (e.g., “Order,” “Submit,” “Buy,” etc.).
- Finally, after all your customizations are complete, select Publish at the top of the Form Builder to get a code to embed the form on your website. You can also get a link to your plant order form to add to your social media profiles or email it to your customers for quick, convenient ordering.
If none of the available Jotform templates exactly match your needs — or if you really want to flex your creative muscles — here’s how to create a form from scratch in Jotform.
How to create an HTML form from scratch with Jotform
Using the online plant order form example, here’s how to create a similar order form from scratch:
- Navigate to Jotform’s Form Builder.
- Select Create Form.
- On the next screen, select Start From Scratch.
- To show all form questions on one page — so customers don’t have to click through multiple pages to complete every field — choose Classic Form as your form layout.
- In your blank form, you’ll see a bright green submit button, which is added by default when you create a new form. As in the previous section, select the gear icon to access the Properties box to make changes to your button.
- In addition to making the same changes as we did in the seventh step in the previous section — like changing the form title and color scheme — let’s also add a product, care instructions for the plant, and payment options.
- To add products, click Add Form Element, scroll down, and click Product List. A product box will appear with customization options for updating the product name, description, price, and quantity. This is also where you can upload a product image.
- To add a section about how to care for the plants being purchased, click Add Form Element, scroll down, and select Paragraph. Click the pencil icon next to the paragraph box to make changes, like adding bold or underlined text.
- To add a payment method, click on Add Form Element and select the Payments tab.
- Select a payment method, such as Square, PayPal, or Stripe. You’ll be prompted to connect your account for your chosen payment method.
- In your form, you should now see two payment options listed: Debit or Credit Card (which includes the necessary form fields to complete that transaction, such as customer name, credit card number, and expiration date) and your chosen payment method — like PayPal — which will automatically link to your customers’ specific profiles to complete the transaction.
- Finally, once you’ve made your final customizations, publish your plant order form just like you did in the previous section.
For any coders out there, this final section is for you.
How to customize a Jotform submit button with CSS
One of Jotform’s best features is its ability to create beautiful forms without any coding. However, those who know how to code and enjoy doing it can use Jotform as well.
Here’s how to customize a form’s submit button with Cascading Style Sheets, or CSS.
- Click the Form Designer icon (the paint roller) in the Form Builder.
- Click the Styles tab, second from the left.
- Scroll down to the Inject Custom CSS box.
- Either apply your own CSS rules, use a ready-made code snippet, or insert the following helpful code from Jotform:
.form-submit-button {
background: #B9DFFF;
color: #fff;
border: 1px solid #eee;
border-radius: 20px;
box-shadow: 5px 5px 5px #eee;
text-shadow: none;
}
.form-submit-button:hover {
background: #016ABC;
color: #fff;
border: 1px solid #eee;
border-radius: 20px;
box-shadow: 5px 5px 5px #eee;
text-shadow: none;
}
And that’s it! You’re done. Congratulations!
Now you know how to create an HTML form with a submit button using simple code, Jotform templates, and Jotform’s Form Builder. You’re now equipped to get creative while building powerful, professional forms that can drum up some serious business. And the next time you hit “submit” (or “order,” “sign up,” or any similar button) on an HTML form, you’ll appreciate all the hard work that goes into creating even this simple feature.


Send Comment: